Snapfon ez-ONE C User manual

TECHNICAL DATA
Quad band GSM 850/900/1800/1900MHz
World phone • Battery: Li-Ion 3.7V / 1000mAh
Dimensions: 103x49x15mm Standby-Time: 120h
Weight: 79.6g (With Battery) Talk time: 120min
Quick Start Guide
ez-ONE C
***Each Step starts from the Home Screen with Time
and Date showing***
Step 1
Make sure that your SIM card is active
Contact your service provider to make sure your SIM
card has been activated.
Contact your service provider if you have problems
with your SIM card.
Step 2
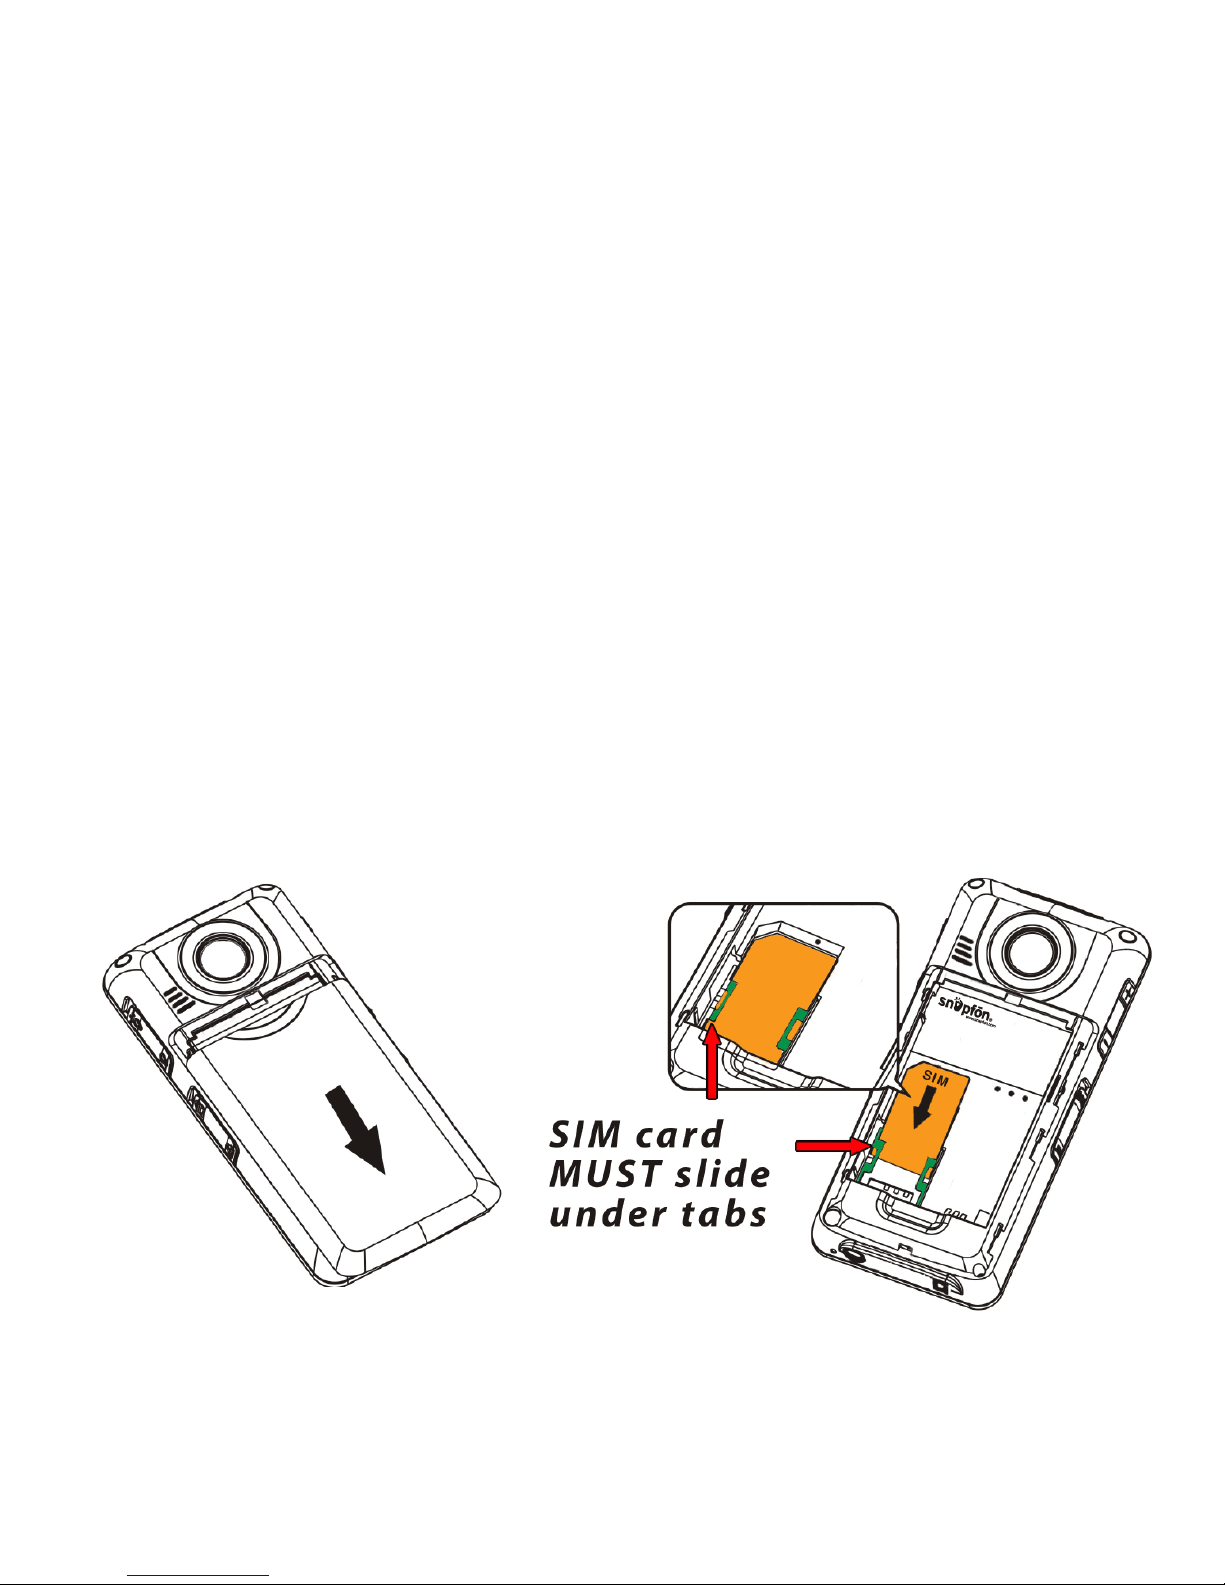
Inserting SIM Card
Fig. 1 Fig. 2
Fig. 1: To remove battery cover, push down and slide.
Fig. 2: Slide SIM card in with gold contact facing down.

Step 3
Inserting and charging the battery
Fig. 3: Insert the battery at an angle with the gold
contacts to the bottom, to the gold contacts in the
battery compartment and press down. Slide cover to
closed position with a ‘click’.
Fig. 4: Insert the charger cable in the socket on the
underside of the handset.
During charging: Bars move on display. Full battery:
Bars are solid. (Charge battery for at least 4 hours
before making/receiving rst call!)
Fig. 3 Fig. 4
Step 4
Turning on the Phone
Press and hold the Power button for 3 to 5
seconds until you hear the phone’s start up chime,
the device turns on, and the screen and keypad light
up, then release.
PWR
NO

Step 5
Set Time and Date
• Scroll UP 2 times using until you reach the
Settings menu, then press .
• Scroll DOWN 4 times then press .
• Use the to select either AM/PM.
• Scroll DOWN 1 time to enter time using the
keypad.
• Scroll DOWN 1 time to enter the date using the
keypad and press to save.
• Date format (MM,DD,YYYY) Month, Date, Year.
OK
OK
OK
#
Step 6
Set up Voicemail (only necessary if you using a newly
activated SIM card)
Hold down the #1 key for 3 seconds until the
Voicemail is dialed, listen to and follow the
instructions given by your service provider to set up
Voicemail and record your personal greeting.
*Please contact your service provider for questions
concerning your voicemail.

• Enter contacts name using the keypad.
Press to save.
• Number entry screen will appear.
• Enter the 10 digit phone number.
• Press to conrm.
• Press to save.
Step 7
Add a New Contact
• Scroll UP 1 time until you reach the
Phonebook menu, then press .
• Scroll DOWN 1 time until you reach New
Contact then press .
• Text entry screen will appear.
OK
OK
OK
OK
OK
Please Note:
The Name and Phone Number must already be saved
as a Contact before you can assign them a Speed Dial
or Emergency Contact number in the SOS Settings.
Saving a new entry directly to a Speed Dial key or SOS
contact is not possible.
The #1 is reserved for accessing your voicemail.

Step 8
Set up SOS Button
• Scroll UP 2 times using until you reach
Settings menu.
• Scroll UP 4 times using until you reach SOS
Settings menu.
(This menu is for customizing how you use this feature.)
Scroll to select
• SOS Button - turn ON/OFF the SOS button.
• SOS Siren - turn ON/OFF
• SOS Number - Press to edit 1 of 4 numbers to
be set as emergency contacts.
(These numbers must rst be added to the phonebook
contacts see Step #7)
(we recommend setting 911 as #1 emergency contact)
SOS Message - Press to customize message using
the keypad. Press to save.
(This message comes formated to say
“Emergency, please help!”)
OK
OK
OK
Step 9
Setting up Speed Dial Contacts
• Scroll UP 1 time using then press .
• Scroll UP 2 times using then press 2 times.
• Scroll to select Speed dial location.
• Press .
• Scroll UP or DOWN using to choose contact
from phonebook
• Press to save.
Step 10
Making a call.
Starting with the phone powered on.
• Use the keypad to dial the ten digit phone
number. Press to call.
Receiving a Call
• When the phone rings, press to accept the call.
• To send a call straight to Voicemail press .
• Adjust the call volume by the +/- switch on the left
side of the phone.
Speed dial call
• Press and hold #’s 2 - 9 until the contact name
appears on the sceen.
Speaker phone call
• The speaker phone option can be switched ON or
OFF by pressing 2 times during an active call.
End a call
• To end an active call press .
PWR
NO
PWR
NO
OK
OK
OK
OK
OK
OK
OK

High intensity LED Flashlight
- Switch up: Flashlight ON
- Switch down: Flashlight OFF
Lanyard Connection
- For use with optional Lanyard
Power Port
- Use only included Snapfōn Wall Charger or optional
Snapfōn Car Charger. (Input 100-240VAC-50/60hz,
0.3A MAX Output: 5.0 VDC / 500mA)
Headphone Port
- Use only Snapfōn earphones,
or Nokia 3.5 mm earphones.

Volume Control + / -
Change the handset
volume (call, ringer, or
radio)
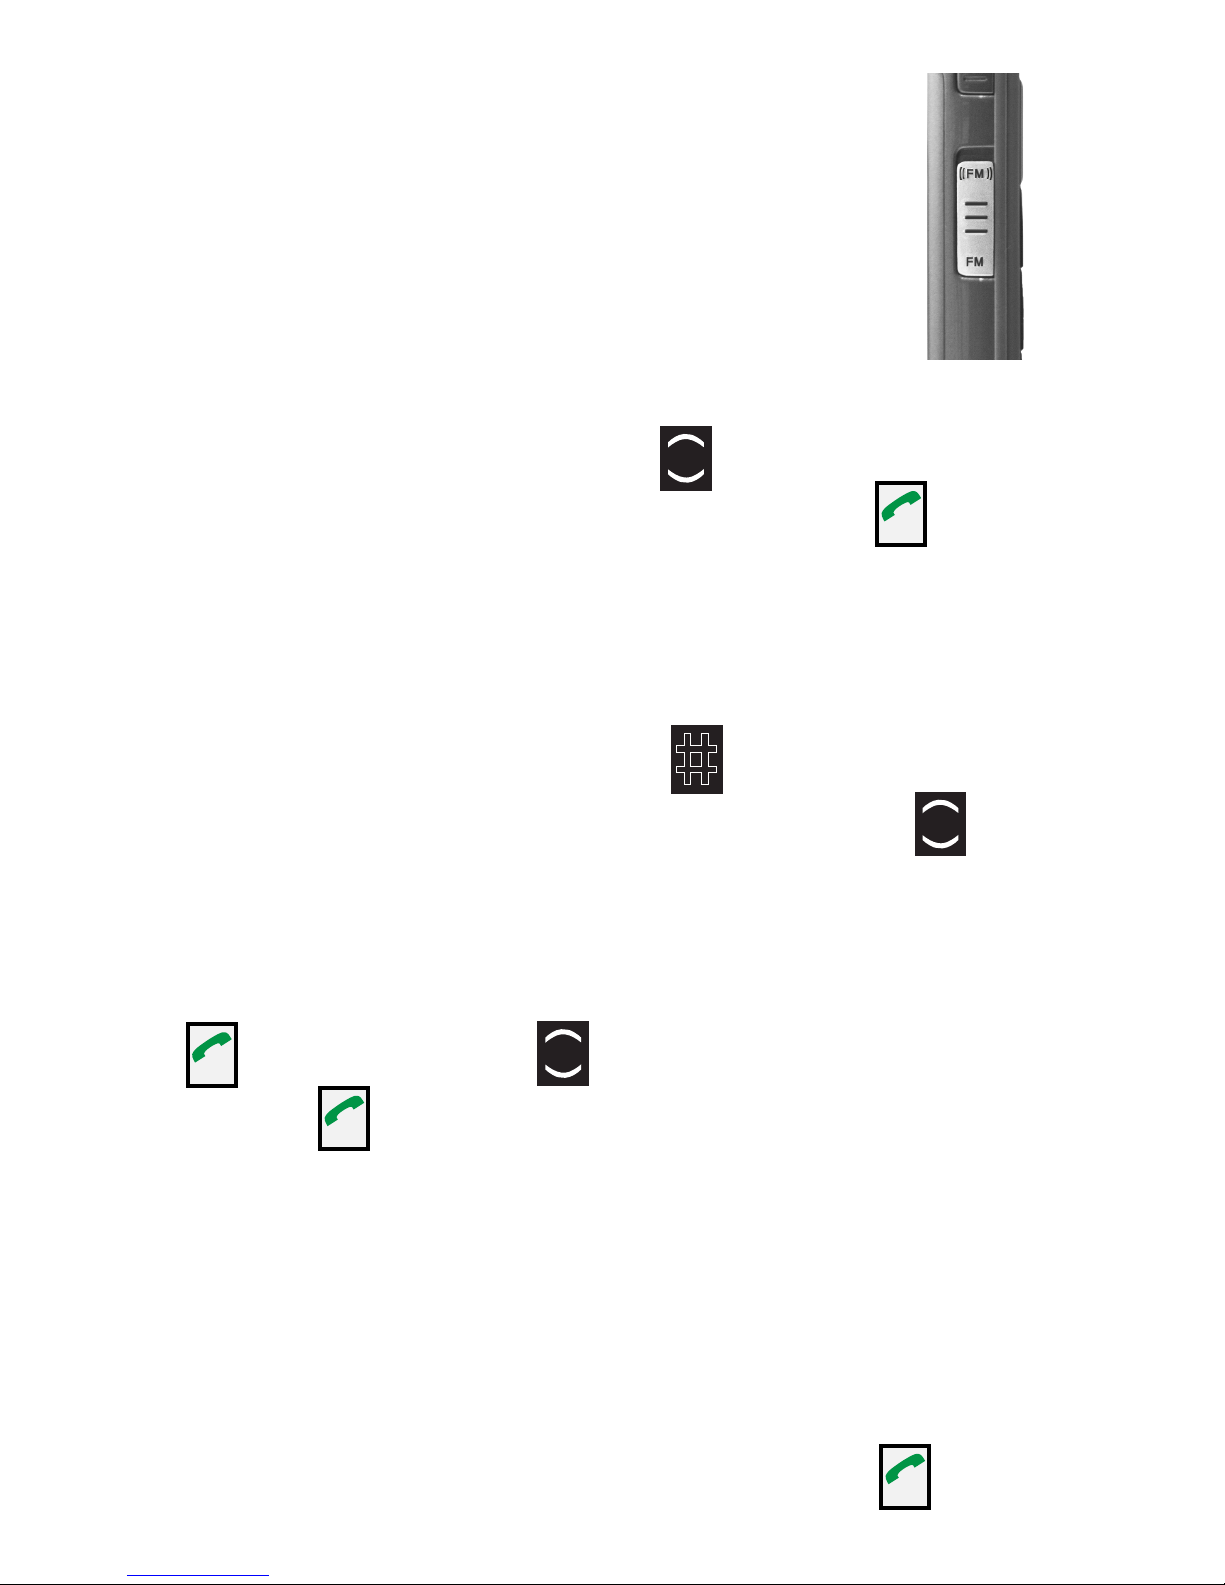
Radio
- Switch up: Radio ON
- Switch down: Radio OFF
Flashlight
- Switch up: Flashlight ON
- Switch down: Flashlight OFF
Keypad Lock
- Switch up: Lock OFF
- Switch down: Lock ON
Emergency call button
(S.O.S. button)
Battery door release
(Press and slide down)

Scroll Button
- Home Screen: Enter the
menu
- Use to scroll within the menu
items: PhoneBook/Call History/
SMS/Settings
- to move within an SMS message
Answer/OK-Key
- Make call or answer call
- Within menu: Conrm selection
- During a call press to turn ON/
OFF Speakerphone
End Call/Backspace/Delete/
Power ON/OFF
- ON/OFF: press for 5 seconds
- Hold down for 2 seconds to
return to Home Screen.
OK
0 - Key
- For SMS: Space
- Press & Hold for Speakerphone
# - Key
- For SMS formating: Switch
between capital, small letters &
numerals
- Radio Seek DOWN
- Change text entry mode
- Key (Text Characters,
Radio Seek)
- Main Screen:
- Press and Hold for inserting:
+,P,W,* (ex. country prex, e.g.
“+39” for ITALY)
- Radio Seek UP
-For SMS: Special characters
, . ? ; : ! “ ’ @ _
1 - Key (Voicemail)
- Press and hold to dial voicemail PWR
NO
Home Screen

FM Radio Home Screen
Home Screen Status Indicators
SMS MESSAGES
SMS (Short Message Service) or “Text Messages” are
written messages with a maximum of 160 characters.
•Write new SMS: Press UP 3 times to Messages
and then press , Press again to select Create
Message.
Entering a Phonebook contact or creating an SMS
message using the keypad.
Use the keys for the letters in the order they appear.
For example, Press 2 twice for B
To create a space between words use the 0 key
Use the * key to add characters, for example: . , ! ‘ “ ( )
Scroll to select then press OK to add.
To switch to a dierent entry mode press the # key.
The entry mode is indicated in the upper left-hand
corner of the text entry screen.
ABC = CAPITOL LETTERS
abc = lower case letters
ES = SPANISH CAPITOL LETTERS
es = spanish lower case letters
123 = Numerals
OK OK
Use the to delete a character.
Use the scroll button to edit within the screen.
•After composing your message, send the message
by pressing twice, enter the number or dial from
the PhoneBook by pressing , scroll through names
to select, press to view number, press to send.
•Receive SMS: A short signal and a registration on
the display will inform you about an incoming SMS
message.
With you can read the message immediately or see
a list of messages which have already been received
in the menu by going to the SMS menu, press
press DOWN and then press to select Inbox,
use the arrow keys to scroll messages and press to
select and view.
SMS Message Tones: Press twice then press ,
on Settings menu, press the DOWN 1 time to
Tone setting and press . Press DOWN 1 time
to select SMS and press , use to select the alert
tone you would like to hear for your incoming SMS
messages and press to save.
OK
OK
OK
OK
OK
OK
OK
OK
OK OK
OK
OK
PWR
NO
RADIO
ON: Switch on the left side upwards.
OFF: Switch on the left side downwards
Channel List
Use the Auto Search below to auto ll your channel
list. To select your station use to scroll through the
stations available in your area and press to select.
Manual Entry
If the desired station is known, enter station number
with the numeric keypad, use to enter the point.
Scroll through the frequency values using to tune
into the desired station.
Auto Search
Press then press UP to reach the Auto Search
Menu. Press twice to begin to search available
stations in your area. When the Search is complete
the stations available in your area will be saved to
the phone memory and you can scroll through the
stations using the number buttons on the keypad. The
strongest stations will be available in your Channel
List by scolling UP/DOWN and pressing to select.
OK
OK
OK
OK
#

When you switch your radio o and on again, you are
on the last heard station again.
Change volume: (does not function when in Auto
Search) with + / - on the left side of the telephone.
Headphones: You can use the radio with and without
headphones. (Note: you will get better radio reception
with the headphones plugged in.)
(Only Snapfōn and Nokia 3.5 mm earphones are
compatible.)

Press and Hold for
5seconds to activate.
(NOTE: The SOS Button is not activated by default on a
new Snapfōn. To activate the SOS Button,
Please follow Steps #7 and #8)
Using the SOS Button
Press and hold the orange SOS button, located on
the back of the phone, for 5 seconds
A siren will sound alerting the emergency. The siren
can be turned o if desired, see Step #8
Immediately the phone will send the Emergency
SMS Message to the Emergency Number(s) stored
previously see Step #8

Next the phone will begin dialing in stored sequence
the Emergency Number(s). If the rst call is not
connected it will call the second number and so on...
When the call is connected the Speakerphone is
activated.
Very Important: This phone does not know the
dierence between a person, an answering machine
or a voicemail answering the phone. We recommend
using 911 or your local emergency center as the rst
Emergency Number. This way the person having
the emergency will speak to Emergency services and
the other Emergency Number (s) will receive an
Emergency SMS message to alert the emergency.
NOTE: If you want to save emergency numbers like
emergency services, police, re department, etc... you
must clarify this with each institution. No liability will be
assumed by Snapfōn for possible costs incurred if you
dial accidentally.

FREQUENTLY ASKED QUESTIONS
•WhatserviceproviderswillworkwithSnapfōn?
This is a quad band GSM phone, that uses these
frequencies GSM 850/900/1800/1900. You must use
an unlocked SIM card from a service provider that
operates with these frequencies. Snapfōn will not
work with CDMA service providers.
•Screenshows“NoSIMcard!“: Check the direction
of the SIM card (Gold contact facing downwards)
•Acallfailed: Check the selected telephone number
and area code again for accuracy (area code entered?)
•Themobiletelephonedisplayisblank/black:
Telephone is in energy saving mode: press any key. Or
it is switched o - Hold for 5 seconds to switch on.
•Themobilephonedoesnotreact:
Remove battery, Re-insert and switch device on. If
there is still no reaction, refer to the service center.
•Thechargingproceduredoesnot
begin: This can take several minutes. If there is no
function after 10 minutes, contact sales agent or
manufacturer.
•Whatisthepointsizeofthescreenfont?
The point size of the font is 28 points.
PWR
NO

•Whatisthepointsizeofthecontactlist?
The contact list uses a 16 point font.
•Howmanycontactsdoesthephonehold?
The phone memory can hold 200 contacts, however
the phone uses the contacts stored on the SIM card
which also holds 200 contacts, The benet of the
phone storage is that you can copy your contacts to
the phone so if you decide to switch carriers in the
future, you can copy the contacts from the phone to
the SIM card with the new service.
•WhatarethesizeofthekeysontheSnapfon?
The number keys are 5/8 inch square.
•WhatdoIdoifmyphoneshowsamissedcall?
Press to view missed call or press to save and
view later.
•WhatdoIdoifmyphonesaysIhaveavoicemail.
Press to connect to the voicemail system or press
to save voicemail and listen to it later.
•WhydoIseean!onmyscreenandhaveno
sound?
The call you were attempting to make failed. Try your
call again.
OKOK
PWR
NO
PWR
NO

WARRANTY & RETURNS
The Snapfōn ez ONE, is warranted against defect,
malfunction, and product failure for one year from
the date of purchase. The warranty covers problems
or defects that are a result of normal usage. The
accessories are warranted to be free from malfunction
or defects for 90 days.
This warranty does not apply to damage done to
the phone by shipping, misuse, abuse, neglect,
accident, or exposure to any type of moisture. The
phone should be disconnected from its charger
during thunderstorms, or events that can cause
power surges. It is not warranted against damage
from voltage uctuations. The battery is not covered
under this warranty, due to its expendable nature.
The battery is guaranteed to be functioning at time of
purchase only. The phone warranty is void if batteries
other than Snapfon authorized or recommended
batteries have been used. If a problem develops due
to a third party battery, or charging adapter please
contact the manufacturer of that accessory for redress
or compensation. If a problem develops during the
warranty period, please contact us and we will either
repair or replace it with a new/refurbished unit, or
issue a refund.
Other manuals for ez-ONE C
1
Table of contents


