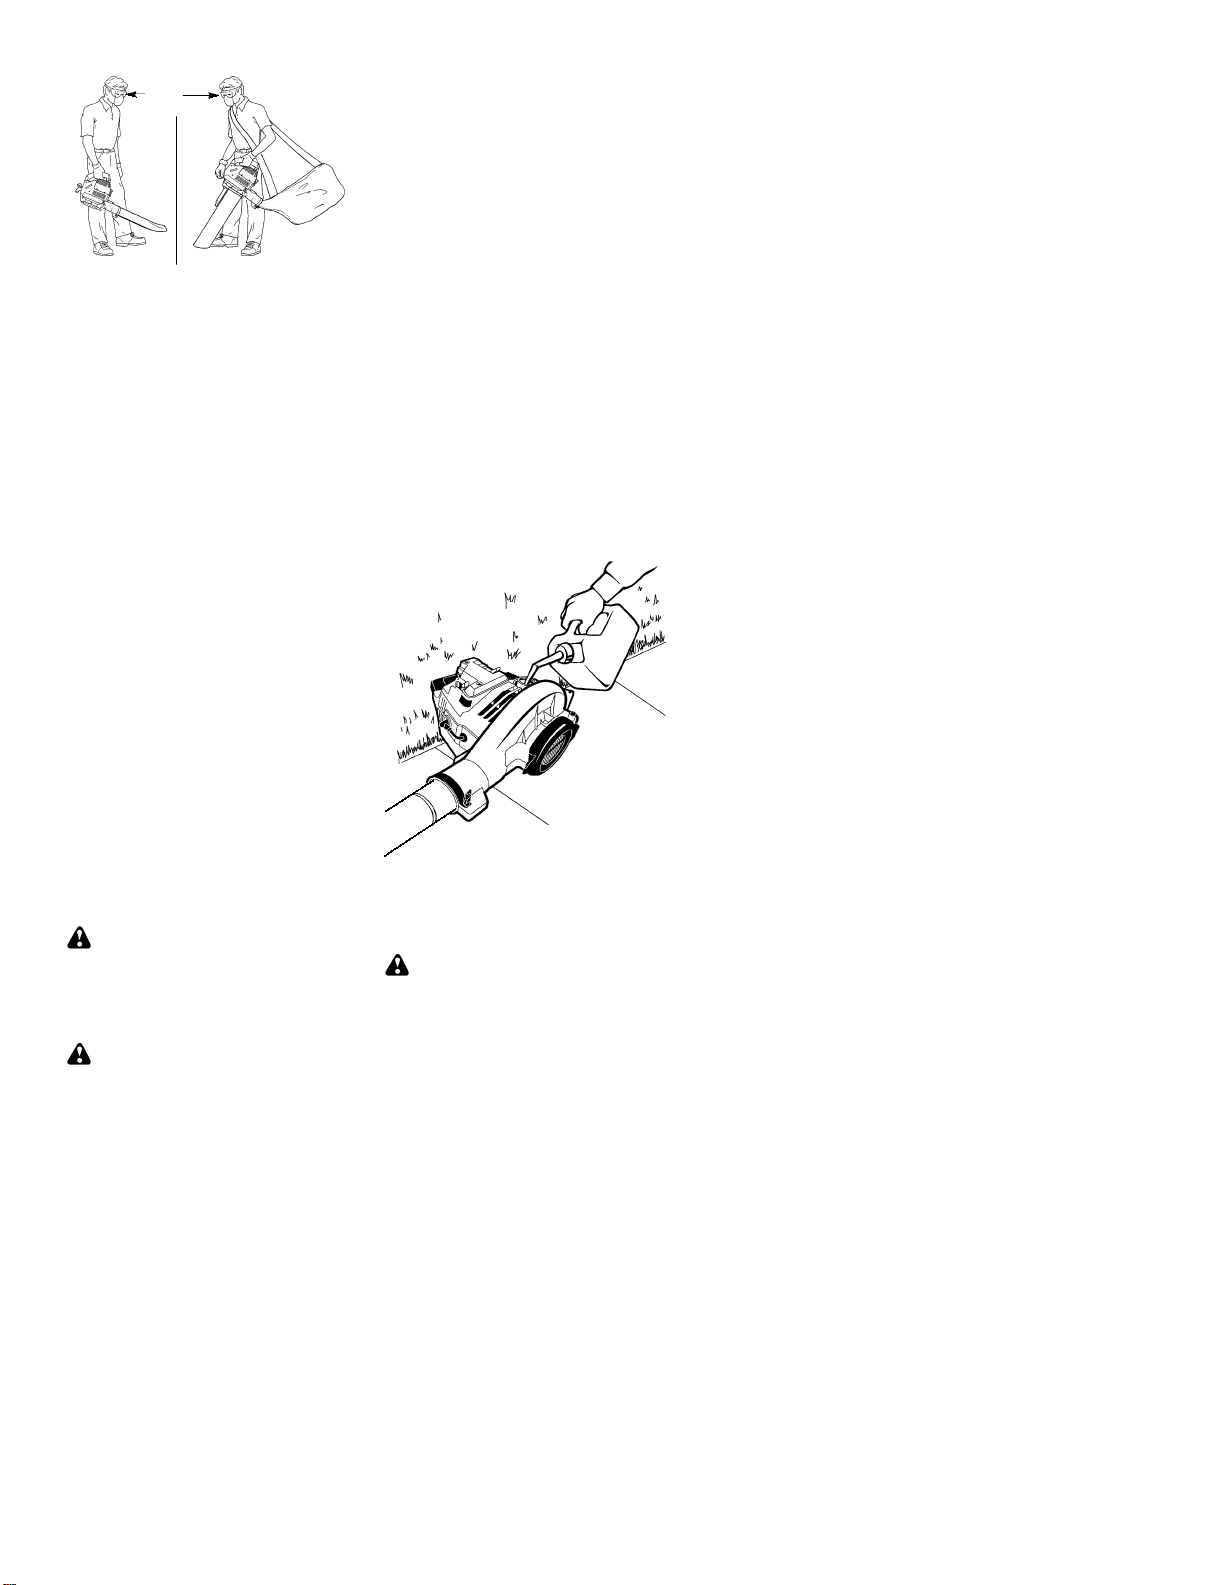
Snapper SB2000M User manual

IMPORTANT MANUAL -- Do not throw away
MANUAL IMPORTANTE -- No lo descarte
MANUEL IMPORTANT -- À Conserver
SB2000M
ENGLISH ESPAÑOL FRANÇAIS
WARNING:
Read and follow all Safety Rules and Operating Instructions before
using this product. Failure to do so can result in serious injury.
ADVERTENCIA:
Lea el manual de instrucciones y siga todas las advertencias e
instrucciones de seguridad. El no hacerlo puede resultar en lesiones
graves.
AVERTISSEMENT:
Veuillez lire le manuel d’instructions et bien respecter tous les
avertissements et toutes les instructions de sécurité. Tout défaut
de le faire pourrait entraîner des blessures graves.
Electrolux Home Products
104 Warren Road
Augusta, GA 30907
Copyright E2004 Electrolux Home Products, Inc. 530163810 2/2/04
Instruction Manual
Manual de Instrucciones
Manuel d’Instructions
For Parts Call K&T 606-678-9623 or 606-561-4983
www.mymowerparts.com

-- 2 --
SAFETY RULES
WARNING: Failure to follow all
Safety Rules and Precautions can result in
serious injury.
KNOW YOUR UNIT
SReadyourinstructionmanualcarefullyuntil
you completely understandand can follow
all warningsandsafetyrules beforeoperat-
ing the unit.
DRestrict unit to users who understandand
will follow all warnings and safety rules in
this manual.
WARNING: Inspect area before start-
ing unit. Remove all debris and hard objects
such as rocks, glass, wire, etc. that can rico-
chet, be thrown, or otherwise cause injury or
damage during operation.
Use your unit as a blower for:
DSweeping debris or grass clippings from
driveways, sidewalks, patios, etc.
DBlowing grass clippings, straw, or leaves into
piles, around joints, or between bricks.
Use your unit as a vacuum for:
DPicking up dry material such as leaves,
grass, small twigs, and bits of paper.
DFor best results during vacuum use, operate
your unit at high speed.
DMove slowly back andforthoverthemate-
rial as you vacuum. Avoid forcing the unit
intoapileofdebrisasthis canclogtheunit.
DKeep the vacuum tube about an inch above
thegroundforbestresults.
PLAN AHEAD
DAlways wear eye protection when operat-
ing, servicing, or performing maintenance
on unit. Wearing eye protection will helpto
preventrocks ordebrisfrombeingblownor
ricocheting into eyes and face which can
result in blindness and/or serious injury.
Eye protection should be marked Z87.
DAlways wear foot protection. Do not go
barefoot or wear sandals.
DAlways wear respirator or face mask when
working with unit in dusty environments.
DSecure hair above shoulder length.Secure
or remove jewelry, loose clothing, or cloth-
ing with loosely hanging straps, ties, tas-
sels, etc. They can be caught in moving
parts.
DDo not operateunit when you aretired, ill, up-
set, or if you are under the influence of alco-
hol, drugs, or medication.
DKeep children, bystanders, and animals
away from work area a minimum of 30 feet
(10meters)whenstartingoroperatingunit.
Do not point the blower nozzle in the direc-
tion of people or pets.
HANDLEFUELWITHCAUTION,ITIS
HIGHLY FLAMMABLE
DEliminate all sources of sparks or flame (in-
cluding smoking, open flames, or work that
cancausesparks)intheareaswherefuelis
mixed, poured, or stored.
DMix and pour fuel in an outdoor area; store
fuel in a cool, dry, well ventilated place; use
an approved, marked container for all fuel
purposes.
DDo not smoke while handling fuel or while
operating the unit.
DMake sure the unit is properly assembled
and in good operating condition.
DDo not fill fuel tank while engine is hot or
running.
DAvoid spilling fuel or oil. Wipe upfuel spills
before starting engine.
DMove atleast 10feet (3meters) awayfrom
fuel and fueling site before starting engine.
DAlways store gasoline in a container ap-
proved for flammable liquids.
OPERATE YOUR UNIT SAFELY
WARNING: Stop the engine before
opening the vacuum inlet door. The engine
must be stopped and the impeller blades no
longer turningto avoid serious injury from the
rotating blades.
DInspect unit before each use for worn,
loose, missing, or damaged parts. Do not
use until unit is in proper working order.
DKeep outside surfaces free of oil and fuel.
DNever start or run engine inside a closed
room, building or other unventilated area.
Breathing exhaust fumes can kill.
DTo avoid static electricity shock, do not
wear rubber gloves or any other insulated
gloves while operating unit.
DDo not set unit on any surface except a
clean, hard area while engine is running.
Debris such as gravel, sand, dust, grass,
etc.couldbepickedupby theairintakeand
thrown out through discharge opening,
damagingunit,property,orcausingserious
injury to bystanders or operator.
DAvoiddangerousenvironments.Donotuse
in unventilated areas or where explosive
vapors or carbon monoxide build up could
be present.
DDo notoverreachor use from unstablesur-
faces such as ladders, trees, steepslopes,
rooftops,etc.Keepfirmfootingandbalance
at all times.
DNever place objects inside the blower
tubes; always direct the blowing debris
awayfrompeople,animals,glass, andsolid
objects such as trees, automobiles, walls,
etc.Theforceofaircancauserocks,dirt,or
sticks to be thrownor toricochet which can
hurt people or animals, break glass, or
cause other damage.
DNever run unit without the proper equip-
ment attached. When using your unit as a
blower, always install blower tubes. When
usingyourunitasavacuum,alwaysinstall
vacuumtubesandvacuumbagassembly.
Makesurevacuum bagassembly is com-
pletely zipped.
DCheck air intake opening, blower tubes,
vacuum tubes, and elbow tubefrequently,
always with engine stopped and spark
For Parts Call K&T 606-678-9623 or 606-561-4983
www.mymowerparts.com

-- 3 --
plug disconnected. Keep vents and dis-
charge tubes free of debris which can ac-
cumulate and restrict proper air flow.
DNever place any object in the air intake
opening as this could restrict proper air flow
and cause damage to the unit.
DNever use for spreading chemicals, fertil-
izers,orothersubstanceswhichmaycon-
tain toxic materials.
DTo avoid spreading fire, do not use near
leaf or brush fires, fireplaces, barbecue
pits, ashtrays, etc.
DUse only for jobs explainedin this manual.
MAINTAIN YOUR UNIT PROPERLY
DHave all maintenance other than the rec-
ommendedproceduresdescribed in thein-
struction manual performed by an autho-
rized service dealer.
DDisconnect spark plug before performing
maintenance except for carburetor adjust-
ments.
DUse only recommended Snappert/Weed
Eater!replacementparts;useofanyother
parts may void your warranty and cause
damage to your unit.
DEmpty fuel tank before storing the unit. Use
upfuel leftin carburetor bystarting engine and
letting it run until it stops.
DDo not use any accessory or attachment
other than those recommended by manufac-
turer for use with your unit.
DDo notstorethe unit orfuel in aclosed area
where fuel vapors can reach sparks or an
open flame from hot water heaters,electric
motors or switches, furnaces, etc.
DStore in a dry area out of reach of children.
SPECIAL NOTICE: Exposure to vibra-
tions through prolongeduse of gasoline pow-
ered hand tools could cause blood vessel or
nerve damage in the fingers, hands, and
joints of people proneto circulation disorders
or abnormal swelling. Prolonged use in cold
weatherhasbeenlinked tobloodvesseldam-
agein otherwisehealthy people.Ifsymptoms
occur such as numbness, pain, loss of
strength, change in skin color or texture, or
loss of feeling in the fingers, hands, or joints,
discontinue the use of this tool and seek
medical attention. An antivibration system
does not guarantee the avoidance of these
problems. Users who operatepower tools on
a continual and regular basis must monitor
closely their physical conditionand thecondi-
tion of this tool.
SPECIALNOTICE:For users on U.S. For-
est Land and in some states, including Cali-
fornia (Public Resources Codes 4442 and
4443),Idaho,Maine,Minnesota,NewJersey,
Oregon, and Washington: Certain internal
combustion engines operated on forest,
brush,and/orgrasscoveredlandintheabove
areas are required to be equipped with a
spark arresting screen, maintained in effec-
tive workingorder, ortheenginemust becon-
structed, equipped, and maintained for the
prevention of fire. Check with your stateorlo-
cal authorities for regulations pertaining to
these requirements. Failure to follow these
requirementsis a violationofthelaw.Thisunit
is not factory equipped with a spark arresting
screen; however, a spark arresting screen is
availableasanoptionalpart.Ifa spark arrest-
ing screen is required in your area, contact
your authorizedservice dealer for thecorrect
kit. Thespark arrestingscreen, blowertubes,
and nozzles must be assembled to unit to be
in full compliance with regulations.
ASSEMBLY
WARNING: Stop engine and be sure
the impeller blades have stopped turning be-
fore opening the vacuum inlet door or at-
tempting to insert or remove the vacuum or
blower tubes. The rotating blades can cause
serious injury. Always disconnect the spark
plug before performing maintenance or ac-
cessing movable parts.
WARNING: If you receive your unit
assembled, check each step to insure your
unit is properly assembled and all fasteners
are secure. Follow all safety information in
the manual and on the unit.
DA standard screwdriver is required for as-
sembly.
BLOWER TUBE ASSEMBLY
1. Align the rib on the blower tube with the
groove in the blower outlet; slide the tube
into place.
NOTE: Knobmustbe looseenoughtoallow
blower tube to be inserted in blower outlet.
Loosen knob by turning counterclockwise.
Blower
Tube
Blower
Outlet
Rib
Groove
2. Securethe tubeby turningthe knobclock-
wise.
3. Toremovethetube,turntheknobcounter-
clockwise to loosen the tube; remove the
tube.
VACUUM BAG ASSEMBLY
1. Open the zipper on the vacuum bag and
insert the elbow tube.
2. Push the small end of the elbow tube
through the small opening in the bag.
For Parts Call K&T 606-678-9623 or 606-561-4983
www.mymowerparts.com

-- 4 --
Small
Opening
Zipper
Opening
Elbow
Tube
Rib
NOTE: Makesureedgeofthesmallopening
is flush against the flared area of the elbow
tube, and the rib on the elbow tube is on the
bottom.
3. Closethezipperonthebag.Makesurethe
zipper is closed completely.
4. Remove blower tube from engine.
Rib
Groove
5. Inserttheelbowtubeintothebloweroutlet.
Make sure elbow tube rib is aligned with
the blower outlet groove.
6. Turnknobclockwise tosecureelbowtube.
VACUUM TUBE ASSEMBLY
WARNING: Stop engine and be sure
the impeller blades have stopped turning be-
fore opening the vacuum inlet door or at-
tempting to insert or remove the vacuum or
blower tubes. The rotating blades can cause
serious injury.
1. Align the lower vacuum tube as shown.
Push lower vacuum tubeinto uppervacu-
um tube.
Lower Vacuum Tube
Upper Vacuum
Tube
2. Insert thetip ofascrewdriverintothelatch
area of the vacuum inlet.
Latch Area
Blower
Outlet
Vacuum
Inlet Cover
Latch
Area
3. Gently tilt thehandleof thescrewdriver to-
ward the back of the unit to release the
latch while pulling up on the vacuum inlet
cover with your other hand.
4. Hold thevacuum inlet cover openuntil up-
per vacuum tube is installed.
Vacuum Inlet
Vacuum
Inlet
Cover
Retaining Post
5. Place thehooksof theuppervacuum tube
on the retaining posts of the unit.
6. Pivot the tube until it is secured to the
blower unit by the vacuum inlet latch.
Retaining
Post
Hook
Inlet Cover
Latch
PIVOT
HOW TO CONVERT UNIT FROM
VACUUM USE TO BLOWER USE
1. Remove the vacuum tubes by inserting
the tip of a screwdriver into the latch area
of the vacuum inlet.
2. Gently tilt handle of screwdriver toward
the back of the unit to release the latch
while pulling up ontheuppervacuumtube
with your other hand.
Latch Area
3. Remove the vacuum bag.
4. Close the vacuum inlet cover and make
sure it is latched closed.
5. Reinstall the blower tube (see BLOWER
TUBE ASSEMBLY).
For Parts Call K&T 606-678-9623 or 606-561-4983
www.mymowerparts.com

-- 5 --
SHOULDER STRAP ADJUSTMENT
1. Hold the unit as shown with the muffler side
facing away from your body and clothes.
2. Pass the shoulder strap over your head
and onto your right shoulder.
3. Extend your left arm towardthe rearofthe
vacuum bag.
4. Adjust shoulder strap until the vacuum
bag/shoulder strap seam lies between
your thumb and index finger.
5. Make sure air flows freely from the elbow
tubeinto bag. If bagis kinked, the unit will
not operate properly.
OPERATION
KNOW YOUR BLOWER
READ THISINSTRUCTIONMANUAL AND SAFETYRULESBEFOREOPERATING YOURUNIT.
Compare the illustrations with your unit to familiarize yourself with thelocation of the variouscontrols
and adjustments. Save this manual for future reference.
Choke Lever
Fuel Mix
Fill Cap
Starter
Rope
Throttle
Lever
Spark Plug
Blower
Tube
Primer Button
Rear
Handle
Lower
Vacuum Tube
Upper
Vacuum Tube
Vacuum Bag
Elbow Tube
THROTTLE LEVER
TheTHROTTLELEVER is usedtoselect the
desired enginespeed and tostop the engine.
Movethethrottlelevertothe positionfor
full speed operation. Move the throttle lever
tothe positionforidlespeed. Tostopthe
engine, move the throttle lever to the STOP
position.
PRIMER BUTTON
The PRIMER BUTTON removes air from the
carburetor andfuel lines and fills them withfuel.
This allows you to start the engine with fewer
pulls on the starter rope. Activate primer button
by pressing it and allowing it to return to its origi-
nal position.
CHOKE LEVER
The CHOKE helps to supply fuel to the engine
to aid in cold starting. Activate the choke by
moving the choke lever to the FULL CHOKE
position.Afterengineattemptstostart, movethe
choke lever to the HALF CHOKE position.
Once engine starts, move choke lever to the
RUN position.
For Parts Call K&T 606-678-9623 or 606-561-4983
www.mymowerparts.com

-- 6 --
OPERATING POSITION
Blower
Eye
Protection
Vacuum
OPERATING TIPS
SWhile vacuuming or blowing debris, hold
the unit with the muffler side facing away
from your body andclothes (seeOPERAT-
ING POSITION illustration above).
STo reduce the risk of hearing loss
associated with sound level(s), hearing
protection is required.
STo reduce the risk of injury associated with
contacting rotating parts, stop the engine be-
fore installing or removing attachments. Do
not operate without guard(s) in place.
SOperate power equipment only at reasonable
hours--not early in the morning or late at night
when people might be disturbed. Comply with
times listed in local ordinances. Usual recom-
mendations are 9:00 a.m. to 5:00 p.m.,
Monday though Saturday.
STo reduce noise levels, limit the number of
pieces of equipment used at any one time.
STo reduce noise levels, operate power
blowers at the lowest possible throttle
speed to do the job.
SUse rakes andbrooms toloosen debrisbe-
fore blowing.
SIn dusty conditions, slightly dampen sur-
faces or use amister attachmentwhenwa-
ter is available.
SConserve water by using power blowers
instead of hoses for many lawn and garden
applications, including areas such as gutters,
screens, patios, grills, porches, andgardens.
SWatchoutforchildren,pets,openwindows,
or freshly washed cars. Blow debris away
safely.
SUse the full blower nozzle extension so the
air stream can work close to the ground.
SAfter using blowers and other equipment,
CLEAN UP! Dispose of debris in trash re-
ceptacles.
BEFORE STARTING ENGINE
WARNING: Be sure to read the fuel
information in the safety rules before you be-
gin. If you donot understandthe safety rules,
do not attempt to fuel your unit. Call
1-800-554-6723.
FUELING ENGINE
WARNING: Remove fuel cap slowly
when refueling.
This engine is certified to operate on un-
leaded gasoline. Before operation, gasoline
must be mixed with a good quality synthetic
2-cycle air-cooled engine oil designed to be
mixed at a ratio of 40:1. Snappert/Weed
Eater!brand synthetic oil is recommended.
Mix gasoline and oil at a ratio of 40:1. A 40:1
ratio is obtainedby mixing 3.2 ounces (95ml)
of oil with 1 gallon (4 liters) of unleadedgaso-
line. DO NOT USE automotive oil or boat oil.
These oils will cause engine damage. When
mixingfuel,follow instructionsprintedoncon-
tainer. Once oil is added to gasoline, shake
container momentarily to assure that the fuel
is thoroughly mixed. Always read and follow
the safety rules relating to fuel before fueling
your unit.
IMPORTANT
Experience indicates that alcohol blended
fuels (called gasohol or using ethanol or
methanol)canattractmoisturewhichleadsto
separation and formation of acids during
storage. Acidic gas can damage the fuel
systemofanenginewhileinstorage.Toavoid
engine problems, empty the fuel system
beforestoragefor30days orlonger.Drainthe
gastank,starttheengineandlet itrununtilthe
fuellines andcarburetorareempty. Usefresh
fuel next season. Never use engine or
carburetorcleanerproducts inthefuel tank or
permanent damage may occur.
NOTE: Unit must be placed on its side when
adding fuel (see illustration below).
TO STOP THE ENGINE
DTo stop the engine, move the throttle lever
to the STOP position.
BEFORE STARTING THE ENGINE
WARNING: YouMUSTmakesure
the tubes are secure before using the unit.
DFuel engine. Move at least 10 feet (3 me-
ters) away from the fueling site.
DHold the unit in the starting position as
shown. Make sure the blower end is di-
rected away from people, animals, glass,
and solid objects.
For Parts Call K&T 606-678-9623 or 606-561-4983
www.mymowerparts.com

-- 7 --
Blower
Vacuum
STARTING POSITION
WARNING: When starting engine,
holdtheunitasillustrated.Donotsetunitonany
surface except aclean, hardarea whenstarting
engine or while engine is running. Debris such
as gravel, sand, dust, grass, etc. could be
picked up by the air intake and thrown out
through the discharge opening, damaging the
unit or property, or causing serious injury to by-
standers or the operator.
STARTING A COLD ENGINE
1. Move throttle lever to the position.
2. Move choke lever to the FULL CHOKE
position.
3. Slowly press the primer button 8 times.
Throttle Lever
Choke Lever
Primer Button
4. Pull starter rope sharply until engine at-
temptstorun,butnomorethan5pulls(be-
low 30_F, 8 pulls).
NOTE:If engine attempts to start beforethe
5th pull, go to next step immediately.
5. Move the choke lever to the HALF
CHOKE position.
6. Pull the starter rope sharply until the en-
gine runs,but no more than5 pulls (below
30_F, 10 pulls).
7. After a 5 second warm--up, move the
choke lever to the RUN position.
8. Allow the unit to run for 30 more seconds
at the RUN position before moving the
throttle lever to position.
If engine has not started after 5 pulls (at HALF
CHOKE), repeat STARTING A COLDENGINE
procedure. If engine still does not start,proceed
to STARTING A FLOODED ENGINE.
9. To stop the engine, move thethrottle lever to
the STOP position.
STARTING A WARM ENGINE
NOTE: If fuel tank is empty, add fuel; then,
follow STARTING A COLD ENGINE proce-
dure. Do not fill fuel tank while engine is hot.
1. Move throttle lever to the position.
2. Pull starter rope sharply until engine runs,
but no more than 5 pulls.
NOTE:If engine has not started, pull starter
rope5 morepulls. Ifengine still does notrun,
it is probably flooded.
3. To stop the engine, move thethrottle lever to
the STOP position.
STARTING A FLOODED ENGINE
Flooded engines can be started by placing the
choke lever in the RUN position. Move throttle
lever to the fast position ; then, pull rope
until engine starts. After engine starts, move the
throttle lever to the slow position toallow
engine to idle.
Starting could require pulling the starter rope
many times depending on how badly the unit is
flooded.
If unit still doesn’t start refer to the TROUBLE-
SHOOTING TABLE or call 1-800-554-6723.
MAINTENANCE
WARNING: Avoid touching muffler
unless engine and muffler are cold. A hot
muffler can cause serious burns.
WARNING: Stop engine and be sure
the impeller blades have stopped turning be-
fore opening the vacuum inlet door or at-
tempting to insert or remove the vacuum or
blower tubes. The rotating blades can cause
serious injury. Always disconnect the spark
plug before performing maintenance or ac-
cessing movable parts.
GENERALRECOMMENDATIONS
Thewarrantyonthisunitdoesnotcoveritems
that have been subjected to operator abuse
or negligence. To receive full value from the
warranty, the operator must maintain unit as
instructed in this manual. Various adjust-
ments will need to be made periodically to
properly maintain your unit.
CHECK FOR LOOSE
FASTENERS AND PARTS
SSpark Plug Boot
SAir Filter
SHousing Screws
SMuffler
CHECK FOR DAMAGED OR WORN
PARTS
Contact an authorized service dealer for re-
placement of damaged or worn parts.
SFuel Tank -- Do not use unit iffuel tank shows
signs of damage or leaks.
SVacuum Bag -- Do notuse vacuum bag if it
is torn or damaged.
For Parts Call K&T 606-678-9623 or 606-561-4983
www.mymowerparts.com

-- 8 --
INSPECT AND CLEAN UNIT AND
DECALS
SAfter each use, inspect complete unit for
looseor damagedparts. Cleantheunitand
decals usingadampclothwithamilddeter-
gent.
SWipe off unit with a clean dry cloth.
CLEAN AIR FILTER
Air Filter
Cover
Air Filter Screws
Cleaning the air filter:
A dirty air filter decreases engine perform-
ance and increases fuel consumption and
harmful emissions. Always clean or replace
air filter after every 5 hours of operation or
yearly, whichever comes first.
1. Clean the cover and the area around it to
keepdebrisfromfallingintothecarburetor
chamber when the cover is removed.
2. Remove parts as illustrated.
NOTE: Donotcleanfilteringasolineorother
flammable solvent. Doing so can create a fire
hazardor produceharmful evaporativeemis-
sions.
3. Wash the filter in soap and water.
4. Allow filter to dry.
5. Apply a few drops of oil to the filter;
squeeze filter to distribute oil.
6. Replace parts.
REPLACE SPARK PLUG
Replace spark plug each year to ensure the
engine starts easier and runs better. Set
sparkpluggapat0.025inch.Ignition timingis
fixed, nonadjustable.
1. Twist, then pull off spark plug boot.
2. Remove spark plug from cylinder and dis-
card.
3. Replace with Champion RCJ-6Y spark
plug and tighten securely with a 3/4 inch
socket wrench.
4. Reinstall the spark plug boot.
REPLACE FUEL FILTER
Toreplacefuelfilter,drainunitbyrunningitdry
of fuel, then remove fuel cap/retainer assem-
bly from tank. Pull filter from tank andremove
itfromthefuelline.Installnewfuelfilteronfuel
line; reinstall parts.
Fuel Line
Fuel Filter
CHECK MUFFLER MOUNTING
SCREWS
Once each year, ensure muffler mounting
screws are secure and tightened properly to
prevent damage.
Mounting
Screw
Holes
Muffler Cover
Screws
1. Loosen andremovethe 2screws from the
muffler cover.
2. Remove the muffler cover.
3. Tightenthe 2 muffler mounting screws se-
curely.
4. Reinstall muffler cover and 2 screws.
Tighten securely.
CARBURETOR ADJUSTMENTS
Thereis no screw for idle adjustment on your
blower. The throttle lever is used to control
engine speed. The throttle lever can be
placed in one of four positions: STOP, IDLE
or , FULL THROTTLE or , and one
intermittentposition. Ifyourenginewill notrun
properly or you require further assistance,
contact an authorized service dealer or call
1--800--554--6723.
STORAGE
WARNING: Perform the following
steps after each use:
SAllow engine to cool, and secure the unit
before storing or transporting.
SStore unit and fuel in a well ventilated area
where fuel vapors cannot reach sparks or
open flames from water heaters, electric
motors or switches, furnaces, etc.
SStore unit with all guards in place. Position
unit so that any sharp object cannot acci-
dentally cause injury.
SStore unit and fuel well out of the reach of
children.
For Parts Call K&T 606-678-9623 or 606-561-4983
www.mymowerparts.com

-- 9 --
SEASONALSTORAGE
Prepareunit for storageat end of season or if
it will notbe used for 30 days or more.
If your unit is to bestoredfor a periodof time:
SClean the entire unit before lengthy stor-
age.
SStore in a clean dry area.
SLightly oil external metal surfaces.
FUEL SYSTEM
Under FUELING ENGINE in the OPERA-
TIONsectionofthismanual,seemessagela-
beled IMPORTANT regarding the use of ga-
sohol in your engine.
Fuel stabilizer is an acceptable alternative in
minimizing the formation of fuel gum deposits
during storage. Add stabilizer to gasoline in fuel
tank or fuel storage container. Follow the mix
instructions found on stabilizer container. Run
engine at least 5 minutes after adding stabilizer.
ENGINE
SRemove spark plugandpour1 teaspoonof
40:1,2-cycle engineoil (air cooled)through
the spark plug opening. Slowly pull the
starter rope 8 to 10 times to distribute oil.
SReplacespark plugwith newoneofrecom-
mended type and heat range.
SClean air filter.
SCheck entire unit for loose screws, nuts,
and bolts. Replace any damaged, broken,
or worn parts.
SAt the beginning of the next season, use
only freshfuelhavingthepropergasolineto
oil ratio.
OTHER
SDo not store gasoline from one season to
another.
SReplaceyourgasolinecanifitstartstorust.
TROUBLE CAUSE REMEDY
Engine will not
start. 1. Engine flooded.
2. Fuel tank empty.
3. Spark plug not firing.
4. Fuel not reaching
carburetor.
5. Compression low.
1. See “Starting a Flooded Engine”
in Operation section.
2. Fill tank with correct fuel mixture.
3. Install new spark plug.
4. Check for dirty fuel filter; replace.
Check for kinked or split fuel line;
repair or replace.
5. Contact an authorized service dealer.
Engine will not
idle properly. 1. Fuel not reaching
carburetor.
2. Carburetorrequires
adjustment.
3. Crankshaft seals worn.
4. Compression low.
1. Check for dirty fuel filter; replace.
Check for kinked or split fuel line;
repair or replace.
2. Contact an authorized service dealer.
3. Contact an authorized service dealer
4. Contact an authorized service dealer.
1. Air filter dirty.
2. Fuel not reaching
carburetor.
3. Spark plug fouled.
4. Carburetorrequires
adjustment.
5. Carbon build up.
6. Compression low.
Engine will not
accelerate,
lacks power, or
dies under a
load.
1. Clean or replace air filter.
2. Check for dirty fuel filter; replace.
Check for kinked or split fuel line;
repair or replace.
3. Clean or replace spark plug
and re-gap.
4. Contact an authorized service dealer.
5. Contact an authorized service dealer.
6. Contact an authorized service dealer.
Engine smokes
excessively. 1. Choke partially on.
2. Fuel mixture incorrect.
3. Air filter dirty.
4. Carburetorrequires
adjustment.
1. Adjust choke.
2. Empty fuel tank and refill with
correct fuel mixture.
3. Clean or replace air filter.
4. Contact an authorized service dealer.
Engine runs hot. 1. Fuel mixture incorrect.
2. Spark plug incorrect.
3. Carburetorrequires
adjustment.
4. Carbon build up.
1. See “Fueling Engine” in Operation
section.
2. Replace with correct spark plug.
3. Contact an authorized service dealer.
4. Contact an authorized service dealer.
TROUBLESHOOTINGTABLE
WARNING: Always stop unit and disconnect spark plug before performing any of the
recommended remedies below other than remedies that require operation of the unit.
For Parts Call K&T 606-678-9623 or 606-561-4983
www.mymowerparts.com

-- 10 --
LIMITED WARRANTY
ELECTROLUX HOME PRODUCTS, INC.,
warrants to theoriginal purchaserthat each new
Snappert
tt
tbrand gasoline tool or attachment is
free from defects in material and workmanship
and agrees to repair or replace under this war-
ranty any defective gasoline product or attach-
ment as follows from the original date of pur-
chase:
2 YEARS-- Parts and Labor, when used for
household purposes.
90 DAYS -- Parts and Labor, when used for
commercial, professional, or income producing
purposes.
30 DAYS -- Parts and Labor, if used for rental
purposes.
This warranty is not transferable and does not
cover damage or liability caused by improper
handling, improper maintenance, or the use of
accessories and/or attachments not specifically
recommended by ELECTROLUX HOME
PRODUCTS, INC., for this tool. Additionally,
this warranty does not cover tune-ups, spark
plugs, filters, starter ropes, starter springs, cut-
ting line, or rotating headparts that will wear and
require replacement with reasonable use during
the warranty period. This warranty does not
cover predelivery setup or normal adjustments
explained in the instruction manual.
THIS WARRANTY GIVES YOU SPECIFIC
LEGAL RIGHTS, AND YOU MAY HAVE
OTHER RIGHTS WHICH VARY FROM
STATE TO STATE.
NO CLAIMS FOR CONSEQUENTIAL OR
OTHER DAMAGES WILL BE ALLOWED,
AND THERE ARE NO OTHER EXPRESS
WARRANTIES EXCEPT THOSE EX-
PRESSLY STIPULATED HEREIN.
SOME STATES DO NOT ALLOW LIMITA-
TIONS ON HOW LONG AN IMPLIED WAR-
RANTY LASTS OR THE EXCLUSION OR
LIMITATIONS OF INCIDENTAL OR CONSE-
QUENTIAL DAMAGES, SO THE ABOVE
LIMITATIONS OR EXCLUSION MAY NOT
APPLY TO YOU.
The policy of ELECTROLUX HOME PRO-
DUCTS, INC., is to continuously improve its
products. Therefore, ELECTROLUX HOME
PRODUCTS, INC., reserves the right to
change, modify, or discontinue models, de-
signs, specifications, and accessories of all
products at any time without notice orobligation
to any purchaser.
U.S. EPA
EMISSION CONTROL WARRANTY STATEMENT
YOUR WARRANTY RIGHTS AND OB-
LIGATIONS: The U. S. Environmental
Protection Agency and ELECTROLUX
HOMEPRODUCTS,INC.,arepleasedtoex-
plain the emissions control system warranty
on your year 2002--2004 small off--road en-
gine. ELECTROLUX HOME PRODUCTS,
INC., must warrantthe emission control sys-
temonyoursmall off--roadenginefortheperi-
ods of time listed below provided there has
been no abuse, neglect, or improper mainte-
nance of your small off--road engine. Your
emission control system includes parts such
as the carburetor and the ignition system.
Where a warrantablecondition exists, ELEC-
TROLUX HOME PRODUCTS, INC., will re-
pair your small off--road engine at no cost to
you. Expenses covered under warranty in-
cludediagnosis,partsandlabor. MANUFAC-
TURER’SWARRANTYCOVERAGE: Ifany
emissions related part on your engine (as
listed under Emissions Control Warranty
Parts List) is defective ora defectin the mate-
rialsorworkmanshipoftheenginecausesthe
failure of such an emission related part, the
part will be repaired or replaced by ELEC-
TROLUX HOME PRODUCTS, INC. OWN-
ER’S WARRANTY RESPONSIBILITIES:
As the small off--road engine owner, you are
responsible for the performance of the re-
quired maintenance listed in your instruction
manual. ELECTROLUX HOME PROD-
UCTS, INC., recommends that you retain all
receipts covering maintenanceon your small
off--road engine, but ELECTROLUX HOME
PRODUCTS, INC., cannot deny warranty
solelyforthelackofreceiptsorforyourfailure
to ensure the performance of all scheduled
maintenance. As the small off--roadengine
owner, you should be aware thatELECTRO-
LUX HOME PRODUCTS, INC., may deny
you warranty coverage if your small off--road
engine or a part of it has failed due to abuse,
neglect, improper maintenance, unapproved
modifications, or the use of parts not made or
approvedby theoriginal equipmentmanufac-
turer. Youareresponsibleforpresentingyour
small off--road engine to an ELECTROLUX
HOME PRODUCTS,INC., authorizedrepair
centeras soonas aproblem exists. Warranty
repairs should be completed in a reasonable
amountof time, not to exceed 30days. If you
have any questions regarding your warranty
rightsandresponsibilities,youshouldcontact
your nearestauthorizedservice centerorcall
ELECTROLUXHOMEPRODUCTS,INC.,at
1--800--554--6723. WARRANTY COM-
MENCEMENT DATE: The warranty period
begins on the date the small off--roadengine
is purchased. LENGTH OF COVERAGE:
This warranty shall be for a period of two
yearsfromtheinitialdateofpurchase. WHAT
IS COVERED: REPAIR OR REPLACE-
MENT OF PARTS. Repair or replacement of
any warranted part will be performed at no
charge to the owner at an approved ELEC-
TROLUX HOME PRODUCTS, INC., servic-
ing center. If you have any questions regard-
ing your warranty rights and responsibilities,
you should contact your nearest authorized
service center or call ELECTROLUXHOME
PRODUCTS, INC., at 1--800--554--6723.
For Parts Call K&T 606-678-9623 or 606-561-4983
www.mymowerparts.com

-- 11 --
WARRANTY PERIOD: Any warranted part
whichisnotscheduled forreplacementasre-
quired maintenance, or which is scheduled
only for regular inspection to the effect of “re-
pair or replace as necessary” shall be war-
ranted for 2 years. Any warranted part which
is scheduled for replacement as required
maintenanceshallbewarrantedfortheperiod
of time up to the first scheduled replacement
point for that part. DIAGNOSIS: The owner
shall not be charged for diagnostic labor
which leads to the determination that a war-
ranted part is defective if the diagnostic work
is performed at an approved ELECTROLUX
HOME PRODUCTS, INC., servicing center.
CONSEQUENTIAL DAMAGES: ELEC-
TROLUXHOME PRODUCTS,INC., may be
liable for damages to other engine compo-
nents caused by the failure of a warranted
part still under warranty. WHAT IS NOT
COVERED:All failures causedby abuse,ne-
glect, or improper maintenance are not cov-
ered.ADD--ON OR MODIFIED PARTS: The
use of add--on or modified parts can be
grounds for disallowing a warranty claim.
ELECTROLUXHOMEPRODUCTS,INC.,is
not liable to cover failures of warranted parts
caused by the use of add--on or modified
parts. HOW TO FILE A CLAIM: If you have
any questions regardingyour warrantyrights
andresponsibilities, you should contact your
nearest authorized service center or call
ELECTROLUXHOMEPRODUCTS,INC.,at
1--800--554--6723. WHERE TO GET WAR-
RANTY SERVICE: Warranty services or re-
pairs shall be provided at all ELECTROLUX
HOME PRODUCTS, INC., service centers.
Call 1--800--554--6723. MAINTENANCE,
REPLACEMENT AND REPAIR OF EMIS-
SION RELATED PARTS: Any ELECTRO-
LUXHOMEPRODUCTS,INC.,approvedre-
placement part used in the performance of
any warranty maintenance orrepair on emis-
sion related parts will be provided without
charge to the owner if the part is under war-
ranty. EMISSION CONTROL WARRANTY
PARTS LIST: Carburetor, Ignition System:
Spark Plug (covered up to maintenance
schedule),IgnitionModule. MAINTENANCE
STATEMENT: The owner is responsible for
the performance of all required maintenance
as defined in the instruction manual.
This engine is certified to be emissions compliant for the following use:
Moderate (50 hours)
Intermediate (125 hours)
Extended (300 hours)
For Parts Call K&T 606-678-9623 or 606-561-4983
www.mymowerparts.com
Other manuals for SB2000M
1
Table of contents
Other Snapper Blower manuals

Snapper
Snapper SLB552PN User manual

Snapper
Snapper 2100 HHB Operation and maintenance manual

Snapper
Snapper SLB514 User manual

Snapper
Snapper ELBC6152BV User manual

Snapper
Snapper SLB55150BV User manual

Snapper
Snapper XD SXDBL82 User manual

Snapper
Snapper SLBC55151BV User manual

Snapper
Snapper 1688056 User manual

Snapper
Snapper SB2000M User manual

Snapper
Snapper 7800959-00 User manual