SNOWJOE Sunjoe SJFP35-STN-BRL User manual

© 2020 by Snow Joe®, LLC
All rights reserved. Original instructions. SAVE THESE INSTRUCTIONS
1
A Division of Snow Joe®, LLC Model SJFP35-STN-BRL Form No. SJ-SJFP35-STN-BRL-880E-MR1
R
OPERATOR’S MANUAL
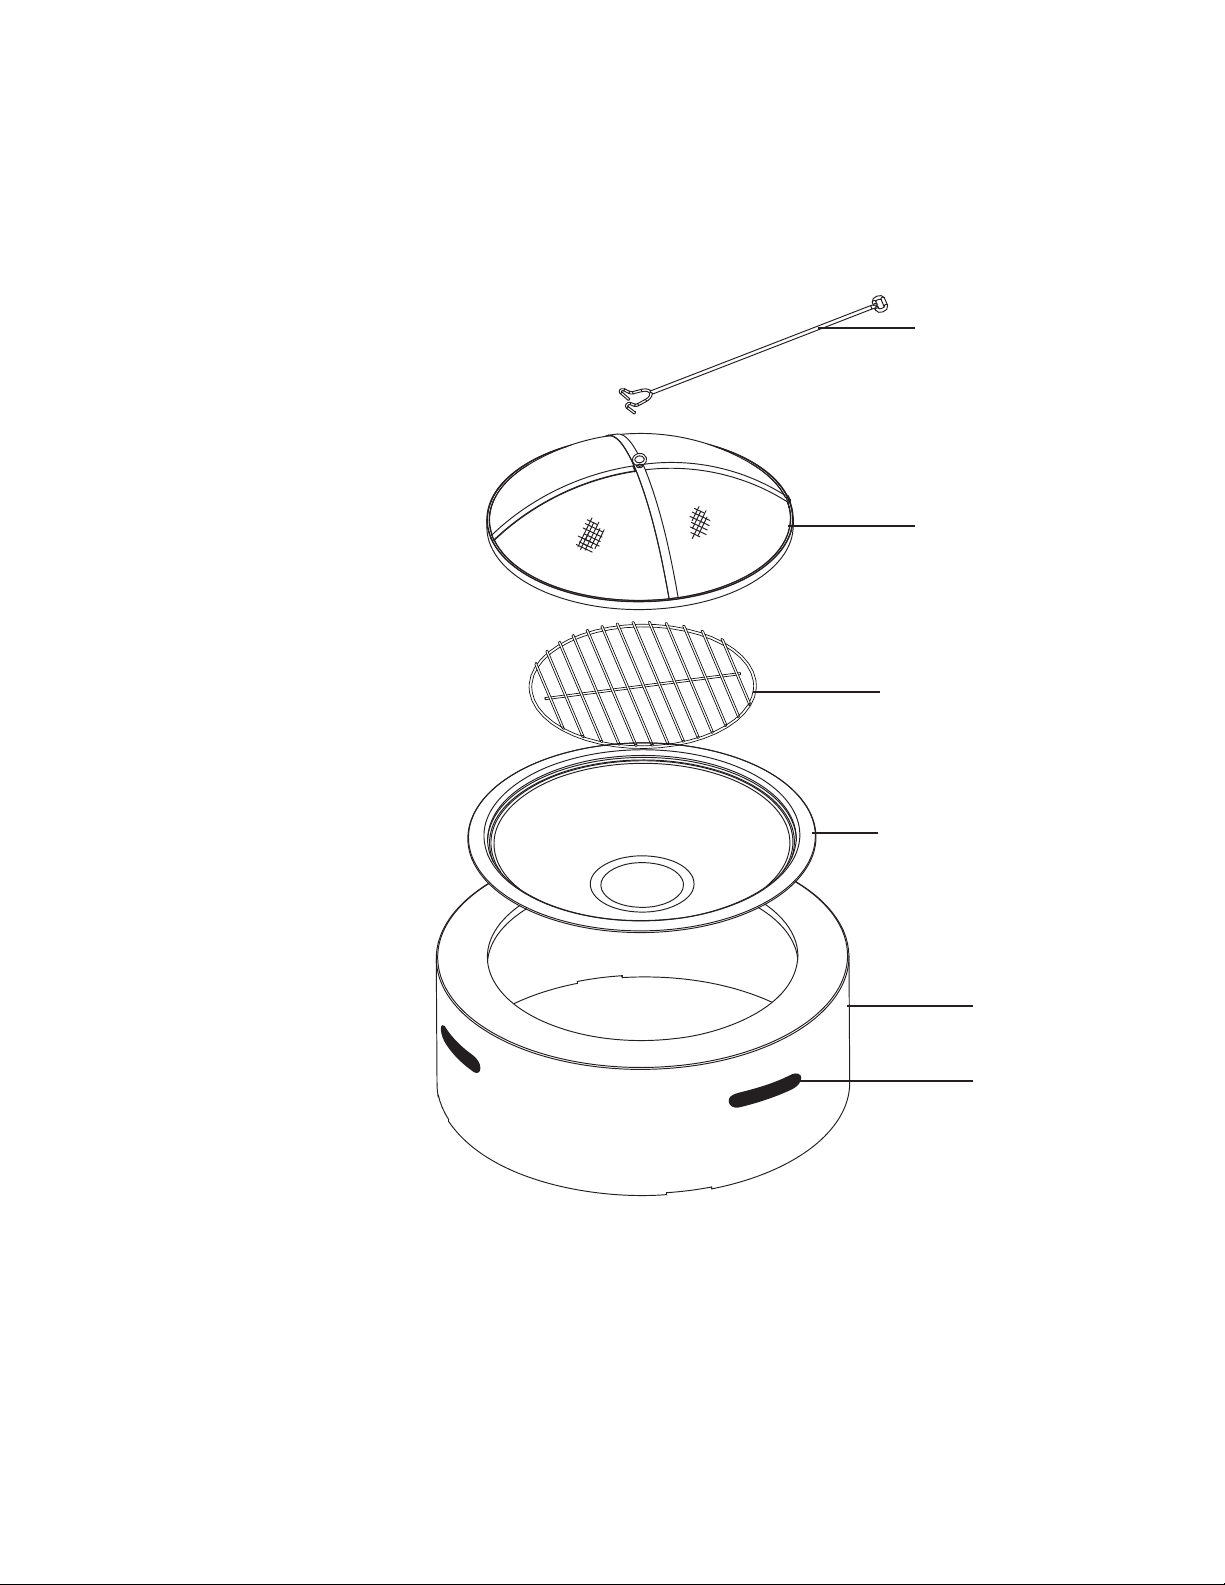
35-INCH CAST STONE FIRE PIT
PROTECTIVE SCREEN | SCREEN HOOK
IMPORTANT!
Safety Instructions
All Operators Must Read These
Instructions Before Use
Read all the instructions contained in this manual. Keep this
manual in a safe place, so that the information is available at
all times. If you give this equipment to another person, make
sure to provide these operating instructions. Basic safety
precautions should always be followed to reduce the risk of
re or explosion, which could cause property damage,
personal injury, or death.
Notice the personal safety alert symbol mused in this
manual to draw your attention to a WARNING given along
with the particular operating instruction. This means that
the operation requires special ATTENTION, CAUTION, and
AWARENESS.
mFOR OUTDOOR USE ONLY
(outside any enclosure)
mWARNING
1. Improper installation, adjustment, alteration, service, or
maintenance may result in property damage, injury, or
death.
2. Throughly read the instructions for installation, operation,
and maintenance before installing or servicing this
equipment.
3. Failure to follow these instructions could result in a re or
explosion, which could cause property damage, personal
injury, or death.
mWARNING
1. This item is for outdoor use only, and should NEVER be
used in a building, garage, or any other enclosed area.
2. DO NOT use this re pit for indoor heating. TOXIC carbon
monoxide fumes can accumulate and cause asphyxiation
or death.
3. This re pit is NOT for commercial use.
4. This re pit is NOT to be operated by children.
5. This re pit is NOT to be used in or on boats or
recreational vehicles.
6. DO NOT carry the re pit by the vents. To avoid injury,
keep hands away from vent openings while in use.
7. This re pit is NOT intended for cooking or food
preparation.
8. Always use this equipment in accordance with all
applicable local, state, and national regulations. Contact
your local re department for details on outdoor burning.
9. When using this re pit, exercise the same precautions as
you would with any open re.
10. The use of alcohol, prescription, or non-prescription drugs
may impair the consumer’s ability to properly assemble or
safely operate this re pit.
11. DO NOT use this re pit without reading this entire
manual and all WARNINGS, cautions, and instructions.
12. This re pit is designed for use with dry, seasoned
hardwood. Such wood will burn hotter, burn more
completely, and create less smoke.
13. DO NOT burn charcoal briquettes, lump charcoal,
manufactured logs, driftwood, trash, leaves, papers,
cardboard, plywood, or painted, stained, or pressure-
treated wood. Avoid using softwoods such as pine or
cedar that can throw sparks.
14. DO NOT alter this re pit in any manner.
15. DO NOT use this re pit until it is COMPLETELY
assembled and all parts are securely fastened and
tightened.
16. DO NOT store or use gasoline or other ammable vapors
or liquids in the vicinity of this or any other appliance.
17. DO NOT store or use an LP gas cylinder within 10 feet
(3.05 m) of this re pit while it is in operation.
18. DO NOT use this re pit near automobiles, trucks, vans, or
recreational vehicles.
19. DO NOT use in an explosive atmosphere. Keep outdoor
area clean and free from combustible materials, gasoline,
and other ammable liquids.
20. DO NOT use this re pit under an overhead or near any
unprotected combustible constructions. Avoid using near
or under overhanging trees and shrubs.
21. Always use this re pit on a hard level non-combustible
surface such as concrete, rock, or stone. An asphalt or
blacktop surface may not be acceptable for this purpose.
DO NOT use on wooden decks.
22. Always empty this re pit before each use.

2
23. DO NOT wear ammable or loose clothing when operating
this re pit.
24. DO NOT use in windy conditions.
25. DO NOT use this re pit unless protective screen is
securely in place.
26. DO NOT use gasoline, kerosene, diesel fuel, lighter uid,
or use these items to relight res.
27. Keep all electrical cords away from a hot re pit.
28. All surfaces of this re pit are hot when in operation.
To avoid burns, do NOT touch the re pit until it has
completely cooled, unless you are wearing protective
gear (i.e. pot holders, gloves, BBQ mittens, hot pads, etc.)
Never touch ashes or coals to see if they are hot.
29. DO NOT leave a lit re pit unattended, especially around
children and pets.
30. DO NOT attempt to move or store this re pit until all of
the ashes and coals are completely extinguished.
31. DO NOT remove ashes or coals until they are completely
extinguished.
32. Use heat-resistant gloves or hot pads when contacting
handles.
33. Use long, sturdy re pit tools when adding or moving logs.
34. DO NOT place wood directly onto the bottom of the re
pit. Place wood only on the log grid.
35. DO NOT overload the re pit. DO NOT add additional
rewood until the re burns down.
NOTICE: If any portion of the bowl lid or spark guard
of this re pit glows red, this indicates that the re pit is
overloaded.
36. DO NOT lean over this re pit when lighting or when in
use.
37. DO NOT place a hot spark guard or hot re pit tools onto
combustible surfaces such as grass, wooden decks, or
furniture.
38. Avoid breathing smoke from the re and avoid getting it
into your eyes.
39. This re pit should be thoroughly inspected and cleaned
on a regular basis.
40. After a period of storage and/or non-use, check for signs
of damage and creosote buildup. DO NOT operate until all
necessary repairs and/or proper cleaning procedures have
been successfully executed.
41. Death, serious injury, or damage to property may occur if
any of the above precautions are not followed exactly.

3
Know Your Fire Pit
Read the owner’s manual and safety rules carefully before using your re pit. Compare the illustration below to the actual unit in
order to familiarize yourself with the location of the various parts and hardware. Save this manual for future reference.
1
2
3
4
5
6
1. Screen hook
2. Protective screen
3. Log grid
4. Fire bowl
5. Cast stone base
6. Vent
Technical Data
Fire Bowl Diameter ............................................ 29.5 in. (75 cm)
Fire Bowl Depth................................................. 7 in. (18 cm)
Protective Screen Dimensions .......................... 26 in. x 6 in.
(66 cm x 15 cm)
Screen hook Dimensions ................................ 24 in. (61 cm)
Log Grid Diameter ........................................... 16.5 in. (42 cm)
Temperature Resistance.................................. 1,112 ºF (600 ºC)
Weight ............................................................. 57 lbs (25.9 kg)

4
Unpacking
NOTE: Before beginning assembly, make sure that all of
the parts and hardware listed below are present. If any part
is missing or damaged, do not attempt to assemble the
product. Contact the Snow Joe®+ Sun Joe®customer service
department at 1-866-SNOWJOE (1-866-766-9563).
Parts
1. Screen hook 4. Fire bowl
2. Protective screen 5. Cast stone base
3. Log grid
Hardware
6. M6 ring screw 7. M6 nut
Assembling the Fire Pit
No Tools Required
Choose a soft and level location for assembly. Remove all
parts from the packaging, and check for missing parts.
1. Attach the M6 ring screw to the protective screen using
the M6 nut (Fig. 1).
2. Place all parts on the cast stone base (Fig. 2).
Care and Maintenance
Lighting
1. Make sure there is only a small amount of ash in the
bottom of the bowl.
2. Place a layer of dry kindling or a natural re-starter onto
the center of the log grid.
3. Above the kindling or re-starter, place a layer of dry
seasoned hardwood that is cut to lengths that are no
more than 3/4 the diameter of the bowl.
4. Use a match to light the kindling or re-starter.
5. Using the screen hook that is provided and heat-resistant
gloves, replace the protective screen once the kindling or
re-starter is lit.
Fig. 1
Hardware Used: M6 ring screw (x1)
Hardware Used: M6 nut (x1)
M6 ring screw
Protective screen
M6 nut
Fig. 2
Screen hook
Protective
screen
Log grid
Fire bowl
Cast stone
base

5
Tending the Fire
You may need to shift and/or add logs for an ideal re pit
experience. DO NOT place a hot protective screen cover or hot
re pit tools onto combustible surfaces such as grass, wooden
decks, or furniture.
1. Using the screen hook that is provided and heat-resistant
gloves, carefully remove the protective screen.
2. Using a long-handled re pit tool, shift the coals and logs
to allow for additional air ow.
3. DO NOT add gasoline, kerosene, diesel fuel, lighter uid,
or alcohol to relight or enhance an existing re.
4. Use a match to light the kindling or re-starter.
5. Wait until glowing coals have developed before adding
any additional wood. If additional wood is required, place
the wood on top of the coals, taking care not to shift the
ashes.
Extinguishing
1. Let the re burn itself out.
2. DO NOT use water to extinguish the re. Such action is
dangerous and can cause irreversible damage to the re
pit.
Inspecting
This re pit should be inspected on a regular basis to ensure
product safety and longer product life.
m DO NOT attempt to inspect this re pit until the re is
COMPLETELY out and the re pit has COMPLETELY cooled.
1. Check components for any signs of damage or rust.
2. If damage to any component is detected, DO NOT use the
re pit until repairs are properly performed.
Cleaning
This re pit should be cleaned on a regular basis to promote
safer experiences and longer product life.
NOTE: After repeated use, a slight discoloration of the nish
may occur.
DO NOT attempt to clean this re pit until the re is
COMPLETELY out and the re pit has COMPLETELY cooled.
DO NOT use oven cleaner or abrasive cleaners as they will
damage this product.
DO NOT clean any part of this re pit in a self-cleaning oven as
this may damage the nish.
1. Wipe exterior surfaces with a mild dish washing detergent
or baking soda.
2. For stubborn surfaces, use a citrus-based degreaser and
a nylon scrubbing brush.
3. Rinse and clean with water.
4. Remove built-up creosote from components with a
chimney cleaning product.
Storage
DO NOT move or store this re pit until the re is
COMPLETELY out and the re pit is cool to the touch.
1. Once the re is out, the coals have completely cooled,
and the re pit can be safely handled, remove and
properly dispose of the ashes.
2. Store the re pit in a clean and dry location to maximize
product life.
3. Store the re pit assembled in a safe location away from
children and pets.
Support
If your Sun Joe® SJFP35-STN-BRL cast stone re pit requires
service or maintenance, please call 1-866-SNOWJOE
(1-866-766-9563) for assistance.
Model and Serial Numbers
When contacting the company, reordering parts, or arranging
service from an authorized dealer, you will need to provide
the model and serial numbers, which can be found on the
decal located on the unit. Copy these numbers into the space
provided below.
Record the following numbers from your new product:
Model #:
Serial #:
S J F P 3 5 - S T N - B R L

6
Optional Accessories
mWARNING! ALWAYS use only authorized Snow Joe® + Sun Joe®replacement parts and accessories. NEVER use
replacement parts or accessories that are not intended for use with this re pit. Contact Snow Joe® + Sun Joe®if you are
unsure whether it is safe to use a particular replacement part or accessory with your re pit. The use of any other attachment or
accessory can be dangerous and could cause injury or mechanical damage.
NOTE: Accessories are subject to change without any obligation on the part of Snow Joe® + Sun Joe®to provide notice of such
changes. Accessories can be ordered online at sunjoe.com or via phone by contacting the Snow Joe® + Sun Joe®customer
service center at 1-866-SNOWJOE (1-866-766-9563).
Screen hook
Protective screen
Log grid
Fire bowl
SJFP35-STN-E
SJFP35-STN-D
SJFP35-STN-C
SJFP35-STN-B
ModelAccessories Item
1
2
3
4

7R4_01282020
SNOW JOE®+ SUN JOE®CUSTOMER PROMISE
OUR WARRANTY:
Snow Joe warrants new, genuine, powered and non-powered Products to be free from defects in material or workmanship when used
for ordinary household use for a period of two years from the date of purchase by the original, end-user purchaser when purchased
from Snow Joe or from one of Snow Joe’s authorized sellers with proof of purchase. Because Snow Joe is unable to control the quality
of its Products sold by unauthorized sellers, unless otherwise prohibited by law, this Warranty does not cover Products purchased from
unauthorized sellers. If your Product does not work or there’s an issue with a specic part that is covered by the terms of this Warranty,
Snow Joe will elect to either (1) send you a free replacement part, (2) replace the Product with a new or comparable product at no
charge, or (3) repair the Product. How cool is that!
This Warranty gives you specific legal rights, and you may also have other rights which vary from State to State.
PRODUCT REGISTRATION:
Snow Joe strongly encourages you to register your Product. You can register online at snowjoe.com/register, or by printing and
mailing in a registration card available online from our website, or calling our Customer Service Department at 1-866-SNOWJOE
(1-866-766-9563), or by e-mailing us at [email protected]. Failure to register your Product will not diminish your warranty
rights. However, registering your Product will allow Snow Joe to better serve you with any of your customer service needs.
WHO CAN SEEK LIMITED WARRANTY COVERAGE:
This Warranty is extended by Snow Joe to the original purchaser and original owner of the Product.
WHAT IS NOT COVERED?
This Warranty does not apply if the Product has been used commercially or for non-household or rental applications. This Warranty also
does not apply if the Product was purchased from an unauthorized seller. This Warranty also does not cover cosmetic changes that do
not aect performance. Wearing parts like belts, augers, chains and tines are not covered under this Warranty, and can be purchased
at snowjoe.com or by calling 1-866-SNOWJOE (1-866-766-9563).
ABOVE ALL ELSE, Snow Joe, LLC (“Snow Joe”) is dedicated to you, our customer. We strive to make your experience as pleasant as
possible. Unfortunately, there are times when a Snow Joe®, Sun Joe®, or Aqua Joe® product (“Product”) does not work or breaks under
normal operating conditions. We think it’s important that you know what you can expect from us. That’s why we have a Limited Warranty
(“Warranty”) for our Products.

sunjoe.com
Table of contents
Other SNOWJOE Outdoor Fireplace manuals

SNOWJOE
SNOWJOE SUNJOE SJFP28-STN-RW User manual

SNOWJOE
SNOWJOE SUNJOE FIRE JOE SJFP30 User manual

SNOWJOE
SNOWJOE sunjoe SJFP35-STN User manual

SNOWJOE
SNOWJOE SUNJOE SJFP28-STN-CS User manual

SNOWJOE
SNOWJOE Martha Stewart MTS-FP35-FB User manual

SNOWJOE
SNOWJOE SUNJOE SJFP35-STN-LSN User manual

SNOWJOE
SNOWJOE Sunjoe SJFP35-RW-STN User manual

SNOWJOE
SNOWJOE SUNJOE SJFP35-STN-RWD User manual

SNOWJOE
SNOWJOE SUNJOE SJFP35-CS-STN User manual

SNOWJOE
SNOWJOE SUNJOE SJPPFP-CVR User manual