Snug Seat Hippo User manual

by
Hippo™
User Guide
PLEASE READ
INSTRUCTIONS
STORE UNDER
COVER


Table of Contents
Safety Information.................................................................................2
Warnings ...............................................................................................................2
Important Notes....................................................................................................4
Certification ...........................................................................................................5
Registration ...........................................................................................................5
Child Fit Information .............................................................................................6
Child Seat Features...............................................................................8
Child Seat Configurations ....................................................................................10
Recline Criteria......................................................................................................10
Tethering Criteria...................................................................................................10
Wedge Positioning System ..................................................................11
Vehicle Compatibility ............................................................................12
Incompatible Vehicle Seat Belts ..........................................................................12
Vehicle Buckle Positions ......................................................................................13
Vehicle Seating Positions.....................................................................................13
Installation: Rear-Facing.......................................................................14
LATCH Installation ................................................................................................14
Lap-Shoulder Belt Installation .............................................................................16
Lap-Belt Installation ..............................................................................................18
Installation: Forward-Facing.................................................................20
LATCH Installation ................................................................................................20
Lap-Shoulder Belt Installation..............................................................................22
Lap-Belt Installation ..............................................................................................24
Installation: Aircraft...............................................................................26
Installation: Versa-Tether ......................................................................27
Safety Information.................................................................................................27
Using the Versa-Tether .........................................................................................28
Tether Connector Strap........................................................................................29
Energy-Absorbing Tether .....................................................................................30
Child Seat Functions.............................................................................31
Recline Adjustment...............................................................................................31
Chest Clip..............................................................................................................32
HUGS Chest Pads................................................................................................32
Harness Buckle.....................................................................................................32
Adjusting the Harness Height..............................................................................33
Securing Your Child ..............................................................................34
Buckling and Tightening the Harness.................................................................34
Care and Maintenance..........................................................................36
Warranty .................................................................................................40
BRITAX®, HUGS™, Hippo™, and Versa-Tether® are trademarks owned by Britax Child Safety, Inc., and
registered in the U.S.A. and other countries. All rights reserved. ©2014 Britax Child Safety, Inc. This product
and its components are subject to change without notice. Printed in U.S.A. P617100_B:02.14
2 3
• Based on crash statistics, the National Highway Traffic Safety
Administration (NHTSA) recommends that parents select the back
seat as the safest location for a properly installed child seat. Please
study Vehicle Compatibility on pages 12 – 13 to ensure your child’s
safety and consult your vehicle owner’s manual.
• Secure this child seat even when it is not occupied. In a crash, an
unsecured child seat may injure vehicle occupants.
• To prevent injury due to deterioration or hidden damage,
discontinue use of a child seat that is older than six years or has
been in a moderate or severe crash. See Serial Number and
Manufactured Date Label located on child seat (see page 9).
• Do not use the lower anchors of the child restraint anchorage
system (LATCH system) to attach this child restraint when
restraining a child weighing more than 40 lbs (18 kg) with the
internal harnesses of the child restraint.
• The use of non-Britax Child Safety, Inc., covers, inserts, toys,
accessories, or tightening devices is not approved by BRITAX.
Their use could cause this child seat not perform as intended in a
crash.
WARNING!
DO NOT place child seat
rear-facing in the front seat of a vehicle with a
passenger air bag. DEATH or SERIOUS INJURY
can occur. See your vehicle owner’s manual for
child seat installation instructions. The back seat is
the safest place for children 12 and under.
WARNING!
Failure to follow all warnings and instructions could result in SERIOUS
INJURY or DEATH.
FIT REQUIREMENTS
• All references to child’s weight include weight of cast.
• For casted children, caregivers should consult with a medical
professional for special positioning requirements.
• Use only in a rear-facing position when using it with an infant
weighing less than 20 lbs (9.1 kg).
• Use only with children whose weight is between 5 and 65 lbs (2.3
– 29.4 kg) and whose height is 49 in. (124.5 cm) or less. Use rear-
facing for children whose weight is between 5 and 35 lbs (2.3 –
15.9 kg). Use forward-facing for children whose weight is between
20 and 65 lbs (9.1 – 29.4 kg).
• Snugly adjust the belts provided with this child restraint around
your child.
INSTALLATION
• Secure the top anchorage strap provided with this child restraint.
• Secure this child restraint with the vehicle’s child restraint
anchorage system if available, or with a vehicle belt.
• Child seat must be reclined when installed rear facing.
• Child seat must be in the full upright position when installed in
forward-facing mode with children whose weight is more than 40 lbs
(18 kg).
• HUGS chest pads must be used in forward-facing mode. Removal
of HUGS is optional only for rear-facing mode.
GENERAL USAGE
• Follow all instructions on this child restraint and in the written
instructions located under the child seat cover.
• Register your child restraint with the manufacturer.

4 5
Certification
This child seat system conforms to all applicable Federal Motor Vehicle
Safety Standards. This child seat is certified for use in motor vehicles
and aircraft.
Registration
Child seats can be recalled for safety reasons. You must register this
child seat to be reached in a recall. Send your name, address, and the
child seat’s model number and manufacturing date to Britax Child Safety,
Inc., 4140 Pleasant Road, Fort Mill, SC 29708 or call 1-888-427-4829, or
register online at www.BritaxUSA.com/registration. For recall information,
call the U.S. Government’s Vehicle Safety Hotline at 1-888-327-4236 (TTY
1-800-424-9153), or go to http://www.NHTSA.gov.
The Hippo is distributed by Snug Seat, Inc. For customer service call
1-800-336-7684 or write: Snug Seat, Inc., PO Box 1739 Matthews, NC
28106.
Serial Number:___________________________________
Batch Number:___________________________________
Date of Manufacture:______________________________
Safety Information
Important Notes
• Discontinue use of this child seat if it has been in a moderate
or severe crash. It is not necessary to replace a car seat after a
minor crash, defined by the US National Highway Traffic Safety
Administration (NHTSA) as:
a. The vehicle is drivable from the crash site; and
b. The vehicle door nearest the child seat was not damaged; and
c. No vehicle occupants were injured; and
d. There is no visible damage to the child seat; and
e. The airbags (if present) did not deploy.
• Cover the child seat when the vehicle is parked in direct sunlight.
Parts of child seat could become hot enough to burn a child.
• Store the child seat in a safe place when it is not being used. Avoid
placing heavy objects on top of it.
• Do not, except as described in this booklet, attempt to disassemble
any part of the child seat or change the way the harness or
vehicle’s seat belts are used.
• Never use the harness straps or harness adjuster strap to lift or
carry this child seat. Doing so could cause damage to harness
adjuster and webbing. Always carry this child seat by its shell or
tether strap.
• Do not use anything to raise the child seat off vehicle seat except
as described in these instructions. In a crash, this could cause the
child seat not to perform as intended.
Safety Information

6 7
Shoulder level
Above Shoulder Level
Below Shoulder Level
UprightReclined
Forward-Facing Harness Height
B
Safety Information
Forward-Facing
Use forward-facing only with children:
• who weigh between 20 –65 lbs (9.1 – 29.4 kg) and
• who are 49 in. (124.5 cm) or less in height and
• the top of the child’s ears are below the top of the child seat shell
and
• the harness straps are at or above the child’s shoulders, parallel
to level ground (Fig. B).
IMPORTANT: When using forward-facing recline mode, it may
become necessary to adjust the harness to a higher height than
would be used when the seat is upright. See Adjusting the Harness
Height on page 33.
Child Fit Information
The American Academy of Pediatrics recommends that all infants
and toddlers should ride in a Rear-Facing Car Seat until they are 2
years of age or until they reach the highest weight or height allowed
by their car seat manufacturer.
Rear-Facing
Use rear-facing only with children:
• who weigh between 5 –35 lbs (2.3 – 15.9 kg) and
• the top of the child’s head is at least 1 in.
(2.5 cm) below the top of the child seat shell
(Fig. A) and
• the harness straps are at or slightly below the
child’s shoulders.
If the child cannot be secured within these
requirements because the child exceeds height
or weight requirements, review the forward-
facing guidelines on page 7.
If the child cannot be secured within these requirements because
the child is too small, selection of a different child seat (such as an
infant carrier) may be required.
IMPORTANT: See Adjusting the Harness Height on page 33.
1 inch
2.5 cm
A
Safety Information
8 9
16
5
18
21
23
24
25
22
19
20
26
17
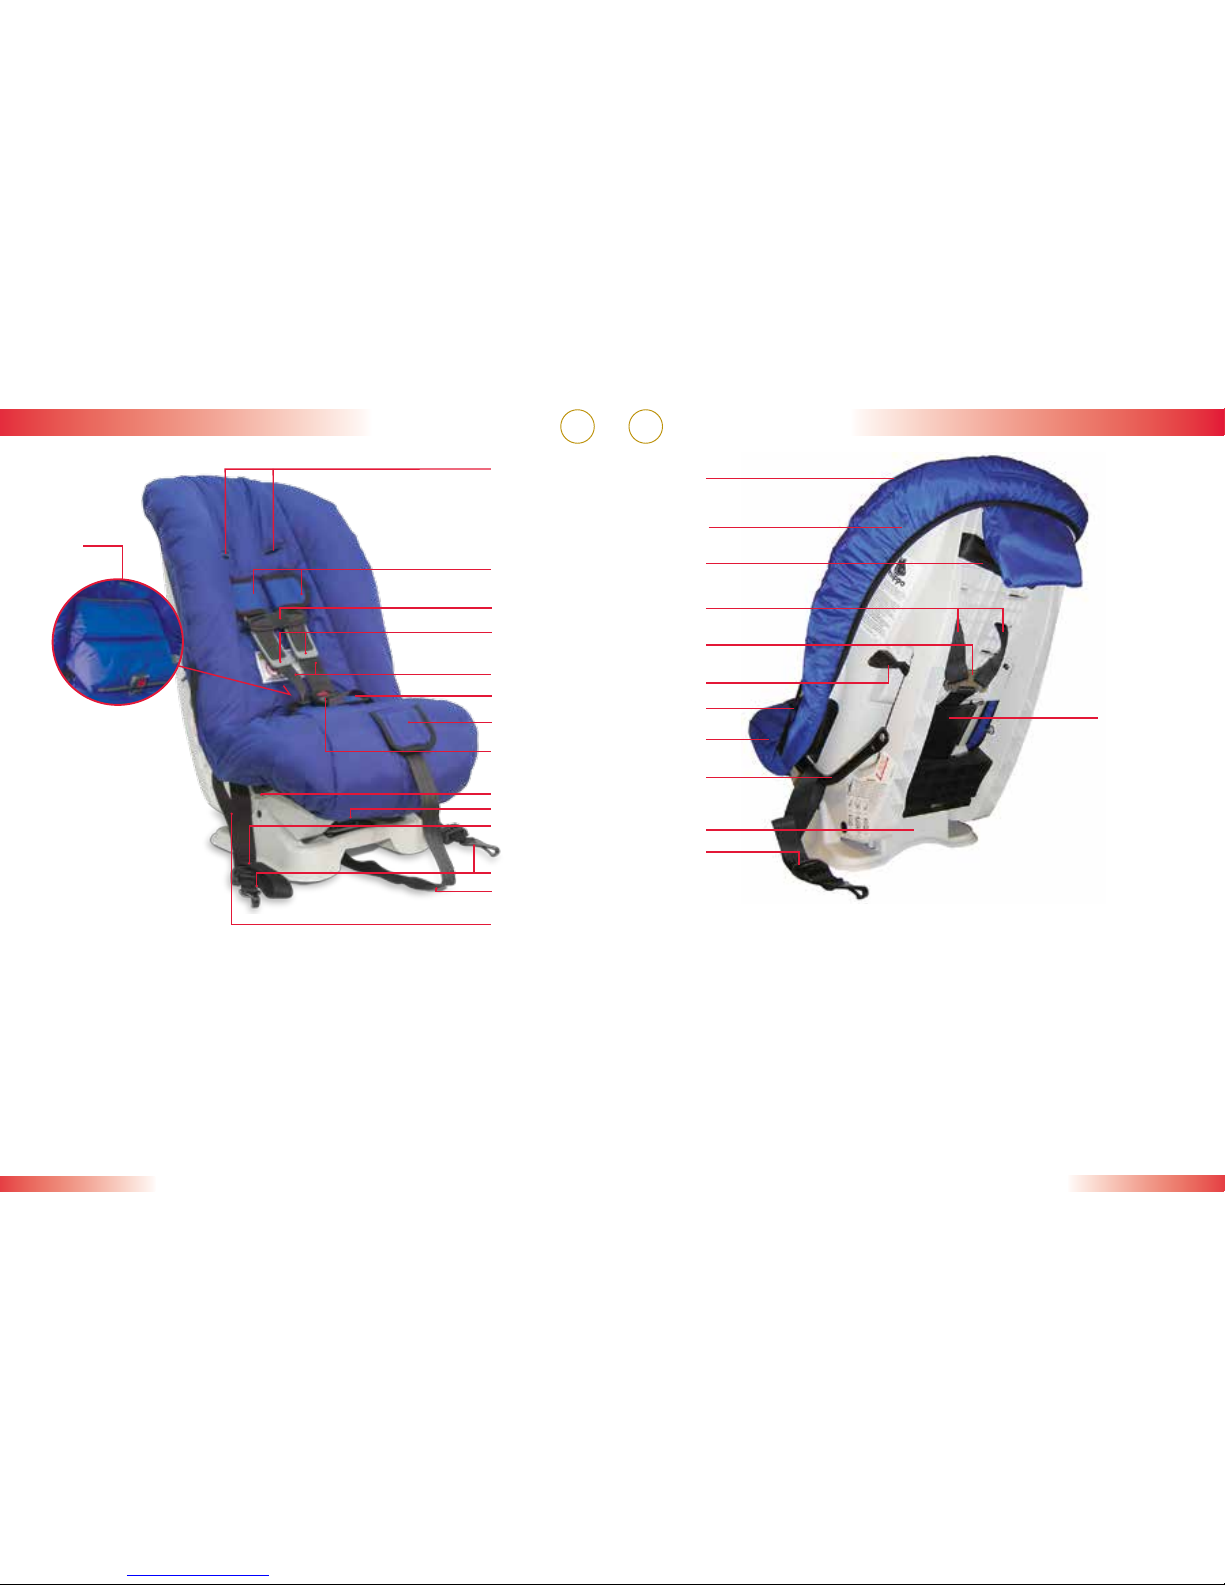
16 Cover
17 Serial Number and
Manufactured Date Label
(under cover)
18 Versa-Tether (Top Anchorage
Strap) in pouch
19 Harness Yoke
20 Forward-Facing Lock-off
21 Elastic Harness Holder
22 Pouch for LATCH Hook (under
cover)
23 LATCH Bar
24 Base
25 LATCH Adjuster Release
Button
26 Belt Shield
Child Seat Features
1
2
3
4
5
7
6
8
9
10
11
12
14
15
13
1 Harness Slots
2 Comfort Pads
3 Chest Clip
4 HUGS (Harness Ultra Guard
System) Chest Pads
5 Harness Straps
6 Belly Pad
7 Harness Adjuster Release
Lever (under flap)
8 Harness Buckle
9 Rear-Facing Lock-Off
10 Recline Handle
11 LATCH Adjuster
12 LATCH Hooks (in pouch #22)
13 Harness Adjuster Strap
14 LATCH Strap
15 Wedge Positioning System
(optional)
Child Seat Features
10 11
A wedge positioning system has been provided to assist in achieving a
snug fit. Consult a medical professional for proper use. See illustration
below for profile view of possible configurations.
A
B
C
Wedge Positioning System
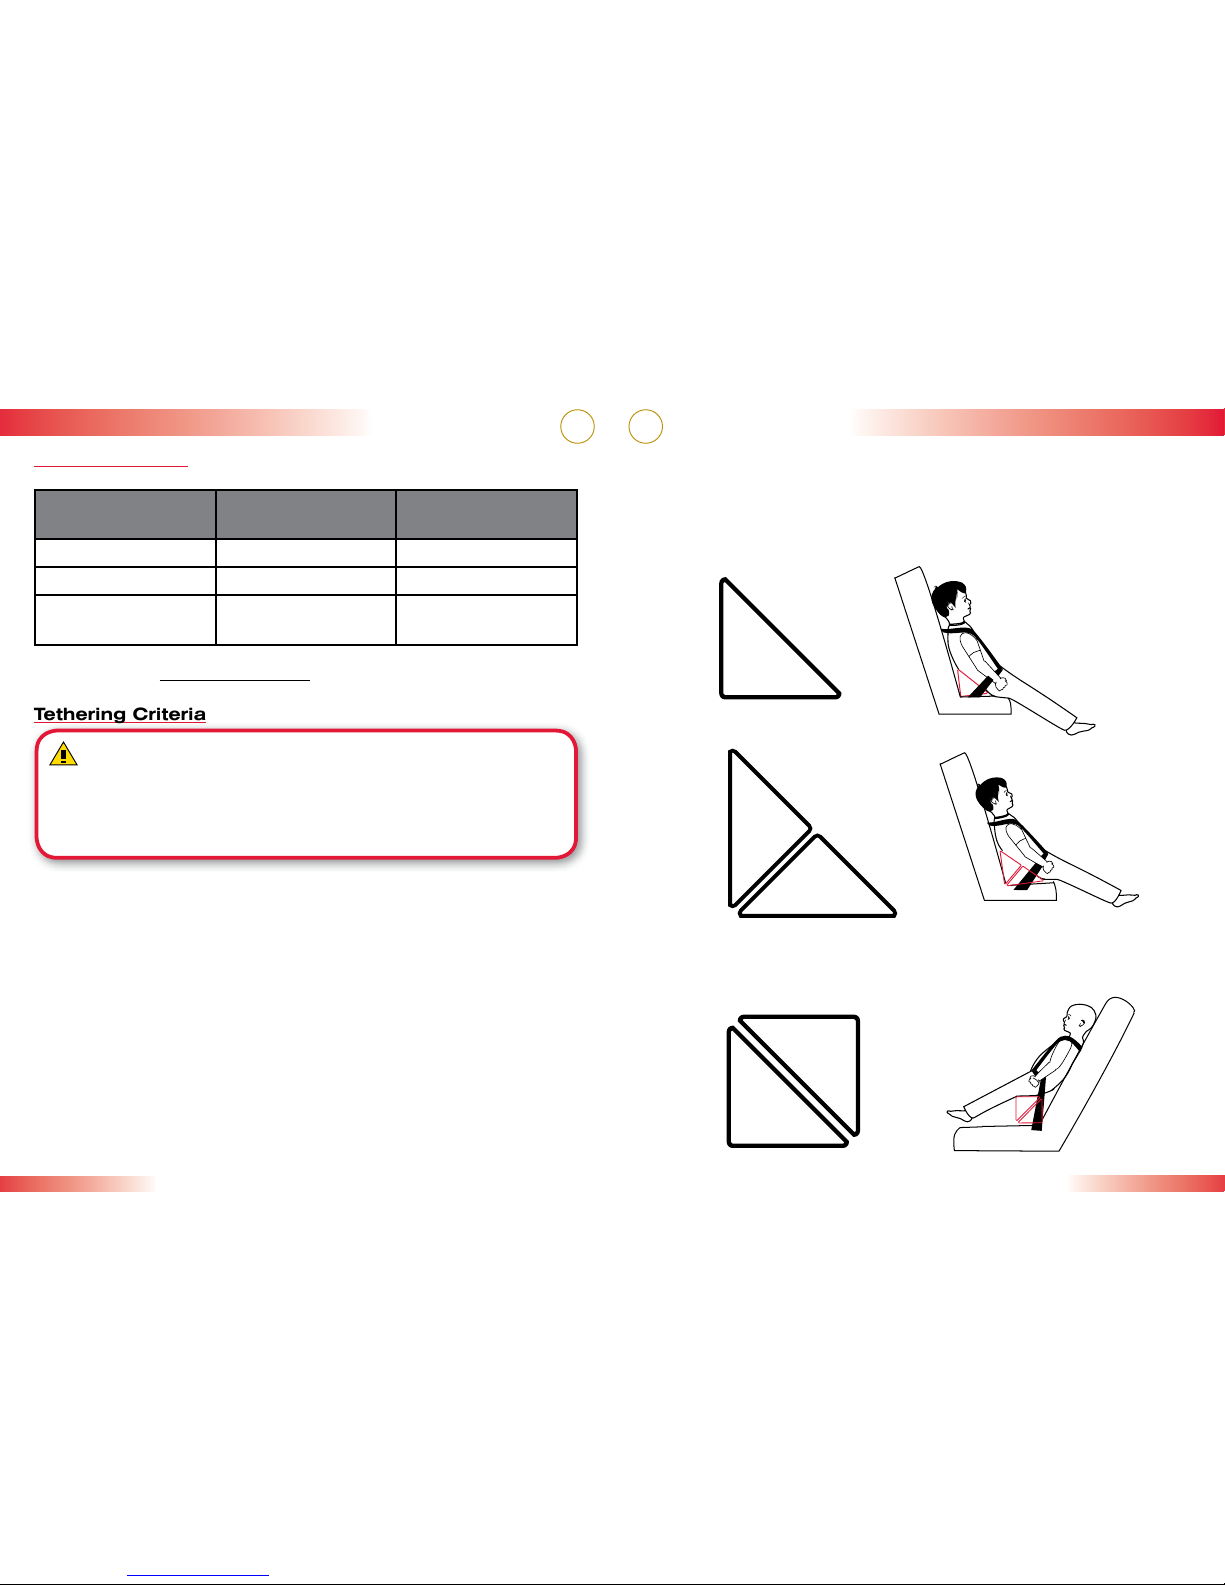
Recline Criteria
Restraint
Orientation
Position Child Weight
Rear-Facing Must be Reclined Max. 35 lbs (15.9 kg)
Forward-Facing Reclined or Upright Max. 40 lbs (18 kg)
Forward-Facing Must be Upright 40 -65 lbs
(18 - 29.4 kg)
See page 31 for Recline Adjustment.
Tethering Criteria
WARNING! Always use the Versa-Tether in the following
conditions:
• Forward-facing recline.
• For children weighing more than 40 lbs (18 kg).
Child Seat Configurations
Britax recommends that the tether always be used forward-facing.
Using the tether will improve the stability of your child restraint and
reduce the risk of injury.
12 13
Vehicle Buckle Positions
If the buckle lies near the incorrect position ( )
when the vehicle seat belt is tightened, try fitting the
child seat in another seating position in the vehicle
OR consult your vehicle owner’s manual to see if you
can lower the vehicle buckle position by twisting the
vehicle buckle stalk. If it is not possible to achieve
the correct position ( ) for the buckle, then another
seating position MUST be used.
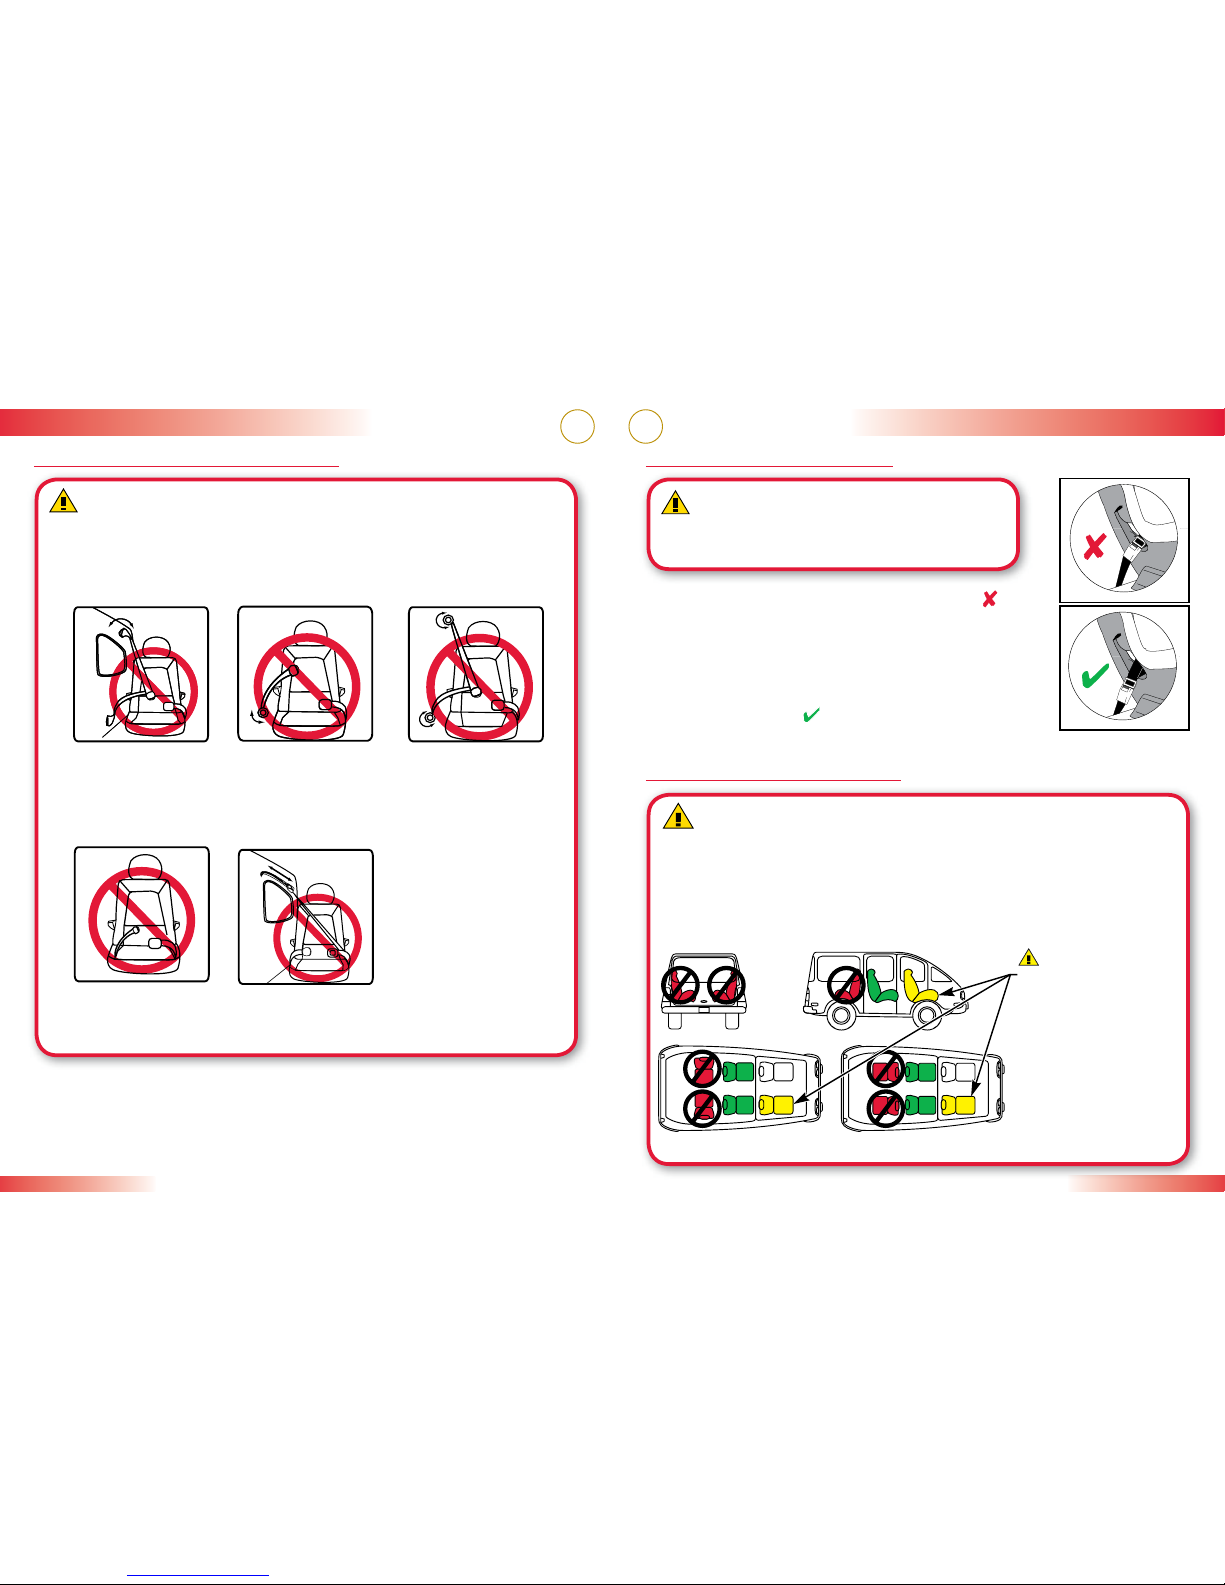
Vehicle Seating Positions
WARNING! The position of the
vehicle seat belt buckle can adversely affect the
stability of the child seat.
WARNING! Some vehicles have no seating positions which
are compatible with this child seat or any other child seat. If in doubt,
contact the vehicle manufacturer for assistance.
Forward-facing vehicle seats MUST be used with this child seat. Side-
facing or rear-facing seats CANNOT be used. See diagram below.
Vehicle Compatibility
DO NOT place a child seat
rear-facing in the front seat
of a vehicle with a
passenger air bag unless
deactivated. DEATH or
SERIOUS INJURY can
occur. See your vehicle
owner's manual for child
seat installation instruc-
tions. The back seat is the
safest place for children
12 and under.
WARNING!
WARNING! The following types of vehicle seat belts are NOT
compatible with this child seat. If any of the belt types listed below are
in the chosen seating position, choose another vehicle seating position
or check your vehicle owner’s manual for information on installing a car
seat in your vehicle.
Incompatible Vehicle Seat Belts
Vehicle Compatibility
Lap-shoulder belts
with top or bottom
anchor points on
the vehicle door.
Motorized, auto-
matic vehicle seat
belts.
Lap-shoulder belts
that have a sepa-
rate retractor each
for the lap section
and shoulder sec-
tion.
Lap belts forward
of the vehicle seat
bight.
Lap belts with a
sewn-in latch plate
that have a retrac-
tor that locks only
in case of a sudden
stop.
IMPORTANT: The Hippo car seat may not be compatible with
certain inflatable lap-shoulder belts. See FAQS in the support section
of the BRITAX website (www.britaxusa.com/support) for additonal
instructions.
14 15
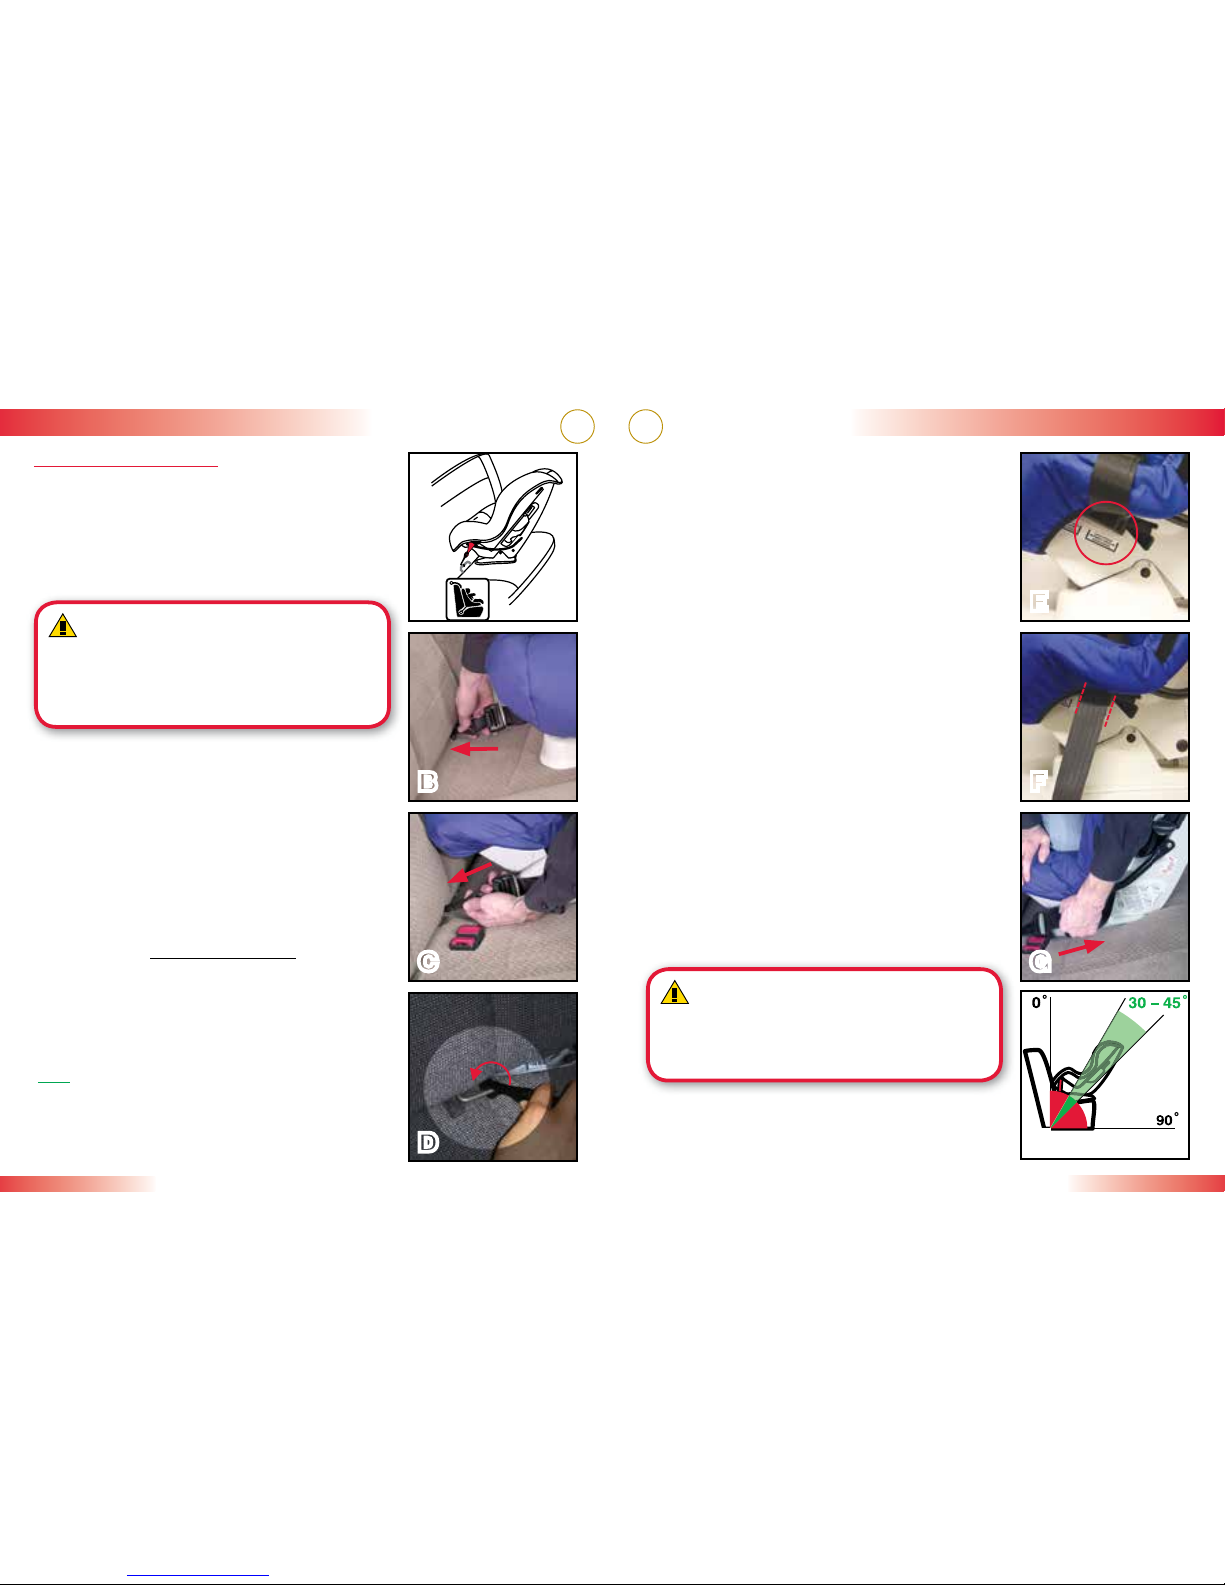
• Rear-facing installation can be improved
by the use of the Versa-Tether. See pages
27–30.
6 Align each LATCH strap on the LATCH bar
with the “LATCH Strap Here Rear-Facing”
label (Fig. E) on each side of the child seat.
(Fig. F).
7 Push the child seat firmly into the vehicle
seat while pulling each LATCH strap tight
(Fig. G).
8 Verify that all connections are secure, the
LATCH strap is aligned to the “LATCH Strap
Here Rear-Facing” label on each side of the
child seat, and that the child seat is stable.
• The child seat is secure when it cannot be
moved more than 1 in. (2.5 cm) front-to-
back or side-to-side at the belt path. If the
child seat is not secure, repeat the process
or use an alternate seating location.
• When properly installed in the rear-facing
position, the back angle of the child seat
should be 30° – 45° from vertical (not to
exceed 45°) when the car is parked on a
level surface (Fig. H).
• If necessary, the proper recline angle can
be achieved by placing a rolled towel or
pool noodle in the seat bight to level the
child seat’s base.
E
F
G
H
WARNING! Do NOT raise the child
seat off the front edge of the vehicle seat. This
could cause your child seat not to perform as
intended.
Installation: Rear-Facing
LATCH Installation
• Figure A illustrates a rear-facing LATCH
installation.
• Verify that your vehicle is equipped with
LATCH anchors. If LATCH anchors are not
available, you must use the vehicle belt
installation methods.
1 If stored, remove the LATCH hooks from the
LATCH storage pouches on the sides of the
child seat.
2 Press and hold the first LATCH adjuster
release button, then pull the LATCH strap to
full length. Repeat for the remaining LATCH
hook.
3 Recline the child seat and place rear-facing
on the vehicle seat. This child seat must be
in the reclined position when installed rear-
facing. See Recline Adjustment on page 31.
4 Attach one LATCH hook to its adjacent
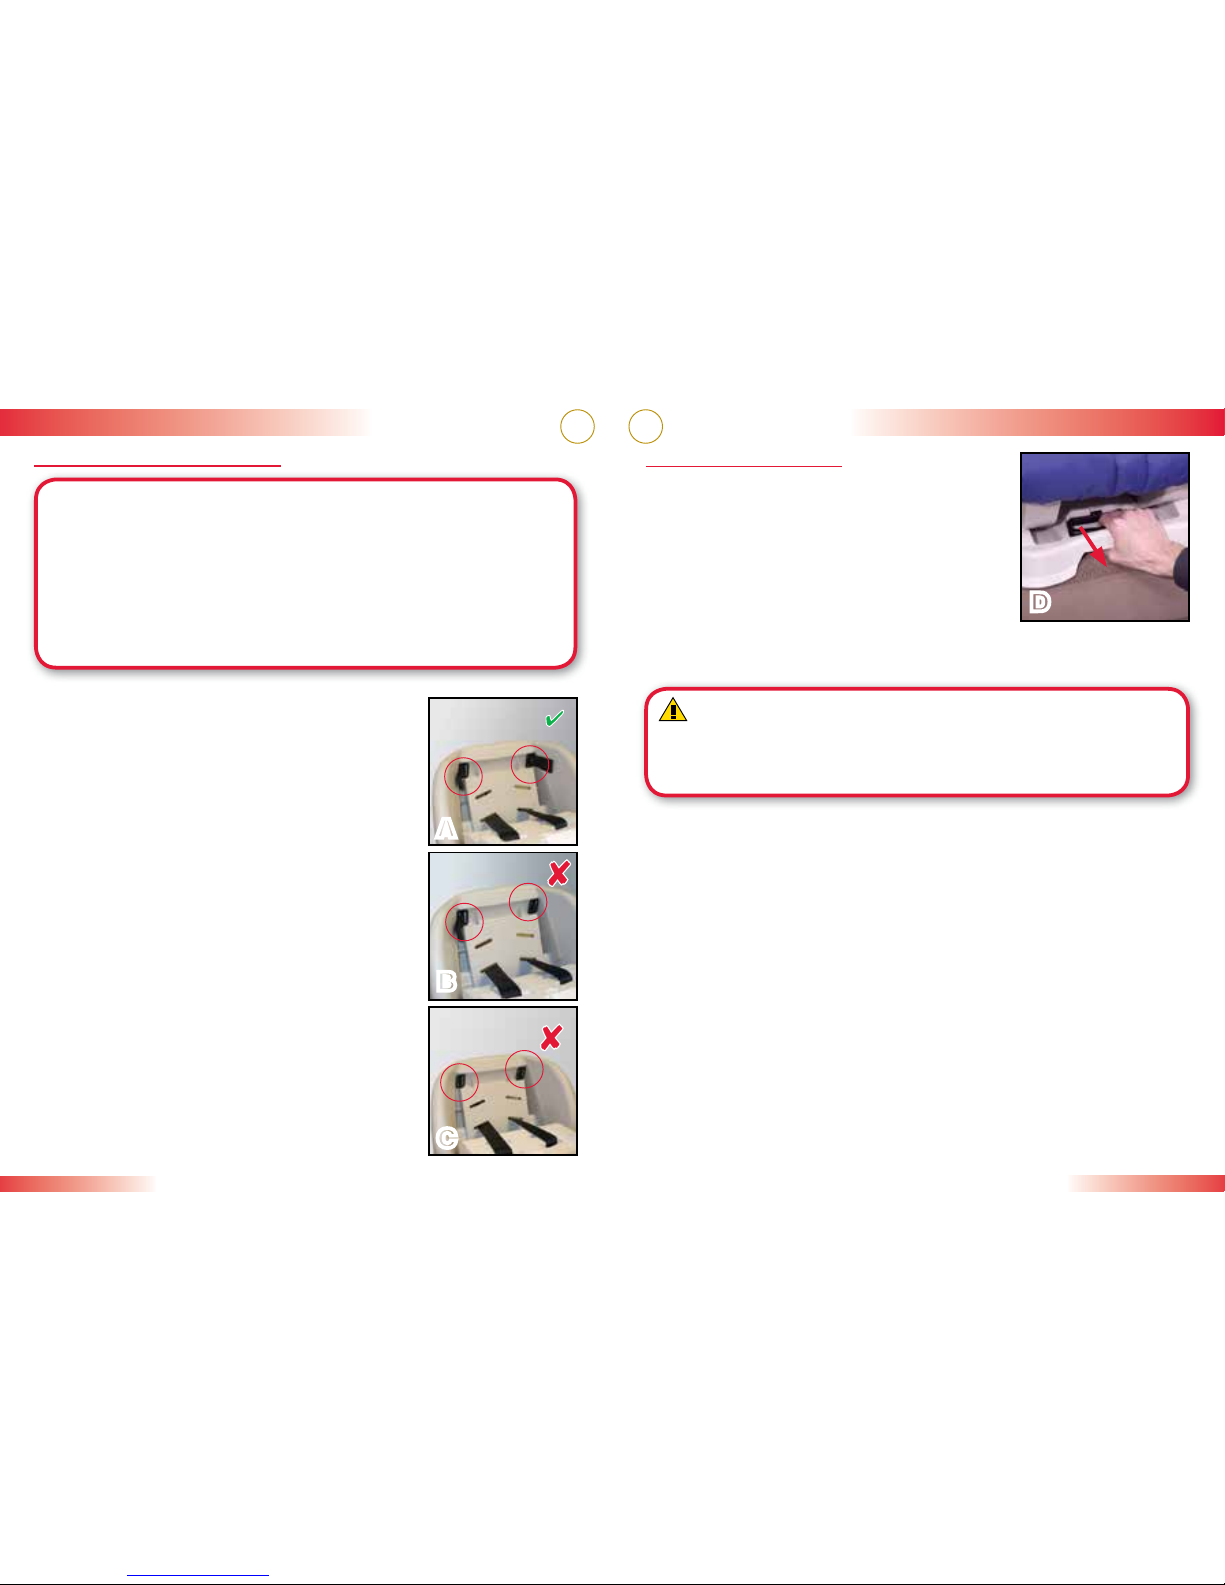
vehicle LATCH anchor (Fig. B).
• The LATCH hook MUST be attached over
the LATCH anchor (Fig. D).
• Pull on the hook to confirm attachment.
TIP:You may need to turn the front of the child
seat toward you for easier access to the
vehicle LATCH anchor.
5 Attach the remaining LATCH hook to its
adjacent vehicle LATCH anchor (Fig. C). D
B
C
Installation: Rear-Facing
A
WARNING! Do not use the lower
anchors of the child restraint anchorage
system (LATCH system) to attach this child
restraint when restraining a child weighing
more than 40 lbs (18 kg).
16 17
• Rear-facing installation can be improved by the use of the Versa-
Tether. See pages 27–30.
• To prevent damage, never extend the lock-
off arm beyond its normal open position and
always keep the lock-off closed when it is
not in use.
• Pre-crash locking vehicle seat belts will
lock in one of two places: the latch plate or
the retractor. If your vehicle seat belt system
includes a pre-crash locking feature, use
of the lock-offs is not required as long as
the vehicle seat belt is locked. Check your
vehicle owner’s manual to determine how
to lock your vehicle seat belt system when
installing a child restraint.
8 Verify that vehicle belt is tight and that the
child seat is secure.
• The child seat is secure when it cannot be
moved more than 1 in. (2.5 cm) front-to-
back or side-to-side at the belt path. If the
child seat is not secure, repeat the process
or use an alternate seating location.
• When properly installed in the rear-facing
position, the back angle of the child seat
should be 30° – 45° from vertical (not to
exceed 45°) when the car is parked on a
level surface (Fig. G).
• If necessary, the proper recline angle can
be achieved by placing a rolled towel or
pool noodle in the seat bight to level the
child seat’s base.
E
F
G
WARNING! Do NOT raise the child seat off the front edge of the
vehicle seat. This could cause your child seat not to perform as intended.
Installation: Rear-Facing
Lap-Shoulder Belt Installation
• Figure A illustrates a rear-facing, lap-
shoulder belt installation.
• When not in use, always store the LATCH
hooks in the storage pouches. See page 9.
1 Recline the child seat and place it rear-
facing on the vehicle seat. This child
seat must be in the recline position when
installed rear-facing. See Recline Adjustment
on page 31.
2 Lift the cover to open the rear-facing lock-off
farthest from where the vehicle belt will be
buckled (Fig. B).
3 Pull the vehicle belt out, then pass it under
the LATCH bar and through the rear-facing
belt slot (Fig. C).
• The vehicle belt can be routed over or
under cover.
4 Route the vehicle belt across seat then
through the opposite rear-facing belt slot
and under the LATCH bar (Fig. D).
IMPORTANT: The vehicle belt must rest behind
the child seat buckle strap (Fig. D).
5 Verify that the vehicle belt is not twisted,
position the lap belt portion through the
open lock-off, then buckle (Fig. E).
6 Push the child seat firmly into the vehicle
seat while removing slack first from the lap
portion of the vehicle belt, then the shoulder
portion.
7 Position both sections of the vehicle belt
through the open lock-off, tighten belt, close
the lock-off arm (Fig. F) and replace the
cover.
• The lock-off is properly closed when a click
is heard.
A
D
B
C
Installation: Rear-Facing

18 19
• The child seat is secure when it cannot be
moved more than 1 in. (2.5 cm) front-to-
back or side-to-side at the belt path. If the
child seat is not secure, repeat the process
or use an alternate seating location.
• When properly installed in the rear-facing
position, the back angle of the child seat
should be 30° – 45° from vertical (not to
exceed 45°) when the car is parked on a
level surface (Fig. G).
• If necessary, the proper recline angle can
be achieved by placing a rolled towel or
pool noodle in the seat bight to level the
child seat’s base.
• Pre-crash locking vehicle seat belts will lock
in one of two places: the latch plate or the
retractor. If your vehicle seat belt system
includes a pre-crash locking feature, use
of the lock-offs is not required as long as
the vehicle seat belt is locked. Check your
vehicle owner’s manual to determine how
to lock your vehicle seat belt system when
installing a child restraint.
8 Verify that vehicle belt is tight, locked, and
that the child seat is secure.
WARNING! Do NOT install this seat
with a non-locking, two-point Emergency
Locking Retractor (ELR) vehicle belt.
E
G
• Rear-facing installation can be improved by the use of the Versa-
Tether. See pages 27–30.
F
WARNING! Do NOT raise the child seat off the front edge of the
vehicle seat. This could cause your child seat not to perform as intended.
Installation: Rear-Facing
Lap-Belt Installation
• Figure A illustrates a rear-facing, lap-belt
installation.
• When not in use, always store the LATCH
hooks in the storage pouches. See page 9.
1 Recline the child seat and place it rear-
facing on the vehicle seat. This child
seat must be in the recline position when
installed rear-facing. See Recline Adjustment
on page 31.
2 Lift the cover and open the rear-facing lock-
off farthest from where the vehicle belt will
be buckled (Fig. B).
3 Pull the vehicle belt out, then pass it under
the LATCH bar and through the rear-facing
belt slot (Fig. C).
• The vehicle belt can be routed over or
under cover.
4 Route the vehicle belt across the child seat
then through the opposite rear-facing belt
slot and under the LATCH bar (Fig. D).
IMPORTANT: The vehicle belt must rest behind
the child seat buckle strap.
5 Verify that the vehicle belt is not twisted,
position the lap belt portion through the
open lock-off, then buckle (Fig. E).
6 Push the child seat firmly into the vehicle seat
while removing slack from the vehicle belt.
7 Tighten the belt, close the lock-off arm and
replace the cover (Fig. F).
• The lock-off is properly closed when a click
is heard.
• To prevent damage, never extend the lock-off
arm beyond its normal open position and
always keep the lock-off closed when not in
use.
A
B
C
D
Installation: Rear-Facing

20 21
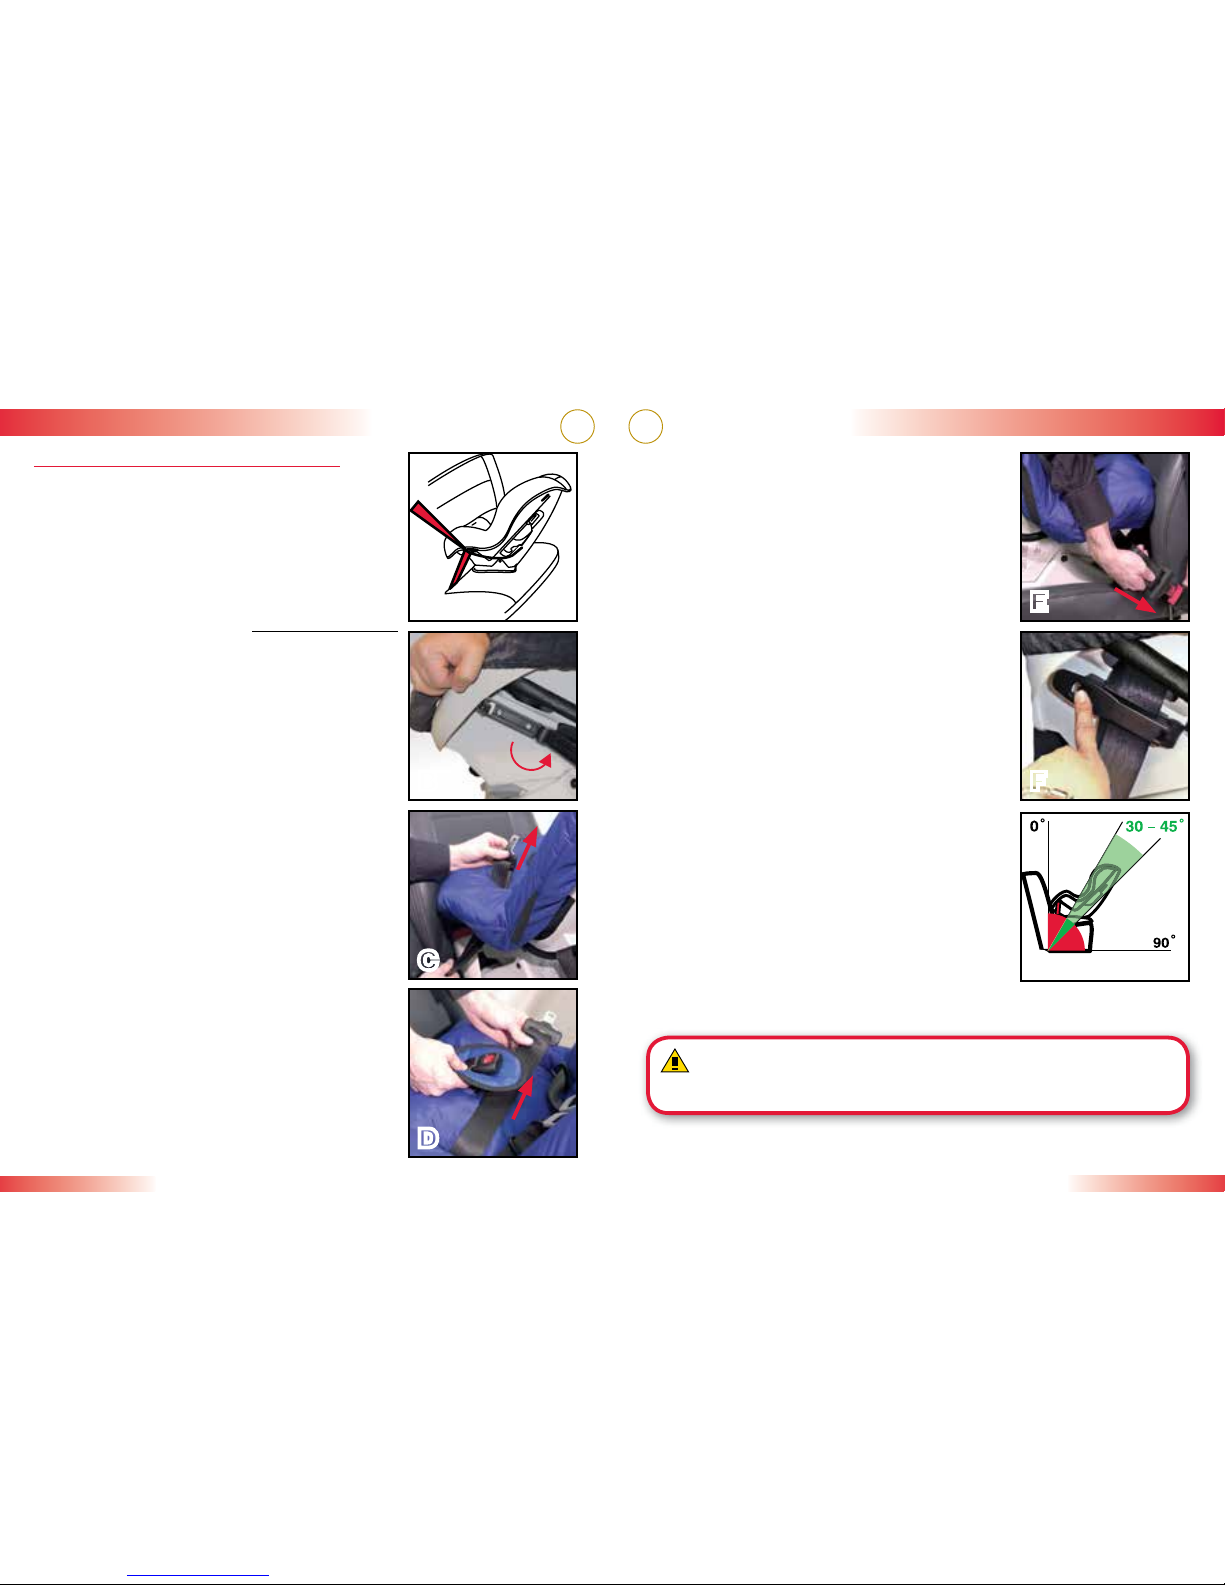
5 Attach one LATCH hook to its adjacent
vehicle LATCH anchor (Fig. B).
• The LATCH hook MUST be attached over
the LATCH anchor (Fig. C).
• Pull on the hook to confirm attachment.
6 Attach the remaining LATCH hook to its
adjacent vehicle LATCH anchor (Fig. D).
7 Push the child seat firmly into the vehicle seat
while pulling each LATCH strap tight (Fig. E).
8 Attach the Versa Tether hook to the vehicle’s
designated tether anchor for the chosen
seating position. Remove all slack from the
tether to secure. Store excess webbing in
the tether pouch. See pages 27 – 30.
9 Verify that all connections are secure and that
the child seat is stable.
• The child seat is secure when it cannot
be moved front- to-back or side-to-side
more than 1 in. (2.5 cm) at the belt path.
If the child seat is not secure, repeat the
installation process or use an alternate
seating location.
C
Installation: Forward-Facing
B
D
E
• Figure A illustrates a forward-facing LATCH
installation.
• Verify that your vehicle is equipped with
LATCH anchors. If LATCH anchors are
not available, you must use vehicle belt
installation methods.
1 If stored, remove the LATCH connectors
from the storage pouches under the cover.
See page 9.
2 Press and hold the first LATCH adjuster
release button, then pull the LATCH strap to full length. Repeat for
the remaining LATCH hook.
3 Remove the Versa-Tether from the pouch and place it up and over
the child seat back.
4 Place the child seat forward-facing on the vehicle seat.
TIP:You may need to raise or remove the vehicle head restraint to
achieve best fit of the child seat.
LATCH Installation
WARNING!
• Do not use the lower anchors of the child restraint anchorage
system (LATCH system) to attach this child restraint when
restraining a child weighing more than 40 lbs (18 kg).
• This child seat must be in full upright position when installed
forward-facing for children who weigh more than 40 lbs (18 kg).
• Always use the Versa-Tether with forward-facing recline.
• Always use the Versa-Tether with children weighing more than
40 lbs (18 kg).
Installation: Forward-Facing
A
22 23
TIP:Turning the back of the child seat toward
you can make routing the vehicle belt
easier (Fig. C).
5 Verify that the vehicle belt is not twisted and
is routed over the LATCH bars, then buckle
(Fig. D).
6 Push the child seat firmly into the vehicle
seat while removing slack first from the lap
portion of the vehicle belt, then the shoulder
portion (Fig. E).
7 Hold the shoulder belt tight, then rotate the
lock-off until the vehicle belt is secured (Fig. F).
• Pre-crash locking vehicle seat belts will
lock in one of two places: the latch plate or
the retractor. If your vehicle seat belt system
includes a pre-crash locking feature, use
of the lock-offs is not required as long as
the vehicle seat belt is locked. Check your
vehicle owner’s manual to determine how
to lock your vehicle seat belt system when
installing a child restraint.
8 Attach the Versa-Tether hook to the designated
tether anchor (if available according to the
vehicle owner’s manual) for the chosen
seating position. Remove all slack from the
tether to secure. Store excess webbing in the
tether pouch. See pages 27–30.
9 Verify that the vehicle belt is tight and the
child seat is secure.
• The child seat is secure when it cannot be moved front-to-back or
side-to-side more than 1 in. (2.5 cm) at the belt path. If the child
seat is not secure, repeat this process or use an alternate seating
location.
D
E
F
Installation: Forward-Facing
1 Place the child seat forward-facing on the
vehicle seat. Ensure the bottom of the child seat
base is in full contact with the vehicle seat.
TIP:You may need to raise or remove the vehicle
head restraint to achieve best fit of the child
seat.
2 If the vehicle is equipped with a designated
tether anchor for the chosen seating
position, remove the Versa-Tether from the
pouch and place it up and over the child seat back.
3 Rotate the lock-off lever to open the forward-facing lock-off farthest
from where the vehicle belt will be buckled.
4 Pull vehicle belt out, then pass it over the LATCH bar, through the
forward-facing belt path, then over the LATCH bar on the opposite
side (Fig. B).
Lap-Shoulder Belt Installation
• Figure A illustrates a forward-facing lap-
shoulder belt installation.
• When not in use, always store the LATCH
connectors in the storage slots. See page 9.
A
B
C
Installation: Forward-Facing
WARNING!
• This child seat must be in full upright
position when installed forward-facing
for children who weigh more than 40 lbs
(18 kg).
• Always use the Versa-Tether with
forward-facing recline.
• Always use the Versa-Tether with
children weighing more than 40 lbs
(18 kg).

24 25
6 Attach the Versa-Tether hook to the
designated tether anchor (if available
according to the vehicle owner’s manual)
for the chosen seating position. Remove all
slack from the tether to secure. Store excess
webbing in the tether pouch. See pages
27–30.
7 Verify that the vehicle belt is tight, locked and the child seat is
secure.
• The child seat is secure when it cannot be moved front-to-back or
side-to-side more than 1 in. (2.5 cm) at the belt path. If the child
seat is not secure, repeat this process or use an alternate seating
location.
4 Verify that the vehicle belt is not twisted, is
routed under the LATCH bars, then buckle
(Fig. D).
5 Push the child seat firmly into the vehicle
seat while removing slack from the vehicle
belt (Fig. E).
WARNING! Do NOT use this seat
with a non-locking, two-point Emergency
Locking Retractor (ELR) vehicle belt.
D
E
Installation: Forward-Facing
Lap-Belt Installation
• Figure A illustrates a forward-facing, lap-belt
installation.
• When not in use, always store the LATCH
connectors in the storage slots. See page 9.
1 Place the child seat forward-facing on the
vehicle seat. Ensure the bottom of the child seat
base is in full contact with the vehicle seat.
TIP: You may need to raise or remove the
vehicle head restraint to achieve best fit of
the child seat.
2 If the vehicle is equipped with a designated
tether anchor for the chosen seating
position, remove the Versa-Tether from the pouch and place it up
and over the child seat back.
3 Pull the vehicle belt out, then pass it under the LATCH bar, through
the forward-facing belt path, then under the LATCH bar on the
opposite side (Fig. B).
TIP: Turning the back of the child seat toward you can make routing
the vehicle belt easier (Fig. C).
A
B
C
Installation: Forward-Facing
WARNING!
• This child seat must be in full upright
position when installed forward-facing
for children who weigh more than 40 lbs
(18 kg).
• Always use the Versa-Tether with
forward-facing recline.
• Always use the Versa-Tether with
children weighing more than 40 lbs
(18 kg).
26 27
WARNING!
• When using the child seat in forward-facing mode, attach the
Versa-Tether only to tether anchors designated by the vehicle
manufacturer as tether anchorage points. Use of other locations
is not approved or permitted.
• Do NOT modify the vehicle without advice from the vehicle
manufacturer if a tether anchorage is not available.
• Do NOT hook the Versa-Tether to the bottom of a vehicle seat
adjuster.
• Always use the Versa-Tether with forward-facing recline.
• Always use the Versa-Tether with children weighing more than
40 lbs (18 kg).
Safety Information
IMPORTANT:
• Britax recommends that the tether be used at all times. Using the
tether will improve the stability of the child seat and reduce the risk of
injury.
• If your vehicle does not currently have a tether anchor attachment,
refer to your vehicle owner’s manual or contact the vehicle
manufacturer for assistance.
Installation: Versa-Tether
This child seat is certified for aircraft use. Most
airlines in the U.S. and Canada will allow the use of
a child seat as long as it is labeled as an approved
child seat for airline use and fits properly on the
aircraft seat. Contact the airline about their policy
prior to traveling.
The FAA recommends that a child weighing up to 40 lbs (18 kg) use a
certified, harnessed child seat while traveling on an aircraft.
Install your child seat in a window seat to avoid blocking the aisle.
If the aircraft lap belt is too short, ask the flight attendant for a belt
extender.
Rear-Facing Installation
For rear-facing aircraft installation (Fig. A), follow
Rear-Facing Lap-Belt Installation instructions on
pages 18–19.
4To aid installation on aircraft, open the
rear-facing lock-offs to allow routing of large
buckles.
Forward-Facing Installation
For forward-facing aircraft installation (Fig. B),
follow Forward-Facing Lap-Belt Installation
instructions on pages 24–25.
A
B
Installation: Aircraft

28 29
WARNING!
Only use the tether connector strap for
rear-facing tether installation when there is NOT a designated vehicle
tether anchor.
D
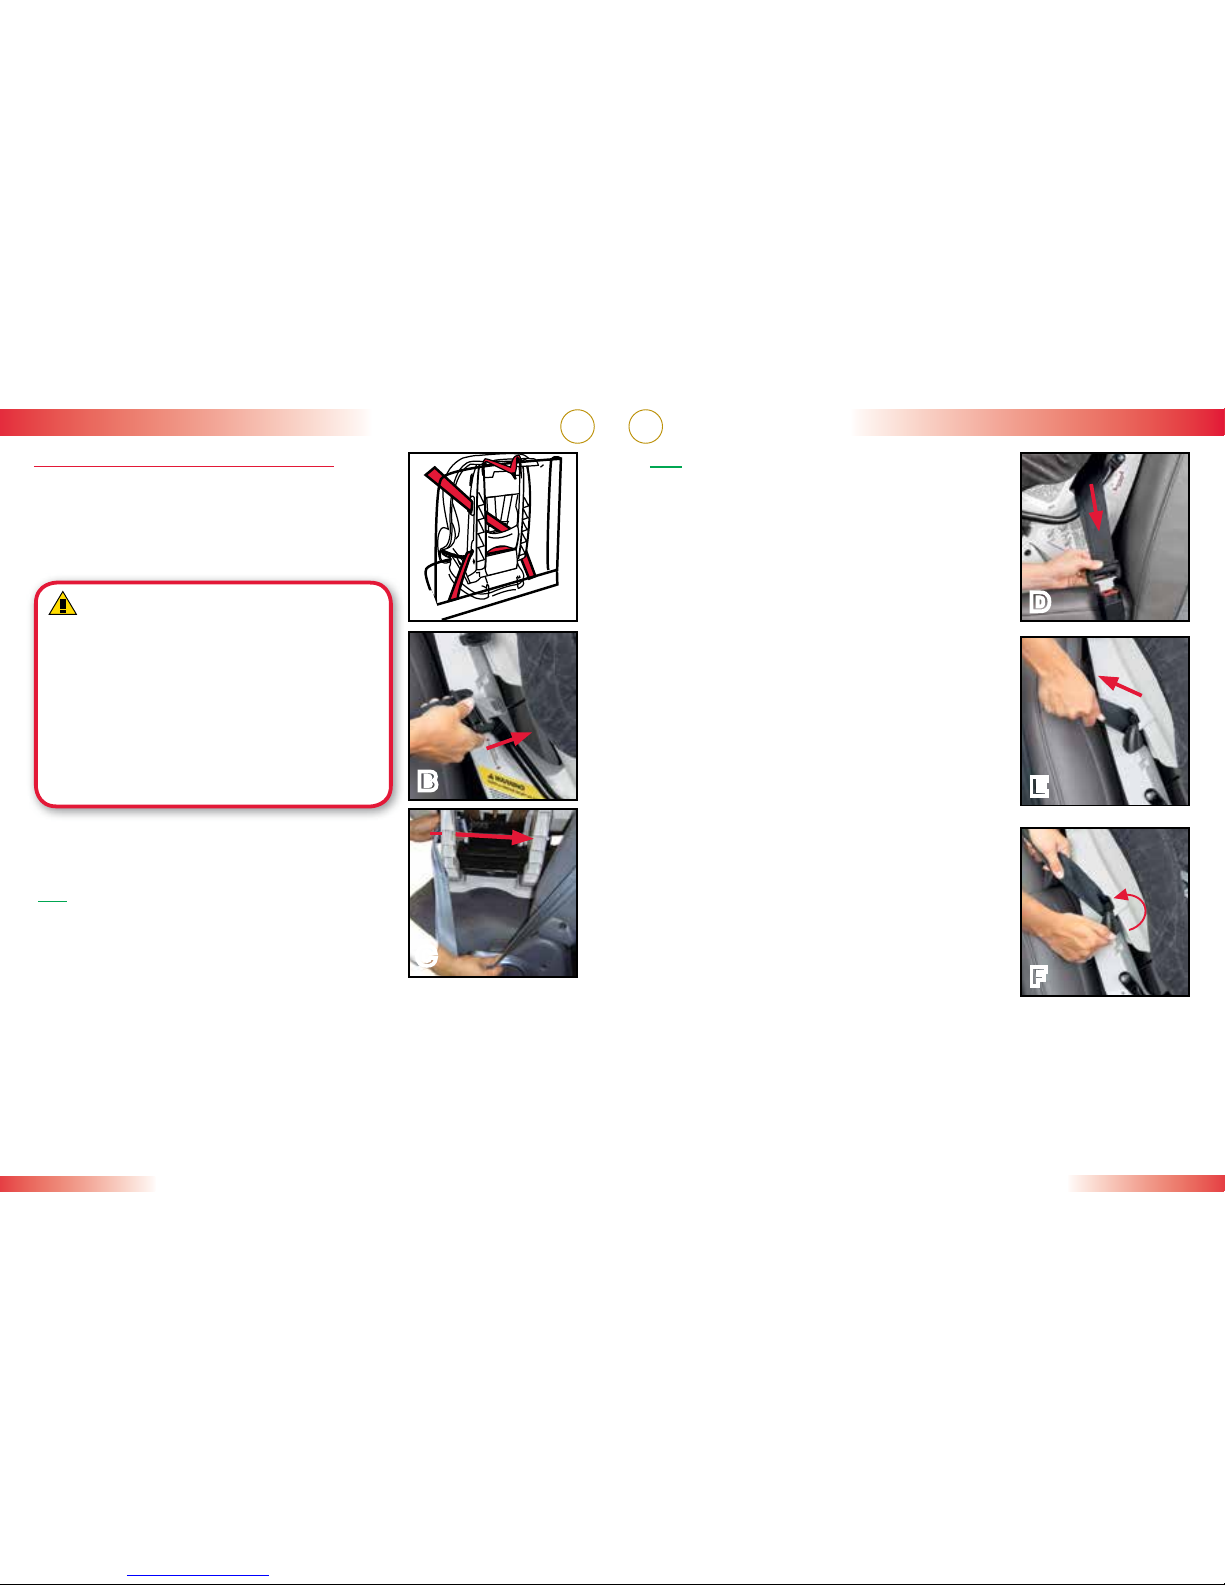
Tether Connector Strap
NOTE: Britax child seats are shipped with the tether connector strap
attached to the Versa-Tether hook. When not in use with rear-facing
installations that have designated tether anchors or forward-facing
installations, store the tether connector strap in the tether pouch.
Because every vehicle model is different,
sometimes you cannot find a location to
properly anchor the tether. Use the tether
connector strap to assist in creating an
anchor point (Fig. D).
1 Find a fixed vehicle anchor point that is
bolted to the floor.
2 If you cannot find an acceptable
location to create an anchor point,
contact the vehicle manufacturer to
identify a suitable tether connection
point.
3 Route the tether connector strap around
the fixed vehicle anchor point.
4 Take the metal D-ring and thread it
through the webbing loop on the other
end of the tether connector strap.
5 Pull the metal D-ring all the way through
until the tether connector strap is tight
around the metal anchor.
6 Use the D-ring as an attachment point
for hook on tether strap.
Installation: Versa-Tether
OR
A
OR
B
C
Using the Versa-Tether
1 Consult your vehicle owner’s manual for
designated tether anchorage locations.
2 Locate the tether on the rear of the child
seat and remove the tether from the pouch.
3 Place the tether up and over the child seat
back.
4 Install the child seat using the LATCH
system or the vehicle seat belts according to
the instructions in this manual.
5 Tilt the tether release tab then pull to fully
extend the tether strap into a “V” shape.
6 Locate the hook on the strap and attach
the tether hook to the vehicle’s designated
tether anchor.
• See figure A for a forward-facing installation.
• See figures B and C for a rear-facing
installation.
IMPORTANT: The tether should be hooked over,
not under, the vehicle tether anchor.
7 Pull the tether adjuster strap to remove all
slack. Roll up excess webbing and store in
tether pouch.
8 Verify there is tension in the tether strap and
that child seat is properly secured.
• The child seat is secure when it cannot be
moved front-to-back or side-to-side more
than 1 in. (2.5 cm) at the belt path.
Installation: Versa-Tether
30 31
Recline Adjustment
Pull the recline handle (Fig. D) then slide
the child seat shell into the desired position.
Release the recline handle, then verify the child
seat has locked into position.
NOTE: It will be necessary to loosen the tether,
vehicle seat belt, and/or LATCH strap before
adjusting the recline position. The tether, vehicle
seat belt, and/or LATCH strap must be properly
re-tightened after adjusting the recline position.
D
Child Seat Functions
WARNING!
• This child seat must be in full upright position when installed
forward-facing for children who weigh more than 40 lbs (18 kg).
• Always use the Versa-Tether with forward-facing recline.
Figure A shows the tether when the child seat
is acceptable for continued use (provided the
child seat has not been involved in a crash). The
colored stitching will be intact and the webbing
will be looped inside the shell.
Figures B and C show the tether when the child
seat is unacceptable for continued use. If any of
the loops have pulled through the back side of
the shell and/or any of the colored stitching has
been released on either side, the child seat is no
longer acceptable for use. Discontinue use of the
child seat.
IMPORTANT: Regardless of whether loops have
pulled through the back side of the shell and the
colored stitching has been released, discontinue
use of the child seat if it has been involved in a
moderate or severe crash.
The energy-absorbing Versa-Tether was designed to enhance
the performance of the child seat tether. By introducing a staged
release of the tether webbing, the forward movement of the child
seat is delayed while reducing the amount of energy transferred to
the child seat during a crash. A secondary benefit of the energy-
absorbing Versa-Tether is to help indicate when the child seat has
been involved in a moderate or severe crash and replacement of the
child seat is necessary.
Energy-Absorbing Tether
Installation: Versa-Tether
A
B
C

32 33
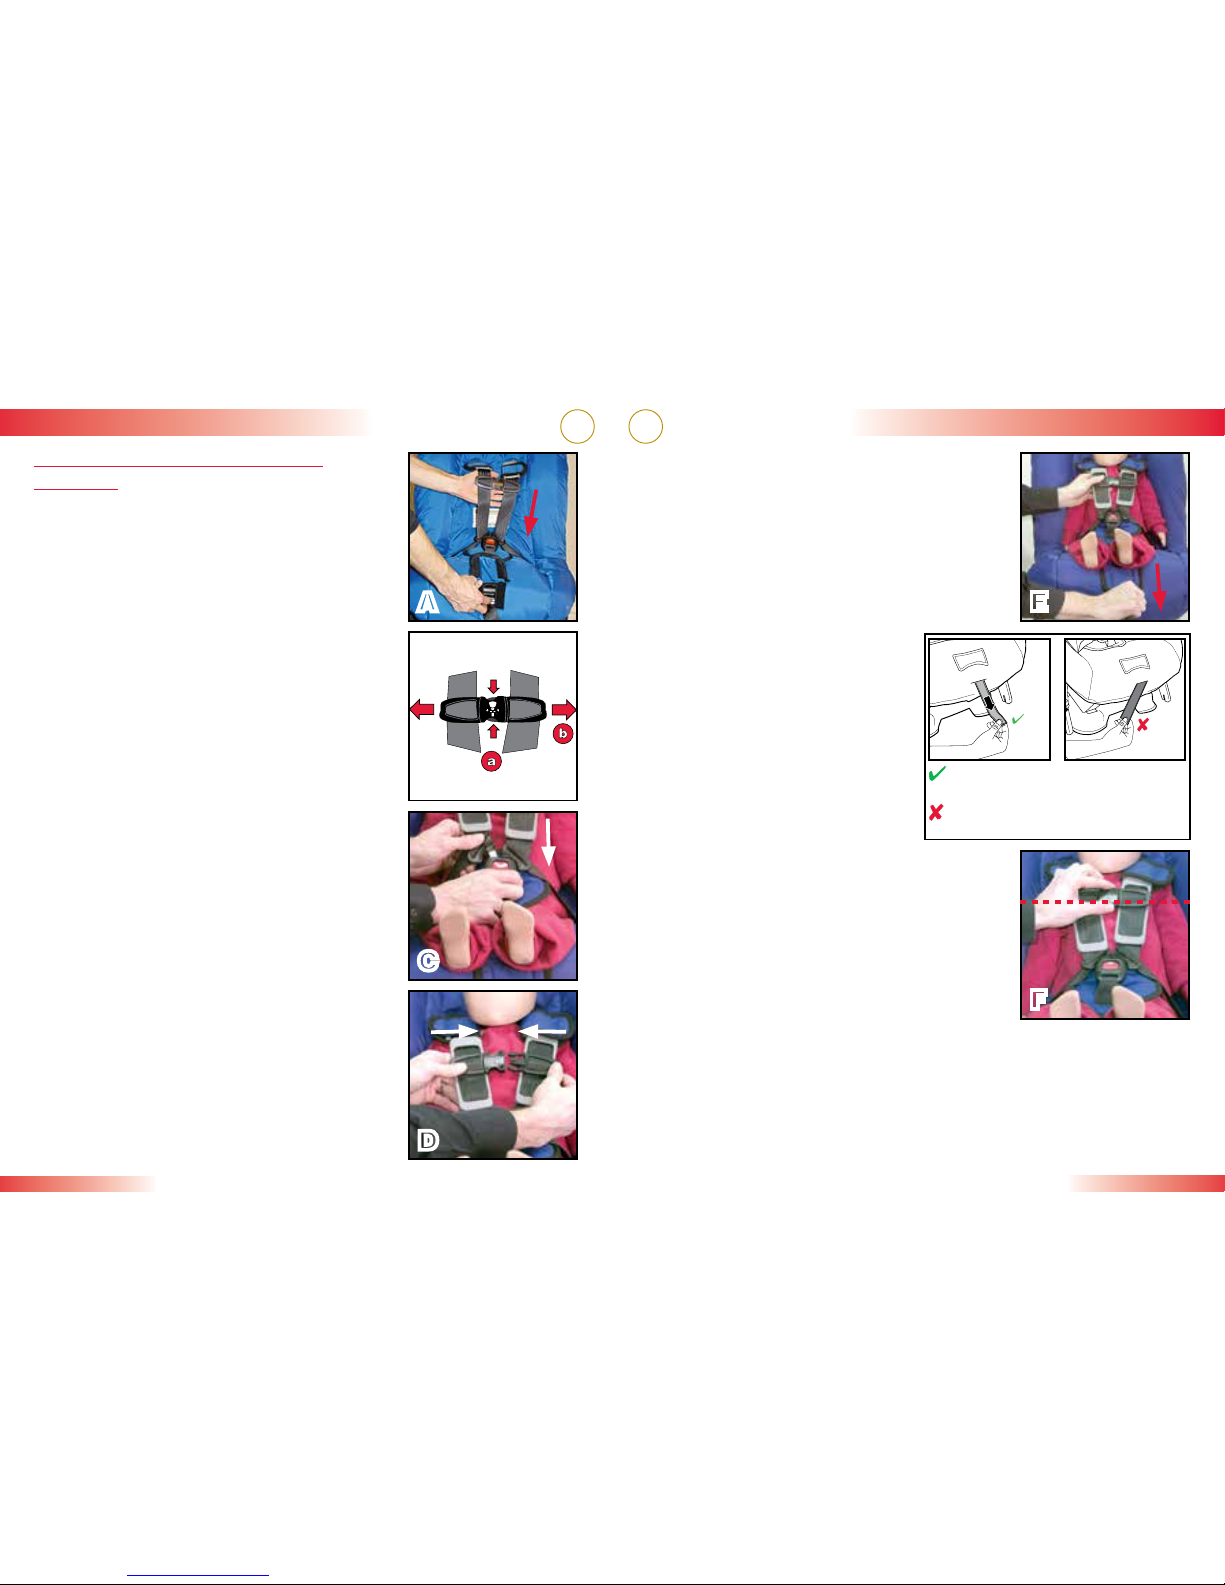
Releasing the Harness Buckle
Press the release button and slide both buckle
tongues from the buckle (Fig. E).
IMPORTANT: Periodically clean the harness
buckle to ensure safe operation. See page 39.
Adjusting the Harness Height
1 Loosen the harness by lifting the harness
adjuster lever while pulling both harness
straps forward as far as possible (Fig. F).
2 From the rear of the child restraint, unhook
the shoulder harness from the yoke (Fig. G).
3 Pull straps through the shell and cover, to
the front of the restraint.
4 Thread the harness straps through the
appropriate harness height slots (Fig. H).
5 Reattach harness straps to the yoke (Fig. G).
6 Pull harness adjuster strap to tighten
the harness.
7 Verify that both harness straps are threaded
at the same height and are not twisted.
IMPORTANT: Ensure the slots in the cover
match the slots in the shell when re-threading
the harness.
E
F
G
H
Child Seat Functions
Chest Clip
Fastening the Chest Clip
Fasten the chest clip by pushing the two halves
together until a positive click is heard (Fig. A).
Releasing the Chest Clip (Fig. B)
1 Squeeze the middle tabs together (1).
2 Pull the two pieces apart (2).
Adjusting the Chest Clip
1 Slide the chest clip up or down (Fig. C) on
the harness so it is positioned at the middle
of the child’s chest, level with the child’s
armpits.
2 Slide the HUGS chest pads and comfort
pads to a comfortable location for the child.
HUGS Chest Pads
Harness Buckle
Fastening the Harness Buckle
Insert one buckle tongue at a time into the
harness buckle (Fig. D).
• A proper connection is confirmed with an
audible click after inserting each buckle
tongue.
A
B
C
WARNING! HUGS chest pads
must be installed for forward-facing use.
Removal of HUGS is optional only for rear-
facing use.
D
Child Seat Functions
34 35
8 Gently pull up on the harness straps to
tighten lap section of the harness which
should fit across the child’s upper thighs.
NOTE: The Wedge Positioning System can be
used to improve the fit of the harness at the
child’s upper thighs. See page 11.
Checklist before tightening the harness:
9Check for proper harness height (see
pages 6 – 7).
9Remove slack from around the
child’s upper thighs.
9Remove slack between the
HUGS chest pads and the
buckle.
9 Slowly pull the adjuster strap
until the harness is snug
around the child (Fig. E).
• A snug strap should not allow
any slack. It lies in a relatively
straight line without sagging. It does not
press on the child’s flesh or push the
child’s body into an unnatural position.
• You should not be able to pinch excess
webbing at the shoulder once the harness
is properly secured.
10 Position the chest clip at the middle of the
child’s chest, level with the child’s armpits
(Fig. F).
11 Verify that the harness is not twisted and the
child is properly secured.
IMPORTANT: Always pull on the harness after securing the child to
ensure the buckle tongues are secure in the harness buckle.
E
F
Securing Your Child
AdvocateCS
Pull the harness adjuster away
from the child seat to tighten.
Do not pull sideways.
Buckling and Tightening the
Harness
1 Loosen the harness by lifting the harness
adjuster release lever located on the front
of the child seat while pulling both shoulder
straps forward (Fig. A).
2 Release the chest clip by squeezing the tabs
and sliding the pieces apart (Fig. B).
3 Unfasten the harness buckle by pressing the
release button and sliding the tongues out.
4 Move the harness straps to the side of the
child seat.
• Use the elastic harness holders located on
both sides of the cover to aid in holding the
straps open.
IMPORTANT: Remove bulky coats and/or
jackets before putting the child in child seat.
Adjust the harness to fit the clothes the child is
wearing.
5 Place child in the child seat.
6 Position harness straps around the child and
fasten harness buckle (Fig. C) and chest clip
(Fig. D).
• Proper connection of the harness buckle
is confirmed with an audible click after
inserting each buckle tongue.
• If the buckle will not fasten with an audible
click after insertion of each buckle tongue,
the harness buckle or adjuster area may
be clogged with food, drink or other debris
that needs to be removed. See page 39 for
cleaning instructions.
7 Slide the HUGS chest pads down towards
the buckle.
B
C
D
A
Securing Your Child
Table of contents
Other Snug Seat Car Seat manuals


