SOLAC HU1060 User manual

Westfalia Bedienungsanleitung
Nr. 110031

Solac is a registered Trade Mark
INSTRUCCIONES DE USO
INSTRUCTIONS FOR USE
MODE D’EMPLOI
GEBRAUCHSANLEITUNG
INSTRUÇÕES DE USO
ISTRUZIONI PER L’USO
GEBRUIKSAANWIJZING
NÁVOD K POUZITÍ
INSTRUCJA OBSLUGI
NÁVOD NA POUŽITIE
HASZNÁLATI UTASÍTÁS
инсрукция за употреба
UPUTE ZA UPOTREBU
INSTRUCŢIUNI DE UTILIZARE
Humidificador
Humidifier
Humidificateur
Luftbefeuchter
Humidificador
Umidificatore
Luchtbevochtiger
Zvlhčovač
Nawilżacz
Zvlhčovačvzduchu
Párásító
Овлажнител
Ovlaživač
Umidificator
Mod. HU1060
11/08
Libro HU1060.book Page 1 Monday, November 10, 2008 10:17 AM

ESPAÑOL es
ENGLISH en
FRANÇAIS fr
DEUTSCH de
PORTUGUÊS pt
ITALIANO it
NEDERLANDS nl
ČESKY cs
POLSKI pl
SLOVENČINA sk
MAGYAR hu
българск bg
HRVATSKA hr
ROMÂNĂro
5-9 •
10-13 •
14-18 •
19-22 •
23-26 •
27-30 •
31-34 •
35-38 •
39-42 •
43-46 •
47-51 •
52-56 •
57-60 •
61-64 •
Libro HU1060.book Page 1 Monday, November 10, 2008 10:17 AM

Libro HU1060.book Page 1 Monday, November 10, 2008 10:17 AM

Libro HU1060.book Page 2 Monday, November 10, 2008 10:17 AM

10 IMPORTANT
ENGLISH en
1IMPORTANT
• Read the instructions carefully before using the product. Keep the
instructions for future reference.
• Children should be supervised to ensure that they do not play with the
appliance.
• This appliance is not intended for use by persons (including children)
with reduced physical, sensory or mental capabilities, or lack of
experience and knowledge, unless they have been given supervision or
instructions concerning use of the appliance by a person responsible for
their safety.
• Remove all elements from the inside or outside of the appliance used for
protection during transport or for sales promotions, such as paper or
plastic bags, plastic sheets, cardboard and stickers.
• Do not plug in the appliance without first checking that your home mains
voltage matches that stated on the specifications plate.
• Do not cover the appliance while in use.
• Place on a flat, firm shelf about 0.5 m or 1 m from the floor. Never use
on the floor. Never tip.
• Do not place the mist outlet near any furniture, the wall, a TV or any other
appliance that can be damaged by damp. Water can condense around
the appliance when the air in the room is not capable of absorbing
the flow of mist produced by the humidifier.
• Use only for the purposes indicated. The manufacturer is not liable for
damage caused by unsuitable or incorrect use of the humidifier.
• Do not use the humidifier if the connection cable is damaged or the
appliance is faulty. Certain operations, such as replacing the power cord,
will have to be done at an authorized service centre, as special tools are
needed.
• If the humidifier is not to be used, unplug it from the mains.
•The unit must be unplugged for assembly, cleaning, removal or
filling with water.
• Always fill the tank with clean water. Do not add detergent, freshener or
essence. NEVER POUR WATER IN THE VAPORISATION CHAMBER.
• Never remove the water tank with the appliance working.
Libro HU1060.book Page 10 Monday, November 10, 2008 10:17 AM

MAIN COMPONENTS 11
en
• Do not use the appliance if the water tank is empty.
• Do not expose to direct sunlight or place near heat sources.
• Ensure that the water tank cover is completely closed.
• Ensure that the appliance is unplugged before removing the water tank.
• Do not touch the ultrasound transmitter with your hands or with tools.
• Do not use the humidifier when barefoot. Do not touch the appliance with
wet hands when in operation.
• When unplugging the appliance, do not pull on the power cord or the
appliance.
• Never leave the appliance outdoors exposed to the elements.
• The appliance and its power cable must not be placed under water in any
case.
• Do not fill it with hot water.
bWARNING!!: When you want to dispose of the appliance, NEVER
throw it in the bin. Take it to your nearest RECYCLING POINT or
waste collection centre for treatment. You will thus be helping to take
care of the environment.
2 MAIN COMPONENTS
1 On/off switch
2 Water tank
3 Tank cover
4 Tank handle
5 Steam outlet
6Base
7 Ion exchange resins
8 Transducer
9 Steam flow regulator
10 Anti-bacteria filter
11 Interior water tank
12 Empty tank indicator light
13 "On" indicator light
3 OPERATION AND USE
1 Remove the water tank (2) from the base (6), turn it over, and remove
the cover from the bottom part (3) by turning it counter-clockwise. Fig.1.
Add cold tap water without filling it completely, otherwise the ion
Libro HU1060.book Page 11 Monday, November 10, 2008 10:17 AM

12 MAINTENANCE AND CLEANING
exchange resins could cause the water to spill over the top when the
cover is put on.
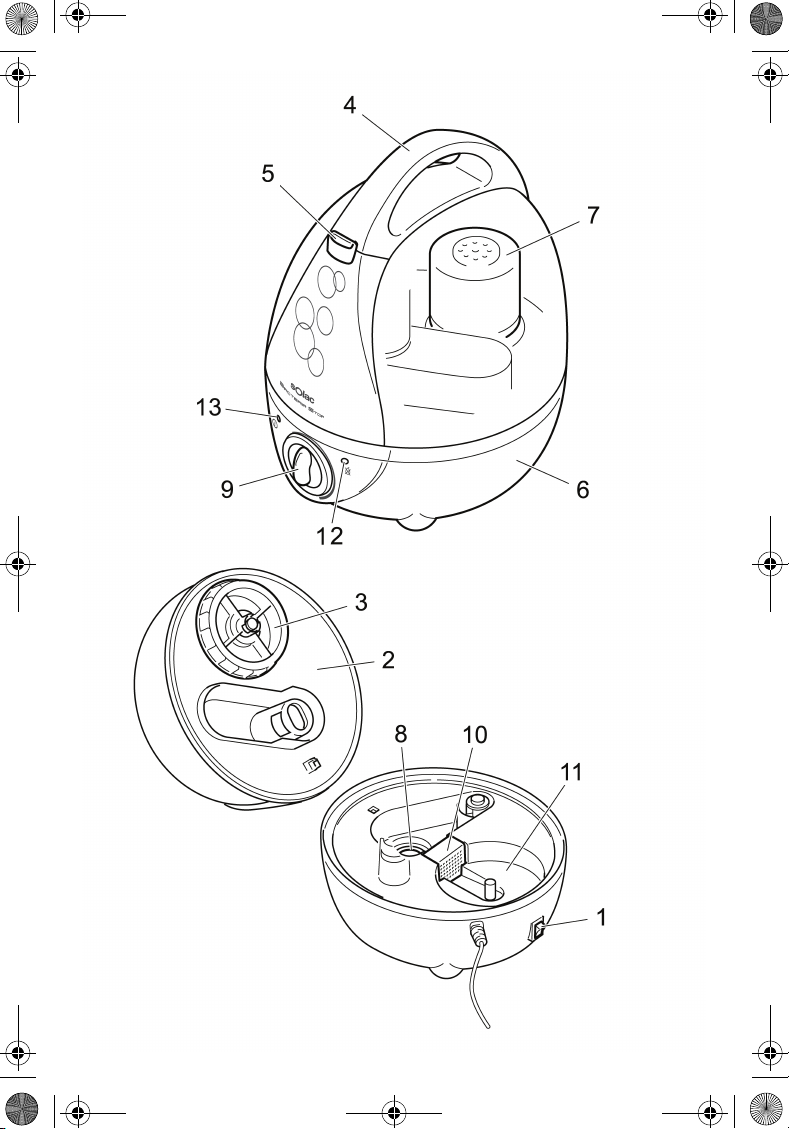
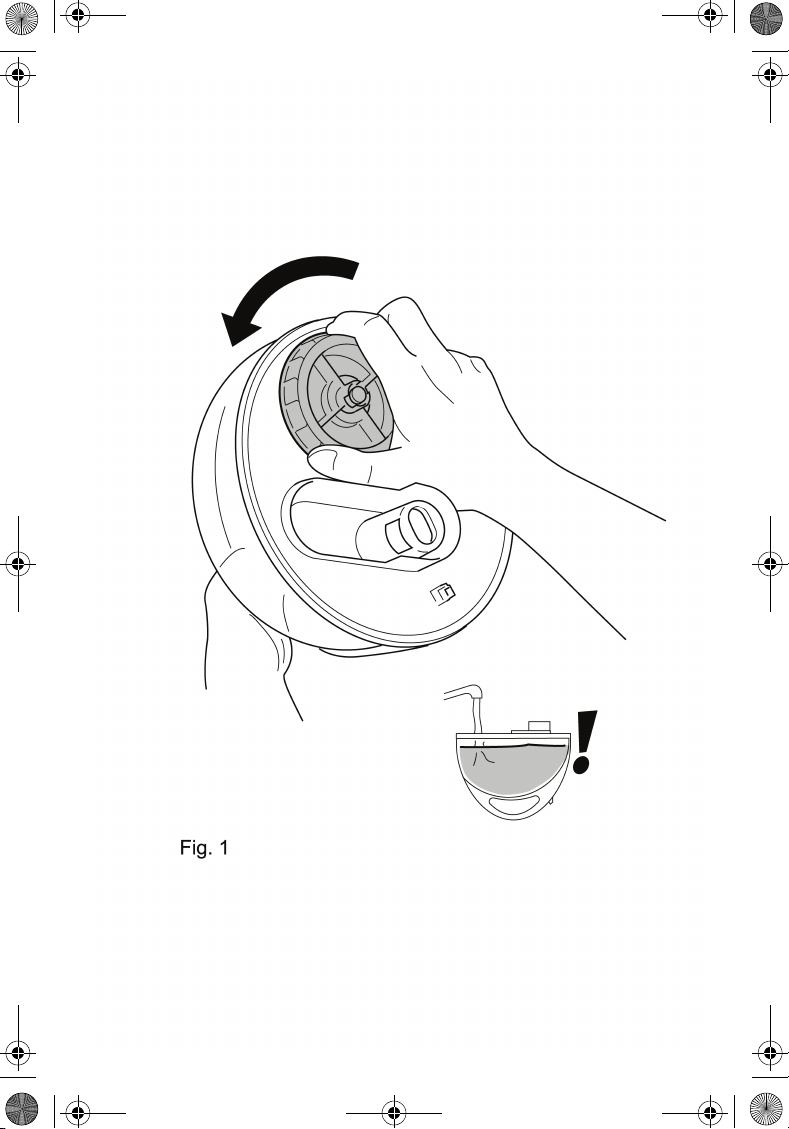
2 Put the cover back on by aligning the marks on the tank with the grooves
on the cover, and turn it clockwise. Be sure that it is closed firmly.
3 Turn the tank back over, and place it on the base while making sure that
it is seated correctly.
4 When placing the water tank (2) back on the base, part of the water that
it contains will transfer to the space existing between the tank and the
body (11). This is how the device works normally and poses no hazard.
5 Plug in the humidifier, and turn it on using the on/off switch (1). The "on"
indicator light will come on.
6 Select the desired steam flow rate using the steam flow regulator (9).
7 If condensation is observed close to the humidifier, select a lower steam
flow rate.
8 When you want to stop the steam flow, select the "off" position using the
on/off switch (1).
9 If there is insufficient water in the tank, the "empty tank indicator light"
(12) will come on, and steam generation will be stopped. In this case, it
will be necessary to turn off the humidifier and refill the tank with water
before turning the device back on.
ZWhile the humidifier is operating, the water used will be filtered through
an anti-bacteria filter (10) located in the base, thus preventing impurities
from being emitted into the atmosphere.
4 MAINTENANCE AND CLEANING
‹Before any cleaning operation, switch the appliance off and unplug it.
1 There may be some scale deposits in the transducer, particularly in
areas with hard water. Overcome this drawback by cleaning the
transducer with vinegar at least once a week, as follows:
a) Moisten a cotton bud with vinegar and wipe the transducer gently,
until the scale deposits disappear completely.
b) Rub down with a dry cloth and remove remains of moisture.
c) Do not rub the transducer with solid objects.
d) Do not clean with chemical products.
2 Clean the inside of the water tank at least once a week, as follows:
a) Fill the tank with clean water adding a few drops of bleach or a
similar disinfectant. Close the tank completely with its cap and
shake forcibly.
Libro HU1060.book Page 12 Monday, November 10, 2008 10:17 AM

OBSERVATIONS 13
en
b) Rinse thoroughly.
iNote: Water accumulated over long periods may create bacteria and
mildew (fungus).
3 The outside of the appliance can be cleaned using a soft damp cloth.
4 Store the appliance in a cool, dry place.
5 Do not place the transducer directly under the tap.
‹Water must not get into the appliance; should this happen, take it to an
authorised service centre before using it again.
5 OBSERVATIONS
iHumidifiers using ultrasound technology produce smaller water particles
which can more easily reach the lower respiratory tracts.
This type of humidifier is therefore suitable for the treatment of
symptoms of the common cold and laryngitis.
ZTheir use is not however recommended for persons with bronchial
asthma and allergies.
• Domestic humidifiers are ideal for obtaining a comfortable humidity
environment between 40% and 60%, the range in which the risk of
respiratory infection is minimised.
Libro HU1060.book Page 13 Monday, November 10, 2008 10:17 AM

ACHTUNG 19
de
DEUTSCH de
1 ACHTUNG
• Lesen Sie diese Anleitung vor Inbetriebnahme des Gerätes aufmerksam
durch. Bewahren Sie sie zum späteren Nachschlagen auf.
• Lassen Sie Kinder nicht mit diesem Gerät spielen.
• Dieses Gerät ist nicht für den Gebrauch durch Personen (einschließlich
Kindern) mit einer körperlichen, sensitiven oder geistigen Behinderung
oder durch Personen, die nicht über die notwendige Erfahrung oder
Kenntnisse verfügen, geeignet, es sei denn, sie werden von der für ihre
Sicherheit zuständigen Person beaufsichtigt bzw. in die Benutzung des
Gerätes eingewiesen.
• Entfernen Sie alle Papier- und Kunststoffbeutel, Kunststofffolien,
Kartons bzw. Aufkleber in oder am Gerät, die als Transportschutz oder
Werbungselemente dienen.
• Vergewissern Sie sich vor dem Anschluss des Gerätes, dass die auf
dem Typenschild angegebene Netzspannung mit der Netzspannung
Ihres Haushalts übereinstimmt.
• Legen Sie während des Betriebs keine Gegenstände auf den
Luftbefeuchter.
• Stellen Sie das Gerät auf eine ebene, feste Abstellfläche, ca. 0,5 - 1 m
über dem Boden. Nicht direkt auf den Fußboden stellen. Nicht schräg
stellen.
• Achten Sie darauf, dass der Dampf nicht in der Nähe von Möbeln,
Wänden, Fernsehern oder anderen Geräten austritt, die durch
Feuchtigkeit beschädigt werden können. Wenn der Raum den vom
Luftbefeuchter erzeugten Dampf nicht absorbieren kann, kann es
zu Wasserkondensationen um das Gerät kommen.
• Verwenden Sie das Gerät ausschließlich für seinen vorgesehenen
Zweck. Der Hersteller haftet nicht für Schäden, die infolge einer
unsachgemäßen bzw. nicht ordnungsgemäßen Benutzung entstehen.
• Benutzen Sie den Luftbefeuchter nicht, wenn Kabel oder Gerät
beschädigt sind. Einige Arbeiten, wie etwa der Austausch des
Netzkabels, müssen von einem autorisierten Kundendienst
durchgeführt werden, da hierfür Spezialwerkzeug erforderlich ist.
• Trennen Sie den Luftbefeuchter vom Netz, wenn Sie ihn nicht benutzen.
Libro HU1060.book Page 19 Monday, November 10, 2008 10:17 AM

20 HAUPTBESTANDTEILE
• Wenn das Gerät montiert, gereinigt, umgestellt oder mit Wasser
gefüllt wird, muss es vom Netz getrennt werden.
• Den Tank stets mit sauberem Wasser füllen. Keine Spülmittel,
Luftverbesserer oder Duftöle hinzufügen. GIESSEN SIE DAS WASSER
NIEMALS IN DIE VERDAMPFUNGSKAMMER.
• Wassertank niemals während des Betriebs abnehmen.
• Benutzen Sie das Gerät nicht mit leerem Wassertank.
• Setzen Sie das Gerät keiner direkten Sonneneinstrahlung aus und
halten Sie es von Wärmequellen fern.
• Achten Sie darauf, dass der Deckel des Wassertanks stets gut
verschlossen ist.
• Vergewissern Sie sich, dass das Gerät vom Netz getrennt ist, bevor Sie
den Wassertank entnehmen.
• Den Umwandler nicht mit der Hand oder Werkzeugen berühren.
• Während des Betriebs des Luftbefeuchters nicht barfuß laufen. Das
Gerät während des Betriebs nicht mit feuchten Händen berühren.
• Nicht am Kabel oder Gerät ziehen, wenn Sie es vom Netz trennen.
• Gerät nicht der Witterung aussetzen.
• Gerät oder Netzkabel niemals in Wasser tauchen.
• Nicht mit heißem Wasser befüllen.
bACHTUNG!!: Wenn Sie das Gerät entsorgen möchten, geben Sie es
NIEMALS zum Hausmüll, sondern suchen Sie den nächstgelegenen
WERTSTOFFHOF oder eine Annahmestelle für Reststoffe auf, damit
es anschließend sachgemäß entsorgt wird.So leisten Sie einen
Beitrag zum Umweltschutz.
2 HAUPTBESTANDTEILE
1 Ein- / Aus-Schalter
2 Wassertank
3 Deckel Wassertank
4 Griff Wassertank
5 Dampfaustritt
6 Sockel
7 Ionenaustauschharze
8 Wandler
9 Dampfstromregler
10 Antibakterieller Filter
Libro HU1060.book Page 20 Monday, November 10, 2008 10:17 AM

BETRIEB UND GEBRAUCH 21
de
11 Innenwassertank
12 Leuchtanzeige Wassertank leer
13 Betriebsleuchtanzeige
3 BETRIEB UND GEBRAUCH
1 Wassertank (2) vom Sockel (6) abnehmen, umdrehen und den Deckel
im unteren Bereich (3) gegen den Uhrzeigersinn abdrehen. Abb. 1 Tank
nicht vollständig mit kaltem Wasser füllen, da ansonsten beim Einsatz
des Verschlusses mit den Ionenaustauschharzen oben Wasser
austreten könnte.
2 Verschluss wieder aufsetzen. Darauf achten, dass die Einkerbungen
des Gehäuses mit den am Verschluss vorgesehenen Nuten
übereinstimmen und im Uhrzeigersinn aufdrehen. Stellen Sie sicher,
dass er gut verschlossen ist.
3 Wassertank umdrehen und so auf den Sockel setzen, dass er fest
einrastet.
4 Beim Aufsetzen des Wassertanks (2) auf den Sockel tritt etwas Wasser
in die Öffnung zwischen Wassertank und Gehäuse (11) ein. Dies gehört
zur normalen Funktionsweise des Geräts und stellt keine Gefahr dar.
5 Schließen Sie den Luftbefeuchter an das Netz an und schalten Sie ihn
mithilfe des Ein/Aus-Schalters (1) ein. Die Betriebsanzeige leuchtet auf.
6 Wählen Sie den gewünschten Dampfstrom mithilfe des
Dampfstromreglers (9) aus.
7 Wenn es zu Wasserkondensationen in der Nähe des Luftbefeuchters
kommt, stellen Sie einen geringeren Dampfstrom ein.
8 Um den Dampfstrom zu beenden, stellen Sie den Ein/Aus-Schalter (1)
auf Aus.
9 Wenn nicht genug Wasser im Tank ist, leuchtet die Leuchtanzeige
Wassertank leer (12) auf und die Dampfabgabe wird unterbrochen. In
diesem Fall schalten Sie den Luftbefeuchter aus und füllen Sie den
Wassertank neu auf, bevor Sie ihn wieder in Betrieb nehmen.
ZWährend des Betriebs des Luftbefeuchters wird das verwendete Wasser
mithilfe des antibakteriellen Filters (10) im Sockel gefiltert. So wird
verhindert, dass Verunreinigungen an die Umwelt abgegeben werden.
Libro HU1060.book Page 21 Monday, November 10, 2008 10:17 AM

22 PFLEGE UND REINIGUNG
4 PFLEGE UND REINIGUNG
‹Vor jeder Reinigung muss das Gerät abgeschaltet und vom Netz
getrennt werden.
1 Besonders in Gebieten mit hartem Wasser kann es vorkommen, dass
sich Kalkreste am Umwandler absetzen. Zur Entfernung dieser
Ablagerungen reinigen Sie den Umwandler mindestens einmal
wöchentlich mit Essig. Gehen Sie dabei folgendermaßen vor:
a) Ein Wattestäbchen mit Essig befeuchten und den Umwandler
vorsichtig abreiben, bis die Kalkreste vollständig beseitigt sind.
b) Feuchtigkeitsrückstände mit einem trockenen Tuch entfernen.
c) Umwandler nicht mit festen Gegenständen abreiben.
d) Keine chemischen Reinigungsprodukte verwenden.
2 Das Innere des Wassertanks mindestens einmal wöchentlich
folgendermaßen reinigen:
a) Den Tank mit sauberem Wasser füllen, dem einige Tropfen einer
Chlorlösung oder ähnlichen Desinfektionsmittels zugegeben
werden können. Tank gut verschließen und kräftig schütteln.
b) Sorgfältig ausspülen.
iHinweis: Durch nicht entfernte Wasserreste im Tank können sich
Bakterien und Schimmel (Pilze) bilden.
3 Reinigen Sie das Gehäuse des Geräts mit einem leicht angefeuchteten Tuch.
4 Bewahren Sie das Gerät an einem trockenen und kühlen Ort auf.
5 Den Umwandler nicht direkt unter fließendes Wasser halten.
‹Achten Sie stets darauf, dass kein Wasser in das Gerät eindringt. Sollte
Wasser eingedrungen sein, muss das Gerät vor einem erneuten
Gebrauch von einem autorisierten Kundendienst überprüft werden.
5 ANMERKUNGEN
iUltraschall-Luftbefeuchter erzeugen kleinste Wasserpartikel, die
besonders leicht in die unteren Atemwege gelangen.
Daher eignen sich diese Luftbefeuchter für die Behandlung von
Symptomen bei Erkältungen und Kehlkopfentzündungen.
ZSie sollten jedoch nicht benutzt werden, wenn sich Personen mit
Bronchialasthma und Allergien im Raum aufhalten.
• Luftbefeuchter für den Haushalt sind optimal, um ein angenehmens
Raumklima mit einer Luftfeuchtigkeit von 40% bis 60% zu erzielen, da
sich in diesem Bereich die Gefahr von Atemwegsinfektionen verringern
kann.
Libro HU1060.book Page 22 Monday, November 10, 2008 10:17 AM
Other manuals for HU1060
1
Table of contents
Languages:
Other SOLAC Humidifier manuals
Popular Humidifier manuals by other brands

Honeywell
Honeywell TrueEASE Professional installation guide

Olimpia splendid
Olimpia splendid LIMPIA Important instructions

Condair
Condair Nortec SAM-e Installation and operation manual

Stulz
Stulz SupraSteam SEH Series manual

AromaRoom
AromaRoom HU5003 instruction manual

Philips
Philips HU4811/10 user manual