Solaire AllAbout SOL-AA23GC User manual
Form: SOL-AA23GC-617 Page 1
Assembly Instructions for Cart for use with
Solaire AllAbout Double Burner Infrared Grill
Read This Manual Thoroughly Before Assembling Cart
or Using Grill
Manufactured by: Rasmussen Gas Logs & Grills
12028 Philadelphia Street, Whittier, CA 90601 USA
Quality Products Since 1907
+
=
Item #SOL-AA23GC
Item #SOL-AA23A-LP
(sold separately)
Complete Grill on Cart
Form: SOL-AA23GC-617 Page 2
OUTDOOR USE ONLY
Your SOLAIRE INFRARED Grill is designed for outdoor use only and must
not be installed in or on recreational vehicles
and/or boats.
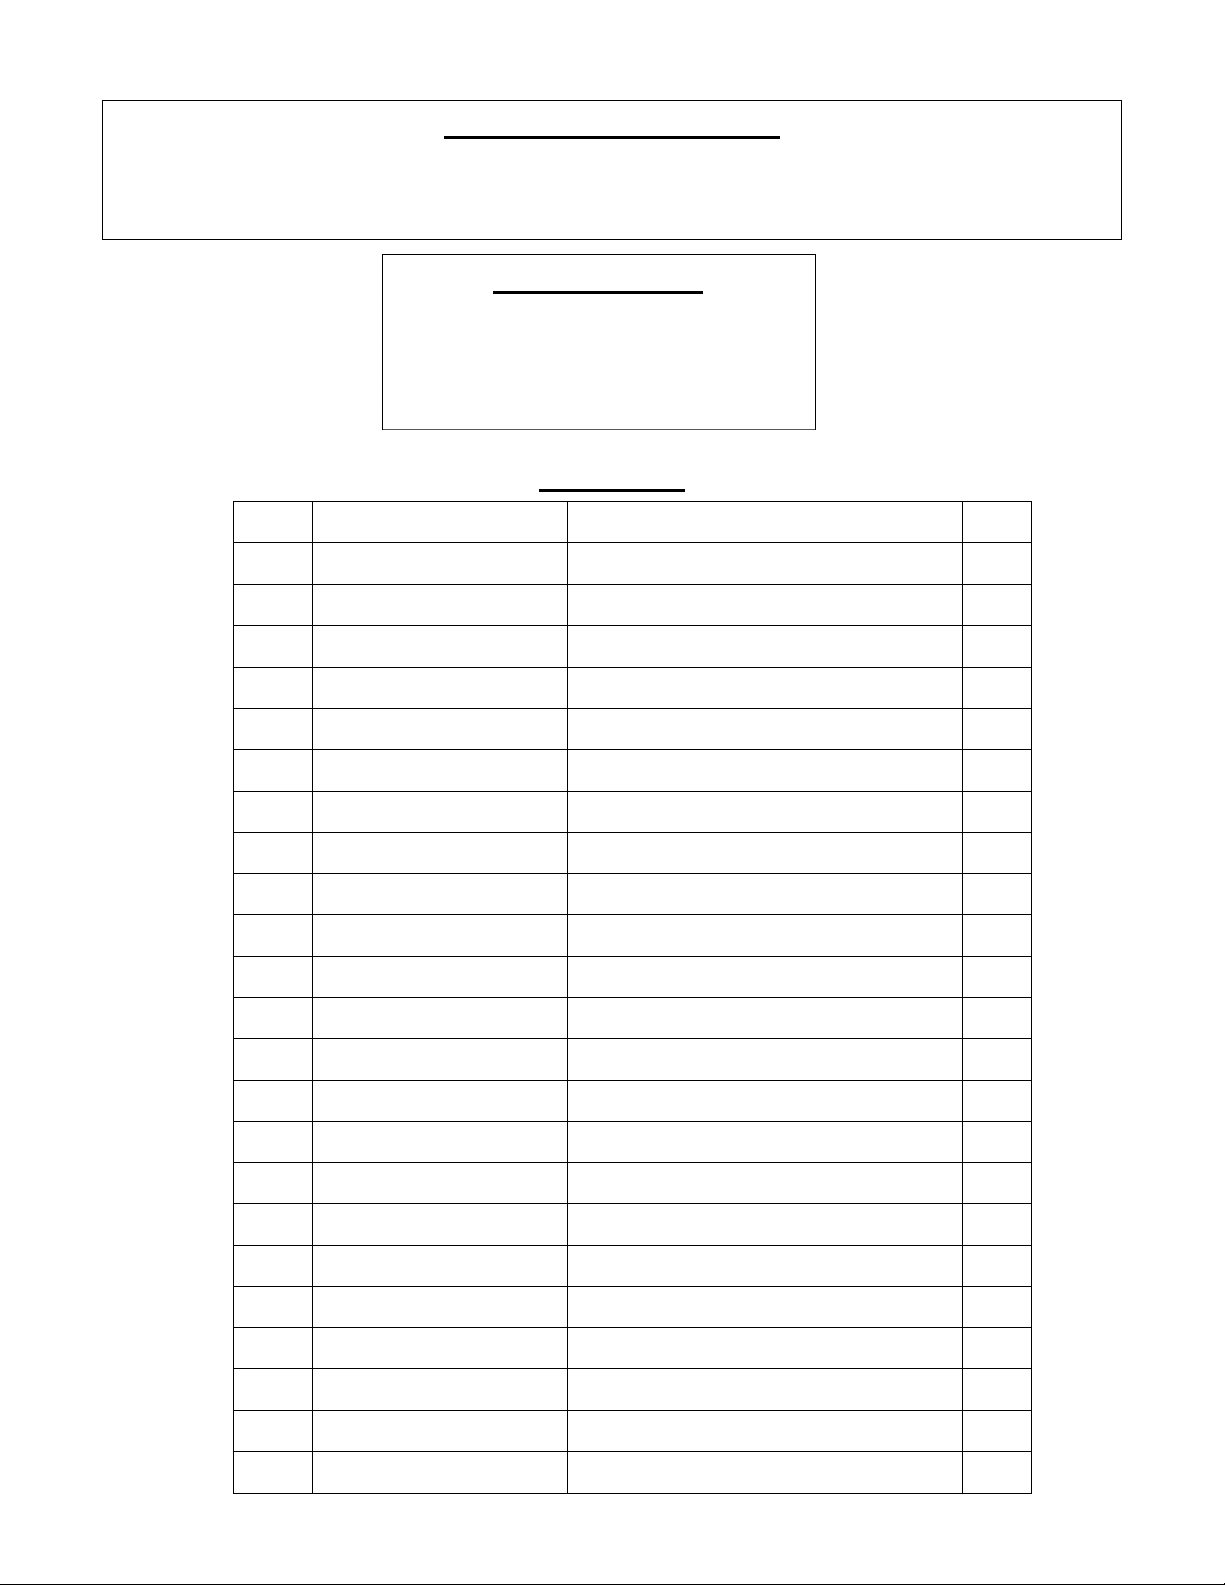
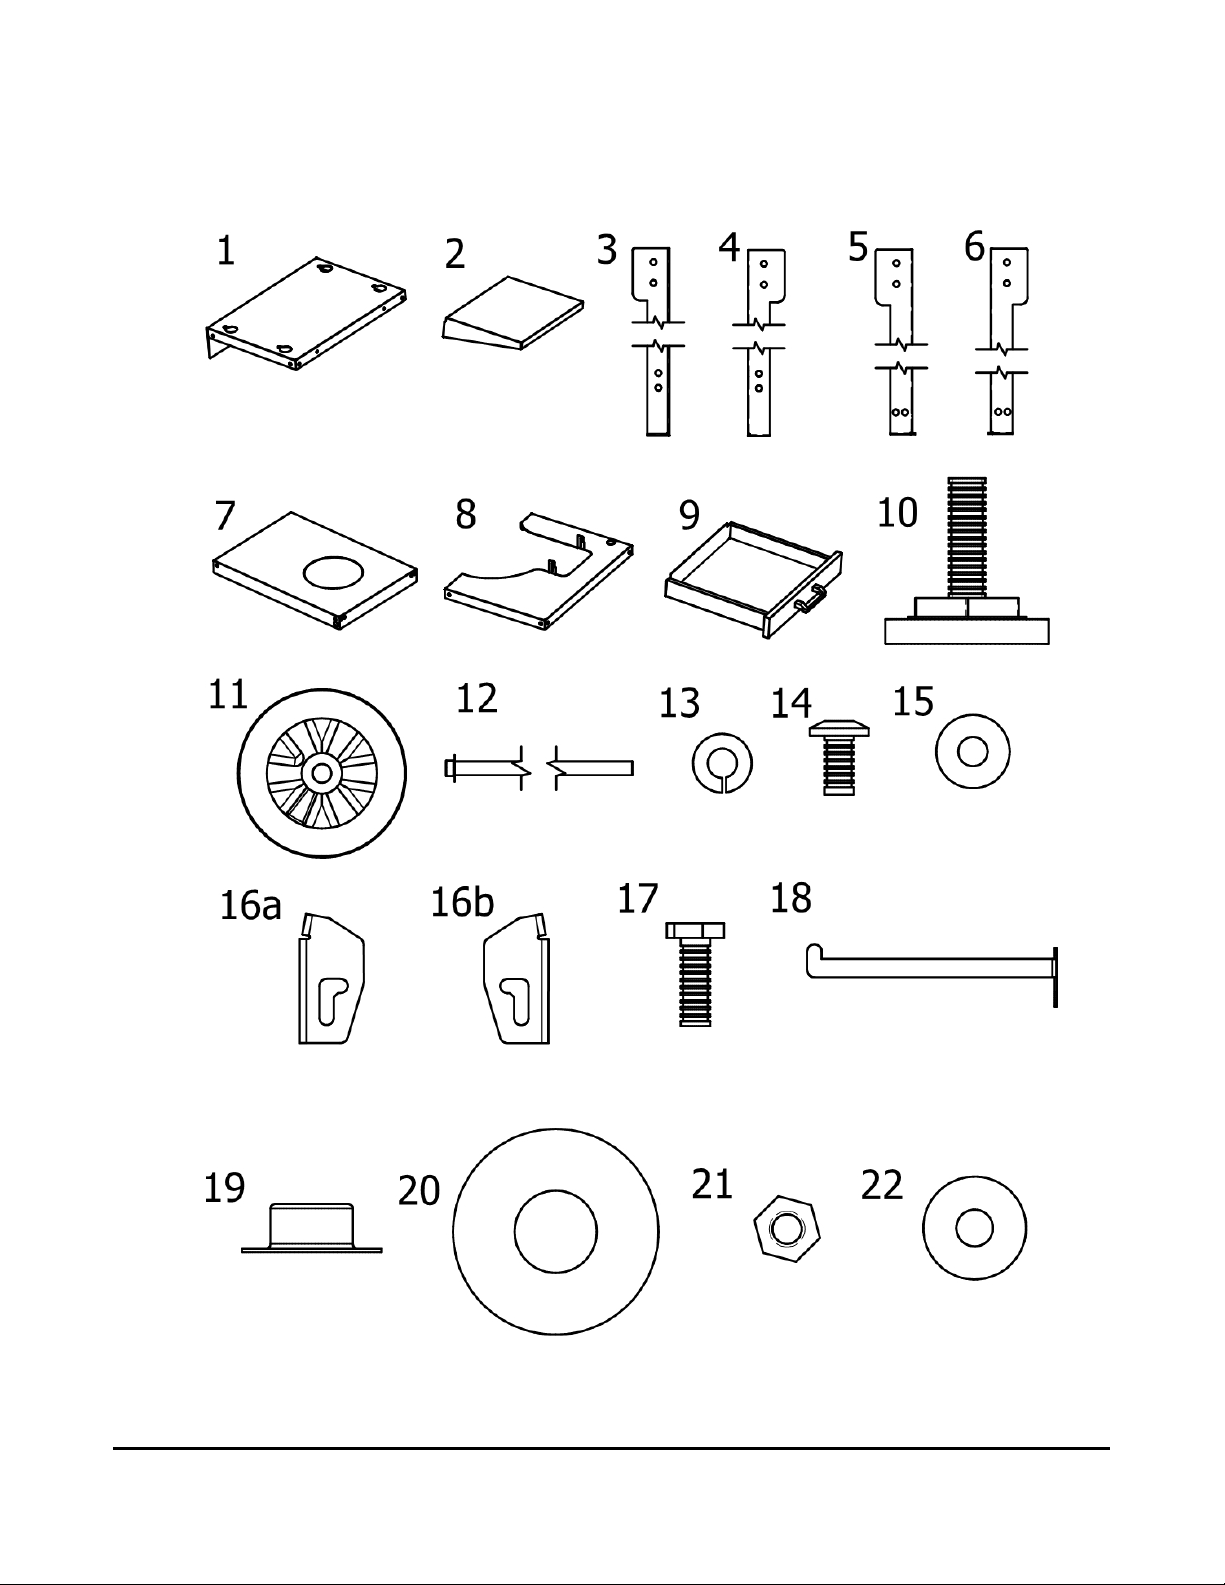
Parts List
ID #
Part #
Description
Qty
1
SOL-11024R
Top Shelf
1
2
SOL-2784R
Side Shelf
2
3
SOL-11028R
Front Left Leg "B"
1
4
SOL-11029R
Back Left Leg "C"
1
5
SOL-11030R
Back Right Leg "D"
1
6
SOL-11027R
Front Right Leg "A"
1
7
SOL-11026R
Bottom Shelf
1
8
SOL-11025R
Middle Shelf
1
9
SOL-11033R
Drawer
1
10
SOL-1717R-A
Adjustable Feet (factory installed)
2
11
SOL-2301
Wheel
2
12
SOL-2303
Axle with Cap Installed, 22”
1
13
SOL-7011
Lock Washer, 1/4"
32
14
SOL-7013
Screw, 1/4-20 x .5”
24
15
SOL-7014
Flat Washer, 1/4-20
4
16a
SOL-9049RB-L
Side Shelf Bracket - Left
2
16b
SOL-9049RB-R
Side Shelf Bracket - Right
2
17
SOL-7012
Hex Bolt, 1/4-20 x .75”
8
18
SOL-11031R
Tank Guard
1
19
SOL-2304
Axle Cap, 5/8”
1
20
SOL-2305
Axle Washer, 1 ¾ x 11/16
2
21
SOL-7007
Hex Nut, 5/16-18
4
22
SOL-2313R
Flat Washer, 7/8 x 5/16
4
Tools Needed
- Mallet or Hammer
- Screwdriver, Phillips Head
- 7/16” End Wrench
- 8” or larger Adjustable Wrench
Form: SOL-AA23GC-617 Page 3

Form: SOL-AA23GC-617 Page 4
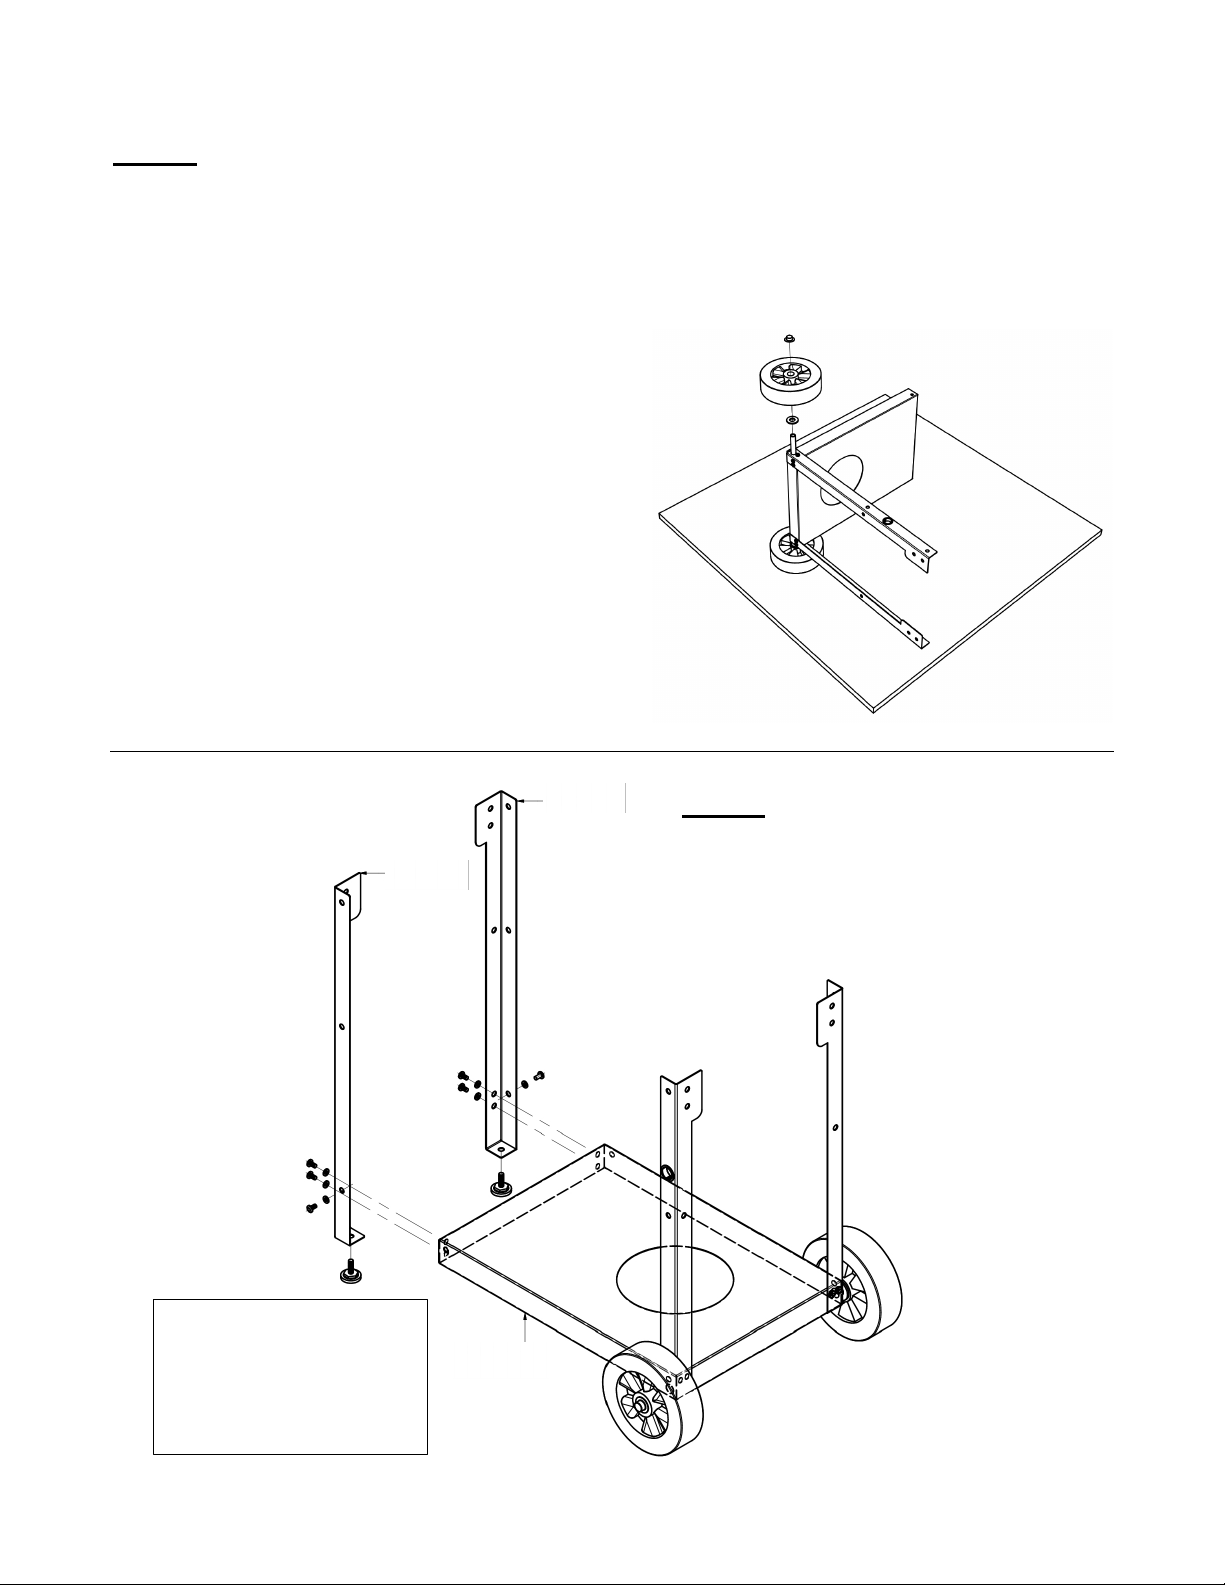
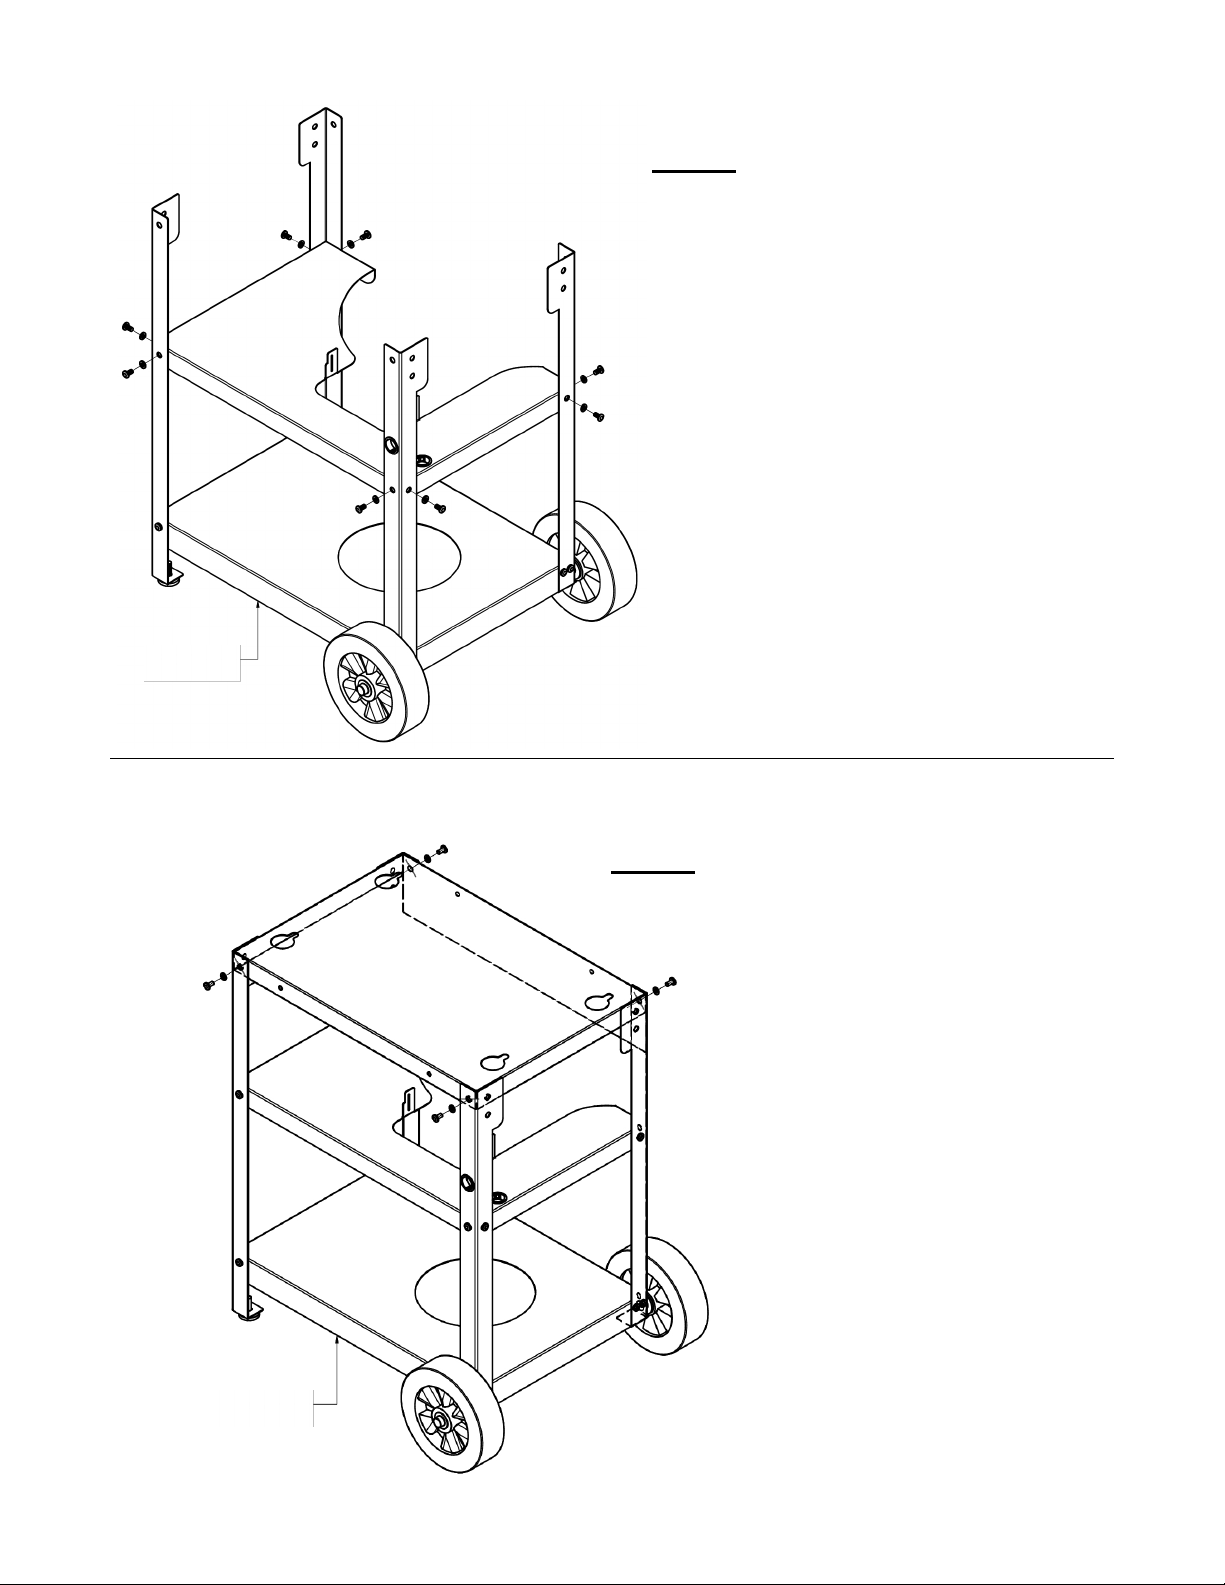
Step 1 - Assemble Legs A (#6) and D (#5) to Right Side of Bottom Shelf
(#7) using 3-Screw (#14) and 3-Lock Washer (#13) per leg.
Step 2 - Assemble Wheels (#11) to Axle (#12) through Bottom Shelf (#7).
Axle comes with one Axle Cap (#19) installed.
Slide open end of Axle through Wheel,
then through Axle Washer (#20),
then through Bottom Shelf (#7),
then though Axle Washer (#20),
then though Wheel (#11).
LEG A
LEG D
FRONT
Form: SOL-AA23GC-617 Page 5
Step 3 - Assemble Axle Cap (#19) to secure Wheel Assembly to Cart
Place assembly as shown onto cardboard or other slick surface to prevent
scratching of parts.
Using a mallet, or hammer with piece of cardboard between
hammer face and Axle Cap
(to prevent marring the Cap’s finish),
strike Axle Cap strongly to secure Cap to Axle.
Step 4 - Assemble Legs B
(#3) and C (#4) to Left Side
of Bottom Shelf (#7) using
3-Screw (#14) and 3-Lock
Washer (#13) per leg.
LEG C
LEG B
Note: Adjustable Feet
(#10) are assembled
to Legs by factory.
Turn Feet to make
grilling surface level.
FRONT
Form: SOL-AA23GC-617 Page 6
Step 6 - Assemble Top Shelf (#1)
to four Legs using 1-Screw (#14)
and 1-Lock Washer (#13) per leg.
Step 5 - Assemble Middle Shelf
(#8) to four Legs using 2-Screw
(#14) and 2-Lock Washer (#13)
per leg.
FRONT
FRONT
Form: SOL-AA23GC-617 Page 7
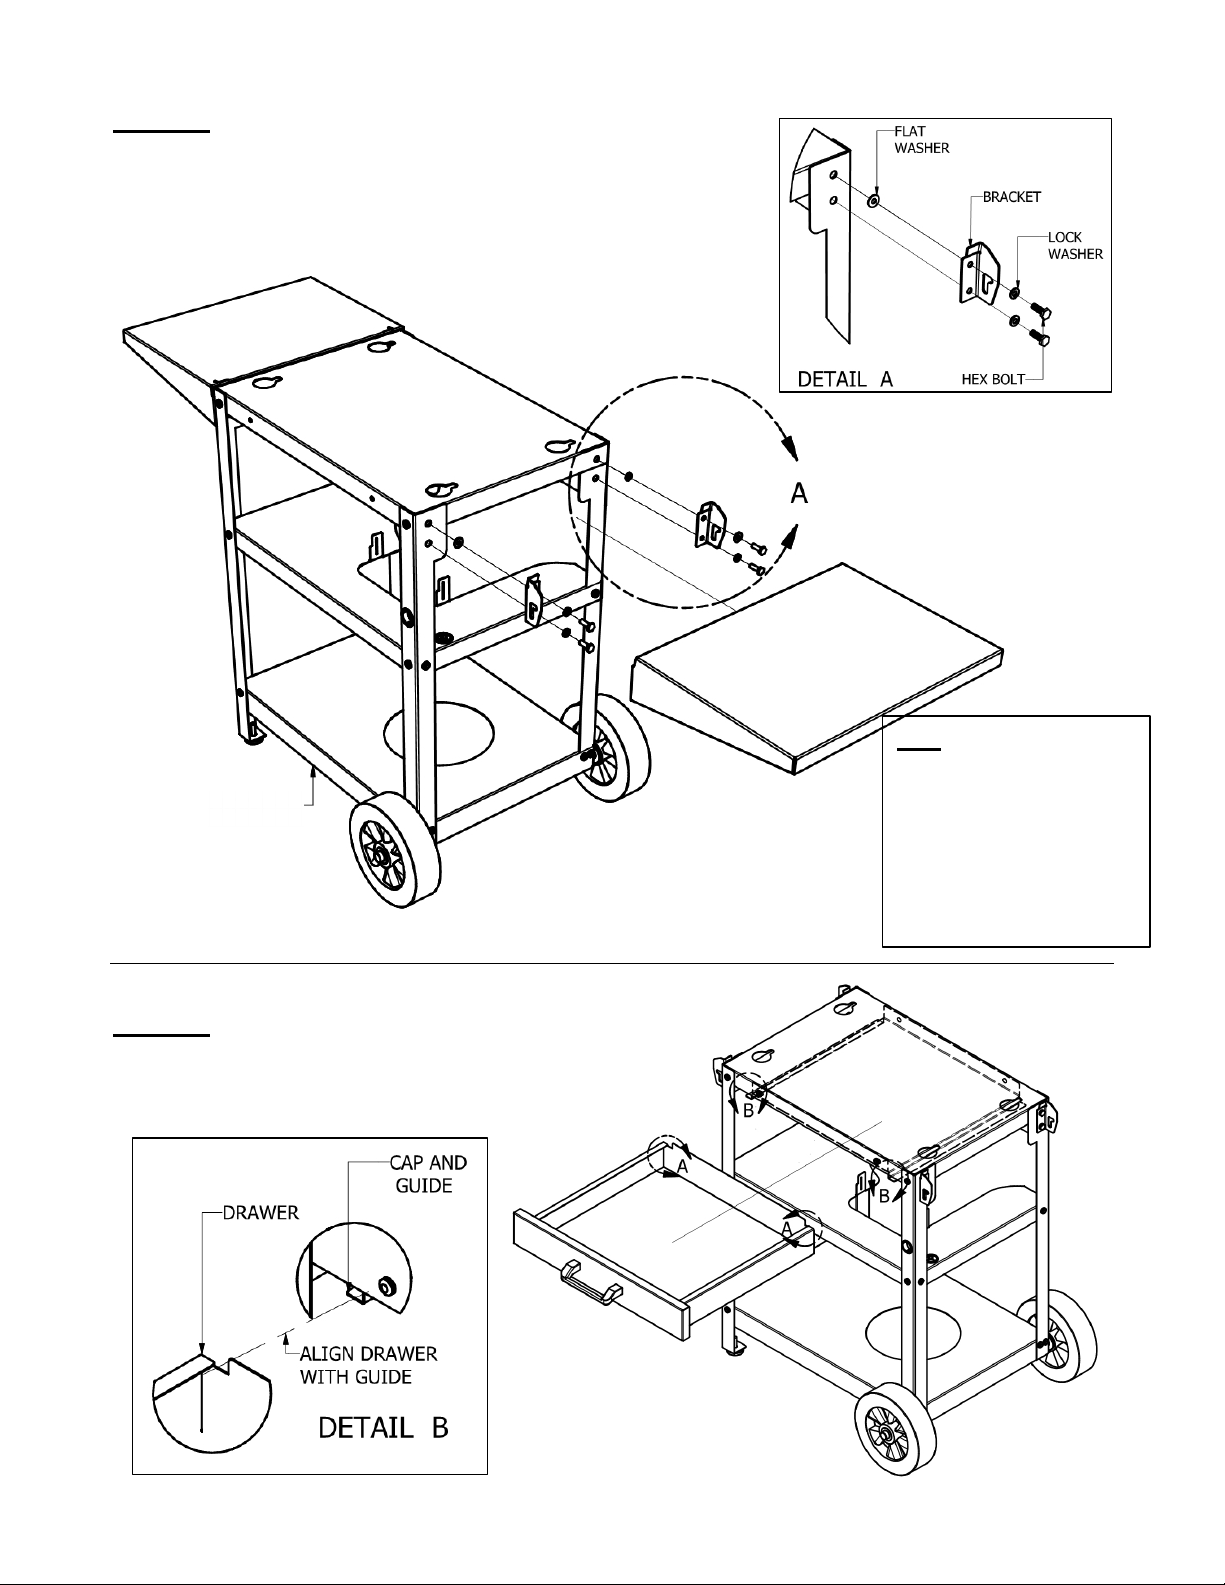
STEP 7 - Assemble Side Shelf (#2) to right side
of cart using 1-Right Bracket (#16b) and 1-Left
Bracket (#16a); 2-Hex Bolt (#17), 1-Flat Washer
(#15) on the top Hex Bolt, and 2-Lock Washer
(#13) per bracket. Repeat for left side.
STEP 8 - Insert Drawer (#9)
into guides underneath Top
Shelf (#1).
Tip: Assemble front
bracket first, then just
the top Hex Bolt of the
rear bracket. Insert
shelf pins into slots,
then secure with Hex
Bolt in bottom hole of
rear bracket.
FRONT
Form: SOL-AA23GC-617 Page 8
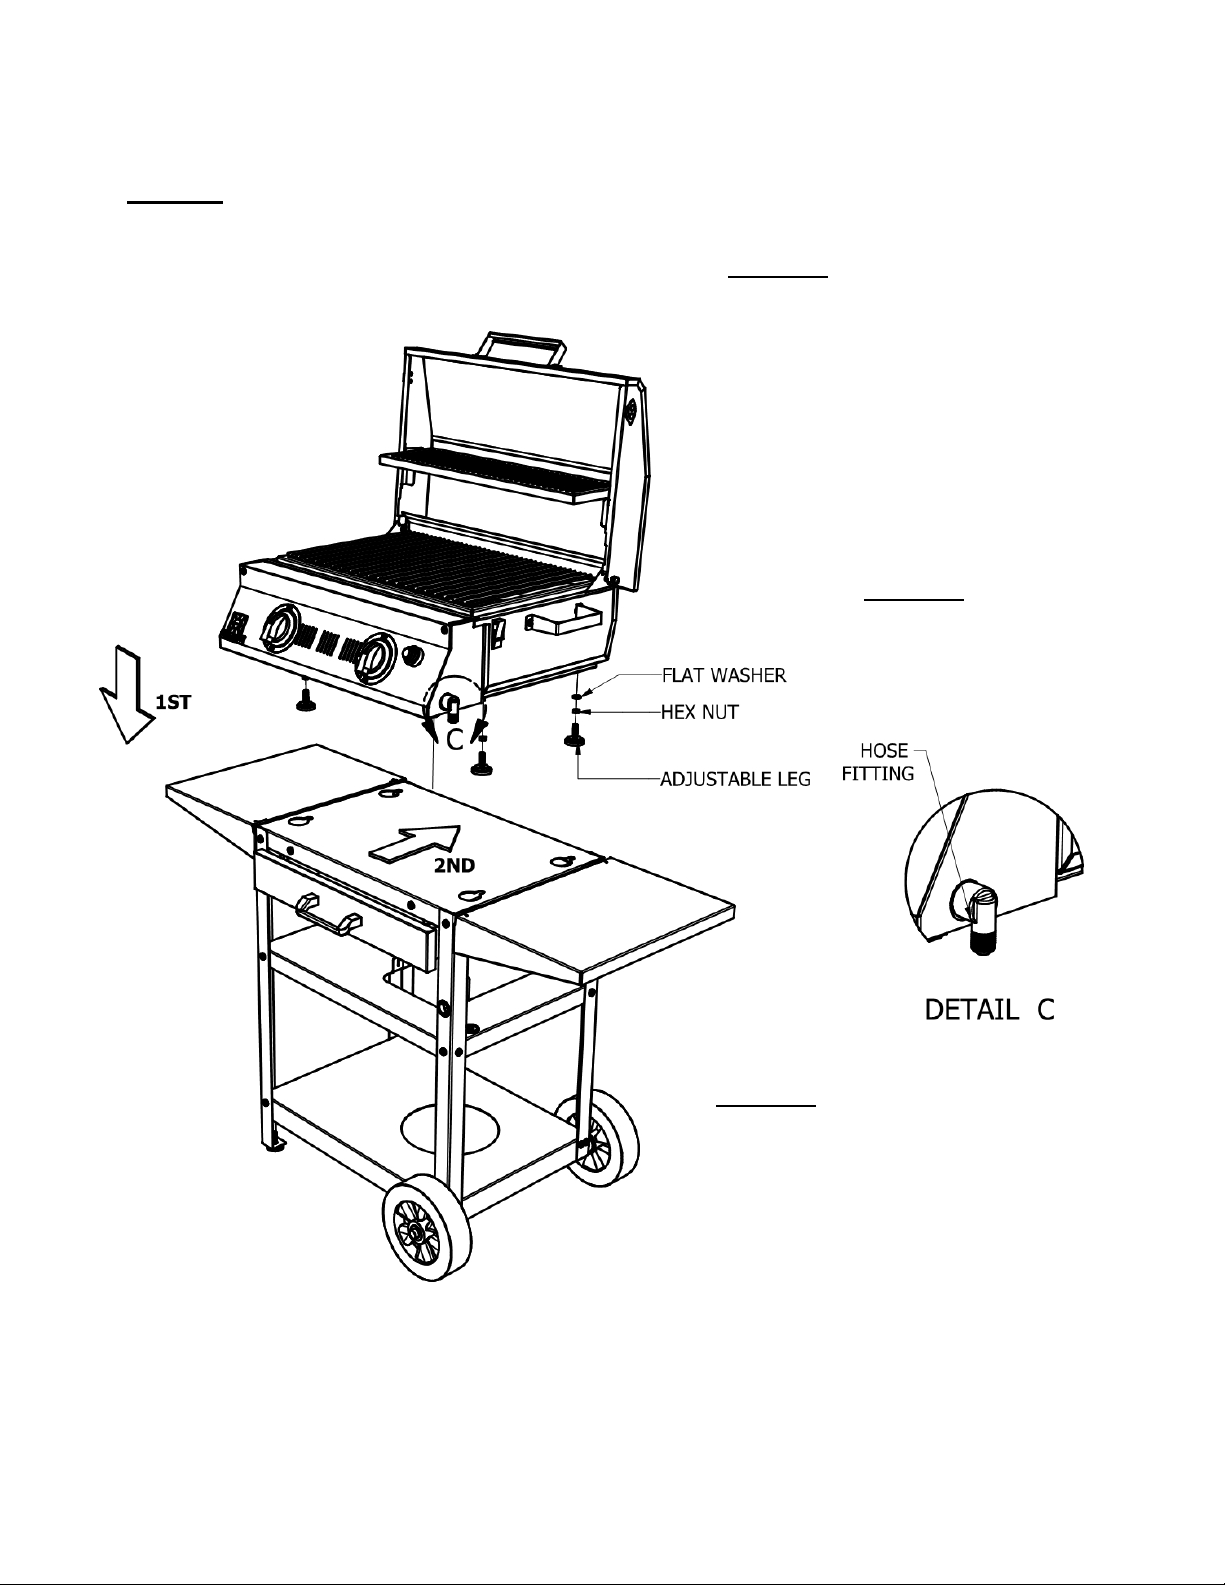
STEP 9B - With
Adjustable Wrench,
turn gas input fitting
clockwise to straight
down position.
STEP 9C - Set the four feet
through the holes in the top shelf,
then push the grill to the rear to
locate the threaded portion of the
feet into the keyways. Tighten the
four feet from underneath the top
shelf to secure the Grill to the
Cart.
STEP 9 - Assemble Grill (Solaire AllAbout Double Burner) to Cart
STEP 9A - Thread Hex
Nut (#21) and Flat
Washer (#22) onto each
of the four Adjustable
Legs of the Grill (which
allows for Grill to securely
attach to Cart.

Form: SOL-AA23GC-617 Page 9
STEP 10 - Connect Hose to Grill, then Hose to Propane Tank
From underneath the Middle Shelf (#8), pass the small end of the Hose (supplied with the
Grill) through the hole, then though the hole in the Front Right Leg “A” (#6). Assemble the
fitting onto the Hose Fitting on the Grill (Note: Do Not use Teflon tape or pipe thread
compound on these threads, as doing so could result in a gas leak). Tighten fitting snugly with
wrench.
Insert 20 lb. Propane Tank into hole in Bottom Shelf. Hand-tighten fitting on Regulator to tank.
STEP 11 - Secure Propane Tank by sliding the
Tank Guard (#18) through the two slots on both
sides of the upper portion of the tank.
STEP 12 - Happy Grilling!

Form: SOL-AA23GC-617 Page 10
Care of Your Cart
Please refer to the Care/Use Manual provided with your AllAbout Grill for Care of Stainless
Steel, or visit our Knowledge Base at www.RasBox.com
Solaire Infrared Grills Limited Warranty
This warranty covers Item #SOL-AA23GC
DURATION OF WARRANTY
Rasmussen Iron Works, Inc. warrants all Cart components to the original purchaser to be free
of factory defects in material and workmanship for a period of Two (2) years from the original
date of purchase. This does not apply if the unit was subject to other than normal household
use.
Rasmussen Will Cover:
Repair or replacement, at our election, for parts found to be defective due to defects in
materials or workmanship.
Rasmussen WILL NOT Cover:
• Installation or start-up
• Damage resulting from accident, alteration, misuse, abuse, hostile environments, improper
installation or installation not in accordance with local codes.
• General maintenance.• Shipping damage• Service by an unauthorized agency.
• Damage or repairs due to service by an unauthorized agency.
• The use of unauthorized parts.• Overtime, weekends, holidays
• Improper installation, such as: no regulator, improper hook-up, etc.
• Service visits to correct the installation. • Repairs due to other than normal use.
• Supply the user with operational assistance on site.
Replacement will be F.O.B. Rasmussen Iron Works, Inc., Whittier, California. Rasmussen will
not be liable for any transportation costs, labor costs, or export duties. This warranty shall not
apply, nor can we assume responsibility for damage that might result from failure to follow
manufacturer’s instructions or local codes, where the appliance has been tampered with or
altered in any way or which, in our judgement, has been subjected to misuse, negligence, or
accident. Implied warranty shall not extend beyond the duration of this written warranty. This
warranty is in lieu of all other warranties expressed or implied and all other obligations or
liability, in connection with the sale of this appliance.
How to Obtain Service:
For warranty service, contact Rasmussen. Provide the Model #, Serial #, gas type and date of
installation, and a brief description of the problem, as well as photos (up to 8 mb per email)
that support your claim.
Contact us at:
Rasmussen Gas Logs & Grills
12028 Philadelphia Street, Whittier, CA 90601 USA
This manual suits for next models
1
Table of contents


