Solar Electronics FK 4000-R User manual

Instructions d’installation
Extension système MIG/MAG
Einbauanleitung
MIG/MAG Systemerweiterung
Installation instructions
MIG/MAG system extension
Autotransformateur FK 4000-R
Autotransformer FK 4000-R
Autotrafo FK 4000-R
DEENFR
/ Battery Charging Systems / Welding Technology / Solar Electronics
42,0410,0686 002-04042012

1
DE
Einbauanleitung Autotrafo FK 4000-R
Allgemeines
Warnung! Fehlerhaft durchgeführte Arbeiten können schwerwiegende Sach-
und Personenschäden verursachen. Nachfolgend beschriebene Tätigkeiten
dürfen nur von geschultem Fachpersonal durchgeführt werden! Beachten Sie
die Sicherheitsvorschriften in der Bedienungsanleitung der Stromquelle.
Warnung! Ein Elektroschock kann tödlich sein. Vor Öffnen des Gerätes:
- Netzschalter der Stromquelle in Stellung „O“ schalten
- Stromquelle vom Netz trennen
- Deutlich lesbares und verständliches Warnschild gegen Wiedereinschal-
ten anbringen
Nach dem Öffnen des Gerätes gegebenenfalls spannungsführende Bauteile
(z.B. Kondensatoren) entladen.
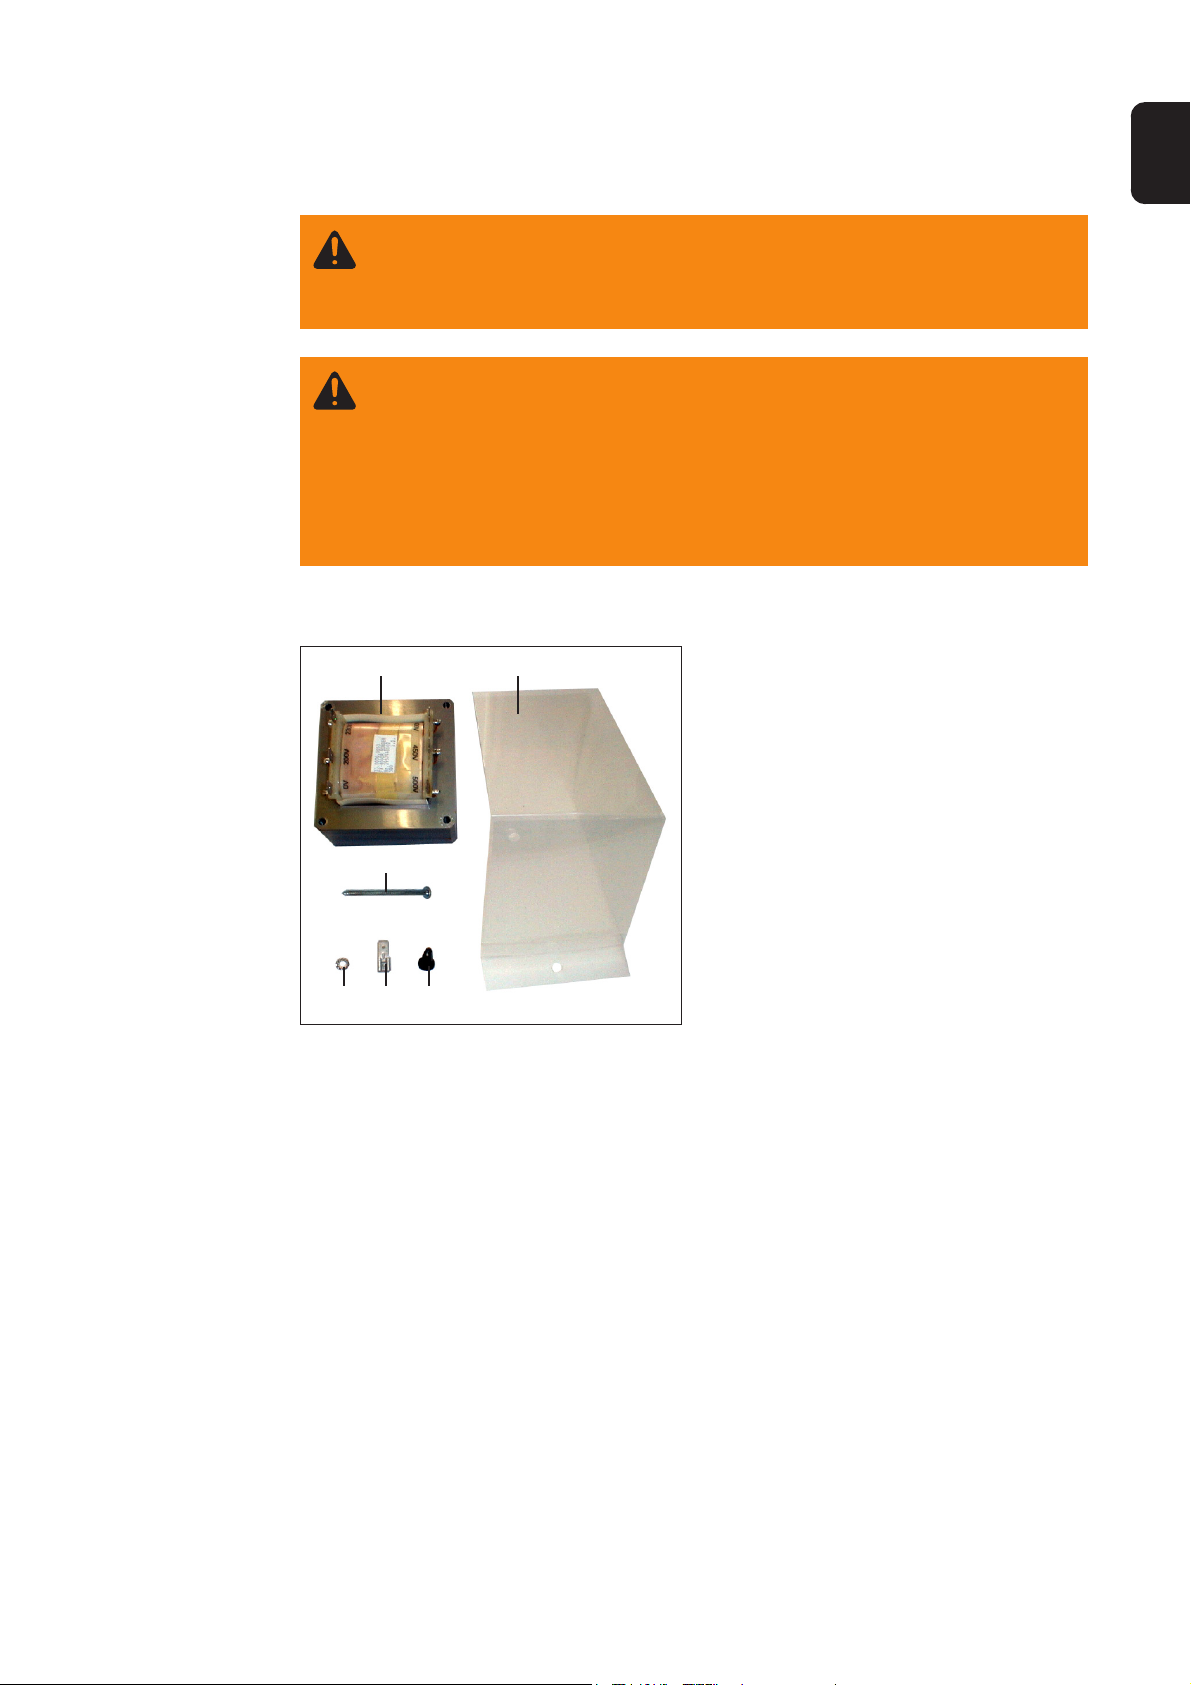
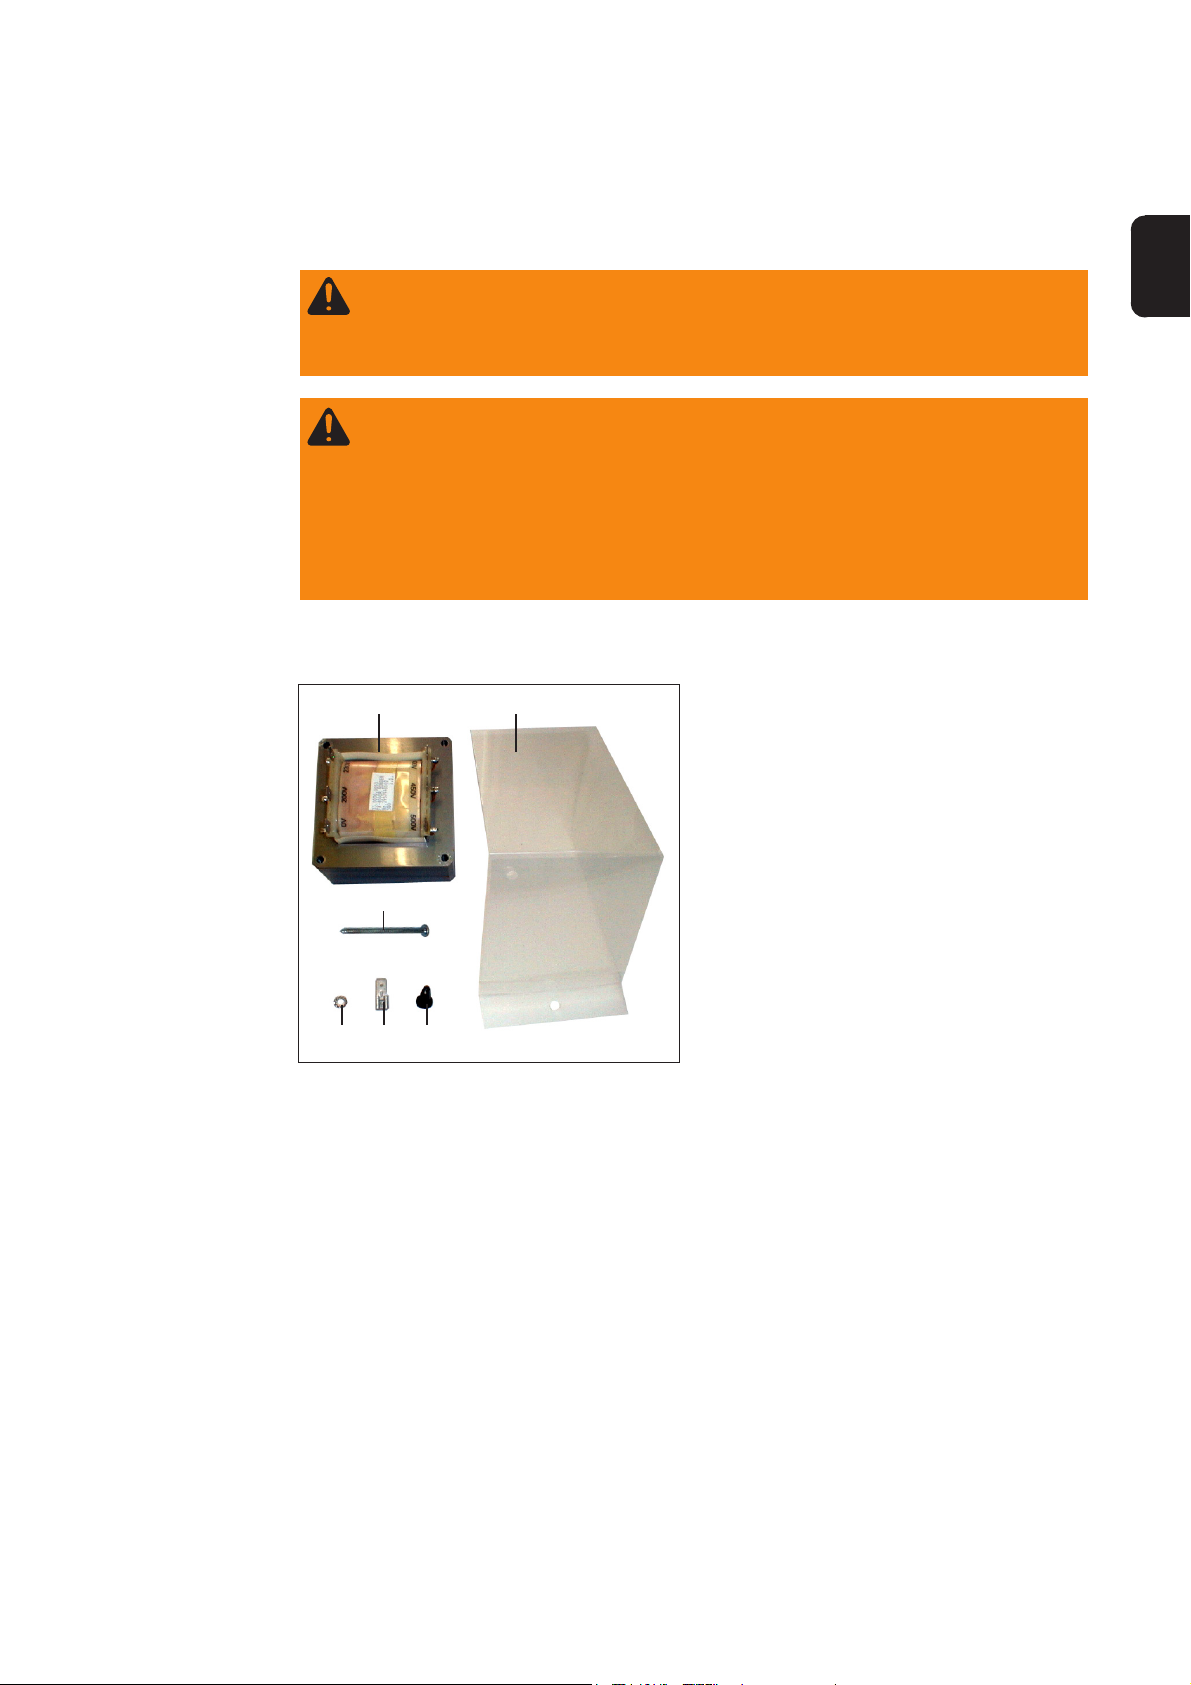
(1) 1 Stk. Autotrafo FK 4000-R 33.0030.0054
(2) 4 Stk. Linsenblechschraube 42.0401.0817
(3) 1 Stk. Autotrafoabdeckung 42.0409.2632
(4) 3 Stk. Kunststoffniete 42.0407.0478
(5) 4 Stk. Fächerscheibe 42.0407.0312
(6) 1 Stk. Steckverteiler 43.0003.0308
Einbauset be-
steht aus
Abb.1 Einbauset Autotrafo
Vorgangsweise 1. Seitenteil entfernen
2. Flachsteckverbinder X2 vom Kabelbaum demontieren
3. Ausbrechblech aus Ventilatorblech mittels Schraubendreher herausbrechen
4. Autotrafo FK4000-R (1) mittels Linsenblechschrauben (2) und Fächerscheiben (5)
so montieren, daß die Flachsteckerleiste 0-200-230 zur Pumpe zeigt
5. Anschlußleitung „OV“ (von Klemme X1/Pin5) am Autotrafo auf Flachsteckzunge OV
anstecken
6. Anschlußleitung „200-230V“ (von Molex X10/Pin15) am Autotrafo je nach Netz-
spannung auf Flachsteckzunge 200V oder 230V anstecken
7. Steckverteiler (6) am Autotrafo auf Flachsteckzunge 400V aufstecken
8. Anschlußleitung „400-450-500V“ (von Molex X10/Pin8) je nach Netzspannung am
Autotrafo auf Flachsteckzunge 400V, 450V oder 500V anstecken
(1)
(6)(5) (4)
(3)
(2)
2
Hinweis! Die 450V-Abzapfung ist
für 440V und 460V Netzspan-
nung geeignet!
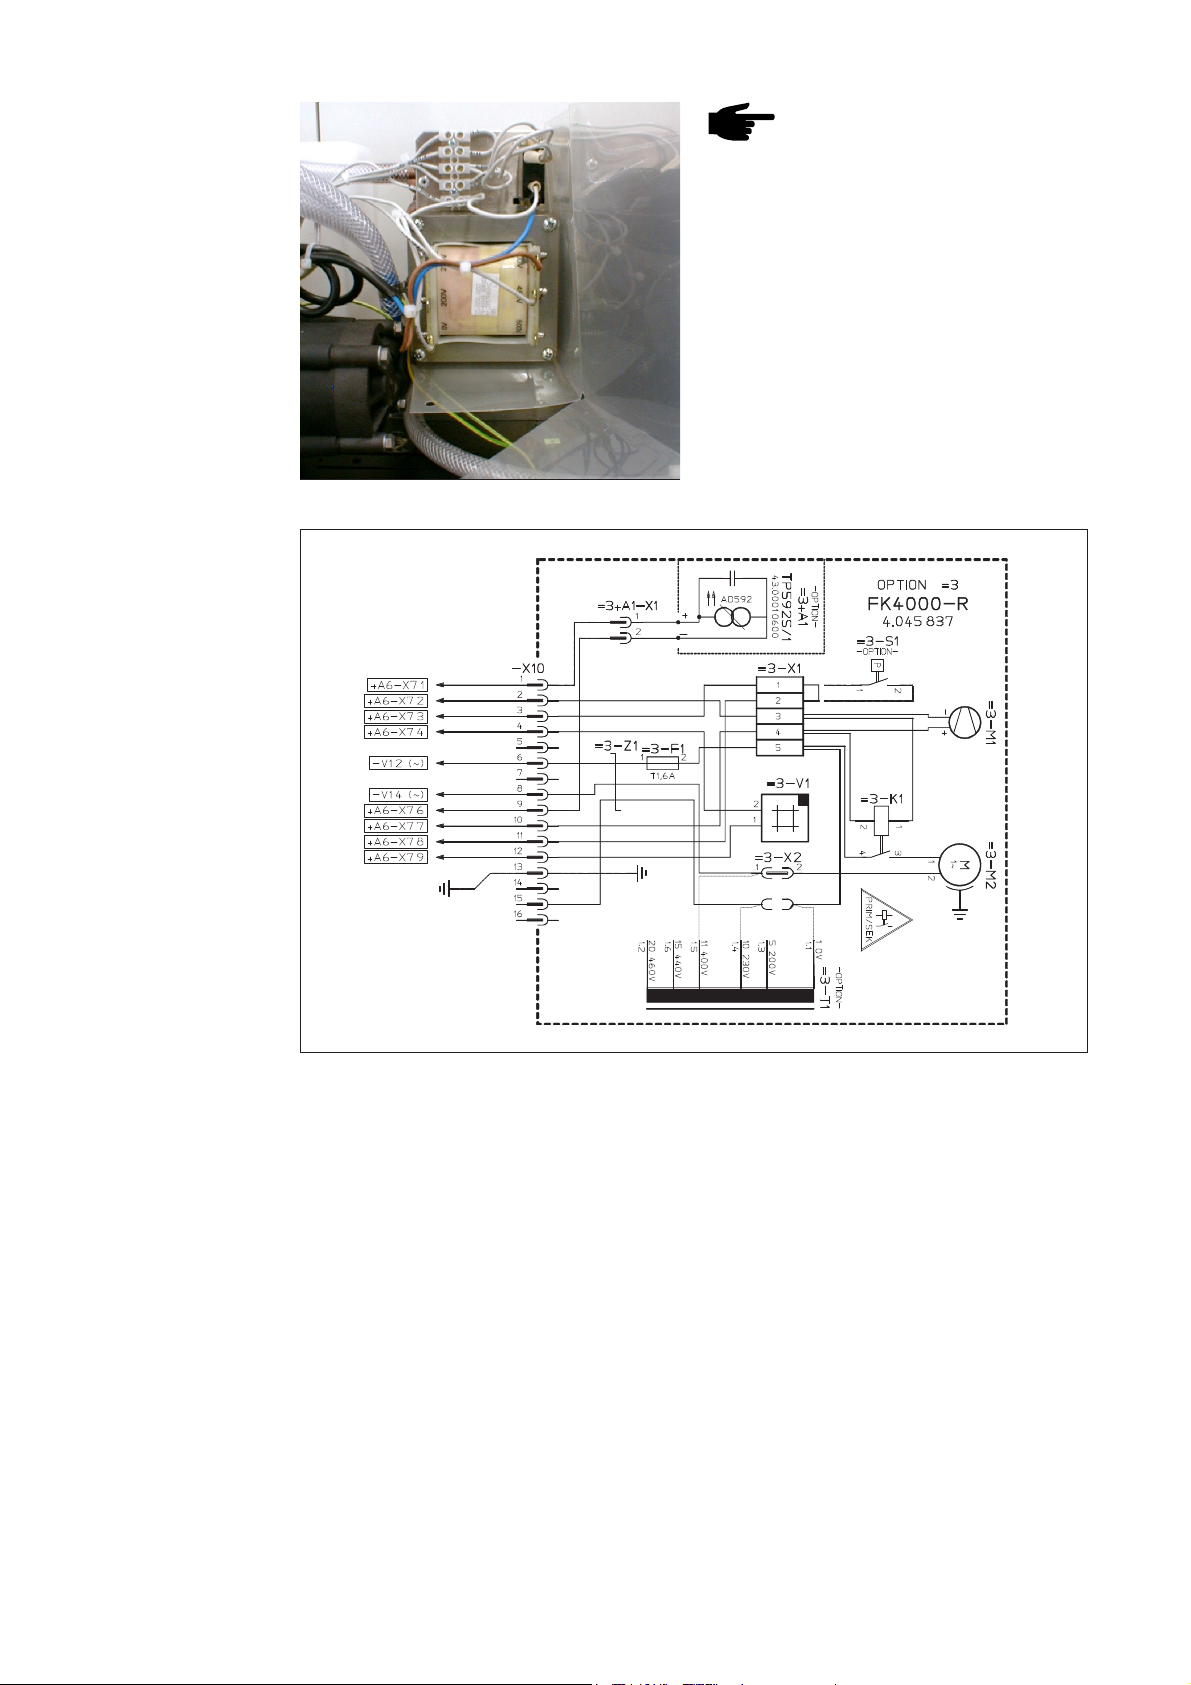
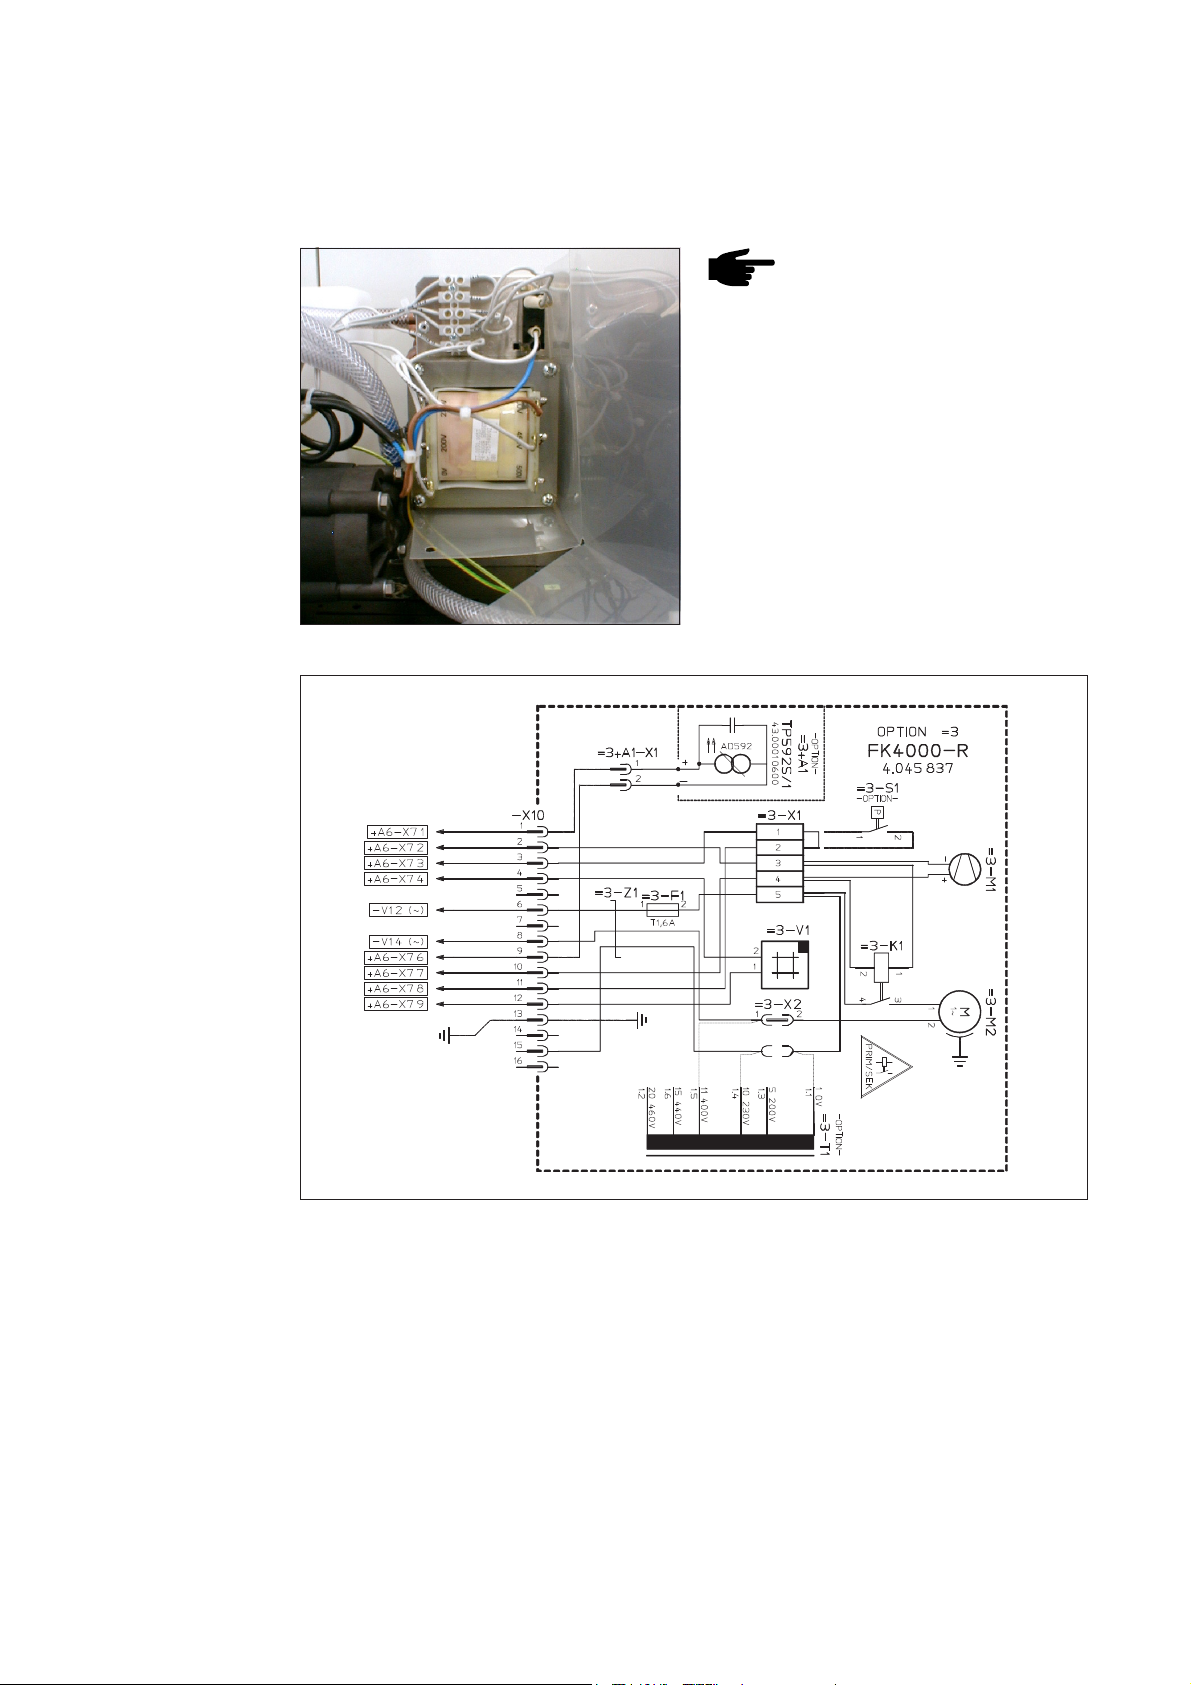
Abb.2 Autotrafo FK 4000-R montiert
Abb.3 Auszug aus Gesamtschaltplan TS 4000/5000, TPS 4000/5000
9. Versorgungsleitung Kreiselpumpe 3-
M2/Pin2 (braune Litze) am Autotrafo
auf Steckverteiler der Flachsteckzun-
ge 400V aufstecken
10. Autotrafoabdeckung (3) mittels
Kunststoffnieten (4) montieren
11. Seitenteil am Kühlgerät wieder
montieren
Vorgangsweise
(Fortsetzung)
1
EN
Installation instructions for autotransformer
FK 4000-R
General remarks
Adapter kit
comprising
Fig.1 Autotransformer adapter kit
Procedure 1. Remove the side panel
2. Remove the blade connector X2 from the wiring harness.
3. Remove the break-out section from the vent panel using a screwdriver.
4. Fit the autotransformer FK4000-R (1) using self-tapping pan (2) head screws and
(5) serrated lock washers so that the 0-200-230 blade connector strip points to-
wards the pump.
5. Connect the OV interconnecting cable (from terminal X1/pin 5) on the autotransfor-
mer to the OV blade connector lug.
6. Depending on the mains voltage, connect the 200 – 230V interconnecting cable
(from Molex X10/Pin 15) on the autotransformer to the 200V or 230V blade connec-
tor lug.
(1)
(6)(5) (4)
(3)
(2)
(1) 1 off Autotransformer FK 4000-R 33.0030.0054
(2) 4 off Self-tapping pan head screws 42.0401.0817
(3) 1 off Autotransformer cover 42.0409.2632
(4) 3 off Plastic rivets 42.0407.0478
(5) 4 off Serrated lock washers 42.0407.0312
(6) 1 off Adapter plug 43.0003.0308
Warning! Work that is not carried out correctly can cause serious damage and
injury. The actions described below may ONLY be carried out by skilled, trained
technicians! Observe and follow the “Safety rules” in the “Operating Instructions”
manual for the power source.
Warning! An electric shock can be fatal. Before opening up the machine:
- Shift the mains switch of the power source into the “O” position
- Unplug the power source from the mains
- Affix an easily readable and understandable warning sign to prevent machi
ne from being switched back on.
Upon opening up the machine discharge any live components, if available (e.g.
electrolytic capacitors).
2
Fig.2 FK 4000-R autotransformer fitted
Procedure
(continued)
7. Connect the adapter plug (6) to the 400 V blade connector lug on the autotransfor-
mer.
8. Depending on the mains voltage, connect the 400-450-500V interconnecting cable
(from Molex X10/Pin 8) to the 400V, 450V or 500V blade connector lug on the
autotransformer.
Note:! The 450V tap is suitable
for 440V and 460V mains
voltage.
9. Connect the centrifugal pump supply
cable 3-M2/Pin 2 (brown wire) on the
autotransformer to the adapter plug
on the 400V blade connector lug.
10. Secure the autotransformer (3) cover
with plastic rivets (4).
11. Refit the side panel on the cooling
unit.
Fig.3 Excerpt from TS 4000/5000, TPS 4000/5000 overall circuit diagram

1
FR
Instructions d´installation pour autotransformateur
FK 4000-R
Sécurité
Attention !Un choc électrique peut être mortel. Avant d’ouvrir l’appareil :
- Mettre le commutateur principal du générateur sur «O»
- Isoler le générateur du réseau
- Installer un écriteau lisible et compréhensible interdisant la remise en
circuit
Après ouverture de l´appareil, décharger le cas échéant les composants à
charges électriques (p.ex. les condensateurs).
(1) 1 unité transformateur auto FK 4000-R 33.0030.0054
(2) 4 unités vis à tôle à tête bombée 42.0401.0817
(3) 1 unité capot du transformateur auto 42.0409.2632
(4) 3 unités rivets en plastique 42.0407.0478
(5) 4 unités rondelles à dents chevauchantes extérieures 42.0407.0312
(6) 1 unité tableau de distribution à fiches 43.0003.0308
Attention ! Des travaux mal effectués peuvent occasionner de graves dommages
matériels et corporels. Les opérations décrites ci-après doivent être réalisées
uniquement par le personnel qualifié. Respectez les consignes de sécurité du
manuel d’utilisation du source de courant.
Le set
d´installation se
compose de
Fig.1 Set d’installation: transformateur auto
(1)
(6)(5) (4)
(3)
(2)
Procedure 1. Retirer l’élément latéral
2. Démonter le connecteur à fiche plate X2 du faisceau de câbles
3. Enlever la zone de la tôle avec partie enfonçable de la tôle du ventilateur à l’aide
d’un tournevis
4. Monter le transformateur auto FK4000-R (1) au moyen des vis à tôle à tête bom-
bée (2) et des rondelles à dents chevauchantes extérieures (5) en faisant en sorte
que la barre à fiche plate 0-200-230 soit orientée vers la pompe
5. Brancher la ligne de connexion "OV" (de la borne X1/broche 5) sur la lame de
contact à fiche plate OV

2
Fig.2 Transformateur auto FK 4000-R monté
Procedure
(suite)
Remarque! La lame de contact
450V peut être utilisée pour une
tension d’alimentation secteur de
440V und 460V !
9. Embrocher la ligne d’alimentation
électrique de la pompe centrifuge 3-
M2/broche 2 (toron brun)sur le
distributeur à fiche de la lame de
contact 400V située sur le transfor-
mateur auto
10. Monter le capot de recouvrement du
transformateur auto (3) au moyen
des rivets en plastique (4)
11. Remettre en place l’élément latéral
sur l’appareil de refroidissement
6. Brancher la ligne de connexion "200-230V" (de Molex X10/broche15) située sur le
transformateur auto (selon la tension d’alimentation) sur la lame de contact à fiche
plate 200V ou 230V
7. Embrocher le tableau de distribution à fiches (6) sur la lame de contact à fiche
plate 400V située sur le transformateur auto
8. Brancher la ligne de connexion "400-450-500V" (de Molex X10/broche 8) en
fonction de la tension d’alimentation sur la lame de contact à fiche plate 400V,
450V oder 500V située sur le transformateur auto
Fig.3 Extrait du schéma de connexion global TS 4000/5000, TPS 4000/5000

ud_fr_st_so_00082 012011
FRONIUS INTERNATIONAL GMBH
Froniusplatz 1, A-4600 Wels, Austria
Tel: +43 (0)7242 241-0, Fax: +43 (0)7242 241-3940
E-Mail: [email protected]
www.fronius.com
www.fronius.com/addresses
Under http://www.fronius.com/addresses you will find all addresses
of our Sales & service partners and Locations.
Table of contents
Languages:
Popular Transformer manuals by other brands

Gossen MetraWatt
Gossen MetraWatt WZ11 Series operating instructions

Larson Electronics
Larson Electronics DCP-16-DP-HD instruction manual

RAM
RAM TUS404 user manual

Camille Bauer
Camille Bauer SIRAX BT7200 operating manual

Siemens
Siemens SIDOOR 6FB1112-0AT20-2TR0 operating instructions

Bryston
Bryston TF1 user manual


