SolarMate SM907 User manual
WARRANTY
Thank you for purchasing a quality SOLARMATE product. This product has been manufactured and tested to specifications
for internal distribution. All SOLARMATE products have a limited warranty of 12 months from the date of purchase against
defects in material and manufacturer workmanship. Damage or injury due to the incorrect installation and application of
the products is not covered under warranty.
For all warranty related claims or queries, please contact GENTECH INDUSTRIES on +27 11 466 6790/793.
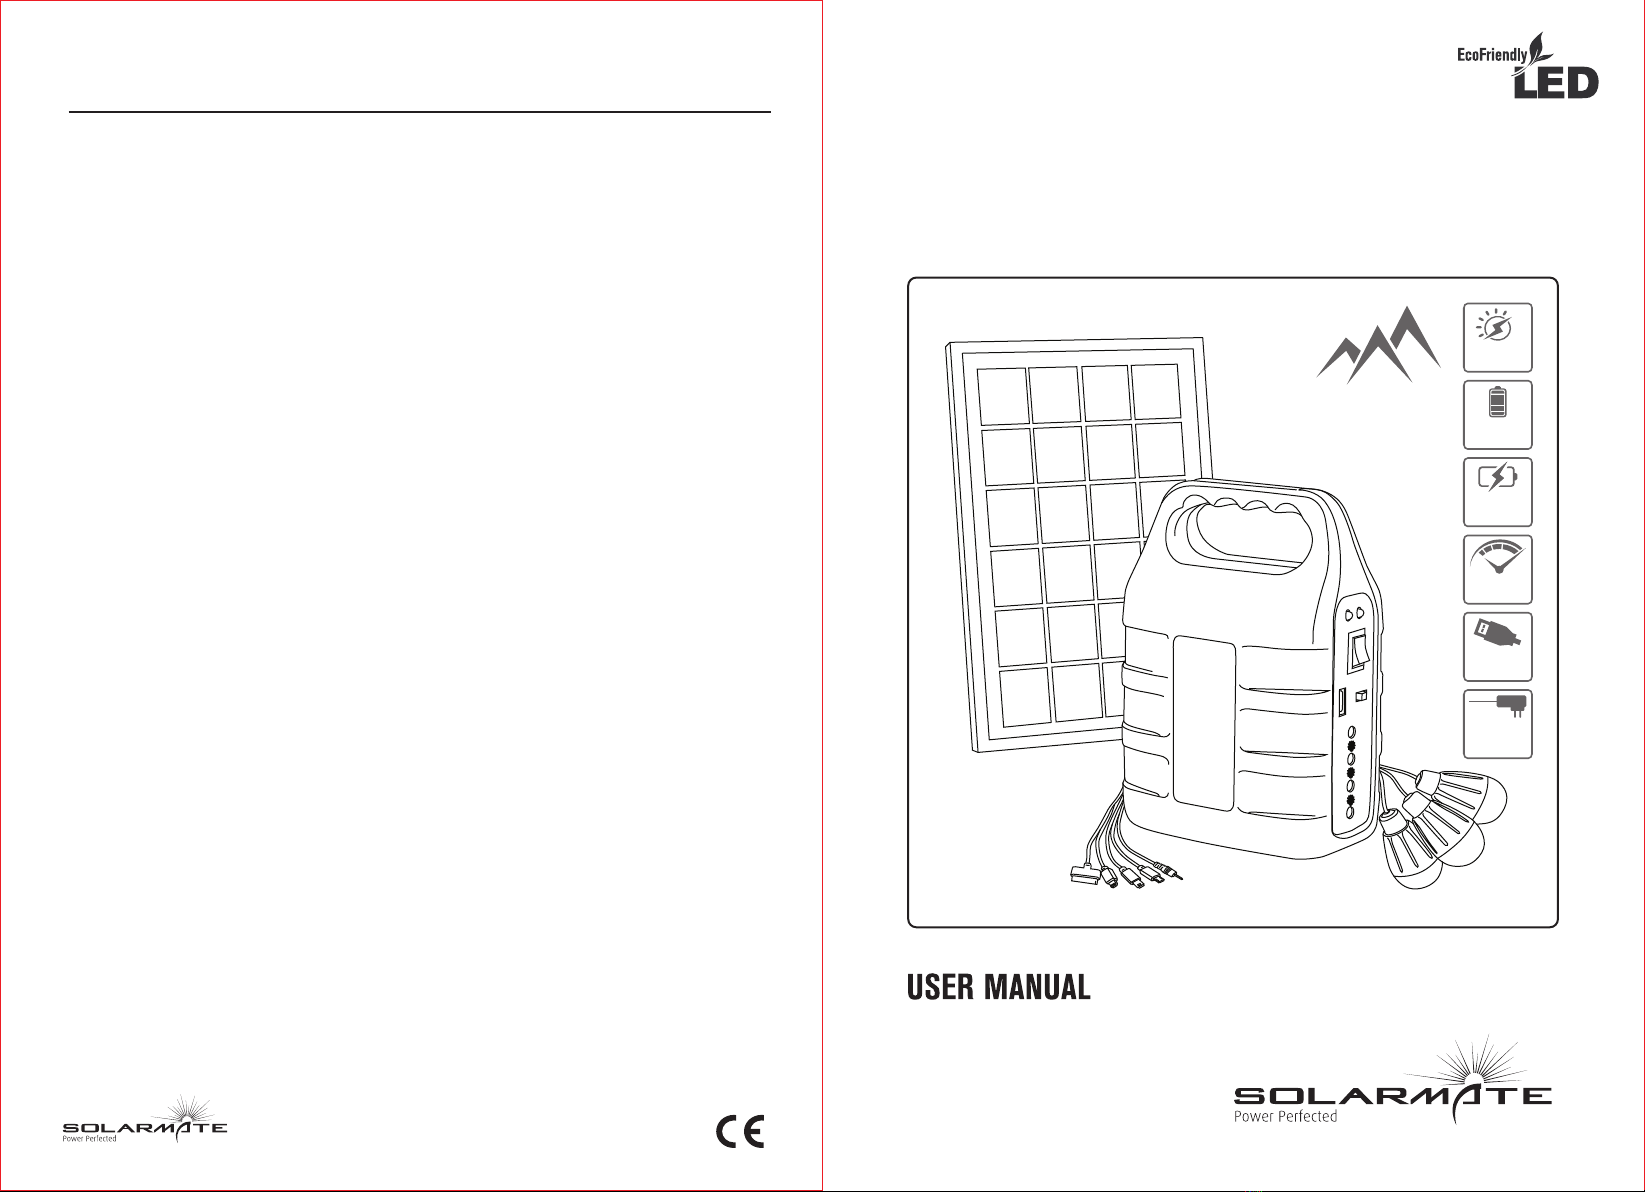
MOBILE SOLAR POWERED DC KIT
IDEAL FOR
CAMPING
BATTERY
6000mAh
CHARGING TIME
AC: 10HRS
SOLAR: 35HRS
LASTS UP TO
48 HOURS
SOLAR
POWERED
5-IN-1 USB
CHARGING CABLE
ADAPTER
INCLUDED
AC
SM907
PRECAUTIONS & WARNINGS
1. To ensure the life of battery, please recharge for 4 hours before first using it.
2. When the product USB port or DC port is exposed to over-current or a short circuit, it will
automatically disconnect all output and the power indicator lamp lights will go out. In order to
continue using it, you must first remove the over-current or short circuit failure items, then reopen
the power switch.
3. When the unit is being used, if the power indicator light (25%) is flickering or the ray of the LED light
is becoming dim, this indicates the power is close to finishing. When the output port stops working,
the battery is being depleted and is close to being flat - so switch off the power supply and stop
charging the device in order to continue using it for longer.
4. When in use, the unit becomes warm, but this is normal.
5. The longest charging time cannot surpass 24 hours.
6. When charging, don’t insert the charging plug into the output port, or it may burn out the internal
components and external charger.
7. Don’t use the unit’s adapter for anything else, or it will become damaged.
8. Don’t put the unit too close to fire or in case it catches on fire and explodes.
9. Don’t take apart or in any way damage the mobile power bank.
10. When in use, do not shine the light in the eyes directly as it may cause damage to the eyes.
11. Don’t put the product into water or expose to damp conditions because although it is rubberized, the
unit is not waterproof and must be kept dry.
12. The unit must be charged every two months when it is not used over long periods of time and must
be kept at full power; When charging, please keep away from flammable and explosive dangerous
goods.
13. Please turn the switch off when not in use to avoid power being lost.
14. Please follow the instructions and adhere to the precautions strictly and do not dissemble the unit
at all.

PRODUCT FEATURES
1. The quality product is quick charging, stable, durable (rubberized), reliable and safe; and is
environmentally friendly. It comes equipped with a hand shank and hook and is convenient to carry
and use. It is the best choice for all kinds of outdoor recreational activities and also for field work
where personnel are required to perform their duties in areas where there is no electricity available.
2. The SM907 has a built-in rechargeable 6000mAH lead-acid battery, charged by the built in solar
panel, that does not require maintenance.
3. It has a built-in circuit with a charging status indicator; ie. a 4 level power charge indicator, being
25%, 50%, 75% and 100%. This feature will keep one informed as to how much charge the battery
has at any given time.
4. Included is a fast charging high quality power supply charger with over-charge and trickle-charge
protection, and a status indication function.
5. This product is equipped with 3 DC output power cord that has discharge, over-current and short
circuit protection functions. It is capable of connecting multiple energy saving bulbs simultaneously
and it also has a DC input power charger that can include solar panels.
6. It is equipped with an energy-saving, environmentally friendly mono-crystalline silicon solar panel
with high conversion efficiency.
7. The SM907 has a super bright environmentally friendly LED light with an independent LED switch to
control light strength, of which the life span can be up to 100,000h. This LED light has low power
consumption; ie. the strongest light of 21SMD only consumes 3.1W and can work for over 20h; and
the weak light only consumes 1W and can work for over 60h. There are two 3W LED energy-saving
bulbs and the bulbs can work for 7h simultaneously.
8. This unit also has a USB input/output charge feature of which has a discharge, over-current and
short circuit protection function. It can set according to different brands, model and operation mode
and is compatible with all brands of devices, ie cellphones and iPads (Apple, Nokia, Samsung, Moto,
LG, Sony Ericsson etc). It also supports MP3,PDA, MP4 and MP5 including gaming consoles.
SPECIFICATIONS
• Solar Panel: 3W/6V Poly Crystalline Solar Panel
• LED Bulbs: 3 x LED lamps, 5W output with 3 meter long cable
• LED Lighting: 30 x 4W SMD white LED
• Battery: 6000mAh Lead Acid Maintenance free 6Ah/6V battery
• Output interface: 3 x port of 12V DC for LED bulbs
2 x 1.5A 6V USB output
• AC charging time: 10 hours
• Solar Charging time: 35 hours
• Working time: 3 pcs 3W bulbs can wor, continually for up to 48 hours
• Overcharge and discharge protection for battery integrated in PCB
CONTENTS:
• 6000mAh DC Power Unit
• Solar Panel
• 3 x 3W DC LED lamps including (3m cable)
• 1 x 5-in-1 USB charging cable
• 1 x AC power adaptor included
DIRECTIONS OF USE
1. When charging, insert the AC plug of the charger into the AC110 ~ 240V/50 ~ 60Hz power source
socket, the red indicator light of the charger will now be on. Then insert the DC plug of the charger
into the unit’s DC input socket, the relevant charging indicator light will now be on. When the
indicator light changes to green, it indicates the unit is now at full power and it takes about 10 hours
for the unit to fully charge. Note the power indicator will not be on while the unit is on charge.
2. When using the solar panel to charge the unit, face the solar panel towards sun, then insert the DC
plug into the unit’s DC input port - the unit’s indicator light will now be red. When the red light turns
green, it indicates that the unit is at full power. Note the power indicator will not be on while the unit
is on charge.
3. When using the USB output charger, insert one end of the USB power cord into the unit’s USB port
and the other end into digital devices. Then open the product power switch. The USB port will now
be charging and the electricity indicator light will be green indicating 25%,50%,75%, and 100%
charge.
4. When using an energy-saving bulb light, insert the power cord DC plug of bulb into the unit’s DC
output port and open the power switch. The bulb light will be on and the electricity indicator light will
be green indicating 25%,50%,75%, and 100%.
5. When using a LED light, push the LED switch to left, the light will be on bright, to the right is the dim
light and in the middle the light is off. When the power switch is OFF, the power indicator will not
function.
SPECIFICATIONS
Smartphone Digital Camera Digital Camcorder
Tablet
6000mAh


