manuals.online logo
Brands
  1. Home
  2. •
  3. Brands
  4. •
  5. Solaxx
  6. •
  7. Water Filtration System
  8. •
  9. Solaxx Saltron Retro User manual

Solaxx Saltron Retro User manual

Compliments of www.poolsandstuff.com
INTRODUCTION
The Saltron produces a pure form of chlorine by electrolysis of salt (NaCl) in order to sanitize your pool water. After the salt is converted to Chlorine and the bacteria
are killed, the chlorine converts back to salt and this process is ongoing. The salt concentration used is very low (less then that in a human tear). Chlorine can be
easily destroyed by ultraviolet light from the sun so it is always a good idea to run the Saltron as much as possible during the night hours along with the pool pump
system. That way the chlorine generated is not immediately destroyed by the sun rays. The chlorine level in your pool can be checked by using a standard chlorine
test kit.
IMPORTANT SAFETY INSTRUCTIONS
WARNING: To reduce the risk of injury or electric shock, do not allow children to use this product.
WARNING: Power supply should be installed in a shaded area to protect the transformer from direct sunlight.
WARNING: Do not connect the power supply unit to AC power until the installation is complete.
WARNING: Disconnect the power supply from the outlet when not in use.
WARNING: Do not operate with a damaged cord or power supply.
WARNING: To avoid risk of electrical shock, do not put the power supply in the water.
WARNING: Use of extension cords can result in death or injury.
WARNING: Make sure the power supply is unplugged from the wall when cleaning/servicing the cell assembly.
WARNING: The sole purpose of this product is for use as a chlorine generator as described in this manual; any modification or
other use will void the warranty.
WARNING: Never open the power supply for any reason. Failure to comply will result in loss of warranty.
2
Compliments of www.poolsandstuff.com
345
1. The pool chemistry must be balanced before
installing the Saltron in the swimming pool.
2. Locate an area of the pool which has an easy
access to a GFCI socket. This product will work best if
installed in close proximity to the pool return, which is
an outlet where water is returned to the pool after
going through the filter system.
3. For above-ground pool installation, remove
screws and caps securing the top ledge of the pool in
the desired area (Fig.1)
Hang the Saltron on to the ledge and tighten the
bracket screw to secure. Re-attach the cap to the pool
ledge. (Fig.2)
a. Press in the tabs and separate the upper hanger
from the lower bracket(Fig.3).
b. Pull the cable assembly through the hole (Fig.4). c. You should be left with just a cable coming out of the
lower hanger (Fig.5).
4. For In-ground pool installation, the upper hanger (above-ground) 1 should be replaced with the upper hanger (in-ground) 2 using the following steps:
INSTALLATION
3
12
Compliments of www.poolsandstuff.com
876
INSTALLATION
Secure the supplied upper hanger onto the lower hanger using the following steps:
a. Pull the cable up through the middle hole of the
upper hanger IG (Fig.6).
b. Snap the upper hanger IG onto the lower hanger
(Fig.7).
c. Loop the cable through the upper hanger hole and
under the assembly (Fig.8).
9 10 11
5. Affix the upper hanger directly on the pool edge
using hardware kit provided (Fig.9).
6. Adjust the thumb screws so that both are touching the pool wall (Fig.10, 11).
4
Compliments of www.poolsandstuff.com
1312
INSTALLATION
7. Affix the power supply to a wall or a post near the pool
in a shaded area (Fig.12).
8. Connect the cell cable connector securely into the
power supply cable connector (Fig.13).
9. Plug power supply into the GFCI socket.
10.Bubbles will rise from the unit in the water and a white
milky cloud may be observed. This is absolutely normal
and no special attention is needed.
11.The unit will default to 20 hours of chlorination per
day and the green LED should be illuminated. If the
HIGH or LOW SALT LED is illuminated, please refer to
the troubleshooting section of this manual.
12.Leave the unit on its default setting for a few days
and monitor the chlorine level each day. To adjust the
chlorine setting on the Saltron, refer to the Chlorine
Adjustment section of this manual.
The Saltron system is designed to automatically generate the chlorine for your pool. It is very important to note that chlorine is just one component of your pool chemistry.
Please make sure your pool meets the optimum chemistry levels in the following Pool Chemistry Chart. Test your water weekly or take a water sample to your nearest pool
store. Maintaining these levels will maximize the life of this product. Be sure to inform the pool professional that you are using a chlorine generator.
FACTORS EFFECTING POOL CHEMISTRY
1 Salt
2 PH
3 Free Chlorine
4 Total Alkalinity
5 Cyanuric Acid
6 Saturation Index
7 Phosphates
8 Nitrates
9 Metals
10 Calcium Hardness
PREFERRED LEVELS
3000 to 4000 ppm
7.2 to 7.6
1 to 3 ppm
80 to 120 ppm based on the Saturation Index
60 - 80 ppm
0 ± 0.3
0 ppm
0 ppm
0 ppm
Depends on the pool finish
Pool Chemistry Chart
5
Compliments of www.poolsandstuff.com
CHLORINE ADJUSTMENT
SALT REQUIREMENT
The best salt is a food-quality granulated salt, a 99.9% pure salt or solar salt. These types of salt should be purchased from a pool store and are designed for use with chlorine
generators.
Do not use rock salt, iodized salt or salt with anti-caking additives. Do not use salt with more than 1% yellow prussiate of soda.
Salt Table: Amount of salt needed to achieve 3000 ppm level in your pool.
The optimum salt level is between 3000-4000 ppm. Use the chart above to determine the amount of salt for your pool. The column on the left is the amount of water in your pool.
The column on the top is the current salt level measured in your pool. Always check your salt level before adding salt to the pool even if this is your first time.
Prior use of liquid chlorine and tablets could have caused an increase in salt levels.
3
10,000 (38m )
3
12,000 (45m )
3
14,000 (53m )
3
16,000 (61m )
3
18,000 (68m )
3
20,000 (76m )
250 lbs/
(114 kg)
300 lbs/
(136 kg)
350 lbs/
(159 kg)
400 lbs/
(182 kg)
450 lbs/
(204 kg)
500 lbs/
(227 kg)
210 lbs/
(95 kg)
250 lbs/
(114 kg)
290 lbs/
(132 kg)
335 lbs/
(151 kg)
375 lbs/
(170 kg)
420 lbs/
(189 kg)
170 lbs/
(76 kg)
200 lbs/
(91 kg)
235 lbs/
(106 kg)
270 lbs/
(121 kg)
300 lbs/
(136 kg)
335 lbs/
(151 kg)
125 lbs/
(57 kg)
150 lbs/
(68 kg)
175 lbs/
(79 kg)
200 lbs/
(91 kg)
225 lbs/
(102 kg)
250 lbs/
(114 kg)
85 lbs/
(38 kg)
100 lbs/
(45 kg)
120 lbs/
(53 kg)
135 lbs/
(61 kg)
150 lbs/
(68 kg)
170 lbs/
(76 kg)
40 lbs/
(19 kg)
50 lbs/
(23 kg)
60 lbs/
(26 kg)
70 lbs/
(30 kg)
75 lbs/
(34 kg)
85 lbs/
(38 kg)
0
0
0
0
0
0
0
0
0
0
0
0
0 500 1000 1500 2000 2500 3000 3500
Pool Size in Gallons/
(Cubic Meters)
Salinity (ppm) measured in pool
6
After everything is setup, the display will show you a default screen with the current hours of operation per day. You may change this setting anytime by holding down the
for 3 seconds straight. The display will flash indicating it is now ready for time setting changes. In order to determine the proper chlorine timer setting for your pool, measure the
free chlorine level every couple of days during the first few weeks. Adjust the timer accordingly to achieve 1.0-3.0 PPM of Free Chlorine. It is advised to check the chlorine level
at least once a week to make sure the pool is properly sanitized. Weather, bather load, and sunlight have a major influence on the chlorine demand of the pool.
Note: If the pool has reached an undesirable amount of chlorine, it is recommended to unplug the Saltron power supply from the GFCI socket. Check chlorine levels each day
until the desired level is achieved. Plug the power supply back into the GFCI socket once the chlorine level is within the desired limit.
Compliments of www.poolsandstuff.com
CHLORINE ADJUSTMENT
Adding Salt:
Turn on the pool pump system and add salt directly to the pool. Use a brush to help dissolve the salt quickly. Any pool cleaner can be used to help dissolve the salt as well. Run
the pool pump system for 24 hours to make sure salt is properly dissolved. Do not add salt to the skimmer because this could damage the main pool equipment.
Removing salt from the pool:
Salt should not be removed from the pool unless the salinity exceeds 4500 ppm or the salinity of the water is undesirable. The only way to remove salt is by draining the pool and
adding fresh water.
POOL SIZE CALCULATION:
Use the following table based on the proper unit of measurement to determine your pool size.
Stabilizer (Cyanuric Acid) Levels:
Cyanuric acid is a critical component to the proper function of the Saltron system. It is very important to check cyanuric acid levels on a regular basis. Cyanuric acid helps
prevent the chlorine from being destroyed by the sun rays. Thus, the Saltron will have a longer lifetime. The optimum stabilizer level is 80 ppm. Stabilizer/conditioner is found in
liquid or granular form. When adding granular stabilizer to the pool, make sure you give it time to dissolve. Check levels for several days after adding and before adding more.
Pool ShapeVolume in Gallons (Units in ft)
RectangularLength x Width x Average Depth x 7.5 cubic feet
Circular/RoundDiameter x Diameter x Average Depth x 5.9 cubic feet
Oval/EllipticalLength x Width x Average Depth x 6.7 cubic feet
Pool ShapeVolume in Liters (Units in meter)
RectangularLength x Width x Average Depth x 1000 cubic meter
Circular/RoundDiameter x Diameter x Average Depth x 785 cubic meter
Oval/EllipticalLength x Width x Average Depth x 893 cubic meter
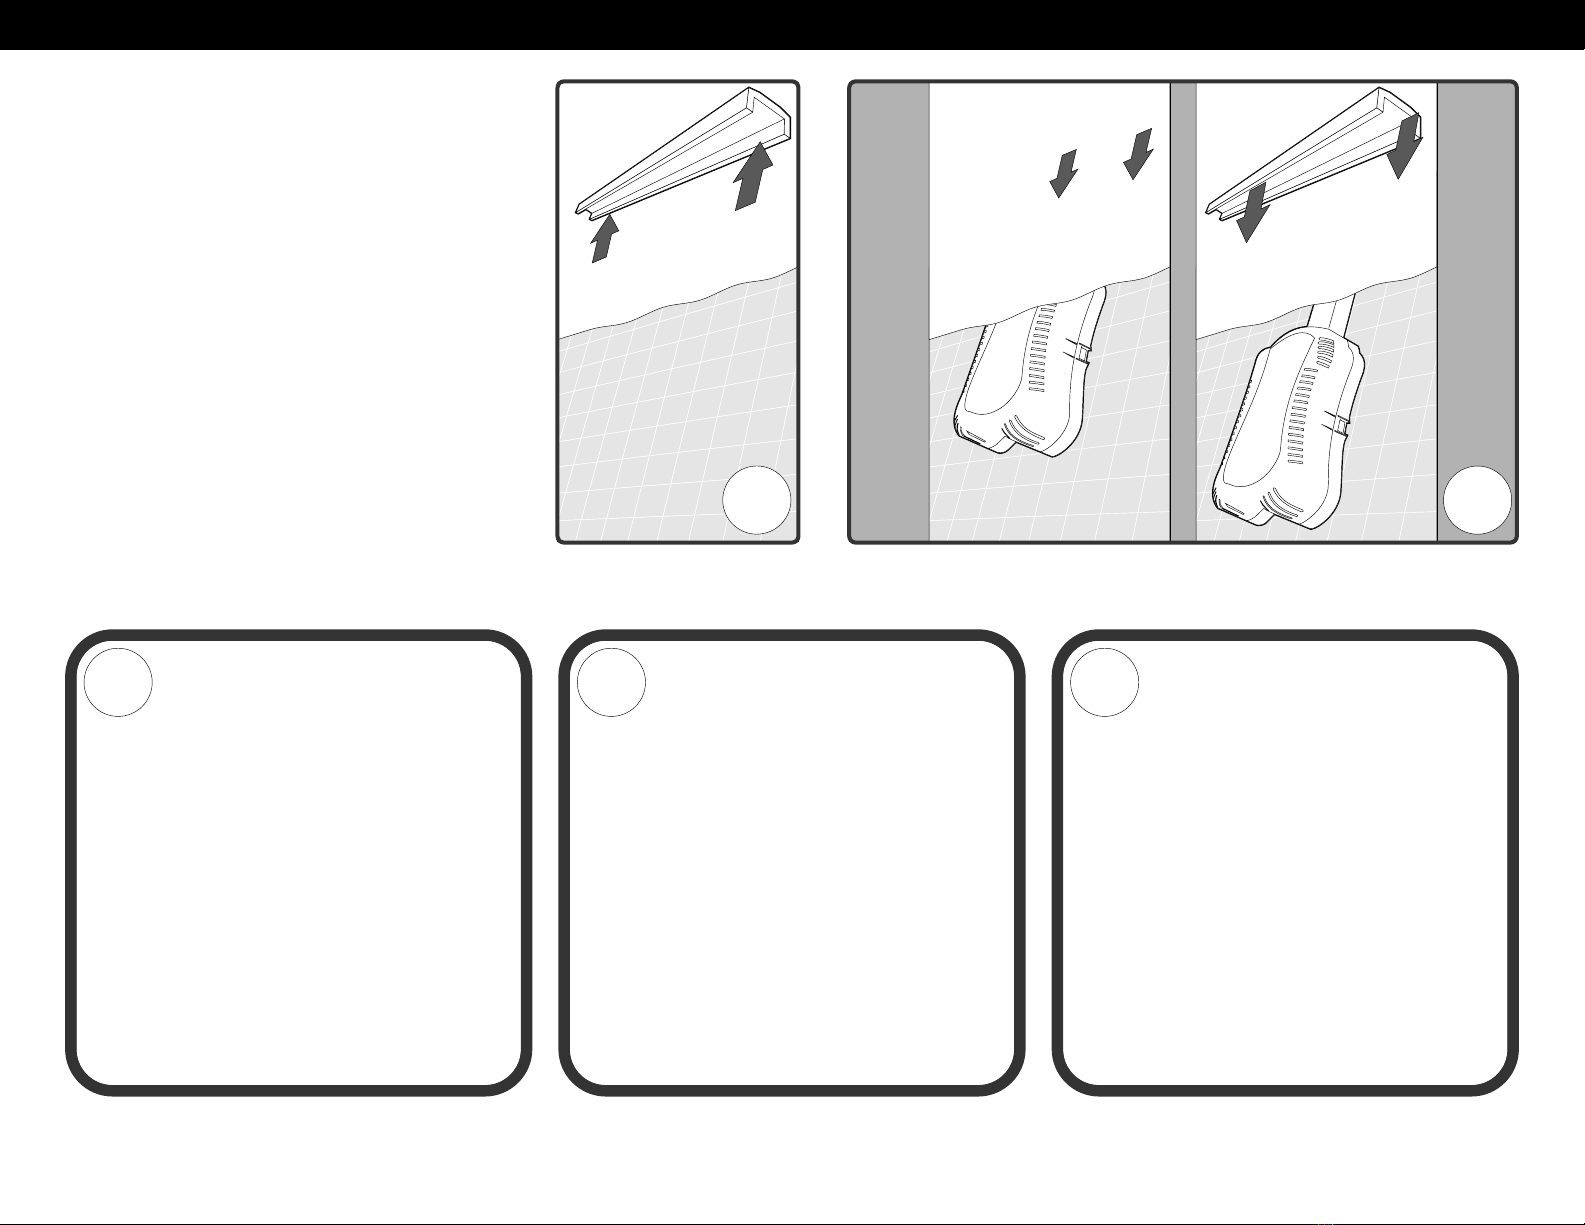
Inspecting the Cell:
The cell should be inspected every 3 months. Unplug the Saltron from the GFCI socket. Remove the cover of the cell housing so that the cell is exposed. Push the tab with your
finger and remove the cell. Inspect the cell for scaling (white, sugar-like) deposit. If scaling exists, the cell should be cleaned.
UNIT MAINTENANCE
7
Cleaning the cell:
To clean the cell, a bucket or a large cup should be used. The bucket should be filled
with 80% water and 20% muriatic acid. NEVER ADD WATER TO ACID, only acid to
water. It is recommended to wear safety goggles when handling the acid. Place the
entire cell into the bucket for 20 minutes. Remove the cell and dump the water from
the bucket into the pool. If the scaling remains, repeat the process. NEVER USE
ANY TOOLS TO CLEAN THE SCALE DEPOSIT. This will damage the plates and
result in immediate loss of warranty. After the scale is removed, rinse the cell with
fresh water. To re-install, replace cell into housing. Replace cover onto base.
Replace Saltron cell housing onto the hanger on the pool edge using the snapping
mechanism.
Winterizing:
Remove the Saltron cell housing from the pool. It is only necessary to remove it if the temperatures during the winter drop below 32 F (0 C) where you live. Clean the cell before
storing the Saltron system indoors. If the housing is not removed from the pool for winterization, freezing water will cause damage to the cell resulting in loss of warranty.
14 15 16
Compliments of www.poolsandstuff.com
SALTRON RETRO OPERATION MODE AND TROUBLE SHOOTING
8
no display
“- -”
“- -” and Hours (20 by
default) alternating
“LO” and Hours (20 by
default) alternating
Hours (20 by default)
“HI” and Hours (20 by
default) alternating
“HI”
“8 8” blinking
chlorine level is low
chlorine level is too high
Symptom in Pool Water
no lights
no lights
no lights
Yellow light
Green light
Red light
Red light blinking
All lights blinking
1 - power outage
2 - fuse burnt
3 – power supply failure
Retro is in rest mode
1 - chlorinator cell is outside
the water
2 - open circuit in chlorinator
cell
1 - salt level low
2 - water temperature low
3 - chlorinator cell at its life
end
normal operation mode
1 - salt level high
2 - water temperature high
1 - salt level too high
2 - water temperature too
high
3 - short circuit in chlorinator
cell
Power supply outage
Hours set too low
Hours set too high
Make sure there is power to the unit.
Check and change the fuse if it's burnt.
Call customer service
No action is needed. If you want it to operate immediately, unplug/plug
the power or adjust the timer. Both will start the operation right away.
Put it back into the water or fill water line halfway up the Retro.
Check the wire connections and make sure no cut or broken wire.
Add more salt to the pool and allow time to dissolve.
Don't use Retro if the water temperature is under 65 °F (or 15 °C).
Call customer service for replacement.
No action is needed.
No action is needed. Stop adding salt to water if you are doing so.
Using Retro for water temperatures above 100 °F (or 45 °C) such as SPA
water is not recommended.
You will have to dilute your pool water with fresh water until you reach
3000 ppm salt level.
Stop using Retro until water cools down.
Check to make sure there is no metal objects caught in between the
electrode plates.
Unplug and plug in the power cord to reset the power supply. If the
problem persists, call customer service.
Adjust the hours setting to higher number (the maximum is 24 hours/day).
Make sure the cyanuric acid level in your pool is between 50-80 PPM
Adjust the hours setting to lower number (the minimum is 0 hours/day).
LEDDisplay
Symptom in power Supply Possible causes Solution
1
2
3
4
5
6
7
9
10
8
Compliments of www.poolsandstuff.com
SALTRON RETRO PARTS LIST
1 2 3 4
5678
1. Thumb Screw for Above-Ground Pool
2. Upper Hanger for Above-Ground Pool
3. Lower Hanger
4. Top Cover
5. Upper Hanger for In-Ground Pool
6. Bottom Cover
7. Adjustable Thumb Screw
8. Cell
Compliments of www.poolsandstuff.com

Other Solaxx Water Filtration System manuals

Solaxx Salt3 User manual

Solaxx

Solaxx Salt3 User manual

Solaxx Resilience E Series User manual

Solaxx

Solaxx Resilience E Series User manual

Solaxx Renessance User manual

Solaxx

Solaxx Renessance User manual

Popular Water Filtration System manuals by other brands

IGS MBG-N5.5 Operation and maintenance manual

IGS

IGS MBG-N5.5 Operation and maintenance manual

Dean 75SCF Installation & operation manual

Dean

Dean 75SCF Installation & operation manual

Kongskilde RVS Series manual

Kongskilde

Kongskilde RVS Series manual

JRC NSVS1148 manual

JRC

JRC NSVS1148 manual

Parker PHB Demi Instructions for use

Parker

Parker PHB Demi Instructions for use

laguna Powerfalls Installation and maintenance guide

laguna

laguna Powerfalls Installation and maintenance guide

Paragon PW750F Installation & operation manual

Paragon

Paragon PW750F Installation & operation manual

ProMinent Dulcodes M operating instructions

ProMinent

ProMinent Dulcodes M operating instructions

Rx Clear HydroSalt Installation & operation manual

Rx Clear

Rx Clear HydroSalt Installation & operation manual

Toshiba TWP-N1861UUFKW instruction manual

Toshiba

Toshiba TWP-N1861UUFKW instruction manual

Insignia NS-MWF-1 Quick setup guide

Insignia

Insignia NS-MWF-1 Quick setup guide

Eljen Mantis M5 Series Installation and System Design Guide

Eljen

Eljen Mantis M5 Series Installation and System Design Guide

Sanitron S2400C Installation operation & maintenance

Sanitron

Sanitron S2400C Installation operation & maintenance

Neptun Classic NCTF-O 8000 operating instructions

Neptun

Neptun Classic NCTF-O 8000 operating instructions

SMARDY HOME 190 instruction manual

SMARDY

SMARDY HOME 190 instruction manual

Flexit Nordic S2 manual

Flexit

Flexit Nordic S2 manual

Kenmore 625.343921 manual

Kenmore

Kenmore 625.343921 manual

Sealey PS9821 instructions

Sealey

Sealey PS9821 instructions

manuals.online logo
manuals.online logoBrands
  • About & Mission
  • Contact us
  • Privacy Policy
  • Terms and Conditions

Copyright 2025 Manuals.Online. All Rights Reserved.