manuals.online logo
Brands
  1. Home
  2. •
  3. Brands
  4. •
  5. Solid
  6. •
  7. Garden House
  8. •
  9. Solid S8730-1 User manual

Solid S8730-1 User manual

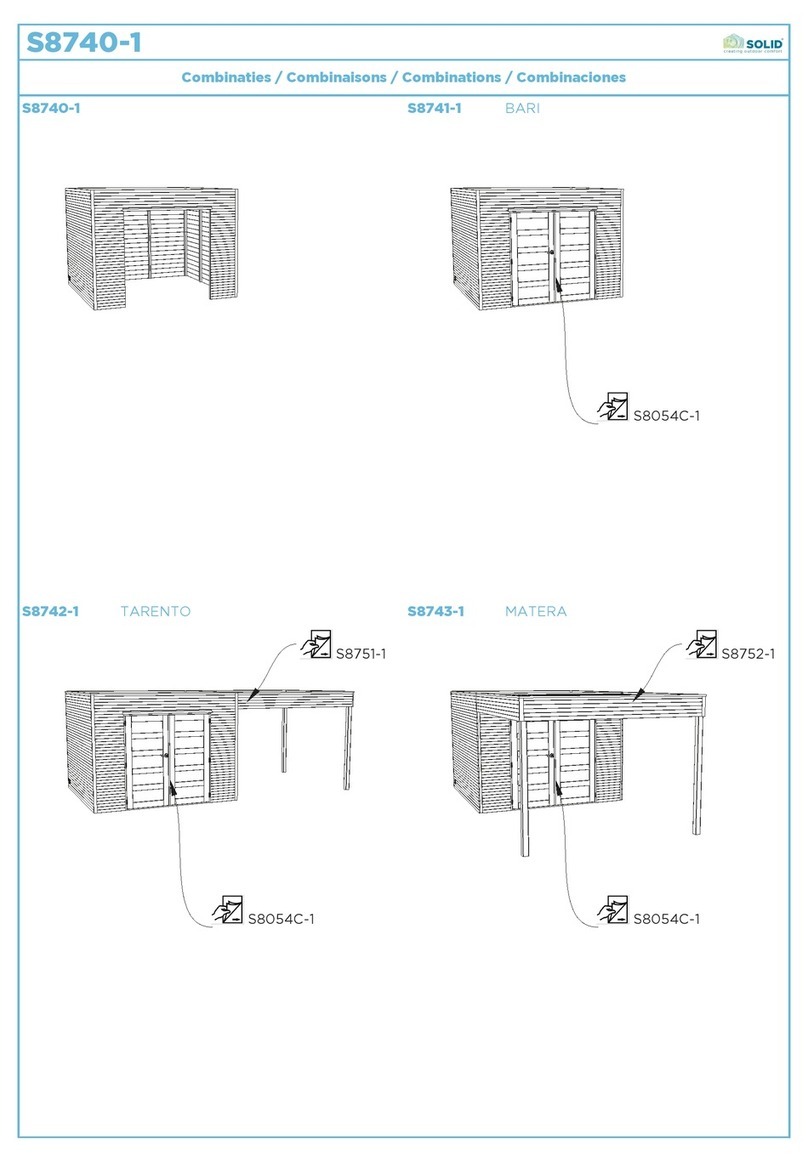
S8730-1
S8730-1 S8731-1
S8054C-1
Combinaties / Combinaisons / Combinations / Combinaciones
S8732-1 S8733-1
S8752-1S8750-1
S8054C-1S8054C-1
CAPRI
SALERNO POTENZA
S8730-1
NL F GB D
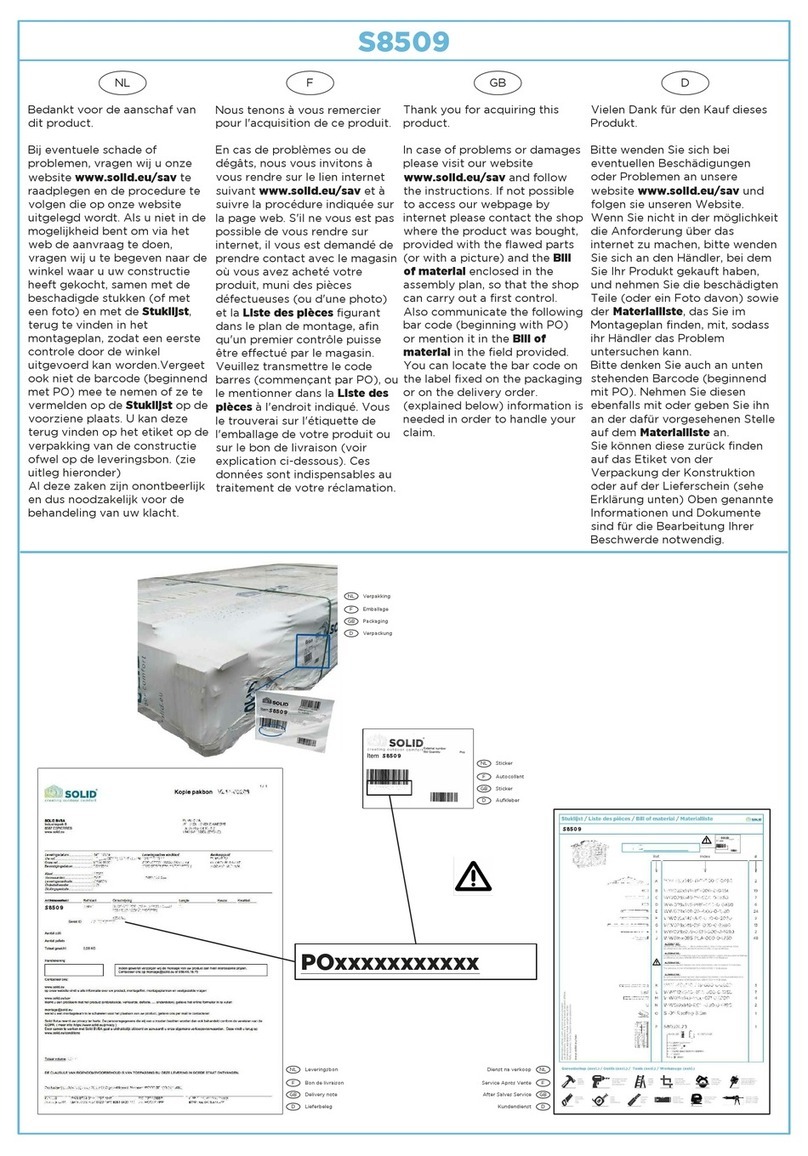
Bedankt voor de aanschaf van
dit product.
Bij eventuele schade of
problemen, vragen wij u onze
website www.solid.eu/sav te
raadplegen en de procedure te
volgen die op onze website
uitgelegd wordt. Als u niet in de
mogelijkheid bent om via het
web de aanvraag te doen,
vragen wij u te begeven naar de
winkel waar u uw constructie
heeft gekocht, samen met de
beschadigde stukken (of met
een foto) en met de Stuklijst,
terug te vinden in het
montageplan, zodat een eerste
controle door de winkel
uitgevoerd kan worden.Vergeet
ook niet de barcode (beginnend
met ASKAO) mee te nemen of
ze te vermelden op de Stuklijst
op de voorziene plaats. U kan
deze terug vinden op het etiket
op de verpakking van de
constructie ofwel op de
leveringsbon. (zie uitleg
hieronder)
Al deze zaken zijn onontbeerlijk
en dus noodzakelijk voor de
behandeling van uw klacht.
Nous tenons à vous remercier
pour l'acquisition de ce produit.
En cas de problèmes ou de
dégâts, nous vous invitons à
vous rendre sur le lien internet
suivant www.solid.eu/sav et à
suivre la procédure indiquée sur
la page web. S'il ne vous est pas
possible de vous rendre sur
internet, il vous est demandé de
prendre contact avec le magasin
où vous avez acheté votre
produit, muni des pièces
défectueuses (ou d'une photo)
et la Liste des pièces figurant
dans le plan de montage, afin
qu'un premier contrôle puisse
être effectué par le magasin.
Veuillez transmettre le code
barres (commençant par
ASKAO), ou le mentionner dans
la Liste des pièces à l'endroit
indiqué. Vous le trouverai sur
l'étiquette de l'emballage de
votre produit ou sur le bon de
livraison (voir explication
ci-dessous). Ces données sont
indispensables au traitement de
votre réclamation.
Thank you for acquiring this
product.
In case of problems or damages
please visit our website
www.solid.eu/sav and follow
the instructions. If not possible
to access our webpage by
internet please contact the shop
where the product was bought,
provided with the flawed parts
(or with a picture) and the Bill
of material enclosed in the
assembly plan, so that the shop
can carry out a first control.
Also communicate the following
bar code (beginning with
ASKAO) or mention it in the Bill
of material in the field provided.
You can locate the bar code on
the label fixed on the packaging
or on the delivery order.
(explained below) information is
needed in order to handle your
claim.
Vielen Dank für den Kauf dieses
Produkt.
Bitte wenden Sie sich bei
eventuellen Beschädigungen
oder Problemen an unsere
website www.solid.eu/sav und
folgen sie unseren Website.
Wenn Sie nicht in der möglichkeit
die Anforderung über das
internet zu machen, bitte wenden
Sie sich an den Händler, bei dem
Sie Ihr Produkt gekauft haben,
und nehmen Sie die beschädigten
Teile (oder ein Foto davon) sowie
der Materialliste, das Sie im
Montageplan finden, mit, sodass
ihr Händler das Problem
untersuchen kann.
Bitte denken Sie auch an unten
stehenden Barcode (beginnend
mit ASKAO). Nehmen Sie diesen
ebenfalls mit oder geben Sie ihn
an der dafür vorgesehenen Stelle
auf dem Materialliste an.
Sie können diese zurück finden
auf das Etiket von der
Verpackung der Konstruktion
oder auf der Lieferschein (sehe
Erklärung unten) Oben genannte
Informationen und Dokumente
sind für die Bearbeitung Ihrer
Beschwerde notwendig.
ASKAOxxxxxxxxxxx
GB
NL
F
D
S8730-1
S8730-1
S8730-1
Leveringsbon
Bon de livraison
Delivery note
Lieferbeleg
GB
NL
F
D
Dienst na verkoop
Service Après Vente
After Salves Service
Kundendienst
S8730-1
GB
NL
F
D
Sticker
Autocollant
Sticker
Aufkleber
GB
NL
F
D
Verpakking
Emballage
Packaging
Verpackung
S8730-1
(NL) VOOR AANVANG VAN DE MONTAGE :
Bij ontvangst van het pakket dient u de geleverde stukken en hun aantallen te controleren aan de hand van de stuklijst (lijst 'SAV') om u ervan te vergewissen dat u alle stukken ontvangen hebt en dat die zich in
goede staat bevinden. Het is sterk aan te raden niet met de montage te beginnen voor u deze controle hebt uitgevoerd en indien nodig de vervangstukken ontvangen hebt. Het is tevens verplicht het artikel op
een betonplaat te monteren. Het is heel belangrijk te controleren dat alles waterpas gemonteerd werd en onder de correcte rechte hoek. Heel belangrijk is dat u het natuurlijke krimpen en uitzetten van het hout
toelaat en de structuur niet blokkeert. (pas op met kasten, rekken, hangplanken, rails,...)
U heeft een geimpregneerd artikel aangekocht en dit heeft enkele consequenties wat de montage betreft.
Door de opname van het beschermend product zullen alle onderdelen licht afwijkende afmetingen hebben en wij raden ten stelligste aan alles open te leggen om een zo goed mogelijke droging te bekomen
alvorens de montage aan te vangen.
Verder is het niet abnormaal dat kleine openingen te zien zijn bij de montage, zowel boven de deur als bij de dakopbouw. Deze zullen na het natuurlijk drogen van het product verdwijnen, hou er evenwel rekening
mee dat dit enkele weken kan duren.
(FR) AVANT LE MONTAGE :
A réception du colis, il convient de vérifier, par rapport à la nomenclature de l'abri (feuille SAV) que toutes les pièces figurent bien dans le colis et sont en bon état. Il est judicieux de ne commencer le montage
effectif de l'abri qu'après avoir effectué cette vérification et éventuellement avoir reçu les pièces nécessaires au remplacement des pièces défectueuses. Il est imperatif de monter l'article sur une dalle de béton. Il
est très important de s'assurer de l'horizontalité de l'abri ainsi que de l'équerrage. Par ailleurs, il est impératif de ne pas fixer entre elles les planches constituant la structure de l'abri. (attention aux équerres,
étagères, rails,...)
Vous avez acheté un article imprégné et cela a bien quelques conséquences en ce qui concerne le montage.
Par l'absorbation du produit protégeant toutes les parties auront des mesures légèrement divergentes.
On conseille dès lors fortement d'exposer à l'air extérieur toutes les parties en visant un meilleur séchage avant de commencer le montage.
Puis il n'est pas anormal qu'il y ait des petits trous à voir lors du montage tant au-dessus de la porte qu'en montant le toit.
Ceux-ci disparaîtront après le séchage naturel du produit. Tenez cependant compte que cela peut durer quelques semaines.
(GB) BEFORE THE ASSEMBLY :
When you receive the pack, please check if all the supplied pieces and their numbers comply with the parts list "SAV" to make sure you have received all the pieces and that they are in good condition. It is
strongly recommended not to start the installation before completing this check and if necessary, receiving the replacement parts. Furthermore, it is mandatory to install the product on a concrete slab, with a foil
against rising damp underneath. The product must be installed level, fitted with the required drainage channels and at the correct right angle. It is very important that you allow the natural expansion and
contraction of the wood and that you do not block the structure (watch out with cupboards, racks, hanging shelves, rails, etc.).
You have purchased an impregnated article, which has some implications regarding the assembly. Due to the absorption of the protective product, all parts will have slightly different dimensions and we strongly
recommend to lay everything open in order let the parts dry as well as possible before starting the assembly.
Furthermore, it is not unusual that small openings are visible during the assembly, both above the door and in the roof. These will disappear after the natural drying of the product, keep in mind, however, that this
may take several weeks.
(D) VOR ANFANG DES AUFBAUS :
Beim Erhalt des Pakets sind die gelieferten Teile sowie ihre Mengen anhand der Stückliste (Liste „SAV“) zu überprüfen, damit Sie sich davon überzeugen können, dass Sie sämtliche Teile erhalten haben, und dass
diese einwandfrei sind. Es ist durchaus empfehlenswert, nicht mit dem Aufbau anzufangen ehe Sie dies überprüft und erforderlichenfalls die Ersatzteile erhalten haben. Es ist zudem ferplicht, den Artikel auf einer
Betonplatte aufzustellen.Es ist aber sehr wichtig, zu überprüfen, dass die Gesamtheit waagerecht und im richtigen geraden Winkel aufgebaut wurde. Sehr wichtig ist, dass Sie das natürliche Schwinden und
Quellen des Holzes erlauben und das Gefüge nicht sperren. (Bitte achten Sie auf Schränke, Regale, Hängebretter, Schienen, usw.)
Sie haben einen imprägnierten Artikel erworben, und dies hat einige Auswirkungen auf den Aufbau.
Wegen der Aufnahme des schützenden Produktes werden sämtliche Teile etwas abweichende Abmessungen aufweisen. Wir empfehlen daher unbedingt, das Ganze auszulegen, damit Sie eine möglichst gute
Trocknung erreichen, ehe Sie mit dem Aufbau anfangen.
Weiterhin ist es nicht abnormal, dass beim Aufbau, sowohl oberhalb der Tür als auch beim Dachaufbau kleine Öffnungen zu sehen sind. Nach der natürlichen Trocknung des Produktes werden diese verschwinden.
Berücksichtigen Sie aber, dass dies einige Wochen in Anspruch nehmen kann.
(ES) ANTES DEL MONTAJE :
Nada más recibir el paquete usted tiene que controlar las piezas entregadas y el número de ellas a través de la lista (lista 'SAV') para que pueda averiguar si ha recibido todas las piezas y si ellas se encuentran en
buen estado. Es muy aconsejable que usted no empiece con el montaje antes de haber hecho este control y, si fuera necesario, antes de haber recibido las piezas de repuesto. Además se recomienda montar el
artículo en la chapa de hormigón. Pero de todos modos es muy importante que usted averigüe que todo fue montado a nivel y bajo el ángulo recto adecuado. Es muy importante que usted admita el
encogimiento y la expansión naturales de la madera y que no se bloquee la estructura (cuidado con armarios, anaqueles, estantes, railes, etc.).
Usted compró un artículo impregnado, lo que lleva a unas consecuencias en cuanto al montaje.
Por la absorción del producto protector, todas las piezas tendrán unas dimensiones ligeramente divergentes. Nos le aconsejamos vivamente abrir todo para que todo se seque lo antes posible, antes de empezar
con el montaje.
Además, no es nada abnormal que se ve pequeños huecos con el montaje, tanto arriba de la puerta como con la construcción del techo. Esos huecos desaperecerán después de haber secado de modo natural. Sin
embargo, hay que darse cuenta de que ese proceso puede durar unas semanas.
(P) ANTES DE PROCEDER À MONTAGEM :
Logo que tenha recebido a encomenda, convém que verifique, em relação à lista das peças (a lista 'SAV'), se recebeu todas as peças e se elas se encontram em bom estado. É aconselhável não começar com a
montagem antes de ter efetuado esta verificação e de eventualmente ter recebido as peças necessárias para substituir as peças defeituosas. Recomenda-se também que monte o artigo numa placa de betão.
Pode sempre optar por montar o produto num suporte diferente, mas é em todo o caso importante verificar a horizontalidade e a ortogonalidade do produto. É também indispensável que permita o encolhimento
e dilatação naturais da madeira e que não bloqueie a estrutura. (cuidado com armários, estantes, prateleiras, calhas,...)
Acaba de comprar um produto impregnado e isto tem algumas consequências no que diz respeito à montagem.
Devido à absorção do produto de proteção todas as partes terão medidas ligeiramente divergentes.
Recomendamos fortemente que exponha todas as peças ao ar exterior a fim de garantir uma boa secagem antes de proceder à montagem.
Além disso, não é anormal que haja pequenas gretas após a montagem, tano em cima da porta como na montagem do telhado. Estas desaparecerão depois da secagem natural do produto. Porém, tenha em
conta que isto poderá durar algumas semanas.
(I) PRIMA DEL MONTAGGIO :
Al ricevimento del pacco, il cliente deve controllare i componenti forniti e i loro numeri sulla base dell'elenco dei pezzi (elenco "SAV"), per essere certo di aver ricevuto tutti i componenti e che essi siano in buono
stato. Si consiglia vivamente di non procedere al montaggio prima di aver eseguito tale controllo e, qualora necessario, aver ricevuto i pezzi di ricambio. Si consiglia altresì di montare l'articolo su una lastra di
cemento. In ogni caso, è molto importante controllare che il tutto sia stato montato con l'orizzontalità e l'ortogonalità corretta. È altresì essenziale, ovviamente, consentire il restringimento e la dilatazione naturale
del legno e non bloccare la struttura (prestare attenzione ad armadi, scaffali, mensole sospese, traverse).
Ha acquistato un articolo impregnato, il che ha conseguenze sul montaggio.
Tutti i componenti avranno misure leggermente diverse, a causa dell'assorbimento del prodotto protettivo. Raccomandiamo vivamente di esporre il tutto all'aria aperta per conseguire l'asciugatura migliore
possibile prima di iniziare il montaggio.
Le piccole aperture che si notano durante il montaggio sia sopra alla porta, sia verso il tetto non rappresentano anomalie: spariranno dopo la naturale asciugatura del legno. Tenga, tuttavia, conto che possono
volerci alcune settimane.
(CZ) PŘED ZAHÁJENÍM MONTÁŽE :
Při přijetí balíčku prosím zkontrolujte dodané díly a jejich množství podle kusovníku (seznam „SAV“) a ujistěte se, že jste obdrželi všechny díly a že jsou díly nepoškozené. Výrazně doporučujeme nezačínat s
montáží dříve, než provedete tuto kontrolu nebo než případně obdržíte náhradní kusy. Stejně tak výrazně doporučujeme montovat výrobek na betonovou desku. Můžete se také rozhodnout provést montáž na jiný
podklad, ale i v tom případě je velmi důležité zkontrolovat, zda jsou všechny díly smontovány vodorovně a ve správném pravém úhlu. Neméně důležité je, abyste umožnili přirozené smršťování a roztahování dřeva
a neblokovali jeho strukturu (opatrně se skříněmi, regály, závěsnými deskami, kolejnicemi…)
Zakoupili jste impregnovaný výrobek a to má určité důsledky týkající se montáže.
V důsledku absorpce ochranného produktu se budou rozměry všech dílů mírně lišit, a proto výrazně doporučujeme všechny díly po vybalení rozložit a zajistit k nim přístup vzduchu, čímž umožníte jejich vysušení
ještě předtím, než zahájíte montáž. Dále je možné, že při montáži uvidíte malé otvory, a to jak nad dveřmi, tak u osazení střechy. Nejedná se o závadu. Otvory zmizí po přirozeném vyschnutí výrobku, to může
nicméně trvat i několik týdnů.
S8730-1
CreateDate: 12.03.2021
SaveDate: 12.03.2021
PlotDate: 25.03.2021
Industriepark 8
8587 Spiere-Helkijn
Deze technische tekening, montagehandleiding, afgeleide of detail ervan kan beschermd zijn door intellectuele eigendomsrechten en
niets daarvan mag zonder schriftelijke toestemming van Solid NV worden gereproduceerd of gebruikt; anders dan het downloaden,
het bekijken daarvan op een enkele computer en/of printen van een enkele hardcopy ten behoeve van persoonlijk, niet bedrijfsmatig
gebruik. Elk ander gebruik van deze informatie (inclusief, maar niet beperkt tot, het geheel of gedeeltelijk reproduceren, de verdere
verspreiding of distributie ervan onder welke vorm dan ook) is verboden en kan strafrechterlijk vervolgd worden. Met dank voor uw
medewerking.
1703
2870
2988
1802
2244
1996
1870
1988
2996
5.37m²5.94m²5.98m²
5.84m²
1°
(B)
1703
(H)
1802
S5015 EPDM (3200x2200)
WP019x123-CDER-TPP-1-1120x2870
WP019x123-CDEV-TPP-1-0448x2870
WP019x123-CDRO-TPP-1-1120x1950
WP019x123-CGAU-TPP-1-1120x1950
WP019x123-CPPN-000-1-1131x1950
WP019x123-CPPN-000-1-1131x2870
WP019x123-CPPU-000-1-2160x0545
WW016x095-PLA-000-1-1948
WW019x059-4FA-000-1-2240
WW028x040-4FA-000-1-2132
WW040x040-4FA-000-1-2066
WW040x120-4FA-IF0-1-2950
A1 1
A2 1
A3 1
A4 1
B1 1
B2 2
C 2
D1 2
D2 2
J 34
L 4
K 1
O 1
O1 3
S5010 Contactspray
Hamer
Marteau
Hammer
Hammer
Silicone  pomp
Silicone  pompe
Silicone  pump
Silikon  Pumpe
lokboor  mm
Scie cloche  mm
Hole saw  mm
Bohren  mm
Schroefboormachine
Perceuse / Viseuse
Screw drill
Schraubenbohrer
Ladder
Échelle
Ladder
Leiter
Winkelhaak
Crochet carré
Square hook
Quadratischer Haken
Handzaag
Scie à main
Saw
Säge
Meter
Mètre
Meter
Rollenmesser
Breekmas
Couteau
Cutter
Messer
Waterpas
Niveau à bulle
Plumb rule
Wasserwaage
Cirkelzaag
Scie circulaire
Circular saw
reissäge
Decoupeerzaag
Scie sauteuse
igsaw
Stichsäge
Gereedschap (excl.) / Outils (excl.) / Tools (excl.) / Werkzeuge (exkl.)
Stuklijst / Liste des pièces / Bill of material / Materialliste
S8730-1
#Ref. Index
ASKAO__________
S8730-1
Afmetingen, uiterlijk, vorm, gewicht kunnen afwijken.
Les dimensions, l'apparence, la forme, le poids peuvent différer.
Dimensions, appearance, shape, weight may differ.
Maße, Aussehen, Form, Gewicht können abweichen.
www.solid.eusav
Hamer
Marteau
Hammer
Hammer
Silicone  pomp
Silicone  pompe
Silicone  pump
Silikon  Pumpe
lokboor  mm
Scie cloche  mm
Hole saw  mm
Bohren  mm
Schroefboormachine
Perceuse / Viseuse
Screw drill
Schraubenbohrer
Ladder
Échelle
Ladder
Leiter
Winkelhaak
Crochet carré
Square hook
Quadratischer Haken
Handzaag
Scie à main
Saw
Säge
Meter
Mètre
Meter
Rollenmesser
Breekmas
Couteau
Cutter
Messer
Waterpas
Niveau à bulle
Plumb rule
Wasserwaage
Cirkelzaag
Scie circulaire
Circular saw
reissäge
Decoupeerzaag
Scie sauteuse
igsaw
Stichsäge
Gereedschap (excl.) / Outils (excl.) / Tools (excl.) / Werkzeuge (exkl.)
Stuklijst / Liste des pièces / Bill of material / Materialliste
S8730-1
V1 1
V2 1
V3 2
S5018 Drainage pipe connection
S5232 Drainage pipe
S5238 Drainage pipe corner 45°
S6746 Ventilation-kit
S6707 25x25x3 CENTER (2996)
S6707 25x25x3 CENTER (1996)
R 1
2.5 x 40 #180
3.0 x 40 #16
4.0 x 60 #62
S8730-Zmt
Z 1
X1 2
X2 2
V4 2
S5236 Fixo PVC
#Ref. Index
S8054-K-1
P 1
S8084-ALU
Xref T:\CAD\Montage\_S\DEUREN\ALU\S8084-ALU.dwg
4.0 x 70 #2
Ø4.0 #2
S80201
S6203-L
S6203-R
S673 (x2)
P 1
P 1
P 1
P 3
P 3
P 1
Afmetingen, uiterlijk, vorm, gewicht kunnen afwijken.
Les dimensions, l'apparence, la forme, le poids peuvent différer.
Dimensions, appearance, shape, weight may differ.
Maße, Aussehen, Form, Gewicht können abweichen.
www.solid.eusav
S8730-1
1
2
B1
B2
B2
B1
4.0 x 60 # 4
4.0 x 60 # 4
B2
B2
B1
B1 = 1
B2 = 1
B2 = 1
!! Silicone aanbrengen (excl.)
!! Appliquer du silicone (excl.)
!! Apply silicone (excl.)
!! Silikon auftragen (excl.)
!! Silicone aanbrengen (excl.)
!! Appliquer du silicone (excl.)
!! Apply silicone (excl.)
!! Silikon auftragen (excl.)
S8730-1
3
4
4.0 x 60 # 8
C
C
4.0 x 60 # 16
A2
A3
A4
C = 2
A2 = 1
A3 = 1
A4 = 1
1780
H>h
!! Silicone aanbrengen (excl.)
!! Appliquer du silicone (excl.)
!! Apply silicone (excl.)
!! Silikon auftragen (excl.)
!! Silicone aanbrengen (excl.)
!! Appliquer du silicone (excl.)
!! Apply silicone (excl.)
!! Silikon auftragen (excl.)
S8730-1
5
6
4.0 x 60 # 10
A1
4.0 x 60 # 4
K
K = 1
A1 = 1
K
K
!! Silicone aanbrengen (excl.)
!! Appliquer du silicone (excl.)
!! Apply silicone (excl.)
!! Silikon auftragen (excl.)
S8730-1
7
4.0 x 60 # 4
4.0 x 60 # 8
D
D2
4.0 x 60 # 4
D
D = 1
D1 = 2
D = 1
K
D
S8730-1
8
2.5 x 40 # 180
J
J = 34
x
min. 2 mm !!
S8730-1
9
S6746 Ventilation-kit
S8731-1
S8732-1
S8733-1
CAPRI
SALERNO
POTENZA
Ga verder met de handleiding van
S8750-1.
Continuer avec le manuel de
S8750-1.
Continue with the manual from
S8750-1.
Fahren Sie mit dem Handbuch von fort
S8750-1.
Ga verder met de handleiding van
S8752-1.
Continuer avec le manuel de
S8752-1.
Continue with the manual from
S8752-1.
Fahren Sie mit dem Handbuch von fort
S8752-1.
Ga verder met de handleiding van
S8730-1.
Continuer avec le manuel de
S8730-1.
Continue with the manual from
S8730-1.
Fahren Sie mit dem Handbuch von fort
S8730-1.
11
10
3.0 x 40 # 16
L = 4
S8750-1
L
L
L
L
1
2
3
4
LL
L L
S5015 EPDM (3200x2200)
WP019x123-CGAU-TER-1-0336x2870
WP019x123-CDER-TER-1-0336x1870
WP019x123-CDRO-TER-1-0336x2870
WW016x095-PLA-000-1-2867
WW019x059-4FA-000-1-0336
WW040x040-4FA-000-1-1870
WW040x120-4FA-IF0-1-1950
A1 1
A2 1
A3 1
D1 2
D2 1
J 23
L 2
K 2
O 1
O1 3
S8750-1
WW040x095-4FA-Y45-1-0455
WW040x040-4FA-000-1-0130
D3 1
RW088x088-4R8-000-1-2124
S 2
V1 1
V2 1
S5018 Drainage pipe connection
S5232 Drainage pipe
2.5 x 40 #92
3.0 x 40 #8
5.0 x 90 #2
4.0 x 60 #38
S8750-Zmt
R 1
S6705 25x25x3 LINKS (2896)
S5010 Contactspray
S6706 25x25x3 RECHTS (2896)
S6707 25x25x3 CENTER (1996)
X1 1
X2 1
X3 1
V3 2
S5238 Drainage pipe corner 45°
V4 2
S5236 Fixo PVC
Hamer
Marteau
Hammer
Hammer
Silicone  pomp
Silicone  pompe
Silicone  pump
Silikon  Pumpe
lokboor  mm
Scie cloche  mm
Hole saw  mm
Bohren  mm
Schroefboormachine
Perceuse / Viseuse
Screw drill
Schraubenbohrer
Ladder
Échelle
Ladder
Leiter
Winkelhaak
Crochet carré
Square hook
Quadratischer Haken
Handzaag
Scie à main
Saw
Säge
Meter
Mètre
Meter
Rollenmesser
Breekmas
Couteau
Cutter
Messer
Waterpas
Niveau à bulle
Plumb rule
Wasserwaage
Cirkelzaag
Scie circulaire
Circular saw
reissäge
Decoupeerzaag
Scie sauteuse
igsaw
Stichsäge
Gereedschap (excl.) / Outils (excl.) / Tools (excl.) / Werkzeuge (exkl.)
#Ref. Index
ASKAO__________
S8730-1
Stuklijst / Liste des pièces / Bill of material / Materialliste
Afmetingen, uiterlijk, vorm, gewicht kunnen afwijken.
Les dimensions, l'apparence, la forme, le poids peuvent différer.
Dimensions, appearance, shape, weight may differ.
Maße, Aussehen, Form, Gewicht können abweichen.
www.solid.eusav
S8730-1
1
4.0 x 60 # 4
A1
S
S
A1 = 1
S = 2
2870
S8730-1
2
4.0 x 60 # 4
4.0 x 60 # 4
A3
A2
A2 = 1
A3 = 1
S8730-1
4
3
4.0 x 60 # 2
5.0 x 90 # 2
3.0 x 40 # 8
D1 = 2
D3 = 4
K = 2
D2 = 1
L = 2
4.0 x 60
5.0 x 90
4.0 x 60 #24
D1
D1
D3
D2
L
L
K
K
L
D3 D3
D3
S8730-1
6
5
2.5 x 40 # 92
J = 23
S8054C-1
x
min. 2 mm !!
EPDM (CONTACTSPRAY)
21 3
54 6
87 9
1110 12
1413 15
1716 18
##
ok/nok
Ref. Index
P 1
Het kan gebeuren dat er vlekjes op het glas zichtbaar zijn. Dit is het gevolg van de impregnatie.
Deze kunnen verwijderd worden met warm water en een niet-schurende spons.
Een wonderspons kan ook gebruikt worden ofwel met ijzerwol '000'.
Il peut arriver que des taches soient visibles sur le verre. C'est le résultat de l'imprégnation.
Ceux-ci peuvent être enlevés avec de l'eau tiède et une éponge non abrasive.
Une éponge miracle peut également être utilisée, ou avec de la laine de fer '000'
It may happen that spots are visible on the glass. This is the result of the impregnation.
These spots can be removed with warm water and a non-abrasive sponge.
A miracle sponge can also be used, or iron wool '000'.
Es kann vorkommen, dass Flecken auf dem Glas sichtbar sind. Dies ist das Ergebnis der Imprägnierung.
Diese können mit warmem Wasser und einem nicht scheuernden Schwamm entfernt werden.
Ein Wunderschwamm kann auch mit Eisenwolle '000' verwendet werden
Tip / Conseil / Advice / Beratung
Hamer
Marteau
Hammer
Hammer
Silicone + pomp
Silicone + pompe
Silicone + pump
Silikon + Pumpe
Klokboor Ø 60mm
Scie cloche Ø 60mm
Hole saw Ø 60mm
Bohren Ø 60mm
Schroefboormachine
Perceuse / Viseuse
Screw drill
Schraubenbohrer
Ladder
Échelle
Ladder
Leiter
Winkelhaak
Crochet carré
Square hook
Quadratischer Haken
Handzaag
Scie à main
Saw
Säge
Meter
Mètre
Meter
Rollenmesser
Breekmas
Couteau
Cutter
Messer
Waterpas
Niveau à bulle
Plumb rule
Wasserwaage
Cirkelzaag
Scie circulaire
Circular saw
Kreissäge
Decoupeerzaag
Scie sauteuse
Jigsaw
Stichsäge
Gereedschap (excl.) / Outils (excl.) / Tools (excl.) / Werkzeuge (exkl.)
Stuklijst / Liste des pièces / Bill of material / Materialliste
S8054-1
S8054-1 Montage
ASKAO__________
S8054-1

This manual suits for next models

12

Other Solid Garden House manuals

Solid S8372CR4 User manual

Solid

Solid S8372CR4 User manual

Solid S877CR0 User manual

Solid

Solid S877CR0 User manual

Solid S844 User manual

Solid

Solid S844 User manual

Solid Cork S8507 User manual

Solid

Solid Cork S8507 User manual

Solid Vernier S8346CR0 User manual

Solid

Solid Vernier S8346CR0 User manual

Solid S7749 User manual

Solid

Solid S7749 User manual

Solid S8474 User manual

Solid

Solid S8474 User manual

Solid S8764 User manual

Solid

Solid S8764 User manual

Solid Milano User manual

Solid

Solid Milano User manual

Solid S8215CR6 User manual

Solid

Solid S8215CR6 User manual

Solid S8980 User manual

Solid

Solid S8980 User manual

Solid S8484 User manual

Solid

Solid S8484 User manual

Solid S8387 User manual

Solid

Solid S8387 User manual

Solid S8217 User manual

Solid

Solid S8217 User manual

Solid S8970 User manual

Solid

Solid S8970 User manual

Solid Bergen User manual

Solid

Solid Bergen User manual

Solid Oleron S8717 User manual

Solid

Solid Oleron S8717 User manual

Solid S8949 User manual

Solid

Solid S8949 User manual

Solid S8755 User manual

Solid

Solid S8755 User manual

Solid S8505 User manual

Solid

Solid S8505 User manual

Solid S8784 User manual

Solid

Solid S8784 User manual

Solid Rohan User manual

Solid

Solid Rohan User manual

Solid S8216 User manual

Solid

Solid S8216 User manual

Solid S8794CR4AGGLO User manual

Solid

Solid S8794CR4AGGLO User manual

Popular Garden House manuals by other brands

USP 98001-1 owner's manual

USP

USP 98001-1 owner's manual

Mercia Garden Products 01DTOVRA0604SDFW-V1 General instructions

Mercia Garden Products

Mercia Garden Products 01DTOVRA0604SDFW-V1 General instructions

Palmako Hanna installation manual

Palmako

Palmako Hanna installation manual

Mercia Garden Products 01DDPENT1408-V3 General instructions

Mercia Garden Products

Mercia Garden Products 01DDPENT1408-V3 General instructions

Palmako FRJ34-4032 installation manual

Palmako

Palmako FRJ34-4032 installation manual

VISSCHER Vista Leisure Series manual

VISSCHER

VISSCHER Vista Leisure Series manual

Outdoor Life Group 1814 A Assembly instructions

Outdoor Life Group

Outdoor Life Group 1814 A Assembly instructions

OLT Architectural Knotty with Cedar Roof Assembly manual

OLT

OLT Architectural Knotty with Cedar Roof Assembly manual

Pergola kits USA PREMIUM VINYL PAVILION Assembly manual

Pergola kits USA

Pergola kits USA PREMIUM VINYL PAVILION Assembly manual

Palmako FRKK44-5540-1 installation manual

Palmako

Palmako FRKK44-5540-1 installation manual

Rowlinson Garden Products Keswick Arbour Assembly instructions

Rowlinson Garden Products

Rowlinson Garden Products Keswick Arbour Assembly instructions

Palmako FRF34-4030 installation manual

Palmako

Palmako FRF34-4030 installation manual

tradetested GS505-V1 manual

tradetested

tradetested GS505-V1 manual

HAMPTON BAY 5LGZ6526-V4 Use and care guide

HAMPTON BAY

HAMPTON BAY 5LGZ6526-V4 Use and care guide

Durabilt Premier Three-Season Sunroom Assembly and installation instructions

Durabilt

Durabilt Premier Three-Season Sunroom Assembly and installation instructions

KUHN Universo Consumer Products CA2977 Assembly instructions

KUHN

KUHN Universo Consumer Products CA2977 Assembly instructions

Palmako FRG44-5341 installation manual

Palmako

Palmako FRG44-5341 installation manual

Palmako EL18-4555 installation manual

Palmako

Palmako EL18-4555 installation manual

manuals.online logo
manuals.online logoBrands
  • About & Mission
  • Contact us
  • Privacy Policy
  • Terms and Conditions

Copyright 2025 Manuals.Online. All Rights Reserved.