SOLO-E SOLO7 User manual

7
USER
MANUAL

Using This Manual
This manual contains important instructions for the safe use and
operation of the scooter.
Please fully read the manual before using the scooter.
Package Contents
1x Scooter quality checklist
1x SOLO7 electric scooter
1x SOLO7 charger
1x Handle bar
5x Screws
1x Tool kit:
- 5x Allen keys
- 1x Flat/Phillips screwdriver
- 2x Spanners
1x Safety manual
7

Disclaimer
At present, electric scooters are not to be used on public roads, footpaths and cycle
lanes in the United Kingdom. It is the complete responsibility of the owner to ensure
that you operate your electric e-scooter within all DFT guidelines.
The owner assumes all liability and risk associated with the use of electric scooter
products and holds SOLO-E Ltd and its owners free from any liability or injury caused by
their use.
7

Specifications
* Note - Actual ranges achieved will vary based on factors including riding style, rider weight, environment and road surface.
The SOLO7 will soon feature upgradable accessories and colour styles - For further information please contact your
authorised dealer
Description
Black
1340x520x1200mm
1250x200x580mm
100kg
3
≤20km/h
40km-50km *
≤15°
18650 Li-ion
36V
250W
10.4Ah
Front & rear disc brakes
LED front light
12” front & rear inflatable tyres
Brushless motor
7
Specification
Top speed
Speed modes
Accelerator type
Range
Brake type
Lights
Motor
Battery
Weight limit
Tyres
Puncture sealant
Weight
Water resistance
Suspension
Description
25kmh / 15.5mph
3 - Low, Normal, High
Thumb Controlled
Up to 50km / 31miles *
Front and Rear dDsc
Front and Rear Brake
250 Watts (geared)
36V 10.4Ah (removable)
150kg / 23.6 stone
Front and Rear 12” Pneumatic
Standard
20.5kg
IP54 Frame; IP67 Electrics
Front and Rear

Description
Black
1340x520x1200mm
1250x200x580mm
100kg
3
≤20km/h
40km-50km *
≤15°
18650 Li-ion
36V
250W
10.4Ah
Front & rear disc brakes
LED front light
12” front & rear inflatable tyres
Brushless motor
SOLO7 Overview
Left brake
Indicator
switch
Light switch
Horn
Front light
Reflector
Front wheel
Front
disc brake
Kickstand
Right brake
Throttle
Anti-slip
deck surface
Folding
buckle
Battery
indicator
Right
indicator
Rear wheel
Reflector
Front fork
Charging
port
Left
indicator
Rear light
Battery
lock
Rear disc
brake
LCD
display
7

Bluetooth
(active when lit)
LCD Dashboard
Speed Modes
Speed
Battery
charge
Speed unit
(km/h when lit,
mph when unlit)
Light
Speed
mode
The scooter’s current speed mode is indicated by the speed mode symbol:
No symbol = Low speed mode
White symbol = Normal speed mode
Red symbol = High speed mode
7

Dashboard
On scooter models without turn signals; the
dashboard features one button at the bottom of
the display; press this to turn the scooter on and
off.
On scooter models with turn signals, the power
button is positioned on the left handlebar (see
later in the manual).
7

Assembly & Unfolding the Scooter
Step 1 - Open the packaging and carefully
remove the scooter and contents.
Step 2 - Pull the steering column up to
unfold the scooter.
Step 3 - Lift the locking buckle (1) up and
press this into position, then lift locking
buckle (2) onto buckle (1).
7
Step 4 - Check both locking buckles are
fully secured and the steering column is
not loose.
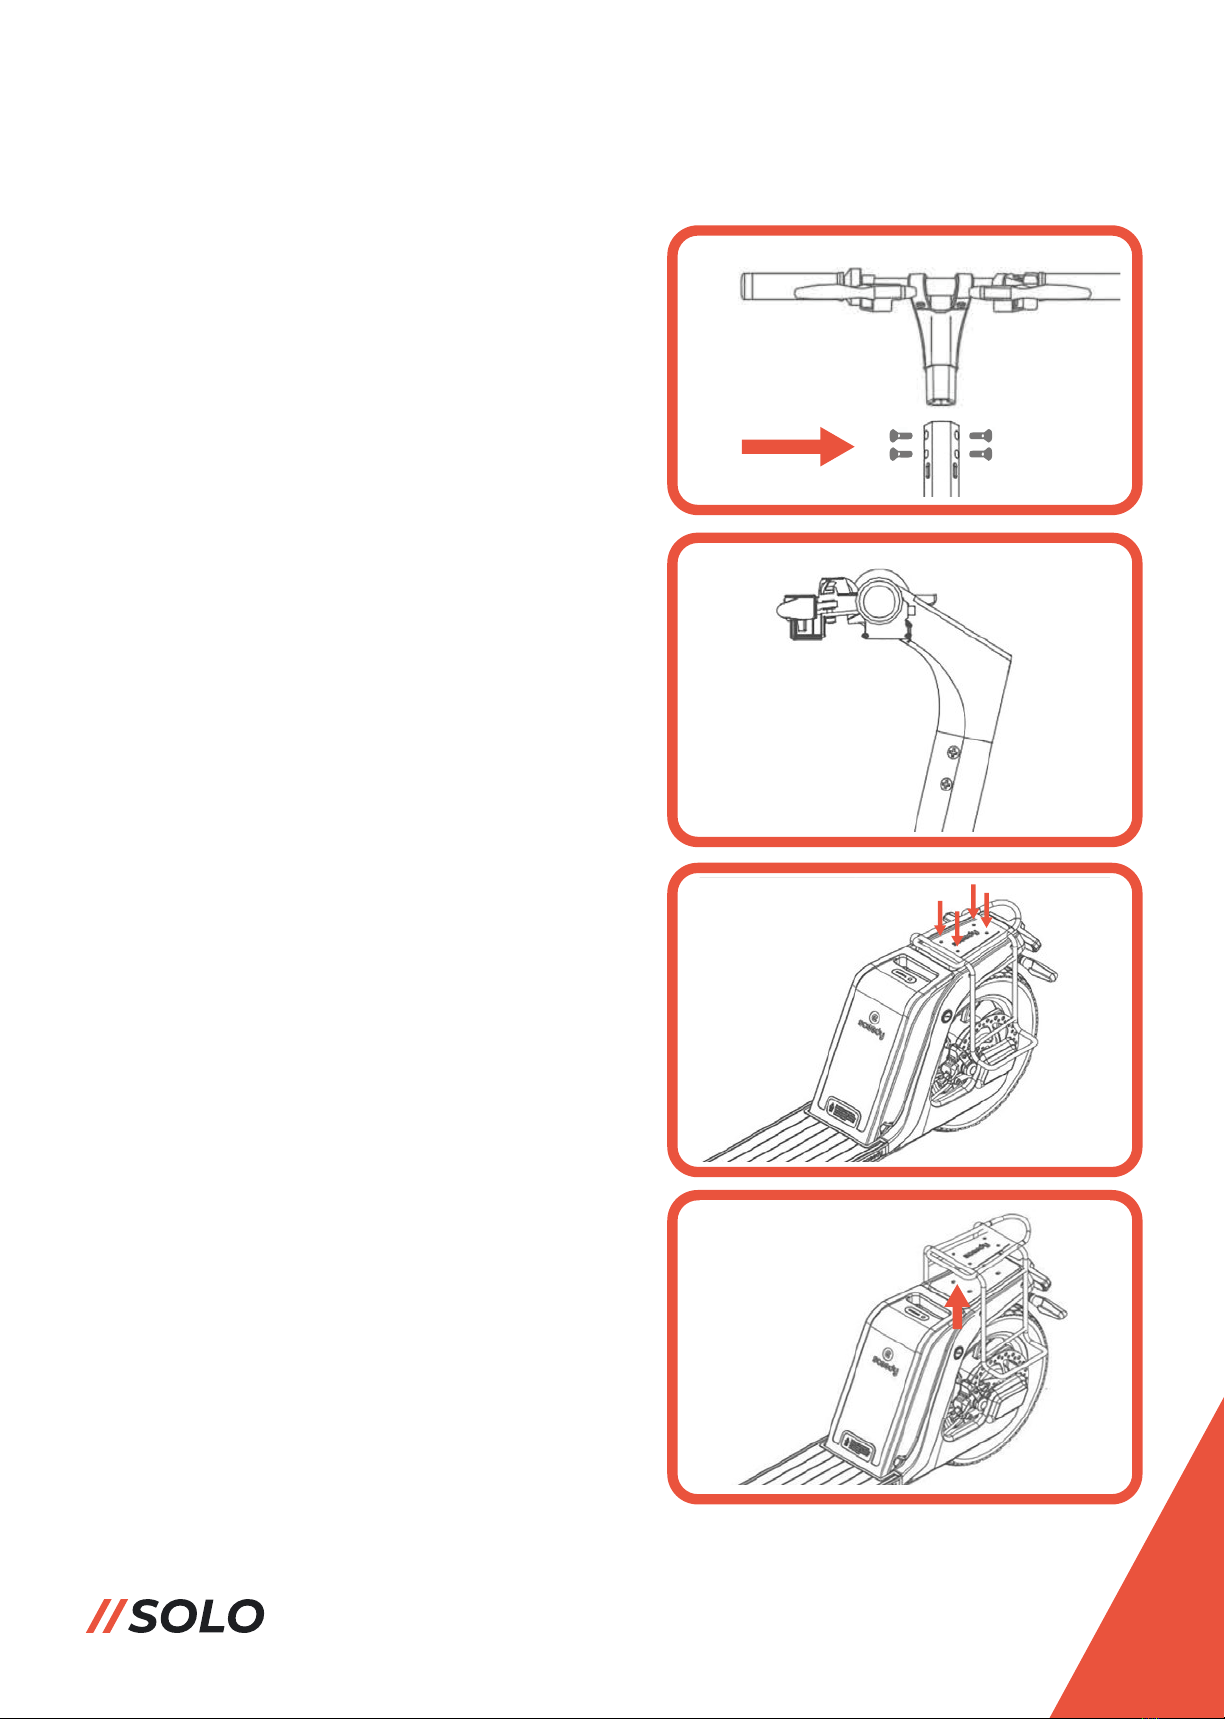
Assembly - Unfolding the Scooter
Step 5 - Fix the handle bars onto the
steering column, using the supplied screws
and tools.
Step 6 - Check that the handle bar is fully
tightened onto the steering column.
7
Load Rack
The scooter comes with the load rack
preinstalled to the rear above the battery
pack.
The rack can be eaily removed if not
needed, or access to the battery pack is
requried, by unscrewing the top four
screws.

Collapsing The Scooter
7
Step 2 - Push the steering column down
towards the rear wheel of the scooter.
Step 1 - Unclip and push down locking
buckle (2), then repeat with locking buckle
(1).
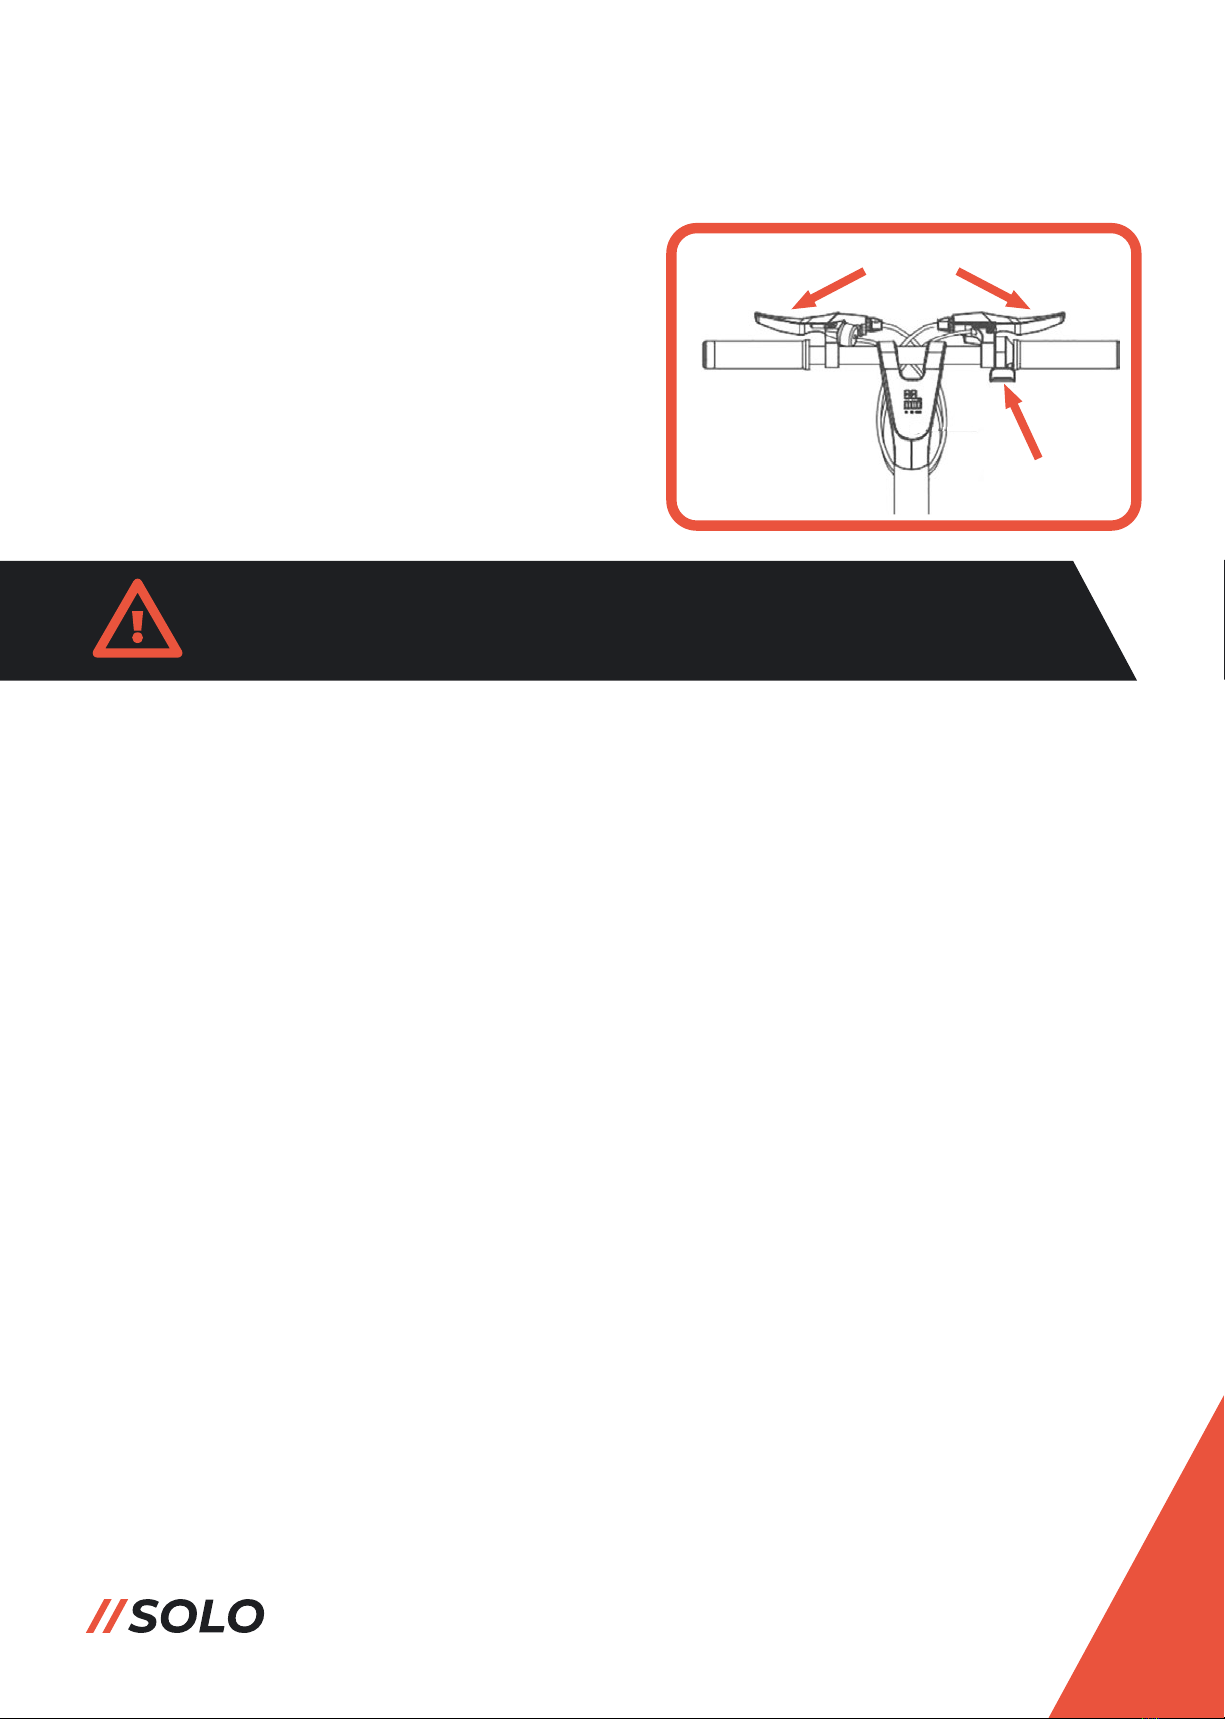
Ensure both the throttle and brake levers are released when
powering the scooter on or off.
Using The Throttle & Brake
Press the right throttle lever to accelerate
the scooter to the desired speed.
Press both brake levers evenly to slow the
scooter down to a stop.
Throttle
Brakes
7
Only operate the scooter in areas where legally permitted and
safe to do so.
Do not ride the scooter on public highways or in built-up areas
that pose a risk of danger or injury to the rider or bystanders.
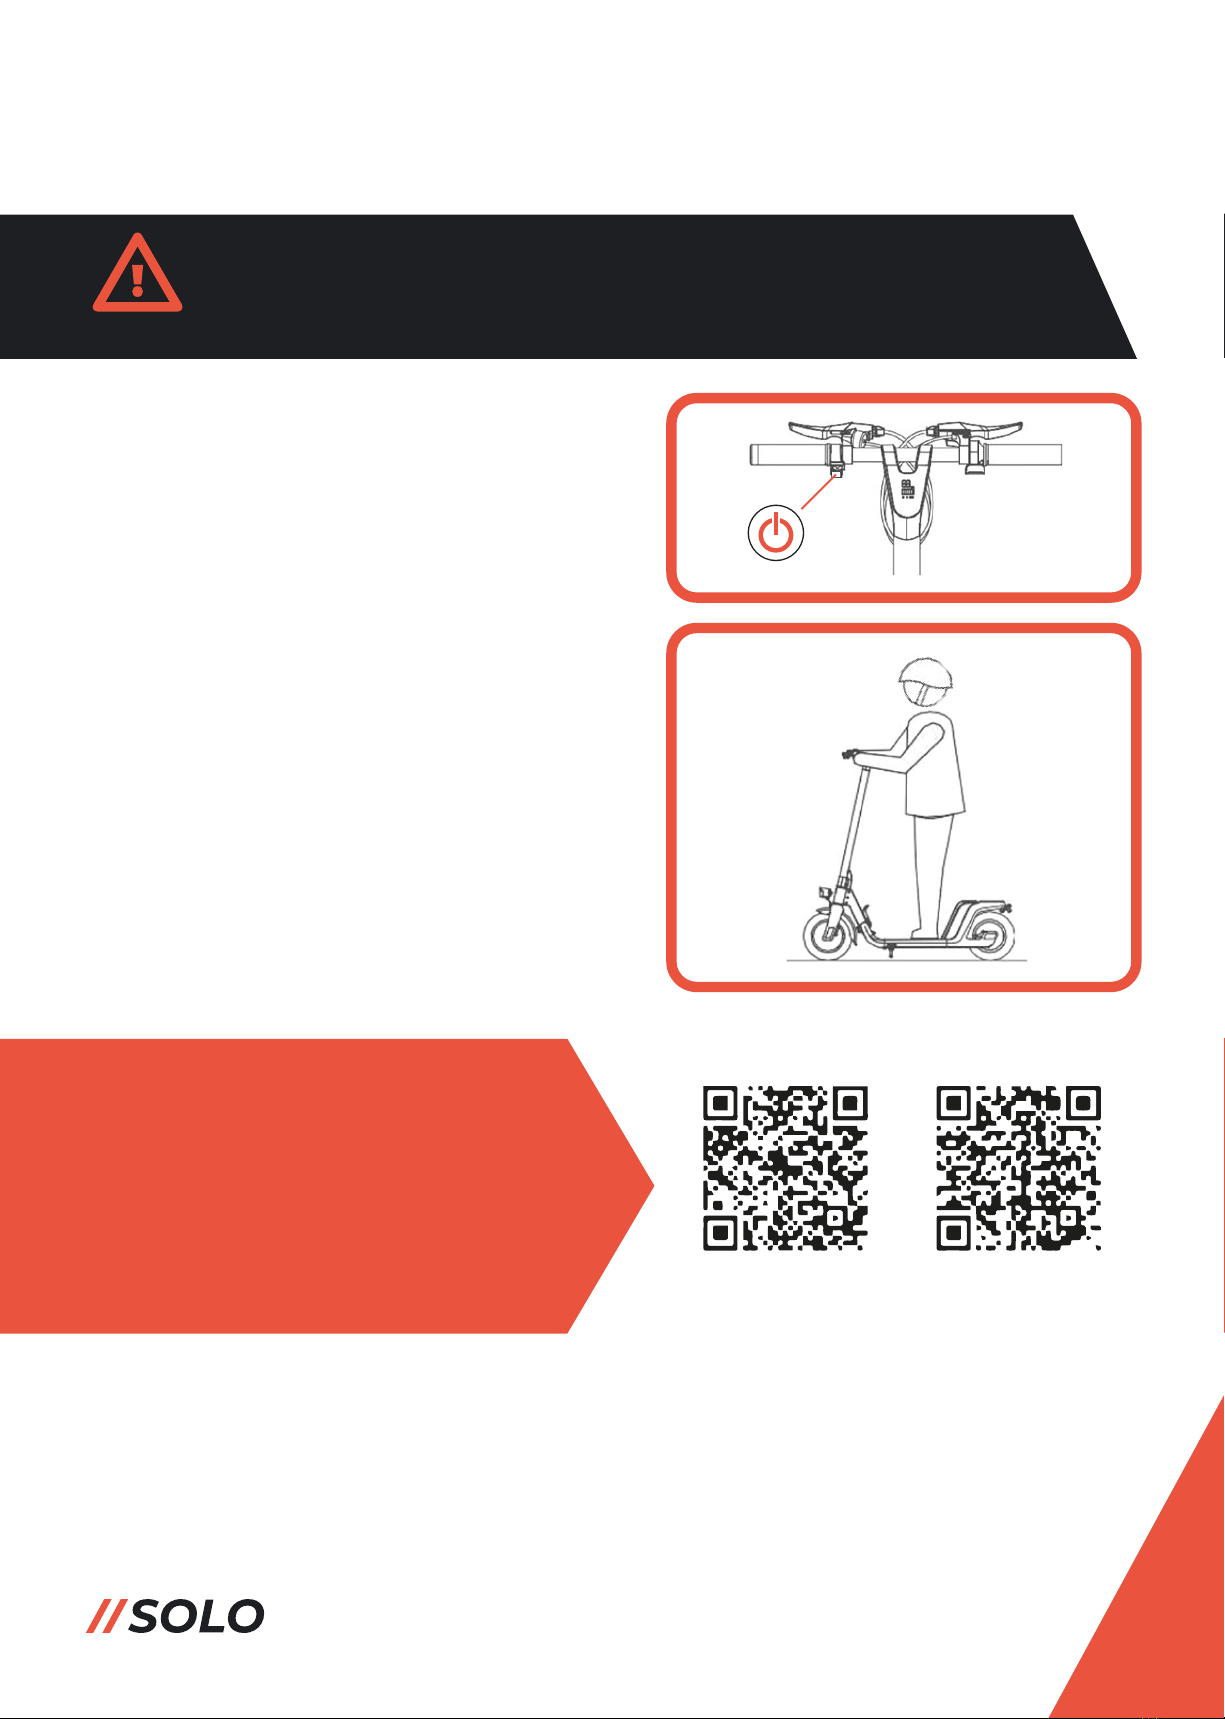
Riding The Scooter
Step 1 - Press and hold the power button
on the left indicator console to power up
the scooter.
7
Step 2 - Hold the handle bar with both
hands; with one foot on the deck push the
scooter with the other foot to start the
scooter.
Press the throttle lever to speed up the
scooter and maintain balance.
Once stable, place the other foot onto the
deck .
Use our App and connect your
device via Bluetooth for an
enhanced display and control of
your scooter!
Search for “EScooter” in the Apple or
Google Play stores, or scan the
attached QR codes to download the
app for iOS and Android Android iOS

Always follow local guidance and highway laws when using
the scooter at all times.
Be wary of your environment, pedestrians and traffic at all
times.
Scooter Safety
It is ultimately the rider’s sole responsibility for the safety
of themselves and others while using the scooter.
The manufacturer and associated parties accept no
responsibility for any damage or injury caused through
improper, inconsiderate or careless use of the scooter.
Read this manual in full before riding the scooter for the first time.
Prior to riding, check that the battery is charged, and there are no defects or
damage that may affect the safety of the scooter.
Always wear protective equipment including a helmet, gloves, knee and
elbow pads when using the scooter.
The scooter is recommended for use only by persons aged 16 or over.
Only use the scooter for short, local journeys or recreation in areas where
there is sufficient space to do so safely.
The scooter should only be used by one rider at any time.
Do not ride or use the scooter under the influence of alcohol, drugs or other
substances.
Do not use personal mobile devices or other items that may cause
distractions or inhibit full control of the scooter.
Ride with respect to your surroundings - In busy or built up areas, ride at a
slower speed or get off the scooter.
7

Always follow local guidance and highway laws when using
the scooter at all times.
Be wary of your environment, pedestrians and traffic at all
times.
Scooter Safety
Use common sense and be courteous at all times when riding the scooter.
Use both hands on the handlebars all times when riding the scooter.
Always maintain an upright standing position while riding the scooter.
Do not power off the scooter while riding.
Do not ride the scooter on wet, icy, oily or rough surfaces; if necessary, slow
down or get off the scooter if doing so.
Avoid sudden acceleration or braking on slippery surfaces.
Do not ride the scooter through standing water more than 3cm deep.
Do not ride the scooter up or down stairs or escalators.
Do not ride the scooter in temperatures below -5°.
Do not ride the scooter on gradients of more than 15°.
Do not ride the scooter in areas of poor light or visibility.
When the battery charge is running low, ride at a slower, conservative speed
and recharge the battery as soon as possible.
Only carry the scooter from the handle bars or steering column, do not carry
of lift it by any other parts of the scooter.
It is ultimately the rider’s sole responsibility for the safety
of themselves and others while using the scooter.
The manufacturer and associated parties accept no
responsibility for any damage or injury caused through
improper, inconsiderate or careless use of the scooter.
7

Cleaning
Clean the scooter using a soft, damp cloth only; for stains that cannot be wiped off,
use a drop of toothpaste and a toothbrush to gently polish the stain away, wiping
with a soft, damp cloth to finish.
Do not use alcohol, solvents, petrol, spirits or other corrosove or volatile chemicals
to clean the scooter, otherwise irrepavrable cosmetic or physical damage may be
caused.
Do not use high pressure brushes or washers to clean the scooter.
Before cleaning the scooter ensure it is powered off, unplugged
and away from the charger unit and the charging port cap is
securely closed to prevent risk of injury or damage through
electrical shock or short circuiting.
Storage
Store the scooter indoors in a cool, dry place.
Storage outdoors, in direct sunlight or extreme heat may cause irreversible
cosmetic damage and reduced battery life.
7
Battery Maintenance
Ensure the scooter is stored in a cool dry place, ensuring the battery is away from
direct sunlight, moisture, extreme heat or cold otherwise this can cause reduced
battery effectiveness.
Avoid charging the battery from a fully discharged state; it is recommended to
recharge the battery after every use to maintain effectiveness.
Shorter mileage ranges may be experienced from a charged state when riding in
colder temperatures.
In the event of long storage the scooter should be charged every 2 months to
prevent over-discharge.
Damage to the battery and internal electrics caused by over-discharging is
unrepairable and are not covered by warranty.
Do not disconnect the battery for any reason as this can cause
injury or damage due to electric shocks or short circuiting.
In the event of a battery issue, please contact your authorised
dealer for further advice and support.
7
If disposing the product, please do so responsibly by
disposing at a local recycling facility and not general
waste - For further information please contact your
authorised dealer fro further advice and support.

Manufacturer’s Warranty
Resolution
A replacement motor will be offered in
the event of a faulty motor unit within
this time frame (3 month turnover
period).
A replacement battery will be offered
should the charge capacity fall below 60%
of the original maximum within this time
frame.
A replacement scooter will be offered in
the event of lost, broken or cracked welds
found in this time frame (modifications
are excluded).
A replacement front wheel will be offered
in the event of flaws or damage found in
this time frame (modifications are
excluded).
A repair will be attempted or a
replacement charger offered in the event
of a faulty charger within this time frame.
A repair will be attempted or a
replacement scooter offered in the event
of a faulty dashboard within this time
frame.
Riders can enjoy peace of mind with our scooters; we will glady repair or replace
scooters or components in the event of faults caused by quality issues as per the
below cases.
Warranties will not be upheld if any damage or faults are deemed malicious or as
a result of inappropriate use as per this manual.
Part
Rear motor
Battery
Frame
Front wheel rim
Charger
Dashboard
Warranty length
12 months
18 months
24 months
12 months
12 months
12 months
7

7
Table of contents


