Soltech Solutions Highland Tracklight User manual

HIGHLAND TRACKLIGHT
QUICK START GUIDE
IMPORTANT SAFETY INSTRUCTIONS
READ AND FOLLOW ALL INSTRUCTIONS
SAVE THESE INSTRUCTIONS

2
TABLE OF CONTENTS
IMPORTANT SAFETY INSTRUCTIONS ......................................................... 3
SAFETY INSTRUCTIONS FOR PET OWNERS............................................... 4
INSTALLATION INSTRUCTIONS ................................................................... 5
INSTALLING THE HIGHLAND ....................................................................... 8
LIGHT CYCLES ..................................................................................................... 9
PROGRAMMING THE DIGITAL WALL TIMER......................................... 10
SETTING THE ANALOG OUTLET TIMER................................................... 12
ADJUSTING THE LIGHT OUTPUT................................................................ 13
DETERMINING THE DISTANCE AND COVERAGE ................................ 13
INDOOR GROWING GUIDE ........................................................................... 19
HIGHLAND TROUBLESHOOTING............................................................... 22
PRODUCT WARRANTY AND RETURN POLICY...................................... 23
CONTACT US...................................................................................................... 24
LEGAL DISCLAIMER ........................................................................................ 24

3
IMPORTANT SAFETY INSTRUCTIONS
1. Read all safety and operating instructions before using this product.
2. Not for use with dimmers of any kind.
3. TURN OFF ELECTRICITY at the main fuse box before installing, adding to
or changing the configuration of the fixture.
4. For indoor use only.
5. Do not install this fixture in a damp or wet location.
6. Install the fixture in a manner consistent with its intended use and in
compliance with the National Electrical Code and with other local
electrical codes.
7. Track rails must maintain polarity.
8. Do not cut the track rails.
9. Use this product only as described in this manual. Any other use is not
recommended by the manufacturer and may cause fire, electrical shock or
injury, and may void the warranty.
10. Avoid eye contact directly with the LED light.
11. Always turn off or unplug the unit before cleaning to reduce risk of
electrical shock. Do not stick anything inside of the rails.
12. Only use a dry or lightly damp cloth to clean the Highland, do not use a
wet cloth or spray anything into or on the unit.
13. The use of attachments not recommended or sold by the manufacturer
may cause injury.
14. Do not operate the product in the presence of explosive and/or flammable
fumes.
15. (For corded systems) If the plug loosely fits in the outlet, discontinue use
with that outlet. A loose-fitting plug may cause the plug or outlet to
overheat. Have a qualified electrician replace the outlet.
16. If you have pets, make sure the wires are out of reach and you check that
your plants are animal friendly.

4
SAFETY INSTRUCTIONS FOR PET OWNERS
When your animals are your family, keeping them safe is a top
priority. All wiring should be kept out of reach of animals. We
recommend a protective tubing or other means of blocking access.
It may not have crossed your mind, but many common houseplants can be
toxic. We highly recommend consulting with professionals before buying new
plants. Provided below is a short list of common plants that may be toxic to
animals and range from rash, oxalates, minor toxicity and major toxicity. The
plants highlighted in bold are considered extremely toxic and may cause
coma, seizures or death.
Aloe Vera
Dahlia
Morning Glory
Amaryllis
Daisy
Mother in Law
American Holly
Deadly Nightshade
Mum
Apple
English Ivy
Oleander
Apricot
Eucalyputs
Orange
Azalea
Fig
Oregano
Baby’s Breath
Garlic
Palm Lily
Begonia
Geranium
Parsley
Bird of Paradise
Glacier Ivy
Peace Lily
Bitter root
Gladiola
Peach
Boxwood
Grapefruit
Plum
Branching Ivy
Hibiscus
Poinsettia
Calamondin Orange
Hops
Pothos
California Ivy
Hosta
Rhodedendron
Carnations
Hydrangea
Sago Palm
Castor Bean
Jade
St. John’s Wort
Cherry
Leek
Sweet Potato Vine
Chinese Jade
Lemon
Sweetheart Ivy
Chives
Lemon Grass
Tomato Plants
Chrysanthemum
Lilies
Tulip
Coffee Tree
Lime
Wandering Jew
Cyclamen
Marijuana
Yew
Daffodil
Milkweed
Yucca
Please note that the information contained in our plants list is not meant to be
all-inclusive, but rather a compilation of the most frequently encountered
plants. If you think that your animal may have ingested a poisonous plant,
contact your local veterinarian or the ASPCA 24-hour emergency poison
hotline directly at 1-888-426-4435. Soltech Solutions LLC and authorized
distributors are not responsible for illness or death of persons or animals.

5
INSTALLATION INSTRUCTIONS
(OPTION 1) INSTALL AN ELECTRICAL FEED FROM A JUNCTION BOX
WITH FLOATING CANOPY
1. Make sure the power is off.
2. Route the wires from the electrical adapter through the mounting
plate.
3. Connect the wires to the existing wiring from the junction box.
4. Tuck excess wiring back into the junction box.
5. Install the mounting plate to the junction box.
6. Before installing the track rail, confirm that the polarity of the rail is
in the right direction for the electrical adapter and all accessories.
Accessories, such as connectors, elbows and plugs will only fit in
one direction. The groove in the rail indicates the neutral side.
7. Raise track assembly to the ceiling. Mark hole locations.
8. Two types of fasteners are provided; a nylon self-drilling anchor for
drywall ceilings and a butterfly anchor for plaster and lath ceilings
or drop ceilings.
a. The nylon self-drilling anchors can be installed in the
ceiling with either a screw driver or drill. Press the anchor
into the ceiling and screw the anchor in. Put the track rail
in place and tighten the metal screw into the anchor until
the rail is secured.
b. Butterfly anchors (toggle bolts) require a 5/8 inch drill bit.
First, prepare the track rail by routing the bolt through the
rail. Thread on the toggle so that the tips of the wings are
facing down towards the screw head. Squeeze the toggle
closed and insert into the hole in the ceiling. The wings of
the toggle will open in the ceiling, allowing you to tighten
the bolt. You may need to carefully pull down on the
screw head or rail so the wings catch on the ceiling.
Tighten until the rail is secure.
9. Tighten the screws located on the screw tab to secure the track rail to
the mounting plate.
10. Twist in the electrical adapter into the track rail. Take note of the
polarity of the track rail and the polarity of the electrical adapter.
The side of the electrical adapter that has two contacts should twice
into the side of the rail with a groove. Do not force the adapter in the
wrong way, it will break.
11. Install the canopy cover and secure with screws.
12. Install the Highland LED lights.

6

7
(OPTION 2) INSTALL A LIVE END PLUG OR ELECTRICAL FEED
1. Make sure the power is off.
2. Before installing the track rail, identify the side that accepts the live
end connector. Confirm that the polarity of the rail is in the correct
direction for the electrical adapter and all accessories. The plug end
and all accessories will only fit in one direction. The groove in the
rail indicates the neutral side.
3. Brace the opposite end of the track against a solid surface.
4. Insert the live end and secure by tightening the screw.
5. Raise track assembly to the ceiling. Mark hole locations.
6. Two types of fasteners are provided; a nylon self-drilling anchor for
drywall ceilings and a butterfly anchor for plaster and lath ceilings
or drop ceilings.
a. The nylon self-drilling anchors can be installed in the
ceiling with either a screw driver or drill. Press the anchor
into the ceiling and screw the anchor in. Put the track rail
in place and tighten the metal screw into the anchor until
the rail is secured.
b. Butterfly anchors (toggle bolts) require a 5/8 inch drill bit.
First, prepare the track rail by routing the bolt through the
rail. Thread on the toggle so that the tips of the wings are
facing down towards the screw head. Squeeze the toggle
closed and insert into the hole in the ceiling. The wings of
the toggle will open in the ceiling, allowing you to tighten
the bolt. You may need to carefully pull down on the
screw head or rail so the wings catch on the ceiling.
Tighten until the rail is secure.
7. Use staples, fairleads, wire mold, hooks, command hooks or other
products to secure the wire along the ceiling and wall.
8. Set an outlet timer to your desired light cycle, we recommend
between 12-16 hours. Do not exceed 18 hours of light per day! Your
plants need to sleep and too much light will kill them.
9. Install the Highland LED lights.
8
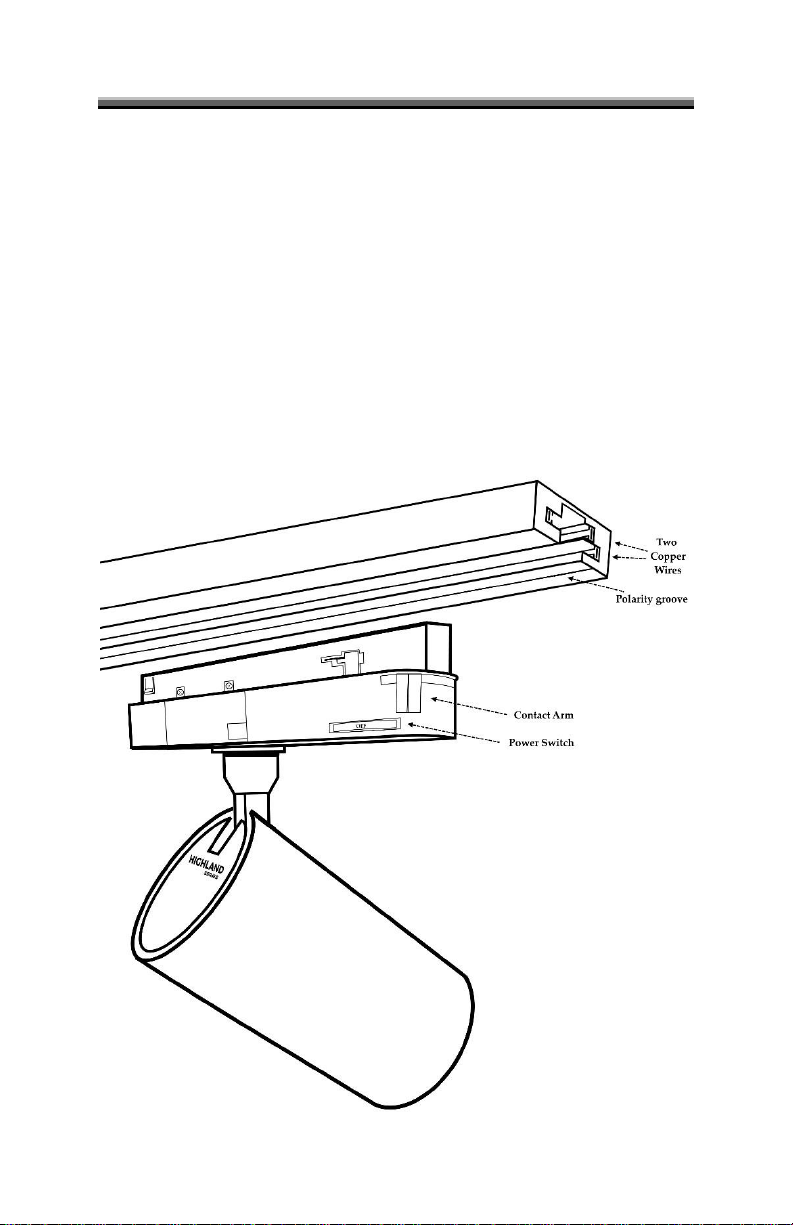
INSTALLING THE HIGHLAND
When installing the Highland grow light, take note of the polarity groove on
the track rail. The side of the Highland with no writing on the box should face
the polarity groove of the track light rail. The side of the Highland with
writing and access door should be on the opposite side of the polarity groove.
1. Make sure the power is off.
2. Insert the Highland into the track light rail. The base of the Highland
should be flush with the track light rail.
3. Switch the contact arm from left to right. The contact arm should be
completely to the right; clicking into place.
4. Position the head of the Highland towards your plants.
5. Switch the power switch from OFF to ON.
6. Removal is the reverse procedure. With the power off, switch the
contact arm form right to left and gently remove the highland from
the track rail.

9
LIGHT CYCLES
Light cycles are used to simulate the conditions of day and night for indoor
plants. We highly recommend the use of a 24-hour timer to create a repeatable
light cycle.
Most plants grow in two stages, the vegetative stage and flowering stage.
During the vegetative growth stage, the plant is focused on growing in
preparation for flowering. Some plants can be left in the vegetative stage
indefinitely with no adverse effects. The flower stage is initiated when the
light cycle changes into the critical light period, explained below. This change
will cause your plant to focus completely on making flowers and seeds for
reproduction.
There are three types of plant responses; short-day, long-day, and day-neutral.
The first two types have a critical light and dark period associated with them
and can vary from plant to plant. This critical period will determine when the
plant switches from the vegetative stage to the flowering stage. Day-neutral
plants are generally unaffected by light cycles and flower when the plant is
mature. If you find that it is difficult to flower a short-day plant due to a light
flash at night, we recommend flowering in a closet or grow tent.

10
PROGRAMMING THE DIGITAL WALL TIMER
Before installing the timer, read the Use and Care Guide included with the
wall timer. The guide will give you detailed instructions on how to install and
program your timer. You can skip this section if you rather follow instructions
or if you are using a different wall timer. We provided the instructions below
to help simplify the setup and as a reference for the future. Below is the
method we used to set up the timer for the first time (adapted from the Use
and Care Guide) and two methods of programming the timer. Method 1
matches the sunrise and sunset of your location and automatically changes
throughout the year. Method two is used to set an exact on/off time that does
not change.
Setting up the timer for the first time.
1. Follow the instructions for installing the timer.
2. Press the reset button to clear any information.
3. Press the set button.
4. Use the up/down buttons to set the time. Press the set button.
5. Use the up/down buttons to set the year. Press the set button.
6. Use the up/down buttons to set the month. Press the set button.
7. Use the up/down buttons to set the day. Press the set button.
8. Use the up/down buttons to turn on/off DST (Daylight Savings
Time). If you leave DST on, the timer will automatically adjust the
clock for you. Press the set button.
9. Use the up/down buttons to set the zone. Press the set button.
10. Use the up/down buttons to set the dusk time. Press the set button.
11. Use the up/down buttons to set the dawn time. Press the set button.
12. Press the set button to complete the setup and return to clock mode.

11
Method 1: Matching the sunrise and sunset of your location.
1. Press program (prg) to set the ON time. (PRG 1 ON)
2. Press the set button. This makes the days of the week flash along the
top. No changes are needed, we recommend the default of everyday.
3. Press the set button. This allows you to pick the ON time. Use the
down button and set the timer to DAWN.
4. Press the set button.
5. Press program (prg) to set the OFF time. (PRG 1 OFF)
6. Press the set button. This makes the days of the week flash along the
top. No changes are needed, we recommend the default of everyday.
7. Press the set button. This allows you to pick the OFF time. Use the
up/down buttons to select DUSK.
8. Press the set button.
9. Press and hold the program (prg) button for 3 seconds or press
nothing for 20 seconds to return to the main screen.
Method 2: Programming an ON/OFF time.
1. Press program (prg) to set the ON time. (PRG 1 ON)
2. Press the set button. This makes the days of the week flash along the
top. No changes are needed, we recommend the default of everyday.
3. Press the set button. This allows you to pick the ON time. TIME
should be displayed, if not, use the up/down buttons to find the
clock setting.
4. Press the set button. This allows you to change the time. Use the
up/down buttons to set the ON time. Press the set button.
5. Press program (prg) to set the OFF time. (PRG 1 OFF)
6. Press the set button. This makes the days of the week flash along the
top. No changes are needed, we recommend the default of everyday.
7. Press the set button. This allows you to pick the OFF time. TIME
should be displayed, if not, use the up/down buttons to find the
clock setting.
8. Press the set button. This allows you to change the time. Use the
up/down buttons to set the OFF time. Press the set button.
9. Press and hold the program (prg) button for 3 seconds or press
nothing for 20 seconds to return to the main screen.

12
SETTING THE ANALOG OUTLET TIMER
The use of an outlet timer is essential for maintaining proper growth of your
plants. Never leave your light on for 24 hours, your plants need to sleep!
Setting the timer:
1. Locate the pins around the outer edge of the timer’s dial. These pins
represent 30 minutes.
2. Determine the light cycle that best fits your plant. This can be done
by asking your nursery, finding the information online, or by
finding out where the plant is native and mimicking the light cycle
of that location. If you cannot determine the light cycle, we
recommend either mimicking the current sunrise/sunset of your
location or keeping a 16 hour on/8 hour off cycle. Adjust as needed.
3. Pull up on the pins to turn the light off, push down to turn the light
on. We recommended having the light on during the times you are
awake. This will help prevent night interruption.
4. Rotate the timer’s dial clockwise until the pointer on the face of the
dial points to the current time.
5. Set the master switch on the timer to the “timer on” position.
6. Plug the Highland into the outlet on the side of the timer. Plug the
timer into the wall outlet. To override the timer and turn on the
Highland, set the master switch to “outlet on” position.

13
ADJUSTING THE LIGHT OUTPUT
The Highland power supply was designed to be adjustable from 24 watts to
30 watts. By default, the Highland is set on the most powerful setting. While
we highly recommend keeping the setting at the maximum, there are many
situations where lowering the amount of power is necessary. Below are the
steps on how to adjust the power output on the Highland.
1. Remove the Highland from the track rail.
2. Locate and remove the two screens on the power supply cover.
3. Remove the power supply cover by pressing in on the flap.
4. Locate the DIP switches. By default, both will be up or ON.
5. Turn off the switches to lower the power. A DIP switch table is
provided on the fixture.
6. Replace the cover and screws; reinstall the Highland.
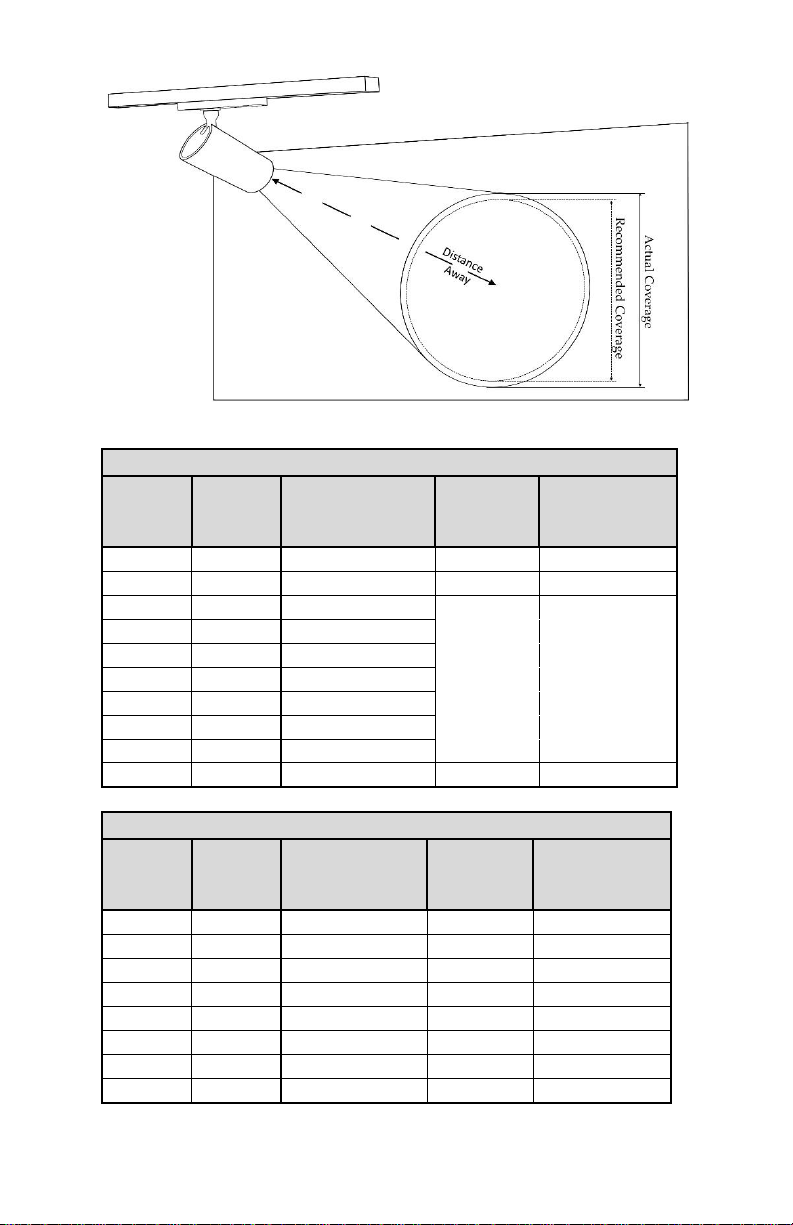
DETERMINING THE DISTANCE AND COVERAGE
Finding the perfect distance between the Highland and your plant can be a
challenge. The following pages will give you information on how far the
Highland should be from your plants. This information is assuming the
Highland is set at the maximum power.
Highlands are made with either a 30- or 60-degree reflector. This determines
how far the light can travel. A 30-degree reflector provides a beam angle that
is narrow and more focused. You can use Highlands with a 30-degree reflector
up to 6 foot away, providing you with a circle of light approximately 33 inches
in diameter. A 60-degree reflector provides a beam angle that is wider, less
focused light. You can use Highlands with a 60-degree reflector up to 4 ½ feet
away, providing you with a circle of light approximately 54 inches in
diameter.
Need more light? Not a problem! When you point two Highlands in the same
place, the amount of light doubles. For example, a Highland with a 30-degree
reflector located 4 feet away would provide a circle of light approximately 22
inches in diameter and provide moderate light. Using 2 Highlands pointed at
the same spot would increase the light from moderate to high light.
14
30 Degree Reflector
Distance
Away
(Feet)
Distance
Away
(Inches)
Light
Actual
Coverage
(Inches)
Recommended
Coverage
(Inches)
1.5
18
Full Sun
9.6
8.4
2
24
Full Sun
12.9
11.1
2.5
30
Full Sun
16.1
13.9
3
36
High Light
19.3
16.7
3.5
42
Moderate Light
22.5
19.5
4
48
Moderate Light
25.7
22.3
4.5
54
Moderate Light
28.9
25.1
5
60
Low Light
32.1
27.8
5.5
66
Low Light
35.4
30.6
6
72
Low Light
38.6
33.4
60 Degree Reflector
Distance
Away
(Feet)
Distance
Away
(Inches)
Light
Actual
Coverage
(Inches)
Recommended
Coverage
(Inches)
1
12
Full Sun
13.8
12.0
1.5
18
Full Sun
20.8
18.0
2
24
High Light
27.7
24.0
2.5
30
High Light
34.6
30.0
3
36
Moderate Light
41.5
36.0
3.5
42
Moderate Light
48.5
42.0
4
48
Low Light
55.4
48.0
4.5
54
Low Light
62.3
54.0

15
Common Name
Lighting Requirements
30
Degree
60
Degree
African Violets
Moderate to Low Light
42" - 72"
36" - 54"
Aglaonemas
Moderate to Low Light
42" - 72"
36" - 54"
Aloe
High Light
36"
24" - 30"
Aluminum Plant
Moderate to Low Light
42" - 72"
36" - 54"
Amaryllis
High Light
36"
24" - 30"
Anthurium
Moderate Light
42" - 54"
36" - 42"
Aralia, Balfour
High Light
36"
24" - 30"
Aralia, False
High to Moderate Light
36" - 54"
24" - 42"
Aralia, Ming
High to Moderate Light
36" - 54"
24" - 42"
Arrowhead Vine
Moderate Light
42" - 54"
36" - 42"
Azalea
High Light
36"
24" - 30"
Begonia, Angel Wing
Moderate Light
42" - 54"
36" - 42"
Begonia, Iron Cross
Moderate Light
42" - 54"
36" - 42"
Begonia, Strawberry
Moderate Light
42" - 54"
36" - 42"
Bird-of-Paradise
High to Moderate Light
36" - 54"
24" - 42"
Bomeliad, Earth Star
Moderate Light
42" - 54"
36" - 42"
Bougainvilla
High Light
36"
24" - 30"
Brake, Victoria
High Light
36"
24" - 30"
Bromeliad, Air Plant
High Light
36"
24" - 30"
Bromeliad, Bird Nest
Moderate to Low Light
42" - 72"
36" - 54"
Bromeliad, Blushing
Moderate Light
42" - 54"
36" - 42"
Bromeliad, Dyckia
High Light
36"
24" - 30"
Bromeliad, Flaming
Sword
Moderate to Low Light
42" - 72"
36" - 54"
Bromeliad, Friendship
Moderate Light
42" - 54"
36" - 42"
Bromeliad, Pineapple
High Light
36"
24" - 30"
Bromeliad, Star
Moderate to Low Light
42" - 72"
36" - 54"
Bromeliad, Living Vase
Moderate Light
42" - 54"
36" - 42"
Burro's (Donkey's) Tail
High Light
36"
24" - 30"
Cactus, Christmas
Moderate Light
42" - 54"
36" - 42"
Cactus, Easter
Moderate Light
42" - 54"
36" - 42"
Cactus, Old Man
High Light
36"
24" - 30"

16
Common Name
Lighting Requirements
30
Degree
60
Degree
Cactus, Prickly Pear
High Light
36"
24" - 30"
Cactus, Thanksgiving
Moderate Light
42" - 54"
36" - 42"
Calathea
Moderate Light
42" - 54"
36" - 42"
Cast Iron Plant
Moderate to Low Light
42" - 72"
36" - 54"
Century Plant
High Light
36"
24" - 30"
Chenille Plant
High Light
36"
24" - 30"
Chinese Evergreens
Moderate to Low Light
42" - 72"
36" - 54"
Citrus
High Light
36"
24" - 30"
Coffee Plant
High to Moderate Light
36" - 54"
24" - 42"
Coralberry
Moderate Light
42" - 54"
36" - 42"
Croton
High Light
36"
24" - 30"
Crown of Thorns
High to Moderate Light
36" - 54"
24" - 42"
Cyclamen
High to Moderate Light
36" - 54"
24" - 42"
Dracaena, Corn Plant
Moderate to Low Light
42" - 72"
36" - 54"
Dracaena, Dragon Tree
High to Moderate Light
36" - 54"
24" - 42"
Dracaena, Gold Dust
High to Moderate Light
36" - 54"
24" - 42"
Dracaena, 'Janet Craig'
Moderate to Low Light
42" - 72"
36" - 54"
Dracaena, Red Margined
Moderate Light
42" - 54"
36" - 42"
Dracaena, Song of India
Moderate Light
42" - 54"
36" - 42"
Dracaena, 'Tri-color'
Moderate Light
42" - 54"
36" - 42"
Dumbcane
Moderate Light
42" - 54"
36" - 42"
Elephant's Ear
Moderate Light
42" - 54"
36" - 42"
Fern, Asparagus
Moderate Light
42" - 54"
36" - 42"
Fern, Bird's Nest
Moderate to Low Light
42" - 72"
36" - 54"
Fern, Button
High to Moderate Light
36" - 54"
24" - 42"
Fern, Rabbit's Foot
High to Moderate Light
36" - 54"
24" - 42"
Fern, Staghorn
Moderate Light
42" - 54"
36" - 42"
Ferns (Sword, Dallas,
Boston)
High to Moderate Light
36" - 54"
24" - 42"
Ferns, Maidenhair
Moderate Light
42" - 54"
36" - 42"
Fig, Creeping
Moderate Light
42" - 54"
36" - 42"
Fig, Fiddleleaf
Moderate Light
42" - 54"
36" - 42"

17
Common Name
Lighting Requirements
30
Degree
60
Degree
Fig, Weeping
Moderate Light
42" - 54"
36" - 42"
Fuchsia
Moderate Light
42" - 54"
36" - 42"
Gardenia
High to Moderate Light
36" - 54"
24" - 42"
Gloxinia
High Light
36"
24" - 30"
Goldfish Plant
High Light
36"
24" - 30"
Hawaiian Ti Plant
Moderate Light
42" - 54"
36" - 42"
Haworthia
Moderate Light
42" - 54"
36" - 42"
Hibiscus
High to Moderate Light
36" - 54"
24" - 42"
Hoya / Wax Plant
High Light
36"
24" - 30"
Indian Rubber Plant
High Light
36"
24" - 30"
Ivy, Algerian
High to Moderate Light
36" - 54"
24" - 42"
Ivy, Aralia (Fatshedra)
High to Moderate Light
36" - 54"
24" - 42"
Ivy, English
High to Moderate Light
36" - 54"
24" - 42"
Ivy, Grape
Moderate Light
42" - 54"
36" - 42"
Ivy, Parlor
Moderate Light
42" - 54"
36" - 42"
Ivy, Swedish
Moderate Light
42" - 54"
36" - 42"
Ivy, Variegated Mintleaf
Moderate Light
42" - 54"
36" - 42"
Ivy, Wax
Moderate Light
42" - 54"
36" - 42"
Jade Plant
High to Moderate Light
36" - 54"
24" - 42"
Kalanchoe
High Light
36"
24" - 30"
Lantana
High Light
36"
24" - 30"
Lipstick Plant
High Light
36"
24" - 30"
Natal Plum
High Light
36"
24" - 30"
Nerve Plant
Moderate to Low Light
42" - 72"
36" - 54"
Norfolk Island Pine
Moderate Light
42" - 54"
36" - 42"
Orchid, Buttonhole
High Light
36"
24" - 30"
Orchid, Cattleya
High Light
36"
24" - 30"
Orchid, Dendrobium
High to Moderate Light
36" - 54"
24" - 42"
Orchid, Lady's Slipper
Moderate Light
42" - 54"
36" - 42"
Orchid, Moon/Vanda
Moderate Light
42" - 54"
36" - 42"
Orchid, Oncidium
Moderate Light
42" - 54"
36" - 42"
Orchid, Phalanopsis
High to Moderate Light
36" - 54"
24" - 42"

18
Common Name
Lighting Requirements
30
Degree
60
Degree
Palm, Fan
High to Moderate Light
36" - 54"
24" - 42"
Palm, Parlor
Moderate to Low Light
42" - 72"
36" - 54"
Palm, Sago
Moderate Light
42" - 54"
36" - 42"
Panda Plant
High Light
36"
24" - 30"
Peace Lily
Moderate to Low Light
42" - 72"
36" - 54"
Peperomia
Moderate Light
42" - 54"
36" - 42"
Philodendron
Moderate to Low Light
42" - 72"
36" - 54"
Philodendron, Split Leaf
(Monstera)
Moderate to Low Light
42" - 72"
36" - 54"
Piggyback Plant
High Light
36"
24" - 30"
Pitcher Plant
High Light
36"
24" - 30"
Poinsettia
High Light
36"
24" - 30"
Polka Dot Plant
High to Moderate Light
36" - 54"
24" - 42"
Ponytail Plant
High to Moderate Light
36" - 54"
24" - 42"
Pothos
High to Moderate Light
36" - 54"
24" - 42"
Prayer Plant
Moderate Light
42" - 54"
36" - 42"
Primrose
Moderate Light
42" - 54"
36" - 42"
Primrose, Cape
High Light
36"
24" - 30"
Purple Passion (Velvet)
High Light
36"
24" - 30"
Purple Waffle Plant
Moderate to Low Light
42" - 72"
36" - 54"
Rosary Vine
High Light
36"
24" - 30"
Schefflera (Umbrella)
High to Moderate Light
36" - 54"
24" - 42"
Shamrock Plant
High to Moderate Light
36" - 54"
24" - 42"
Shrimp Plant
High Light
36"
24" - 30"
Snake Plant
Moderate to Low Light
42" - 72"
36" - 54"
Spiderplant
Moderate Light
42" - 54"
36" - 42"
String-of-Pearls
High Light
36"
24" - 30"
Tahitian Bridal Veil
High to Moderate Light
36" - 54"
24" - 42"
Venus Fly Trap
High Light
36"
24" - 30"
Wandering Jew (Purple)
High to Moderate Light
36" - 54"
24" - 42"
Yucca
High to Moderate Light
36" - 54"
24" - 42"
Zebra Plant
Moderate Light
42" - 54"
36" - 42"

19
INDOOR GROWING GUIDE
Plants should not be an overlooked element in creating a warm and inviting
room; a perfectly placed plant can bring the entire room to life! For beginner
gardeners, or even those with a year or two under their belts, the world of
garden tools, materials, and supplies can be overwhelming. We provided this
guide to help you decide what essentials you need to get started.
Lighting:
Lighting is the most important first step for your plants! This manual will help
you determine the appropriate distance, light cycles and more. You can tell if
your plant is not receiving enough light if it stops growing, the spaces
between the leaves on new growth are much longer than before, the new
leaves are smaller, the leaf color is lighter, or older leaves are dead.
It is important that light covers the entire plant, including the sides of the
plant. Larger plants may require two or more Highlands to provide adequate
light intensity. If you have questions, you can contact Soltech Solutions and
we would be glad to assist you.
Temperature:
Temperature is a major factor influencing plant growth indoors. Before
picking out your plants, consider the optimal temperature the plant needs.
While many plants grow at temperatures around 60°F –85°F (15°C –29°C),
some tropical plants grow best at temperatures exceeding 85°F. Be careful not
to place plants near AC vents or heaters, the change in temperature may kill
them.
Humidity:
Some indoor plants need high humidity and excellent air circulation for
optimal growth. Humidity below 20% is considered low, up to 50% is
medium, and above 50% is high. Many plants come from tropical regions and
require high humidity. Since most homes have low humidity levels, you can
do a few things to increase humidity.
•Place plants close together. Plants naturally humidify the air around
them.
•Set your plants on a tray of pebbles filled with water.
•Use a humidifier if your air is very dry.
Take caution when misting plants, especially if your plant has hairy leaves.
Your plant may be more susceptible to disease and mildew. You may want to
consider adding a fan to increase air circulation.

20
Pots & Containers:
To start your garden, you need the right type of container for your plant. The
container should have drainage holes; water should be able to drain out.
Plants cannot sit in waterlogged soil or they will die.
Watering:
Often overlooked, watering your plants properly is important. When dealing
with how much water to apply, consider the plant type, plant size, container
size, soil moisture and light intensity. For most plants, when deciding when
you should water, feel the soil by pushing your finger about 1-2 inches below
the dirt’s surface. If the soil is still moist, do not water the plant. Overwatering
can lead to root rot, mildew, and disease. Water meters are available at most
greenhouses to simplify watering.
Soil:
Do not use top soil or soil from your garden! We recommend that you find a
high quality, pre-mixed soil at your local garden stores that was designed for
container gardening. Top soil and garden soil have very poor drainage
abilities and you may introduce unwanted pests in your home. If you find
your soil does not drain well, you can add perlite, coarse sand, or peat moss to
increase drainage. Different plants grow better in different soil, make sure you
know which soil you plant needs before planting.
Buying New Plants:
Buying new plants is always fun, but make sure to look for healthy looking
plants with medium to dark green foliage. Avoid plants with unnatural
yellow or brown leaves. Look for pest, especially small white mites on the
undersides of the leaves. Remove the plant from the pot and examine the root
system. Healthy roots generally are visible along the outside of the soil and
have an earthy smell. Brown or black roots, especially if they have a foul
smell, are signs of a problem.
Acclimatization:
Acclimatization is the adaptation of a plant to a new environment. Changing
the environment the plant is accustomed to will stress the plant and may
cause damage, prevent growth, or even kill the plant. The greater the
difference between the previous environment and the new environment, the
greater the stress the plant endures.
Pruning:
Pruning your plant is a great way to encourage dense growth while
maintaining an optimal size and shape. Plants concentrate growing on the top
Table of contents
Popular Dj Equipment manuals by other brands

Squareled
Squareled Aura Panel gold matrix & dream color user manual

Martin
Martin THRILL Compact PAR 64 LED user guide

Coemar
Coemar Reflection LEDko FullSpectrum 6 instruction manual
 manual")
Apollo
Apollo DESIGN MultiSpot HT3030 (HP3) manual

American DJ
American DJ Reflex User instructions

thomann
thomann LaserDerby user manual


