Solwave 180MWASS022 User manual
Commercial Microwave
SERVICE MANUAL
Models
16400051
180MWASS022
180MWASS035

Table of Contents
IMPORTANT SAFETY INSTRUCTIONS................................................................................ 3-5
Oven Specifications ............................................................................................................. 4
Installation & Cleaning .......................................................................................................... 5
Reference Guide................................................................................................................ 6-7
User Options......................................................................................................................... 8
Cooking Instructions ............................................................................................................. 9
Component Location...................................................................................................... 10-15
Door & Door Switch Adjustment .................................................................................... 16-17
Service Test Mode ............................................................................................................. 18
Microwave Power Test ....................................................................................................... 19
Component Specifications ........................................................................................... 20-22
Wiring and Schematic Diagrams….……………………………………….………………… 23-24

PRECAUTIONS
TO
AVOID POSSIBLE EXPOSURE
TO EXCESSIVE MICROW
A
VE ENERGY
A.
DO NOT attempt to operate this oven with the door open since open door operation can
result in harmful exposure to microwave energy
.
It
is important not to defeat or tamper with
the safety interlocks.
B.
DO NOT place any object between the oven front face and the door or allow soil or
cleaner residue to accumulate on sealing surfaces.
C.
DO NOT operate the oven if it is damaged.
It
is particularly important that the oven door
close properly and that there is no damage to the:
1.
door (bent)
2.
hinges and latches (broken or loosened)
3.
door seals and sealing surfaces.
D. The oven should not be adjusted or repaired by anyone except properly qualified service
personnel.
1

To reduce the risk of burns, electrical shock, fire, or personal injury when using
electrical equipment, basic safety precautions should be followed.
1.
READ AND FOLLOW the specific
“PRECAUTIONS TO AVOID POSSIBLE
EXPOSURE TO EXCESSIVE MICROWAVE
ENERGY” on page 1.
2.
This equipment MUST BE GROUNDED.
Connect only to properly GROUNDED outlet. See
“GROUNDING/EARTHING INSTRUCTIONS”
on page 4.
3.
Install or locate this equipment ONLY in
accordance with the installation instructions in this
manual.
4.
Some products such as whole eggs and sealed
containers—for example, closed glass jars—are
able to explode and SHOULD NOT be HEATED in
this oven.
5.
Use this equipment ONLY for its intended use as
described in this manual. Do not use corrosive
chemicals or vapors in this equipment. This type of
oven is specifically designed to heat, cook, or dry
food. It is not designed for industrial or laboratory
use.
6.
As with any equipment, CLOSE SUPERVISION is
necessary when used by CHILDREN.
7.
DO NOT operate this equipment if it has a
damaged cord or plug, if it is not working properly,
or if it has been damaged or dropped.
8.
This equipment, including power cord, must be
serviced ONLY by qualified service personnel.
Special tools are required to service equipment.
Contact nearest authorized service facility for
examination, repair, or adjustment.
9.
DO NOT cover or block filter (if applicable) or other
openings on equipment.
10.
DO NOT store this equipment outdoors. DO NOT
use this product near water – for example, near a
kitchen sink, in a wet basement, a swimming pool,
or a similar location.
11.
DO NOT immerse cord or plug in water.
12.
Keep cord AWAY from HEATED surfaces.
13.
DO NOT let cord hang over edge of table or
counter.
14.
See door cleaning instructions on page 4.
Cleaning and user maintenance shall not be
made by children without supervision.
15. To avoid risk of fire in the oven cavity:
a.
DO NOT overcook food. Carefully attend oven
when paper, plastic, or other combustible materials
are placed inside the oven to facilitate cooking.
b.
Remove wire twist-ties from paper or plastic bags
before placing bag in oven.
c.
If materials inside the oven ignite, keep oven door
d.
CLOSED, turn oven off and disconnect the power
cord, or shut off power at the fuse or circuit
breaker panel.
e.
DO NOT use the cavity for storage. DO NOTleave paper
products, cooking utensils, or food in the cavity when not in
use.
17. For commercial use only.
18. It is hazardous for anyone other than a competent person to
carry out any service or repair operation that involves the
removal of any cover which gives protection against exposure
to microwave energy.
19. If the door or door seals are damaged, the oven must not be
operated until it has been repaired by a competent person.
20. Appliance is not to be used by children 8 years and below or
persons with reduced physical, sensory or mental capabilities
or lack of experience and knowledge, unless they have been
given supervision or instruction.
21. Children being supervised not to play with appliance.
22. Only use utensils that are suitable for use in microwave oven.
23. When heating food in plastic or paper containers, keep an eye
on the oven due to the possibility of ignition.
24. If smoke is observed, switch off or unplug the appliance and
keep the door closed in order to stifle any flames.
25. Failure to maintain the oven in a clean condition could lead to
deterioration of the surface that could adversely affect
the life
of the appliance and possibly result in a hazardous situation.
26. The appliance should not be cleaned with a water jet (for
appliances intended to stand on the floor and which are not at
least IPX5).
27. Liquids or other foods must not be heated in sealed
containers since they are liable to explode.
28. Microwave heating of beverages can result in delayed
eruptive boiling, therefore care must be taken when
handling the container.
Combination Ovens Only:
29. DO NOT insert oversized foods or oversized utensils in a
microwave/convection oven as they may create a fire, an
electrical arc, or risk of electrical shock.
30. DO NOT clean with metal scouring pads. Pieces can break off
the pad and touch electrical parts involving risk of electrical
shock.
31. DO NOT use paper products not intended for high
temperature cooking when equipment is operated in
convection or combination mode.
32. DO NOT store any materials, other than manufacturer’s
recommended accessories, in this equipment when not in
use.
33. DO NOT cover any part of the oven with metal foil. Airflow
restriction will cause overheating of the oven.
34. DO NOT spray oven cleaning solutions toward the rear inner
cavity surface. This will contaminate and damage the
convection heating assembly.
ARNING
2

To avoid risk of personal injury or property damage, observe the following safety
instructions:
General Use:
1.
Do not use regular cooking thermometers
in oven. Most cooking thermometers contain
mercury and may cause an electrical arc,
malfunction, or damage to oven.
2.
Never use paper, plastic, or other combustible
materials that are not intended for cooking.
3.
When cooking with paper, plastic, or other
combustible materials, follow manufacturer’s
recommendations on product use.
4.
Do not use paper towels which contain nylon
or other synthetic fibers. Heated synthetics
could melt and cause paper to ignite.
5.
To avoid surface deterioration, keep the oven
in a clean condition. Infrequent cleaning could
adversely affect the life of the appliance and
possible result in a hazardous situation.
6.
Clean oven regularly and remove any food
deposits.
Heating Foods and Liquids:
7.
Liquids such as water, coffee, or tea are ableto
be overheated beyond the boiling point without
appearing to be boiling due to surface tension
of the liquid. Visible bubbling or boiling when
the container is removed from the microwave
oven is not always present. THIS COULD
RESULT IN VERY HOT LIQUIDS SUDDENLY
BOILING OVER WHEN A SPOON OR
OTHER UTENSIL IS INSERTED INTO
THE LIQUID. To reduce the risk of injury to
persons:
a.
Do not overheat the liquid.
b.
Stir the liquid both before and halfway
through heating it.
c.
Do not use straight-sided containers with
narrow necks.
d.
After heating, allow the container to stand
in the microwave for a short time before
removing it.
e.
Use extreme care when inserting a spoon
or other utensil into the container.
8.
Do not deep fat fry in oven. Fat could overheat
and be hazardous to handle.
9.
Do not cook or reheat eggs in shell or with
an unbroken yolk using microwave energy.
Pressure may build up and erupt. Pierce yolk
with fork or knife before cooking.
10.
Pierce skin of potatoes, tomatoes, and similar
foods before cooking with microwave energy.
When skin is pierced, steam escapes evenly.
11.
Do not heat sealed containers or plastic bags in
oven. Food or liquid could expand quickly and
cause container or bag to break. Pierce or open
container or bag before heating.
12.
Do not heat baby bottles in oven.
13.
Baby food jars shall be open when heated and
contents stirred or shaken before consumption,
in order to avoid burns.
14.
Never use oven to heat alcohol or food
containing alcohol as it can more easily catch
fire if overheated.
Additional Microwave Oven Safety Instructions:
15.
Do not operate equipment without load or food in
oven cavity.
16.
Use only popcorn in packages designed and
labeled for microwave use. Popping time varies
depending on oven wattage. Do not continue
to heat after popping has stopped. Popcorn will
scorch or burn. Do not leave oven unattended.
17.
Do not use metal utensils in oven.
18.
An authorized servicer MUST inspect equipment
annually. Record all inspections and repairs for
future use.
Additional Combination Oven Safety Instructions:
19.
Do not pop popcorn in this oven.
20.
Do not use metal utensils in oven except when
recommended by microwave food manufacturers
or recipe requires metal utensils in convection or
combination mode. Heat food in containers made
of glass or china if possible.
21.
Oven temperature is at least 450°F in convection
mode. Verify plastic, paper or other combustible
materials are recommended by the manufacturer
to withstand the maximum oven temperature.
22.
Racks, utensils, rack guides, and oven surfaces
may become hot during or after use. Use utensils
or protective clothing, like pan grips or dry oven
mitts, when necessary to avoid burns.
23.
Do not unplug oven immediately after use.
Internal fan must cool oven to avoid damage of
electrical components.
24.
Caution: To avoid burns, do not use containers
loaded with liquid or kitchen products that
become liquid by heating at levels above those
that can be easily observed.
CAUTION
3

Specifications
All safety information must be followed
To avoid risk of electrical shock, personal injury, or death, disconnect power to oven and discharge capacitor
before servicing, unless testing requires power.
2200 Watts
3500 Watts
Minimum temperature rise (∆T)
22ºF/11.2ºC
35ºF/19.5ºC
Operating frequency
2450 MHz
2450 MHz
Power Consumption
Cook condition microwave
3500 Watts
5100 Watts
Dimensions
Cabinet
Width
25 5/8in 650mm
25 5/8in 650mm
Height
18 5/8in 472mm
18 5/8in 472mm
Depth
23 1/2in 597mm
23 1/2in 597mm
Oven Interior
Width
21in 535mm
21in 535mm
Height
9 7/8in 251 mm
9 7/8in 251 mm
Depth
13in 330 mm
13in 330 mm
Weight
Crated
161lb 73kg
161lb 73kg
Uncrated
146lb 66kg
146lb 66kg
CAUTION
!
!
WARNING
4
Models 180MWASS022 180MWASS035
Power Source
Voltage AC 240/208 VAC 240/208 VAC
Amperage (single unit) 20A 30 A
Frequency 60 Hz 60 Hz
Single phase, 3 wire grounded X X
Plug NEMA 6-20 NEMA 6-30
Power Output
Nominal microwave energy
(IEC705)
INSTALLATION & CLEANING
Unpacking Oven
• Inspect oven for damage such as dents in door or inside oven cavity.
• Report any dents or breakage to source of purchase immediately.
Do not attempt to use oven if damaged.
• Remove all packing materials from oven interior.
• If oven has been stored in extremely cold area, wait a few hours
before connecting power.
• A protective film is used to prevent scratching of the outer case during
transportation. Peel off the film from the exterior of the oven before
installation.
• The warning label provided with the oven must be placed in a
conspicuous location near the oven.
Radio Interference
Microwave operation may cause interference to WiFi network, radio, television, or
a similar oven. Reduce or eliminate interference by doingthe following:
• Clean door and sealing surfaces of oven according to provided
instructions.
• Place WiFi network, radio, television, etc. as far as possible from oven.
• Use a properly installed antenna on radio, television, etc. to obtain
stronger signal reception.
Oven Placement
• Do not install oven next to or above source of heat, such as pizza oven
or deep fat fryer. This could cause microwave oven to operate improperly
and could shorten life of electrical parts.
• Do not block or obstruct oven filter. Allow access for cleaning.
• Install oven on level countertop surface.
• Outlet should be located so that plug is accessible when oven is in
place.
Cleaning Interior, Exterior, and Door
Clean microwave oven daily with mild detergent in warm water
using soft sponge or cloth. Wring sponge or cloth to remove
excess water before wiping equipment. If desired,
boil a cup of water in microwave oven to loosen soil before cleaning. DO
NOT allow cooking residues such as grease or fat to remain in oven
interior for any length of time.
• Do NOT allow cooking residues to remain in oven cavity.
• Do NOT use abrasive cleansers or cleaners containing
ammonia.
These could damage finish.
• Do NOT use caustic cleaning products or those containing ammonia,
phosphates or chlorine in oven. These could damage oven. Use non-
caustic cleaner.
• NEVER pour water into microwave oven bottom.
• Do NOT use water pressure type cleaning systems.
• For more detailed cleaning instructions, see the Owner’s
Manual.
Grounding/EarthingInstructions
Oven MUST be
grounded. Grounding
reduces risk of electric
shock by providing an
escape wire for the
electric current, if an electrical short
occurs. This oven is equipped with a
cord having a ground wire with a
grounding plug. The plug must be
plugged into an outlet that is properly
installed and grounded.
Consult a qualified electrician or
servicer if grounding instructions are
not completely understood, or if doubt
exists as to whether the oven is
properly grounded.
Do not use an extension cord. If
the product power cord is too short,
have a qualified electrician
install a three-slot receptacle. This
oven should be plugged into a
separate circuit with the electrical
rating as provided in product
specifications. When a microwave
oven is on a circuit with other
equipment, an increase in cooking
times may be required and fuses can
be blown.
External Equipotential
Earthing
Terminal (export only) Equipment has
secondary earthing terminal. Terminal
provides external earthing connection
used in addition to earthing
prong on plug. Located
on outside of oven back,
terminal is marked with
symbol shown below.
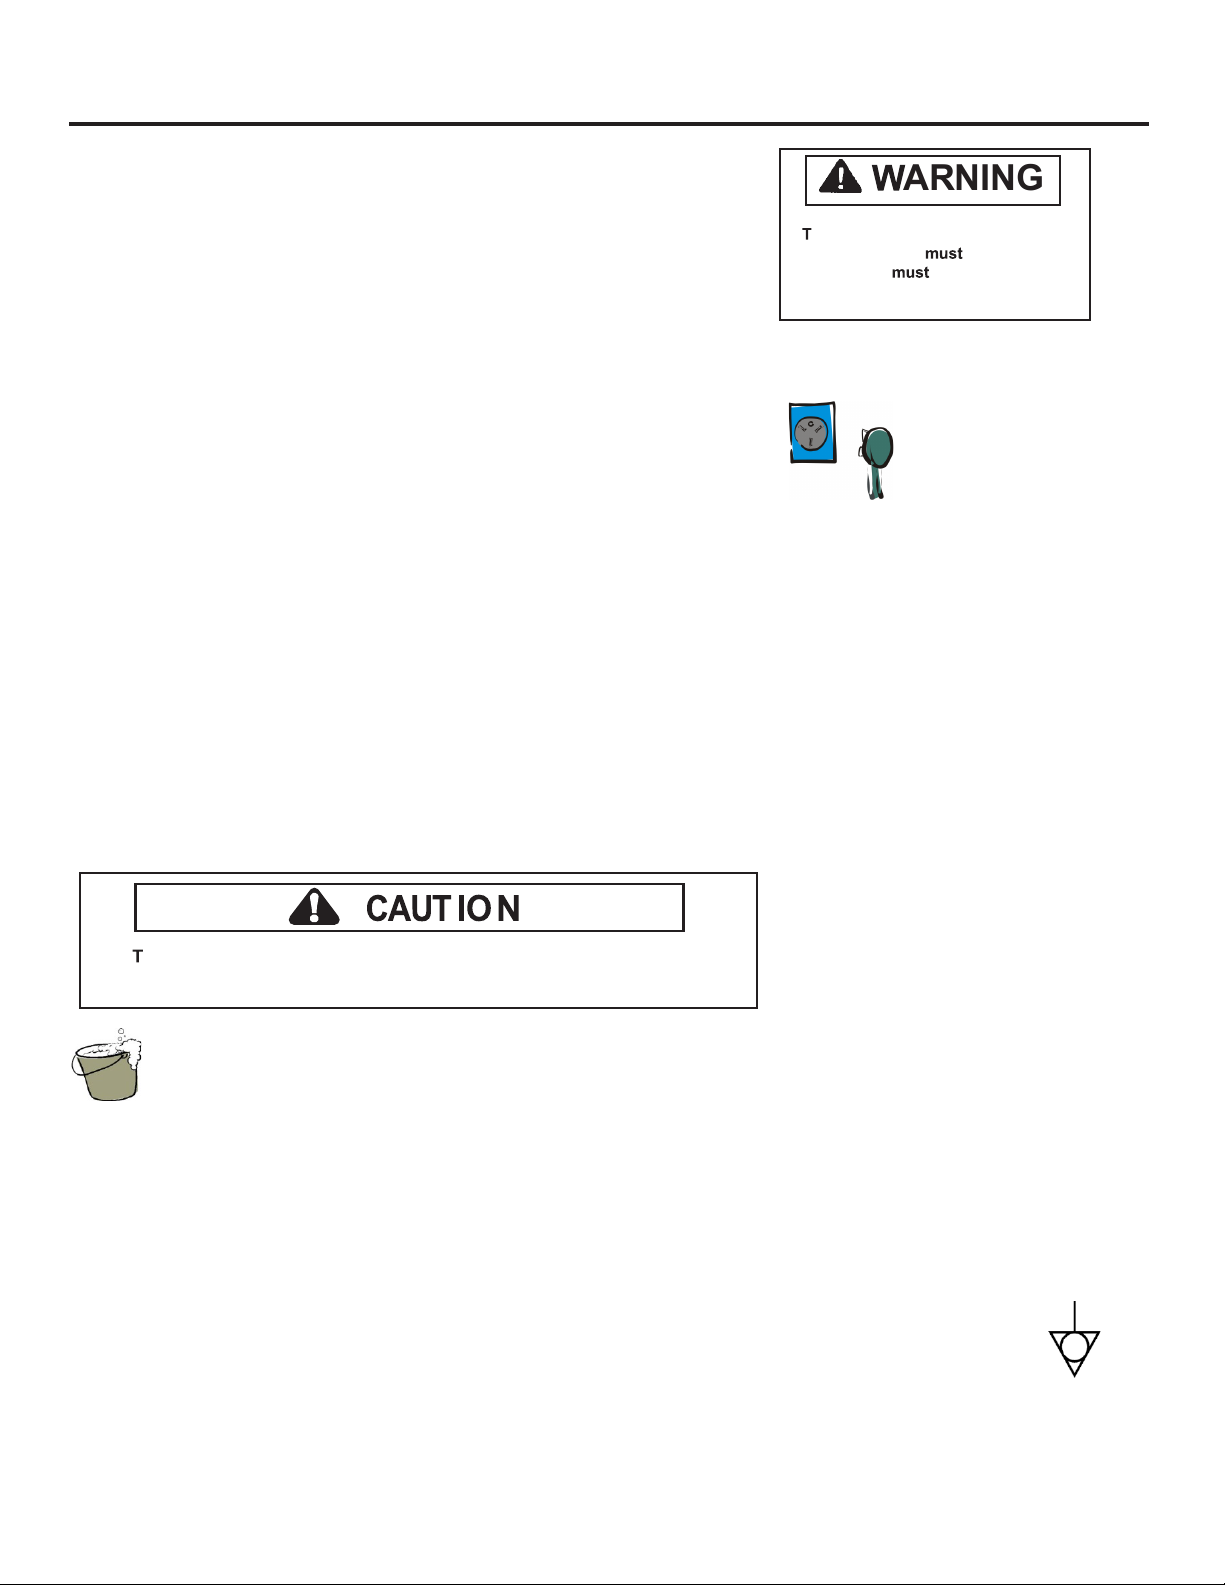
o avoid risk of electrical shock, severe personal injury or death,
unplug power cord or open circuit breaker to oven before cleaning.
ARNING
o avoid risk of electrical shock or
death, this oven be grounded
and plug not be altered.
5
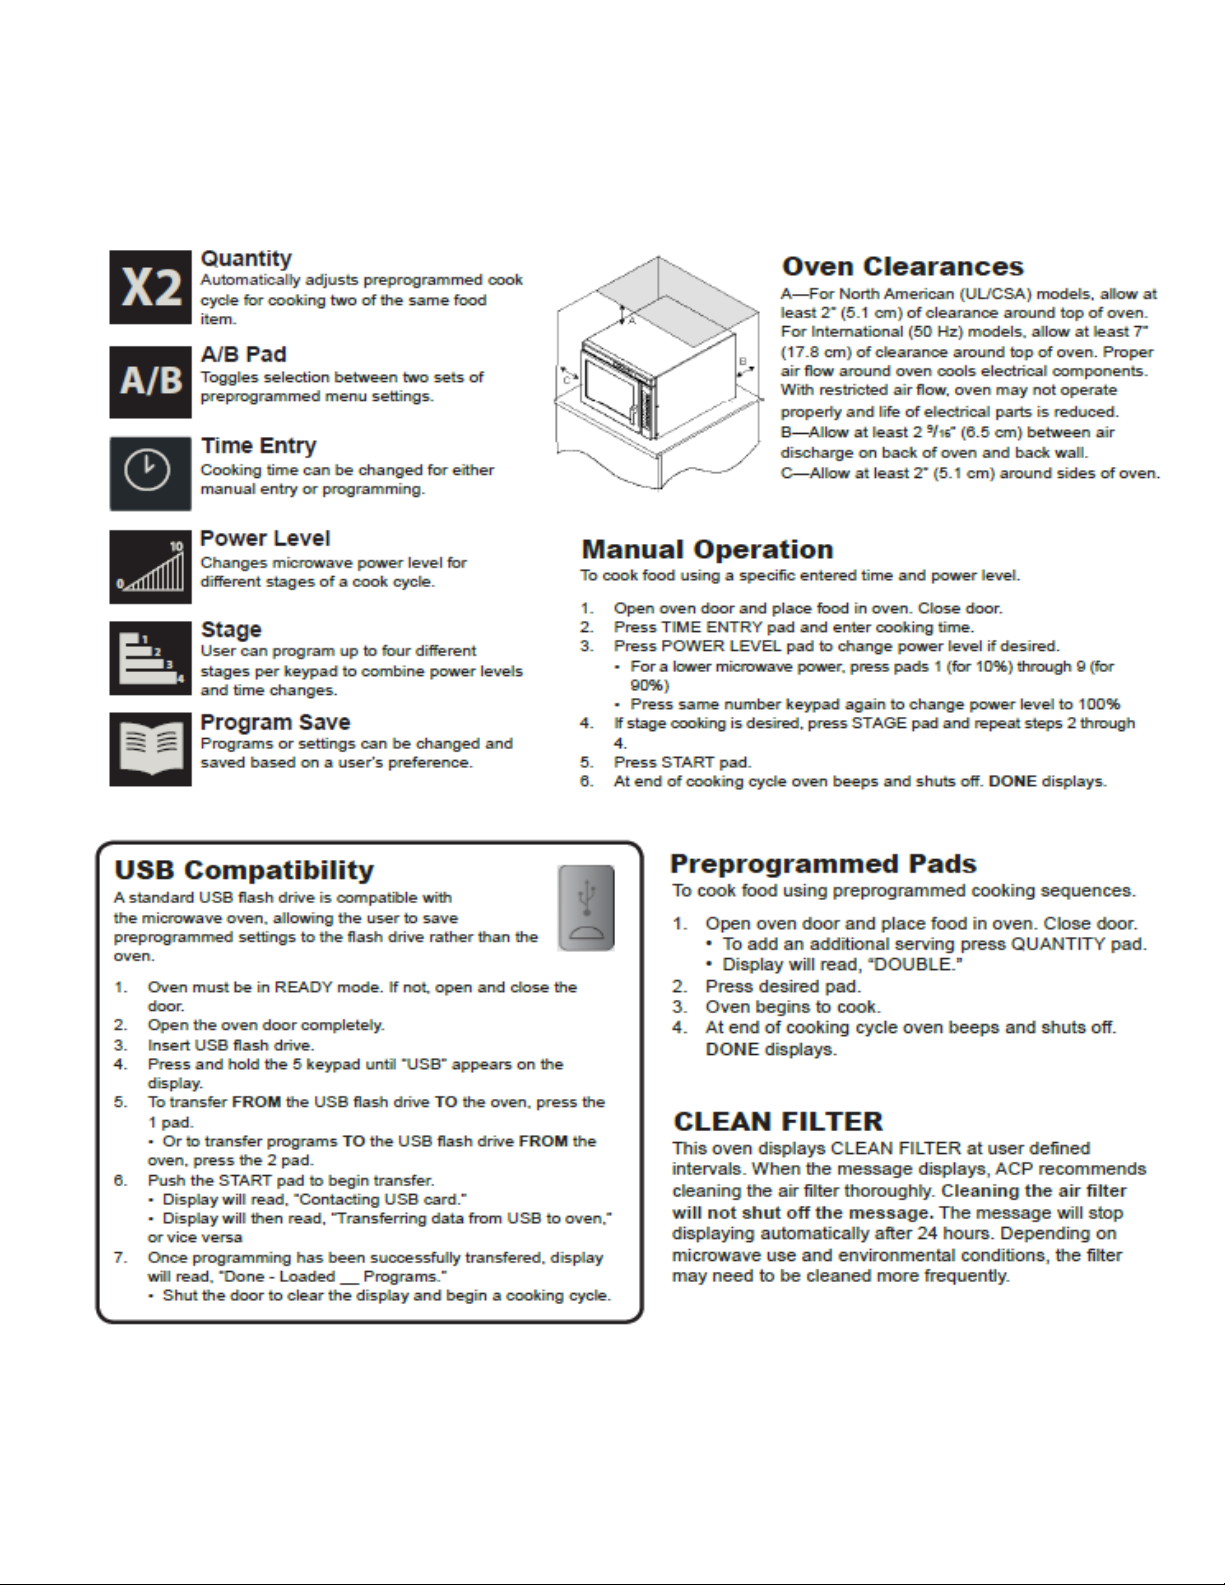
QUICK START REFERENCE GUIDE
6
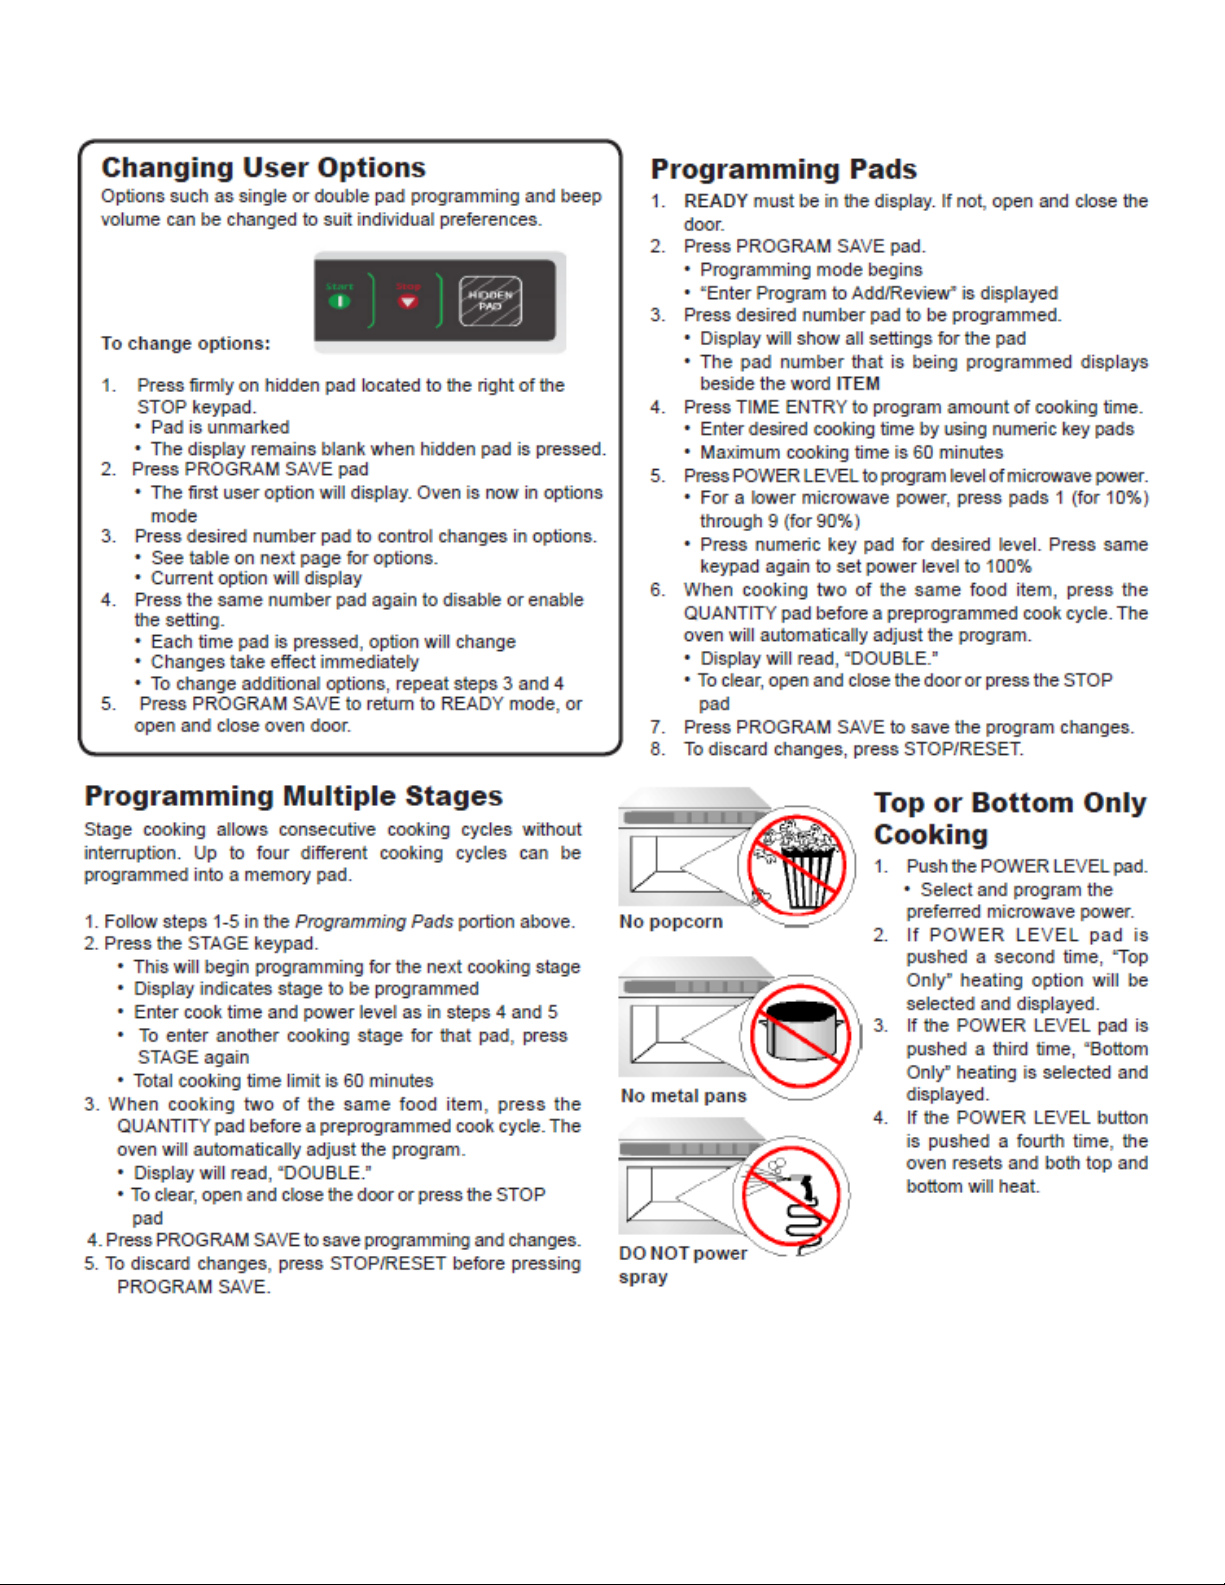
7
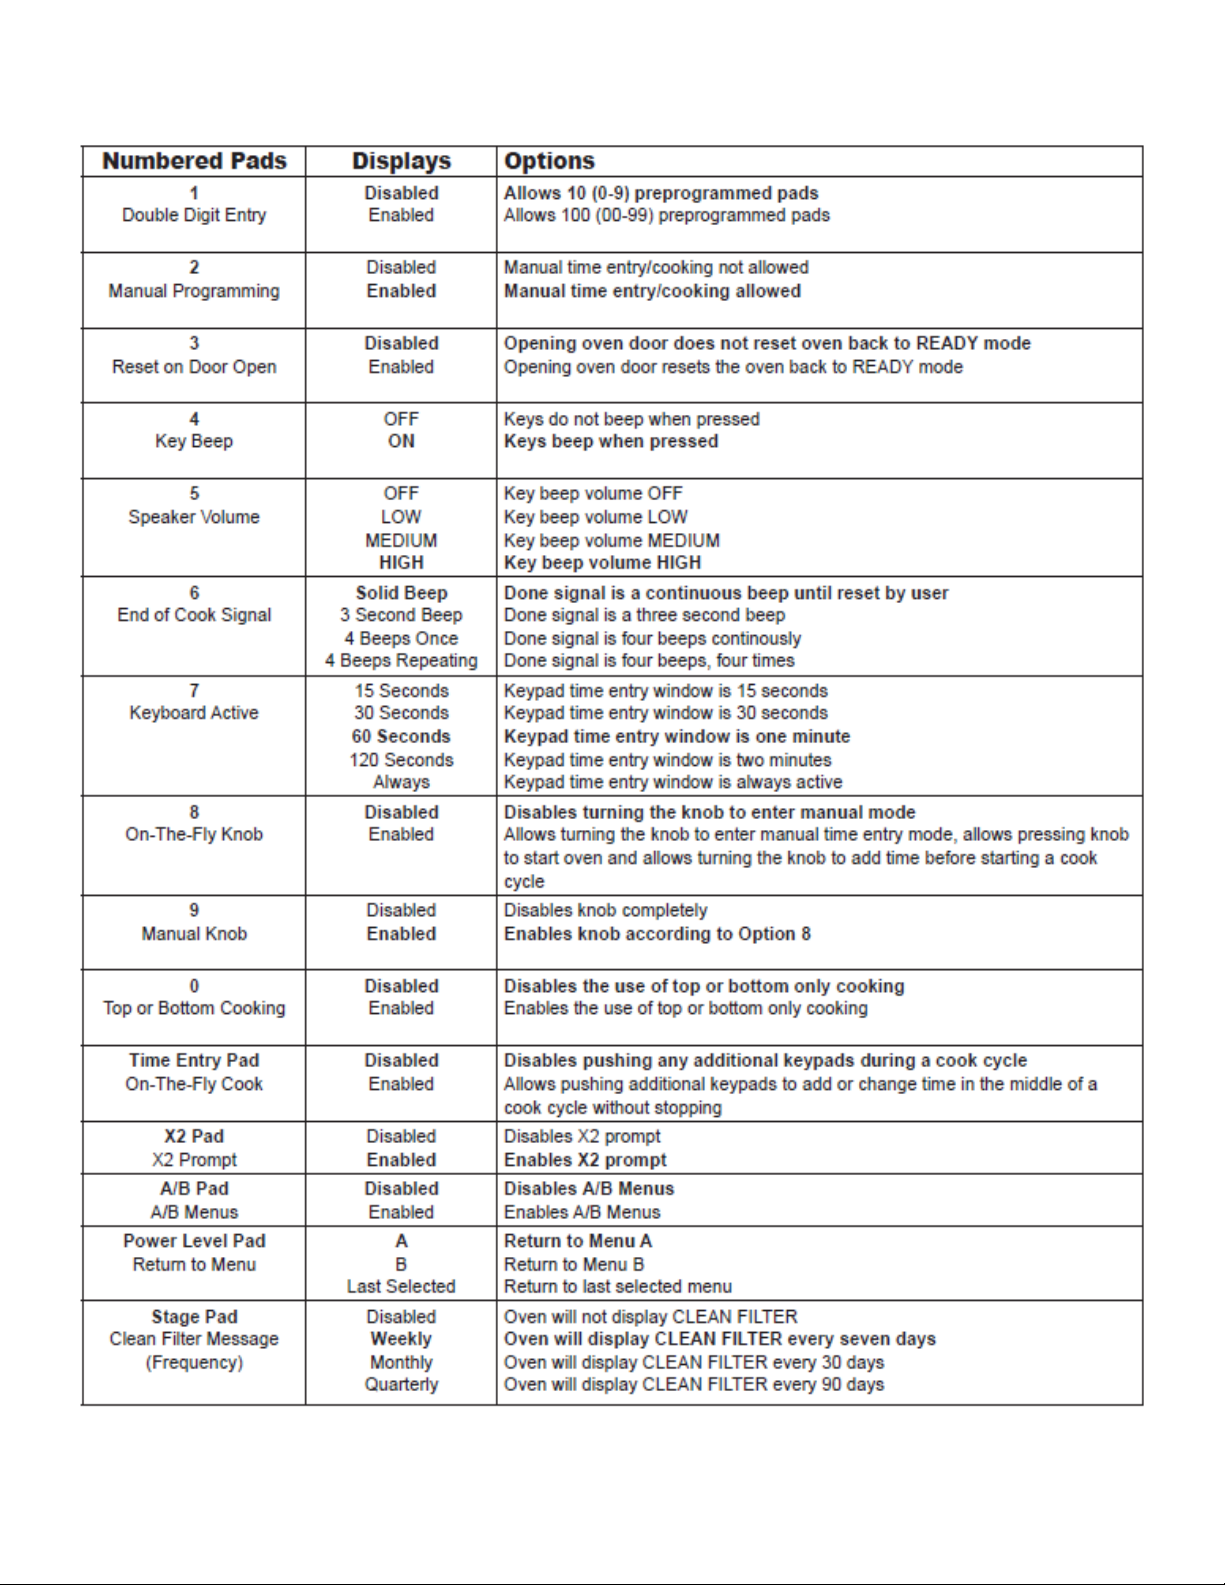
USER OPTIONS
8

COOKING INSTRUCTIONS
9

Primary Switch
USB
Display
“HIDDEN”
PAD
Control Knob
Encoder Board Has To Be
Removed To Remove Knob
Damper
Removable
Divider Shelf
(Slides Out)
Removable
Tray (Strong Suction Cup)
Antenna
Cover
(14 Clips)
L.E.D.
L.E.D.
Front of Oven
Component Locations
10
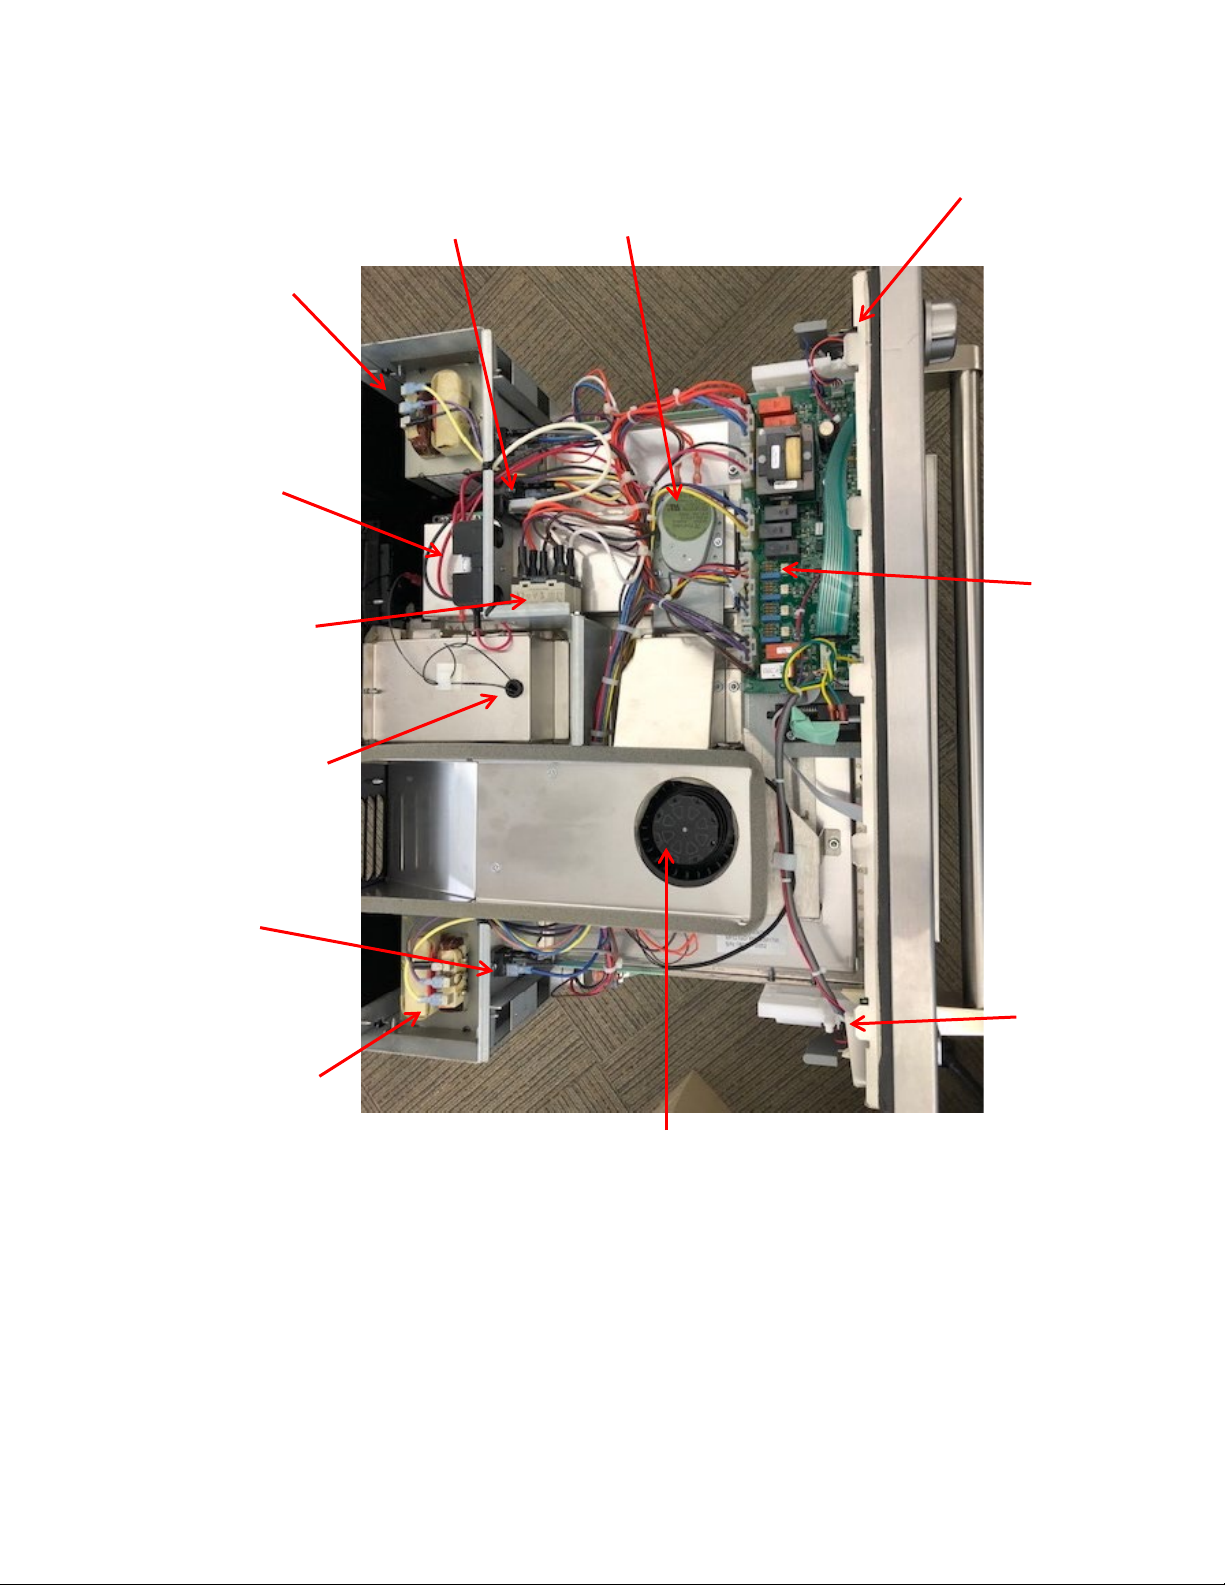
Transformer #2
Triac
Power
Relay
Transformer #1
Main
Fuses
Oven
Thermal
Cutout
(under cover)
Triac
Cavity Fan Motor
Control Board
Antenna
Motor
USB Board
Top of Oven
Encoder
Board
11
Capacitors
Door Spring
Damper
Assembly
Main Board
Monitor
Switch
Door Hinge Arm
Right Side of Oven
Secondary
Interlock
Switch
LED Light
12

Damper Assembly
Secondary
Switch
Door Hinge
Arm
Capacitors
Door Spring
Cavity Fan Motor
LED Light
Monitor
Switch
Left Side of Oven
Lower Antenna Motor
13

Transformer #3
Capacitors
&
Diodes
Transformer #1
Magnetron #3
Magnetron #1
Blower Motor
Transformer #4
Capacitors
&
Diodes
Transformer #2
Magnetron #4
Magnetron #2
Main Fuses (2)
Blower Housing
High Voltage Fuse
(
each
Transformer)
Back of Oven - Removed
Magnetron
Thermal Cutout
(TCO) (each Magnetron)
14
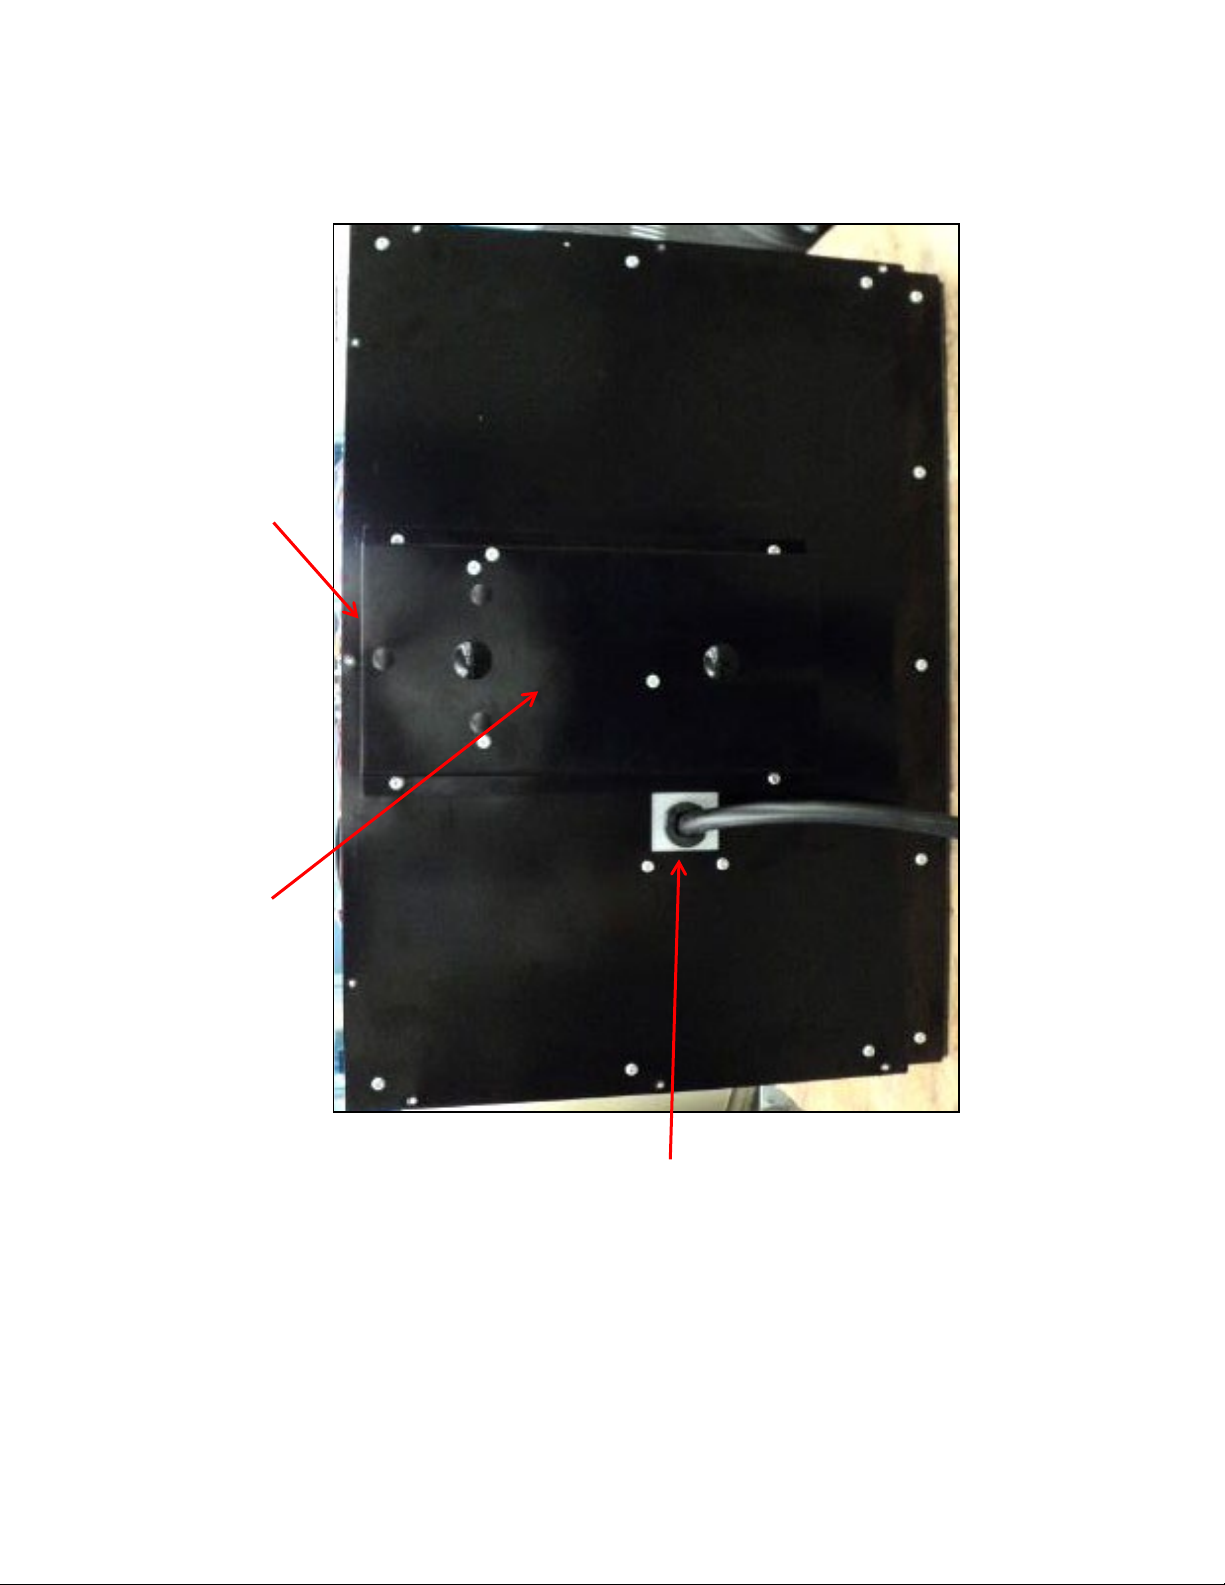
EXHAUST OUTLET COVER
POWER
CORD
EXHAUST SCREEN
Back of Oven
15

Door and Door Switch Adjustments
Primary Switch
The Primary Switch found top center of oven. Its purpose is to inform the control board that the door is
either in the open or closed position.
To Access:
1. Unplug the oven and remove the outer case.
2. To test/adjust the Primary Switch, close the door and remove wires. With door closed, the switch
should have continuity (closed). The switch should change to the open condition when the door is
opened 1/16 inch.
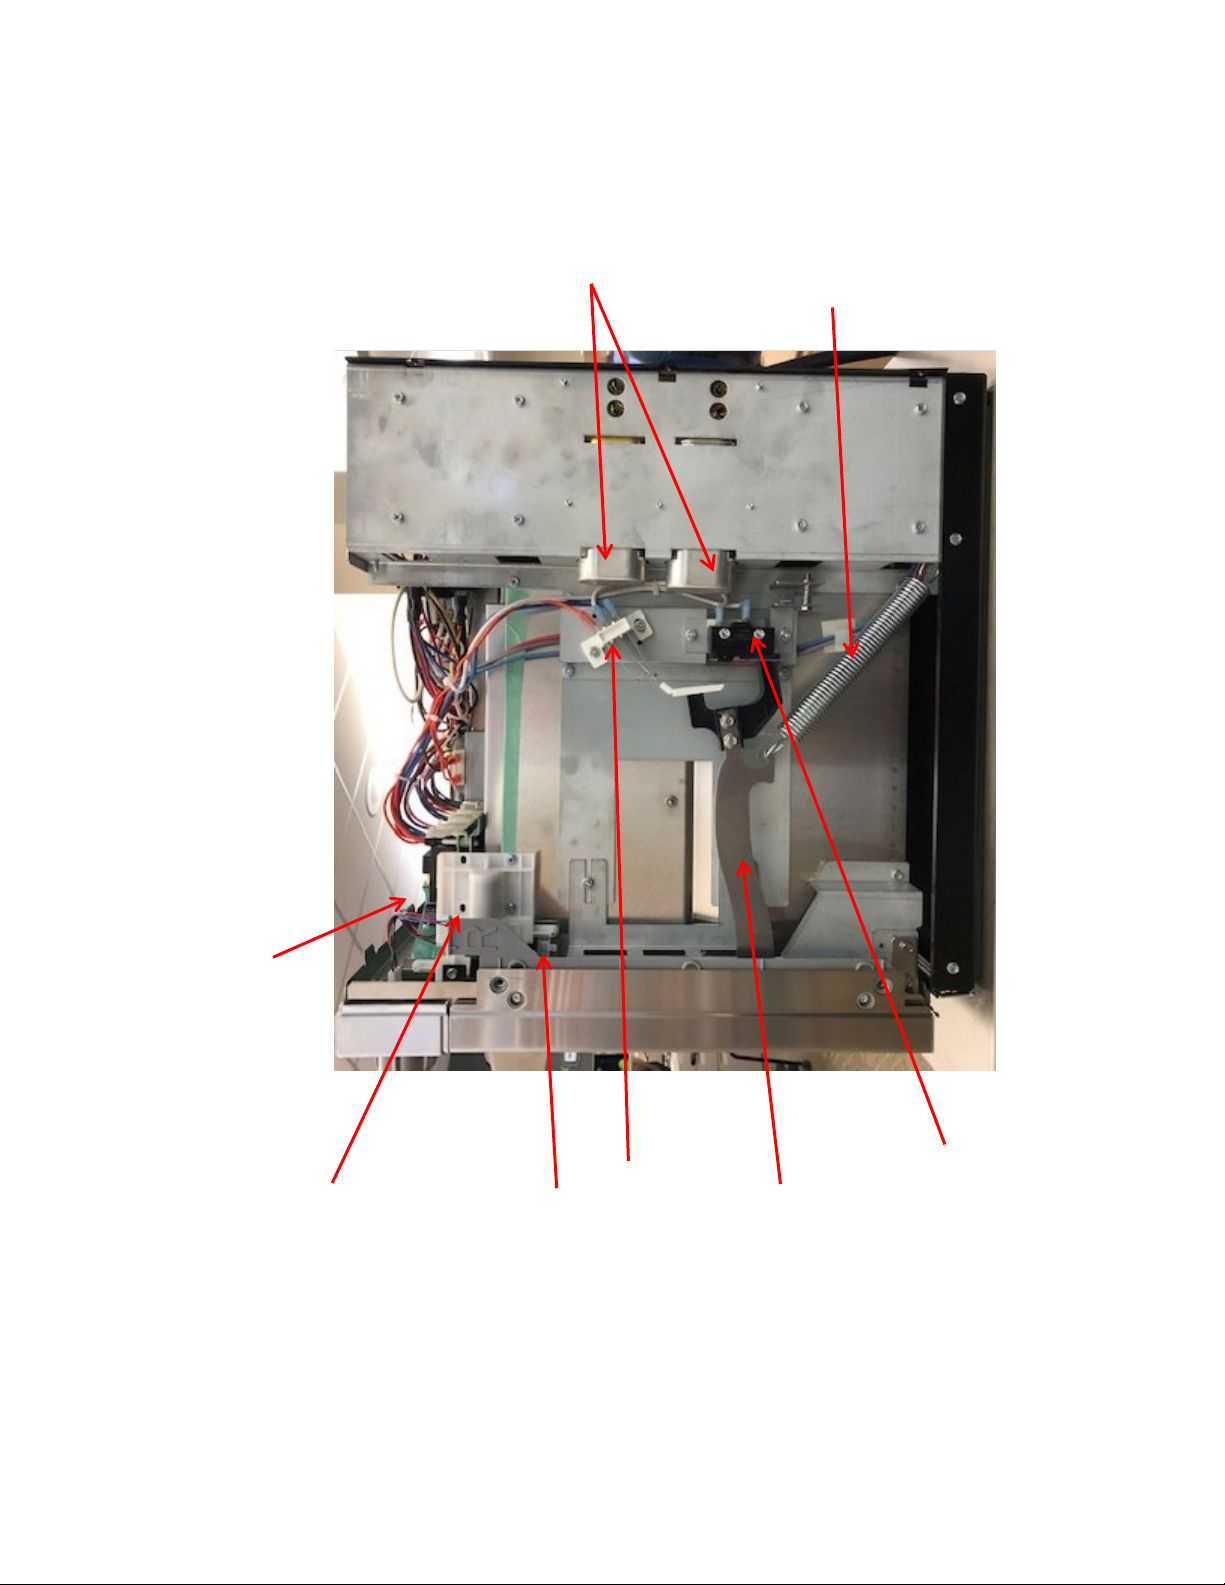
Interlock and Monitor Switches
It is very important that the Switch Actuator hits the center of the Monitor Switches paddle dead
center on the left and right sides as shown in Figure 3 (circled); otherwise, damage to the switches
will occur. If out of adjustment, loosen the two door mounting screws shown in Figure 2 (circled). and
move door up or down until the actuator is centered. Use thread sealant when retightening screws.
Figure 2
Primary Switch
Assembly
Adjuster
Figure 1 –
Board wires removed for clarity
16

Right Side
The right side switches are protected by the F2 fuse and are part of the two bottom high
voltage transformer circuits (T3 bottom right & T4 bottom left). If not adjusted properly the
symptoms would be low heat (blown F2 fuse or incomplete circuit to the bottom
transformers).
1. To test/adjust the Secondary Switch (lower switch), close the door, mark and remove wires. With the
door closed, the switch should have continuity (closed). The switch should open when the door is
opened 3/16 inch.
2. To test/adjust the Monitor Switch (upper switch), close the door, mark and remove wires. With door
closed, the switch should have continuity (closed) between the middle and lower terminals. The
switch should open when the door is opened 1/4 inch.
Left Side
The left side switches are protected by the F1 fuse Main and are part of the two top high voltage
transformer circuits (T1 top right & T2 top left). If not adjusted properly the symptoms would be
oven is dead (blown F1 fuse) or low heat (incomplete circuit to the bottom transformers). See
Interlock and Monitor Switches (Right Side) for adjustments.
Monitor
Switch
Switch
Actuator
Secondary
Switch
Figure 3
17

Service Test Mode
To Exit the Service Mode press and release the STOP Pad.
PAD
FUNCTION
DISPLAY
1
Magnetron 1 (top right from front of oven)
Press pad once to start and again to stop.
Magnetron #1: ON Do not use Amperage Reading as
01:00 Amps 0.2 diagnostic. Use Power Test
Output @ 9 degree F Rise
2
Magnetron 2 (top left from front of oven)
Press pad once to start and again to stop
Magnetron #2: ON Do not use Amperage Reading as
01:00 Amps 0.2 diagnostic. Use Power Test
Output @ 9 degree F Rise
3
Magnetron 3 (bottom right from front of oven)
Press pad once to start and again to stop
Magnetron #3: ON Do not use Amperage Reading as
01:00 Amps 0.2 diagnostic. Use Power Test
Output @ 9 degree F Rise
4
Magnetron 4 (bottom left from front of oven)
Press pad once to start and again to stop
Magnetron #4: ON Do not use Amperage Reading as
01:00 Amps 0.2 diagnostic. Use Power Test
Output @ 9 degree F Rise
5
Cycles on/off the LED lights along with Fan
and Antenna Motors
Aux. Output: ON
7
Magnetron Tube Hours
Magnetron Hours
0
8
Door Cycle Count (1 equals door open and
closed)
Door Cycles
3210
9
Clears Door Cycles and Magnetron Hours
Press START to
Clear serv. info
0
Clears Call Service Alarm
CALL SERVICE
Alarm Cleared
ALL
OTHER
PADS
May access engineering modes. Do not use
or change settings.
Various engineering modes. Do not use
HIDDEN
PAD
Press and Hold during power up
Software Revision Number and Date
HIDDEN PAD
MSO Units have an easily accessed Service Mode that allows a technician to operate components, clear service
alarms, check door cycles, and check magnetron hours. To enter the Service Mode, perform the following:
PRESS and RELEASE the Hidden Pad
PRESS and RELEASE In Order: 1, 3, 5, 7, 9. Display will now show “SERVICE MODE”, the applied voltage, and Hz.
The unit is now in the Service Mode and pressing individual pads will activate or open specific
components/programs:
18
This manual suits for next models
1
Table of contents
Other Solwave Microwave Oven manuals

Solwave
Solwave 180MWAS12T User manual

Solwave
Solwave 180MW1000D User manual

Solwave
Solwave 180MW1000SS User manual

Solwave
Solwave 180MWHD12 User manual

Solwave
Solwave 180MWASHD12 User manual

Solwave
Solwave 180MW1000T User manual

Solwave
Solwave 180MW1000D User manual

Solwave
Solwave 180MW1200T User manual

Solwave
Solwave SWA-T Series User manual

Solwave
Solwave SWAFP Series User manual


