Somopar 100020 User manual
01
02
03
04
05
06
07
08
09
10
11
12
13
14
15
16
17
18
19
20
Div. nicho / Divisor nicho / Dividing niche
Tampo / Cubierta / Lid
Divisor / Divisor / Dividing
Base / Soporte / Support
Lat. esq. / Lado izqu. / Left side
Lat. dir. / Lado dere. / Right side
Painel inf. / Panel inf. / Bottom panel
Prat. nicho inf. / Estante nicho inf. / Bottom shelf niche
Apoio inf. / Soporte debajo / Support lower
Regua painel inf. / Cinta panel abajo / Lower panel ruler
Regua parede / Cinta pared / Wall ruler
Painel sup. / Panel sup. / Upper panel
Prat. nicho sup. / Estante nicho sup. / Upper shelf niche
Regua painel sup. / Cinta pane arriba / Panel upper ruler
Apoio painel ext. / Panel soporte exterior / External panel support
Apoio painel int. / Panel soporte interno / Internal panel support
Painel sem furo / Panel ñ agujero / Panel wihout hole
Painel inferior / Panel abajo / Bottom panel
Apoio união / Soporte unión / Support union
Porta / Puerta / Door
MDP
MDP
MDP
MDP
MDP
MDP
MDP
MDP
MDP
MDP
MDP
MDP
MDP
MDP
MDP
MDP
MDP
MDP
MDP
MDP
192*140*15
1772*299*15
209*255*15
1772*299*15
300*250*15
300*250*15
1810*448*15
1800*224*25
345*60*15
670*75*15
670*60*15
1810*416*15
1800*145*25
670*60*15
1150*60*15
1000*60*15
1810*416*15
1810*416*15
448*86*15
900*248*15
01
01
01
01
01
01
01
01
03
02
04
01
01
02
02
02
01
01
02
02
DAKAR
M. P.
Nº
Características / descripción
NERO
Disponível nas cores / Disponible en colores / Avaliable colors:
Manual de Instruções / Manual de instrucciones / Instruction Manual
Pag. 1/4
SALA / SÁLON / ROOM - HOME CANYON - 100020
Lançamento - 10/03/2017 /// Alterado - 00/00/0000
Ilustração: Sidnei dos Anjos
Temos ainda algumas informações muito importantes:
01 - Para a limpeza, utilize sempre pano macio e seco. / 02 - Nunca utilize na limpeza palhas de aço e produtos abrasivos, tais como: Álcool ou detergentes. Alguns produtos químicos podem comprometer a aparência e durabilidade do
móvel. / 03 - Evite colocar peso excessivo em cima do móvel, isto poderá provocar empenamento e, em casos mais extremos, quebra de algum componente ou ainda danos na parte estrutural.
- Caso seja necessário desmontar o produto, procure a ajuda de um profissional especializado. / A SOMOPAR acredita no princípio da responsabilidade ambiental, para tanto, utilizamos em nossa linha de produtos, madeira reconstituída
proveniente de fornecedores e detentores de certificação ambiental.
Termo de garantia: Os produtos da SOMOPAR tem garantia de 3 meses a contar da data de emissão da nota fiscal pela loja. Qualquer dúvida ou problema entre em contato no local em que foi efetuada a compra.
Todavía tenemos una información muy importante:
01 - Para la limpieza, utilice siempre un paño suave y seco. / 02 - Nunca use lana de acero en la limpieza y abrasivos productos, como alcohol o detergentes. Algunos productos químicos pueden comprometer la apariencia y durabilidad de los muebles.
- Evite colocar el exceso de peso en la parte superior de la unidad, esto puede causar deformaciones y, en casos extremos, la rotura de cualquier componente o dañar la parte estructural. / 03 - Si necesita desmontar el producto, buscar la ayuda de un
especialista. / SOMOPAR cree en el principio de la responsabilidad ambiental, tanto que utilizamos en nuestra línea de productos, Madera reconstituida de proveedores y titulares de certificación ambiental.
Plazo de garantía: Los productos de SOMOPAR tienen una garantía de tres meses a partir de la fecha de emisión de la factura por la tienda. Cualquier pregunta o problema, por favor póngase en contacto con el lugar donde se realizó la compra.
We still have some very important information:
01 - To clean, use only soft, dry cloth. / 02 - Never use in cleaning steel wool and abrasive products, such as alcohol or detergents. Some chemicals may compromise the appearance and durability of the furniture. / 03 - Avoid placing excessive weight on top of the unit, this
may cause warping and, in extreme cases, breakage of any component or damage the structural part.
- If you need to disassemble the product, seek help from a specialist. / A SOMOPAR believes in the principle of environmental responsibility, therefore we use in our product line, reconstituted wood from suppliers and environmental certification holders.
Warranty term: SOMOPAR's products are guaranteed for three months from the date of issuance of the invoice by the store. Any questions or problems please contact the place where the purchase was made.
Herramientas necesarias (No proporcionado)
Montador
Destornillador phillips
Martelo
Parafusadeira
Chave de fenda
Pessoas necessárias
para montagem
Broca Ø3mm
Del taladro 3mm
Ferramentas Necessárias (Não fornecidas)
Ensamblador
Destornillador
Martillo
Chave de phillips
Destornillador eléctrico
Necesario en ensamblador
Configuración
Prof. 345mm
Larg. 1810mm
Altura 1696mm
Qtde.
Dim. ( m m )
10002001.056
10002002.056
10002003.056
10002004.056
10002005.056
10002006.056
10002007.056
10002008.056
10002009.999
10002010.999
10002011.999
10002012.056
10002013.056
10002014.999
10002015.999
10002016.999
10002017.056
10002018.056
10002019.999
10002020.056
1/2
1/2
1/2
2/2
1/2
1/2
2/2
2/2
1/2
1/2
1/2
2/2
2/2
2/2
1/2
1/2
1/2
1/2
1/2
1/2
Vol.
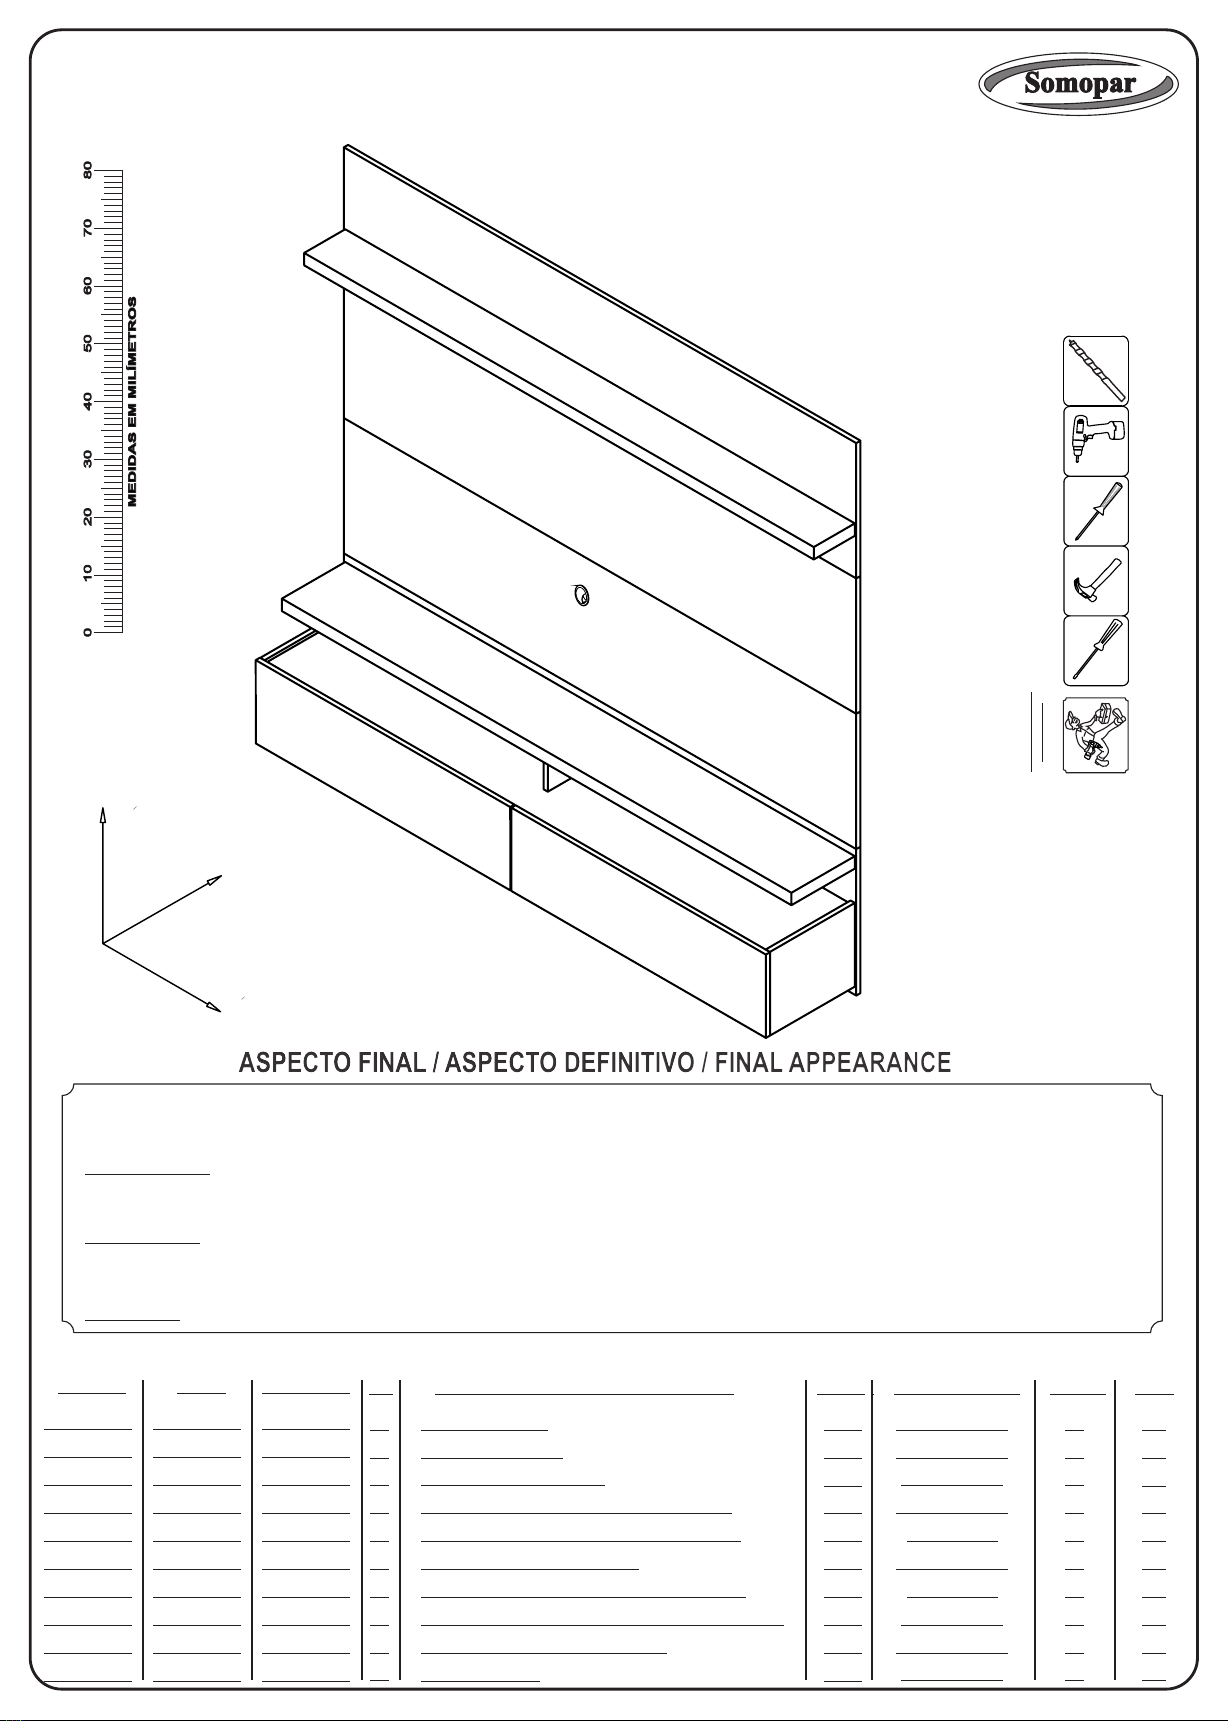
ASPECTO FINAL / ASPECTO DEFINITIVO / FINAL APPEARANCE
10002001.068
10002002.068
10002003.068
10002004.068
10002005.068
10002006.068
10002007.068
10002008.068
10002009.999
10002010.999
10002011.999
10002012.068
10002013.068
10002014.999
10002015.999
10002016.999
10002017.068
10002018.068
10002019.999
10002020.068
BCOFF/AMBAR
10002001.058
10002002.058
10002003.058
10002004.058
10002005.058
10002006.058
10002007.058
10002008.070
10002009.999
10002010.999
10002011.999
10002012.058
10002013.070
10002014.999
10002015.999
10002016.999
10002017.058
10002018.058
10002019.999
10002020.058

Pag. 2/4
TAMANHO REAL DOS PARAFUSOS E CAVILHAS USAR A REGUA / TAMAÑO REAL DE TORNILLOS Y ESTAQUILLA UTILIZAR LA REGLA
A
(Metal) Parafuso / Tornillo / Srew - Ø4,0*45mm
= 19 pçs/partes (11962)
B
(Madeira) Cavilha / Staquilla / Pin - Ø6*50mm
= 01 pç/parte (10358)
C
(Metal) Parafuso / Tornillo / Srew - Ø3,5*25mm
= 47 pçs/partes (11942)
D
(Metal) Parafuso / Tornillo / Screw - 3,5*14mm
= 26 pçs/partes (11940)
E
(Metal) Pino / Pin girofix
= 11 pçs/partes (12183)
F
(Metal) Castanha / Castanha / Chestnut girofix Ø12mm
= 11 pçs/partes (10345)
G
(Plástico) Tampa / Tapa / Lid girofix
= 11 pçs/partes
H
(Madeira) Cavilha / Staquilla / Pin - Ø6*30mm
= 17 pçs/partes (10357)
I
(Plástico) Bucha / Bujes / Bushing - Ø8mm
= 08 pçs/partes (10248)
J
(Metal) Parafuso / Tornillo / Srew - Ø5,0*60mm
= 08 pçs/partes (11980)
K
(Madeira) Cavilha / Staquilla / Pin - Ø6*20mm
= 24 pçs/partes (10356)
L
(Metal) Dobradiça / Bisagra / Hinge Ø26mm
= 04 pçs/partes (10542)
M
(Metal) Calço dobradiça / Calzo bisagra / Shim hinge
= 04 pçs/partes (10280)
N
(Metal) Articulador zincado / Pivotante zinc / Pivoting zinc
= 02 pçs/partes (10143)
O
(PVA) Cola / Cola / Glue 10ml
= 02 pçs/partes (12456)
P
(Plástico) Passa fio / Pasa cable / Pass wired - Ø46mm
= 03 pçs/partes (10469)
Q
(Metal) Arruela lisa / Arandela plana / Washers - 1/4
= 08 pçs/partes (10135)
PASSO 02 - Definição de cor: peça (05) para cima igual a segunda cor, com a
peça (03) para cima igual a primeira cor. - Para garantir a segurança do produto
durante a montagem da peça (11 e 08) e necessário utilizar cola (O) nas cavilhas
(K)
PASO 02 - Conjunto de colores: pieza (05) hacia arriba igual al segundo color,
con Unidad (03) hacia arriba igual a la primera color. - Para garantizar la
seguridad del producto durante el montaje de la parte (11 y 08) y necesario para
el uso de pegamento (O) en las clavijas (K)
STEP 02 - Color Set: piece (05) up equal to second color, with piece (03) upwards
equal to the first color. - To guarantee the safety of the product during assembly
of the part (11 and 08) and necessary to use glue (O) on the pins (K)
10
Passar cola na peça antes de juntar
Pasar pegamento en la pieza antes de unirse
Pass glue in the piece before joining
C
09 pçs/partes
H
15 pçs/partes
O
01 pç/parte
K
10 pçs/partes
M
04 pçs/partes
F
11 pçs/partes
G
11 pçs/partes
E
11 pçs/partes
A
14 pçs/partes
D
08 pçs/partes
P
02 pçs/partes
B
01 pç/parte
E
E
E
E
E
E
E
E
H
H
H
H
B
H
H
H
H
M+D M+D M+D M+D
01
02
03
04
05 06
07
08
09
10
10
A
A
A
A
A
A
AA
A
AA
A
A
K
K
K
K
K
C
C
C
C
C
C
C
H
H
H
H

A
05 pçs/partes
C
38 pçs/partes
K
14 pçs/partes
H
02 pçs/partes
O
01 pç/parte
P
01 pç/parte
Pag. 3/4
PISO - PISO - FLOOR
500MM
1188MM
390MM
I
08 pçs/partes
J
08 pçs/partes
Q
08 pçs/partes
PASSO 02 - Instalar a peça (11) respeitando a medida
do chão até a mesma, e também entre elas que e de
390 e 70mm, pois, deve ficar um espaço entre elas
para a passagem da fiação, utilizando bucha (I)
Arruela lisa (Q) e parafuso (J). Com o conjunto inferior
já fixado, instalar a peça (11), respeitando exatamente
a medida entre elas, utilizando bucha (I) Arruela lisa
(Q) e parafuso (J).
PASO 02 - Instalación de la parte (11) el respeto de
la medida desde el suelo hasta la misma, y también
entre ellos y que 390 y 70mm, por lo tanto, debe
haber un espacio entre ellas para paso del cableado,
utilizando la manga (I) Arandela plana (Q) y el
tornillo (J). Con el conjunto inferior ya fijado, instalar
la parte (11), respetando la medida exacta entre
ellos, el uso de casquillo (I) Arandela plana (Q) y
el tornillo (J).
STEP 02 - Install the part (11) respecting the measure
from the ground up to the same, and also between
them and that 390 end 70mm, therefore, should be a
space between them for passage of wiring, using
sleeve (I) Flat washer (Q) and screw (J). With the
lower set already fixed, install the part (11), respecting
the exact measurement among them, using bushing
(I) Flat washer (Q) and screw (J).
70MM
K
C
C
C
C
C
C
C
C
C
C
C
C
C
C
C
C
C
C
C
C
C
C
C
C
C
C
C
C
14 14
12
13
15
15
16
16
17
18
19 19
CCC
CCCC
C
C
A
A
A
A
A
14
Passar cola na peça antes de juntar
Pasar pegamento en la pieza antes de unirse
Pass glue in the piece before joining
15
PASSO 03 - Iniciar o passo alinhando as peças (12, 17 e 18) em seguida posicione as peças (13 e 14) encaixe a
cavilha (K e H) então fixe os parafusos (C e A) conforme a figura abaixo. Fixe as peças (15,16 e 19) instalando as
cavilhas (K) e fixando com o parafuso (C).Na montagem da peça (14 e 15) passar cola (O) nas cavilhas (K) e na própria
peça antes de fixar. Para finalizar o passo encaixe o passa fio (P).
Paso 03 - Iniciar paso a la alineación de las partes (12, 17 y 18), entonces la posición partes (13 y 14) que intervenga
el pasador (K e H) y fije los tornillos (C e A) como se muestra en la figura a continuación. Coloque las piezas
(15,16 y 19) mediante la instalación de los pernos (k) y fijar con el tornillo (C) .En el montaje de la pieza (14 y 15) de
cola de cruce (O) sobre los pasadores (K) y en la propia parte antes de fijar. Por último paso adjuntar los pases de
alambre (P).
Step 03 - Start step by aligning the parts (12, 17 and 18) then position parts (13 end 14) engaging the pin (K end H)
then secure the bolts (C end A) as shown in figure below. Attach the pieces (15,16 end 19) by installing the bolts (h) and
fixing with screw (C).In assembling the piece (14 end 15) passing glue (O) on the pins (K) and in part itself before fixing.
Finally step attach the wire passes (P).

PASSO 05 - Fazer a montagem das portas (20) instale a .
dobradiça (L) utilizando o parafuso (D). Para finalizar a .
montagem instale o articulador (N) fixando com o .
parafuso (D), regulando a porta em zero grau .
de angulo. .
PASO 05 - Volver a montar las .
puertas (20) instalar Bisagra .
(L) por medio del perno .
(D). Para finalizar la .
Montaje instalar el .
articulador (N) de fijación .
con el tornillo (D) la .
regulación de la puerta .
en grado cero ángulo.
STEP 05 - Assembling the doors
(20) install the Using the screw
(D). To end the Install the articulator
(N) securing with the Screw (D),
adjusting the door to zero degree
Of angle.
Pag. 4/4
PASSO 04 - Encaixar o passo 03 na peça (11) ja instalada na parede,
deixando as peças (07 e 18) totalmente unidas, as pontas das peças
(10 e 19) servem para um encaixe rápido do produto.
PASO 04 - Montar el paso 03 en la pieza (11) ya instalado en la pared,
dejando partes (07 y 18) unidas por completo, las partes de los
extremos (10 y 19) sirven para un movimiento rápido del
producto.
STEP 04 - Fit the step 03 in the piece (11)
already installed on the wall, leaving
parts (07 and 18) completely joined,
the parts of the ends (10 and 19) are
used to a quick snap of the
product.
D
18 pçs/partes
L
04 pçs/partes
N
02 pçs/partes
07
18
10
19
N+D
L+D
L+D
20
L+D
20
03
KG
03
KG
03
KG
03
KG
06
KG
05
KG
19
KG
Other Somopar Indoor Furnishing manuals


Popular Indoor Furnishing manuals by other brands

Regency
Regency LWMS3015 Assembly instructions

Furniture of America
Furniture of America CM7751C Assembly instructions

Safavieh Furniture
Safavieh Furniture Estella CNS5731 manual

PLACES OF STYLE
PLACES OF STYLE Ovalfuss Assembly instruction

Trasman
Trasman 1138 Bo1 Assembly manual

Costway
Costway JV10856 manual


