Soniclear HA1 User manual
HA1 Hybrid Audio Kit
OPERATION GUIDE

About This Manual
This manual covers the installation and usage of the HA1 Hybrid Audio Kit
for use with the SoniClear digital recording software product and
communications software products.
Revision Date:
6/14/21
Printed in the United States.
©Copyright 2021 Trio Systems LLC
All rights reserved. No part of this publication may be reproduced, stored in a
retrieval system, or transmitted, in any form or by any means, electronic,
mechanical, photocopying, recording, or otherwise, without the prior written
permission of the publisher.
SoniClear is a registered trademark of Trio Systems LLC. Meeting
Recorder, Gov Recorder, Interview Recorder, Court Recorder, and
Transcriber Live are trademarks of Trio Systems LLC. All other
trademarks are the property of their respective owners.

Contents
Evo 4 Operation............................................................................................................................................5
Overview...............................................................................................................................................5
Using Microphone and Headphone.......................................................................................................5
Additional Usage Notes........................................................................................................................6
Resetting All Controls...........................................................................................................................6
HA1 Hybrid Audio Kit Installation ..............................................................................................................9
Evo 4 Hardware Installation .....................................................................................................................9
Overview...............................................................................................................................................9
USB Interface........................................................................................................................................9
Power Connection.................................................................................................................................9
Audio Connections................................................................................................................................9
Evo 4 Software Installation.....................................................................................................................10
Drivers.................................................................................................................................................10
Loading and Saving Presets................................................................................................................10
Evo 4 Loopback Settings ....................................................................................................................14
Default Headphone Settings................................................................................................................15
Audio Loopback Cable .......................................................................................................................16
SoniClear Software Configuration for Evo 4..........................................................................................17
Recording Options Tab - Sound Quality.............................................................................................17
Hardware Tab –Audio Device Selection............................................................................................17
Advanced Recording Options.............................................................................................................17
Playback Device Selection..................................................................................................................18
Enable Live Monitoring......................................................................................................................18
Advanced Playback Options...............................................................................................................18
Transcriber Live Software Configuration for Evo 4...............................................................................20
Hardware Tab –Audio Device Selection............................................................................................20
Playback Device Selection..................................................................................................................20
Enable Live Monitoring......................................................................................................................20
Advanced Playback Options...............................................................................................................21
Communication Software Configuration for Evo 4................................................................................22
Playback Software Configuration for Evo 4...........................................................................................22


5
Evo 4 Operation
Overview
The HA1 Hybrid Audio Kit is designed to make it easy to record computer-based teleconferences in
SoniClear with high audio quality. It will work with any conferencing software, such as Zoom, WebEx,
or Teams. It also works with softphone programs, such as 8x8 Work, Vonage, Ring Central, and Avaya.
The Evo 4 must be installed correctly before use. See the section below, “HA1 Hybrid Audio Kit
Installation”. After installation, the Evo 4 interface will turn on automatically when the computer is
started, making it immediately ready for teleconferencing and for recording in SoniClear.
Using Microphone and Headphone
The kit includes a microphone, a monitor headphone, and the black Evo 4 interface control box for
connecting the microphone and headphone to the computer.
Place the microphone so that it is close to where you are sitting without being in the way of your work.
The microphone has a very directional pickup pattern, so it does not need to be right in front of your
mouth. You will be heard clearly without needing to lean in to the microphone.
All of the features of the Evo 4 are adjusted using the buttons and single large knob on the top of the
control box:
You will normally only need to use the volume knob to adjust the playback level on the headphones.
When starting your conference, press the headphone level button in the lower right corner. Then turn
the large knob to get the desired listening level.

6
Additional Usage Notes
1. In normal use only the control button for adjusting the headphone level will need to be used. The
other buttons on the Evo 4 should not be pressed. For example, the “48V” button in the upper left
corner should always be on (illuminated red). Pressing the control buttons may result in the
settings being incorrect. See “Resetting All Controls” below for fixing this problem.
2. If you have trouble hearing the teleconference participants, you may need to adjust the
monitoring balance. This allows you to have a comfortable level for hearing the participants and
yourself. This adjustment also controls the volume in the headphones when using the computer to
play audio to the teleconference participants. Press the monitor button in the lower right
corner of the Evo 4. Turning the volume knob counterclockwise will increase the volume of your
microphone (and the playback audio from the computer). Turn the volume knob clockwise to
increase the proportion of sound from the teleconference participants. Normally setting the
monitor level to the middle (12 O’clock position) will give a good balance of the signals.
3. If the participants in the teleconference have trouble hearing you because the volume is too low or
too high, the microphone level can be adjusted by pressing #1 microphone button and then
turn the large knob to get the proper volume. After adjusting the microphone level, you should
press the headphone level button again (to avoid accidently changing the microphone level).
4. The supplied single-earpiece headphone can be replaced with any type of headphone that you
prefer for listening to the teleconference, using the included ¼” to 3.5mm headphone adapter.
Resetting All Controls
If for some reason any of the required Evo 4 settings are accidentally changed, the default settings can be
restored with the following steps:
Left click on in the “Windows System Tray”. This is the little up arrow icon in the lower right corner of
the computer screen:
Then right click on the Evo control icon:

7
Select “Show EVO Control” to display the Evo 4 control panel:
Click on the File/Open pulldown menu selection to open the Load Mixer window:

8
Select the SoniClear setting shown there and click the Load button to reset the Evo 4 to the default values.
Note that it may appear that the Load button is disabled when it is in fact working. Hovering the mouse
over that button will cause it light up so that it can be clicked.

9
HA1 Hybrid Audio Kit Installation
Evo 4 Hardware Installation
Overview
The HA1 Hybrid Audio Kit is based on the Audient Evo 4 USB audio interface. It includes the parts
needed for recording Windows communication software, such as a Zoom online conference IP telephone
“softphone”. Included in the kit are:
-Audient Evo 4 USB audio interface mixer (2 channels)
-Microphone or Headset:
oSamson C02 microphone and desk stand
oJabra noise cancelling headset with adapter
-Computer 3.5mm to ¼” audio output cable
-Monitoring headphone with ¼” adapter
-Mono monitoring headphone
USB Interface
The Audient Evo 4 interface requires a USB 2.0 or USB 3.0 connection. The Evo 4 should be connected
directly to a port on the computer or a manufacturer supplied docking station. Connecting it to a USB hub
may result in unreliable operation.
Power Connection
The Evo 4 is powered from the USB Port and does not require the use of a power adapter.
Audio Connections
The included microphone is connected to the Evo 4 microphone input #1 using the included standard
XLR microphone cable. This microphone is used to record the local participant in SoniClear and can also
be configured as the microphone for the communications software.
The speaker or headphone output of the computer is connected to the Evo 4 microphone input #2 using
the ¼” to 3.5 mm audio cable included in the kit. Note that this cable is plugged into the ¼” part of the
“combo” input connector on the back of the Evo 4.
The supplied monitoring headphone is plugged into the front of the Evo 4 adapter using the supplied ¼”
adapter. Any standard headphone can be used for monitoring, as well.

10
Evo 4 Software Installation
Overview
The Evo 4 USB audio interface requires manual installation of product-specific drivers and adjustment of
the driver settings to work with the SoniClear software.
Install Drivers
Download the latest Evo 4 drivers from the Audient support website. As of the last update to this manual,
the download link for the driver installer was:
https://evo.audio/evo-support/general/driver-installation/.
Only install software downloaded from the official Evo 4 or Audient website. Do not install software
from a third-party service.
Download SoniClear Presets
The Evo 4 requires special configuration for compatibility with SoniClear. Depending on which version
you have installed, SoniClear presets for the Evo 4 may be available in the SoniClear program presets
folder:
C:\Program Files (x86)\SoniClear97\Presets
If the presets are not available for your version of the software, they can be downloaded from the
SoniClear website:
https://download.soniclear.com/ha1/
Evo Control Panel
The Evo 4 Control software is installed along with the drivers. This control panel is used to adjust the
driver setup and to load and save preset files. To open the Evo 4 Control software, right click on the Evo
4 icon in system tray and select “Show Evo Control”:

11
This will display the Evo 4 Control panel:

12
Driver Settings
Set the driver Sample Rate to 44.1 kHz by selecting that option from the Setup pulldown menu:
13
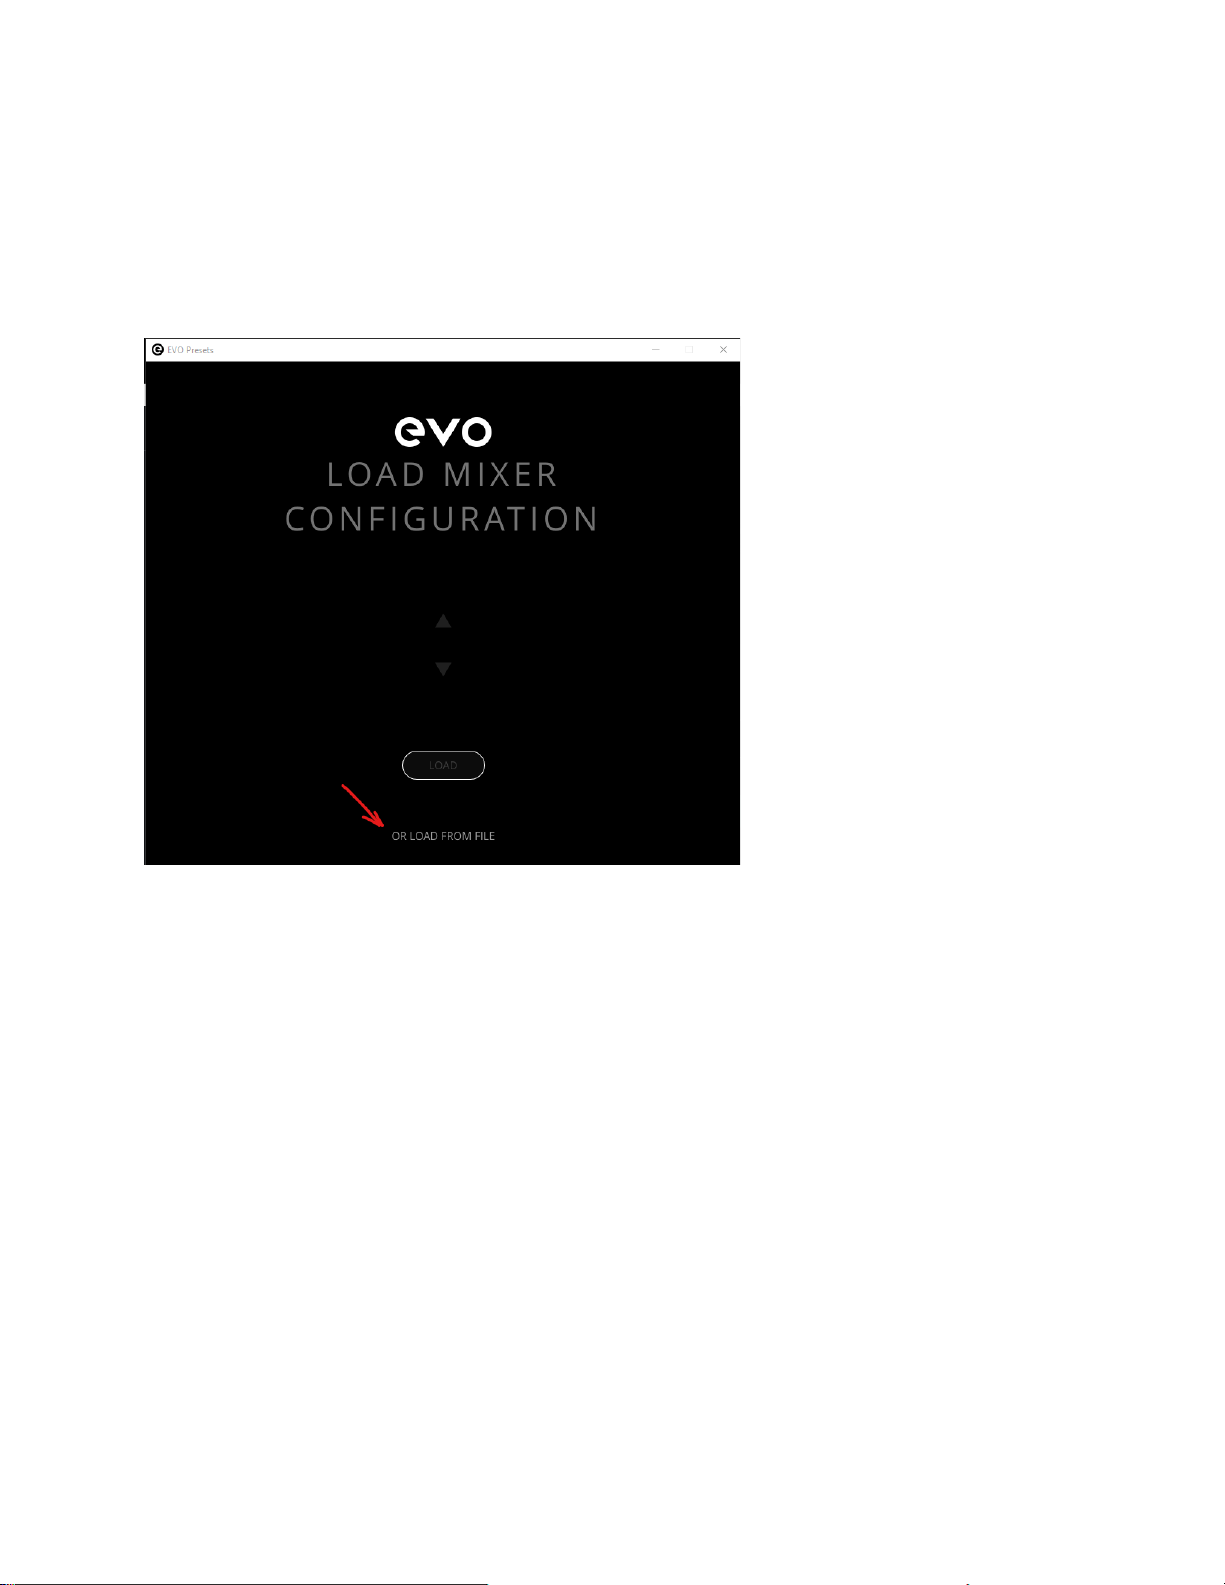
Load Mixer Presets
The Evo 4 Control Panel is used to load mixer presets. Click on the File/Open pulldown menu selection.
This opens the Load Mixer window:
After initial installation of the Evo 4 drivers, the presets list in this control dialog will be blank.
To load the downloaded SoniClear presets file, click the gray link “OR LOAD FROM FILE” and select
the preset file from the location in the program presets, or where it was extracted from the downloaded
preset zip file.
Save Mixer Presets
It is important to save these presets in the Evo 4 Control panel so that the SoniClear user can restore the
correct settings in case they pressed one of the setting buttons by accident.
After adjusting the microphone and headphone levels to work properly with the teleconference software,
save these customized settings by selecting File/Save from the pulldown menu. The values for the preset
will be stored in the user’s AppData folder and that file will be available to select directly in the Load
Mixer Configuration screen.

14
Evo 4 Mixer Settings
The Evo 4 includes a built-in mixer that sends audio from the interface back to the computer. This makes
it possible to “loop back” audio from the computer back into another program in the computer. In this
case, the Zoom or softphone audio is sent to the Evo 4 device, and then sent back to SoniClear to be
recorded using the “Loopback Device” provided by the Evo 4 drivers.
The loopback mixer is configured properly after the supplied SoniClear presets have been loaded,
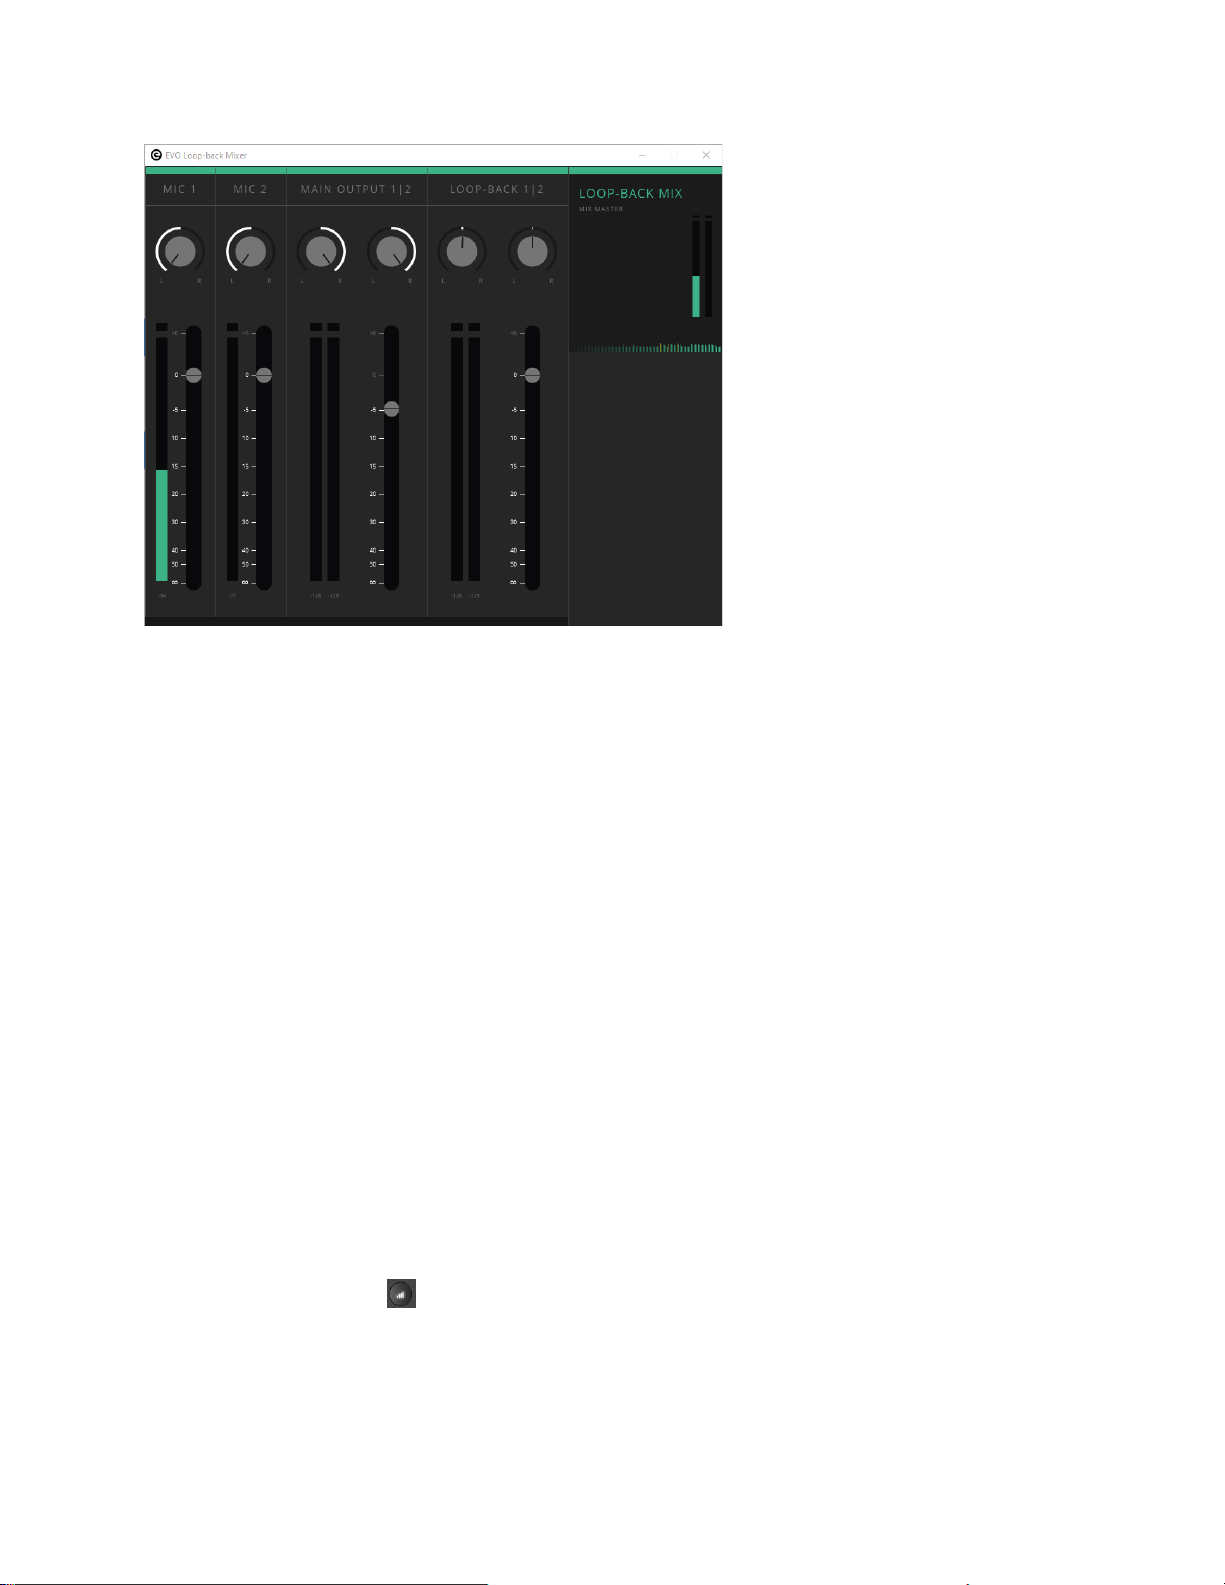
following the instructions above. These settings can be observed using the Loop-back Mixer control
panel.
To display the Evo 4 Loop Back Mixer panel, right click on the Evo 4 icon in the System Tray:
Then select the “Show Loop-back Mixer” option on the popup menu:
15
If you make changes to these settings, be aware that setting the values incorrectly may result in feedback
or echo problems with the communications software, or loss of audio for recording in SoniClear.
The way the loopback in configured in the presets, the following is happening in the mixer:
-Audio input from the microphone (MIC 1) and computer speaker output (MIC 2) is sent to the
left loopback channel. This allows the communications software to receive only input signals,
excluding communication audio that would cause a feedback or echo problem.
-The Main Output 1/2 signal from the communication software is sent exclusively to the right
channel, so that it is not looped back to the communications software.
-The Loop-Back 1/2 output channel from the computer is not used in this configuration.
If you have any questions about loopback settings, contact SoniClear Support.
Default Headphone Settings
The desired headphone level should be set as a default for the user. This involves setting the overall level
of the headphone and the monitor mix level.
Adjust the headphone level so that the teleconference audio is at a comfortable volume. To do this, press
the headphone level button in the lower right corner. Then turn the large knob to get the desired
listening level.
The monitor mix adjustment sets the level of the input volume in relation to the output volume. The user
will want to hear a good balance of their own voice and playback audio (the microphone on Channel 1

16
and the hardware loopback from the computer on Channel 2), in comparison to the teleconference
participants audio coming from the computer.
To set the monitor mix, press the monitor button in the lower right corner of the Evo 4. Normally
setting the monitor level to the middle (12 O’clock position) will give a good balance of the signals. Turn
the volume knob clockwise to increase the proportion of sound from the teleconference participants.
Turning the volume knob counter clockwise will increase the volume of user’s microphone (and the
playback audio from the computer). When changing the monitor mix, it may be necessary to readjust the
headphone level.
Audio Loopback Cable
The HA1 Hybrid Audio Kit includes a hardware audio cable for looping audio back from the computer
into Channel 2 of the mixer. The purpose of this cable is to allow other programs on the computer to play
audio into the teleconference software and be recorded in SoniClear. To use this option, connect the
speaker or headphone output of the computer to Channel 2 of the Evo 4 interface. Then configure the
software that you will be using to play audio to play to that speaker or headphone location.
This audio loopback cable can also be used to play audio from a second computer system or other audio
playback device, rather than the recording computer. This can be useful, for example, in situations where
a second computer is used for playing presentations or other media.

17
SoniClear Software Configuration for Evo 4
The SoniClear software must be manually set to the correct configuration to work with the Evo 4
interface. To do this, start SoniClear and select Edit/Preferences from the pulldown menu.
Recording Options Tab - Sound Quality
In the Recording Options preferences tab, set the recording format. For Meeting Recorder 9
select Meeting (Stereo WAV). For All other SoniClear products, select Multichannel (MP3) and
set the channels selector to 2 channels.
Hardware Tab –Audio Device Selection
Select the Hardware tab and modify the settings according to the following instructions.
Recording Device Setup
The Recording Device Selection side of the Hardware tab controls the usage of the sound cards
in the computer during recording.
Default Recording Device
This is the sound card input for recording. It should be set to “Loopback 1/2 (Audient EVO4)”.
Note that the name may have an additional number in front of the word Audient, such as
“Loopback 1/2 (2- Audient EVO4)”. This indicates that the Evo 4 interface has been plugged
into more than one USB jack on the computer at some point in time.
Once the Default Recording Device field has been set, the Evo 4 must be plugged into the same
USB jack on the computer each time it is used.
Removable Recording Device
The automatic selection of a removable audio device is not used for this configuration. The “Use
Removable Device If Present” and “Automatically Set Removable Device ” check boxes should
be unchecked.
Advanced Recording Options
These options control how recording is processed.

18
Recording Process Priority
Default value should be set to High or Automatic.
Disk Update Time
The default value should be set to 5000 milliseconds.
MMCSS
The value should be set to Checked.
Force Recording at 44.1KHz
The value should be set to Checked.
Playback Device Selection
The Playback Device Selection section of the Hardware tab controls the usage of the sound cards
in the computer during playback.
Default Speaker Device Selection
This is the sound card that will be used for playback. To listen to SoniClear playback through the
Evo 4 headphone jack, select “Main Output 1/2 (Audient EVO)”.
Removable Recording Device
The “Use Removable Device If Present” and “Automatically Set Removable Device” check
boxes should be unchecked.
Enable Live Monitoring
With the supplied hardware in the kit the Live Monitoring option should be disabled. However,
if live monitoring is desired, a separate headphone device will need to be connected to the
computer and selected in this field.
Advanced Playback Options
These options control how playback is processed. These fields should only be changed in the
event of problems with playback using the default settings. Consult SoniClear support for
assistance.

19
Monitor Delay
Monitor Delay should be set to the default of 3 seconds.
Force Recording at 44.1KHz.
This field should be set to Unchecked.

20
Transcriber Live Software Configuration for Evo 4
When Transcriber Live is used with SoniClear Court Recorder 9, audio for a readback can be
played so that it is heard by the teleconference participants. The included hardware cable sends
this readback audio from the computer headphone jack into Channel 2 of the Evo 4 interface.
Monitoring of audio for this application must be done using a separate headphone device (not
included with this kit).
Configure Transcriber Live for this usage in Edit/Preferences Hardware tab.
Hardware Tab –Audio Device Selection
Select the Hardware tab and modify the settings according to the following instructions.
Playback Device Selection
The Playback Device Selection section of the Hardware tab controls the usage of the sound cards
in the computer during playback.
Default Speaker Device Selection
This is the sound card that will be used for playback into the teleconference call (like playing
into speakers in the room when meeting in person). Set the device either the built-in speaker, or
built-in headphone jack if that is a separate device for this computer.
For digital court reporting application that require performing a readback, Transcriber Live can
play back the audio through the included loopback audio cable. In this case, the Default Speaker
Device should be set to the device where the physical loopback cable is connected. This is
typically either the “Speaker/Headphone” device, or the “Headphone” device (if headphone
output is treated separately from the built-in speaker).
Removable Recording Device
The “Use Removable Device If Present” and “Automatically Set Removable Device” check
boxes should be unchecked.
Enable Live Monitoring
The Monitor Device should be set to “Main Output 1/2 (Audient EVO)”.
Table of contents
Other Soniclear Stereo System manuals


