SONOR Orff SMART Series User manual

ORFF
SMART SERIEs
Instruction Manual
THANK YOU...
...for choosing this premium SONOR Or instrument. The SONOR Or SMART Series embraces market-leading innovations in sound, functionality,
and design. For maximum enjoyment, this manual includes basic guidelines and safety information, as well as advice on usage and maintenance.
Visit sonor.com for more tips and ideas.
Enjoy your SMART series instrument - with best regards,
Your SONOR Team
Instruction Manual, English
Related Items:
SONOR Smart Series Instruments (SSX 100;
ASX 100; SSX 1.1; AXS 1.1; SSM 10; ASM 10).
For simplification the term xylophone is used in
throughout this document, however, informa-
tion applies to all the instruments throughout
the SMART Series.
Instruction Manual No. 001, date: May 15, 2021
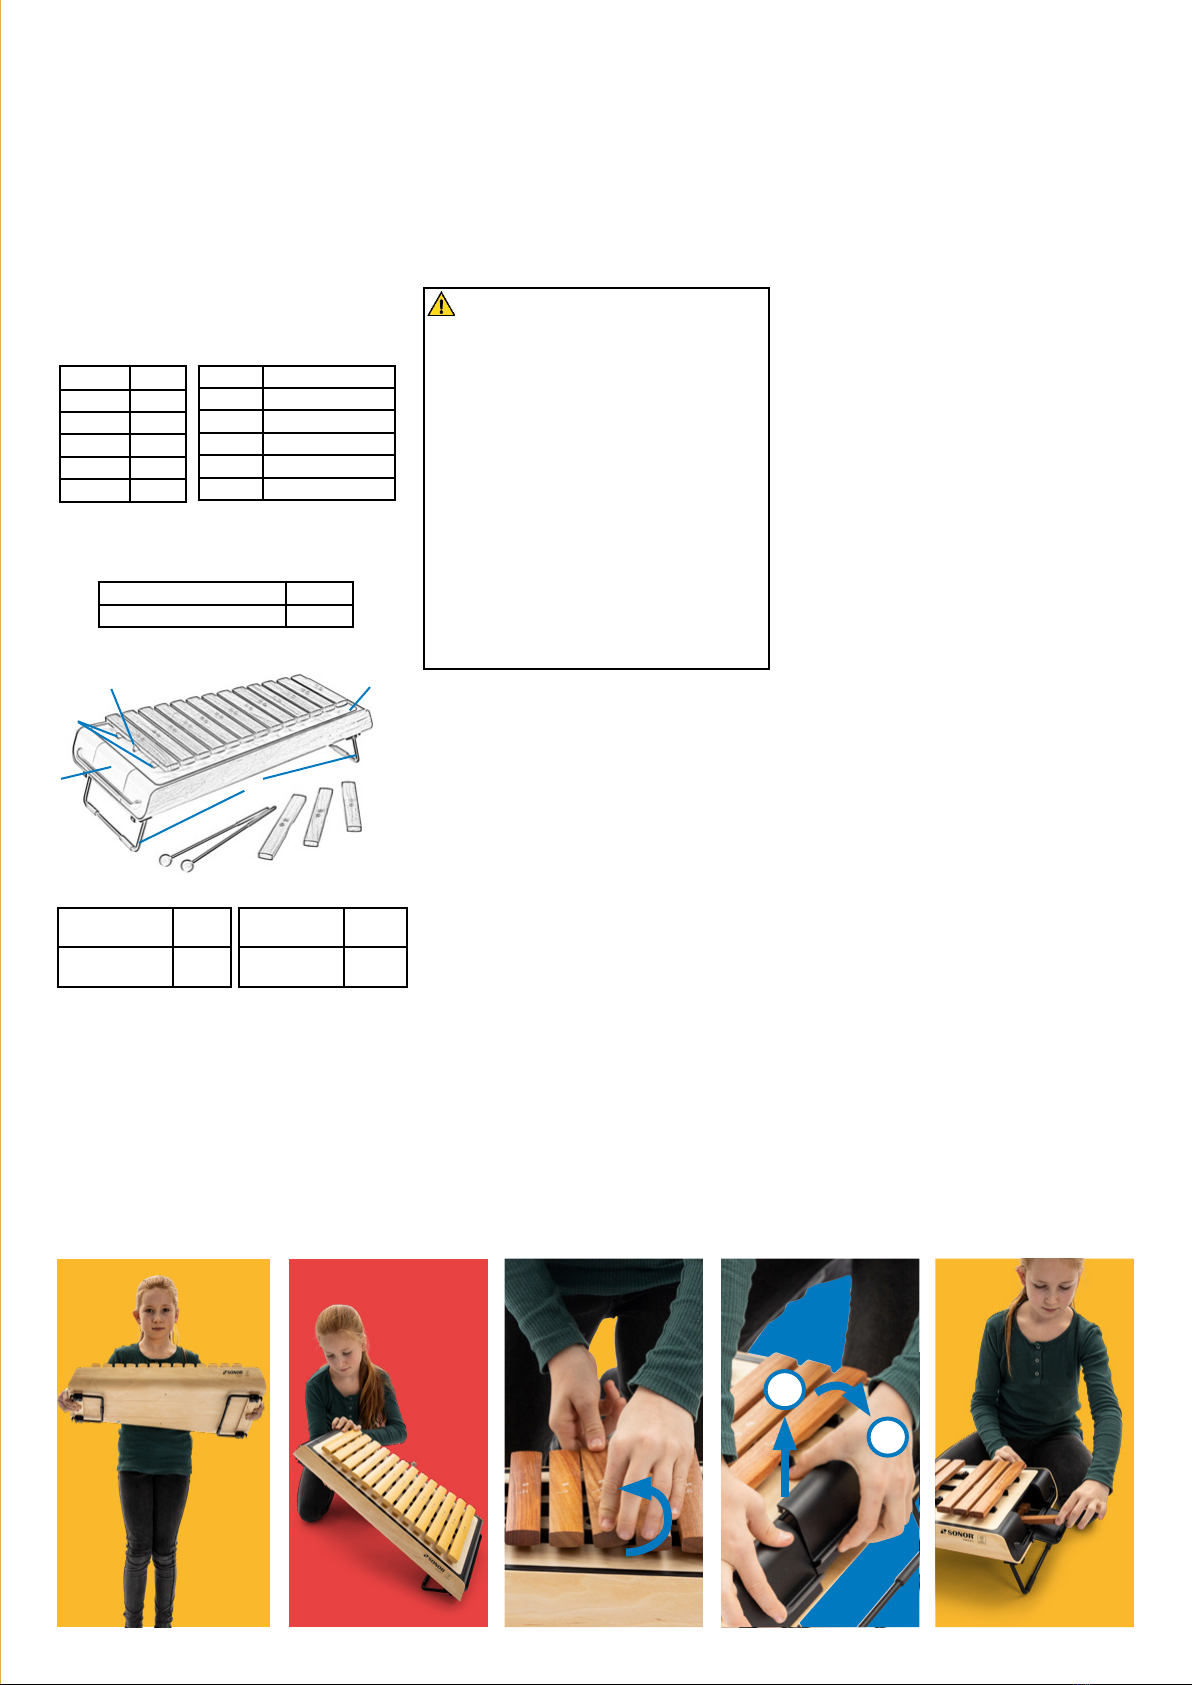
Technical Data
Fundamental tuning: a= 440 Hz
Instrument weight:
Patents/Patents Pending
Scope of Delivery
Country Of Origin
Germany
Product Warranty
National product warranty terms apply. Claims
have to be reported to and handled by the
retailer this product was purchased from.
Disposal
In case of disposal, please contact local recyc-
ling companies for more details.
Manufactuer: SONOR GmbH
Zum Heilbach 5
57319 Bad Berleburg, Germany
phone +49 (0) 2759-790
fax +49 (0) 2759-79-131
e-mail: info@sonor.de
Internet: www.sonor.com
Safety Instructions
1. Please make sure the xylophone is always
safely stowed and locked during transport.
Ignoring may cause serious injuries.
2. Protect your fingers when closing the bar/
mallet storage door.
3. Please be careful - applying +110# weight
to the instrument causes the fold-out legs
to collapse outwards which could result in
injuries underneath the instrument.
4. Do not stack more than five SMART instru-
ments on top of each other.
5. Depending on the type of mallet used the
xylophone could reach a sound level up
to 90 decibels, and could cause hearing
damage.
6. This is not a toy.
Important!
Please read before using and
store instruction manual in
a safe place.
Usage advice
The instrument is played with the included pair
of mallets. Other mallets can be used to create
dierent sounds. Using mallets with very hard
heads, such as glass or hard wood, may result
in exceptional wear or damage of the sound
bars. We recommend mallets with heads made
out of felt, rubber or wool.
Do not rest the mallets on the sound bars after
striking. Tonal results are best when hit short,
in the center of the bar (marked by the type of
tone).
Choosing the right packaging for a safe trans-
port and storage is imperative. It protects your
xylophone from dust, humidity and damage.
All SONOR Or instruments are packed
in premium packaging. Please make sure to
only use the original packaging for storing or
shipping.
[
IMAGE
1 ] When removing the instrument
from the box, please place your hands on both
sides of the resonator box, grip firmly and
lift the instrument. We recommend the same
action when carrying the instrument.
Place the instrument on the floor, a table or
another flat surface. The sound quality is not
aected by the legs being folded in or out.
[ IMAGE 2 ] For optimized ergonomic playing
height (e.g. playing the instrument on the floor),
the Smart instruments feature fold-out legs. Lift
the instrument on one side, pull the leg to the
outside carefully until the leg is locked. Repeat
steps with opposite legs.
In order to fold-in the legs repeat the steps in
reverse, side by side. Please make sure your
fingers are not located between the legs and
resonator box when closing.
To avoid the legs from breaking we installed a
safety mechanism. When excessive pressure is
applied to the instrument with the legs folded
out, they will collapse to the outside. By folding
them back in they will be set back in their initial
state.
ATTENTION:
IMPROPER USAGE MAY RESULTS
IN RISK OF INJURIES.
[ IMAGE 3 ] How to remove sound bars:
hold the bar on both ends and evenly roll it to-
wards one side until the pins on the bottom of
the sound bar slide out of the pin locks located
on the mounting strip.
How to install sound bars: proceed in reverse
order of removal. Line up the bar so the pins on
the bottom of the bar align with the pin locks
on the mounting strip. Press the bar into the
mounting strip. Bar should securely fit on the
mounting strip.
If pin locks are accidentialy removed from the
top of the resonator box while removing sound
bars, use a narrow flat object (alternatively your
finger) and press the pin gently back into the
hole until it locks.
Removing the pin screws in the sound bars is
not necessary and should be avoided due to
safety reasons.
For an extended sound spectrum and diverse
musical possibilities the semitones f# and b-flat
are included with all SMART series instruments.
Changing Scale: To play in pentatonic C scale
remove the f and b natural bars. To play in G
major scale, replace all f sound bars with f#.
To play in F major scale, replace the b natural
sound bars with b-flat.
SSX 100 10#
ASX 100 12#
SSX 1.1 7.75#
ASX 1.1 9.5#
SSM 10 11.5#
ASM 10 14#
SSX 100 24 x 13.7 x 4.75 in
ASX 100 24 x 15.25 x 4.75 in
SSX 1.1 24 x 13.7 x 4.75 in
ASX 1.1 24 x 15.25 x 4.75 in
SSM 10 24 x 13.7 x 4.75 in
ASM 10 24 x 13.7 x 4.75 in
1 23
ASX 100; ASX 1.1; ASM 10 c1 – a2
SSX 100; SSX 1.1; SSM 10 c2 – a3
ASX 100; ASX 1.1;
ASM 10; SSM 10 SCH 23
SSX 100; SSX 1.1 SCH 32
ASX 100;
ASX 1.1; ASM 10
f#1, bb1,
f2
SSX 100;
SSX 1.1; SSM 10
f#2, bb2,
f#3
Sound Bars
Mallets (one pair) Semitone Soundbars
Fold-out Legs
Resonator Box
Fold-out
Flap,
Storage
Separating
Strip
Separating
Bar
45
1
2
Dimensions Instrument (L x W x H)
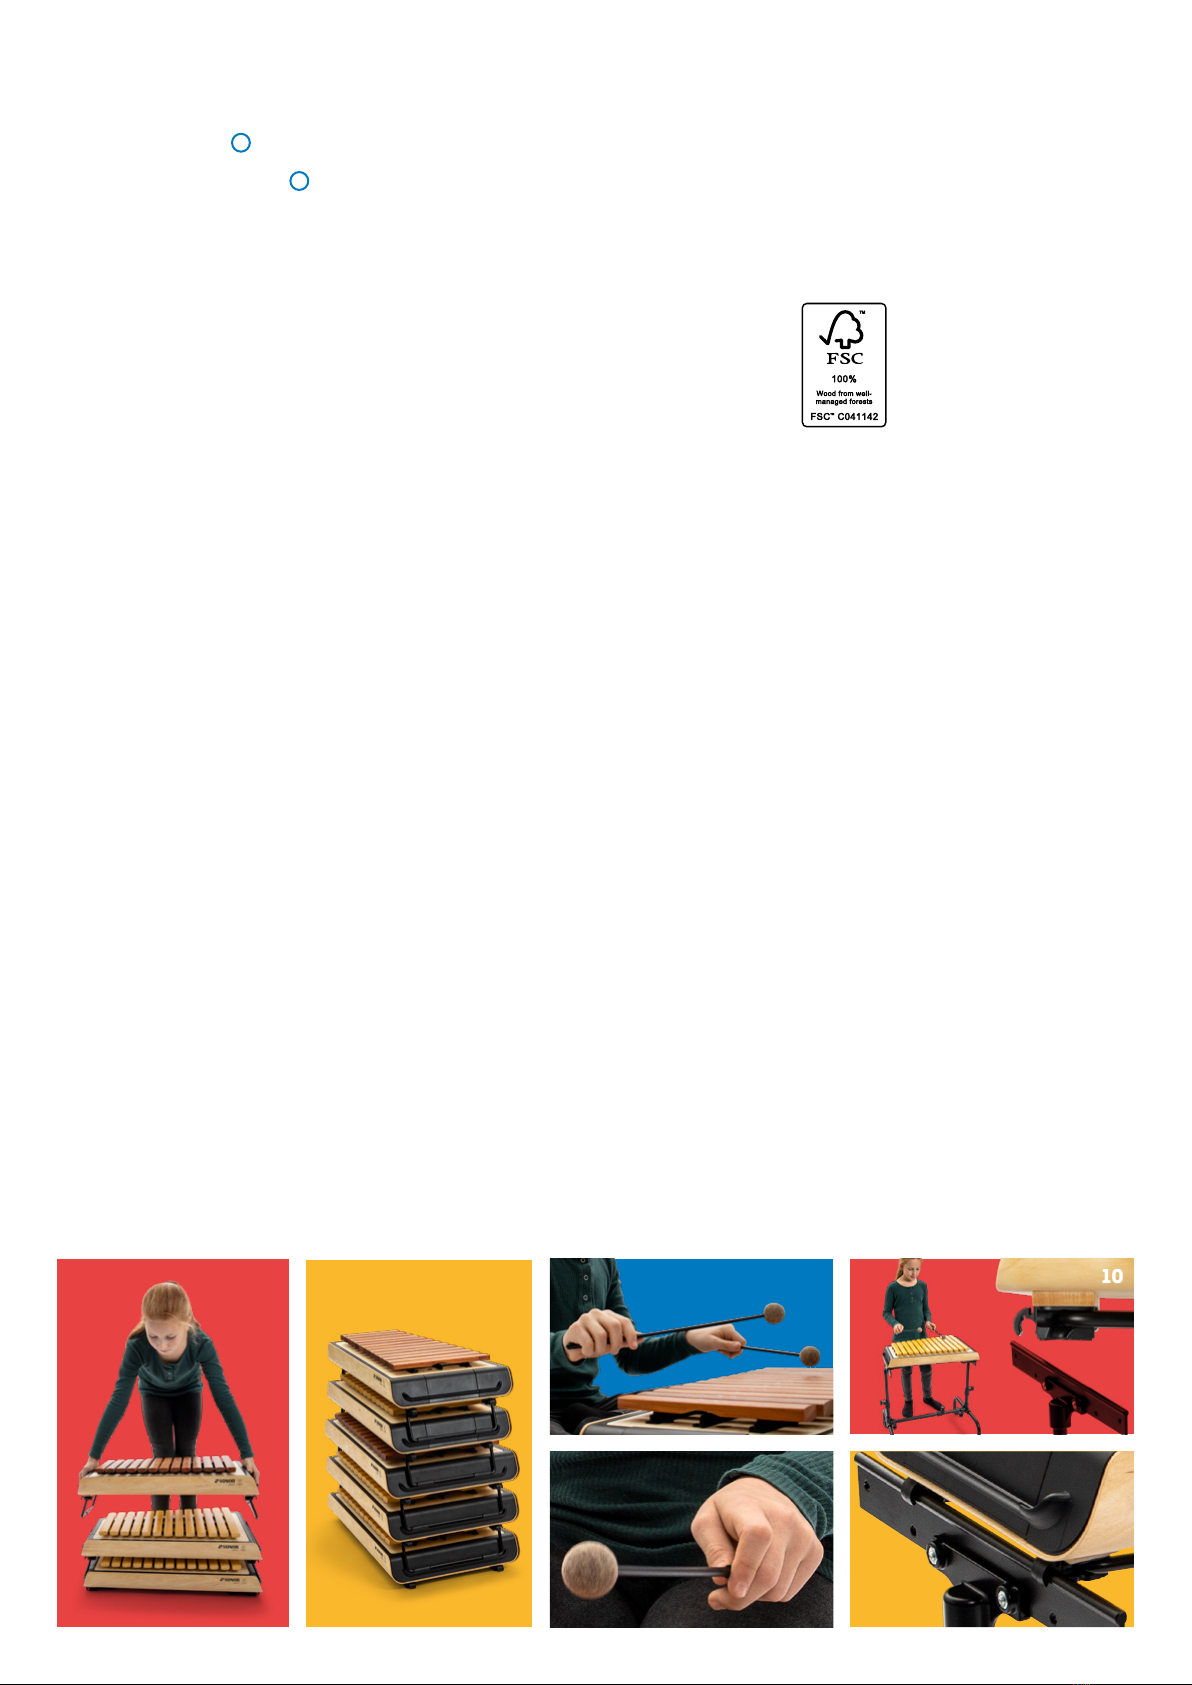
[
IMAGE
4 + 5 ] While not in use, extra
sound bars and mallets can be stored in the
accessory storage (garage). Open the fold-out
flap on the side of the resonator box by softly
pushing the lip upwards 1and then move
it to the outside (Alto instruments to the left,
Soprano instruments to the right) 2
Should the flap be removed by accident, it can
be put back in place using the locking knobs.
Put them in place on one side first, then on the
other side.
[
IMAGE
6 + 7 ]
To store the instruments
and save space, they can be stacked on top of
each other. Please only stack when placed on a
flat, firm surface. Fold in legs of the instrument
on the bottom. The instruments to be stacked
need the legs to be folded out. Place the legs in
the groove on both side of the instrument
underneath. Make sure that the narrow and
wide side matches each instrument and acces-
sory storages flaps are closed.
For your own safety and to avoid damage to the
instruments, please do not stack:
→ more than five (5) instruments and
→ always place Alto instruments on the
bottom, Soprano instruments on top.
[
IMAGE
8 + 9 ] For an optimal sound we
recommend the mallets to be held as follows:
hold the mallet from half of the shaft down-
wards with thumb, index and middle finger,
with the back of the hand facing upwards.
Pay attention to a relaxed playing position, so
that the mallet can bounce back after striking
the sound bar.
[
IMAGE
10 + 11 ] To use a Smart instru-
ment with the SONOR Basis Trolley (BT) you
need the AS1 adapter rails which are available
separately.
Mount the adapter rails (AS1) with the included
screws on both ends of the Basis Trolley. Mount
the instrument by gently pushing the folded flat
legs into the hooks of the adapter.
INSTRUMENT CARE
To avoid dust and dirt collecting inside the
resonator box, we recommend to cover the
instrument when not in use, or store in a closet.
We recommend to clean the instrument regu-
larly using a dry, lint free cloth.
Heavier dirt may be removed using a lightly
wet cloth.
Attention! Please do not use furniture polish or
sprays to clean any of the instrument‘s part. It
may cause serious damage to the instrument.
To clean the acoustic chambers please remove
all sound bars first and safely use a vaccum
cleaner in and around the resonator box.
WARNING NOTICE
1. High humidity (caused e.g. by fog, rain,
dampness, sweat) may result in de-tuning,
warping of the instrument and its wooden
components.
2. Palisono sound bars are not eected by
humidity due to its hygroscopic properties.
3. High temperature may result in damage,
too. Especially when the instrument is
placed in direct sun, or close to a heater.
Please do not store the instrument in direct
sun, closed vehicles or behind window
glass.
4. Please keep liquids away from the instru-
ment.
5. Sharp-edged objects in close distance to
the instrument may result in signs of wear
on the instrument‘s components.
Compliance of the information in this manual
can‘t be monitored. Improper usage and non-
compliance may result in damages to health,
or damage to the instrument and its compo-
nents. SONOR refuses to take any responsi-
bility or liability for loss, damage or expenses
that directly or in-directly result from non-com-
plicance of the safety, usage and maintenance
advice given in this user manual.
SPARE PARTS
Service parts for SONOR instruments
can be located online under
www.sonor.com/service/spare-parts/
Please contact a SONOR dealer for repair
instructions, or contact SONOR directly:
(e-mail: service@sonor.de,
phone: +49 (0) 2759 - 79146) or follow the
instructions on www.sonor.com.
FSC®CERTIFICATION
FSC certification ensures that
products come from respon-
sibly managed forests that
provide environmental, social
and economic benefits.
The FSC Principles and Criteria
provide a foundation for all
forest management standards
globally, including the FSC US National Stan-
dard (v1.0) that guides forest management
certification in the U.S.
Note: Wood is a natural material, deviation in
structure, surface, texture and depth of lacque-
ring are not object to claim warranty.
67810
11
9
9
This manual suits for next models
6


