manuals.online logo
Brands
  1. Home
  2. •
  3. Brands
  4. •
  5. Sony
  6. •
  7. Camera Lens
  8. •
  9. Sony SEL24105G User manual

Sony SEL24105G User manual



–1
(1) (2)

–2



(1)
(2)


電気製品は、安全のための注意事項を守ら
ないと、人身への危害や火災などの財産へ
の損害を与えることがあります。
この取扱説明書には、事故を防ぐための重要な注意事項と製品
の取り扱いかたを示しています。この取扱説明書をよくお読
みの上、製品を安全にお使いください。お読みになったあとは、
いつでも見られる所に必ず保管してください。
この「取扱説明書」ではレンズの使いかたを説明し
ています。使用上のご注意など、レンズに共通した
ご注意や説明については別冊の「使用前のご注意」
でご覧頂けます。
必ずご使用の前に、本書と合わせてよくお読みのう
えでご使用ください。
本機はEマウントカメラ専用のレンズです。Aマウン
トカメラにはお使いになれません。
本機は35mm判相当の撮像素子範囲に対応していま
す。
35mm判相当の撮像素子搭載機種ではカメラ設定に
よってAPS-Cサイズでも撮影が可能です。
カメラの設定方法については、カメラの取扱説明書を
ご覧ください。
カメラ本体との互換情報については専用サポートサイ
トでご確認ください。
http://www.sony.jp/support/ichigan/
使用上のご注意
•レンズを絶対に太陽や強い光源に向けたままにしないで
ください。レンズの集光作用により、発煙や火災、ボディ・
レンズ内部の故障の原因になります。やむを得ず太陽光
下等におく場合は、前後レンズキャップを取り付けてく
ださい。
•逆光撮影時は、太陽を画角から充分にずらしてください。
太陽光がカメラ内部で焦点を結び、発煙や火災の原因と
なることがあります。また、太陽を画角からわずかに外
しても発煙や火災の原因となることがあります。
•レンズを取り付けてカメラを持ち運ぶときは、カメラと
レンズの両方をしっかり持ってください。
•ズームにより繰り出されたレンズ部分でカメラを保持し
ないでください。
•本機は防じん、防滴性に配慮して設計されていますが、防
水性能は備えていません。雨中使用時などは、水滴がか
からないようにしてください。
フラッシュ使用時のご注意
•カメラ内蔵フラッシュはお使いになれません。外付けフ
ラッシュ(別売)をご使用ください。
•フラッシュ光がレンズでさえぎられて、写真下部に影が
できることがあります。レンズフードを取りはずしてく
ださい。
周辺光量について
•レンズは原理的に画面周辺部の光量が中心部に比べ低下
します。周辺光量の低下が気になる場合は、開放絞りか
ら1~2段絞り込んでご使用ください。
各部のなまえ
 1レンズフード指標
 2フォーカスリング
 3ズームリング
 4焦点距離指標
 5レンズ信号接点*
 6焦点距離目盛
 7レンズフード
 8フォーカスホールドボタン
 9フォーカスモードスイッチ
10手ブレ補正スイッチ
11マウント標点
12レンズマウントゴムリング
*直接手で触れないでください。
レンズの取り付けかた/取りはず
しかた
取り付けかた(イラスト–参照)
1 前後のレンズキャップとカメラのボディ
キャップをはずす。
 レンズフロントキャップは図の(1)、(2)の2通りの方
法で取り付け/取りはずしができます。(2)は、レン
ズフードを付けた状態でのレンズキャップの取り付
け/取りはずしに便利です。
2 レンズとカメラの白の点(マウント標点)を
合わせてはめ込み、レンズを軽くカメラに押
し当てながら、時計方向に「カチッ」とロック
がかかるまでゆっくり回す。
 レンズを取り付けるときは、カメラのレンズ取りは
ずしボタンを押さないでください。
 レンズを斜めに差し込まないでください。
取りはずしかた(イラスト–参照)
カメラのレンズ取りはずしボタンを押したま
ま、レンズを反時計方向に回してはずす。
レンズフードを取り付ける
画面外にある光が描写に影響するのを防ぐために、レ
ンズフードの使用をおすすめします。
レンズフードの赤線をレンズの赤線(レンズ
フード指標)に合わせてはめ込み、レンズフード
の赤点とレンズの赤線が合って「カチッ」という
まで時計方向に回す。
•カメラ内蔵、もしくは外付けフラッシュを使って撮影す
るときは、フラッシュ光が遮られることがありますので、
レンズフードをはずしてください。
•撮影後レンズフードを収納するときは、逆向きにレンズ
に取り付けてください。
ズームする
ズームリングを回して、希望の焦点距離(ズーム
の位置)に合わせる。
ピントを合わせる
•本製品のフォーカスモードスイッチは、一部のカメラ本
体においてお使いになれません。
カメラ本体との互換情報については専用サポートサ
イトでご確認ください。
AF(オートフォーカス)/MF(マニュアル
フォーカス)の切り替え
AF(オートフォーカス:自動ピント合わせ)/MF(マ
ニュアルフォーカス:手動によるピント合わせ)の設定
を、レンズ側で切り替えることができます。
AFで撮影する場合は、カメラ側とレンズ側両方の設定
をAFにします。カメラ側あるいはレンズ側のいずれか
一方、または両方の設定がMFの場合、MFになります。
レンズ側の設定
フォーカスモードスイッチを、AFまたはMFの
いずれか設定したいほうに合わせる(1)。
•カメラのフォーカスモードの設定方法については、カメ
ラの取扱説明書をご覧ください。
•MFではファインダー等を見ながらフォーカスリングを
回して、ピントを合わせます(2)。
AF/MFコントロールボタンを装備したカメラをお
使いの場合
•AF動作時にAF/MFコントロールボタンを押すと、一時的
にMFへ切り替えることができます。
•MF動作時にAF/MFコントロールボタンで一時的にAFへ
切り替えができるのは、レンズの設定がAF、カメラの設
定がMFの場合となります。
フォーカスホールドボタンを使用
する
•本製品のフォーカスホールドボタンは、一部のカメラ本
体においてお使いになれません。
カメラ本体との互換情報については専用サポートサイト
でご確認ください。
AF中にフォーカスホールドボタンを押すと、AFの駆
動を止めることができます。ピントが固定され、その
ままのピントでシャッターを切れます。シャッターボ
タンを半押しした状態で、フォーカスホールドボタン
を離すと、AFが再開します。
手ブレ補正を使用する
手ブレ補正スイッチ
•ON: 手ブレを補正します。
•OFF:手ブレを補正しません。三脚をお使いになる場合
は、手ブレ補正をOFFにすることをおすすめします。
主な仕様
商品名
(型名)
FE 24-105mm F4 G OSS
(SEL24105G)
焦点距離(mm) 24-105
焦点距離イメージ*1
(mm)36-157.5
レンズ群一枚 14-17
画角1*284°-23°
画角2*261°-15°
最短撮影距離*3
(m) 0.38
最大撮影倍率(倍) 0.31
最小絞り F22
フィルター径(mm) 77
外形寸法(最大径×長さ)
(約:mm) 83.4 × 113.3
質量(約:g) 663
手ブレ補正機能 あり
*1 撮像素子がAPS-Cサイズ相当のレンズ交換式デジタル
カメラ装着時の35mm判換算値を表します。
*2 画角1は35mm判カメラ、画角2はAPS-Cサイズ相当の撮
像素子を搭載したレンズ交換式デジタルカメラでの値
を表します。
*3 最短撮影距離とは、撮像素子面から被写体までの距離を
表します。ズームの中間域(70mm付近)では0.41mと
なります。
•レンズの機構によっては、撮影距離の変化に伴って焦点
距離が変化する場合があります。記載の焦点距離は撮影
距離が無限遠での定義です。
同梱物(()内の数字は個数)
レンズ(1)、レンズフロントキャップ(1)、
レンズリヤキャップ(1)、レンズフード(1)、
レンズケース(1)、印刷物一式
仕様および外観は、改良のため予告なく変更すること
がありますが、ご了承ください。
 および   はソニー株式会社の商標です。
This instruction manual explains how to use
lenses. Precautions common to all lenses such
as notes on use are found in the separate
“Precautions before using”. Be sure to read both
documents before using your lens.
This lens is designed for E-mount cameras. You
cannot use it on A-mount cameras.
The FE 24-105mm F4 G OSS is compatible with the
range of a 35mm format image sensor.
A camera equipped with a 35mm format image
sensor can also be set to shoot at APS-C size.
For details on how to set your camera, refer to its
instruction manual.
For further information on compatibility, visit the
web site of Sony in your area, or consult your dealer
of Sony or local authorized service facility of Sony.
Notes on Use
 Do not leave the lens exposed to the sun or a bright
light source. Internal malfunction of the camera body
and lens, smoke, or a fire may result due to the effect
of light focusing. If circumstances necessitate leaving
the lens in sunlight, be sure to attach the lens caps.
 When shooting against the sun, keep the sun
completely out of the angle of view. Otherwise, solar
rays may be concentrated at a focal point inside
the camera, causing smoke or a fire. Keeping the
sun slightly out of the angle of view may also cause
smoke or a fire.
 When carrying a camera with the lens attached,
always firmly hold both the camera and the lens.
 Do not hold by the part of the lens that protrudes
when zooming.
 This lens is not water-proof, although designed with
dust-proofness and splash-proofness in mind. If using
in the rain etc., keep water drops away from the lens.
Precautions on using a flash
 You cannot use a built-in camera flash with this lens.
Use an external flash (sold separately).
 When using a flash, the lens may partially block the
light of the flash, resulting in a shadow at the bottom
of the picture.
Vignetting
 When using the lens, the corners of the screen
become darker than the center. To reduce this
phenomena (called vignetting), close the aperture by
1 to 2 stops.
Identifying the Parts
1 Lens hood index
2 Focusing ring
3 Zooming ring
4 Focal-length index
5 Lens contacts*
6 Focal-length scale
7 Lens hood
8 Focus hold button
9 Focus mode switch
10 Shake compensation switch
11 Mounting index
12 Lens mount rubber ring
* Do not touch the lens contacts.
Attaching and Detaching the Lens
To attach the lens
(See illustration –.)
1
R
emove the rear and front lens caps and
the camera body cap.
4-695-033-01(1)
SEL24105G
交換レンズ
Interchangeable Lens
Objectif interchangeable
取扱説明書
Operating Instructions
Mode d’emploi
Manual de instrucciones
E-mount
©2017 Sony Corporation
Printed in China
 You can attach/detach the front lens cap in two
ways, (1) and (2). When you attach/detach the lens
cap with the lens hood attached, use method (2).
2Align the white index on the lens barrel
with the white index on the camera
(mounting index), then insert the lens
into the camera mount and rotate it
clockwise until it locks.
 Do not press the lens release button on the
camera when mounting the lens.
 Do not mount the lens at an angle.
To remove the lens
(See illustration –.)
While holding down the lens release
button on the camera, rotate the lens
counterclockwise until it stops, then detach
the lens.
Attaching the Lens Hood
It is recommended that you use a lens hood to
reduce flare and ensure maximum image quality.
Align the red line on the lens hood with the
red line on the lens (lens hood index), then
insert the lens hood into the lens mount and
rotate it clockwise until it clicks into place
and the red dot on the lens hood is aligned
with the red line on the lens.
 When using a built-in camera flash or an external
flash attached to the camera, remove the lens hood to
avoid blocking the flash light.
 When storing, fit the lens hood onto the lens
backwards.
Zooming
Rotate the zooming ring to the desired focal
length.
Focusing
 The focus mode switch of this lens does not function
with some camera models.
For further information on compatibility, visit the web
site of Sony in your area, or consult your dealer of
Sony or local authorized service facility of Sony.
To switch AF (auto focus)/
MF(manual focus)
The focus mode can be switched between AF and
MF on the lens.
For AF photography, both the camera and lens
should be set to AF. For MF photography, either or
both the camera or lens should be set to MF.
To set the focus mode on the lens
Slide the focus mode switch to the
appropriate mode, AF or MF (1).
 Refer to the camera manuals to set the focus mode of
the camera.
 In MF, turn the focusing ring to adjust the focus (2)
while looking through the viewfinder, etc.
To use a camera equipped with an AF/MF
control button
 By pressing the AF/MF control button during AF
operation, you can temporarily switch to MF.
 Pressing the AF/MF control button during MF
operation lets you temporarily switch to AF if the lens
is set to AF and the camera to MF.
Using the Focus Hold Buttons
 The focus hold button of this lens does not function
with some camera models.
For further information on compatibility, visit the web
site of Sony in your area, or consult your dealer of
Sony or local authorized service facility of Sony.
Press the focus hold button in AF to cancel AF.
The focus is fixed and you can release the shutter
on the fixed focus. Release the focus hold button
while pressing the shutter button halfway to start
AF again.
Using the shake compensation
function
Shake compensation switch
 ON: Compensate for camera shake.
 OFF: Does not compensate for camera shake. We
recommend setting the shake compensation
switch to OFF when shooting with a tripod.
Specifications
Product name
(Model name)
FE 24-105mm F4 G OSS
(SEL24105G)
Focal length (mm) 24-105
35mm equivalent
focal length*1(mm) 36-157.5
Lens groups-elements 14-17
Angle of view 1*284°-23°
Angle of view 2*261°-15°
Minimum focus*3(m (feet)) 0.38 (1.25)
Maximum magnification (X) 0.31
Minimum aperture f/22
Filter diameter (mm) 77
Dimensions (maximum
diameter × height)
(approx., mm (in.))
83.4 × 113.3
(3 3/8 × 4 1/2)
Mass (approx., g (oz)) 663 (23.4)
Shake compensation
function Yes
*1This is the equivalent focal length in 35mm format
when mounted on an Interchangeable Lens Digital
Camera equipped with an APS-C sized image sensor.
*2Angle of view 1 is the value for 35mm cameras, and
angle of view 2 is the value for Interchangeable Lens
Digital Cameras equipped with an APS-C sized image
sensor.
*3Minimum focus is the distance from the image
sensor to the subject. The minimum focus is 0.41 m
(1.35 feet) at a middle zoom range (around 70 mm).
FE 24-105mm
F4 G OSS
 Depending on the lens mechanism, the focal length
may change with any change in shooting distance.
The focal lengths given above assume the lens is
focused at infinity.
Included items
(The number in parentheses indicates the number
of pieces.)
Lens (1), Front lens cap (1), Rear lens cap (1),
Lens hood (1), Lens case (1), Set of printed
documentation
Design and specifications are subject to change
without notice.
and are trademarks of Sony Corporation.
Cette notice explique comment se servir des
objectifs. Les précautions communes à tous
les objectifs, par exemple les remarques sur
l’emploi, se trouvent sur la feuille « Précautions
avant toute utilisation ». Veuillez lire les deux
documents avant d’utiliser votre objectif.
Cet objectif est conçu pour les appareils photo
à monture E. Il ne peut pas être utilisé pour les
appareils photo pourvus d’une monture A.
Le FE 24-105mm F4 G OSS est compatible avec la
plage d’un capteur d’image de format 35 mm.
Un appareil photo équipé d’un capteur d’image de
format 35 mm peut être réglé pour la prise de vue
en APS-C.
Pour les détails sur la manière de régler l’appareil
photo, reportez-vous à son mode d’emploi.
Pour plus d’informations sur la compatibilité,
consultez le site de Sony de votre pays, ou
adressez-vous à un revendeur Sony ou à un service
après-vente agréé Sony.
Remarques sur l’emploi
 Ne laissez pas la lentille orientée vers le soleil ou une
source de lumière intense. Cela risque de provoquer
un problème de fonctionnement interne du boîtier
de l’appareil photo et de l’objectif, de dégager de la
fumée, voire de provoquer un incendie. Si toutefois
vous ne pouvez pas faire autrement, veillez à fixer les
capuchons sur l’objectif.
 Lors d’une prise de vue en direction du soleil, veillez
à ce que le soleil ne soit pas dans l’angle de vue.
Dans le cas contraire, les rayons solaires peuvent être
concentrés vers le point focal dans l’appareil photo,
et provoquer un incendie ou dégager de la fumée.
Vous pouvez provoquer un incendie ou dégager de la
fumée même si le soleil est légèrement en dehors de
l’angle de vue.
 Lorsque vous portez un appareil photo avec l’objectif
dessus, tenez toujours fermement l’appareil photo et
l’objectif.
 Ne tenez pas l’appareil photo par la partie de l’objectif
qui ressort lors d’un zoom.
 Cet objectif n’est pas étanche à l’eau bien qu’il
soit conçu pour résister à la poussière et aux
éclaboussures. Si vous l’utilisez sous la pluie, etc.
veillez à ce que de l’eau ne tombe pas dessus.
Précautions concernant l’emploi d’un flash
 Vous ne pouvez pas utiliser le flash de votre appareil
photo avec cet objectif. Utilisez un flash externe
(vendu séparément).
 Lors de l’utilisation d’un flash, l’objectif peut bloquer
partiellement la lumière du flash et produire une
ombre au bas de l’image.
Vignetage
 Lorsque l’objectif est utilisé, les coins de l’écran
deviennent plus sombres que le centre. Pour réduire
ce phénomène (appelé vignetage), fermez l’ouverture
de 1 ou 2 crans.
Identification des éléments
1 Repère de pare-soleil
2 Bague de mise au point
3 Bague de zoom
4 Repère de focale
5 Contacts d’objectif*
6 Échelle de focale
7 Pare-soleil
8 Bouton de maintien de la mise au point
9 Commutateur de mode de mise au point
10 Commutateur antibougé
11 Repère de montage
12 Bague en caoutchouc de montage de l’objectif
* Ne touchez pas les contacts d’objectif.
Pose et dépose de l’objectif
Pour poser l’objectif
(Voir l’illustration –.)
1Déposez les capuchons d’objectif avant
et arrière et le capuchon de l’appareil
photo.
 Vous pouvez poser et déposer le capuchon
d’objectif avant de deux façons, (1) et (2). Si vous
posez ou déposez le capuchon d'objectif avec le
pare-soleil, utilisez la méthode (2).
2Alignez le repère blanc du barillet
d’objectif sur le repère blanc de l’appareil
photo (repère de montage), puis posez
l’objectif sur la monture de l’appareil
photo et tournez-le dans le sens horaire
de sorte qu’il s’encliquette.
 N’appuyez pas sur le bouton de libération de
l’objectif sur l’appareil photo lorsque vous posez
l’objectif.
 Ne posez pas l’objectif de biais.
Pour déposer l’objectif
(Voir l’illustration –.)
Tout en appuyant sur le bouton de libération
de l’objectif sur l’appareil photo, tournez
l’objectif dans le sens antihoraire jusqu’à
l’arrêt, puis déposez l’objectif.
(Suite à la page arrière)


–1
(1) (2)

–2



(1)
(2)

Fixation du pare-soleil
Il est conseillé d'utiliser un pare-soleil pour réduire
la lumière parasite et obtenir la meilleure image
possible.
Alignez la ligne rouge du pare-soleil sur la
ligne rouge de l'objectif (repère de pare-
soleil), puis insérez le pare-soleil sur la
monture d'objectif et tournez-le dans le sens
des aiguilles d'une montre jusqu'à ce qu'il
s'encliquette et le point rouge du pare-soleil
s'aligne sur la ligne rouge de l'objectif.
 Lorsque vous utilisez le flash intégré d’un appareil
photo ou un flash externe fixé à l'appareil photo,
retirez le pare-soleil pour éviter de bloquer la lumière
du flash.
 Pour ranger le pare-soleil, insérez-le à l'arrière de
l'objectif.
Zoom
Tournez la bague de zoom selon la focale
souhaitée.
Mise au point
 Le mode de mise au point de cet objectif ne fonctionne
pas sur certains modèles d’appareils photo.
Pour plus d’informations sur la compatibilité,
consultez le site de Sony de votre pays, ou adressez-
vous à un revendeur Sony ou à un service après-vente
agréé Sony.
Pour commuter entre AF (mise au
point automatique) et MF (mise au
point manuelle)
Il est possible de régler le mode de mise au point
sur AF ou MF sur l’objectif.
Pour la photographie en mode AF, l’appareil photo
et l’objectif doivent être tous les deux réglés sur AF.
Pour la photographie en mode MF, l’appareil photo
ou l’objectif, ou bien les deux, doivent être réglés
sur MF.
Pour régler le mode de mise au point sur
l’objectif
Réglez le commutateur de mode de mise au
point sur le mode adapté, AF ou MF (1).
 Reportez-vous aux manuels de l’appareil photo pour
régler le mode de mise au point sur l’appareil photo.
 En mode MF, tournez la bague de mise au point pour
faire la mise au point (2) tout en regardant dans le
viseur, etc.
Pour utiliser un appareil photo pourvu
d’une touche de commande AF/MF
 En appuyant sur la touche de commande AF/MF en
mode AF, vous pouvez provisoirement passer en
mode MF.
 En appuyant sur la touche de commande AF/MF
en mode MF, vous pouvez provisoirement passer
en mode AF si l’appareil photo est réglé sur MF et
l’objectif sur AF.
Utilisation des boutons de
maintien de la mise au point
 Le bouton de maintien de la mise au point de cet
objectif ne fonctionne pas sur certains modèles
d’appareils photo.
Pour plus d’informations sur la compatibilité,
consultez le site de Sony de votre pays, ou adressez-
vous à un revendeur Sony ou à un service après-vente
agréé Sony.
Appuyez sur le bouton de maintien de la mise au
point en mode AF pour annuler AF. La mise au point
est fixée et vous pouvez déclencher avec cette mise
au point. Appuyez sur le bouton de maintien de la
mise au point tout en appuyant sur le déclencheur
à mi-course pour recommencer la mise au point
automatique.
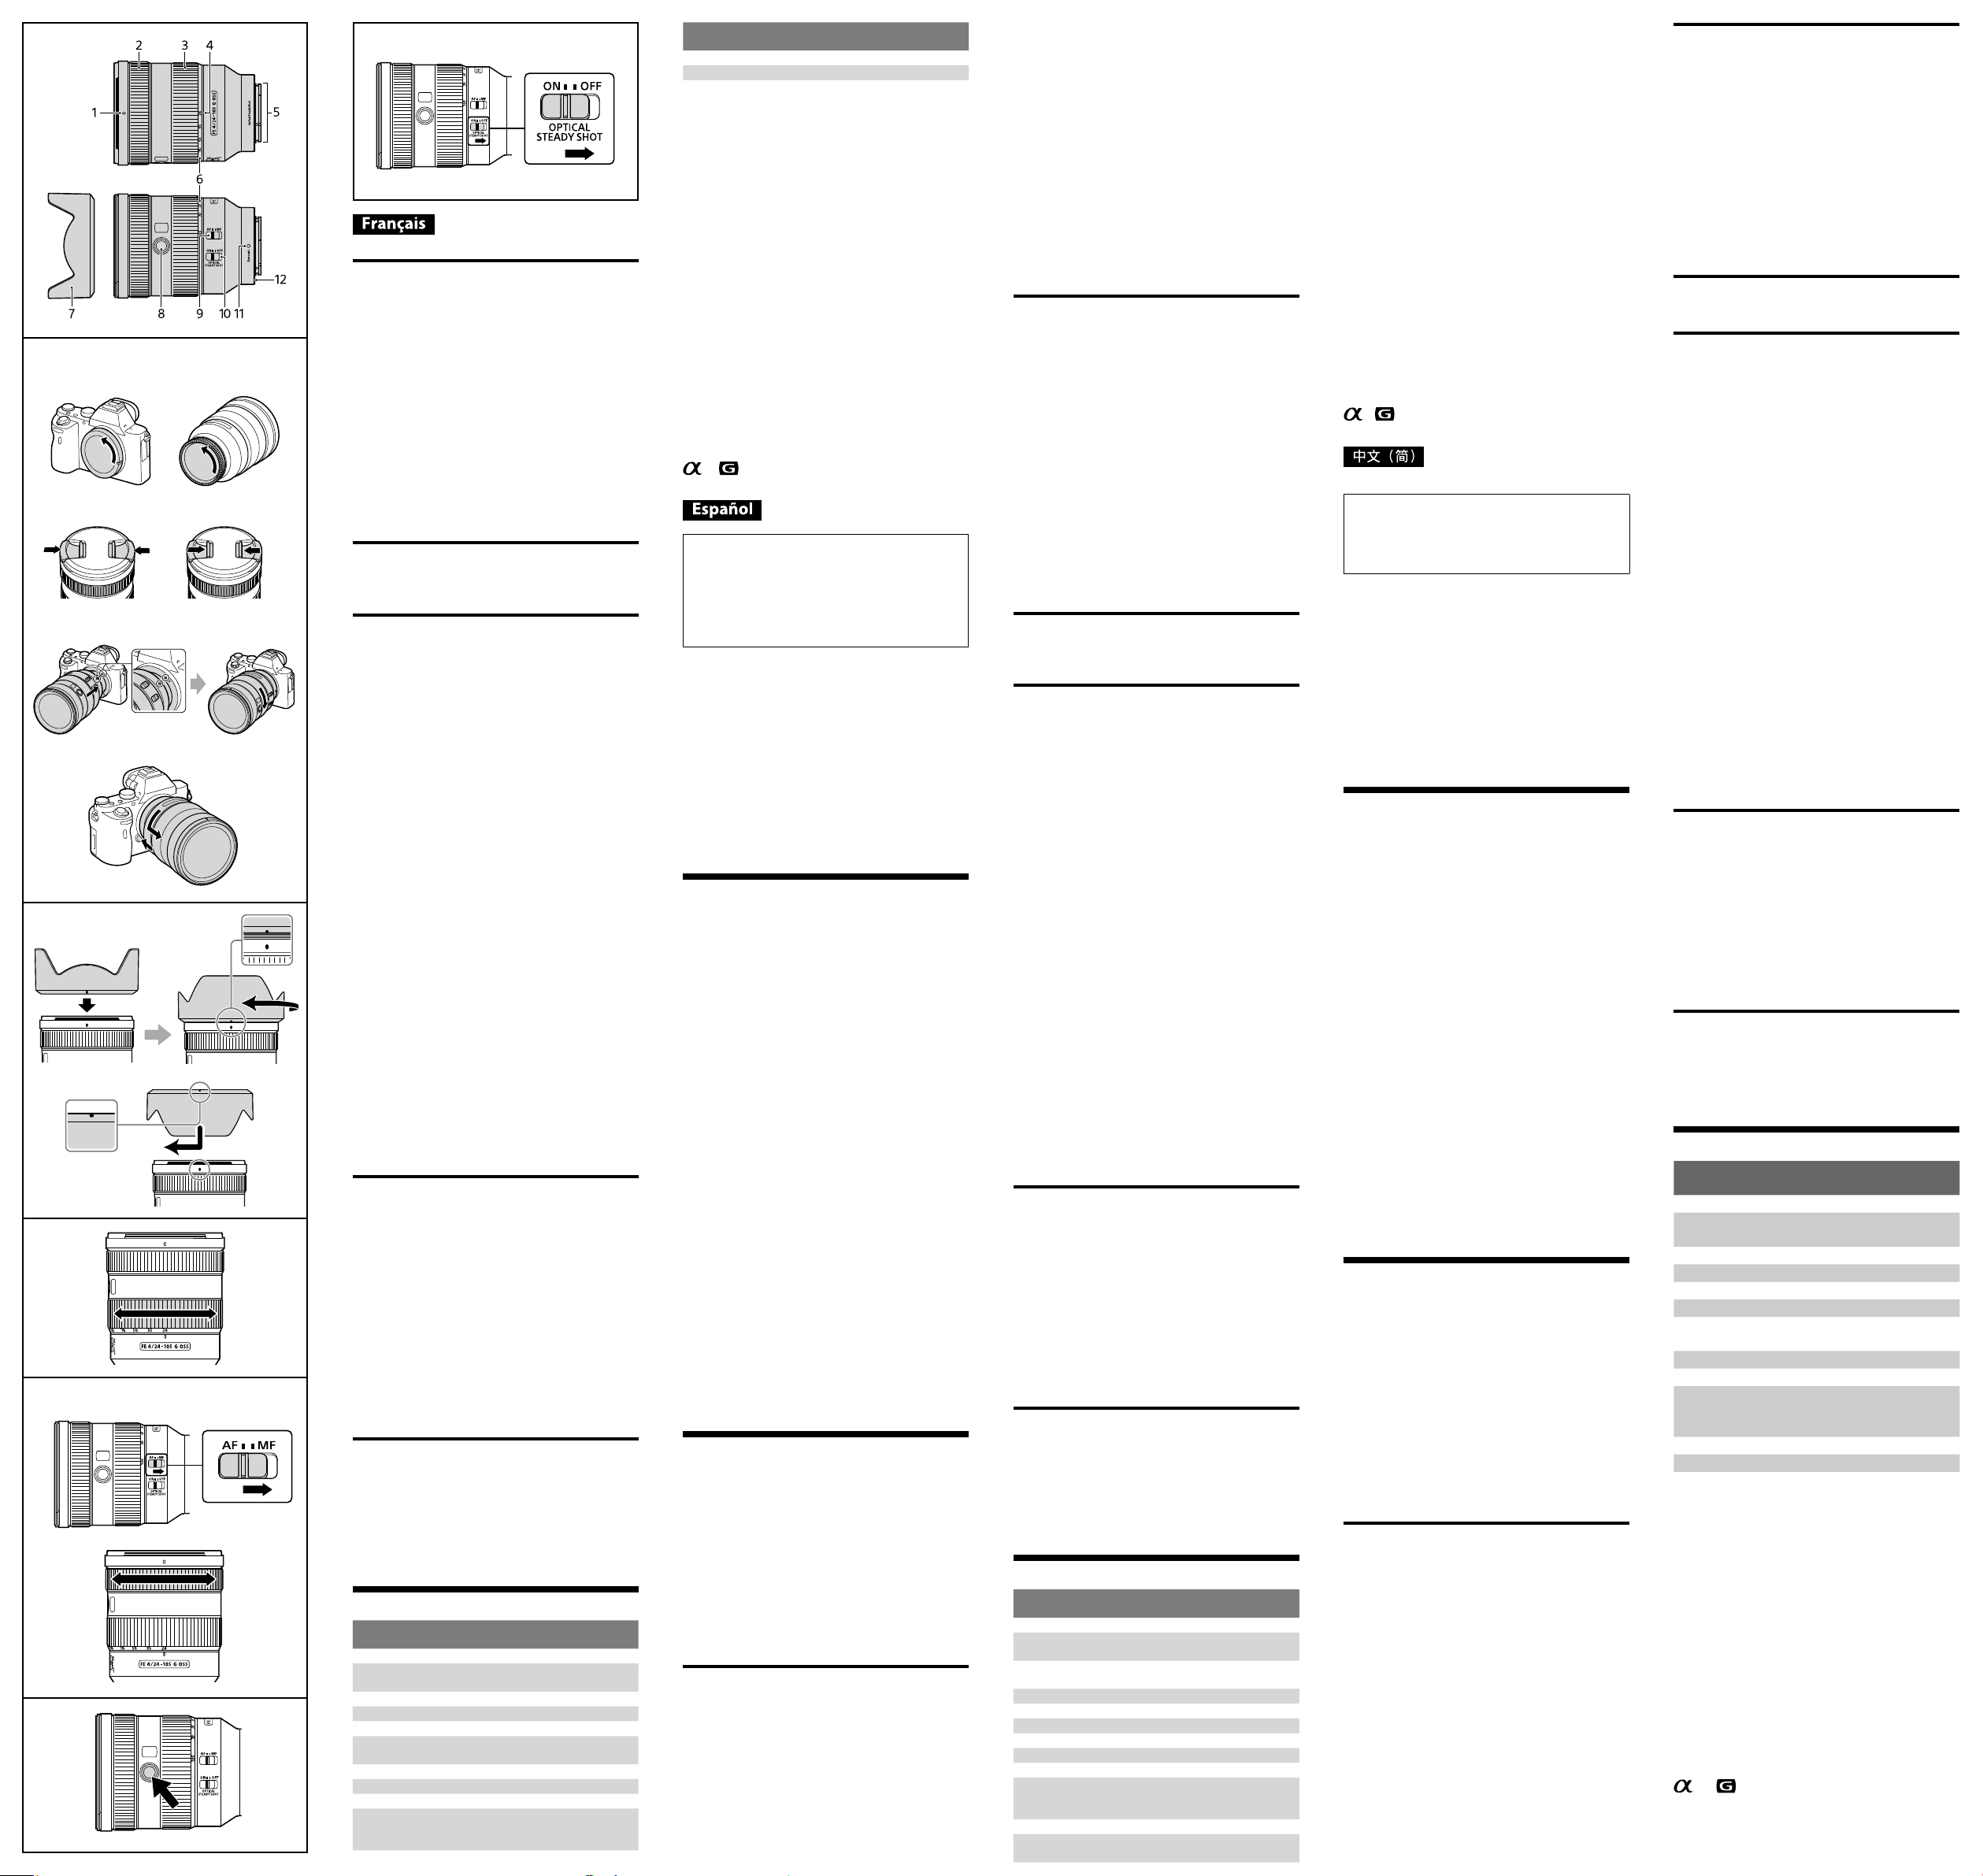
Utilisation de la fonction
antibougé
Commutateur antibougé
 ON : compense les tremblements de l’appareil photo.
 OFF : ne compense pas les tremblements de
l’appareil photo. Nous conseillons de régler le
commutateur antibougé sur OFF lors de la prise
de vue sur un trépied.
Spécifications
Nom de produit
(Nom de modèle)
FE 24-105mm F4 G OSS
(SEL24105G)
Longueur focale (mm) 24-105
Longueur focale équivalente à
35 mm*1(mm) 36-157,5
Éléments-groupes de lentilles 14-17
Angle de champ 1*284°-23°
Angle de champ 2*261°-15°
Mise au point minimale*3
(m (pieds)) 0,38 (1,25)
Grossissement maximal (X) 0,31
Ouverture minimale f/22
Diamètre d’objectif (mm) 77
Dimensions (diamètre
maximal × hauteur)
(environ, mm (po.))
83,4 × 113,3
(3 3/8 × 4 1/2)
Nom de produit
(Nom de modèle)
FE 24-105mm F4 G OSS
(SEL24105G)
Poids (environ, g (oz)) 663 (23,4)
Fonction Antibougé Oui
*1Longueur focale équivalente en format 35 mm
lorsque installé sur un appareil photo à objectif
interchangeable avec capteur d’image de taille
APS-C.
*2L’angle de champ 1 est la valeur correspondant aux
appareils photo 35 mm et l’angle de champ 2 est la
valeur corrspondant aux appareils photo à objectif
interchangeable équipés d’un capteur d’image
APS-C.
*3La mise au point minimale est la distance du capteur
d’image au sujet. La mise au point minimale est de
0,41 m (1,35 pieds) à une plage de zoom moyenne
(environ 70 mm).
 Selon le mécanisme de l’objectif, la focale peut
changer lorsque la distance de prise de vue change.
Les focales indiquées ci-dessus présupposent que
l’objectif est réglé sur l’infini.
Articles inclus
(Le chiffre entre parenthèses indique le nombre
d’unités.)
Objectif (1), Capuchon d’objectif avant (1),
Capuchon d’objectif arrière (1), Pare-soleil (1),
Boîtier d’objectif (1), Jeu de documents imprimés
La conception et les spécifications peuvent être
modifiées sans préavis.
et sont des marques commerciales de Sony
Corporation.
En este manual se explica cómo utilizar
objetivos. Las precauciones comunes a todos
los objetivos, como notas sobre la utilización,
se encuentran en las “Precauciones previas a
la utilización del producto” suministradas por
separado. Cerciórese de leer ambos documentos
antes de utilizar su objetivo.
Este objetivo está diseñado para cámaras con
montura E. No podrá utilizarse con cámaras con
montura A.
El FE 24-105mm F4 G OSS es compatible con la
gama de un sensor de imágenes de formato de
35 mm Una cámara equipada con un sensor de
imágenes de formato de 35 mm puede establecerse
para fotografiar con tamaño APS-C.
Con respecto a los detalles sobre cómo configurar
su cámara, consulte su manual de instrucciones.
Para más información sobre compatibilidad, visite
el sitio Web de Sony de su área, o consulte a su
proveedor Sony o a un centro de servicio local
autorizado por Sony.
Notas sobre la utilización
 No deje el objetivo expuesto al sol o a fuentes de
luz intensas. Es posible que se produzcan fallos de
funcionamiento interno del cuerpo de la cámara y del
objetivo, humo, o un incendio como efecto de la luz
directa. Si las circunstancias exigen dejar el objetivo
expuesto a la luz solar, asegúrese de colocar las tapas
del objetivo.
 Cuando fotografíe contra el sol, mantenga el sol
completamente fuera del ángulo de visión. De lo
contrario, los rayos solares podrían concentrarse en
un punto en el interior de la cámara, causando humo
o un incendio. Mantener el sol ligeramente fuera del
ángulo de visión también puede causar humo o un
incendio.
 Cuando transporte una cámara con el objetivo fijado,
sujete siempre firmemente tanto la cámara como el
objetivo.
 No sujete por la parte del objetivo que sobresale
cuando se utiliza el zoom.
 Este objetivo no es impermeable, aunque se ha
diseñado teniendo en cuenta la resistencia al polvo
y a las salpicaduras. Si se utiliza bajo la lluvia, etc.,
mantenga las gotas de agua alejadas del objetivo.
Precauciones sobre la utilización de un
flash
 Este objetivo no podrá utilizarse con un flash
incorporado en la cámara. Utilice un flash externo
(vendido aparte).
 Cuando utilice un flash, el objetivo puede bloquear
parcialmente la luz del flash, lo que resultará en una
sombra en la parte inferior de la fotografía.
Viñeteado
 Si utiliza el objetivo, las esquinas de la pantalla se
vuelven más oscuras que el centro. Para reducir este
fenómeno (llamado viñeteado), cierre la apertura de
1 a 2 puntos.
Identificación de las partes
1 Índice del parasol de objetivo
2 Anillo de enfoque
3 Anillo de zoom
4 Índice de distancia focal
5 Contactos del objetivo*
6 Escala de distancia focal
7 Parasol de objetivo
8 Botón mantener-enfoque
9 Interruptor del modo de enfoque
10 Interruptor de compensación de sacudidas
11 Índice de montaje
12 Anillo de caucho de montaje del objetivo
* No toque los contactos del objetivo.
Colocación y extracción del
objetivo
Para colocar el objetivo
(Consulte la ilustración –.)
1Extraiga las tapas posterior y frontal
del objetivo y la tapa del cuerpo de la
cámara.
 Usted podrá colocar/extraer la tapa delantera de
objetivo de dos formas, (1) y (2). Cuando coloque/
extraiga la tapa del objetivo con el parasol de
objetivo fijado, utilice el método (2).
2Alinee el índice blanco del barril del
objetivo con el índice blanco de la
cámara (índice de montaje), y después
inserte el objetivo en la montura de la
cámara y gírelo hacia la derecha hasta
que se bloquee.
 No presione el botón de liberación del objetivo de
la cámara cuando monte el objetivo.
 No monte el objetivo de forma inclinada.
Para extraer el objetivo
(Consulte la ilustración –.)
Manteniendo presionado el botón de
liberación del objetivo de la cámara, gire
el objetivo hacia la izquierda hasta que se
pare, y después extraiga el objetivo.
Colocación del parasol de
objetivo
Es recomendable utilizar un parasol de objetivo para
reducir los reflejos y garantizar la máxima calidad
de la imagen.
Alinee la línea roja del parasol de objetivo
con la línea roja del objetivo (índice del
parasol de objetivo), después inserte el
parasol de objetivo en la montura del
objetivo, y gírelo hacia la derecha hasta que
chasquee en su lugar y el punto rojo del
parasol de objetivo quede alineado con la
línea roja del objetivo.
 Cuando utilice un flash incorporado en la cámara o
un flash externo instalado en la cámara, extraiga el
parasol de objetivo para evitar que se bloquee la luz
del flash.
 Cuando guarde la cámara, fije el parasol de objetivo
hacia atrás.
Utilización del zoom
Gire el anillo de zoom hasta la distancia focal
que desee.
Enfoque
 El interruptor de modo de enfoque de este objetivo
no funcionará con ciertos modelos de cámaras.
Para más información sobre compatibilidad, visite
el sitio Web de Sony de su área, o consulte a su
proveedor Sony o a un centro de servicio local
autorizado por Sony.
Para cambiar AF (enfoque
automático)/MF (enfoque manual)
El enfoque puede cambiarse entre AF y MF en el
objetivo.
Para fotografiar con AF, tanto la cámara como el
objetivo deberán ajustarse a AF. Para fotografiar
con MF, tanto la cámara como el objetivo deberán
ajustarse a MF.
Para ajustar el modo de enfoque en el
objetivo
Deslice el interruptor del modo de enfoque
hasta el modo apropiado, AF o MF (1).
 Para ajustar el modo de enfoque de la cámara,
consulte los manuales de la cámara.
 En MF, gire el anillo de enfoque mientras observe a
través del visor, etc., para ajustar el enfoque (2).
Para utilizar una cámara equipada con
botón de control AF/MF
 Pulsando el botón de control AF/MF durante la
operación con AF, podrá cambiar temporalmente a
MF.
 Pulsando el botón de control AF/MF durante la
operación con MF, podrá cambiar temporalmente a
AF si el objetivo está ajustado a AF y la cámara a MF.
Utilización de los botones
mantener-enfoque
 El botón mantener-enfoque de este objetivo no
funcionará con ciertos modelos de cámaras.
Para más información sobre compatibilidad, visite
el sitio Web de Sony de su área, o consulte a su
proveedor Sony o a un centro de servicio local
autorizado por Sony.
Pulse el botón mantener-enfoque en AF para
cancelar AF. El enfoque se fijará y podrá accionar
el obturador en el enfoque fijo. Suelte el botón
mantener-enfoque mientras pulse hasta la mitad el
botón del obturador para iniciar de nuevo AF.
Utilización de la función de
compensación de sacudidas
Interruptor de compensación de sacudidas
 ON: Compensa las sacudidas de la cámara
 OFF: No compensa las sacudidas de la cámara.
Recomendamos poner el interruptor de
compensación de sacudidas en OFF cuando
realice tomas con un trípode.
Especificaciones
Nombre del producto
(Nombre del modelo)
FE 24-105mm F4 G OSS
(SEL24105G)
Distancia focal (mm) 24-105
Distancia focal equivalente
a 35 mm*1(mm) 36-157,5
Grupos y elementos del
objetivo 14-17
Ángulo de visión 1*284°-23°
Ángulo de visión 2*261°-15°
Enfoque mínimo*3(m) 0,38
Ampliación máxima (X) 0,31
Apertura mínima f/22
Diámetro del filtro (mm) 77
Dimensiones (diámetro
máximo × altura)
(Aprox., mm)
83,4 × 113,3
Peso (Aprox., g) 663
Función de compensación
de sacudidas
Sí
*1Esta es la distancia focal equivalente al formato de
35mm cuando se monta en una cámara digital de
lentes intercambiables equipada con un sensor de
imágenes de tamaño APS-C.
*2El ángulo de visión 1 es el valor para cámaras de
formato de 35 mm y el ángulo de visión 2 es el valor
para cámaras digitales de lentes intercambiables
equipadas con un sensor de imágenes de tamaño
APS-C.
*3El enfoque mínimo es la distancia desde el sensor de
imágenes al motivo. El enfoque mínimo es de 0,41 m
en un rango de zoom medio (alrededor de 70 mm).
 En función del mecanismo del objetivo, es posible
que la distancia focal varíe si la distancia de toma
de imagen también lo hace. Las distancias focales
indicadas arriba asumen que el objetivo está
enfocado al infinito.
Elementos incluidos
(El número entre paréntesis indica el número de
piezas.)
Objetivo (1), Tapa delantera de objetivo (1),
Tapa trasera de objetivo (1), Parasol de objetivo (1),
Funda del objetivo (1), Juego de documentación
impresa
El diseño y las especificaciones están sujetos a
cambios sin previo aviso.
y son marcas comerciales de Sony
Corporation.

保留备用
本说明书介绍镜头的用法。有关所有镜头
的一般注意事项(如使用须知)可以在另
外的“使用前注意事项”中找到。务必在
使用镜头前阅读以上两份文件。
本镜头是专为 E 卡口系统相机而设计的。 不
能将其用于 A 卡口系统相机。
FE 24-105mm F4 G OSS 与 35mm 规格的
图像传感器系列兼容。
配备 35mm 规格图像传感器的相机可设定为
以 APS-C 尺寸进行拍摄。
有关如何设定相机的详情,请参阅相机的使用
说明书。
有关兼容性的详细信息,请访问所在地区的
Sony 网站,或者咨询您的 Sony 经销商或当
地的 Sony 授权服务机构。
使用须知
请勿将镜头置于阳光或强光下,由于光线聚集
的结果可能会导致相机机身和镜头的内部故
障,或引起冒烟或者火灾。如果在必须将镜头
置于阳光的情况下,请务必盖上镜头盖。
对着阳光方向拍摄时,不要让太阳进入视
角中。否则,阳光可能会在相机的焦点上聚
集,从而引起冒烟或者火灾。即便是在让太
阳略微偏出视角的情况下,仍可能会引起冒
烟或者火灾。
当在装有镜头的情况下携带相机时,请务必
同时握紧相机和镜头。
请勿握住变焦时镜头突出的任何部分。
尽管本镜头采用了防尘和防溅水设计,但不
具备防水性能。在雨中等环境下使用时,应
确保镜头远离水滴。
闪光灯使用注意事项
本镜头不能与内置相机闪光灯一起使用。请
使用外部闪光灯(另售)。
使用闪光灯时,镜头可能会遮住闪光灯的部
分亮光,从而造成图片的底部出现阴影。
晕影
使用镜头时,屏幕的角落要比其中心暗。为
避免这种现象(周边暗角),请将光圈缩小
1 ~ 2 级。
 部件识别
1 镜头遮光罩标记
2 对焦环
3 可变焦距圈
4 焦距标记
5 镜头接点*
6 焦距刻度
7 镜头遮光罩
8 对焦锁定按钮
9 对焦模式开关
10 震动补偿开关
11 安装标记
12 镜头安装橡胶环
*请勿触摸镜头接点。
 安装/拆下镜头
安装镜头(参见插图 –。)
1 拆下前、后镜头盖和相机机身罩。
可以用 (1) 和 (2) 两种方式安装/拆下前
镜头盖。在不取下镜头遮光罩的情况下
安装/拆下镜头盖时,请使用方法 (2)。
2 将镜筒上的白色标记与相机上的白色
标记(安装标记)对准,然后将镜头
插入相机安装部位并顺时针旋转,直
至镜头锁紧。
请勿在安装镜头时按相机上的镜头释放
按钮。
请勿倾斜安装镜头。
拆下镜头 (参见插图 –。)
按住相机上的镜头释放按钮,逆时针转动
镜头直至其停止,然后拆下镜头。
 安装镜头遮光罩
建议使用镜头遮光罩以减少反光,从而确保最
佳画质。
将镜头遮光罩上的红线与镜头上的红线
(镜头遮光罩标记)对准,然后将镜头遮
光罩插入镜头安装部位并顺时针旋转,直
至其咔哒一声就位,且镜头遮光罩上的红
点与镜头上的红线对准。
使用内置相机闪光灯或使用相机上安装的外
部闪光灯时,请取下镜头遮光罩,以免遮住
闪光灯的亮光。
存放时,请将镜头遮光罩倒过来放在镜头
上。
 变焦
将可变焦距圈转至所需焦距。
 对焦
对于某些型号的相机而言,本镜头的对焦模
式开关无效。
有关兼容性的详细信息,请访问所在地区的
Sony 网站,或者咨询您的 Sony 经销商或当
地的 Sony 授权服务机构。
切换 AF(自动对焦)/MF(手动对焦)
在镜头上,可以在 AF 和 MF 之间切换对焦
模式。
进行 AF 拍摄时,相机和镜头均应设定为
AF。 进行 MF 拍摄时,相机或镜头之一或者
相机和镜头两者应设定为 MF。
在镜头上设定对焦模式
将对焦模式开关滑到相应模式:AF 或
MF (1)。
有关相机的对焦模式设定,请参阅相机的说
明书。
在 MF 模式下,在通过取景器等观察的同
时,转动对焦环调整对焦 (2)。
使用具有 AF/MF 控制按钮的相机
在 AF 操作过程中按 AF/MF 控制按钮,可
临时切换为 MF。
如果镜头设定为 AF 而相机设定为 MF,则
在 MF 操作过程中按 AF/MF 控制按钮可临
时切换为 AF。
 使用对焦锁定按钮
对于某些型号的相机而言,本镜头的对焦锁
定按钮无效。
有关兼容性的详细信息,请访问所在地区的
Sony 网站,或者咨询您的 Sony 经销商或当
地的 Sony 授权服务机构。
在 AF 模式下按对焦锁定按钮可取消 AF。 此
时将锁定对焦,而您可以在对焦锁定状态下释
放快门。 在半按快门按钮的同时释放对焦锁
定按钮将重新启动 AF。
 使用震动补偿功能
震动补偿开关
ON: 补偿相机震动。
OFF: 不补偿相机震动。使用三脚架拍摄
时,建议将震动补偿开关设为 OFF。
规格
产品名称
(型号名称)
FE 24-105mm F4 G OSS
(SEL24105G)
焦距 (mm) 24-105
相当于 35mm
规格焦距*1 (mm) 36-157.5
镜头组-片 14-17
视角 1*284°-23°
视角 2*261°-15°
最小对焦*3 (m) 0.38
最大放大倍数
(倍) 0.31
最小光圈 f/22
滤光镜直径 (mm) 77
尺寸
(最大直径×长)
(约 mm)
83.4 × 113.3
质量(约 g) 663
震动补偿功能 有
*1 此为当镜头安装在配备 APS-C 尺寸图像传
感器的可更换镜头数码相机上时,相当于
35mm 规格的焦距。
*2 视角 1 的值针对 35mm 相机,而视角 2 的
值针对配备 APS-C 尺寸图像传感器的可更
换镜头数码相机。
*3 最小对焦是从图像传感器至物体的距离。最
小对焦为 0.41 m,对应于变焦范围(约 70
mm)的中间位置。
视镜头结构而异,焦距可能会随拍摄距离的
改变而变化。假设镜头对焦在无限远处。
所含物品
(括号中的数字代表件数。)
镜头 (1)、镜头盖 (1)、镜头后盖 (1)、
镜头遮光罩 (1)、镜头袋 (1)、成套印刷文件
设计或规格如有变动,恕不另行通知。
和 是 Sony Corporation 的商标。
(Suite de la page précédente)

Other Sony Camera Lens manuals

Sony SAL70200G - 70-200mm f/2.8 SSM Lens User manual

Sony

Sony SAL70200G - 70-200mm f/2.8 SSM Lens User manual

Sony VCL-HGE08B User manual

Sony

Sony VCL-HGE08B User manual

Sony VCL-M3367 User manual

Sony

Sony VCL-M3367 User manual

Sony VCL-07FEB User manual

Sony

Sony VCL-07FEB User manual

Sony VCL-E07A User manual

Sony

Sony VCL-E07A User manual

Sony LKRL-Z511 User manual

Sony

Sony LKRL-Z511 User manual

Sony VCL-HGD0758 User manual

Sony

Sony VCL-HGD0758 User manual

Sony SAL-1855/BQ User manual

Sony

Sony SAL-1855/BQ User manual

Sony VCL-ES20 User manual

Sony

Sony VCL-ES20 User manual

Sony SAL16105 - Zoom Lens - 16 mm User manual

Sony

Sony SAL16105 - Zoom Lens - 16 mm User manual

Sony SAL-18135 User manual

Sony

Sony SAL-18135 User manual

Sony Alpha 7R IV User manual

Sony

Sony Alpha 7R IV User manual

Sony VCL-HG0737 User manual

Sony

Sony VCL-HG0737 User manual

Sony Alpha SAL55300 User manual

Sony

Sony Alpha SAL55300 User manual

Sony VCL-HG0737Y User manual

Sony

Sony VCL-HG0737Y User manual

Sony SEL-30M35 User manual

Sony

Sony SEL-30M35 User manual

Sony VF-25CPKS User manual

Sony

Sony VF-25CPKS User manual

Sony SAL300F28G2 User manual

Sony

Sony SAL300F28G2 User manual

Sony SAL20F28 - Wide-angle Lens - 20 mm User manual

Sony

Sony SAL20F28 - Wide-angle Lens - 20 mm User manual

Sony SEL50F18F User manual

Sony

Sony SEL50F18F User manual

Sony A6000 User manual

Sony

Sony A6000 User manual

Sony FE 28-60mm F4-5.6 User manual

Sony

Sony FE 28-60mm F4-5.6 User manual

Sony SAL14TC - 1.4x Teleconverter Lens User manual

Sony

Sony SAL14TC - 1.4x Teleconverter Lens User manual

Sony Cyber-shot SLR User manual

Sony

Sony Cyber-shot SLR User manual

Popular Camera Lens manuals by other brands

Nikon 24mm F/1.4G ED AF-S Nikkor Specifications

Nikon

Nikon 24mm F/1.4G ED AF-S Nikkor Specifications

Nikon AF-S NIKKOR 300mm f/4E PF ED VR user manual

Nikon

Nikon AF-S NIKKOR 300mm f/4E PF ED VR user manual

Samsung L18200 user manual

Samsung

Samsung L18200 user manual

Honeywell HLD28V8F95L quick start guide

Honeywell

Honeywell HLD28V8F95L quick start guide

Pentax smc Pentax-FA operating manual

Pentax

Pentax smc Pentax-FA operating manual

Panasonic AK-LZ20M85G operating instructions

Panasonic

Panasonic AK-LZ20M85G operating instructions

Olympus 35mm F3.5 Macro instructions

Olympus

Olympus 35mm F3.5 Macro instructions

Canon 9519B008AA instructions

Canon

Canon 9519B008AA instructions

Hasselblad Distagon CFi 3.5/30 Specification sheet

Hasselblad

Hasselblad Distagon CFi 3.5/30 Specification sheet

Samsung 18-55 mm F3.5-5.6 OIS III user manual

Samsung

Samsung 18-55 mm F3.5-5.6 OIS III user manual

Tamron 360EM Specification sheet

Tamron

Tamron 360EM Specification sheet

Ricoh S10 24-72MM F2.5-4.4VC instruction manual

Ricoh

Ricoh S10 24-72MM F2.5-4.4VC instruction manual

Vicon V6-60HS-1 Series Installation and operation manual

Vicon

Vicon V6-60HS-1 Series Installation and operation manual

Canon EF-S 60mm f/2.8 Macro USM Instruction

Canon

Canon EF-S 60mm f/2.8 Macro USM Instruction

Tamron SP 70-210mm F/3.5 19AH owner's manual

Tamron

Tamron SP 70-210mm F/3.5 19AH owner's manual

OM SYSTEM M. ZUIKO DIGITAL ED 90mm F3.5 Macro IS PRO instructions

OM SYSTEM

OM SYSTEM M. ZUIKO DIGITAL ED 90mm F3.5 Macro IS PRO instructions

Canon EF 8-15mm f/4L Fisheye USM Instruction

Canon

Canon EF 8-15mm f/4L Fisheye USM Instruction

Zeiss Camera Lens Instructions for use

Zeiss

Zeiss Camera Lens Instructions for use

manuals.online logo
manuals.online logoBrands
  • About & Mission
  • Contact us
  • Privacy Policy
  • Terms and Conditions

Copyright 2025 Manuals.Online. All Rights Reserved.