manuals.online logo
Brands
  1. Home
  2. •
  3. Brands
  4. •
  5. Sony
  6. •
  7. Car Speakers
  8. •
  9. Sony XS-GT1325A User manual

Sony XS-GT1325A User manual

This manual suits for next models

3

Other Sony Car Speakers manuals

Sony XS-V6841H User manual

Sony

Sony XS-V6841H User manual

Sony XS-R6943 User manual

Sony

Sony XS-R6943 User manual

Sony XS-MP1611 User manual

Sony

Sony XS-MP1611 User manual

Sony XS-GS6920 User manual

Sony

Sony XS-GS6920 User manual

Sony XS-GF1322X Product guide

Sony

Sony XS-GF1322X Product guide

Sony XS-F693G User manual

Sony

Sony XS-F693G User manual

Sony XS-V1332 Marketing User manual

Sony

Sony XS-V1332 Marketing User manual

Sony XS-GTX1642 Product guide

Sony

Sony XS-GTX1642 Product guide

Sony XS-GTX1622S User manual

Sony

Sony XS-GTX1622S User manual

Sony XS-S160CX - 6.5" Sq Speaker User manual

Sony

Sony XS-S160CX - 6.5" Sq Speaker User manual

Sony XS-L1090P5 Marketing User manual

Sony

Sony XS-L1090P5 Marketing User manual

Sony XS-D170SI - 6.5" Component User manual

Sony

Sony XS-D170SI - 6.5" Component User manual

Sony XS-GT1326A Marketing User manual

Sony

Sony XS-GT1326A Marketing User manual

Sony XS-F1721 User manual

Sony

Sony XS-F1721 User manual

Sony XS-V6930A Instructions  (primary manual) User manual

Sony

Sony XS-V6930A Instructions (primary manual) User manual

Sony XS-V1340H Marketing User manual

Sony

Sony XS-V1340H Marketing User manual

Sony XS-V1632 User manual

Sony

Sony XS-V1632 User manual

Sony XS-W5721 User manual

Sony

Sony XS-W5721 User manual

Sony XS-V160HP User manual

Sony

Sony XS-V160HP User manual

Sony XS-HF137 - Separate 2 Way Speaker Use and maintenance manual

Sony

Sony XS-HF137 - Separate 2 Way Speaker Use and maintenance manual

Sony XS-162ES User manual

Sony

Sony XS-162ES User manual

Sony CXS-GT5516F Product guide

Sony

Sony CXS-GT5516F Product guide

Sony CXS-GT06HP - Fm/am Compact Disc Player Product guide

Sony

Sony CXS-GT06HP - Fm/am Compact Disc Player Product guide

Sony XS-W1621 Marketing User manual

Sony

Sony XS-W1621 Marketing User manual

Popular Car Speakers manuals by other brands

Audiopipe TXX-APA-12BL user manual

Audiopipe

Audiopipe TXX-APA-12BL user manual

Bazooka RS10A-hp installation manual

Bazooka

Bazooka RS10A-hp installation manual

Hertz MILLE PRO owner's manual

Hertz

Hertz MILLE PRO owner's manual

Blaupunkt GTt 300 OPERATING AND INSTALLATION Manual

Blaupunkt

Blaupunkt GTt 300 OPERATING AND INSTALLATION Manual

Boston Acoustics SX55 Specifications

Boston Acoustics

Boston Acoustics SX55 Specifications

Kenwood KFC-W212 Service manual

Kenwood

Kenwood KFC-W212 Service manual

VR3 Elite VRS653 installation manual

VR3

VR3 Elite VRS653 installation manual

Premier TS-W3001D4 Specifications

Premier

Premier TS-W3001D4 Specifications

Infinity 6530cx installation manual

Infinity

Infinity 6530cx installation manual

Blaupunkt GTx Series manual

Blaupunkt

Blaupunkt GTx Series manual

Focal K2 Power 165 KRX3 Specification sheet

Focal

Focal K2 Power 165 KRX3 Specification sheet

Precision Power PPI4.2 owner's manual

Precision Power

Precision Power PPI4.2 owner's manual

Jensen XS Series instruction sheet

Jensen

Jensen XS Series instruction sheet

AudioBahn AT60 operating instructions

AudioBahn

AudioBahn AT60 operating instructions

Focal BombA 27 V1 user manual

Focal

Focal BombA 27 V1 user manual

Blueant S1 user manual

Blueant

Blueant S1 user manual

Naxa NCS-768 Installation diagram

Naxa

Naxa NCS-768 Installation diagram

Focal Polyglass 130 VRS user manual

Focal

Focal Polyglass 130 VRS user manual

manuals.online logo
manuals.online logoBrands
  • About & Mission
  • Contact us
  • Privacy Policy
  • Terms and Conditions

Copyright 2025 Manuals.Online. All Rights Reserved.

Instructions
Mode d’emploi
Instrucciones
2007 Sony Corporation Printed in Vietnam
XS-GT6935A
XS-GT1625A
XS-GT1325A
3-way Speaker
2-way Speaker
2-896-323-11 (1)
Precautions
•Do not continuously use the speaker system
beyond the peak power handling capacity.
•Keep recorded tapes, watches, and personal
credit cards using magnetic coding away from
the speaker system to protect them from
damage caused by the magnets in the
speakers.
If you cannot find an appropriate mounting
location, consult your car dealer or your
nearest Sony dealer before mounting.
Précautions
•Évitez de soumettre le système de haut-
parleurs à une utilisation continue au-delà de
la capacité de traitement de la puissance de
crête.
•Gardez les bandes enregistrées, les montres et
les cartes de crédit utilisant un code
magnétique à l’écart du système de haut-
parleurs pour éviter tout dommage causé par
les aimants des haut-parleurs.
Si vous ne pouvez pas trouver
d’emplacement adéquat pour installer
l’appareil, consultez votre détaillant Sony le
plus proche.
Precauciones
•Procure no utilizar el sistema de altavoces en
forma continua con una potencia que
sobrepase la potencia admisible.
•Mantenga alejados del sistema de altavoces las
cintas grabadas, relojes o tarjetas de crédito con
codificación magnética para evitar daños que
posiblemente causarían los imanes de los
altavoces.
Si no encuentra un emplazamiento
apropiado para el montaje, consulte al
distribuidor de su automóvil o al distribuidor
de Sony más próximo.
Dimensions
Dimensions
Dimensiones
Unit: mm (in)
Unité : mm (po)
Unidad: mm
Specifications
XS-GT6935A
Speaker Coaxial 3-way:
Woofer 16 ×24 cm
(6 3/8×9 1/2in) cone type
Midrange 6.0 cm (2 3/8in)
cone type
Tweeter 1.1 cm (7/16 in)
dome type
Peak power 300 W
Rated power 60 W
Impedance 4 Ω
Sensitivity 93 dB/W/m
Frequency response 25 – 30,000 Hz
Mass Approx. 1,100 g (2 lb 7 oz)
per speaker
Supplied accessories Parts for installation
XS-GT1625A
Speaker Coaxial 2-way:
Woofer 16 cm
(6 3/8in) cone type
Tweeter 3.5 cm (1 7/16 in)
B.D type
Peak power 190 W
Rated power 40 W
Impedance 4 Ω
Sensitivity 91 dB/W/m
Frequency response 30 – 25,000 Hz
Mass Approx. 640 g (1 lb 7 oz)
per speaker
Supplied accessories Parts for installation
XS-GT1325A
Speaker Coaxial 2-way:
Woofer 13 cm
(5 1/8in) cone type
Tweeter 3.5 cm (1 7/16 in)
B.D type
Peak power 150 W
Rated power 35 W
Impedance 4 Ω
Sensitivity 90 dB/W/m
Frequency response 35 – 25,000 Hz
Mass Approx. 500 g (1 lb 2 oz)
per speaker
Supplied accessories Parts for installation
Design and specifications are subject to change
without notice.
Corrugated cardboard is used for the
packaging cushions.
Especificaciones
XS-GT6935A
Altavoz Coaxial de 3 vías:
Graves 16 ×24 cm, tipo
cónico
Gama media 6,0 cm, tipo
cónico
Agudos 1,1 cm, tipo
cúpula
Corriente máxima 300 W
Corriente nominal 60 W
Impedancia 4 Ω
Sensibilidad 93 dB/W/m
Respuesta de frecuencia 25 – 30 000 Hz
Peso Aprox. 1 100 g por altavoz
Accesorios suministrados
Componentes para
instalación
XS-GT1625A
Altavoz Coaxial de 2 vías:
Graves 16 cm, tipo cónico
Agudos 3,5 cm, tipo B.D
Corriente máxima 190 W
Corriente nominal 40 W
Impedancia 4 Ω
Sensibilidad 91 dB/W/m
Respuesta de frecuencia 30 – 25 000 Hz
Peso Aprox. 640 g por altavoz
Accesorios suministrados
Componentes para
instalación
XS-GT1325A
Altavoz Coaxial de 2 vías:
Graves 13 cm, tipo cónico
Agudos 3,5 cm, tipo B.D
Corriente máxima 150 W
Corriente nominal 35 W
Impedancia 4 Ω
Sensibilidad 90 dB/W/m
Respuesta de frecuencia 35 – 25 000 Hz
Peso Aprox. 500 g por altavoz
Accesorios suministrados
Componentes para
instalación
Diseño y especificaciones sujetos a cambio sin previo
aviso.
Se ha utilizado cartón ondulado como
material de relleno y de protección para
este producto.
Caractéristiques
techniques
XS-GT6935A
Haut-parleur Coaxial à 3 voies :
Woofer de 16 ×24 cm (6 3/8
×9 1/2po) type conique
Médium 6,0 cm (2 3/8po)
type conique
Tweeter de 1,1 cm (7/16 po)
type en dôme
Puissance de crête 300 W
Puissance nominale 60 W
Impédance 4 Ω
Sensibilité 93 dB/W/m
Réponse en fréquence 25 – 30 000 Hz
Poids Environ 1 100 g (2 lb 7 oz)
par haut-parleur
Accessoires fournis Eléments d’installation
XS-GT1625A
Haut-parleur Coaxial à 2 voies :
Woofer de 16 cm (6 3/8po)
type conique
Tweeter de 3,5 cm (1 7/16
po) type B.D
Puissance de crête 190 W
Puissance nominale 40 W
Impédance 4 Ω
Sensibilité 91 dB/W/m
Réponse en fréquence 30 –25 000 Hz
Poids Environ 640 g (1 lb 7 oz)
par haut-parleur
Accessoires fournis Eléments d’installation
XS-GT1325A
Haut-parleur Coaxial à 2 voies :
Woofer de 13 cm (5 1/8po)
type conique
Tweeter de 3,5 cm (1 7/16
po) type B.D
Puissance de crête 150 W
Puissance nominale 35 W
Impédance 4 Ω
Sensibilité 90 dB/W/m
Réponse en fréquence 35 – 25 000 Hz
Poids Environ 500 g (1 lb 2 oz)
par haut-parleur
Accessoires fournis Eléments d’installation
La conception et les spécifications sont sujettes à
modification sans préavis.
La prévention contre les chocs est
assurée par une protection en carton
ondulé.
75 (3)
27
(1 1/8)
8
(11/32)
ø5 (7/32)
163 (6 1/2)5.5 (7/32)45
(1 13/16)
ø114 (4
1
/
2
)
ø70
(2
7
/
8
)
184 (7 1/4)
ø126 (5)
136 (5
3
/
8
)
ø80 (3
1
/
4
)
222 (8
3
/
4
)
4.5 ×7.5
(3/16 ×5/16)
153 (6 1/8)
278 (11)
118 (4 3/4)
200 (7 7/8)
13
(17/32)168 (6 5/8)
ø158 (6
1
/
4
)
32
(1 5/16)
36
(1 7/16)
166 (6
5
/
8
)
XS-GT1325A
XS-GT6935A
XS-GT1625A
150 (6) 44
(1 3/4)
149 (5
7
/
8
)
ø75 (3)
5 (
7
/
32
)
ø130 (5
1
/
8
)237 (9
3
/
8
)
142 (5
5
/
8
)
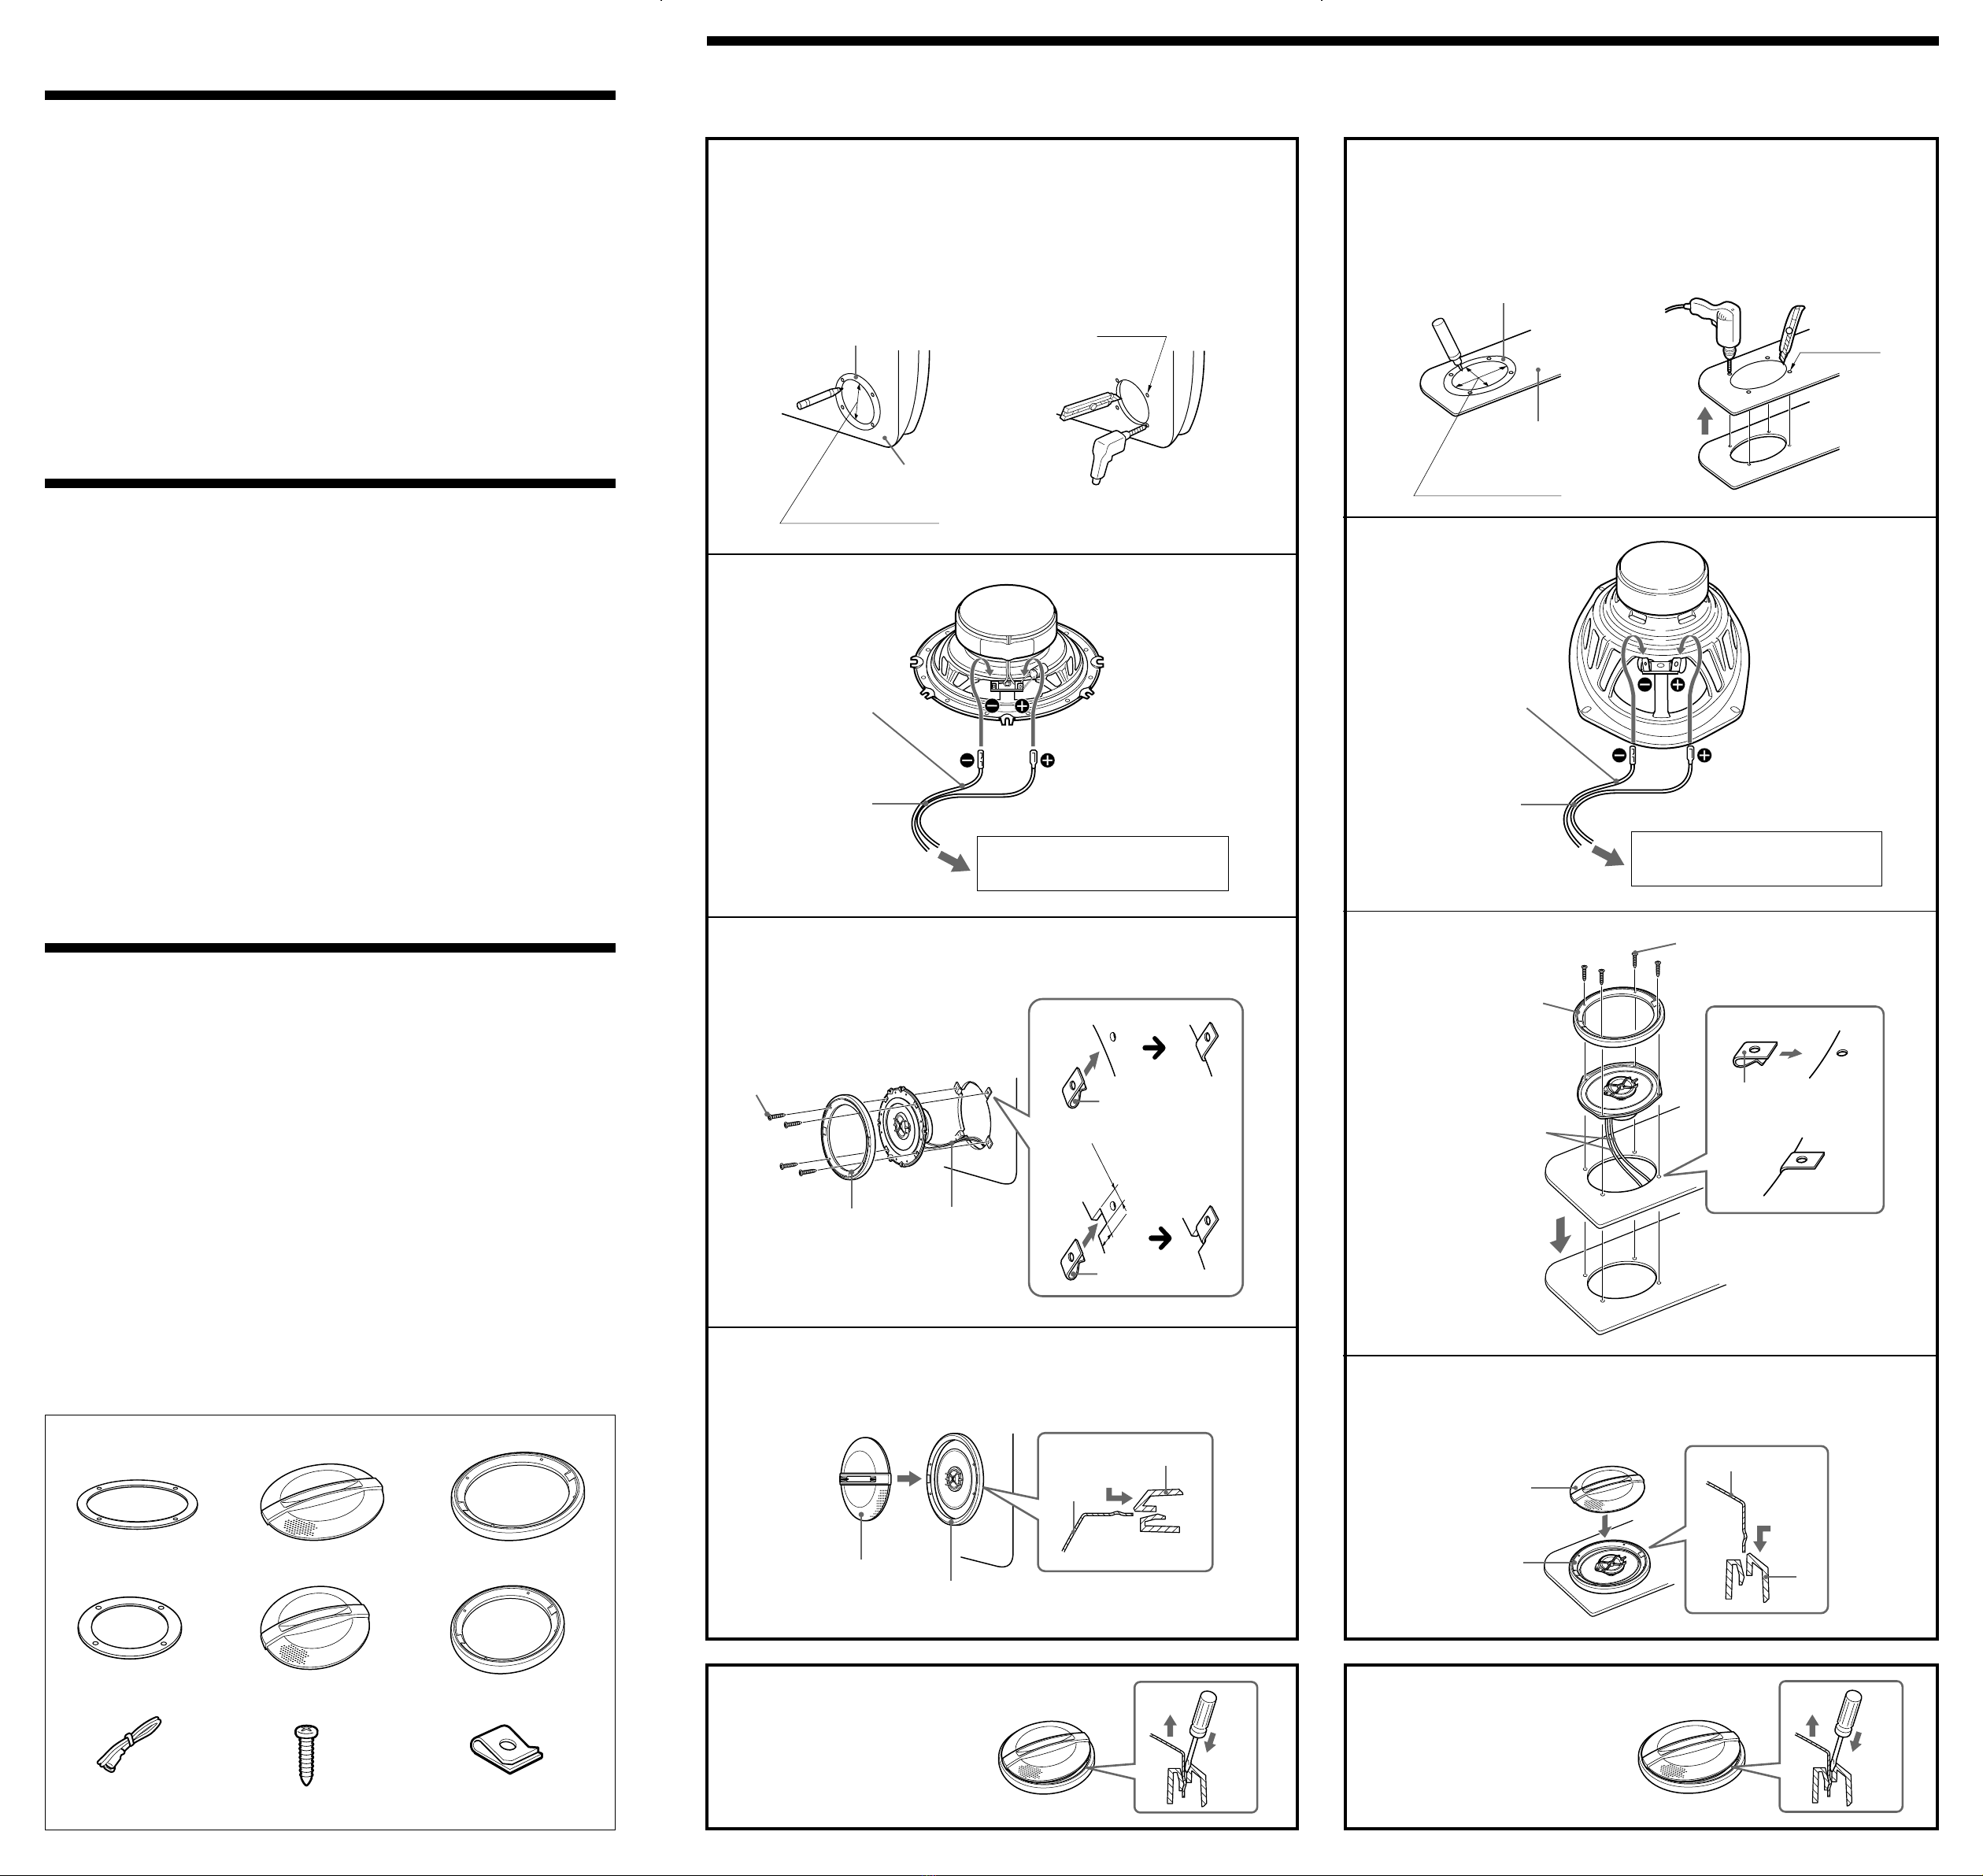
Mounting from the car interior/Montage depuis l’intérieur de l’habitacle/Montaje desde el interior del automóvil
1Mark the 4 bolt holes and make them 3.3 mm*(5/32 in) in diameter.
Marquer les 4 orifices des boulons et percer des trous de 3,3 mm*(5/32 po) de diamètre.
Marque los orificios para los 4 pernos y haga agujeros de 3,3 mm*de diámetro.
*When using 6: ø5 mm (7/32 in)
*Si vous utilisez 6: ø5 mm (7/32 po)
*Si utiliza 6: ø 5 mm
3
2
Striped cord
Cordon rayé
Cable con rayas
ø3.3 (5/32 )
c
1
To speaker cord of a car.
Vers le cordon du haut-parleur d’une voiture.
Al cable del altavoz del automóvil.
34
5
1
3
x
1
2
Rear tray
Plage arrière
Bandeja trasera
3
5
ø3.3 (5/32 )
223 (8 7/8) x 154 (6 1/8)
DOOR (FRONT/REAR)/PORTIÈRE (AVANT/ARRIÈRE)/
PUERTA (FRONTAL/POSTERIOR) (XS-GT1625A, XS-GT1325A) REAR TRAY/PLAGE ARRIÈRE/BANDEJA POSTERIOR (XS-GT6935A)
Door
Portière
Puerta
4
Striped cord
Cordon rayé
Cable con rayas
To speaker cord of a car.
Vers le cordon du haut-parleur d’une voiture.
Al cable del altavoz del automóvil.
44
Avant le montage
Une profondeur d’au moins 75 mm (3 po)
(44 mm (1 3/4po))*1(45 mm (1 13/16 po))*2est
nécessaire pour effectuer le montage encastré.
Mesurez la profondeur de l’emplacement où
vous souhaitez monter le haut-parleur et
assurez-vous que ce dernier ne gêne en rien les
autres composants du véhicule. Prenez les
points suivants en considération lors du choix
de l’emplacement de montage :
•Assurez-vous qu’aucun objet ne fait obstacle à
proximité de l’emplacement de montage sur
la portière (avant ou arrière) ou sur la plage
arrière où vous envisagez de monter le haut-
parleur.
•Il est possible qu’un trou ait déjà été découpé
dans le panneau intérieur de la portière
(avant ou arrière) ou de la plage arrière. Dans
ce cas, il vous suffit de modifier le panneau.
•Si vous envisagez de monter ce système de
haut-parleurs sur la portière (avant ou
arrière), assurez-vous que les bornes, le cadre
ou les aimants du haut-parleur ne sont pas en
contact avec des pièces internes, telles que le
mécanisme de la vitre de la portière (lorsque
vous ouvrez ou fermez la vitre), etc.
Assurez-vous également que la grille du
haut-parleur n’entre pas en contact avec des
éléments internes, tels que les manivelles de
lève-vitre, les poignées de portières, les
repose-bras, les vide-poches, les lampes ou
les sièges, etc.
•Si vous envisagez de monter ce système de
haut-parleurs sur la plage arrière, assurez-
vous que les bornes, le cadre ou les aimants
du haut-parleur n’entrent pas en contact avec
des pièces internes du véhicule, telles que les
ressorts à barre de torsion (lorsque vous
ouvrez ou fermez le coffre), etc.
Assurez-vous également que la grille du
haut-parleur n’entre pas en contact avec des
éléments internes, tels que ceintures de
sécurité, appuis-tête, feux de stop centraux,
garnitures intérieures des essuie-glaces
arrières, rideaux ou filtres à air, etc.
*1(XS-GT1625A)
*2(XS-GT1325A)
Antes del montaje
Para el montaje alineado es necesaria una
profundidad mínima de 75 mm (44 mm)*1
(45 mm)*2. Mida la profundidad del lugar
donde desea montar el altavoz y compruebe
que el altavoz no obstruya ningún componente
del automóvil. Antes de elegir el lugar de
montaje, se debe tener en cuenta lo siguiente:
•Asegúrese de que no haya obstáculos en el
lugar de montaje de la puerta (frontal o
posterior) ni en la bandeja posterior donde
desea instalar el altavoz.
•Es posible que ya exista un orificio de montaje
en el panel interior de la puerta (frontal o
posterior) o en la bandeja posterior. En este
caso, sólo debe modificar el tablero.
•Si desea montar este sistema de altavoces en la
puerta (frontal o posterior), asegúrese de que
ni los terminales del altavoz, ni el marco, ni el
imán interfieran con los componentes
interiore como, por ejemplo, el mecanismo de
la ventanilla de la puerta (al abrir o cerrar la
ventanilla), etc.
Asegúrese también de que la rejilla del
altavoz no está en contacto con accesorios
interiores como, por ejemplo, los picaportes
de las ventanillas y puertas, los reposabrazos,
los compartimientos para guardar objetos
situados en las puertas, las luces o los
asientos, etc.
•Si desea montar el sistema de altavoces en la
bandeja posterior, asegúrese de que ni los
terminales del altavoz, ni el marco, ni el imán
estén en contacto con los componentes
interiores del coche como, por ejemplo, los
resortes de la barra de torsión (cuando abra o
cierre el portaequipajes), etc.
Asegúrese también de que la rejilla del
altavoz no está en contacto con accesorios
interiores como, por ejemplo, los cinturones
de seguridad, los reposacabezas, las luces de
frenos centrales, las cubiertas interiores de los
limpiaparabrisas posteriores, las cortinas o
ambientadores, etc.
*1(XS-GT1625A)
*2(XS-GT1325A)
A depth of at least 75 mm (3 in)
(44 mm (1 3/4in))*1(45 mm (1 13/16 in))*2is
required for flush mounting. Measure the
depth of the area where you are to mount the
speaker, and ensure that the speaker is not
obstructing any other components of the car.
Keep the followings in mind when choosing a
mounting location:
•Make sure that nothing is obstructing around
the mounting location of the door (front or
rear) or the rear tray where you are to mount
the speaker.
•A hole for mounting may already be cut out of
the inner panel of the door (front or rear) or
the rear tray. In this case, you need to modify
the board only.
• If you are to mount this speaker system in the
door (front or rear), make sure that the
speaker terminals, frame or magnet do not
interfere with any inner parts, such as the
Mounting/Montage/Montaje
Before mounting
window mechanism in the door (when you
open or close the window), etc.
Also make sure that the speaker grille does
not touch any inner fittings, such as the
window cranks, door handles, arm rests, door
pockets, lamps or seats etc.
•If you are to mount this speaker system in the
rear tray, make sure that the speaker
terminals, frame or magnet do not touch any
inner parts of the car, such as the torsion bar
springs (when you open or close the trunk
lid), etc.
Also make sure that the speaker grille does
not touch any inner fittings, such as seat belts,
head rests, center brake lights, inner covers of
the rear wipers, curtains or air purifiers, etc.
*1(XS-GT1625A)
*2(XS-GT1325A)
1
Parts list/Liste des pièces/Lista de las piezas
2
456
ø4 ×30
( ×8) ( ×8)
( ×2) ( ×2)
XS-GT6935A
XS-GT1625A/GT1325A
XS-GT1625A : ø127 (5 )
XS-GT1325A : ø115 (4 5/8 )
3
XS-GT6935A
XS-GT1625A/GT1325A
XS-GT6935A
XS-GT1625A/GT1325A
44
XS-GT1625A
( ×2) ( ×2)
Press and insert the edges of the grille net.
Pousser et insérer les bords de la grille de protection.
Presione e inserte los extremos de la rejilla.
How to remove the grille net
Comment retirer la grille de protection
Cómo extraer la rejilla
3
2
2
3
6
Press and insert the edges of the grille net.
Pousser et insérer les bords de la grille de protection.
Presione e inserte los extremos de la rejilla.
How to remove the grille net
Comment retirer la grille de protection
Cómo extraer la rejilla
3
2
2
3
c
6
13 (
17
/
32
)
Unit: mm (in)
Unité : mm (po)
Unidad: mm
Unit: mm (in)
Unité : mm (po)
Unidad: mm
Unit: mm (in)
Unité : mm (po)
Unidad: mm
0.3 m
( ×2)
6
XS-GT1325A
4 (3/16)
Mark the 4 bolt holes and make them 3.3 mm*(5/32 in) in diameter.
Marquer les 4 orifices des boulons et percer des trous de 3,3 mm*(5/32 po) de diamètre.
Marque los orificios para los 4 pernos y haga agujeros de 3,3 mm*de diámetro.
*When using 6: ø5 mm (7/32 in)
*Si vous utilisez 6: ø5 mm (7/32 po)
*Si utiliza 6: ø 5 mm