Instructions
Mode d’emploi
Instrucciones
Montageanleitung
Gebruiksaanwijzing
Istruzioni per I’uso
2008 Sony Corporation Printed in Thailand
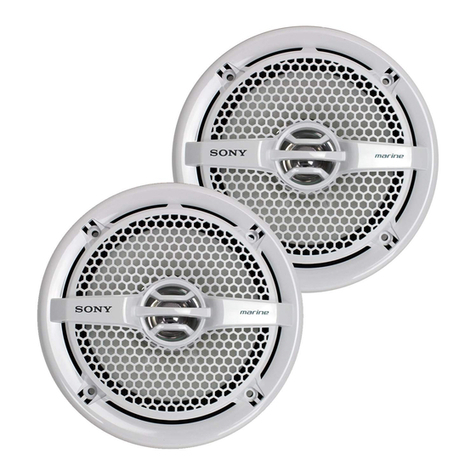
XS-MP1650W
3-287-623-11 (1)
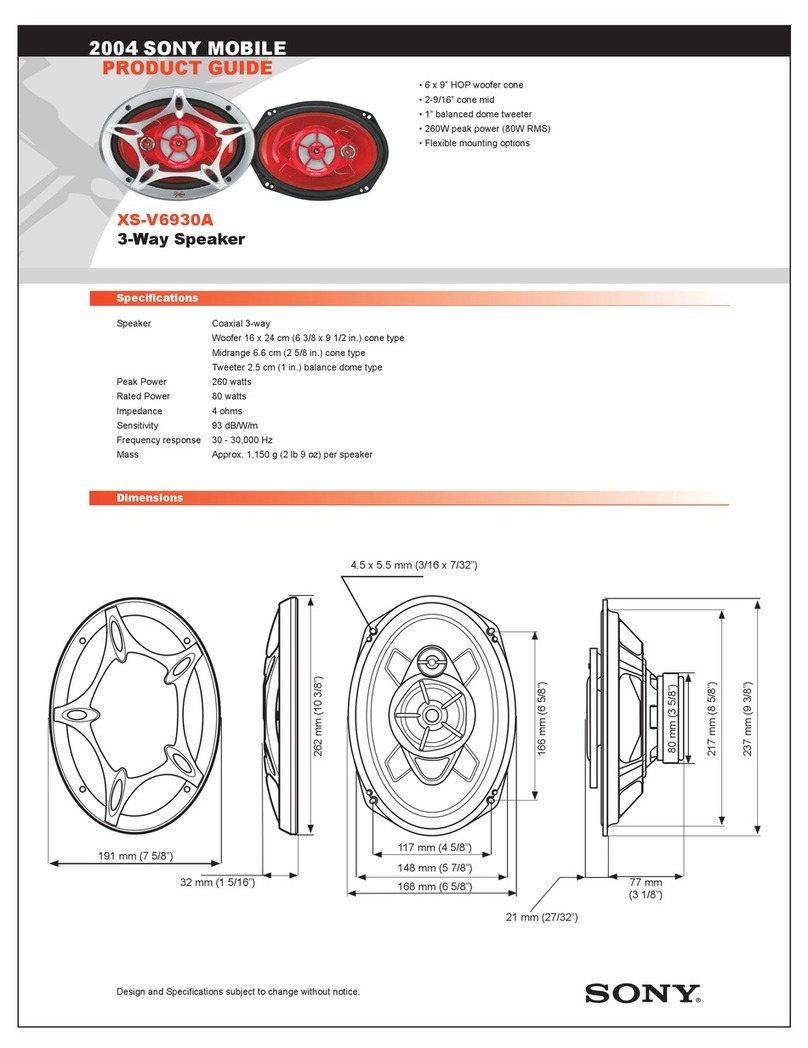
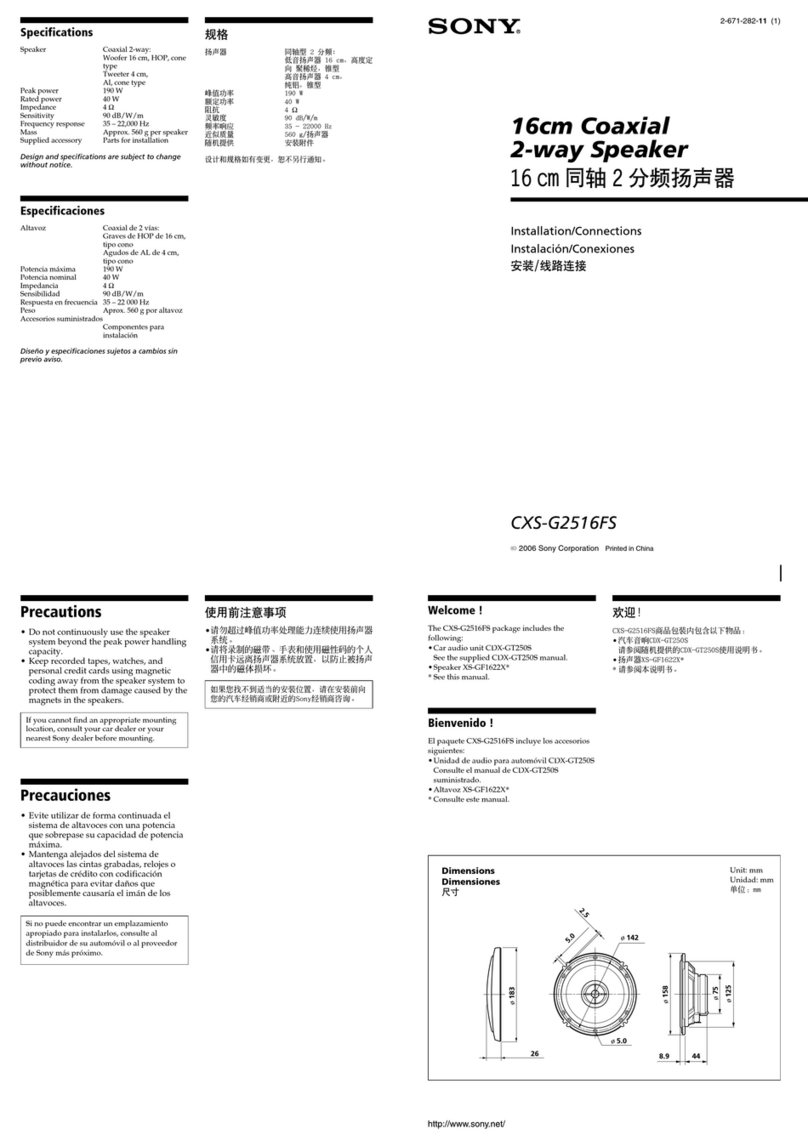
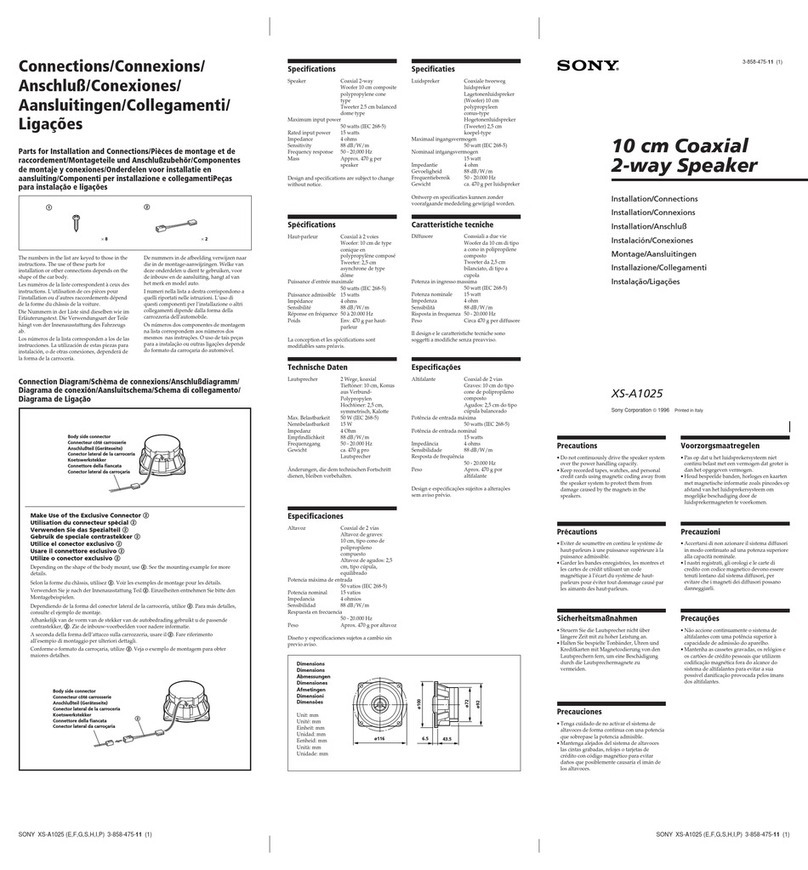
Specifications
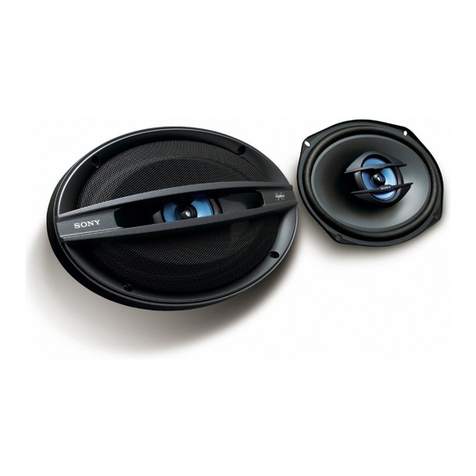
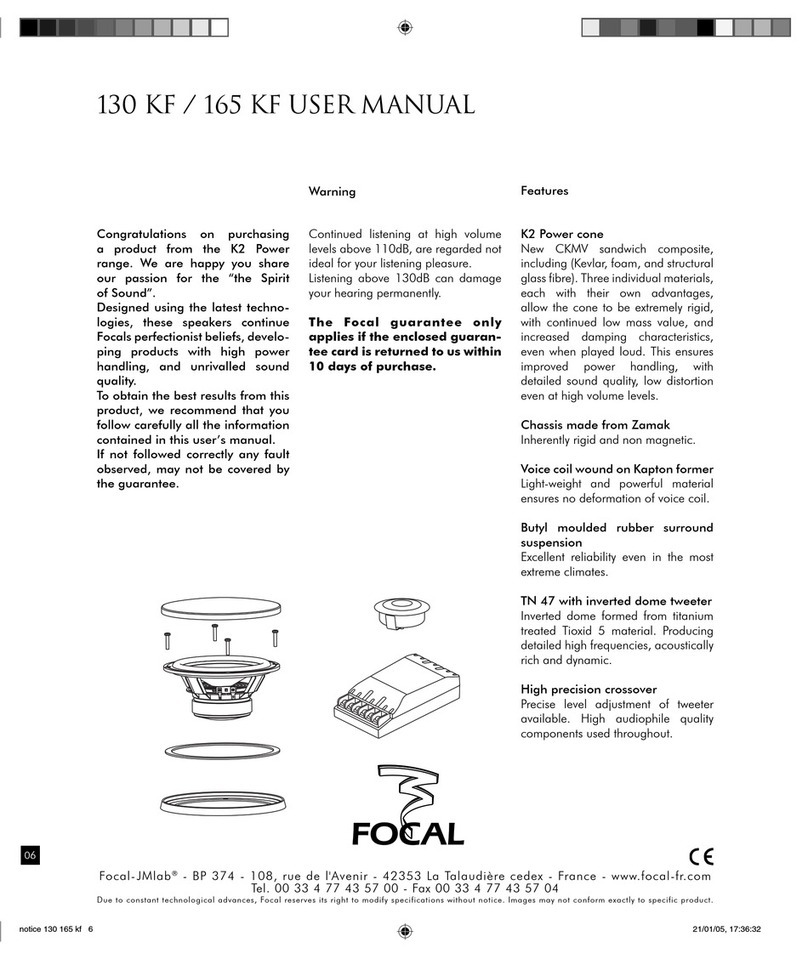
Speaker Separate type, 2-way
Woofer 16 cm (6 3/8 in), cone type
Tweeter 2.5 cm (1 in), dome type
Peak power 180 W
Rated power 50 W
Impedance 4 Ω
Sensitivity 90 ±2 dB (1 W, 1 m)
Frequency response
40 – 26,000 Hz
Crossover frequency
5,000 Hz
Mass Woofer:
Approx. 800 g (1 lb 13 oz) per speaker
Tweeter:
Approx. 65 g (3 oz) per speaker
Supplied accessories
Parts for installation
Design and specifications subject to change
without notice.
Caractéristiques techniques
Haut-parleur Séparé, à 2 voies
Haut-parleur des basses 16 cm
(6 3/8 po), type en cône
Haut-parleur d’aigus 2,5 cm
(1 po), type en dôme
Puissance de crête 180 W
Puissance nominale 50 W
Impédance 4 Ω
Sensibilité 90 ±2 dB (1 W, 1 m)
Réponse en fréquence
40 – 26 000 Hz
Fréquence de transition
5 000 Hz
Poids Haut-parleur des basses :
Environ 800 g (1 lb 13 oz) par haut-
parleur
Haut-parleur d’aigus :
Environ 65 g (3 oz) par haut-parleur
Accessoires fournis
Éléments d’installation
La conception et les caractéristiques techniques
sont à modification sans préavis.
Especificaciones
Altavoz Tipo separado, 2 vías
Altavoz de graves de 16 cm, tipo
cónico
Altavoz de agudos de 2,5 cm, tipo
cúpula
Potencia máxima 180 W
Potencia nominal 50 W
Impedancia 4 Ω
Sensibilidad 90 ±2 dB (1 W, 1 m)
Respuesta en frecuencia
40 – 26 000 Hz
Frecuencia de transición
5 000 Hz
Peso Altavoz de graves:
Aprox. 800 g por altavoz
Altavoz de agudos:
Aprox. 65 g por altavoz
Accesorios suministrados
Componentes para instalación
Diseño y especificaciones sujetos a cambio sin
previo aviso.
Technische Daten
Lautsprecher Getrenntes 2-Wege-System
Tieftöner 16 cm, Konus
Hochtöner 2,5 cm, Kalotte
Max. Leistung 180 W
Nennleistung 50 W
Impedanz 4 Ω
Empfindlichkeit
90 ±2 dB (1 W, 1 m)
Frequenzgang
40 – 26.000 Hz
Übergangsfrequenz
5.000 Hz
Gewicht Tieftöner:
ca. 800 g pro Lautsprecher
Hochtöner:
ca. 65 g pro Lautsprecher
Mitgeliefertes Zubehör
Montageteile
Änderungen, die dem technischen Fortschritt
dienen, bleiben vorbehalten.
Tweeter
Haut-parleur d’aigus
Altavoz de agudos
Hochtöner
Tweeter
Tweeter
Woofer
Haut-parleur des basses
Altavoz de graves
Tieftöner
Woofer
Woofer
Dimensions/Dimensions/Dimensiones/Abmessungen/Afmetingen/Dimensioni
29
(1 3/16)61 (2 1/2)
125 (5)
5 (7/32)
174 (6
7
/
8
)
Unit: mm (in)
Unité : mm (po)
Unidad: mm
Einheit: mm
Eenheid: mm
Unità: mm
51 (2)
Mounting/Montage/Montaje/
Montage/Montage/Montaggio
ø 142 (5
5
/
8
)
ø 87 (3
1
/
2
)
Precautions
• Do not continuously use the speaker system
beyond the peak power handling capacity.
•Keep recorded tapes, watches, and personal
credit cards using magnetic coding away from
the speaker system to protect them from damage
caused by the magnets in the speakers.
•During installation, do not touch the speaker
cones in order to prevent damage to them.
Précautions
•Évitez de soumettre le système de haut-parleurs
à une utilisation continue au-delà de la capacité
de traitement de la puissance de crête.
•Gardez les bandes enregistrées, les montres et les
cartes de crédit utilisant un code magnétique à
l’écart du système de haut-parleurs pour éviter
tout dommage causé par les aimants des haut-
parleurs.
•Pendant le montage, veiller à ne pas toucher le
cône du haut-parleur, pour ne pas
l’endommager.
Precauciones
•Procure no utilizar el sistema de altavoces en
forma continua con una potencia que sobrepase
la potencia admisible.
•Mantenga alejados del sistema de altavoces las
cintas grabadas, relojes o tarjetas de crédito con
codificación magnética para evitar daños que
posiblemente causarían los imanes de los
altavoces.
•Durante el montaje, tenga cuidado de no tocar
el cono del altavoz, porque podría dañarse.
Sicherheitsmaßnahmen
•Verwenden Sie das Lautsprechersystem nicht
kontinuierlich über der maximalen Belastbarkeit.
•Halten Sie bespielte Tonbänder, Uhren und
Kreditkarten mit Magnetcodierung von den
Lautsprechern fern, um eine Beschädigung durch
die Lautsprechermagnete zu vermeiden.
•Berühren Sie beim Einbau nicht die
Lautsprecherkegel, da sie sonst beschädigt
werden können.
Voorzorgsmaatregelen
•Belast de luidsprekers niet constant met een
vermogen dat het maximale ingangsvermogen
overschrijdt.
•Houd banden met opnamen, horloges en
creditcards met magnetische codering uit de
buurt van het luidsprekersysteem om mogelijke
beschadiging door de luidsprekermagneten te
voorkomen.
• Let op dat u tijdens het monteren het konische
gedeelte van de luidspreker niet aanraakt, om
beschadiging te voorkomen.
Precauzioni
•Non utilizzare il sistema diffusori con
alimentazione di potenza nominale superiore a
quella massima supportata e in modo
prolungato.
•I nastri registrati, gli orologi e le carte di credito
con codice magnetico devono essere tenuti
lontano dal sistema diffusori, per evitare che i
magneti dei diffusori possano danneggiarli.
•Durante l’installazione fare attenzione a non
toccare i coni dei diffusori, onde evitare di
danneggiarli..
Before mounting
A depth of at least 51 mm (2 in)*/ 61 mm
(2 1/2 in)** is required for mounting. Measure the
depth of the area where you are to mount the
speaker.
Avant le montage
Une profondeur d’au moins 51 mm (2 po)*/
61 mm (2 1/2 po)** est nécessaire pour effectuer le
montage. Mesurez la profondeur de l’emplacement
où vous souhaitez monter le haut-parleur.
Antes del montaje
Para el montaje es necesaria una profundidad
mínima de 51 mm*/61 mm**. Mida la profundidad
del lugar en el que desea montar el altavoz.
Separate 2-way
Speakers
Disposal of Old Electrical & Electronic
Equipment (Applicable in the
European Union and other European
countries with separate collection
systems)
This symbol on the product or on its packaging indicates
that this product shall not be treated as household waste.
Instead it shall be handed over to the applicable collection
point for the recycling of electrical and electronic
equipment. By ensuring this product is disposed of
correctly, you will help prevent potential negative
consequences for the environment and human health,
which could otherwise be caused by inappropriate waste
handling of this product. The recycling of materials will
help to conserve natural resources. For more detailed
information about recycling of this product, please contact
your local Civic Office, your household waste disposal
service or the shop where you purchased the product.
Traitement des appareils électriques
et électroniques en fin de vie
(Applicable dans les pays de l’Union
Européenne et aux autres pays
européens disposant de systèmes de
collecte sélective)
Ce symbole, apposé sur le produit ou sur son emballage,
indique que ce produit ne doit pas être traité avec les
déchets ménagers. Il doit être remis à un point de collecte
approprié pour le recyclage des équipements électriques et
électroniques. En s’assurant que ce produit est bien mis au
rebut de manière appropriée, vous aiderez à prévenir les
conséquences négatives potentielles pour l’environnement
et la santé humaine. Le recyclage des matériaux aidera à
préserver les ressources naturelles. Pour toute information
supplémentaire au sujet du recyclage de ce produit, vous
pouvez contacter votre municipalité, votre déchetterie ou le
magasin où vous avez acheté le produit.
Tratamiento de los equipos eléctricos
y electrónicos al final de su vida útil
(aplicable en la Unión Europea y en
países europeos con sistemas de
recogida selectiva de residuos)
Este símbolo en el equipo o el embalaje indica que el
presente producto no puede ser tratado como residuos
domésticos normales, sino que debe entregarse en el
correspondiente punto de recogida de equipos eléctricos y
electrónicos. Al asegurarse de que este producto se desecha
correctamente, Ud. ayuda a prevenir las consecuencias
negativas para el medio ambiente y la salud humana que
podrían derivarse de la incorrecta manipulación en el
momento de deshacerse de este producto. El reciclaje de
materiales ayuda a conservar los recursos naturales. Para
recibir información detallada sobre el reciclaje de este
producto, póngase en contacto con el ayuntamiento, el
punto de recogida más cercano o el establecimiento donde
ha adquirido el producto.
Entsorgung von gebrauchten
elektrischen und elektronischen
Geräten (anzuwenden in den Ländern
der Europäischen Union und anderen
europäischen Ländern mit einem
separaten Sammelsystem für diese
Geräte)
Das Symbol auf dem Produkt oder seiner Verpackung
weist darauf hin, dass dieses Produkt nicht als normaler
Haushaltsabfall zu behandeln ist, sondern an einer
Annahmestelle für das Recycling von elektrischen und
elektronischen Geräten abgegeben werden muss. Durch
Ihren Beitrag zum korrekten Entsorgen dieses Produkts
schützen Sie die Umwelt und die Gesundheit Ihrer
Mitmenschen. Umwelt und Gesundheit werden durch
falsches Entsorgen gefährdet. Materialrecycling hilft, den
Verbrauch von Rohstoffen zu verringern. Weitere
Informationen über das Recycling dieses Produkts erhalten
Sie von Ihrer Gemeinde, den kommunalen
Entsorgungsbetrieben oder dem Geschäft, in dem Sie das
Produkt gekauft haben.
Verwijdering van oude elektrische en
elektronische apparaten (Toepasbaar
in de Europese Unie en andere
Europese landen met gescheiden
ophaalsystemen)
Het symbool op het product of op de verpakking wijst
erop dat dit product niet als huishoudelijk afval mag
worden behandeld. Het moet echter naar een plaats
worden gebracht waar elektrische en elektronische
apparatuur wordt gerecycled. Als u ervoor zorgt dat dit
product op de correcte manier wordt verwijderd,
voorkomt u voor mens en milieu negatieve gevolgen die
zich zouden kunnen voordoen in geval van verkeerde
afvalbehandeling. De recycling van materialen draagt bij
tot het vrijwaren van natuurlijke bronnen. Voor meer
details in verband met het recyclen van dit product, neemt
u contact op met de gemeentelijke instanties, het bedrijf of
de dienst belast met de verwijdering van huishoudafval of
de winkel waar u het product hebt gekocht.
Trattamento del dispositivo elettrico
od elettronico a fine vita (applicabile
in tutti i paesi dell’Unione Europea e
in altri paesi europei con sistema di
raccolta differenziata)
Questo simbolo sul prodotto o sulla confezione
indica che il prodotto non deve essere considerato come un
normale rifiuto domestico, ma deve invece essere
consegnato ad un punto di raccolta appropriato per il
riciclo di apparecchi elettrici ed elettronici. Assicurandovi
che questo prodotto sia smaltito correttamente, voi
contribuirete a prevenire potenziali conseguenze negative
per l’ambiente e per la salute che potrebbero altrimenti
essere causate dal suo smaltimento inadeguato. Il
riciclaggio dei materiali aiuta a conservare le risorse
naturali. Per informazioni più dettagliate circa il riciclaggio
di questo prodotto, potete contattare l’ufficio comunale, il
servizio locale di smaltimento rifiuti oppure il negozio
dove l’avete acquistato.
Technische gegevens
Luidsprekers Gescheiden type, 2-weg
Woofer 16 cm, conustype
Tweeter 2,5 cm, koepeltype
Maximaal ingangsvermogen
180 Watt
Nominaal ingangsvermogen
50 Watt
Impedantie 4 Ω
Gevoeligheid 90 ±2 dB (1 W, 1 m)
Frequentiebereik
40 – 26.000 Hz
Kantelfrequentie
5.000 Hz
Gewicht Woofer:
Ongeveer 800 g per luidspreker
Tweeter:
Ongeveer 65 g per luidspreker
Bijgeleverde accessoires
Onderdelen voor installatie
Wijzigingen zonder kennisgeving in ontwerp en
specificaties voorbehouden.
Caratteristiche tecniche
Diffusore Tipo separato, 2 vie
Woofer 16 cm, tipo a cono
Tweeter 2,5 cm, tipo a cupola
Potenza massima
180 Watt
Potenza nominale
50 Watt
Impedenza 4 Ω
Sensibilità 90 ±2 dB (1 W, 1 m)
Risposta in frequenza
40 – 26.000 Hz
Frequenza di transizione
5.000 Hz
Peso Woofer:
circa 800 g per diffusore
Tweeter:
circa 65 g per diffusore
Accessori in dotazione
Elementi per installazione
Il design e le caratteristiche tecniche sono
soggetti a modifiche senza preavviso.
Vor der Montage
Für die Montage ist eine Einbautiefe von
mindestens 51 mm*/61 mm** erforderlich. Messen
Sie die Tiefe an der Stelle, an der der Lautsprecher
montiert werden soll.
Vóór de montage
Voor de montage is een inbouwdiepte van
minimaal 51 mm*/61 mm** vereist. Meet de diepte
van het gebied waar u de luidspreker wilt
installeren.
Prima del montaggio
Per il montaggio, è necessaria una profondità di
almeno 51 mm*/61 mm**. Misurare la profondità
dell’area in cui verrà montato il diffusore.
51 (2)
59 (2
3
/
8
)
Flush Mount
Montage encastré
Montaje alineado
Versenkte Montage
Inbouwmontage
Montaggio a incastro
Surface Mount
Montage en surface
Montaje sobre una superficie
Oberflächenmontage
Oppervlakmontage
Montaggio su superficie
Connections/Connexions/Conexiones/Anschluss/Aansluitingen/
Collegamenti
Car audio unit/Power amplifier
(not supplied)
Autoradio/Amplicateur de puissance
(non fourni)
Sistema de audio de automóvil/
Amplificador de potencia
(no suministrado)
Autostereoanlage/Endverstärker
(nicht mitgeliefert)
Audiosysteem voor auto/
Vermogensversterker
(niet bijgeleverd)
Autoradio/Amplificatore di potenza
(non in dotazione)
6
Tweeter /Haut-parleur d’aigus /
Altavoz de agudos /Hochtöner /
Tweeter /Tweeter
** Woofer
** Haut-parleur des basses
** Altavoz de graves
** Tieftöner
** Woofer
** Woofer
*Tweeter (Flush Mount)
*Haut-parleur des aiguës
(Montage encastré)
*Altavoz de agudos
(Montaje alineado)
*Hochtöner
(Versenkte Montage)
*Tweeter
(Inbouwmontage)
*Tweeter
(Montaggio a incastro)
59 (2 3/8)
41
(1
5
/
8
)
26
(1
1
/
16
)
11
(
7
/
16
)
37 (1
1
/
2
)
57 (2 1/4)
49 (1 15/16)
2*
*White cord — Left speaker
Gray cord — Right speaker
*Cordon blanc — Haut-parleur gauche
Cordon gris — Haut-parleur droit
*Cable blanco — Altavoz izquierdo
Cable gris — Altavoz derecho
*Weißes Kabel — Linker Lautsprecher
Graues Kabel — Rechter Lautsprecher
*Wit snoer — Linkerluidspreker
Grijs snoer — Rechterluidspreker
*Cavo bianco — Diffusore sinistro
Cavo grigio — Diffusore destro
13 (
17
/
32
)
Woofer
Haut-parleur des basses
Altavoz de graves
Tieftöner
Woofer
Woofer


