manuals.online logo
Brands
  1. Home
  2. •
  3. Brands
  4. •
  5. Sony
  6. •
  7. Car Stereo System
  8. •
  9. Sony XPlod MEX-BT5000 Installation instructions manual

Sony XPlod MEX-BT5000 Installation instructions manual

Card remote commander RM-X302
ASOURCE button
To power on; change the source (Radio/CD/
MD*1/Bluetooth AUDIO/AUX).
BJoystick/LIST button
Rotate to: Adjust the volume.
Push up/down/left/right to: Select a menu item.
Press to: Apply a setting.
CD/MD*1:
Push up/down to*2:
– Skip groups*3/albums*4(push).
– Skip groups*3/albums*4continuously (push
and hold).
Push left/right to:
– Skip tracks (push).
– Skip tracks continuously (push, then push
again within about 2 seconds and hold).
– Reverse/fast-forward a track (push and hold).
Radio:
Push up/down to:
– Receive stored station.
Push left/right to:
– Tune in stations automatically (push).
– Find a station manually (push and hold).
Press to:
– Display the list.
CMODE button
To select the radio band (FM/MW/LW)/select
the unit*5.
DMENU button
To enter menu.
EDisplay window
FOPEN button
GOFF button
To power off; stop the source.
HReceptor for the card remote
commander
IAF/TA button
AF (Alternative Frequencies)/TA (Traffic
Announcement), TP (Traffic Programme):
Each time you press (AF/TA), the item changes
as follows:
AF on tTA on tAF/TA on t
AF/TA off
JNumber buttons
CD/MD*1:
(1): REP
(2): SHUF
(5): BBE MP*6
To activate the BBE MP function, set
“BBE MP on.” To cancel, set “BBE MP
off.”
(6): PAUSE *6
To pause playback. To cancel, press again.
Radio:
To receive stored stations (press); store stations
(press and hold).
KDSPL (display)/PTY (Programme Type)
button
To change display items; select PTY in RDS
(press (PTY), then push the joystick up/down to
search for the station, and press).
LDisc slot
To insert the disc (label side up). Playback starts
automatically.
You can play CD-DA (also containing CD
TEXT), CD-R/CD-RW (MP3/WMA files also
containing Multi Session) and ATRAC CD
(ATRAC3 and ATRAC3plus format).
MRESET button
Detach the front panel and press the RESET
button with a pointed object, such as a ballpoint
pen.
Notes
•Before operating the unit for the first time, or after
replacing the car battery or changing the
connections, you must reset the unit.
•Pressing the RESET button will erase the clock
setting and some stored contents.
NZ (eject) button
To eject the disc.
The following buttons on the card remote
commander have also different buttons/functions
from the unit.
qg ENTER button
To apply a setting.
qh LIST button
To list up.
qj Number buttons
Buttons 1 to 6 share the same functions as the
number buttons on the unit.
qk M(+)/m(–) buttons
The same as pushing the joystick up/down.
ql <(.)/,(>) buttons
The same as pushing the joystick left/right.
w; SCRL (scroll) button
To scroll display item.
wa SOUND button
To select sound items.
ws ATT (attenuate) button
To attenuate the sound. To cancel, press again.
wd VOL (volume) +/– buttons
To adjust volume.
*1 When an MD changer is connected.
*2 If the changer is connected, the operation is different.
*3 When an ATRAC CD is played.
*4 When an MP3/WMA is played.
*5 When a CD/MD changer is connected.
*6 When playing back on this unit.
Note
If the unit is turned off and the display disappears, it
cannot be operated with the card remote commander
unless (SOURCE) on the unit is pressed, or a disc is
inserted to activate the unit first.
ASOURCE button
To power on; change the source (Radio/CD/
MD*1/Bluetooth AUDIO/AUX).
BJoystick
Rotate to: Adjust the volume.
Push up/down/left/right to: Select a menu item.
Press to: Apply a setting.
Bluetooth audio device*2:
Push left/right to:
– Skip tracks (push).
– Reverse/fast-forward a track (push and hold).
CBluetooth button
To access the Bluetooth functions; receive a call.
DMENU button
To enter menu; receive a call.
EDisplay window
FOFF button
To power off; stop the source; end or reject a
call.
GCALL button
To access the telephone functions; receive a call.
HReceptor for the card remote
commander
Card remote commander RM-X302
INumber buttons
To call stored dials.
Bluetooth audio device*2:
(6): PAUS E
To pause playback.
JBluetooth indicator
Lights up when the Bluetooth signal is input/
output. Goes off when the Bluetooth signal is
off.
KMicrophone
The following buttons on the card remote
commander have also different buttons/functions
from the unit.
qs ENTER button
To apply a setting.
qd Number buttons
To input numbers (phone number, passcode,
etc.).
Buttons 1 to 6 share the same functions as the
number buttons on the unit.
qf button
qg M(+)/m(–) buttons
The same as pushing the joystick up/down.
qh <(.)/,(>) buttons
The same as pushing the joystick left/right.
qj VOL (volume) +/– buttons
To adjust volume.
qk button
*1 When an MD changer is connected.
*2 When a Bluetooth audio device (supports AVRCP of
Bluetooth technology) is connected. Depending on the
device, certain operations may not be available.
Location of controls and basic operations
Audio function
MEX-BT5000
1
79 qa0
8
35624
RESET
qfqdqs
Main unit
Front panel removed
Warning if your car’s ignition has no
ACC position
After turning the ignition off, be sure to press
and hold (OFF) on the unit until the display
disappears.
Otherwise, the display does not turn off and
this causes battery drain.
7
ql
qk
w;
ws
wd
wa
1
qg
3
4
qh
qa
qj
Bluetooth function
For details on the Bluetooth function, see the
supplied “Enjoy using Bluetooth wireless
technology” or “Operating Instructions.”
MEX-BT5000
1
6097
8
3524
qa
Main unit
Front panel removed
73
6
qh
qg
qj
qk
1
qs
4
qd
qf
MEX-BT5000
© 2006 Sony Corporation
Detaching the front panel/Setting the clock/
Storing stations automatically/Display items/
Repeat and shuffle play/Adjusting menu items/
Customizing the equalizer curve
B
You can detach the front panel of this unit to prevent
theft.
1Press (OFF).
The unit is turned off.
2Press (OPEN).
The front panel is flipped down.
3Slide the front panel to the right, then
gently pull out the left end of the front
panel.
Attaching the front panel
Place the hole Aof the front panel onto the spindle
Bon the unit, then lightly push the left side in.
Press (SOURCE) on the unit (or insert a disc) to
operate the unit.
The clock uses a 24-hour digital indication.
1Press (MENU).
2Push the joystick up/down until “Setup”
appears, then push it right.
3Push the joystick up/down until “Clock
Adjust” appears, then push it right.
4Push the joystick up/down to set the hour
and minutes.
To move the digital indication, push the joystick
left/right.
5After setting the clock, press the joystick.
The clock starts.
Tip
You can set the clock automatically with the RDS feature.
For details, see “Adjusting menu items,” and set to “CT on”
(Clock Time).
— BTM
The unit selects strong signal stations and stores
them. You can store up to 6 stations per band (FM1,
FM2, FM3, MW and LW).
Caution
When tuning in stations while driving, use Best
Tuning Memory to prevent accidents.
1Press (SOURCE) repeatedly until
“TUNER” appears.
To change the band, press (MODE) repeatedly.
You can select from FM1, FM2, FM3, MW or
LW.
2Press (MENU).
3Push the joystick up/down until “Receive
Mode” appears, then push it right.
4Push the joystick up/down until “BTM”
appears.
5Press the joystick.
The unit stores stations in order of frequency on
the number buttons.
A beep sounds when the setting is stored.
Example: when you set Info (information) mode to
“All” (see “Adjusting menu items”).
ASource/MP3/ATRAC/WMA indication
BClock
CTrack number/Elapsed playing time, Disc/artist
name, Album/group number, Album/group
name, Track name, Text information*
*When playing an MP3, ID3 tag is displayed, when
playing ATRAC CD, text information written by
SonicStage, etc., is displayed, and when playing WMA,
WMA tag is displayed.
To change display items C, press (DSPL); scroll
display items C, press (SCRL) on the card remote
commander or set “Auto Scroll on.”
1During playback, press (1) (REP) or (2)
(SHUF) repeatedly until the desired
setting appears.
*1 When an MP3/WMA is played.
*2 When an ATRAC CD is played.
To return to normal play mode, select “Repeat off”
or “Shuffle off.”
— MENU
1Press (MENU).
2Push the joystick up/down until the
desired menu item appears, then push it
right.
The items changes as follows:
Setup yDisplay yReceive Mode y
Sound
3Push the joystick up/down until the
desired setting item appears, then push it
right.
The digital indication moves to the right (setting
selection) side.
4Push the joystick up/down to select the
setting, then press it.
The setting is complete.
5Press (MENU).
The display returns to normal play/reception
mode.
Note
Displayed items will differ, depending on the source and
setting.
Tips
•You can go to the next menu level by pressing the
joystick.
•In step 5, push the joystick left until “EXIT” appears, then
press the joystick, instead of pressing (MENU).
•You can enter the Sound setting menu directly by
pressing (SOUND) on the card remote commander.
The following items can be set (follow the page
reference for details):
“z” indicates the default settings.
Setup
Display
Receive Mode
Sound
*When the unit is turned off.
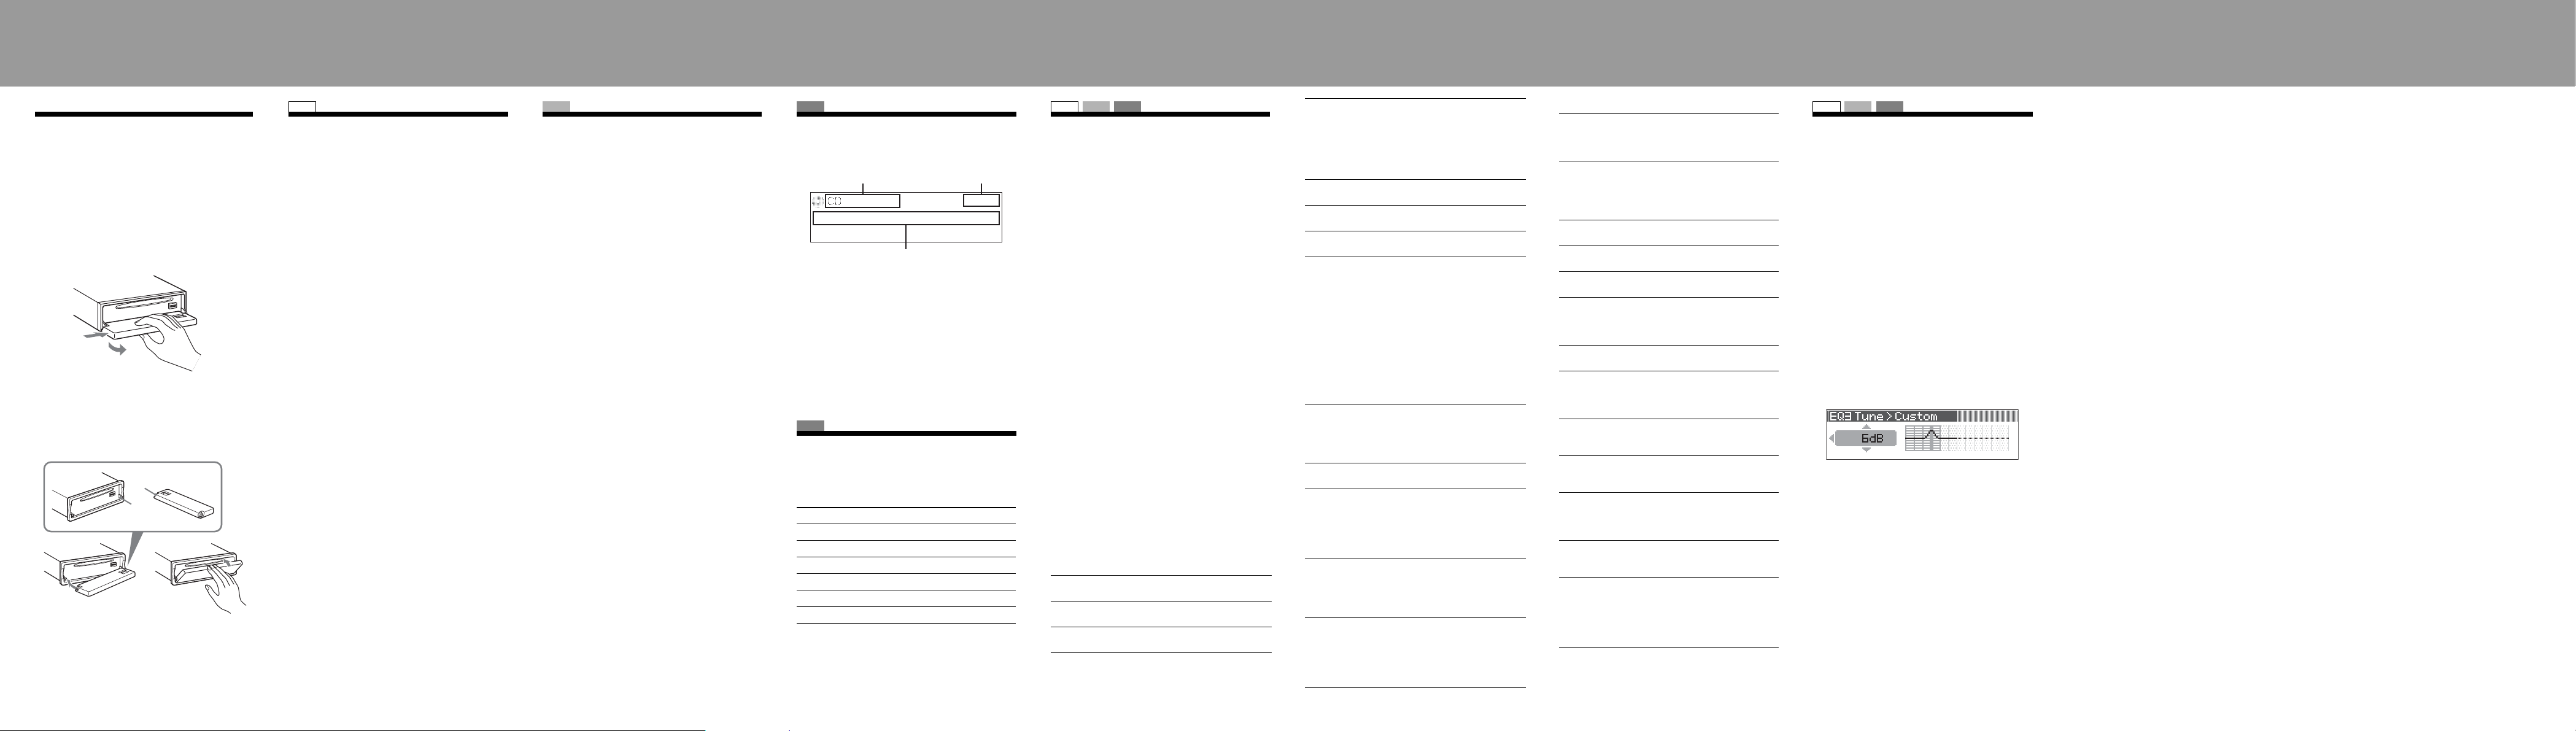
— EQ3 Tune
“Custom” of EQ3 allows you to make your own
equalizer settings.
1Select a source, then press (MENU).
2Select “Sound” c“EQ3 Preset” c
“Custom,” using the joystick.
3Select “EQ3 Tune” using the joystick.
4Select the desired frequency range from
“LOW,” “MID” and “HI.”
5Select the frequency you wish to adjust.
Adjustable frequency in each range:
LOW: 60 Hz or 100 Hz
MID: 500 Hz or 1.0 kHz
HI: 10.0 kHz or 12.5 kHz
6Adjust the equalizer curve.
The volume level is adjustable in 1 dB steps,
from –10 dB to +10 dB.
7Press the joystick.
Repeat steps 4 to 7 to adjust other frequencies.
To restore the factory-set equalizer curve, select
“Initialize” c“Yes” in step 4.
Tip
Other equalizer types are also adjustable.
Detaching the front panel
1
2
c
A
B
SET UP
Setting the clock
RADIO
Storing stations automatically
CD
Display items
CD
Repeat and shuffle play
Select To play
Repeat Track track repeatedly.
Repeat Album*1album repeatedly.
Repeat Group*2group repeatedly.
Shuffle Album*1album in random order.
Shuffle Group*2group in random order.
Shuffle Disc disc in random order.
A B
C
SET UP RADIO CD
Adjusting menu items
Clock Adjust
To set the clock.
CT (Clock Time)
To set “on” or “off” (z).
Beep
To set “on” (z) or “off.”
RM (Rotary Commander)
To change the operative direction of the rotary
commander controls.
– “NORM” (z): to use the rotary commander in the
factory-set position.
– “REV”: when you mount the rotary commander
on the right side of the steering column.
AUX Audio*
To turn the AUX source display “on” (z) or “off.”
Version*
To display the unit’s firmware version.
Image
To set various display images.
– “SpaceProducer” (z): to create animated on-
screen patterns in time with the music.
– “All”: to step repeatedly through the display
images in all display modes.
– “off”: to not display any image.
– “SA 1 – 5”: to display the Spectrum Analyzer.
– “Movie 1 – 3”: to display a movie.
– “Wallpaper 1 – 3”: to display a wallpaper.
– “SA All”/“Movie All”/“Wallpaper All”: to step
repeatedly through the display images of each
mode.
Info (Information)
To display the items (depending on the source, etc.).
– “All”: to display all items.
– “Simple” (z): to not display any items.
– “Clear”: to have items automatically disappear.
Demo*
(Demonstration)
To set “on” (z) or “off.”
Dimmer
To change the brightness of the display.
–“Auto”(
z): to dim the display automatically when
you turn lights on.
– “on”: to dim the display.
– “off”: to deactivate the dimmer.
Auto Scroll
To scroll long displayed item automatically when
the disc/album/group/track is changed.
– “on”: to scroll.
– “off” (z): to not scroll.
ID3 Tag
To switch the priority of the displayed ID3 tag
character (when CD is selected as the source).
–“EUR”(
z): Western Europe display character
priority.
– “RUS”: Cyrillic display character priority.
Local (Local seek mode)
–“off”(
z): to tune normal reception.
– “on”: to only tune into stations with stronger
signals.
Mono (Monaural mode)
To improve poor FM reception, select monaural
reception mode.
–“off”(
z): to hear stereo broadcast in stereo.
– “on”: to hear stereo broadcasts in monaural.
Regional
To set “on” (z)” or “off.”
BTM
To store radio stations automatically.
EQ3 Preset
To select an equalizer type: “Xplod,” “Vocal,”
“Edge,” “Cruise,” “Space,” “Gravity,” “Custom” or
“Off” (z).
EQ3 Tune
To customize the equalizer curve.
DSO
To select the DSO mode: “1,” “2,” “3” or “off” (z).
The larger the number, the more enhanced the
effect.
Balance
To adjust the balance between the right and left
speakers: “R10” – “±0” (z) – “L10”
Fader
To adjust the balance between the front and rear
speakers: “F10” – “±0” (z) – “R10”
Subwoofer
To adjust the subwoofer volume: “+10” – “±0” (z) –
“–10”
(“– ∞” is displayed at the lowest setting.)
LPF (Low Pass Filter)
To select the subwoofer cut-off frequency: “off” (z),
“125Hz” or “78Hz.”
AUX Level
To adjust the volume level for each connected
auxiliary equipment. This setting negates the need
to adjust the volume level between sources.
Adjustable level: “+6 dB” – “±0 dB” (z) –
“–6 dB”
SET UP RADIO CD
Customizing the equalizer
curve
B
Location of controls and basic operations

Other manuals for XPlod MEX-BT5000

11

Other Sony Car Stereo System manuals

Sony XR-C8220R User manual

Sony

Sony XR-C8220R User manual

Sony XAV-65 User manual

Sony

Sony XAV-65 User manual

Sony GT520 - CDX Radio / CD User manual

Sony

Sony GT520 - CDX Radio / CD User manual

Sony CDX-GT565UP User manual

Sony

Sony CDX-GT565UP User manual

Sony CDX-GT565UP Product guide

Sony

Sony CDX-GT565UP Product guide

Sony DVX-100 - 10 Disc Dvd Changer Instruction Manual

Sony

Sony DVX-100 - 10 Disc Dvd Changer Instruction Manual

Sony CDX-M8810 - Fm/am Compact Disc Player User manual

Sony

Sony CDX-M8810 - Fm/am Compact Disc Player User manual

Sony CDX-GT450U User manual

Sony

Sony CDX-GT450U User manual

Sony CDX-GT828U Product guide

Sony

Sony CDX-GT828U Product guide

Sony EXR-400 User manual

Sony

Sony EXR-400 User manual

Sony MEX-BT4700U Product guide

Sony

Sony MEX-BT4700U Product guide

Sony XAV-70BT User manual

Sony

Sony XAV-70BT User manual

Sony MEX-BT3900U Product guide

Sony

Sony MEX-BT3900U Product guide

Sony CDX-CA890X User manual

Sony

Sony CDX-CA890X User manual

Sony DSX-GS80 User manual

Sony

Sony DSX-GS80 User manual

Sony XM-ZR604 - AMPLIFIER 4 CHANNEL User manual

Sony

Sony XM-ZR604 - AMPLIFIER 4 CHANNEL User manual

Sony GT620U - CDX Radio / CD User manual

Sony

Sony GT620U - CDX Radio / CD User manual

Sony CDX-4480ESP - Am/fm Compact Disc Changer Use and maintenance manual

Sony

Sony CDX-4480ESP - Am/fm Compact Disc Changer Use and maintenance manual

Sony CDX-GT63UIW - Fm/am Compact Disc Player User manual

Sony

Sony CDX-GT63UIW - Fm/am Compact Disc Player User manual

Sony XDP-MU110 User manual

Sony

Sony XDP-MU110 User manual

Sony MDX-CA790X User manual

Sony

Sony MDX-CA790X User manual

Sony WX-900BT User manual

Sony

Sony WX-900BT User manual

Sony Honda XR-H594WG User manual

Sony

Sony Honda XR-H594WG User manual

Sony CDXGT620IP - Radio / CD User manual

Sony

Sony CDXGT620IP - Radio / CD User manual

Popular Car Stereo System manuals by other brands

Audiovox Jensen Phase Linear UMP400 owner's manual

Audiovox

Audiovox Jensen Phase Linear UMP400 owner's manual

JVC CD Receiver KW-S601 instructions

JVC

JVC CD Receiver KW-S601 instructions

Blaupunkt SAN FRANCISCO RDM 169 operating instructions

Blaupunkt

Blaupunkt SAN FRANCISCO RDM 169 operating instructions

Audiovox Jensen Phase Linear UMP9020 owner's manual

Audiovox

Audiovox Jensen Phase Linear UMP9020 owner's manual

Clarion NZ501E Service manual

Clarion

Clarion NZ501E Service manual

JVC KS-F545 Installation and connection manual

JVC

JVC KS-F545 Installation and connection manual

Paser KIT052USDB11/JL manual

Paser

Paser KIT052USDB11/JL manual

Pyle PLCD41MU user manual

Pyle

Pyle PLCD41MU user manual

LENCO CS-321 owner's manual

LENCO

LENCO CS-321 owner's manual

Boss Audio Systems 625UAB user manual

Boss Audio Systems

Boss Audio Systems 625UAB user manual

Pioneer MVH-S41BT Operation manual

Pioneer

Pioneer MVH-S41BT Operation manual

BMW 65 41 2 167 061 installation instructions

BMW

BMW 65 41 2 167 061 installation instructions

JVC KD-R420J Customer Procedure

JVC

JVC KD-R420J Customer Procedure

JVC KD-G730 instructions

JVC

JVC KD-G730 instructions

Motorola 9SMV Service manual

Motorola

Motorola 9SMV Service manual

Legacy LCD87DFX owner's manual

Legacy

Legacy LCD87DFX owner's manual

Discount Car Stereo A2D-TOY03 installation guide

Discount Car Stereo

Discount Car Stereo A2D-TOY03 installation guide

Stealthbox SB-T-FJ/12W1v3 installation guide

Stealthbox

Stealthbox SB-T-FJ/12W1v3 installation guide

manuals.online logo
manuals.online logoBrands
  • About & Mission
  • Contact us
  • Privacy Policy
  • Terms and Conditions

Copyright 2025 Manuals.Online. All Rights Reserved.