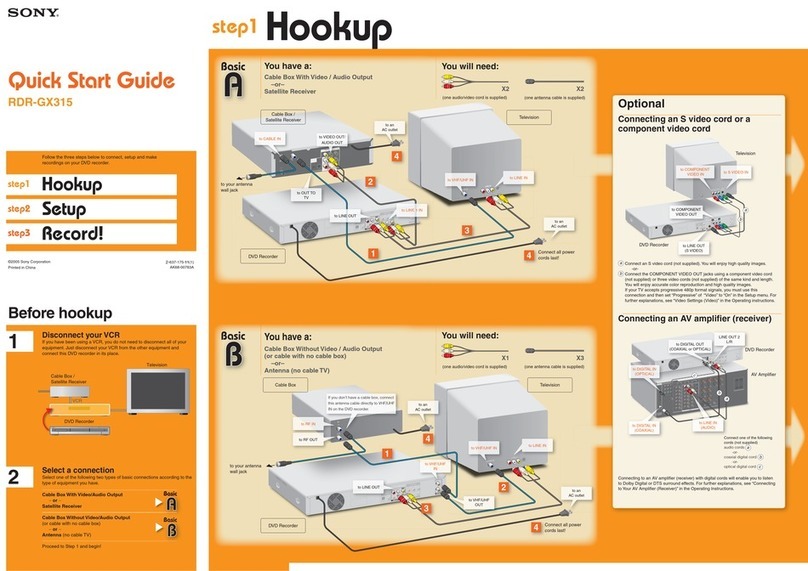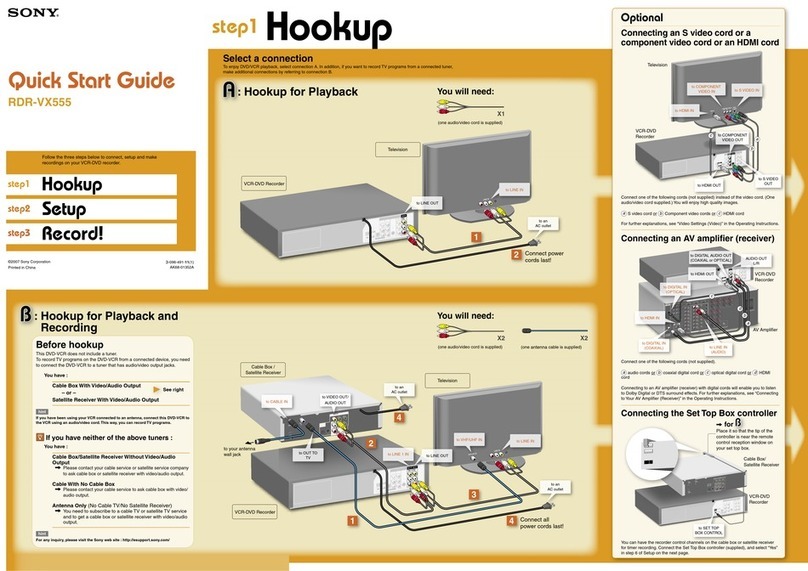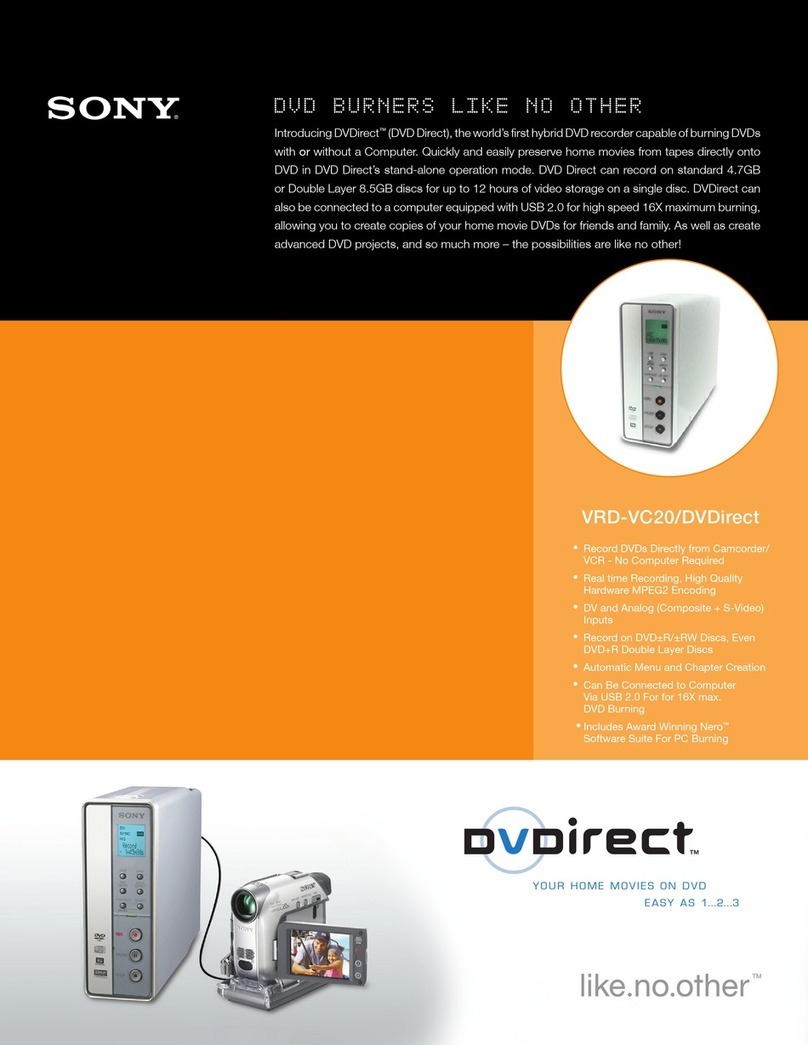
Wait! Be sure to complete Step 1before proceeding w ith Step 2.
When you t urn on your DVD recorder f or the f irst time, t he Easy Set up display
aut omat ically appears on your TV screen. Follow the st eps below t o make t he
minimum number of basic adjust ments t o use t he recorder.
Steps to :Displaying Easy Setup on Your TV
x
Steps t o : OSD Language Setup
x
Step :Clock Setup
x
Step :Tuner and Channel Setup
x
Step :TV Type Setup
x
Steps t o : Audio Connection Setup
x
You're done!
If you do not complete Easy Setup
Easy Set up w ill appear each time you turn on your recorder until you
complet e t he st eps below.
Tu rn on your TV and any other connected equipment.
Press I/ 1 on the remote.
Press the input selector on your TV so that the signal
from the recorder appears on your TV screen.
The f ollow ing message appears: “ Init ial set tings necessary t o operat e t he DVD
recorder w ill be made. You can change them lat er using Setup.” If t his message
does not appear, select “ Easy Set up” from “ SETUP” on t he Syst em M enu. See
“ Step 7: Easy Set up” in t he Operat ing Instruct ions for det ails.
Having t rouble displaying Easy Setup?
Tr y looking at your TV screen each t ime you press the input selector on your
TV. You should see an indicator such as “ Video 1” or “ DVD 1” appear in one
of the four corners of your TV screen. Keep pressing t he input selector until
the name of the jack t o w hich you have connect ed t he recorder appears.
Press the center of the joystick (w ritten hereafter as
“Press ENTER.”)
Easy Set up begins.
Press M/mto select either English or French for the on-
screen display language, then press ENTER.
The display for set t ing the clock
appears.
Step 2Guided Setup Step 3Basic Operations
Press M/mto select “Auto” to automatically set the
clock, then press ENTER.
The display for set t ing the t uner
appears.
Not e t hat the clock w ill be
aut omatically set w hen you turn off
the recorder.
If the clock is w rong, or if the
time is not set
See “ Settings (Basic Settings)” in
the chapter “ Settings and
Adjust ment s” of the Operating
Inst ructions.
Press M/mto select either “Antenna” or “Cable,” then
press ENTER.
•If you connect ed a cable box or receive cable service, select “ Cable.”
• If you do not have cable service, or if you connect ed a sat ellit e receiver or
digit al cable box, select “ Ant enna.”
The Tuner Preset funct ion start s searching for all receivable channels and st ores
them in memory. This may t ake a couple of minut es.
If you connected a satellite receiver or digital cable box
The recorder w ill not set the channels for your sat ellit e receiver or digit al
cable box. Use your sat ellit e receiver or digital cable box t o change channels
once Easy Setup is complete.
After the Tuner Preset is finished, the display for
matching the playback image to your TV appears.
This will select t he way f ull-screen
DVD movies are displayed on your
TV, and will not affect regular
broadcast s. If you have a
wide-screen TV, select “ 16:9.” If you
have a st andard TV, select eit her “ 4:3
Letter Box” (shrink t o f it ) or “ 4:3 Pan
Scan” (st ret ch t o f it ).
Press M/mto select one of the display options, then
press ENTER.
The display for set t ing the audio
connection appears.
Press M/mto select an audio connection option, then
press ENTER.
If you did not connect an AV amplifier (receiver), select “ No” and go t o st ep .
• If you connect ed an AV amplif ier (receiver) using just an audio cord, select
“ Yes: LINE OUT (
R-AUDIO-L
)” and go t o st ep .
•If you connect ed an AV amplif ier (receiver) using eit her a digit al optical or
coaxial cord, select “ Yes: DIGITAL OUT.” After you select “ Yes,” you w ill be
asked t o select t he t ype of signal you w ant to send t o your AV amplifier
(receiver). If your AV amplif ier (receiver) has a Dolby Digit al or DTSdecoder,
select “ Dolby Digit al” or “ On.” If not, select “ D-PCM” or “ Off .” Then go to
st ep .
When “Finish” appears, press ENTER to complete Easy
Setup.
Now you're ready to go to “Step 3Basic Operations.”
How to Record a TV Program
The f ollow ing explains how t o record a current TV program. For
timer recordings, see “ Timer Recording” in the chapt er “ Recording/
Timer Recording” of the Operat ing Inst ruct ions.
Press CH+/ – to select a channel.
The channel number appears in t he f ront panel display.
If you connected a sat ellit e receiver or digit al
cable box
Tu rn on your sat ellit e receiver or digit al cable box and
press CH+/- until “ L1” appears in the front panel display.
Then select a channel on your sat ellite receiver or digit al
cable box.
Press REC M ODE repeatedly to select the
recording mode: HQ, HSP, SP, LP, EP or SLP.
HQ offers t he best quality but the short est recording time.
Recording time increases wit h each successive mode, but
the quality gradually det eriorat es. See below for inst ruc-
tions on how t o decide w hich recording mode meets your
needs.
Press zREC.
The recorder automat ically searches f or recordable disc space,
and st art s recording. To st op recording, press xREC STOP.
Don't know w hat 's going on?
Press the DISPLAY button on the remot e. This w ill
display the current recording st at us on your TV screen.
Unlike a VCR, you do not need to search f or blank space; the
recorder does it f or you. And since recordings can only be manually
deleted by you, t he recorder will never accident ally record over a
previously recorded program. If you want t o delete some or all of
the cont ents t o free up disc space, see “ Erasing a Tit le (Erase)” in
the chapt er “ Edit ing a DVD.” How do you know if you have enough
free space? Read the following to find out!
You can check inf ormat ion about t he disc, such as the remaining
disc space, by pressing TOOLS
while t he disc is insert ed and
select ing “ Disc Info.” from the
displayed TOOLSmenu. The
remaining disc space for each
recording mode is displayed at
the bot t om of t he on-screen
display. Decide which mode
provides enough recording time
for your TV program, and select
it in step above.
Wait! Be sure to complete Step 2before proceeding w ith Step 3.
The f ollow ing explanat ions give a quick overview about how t o use t he DVD recorder.
How to Insert a Disc
x
How to Record a TV Program
x
How to Play the Recorded TV Program
x
How to Remove the Disc
x
Congratulations! You’ve got your ow n DVD.
ENTER TOOLS
TITLE LIST
RETURN
9/15
9/17
9/25
9/25
10/15
10/19
10/26
10/28
1.5/4.7GB
Sort
Date
Number
Title
My MoviesMy Movies
TITLE LISTTITLE LIST ORIGINALORIGINAL
-RW.VR
1 2ch 1:00PM - 2:00PM
2 5ch 8:00PM - 9:00PM
3 12ch 9:00AM - 9:30AM
4 3ch 8:00PM - 8:30PM
5 25ch 8:00PM - 8:30PM
6 L2 9:00PM - 9:30PM
7 8ch 9:00PM - 9:30PM
8 125ch 10:00AM - 10:30AM
1.5/4.7GB
ENTER TOOLS
TITLE LIST
RETURN
1.5/4.7GB
Sort
Date
Number
Title
My MoviesMy Movies
TITLE LISTTITLE LIST ORIGINALORIGINAL
-RW.VR
2ch
5ch
12ch
3ch
1 2ch 1:00PM - 2:00PM
Mon 9/15 1:00PM( 1H00M) SP
2 5ch 8:00PM - 9:00PM
Wed 9/17 8:00PM( 1H00M) SLP
3 12ch 9:00AM - 9:30AM
Thu 9/25 9:00AM( 0H30M)
EP
4 3ch 8:00PM - 8:30PM
Thu 9/25 8:00PM( 0H30M) SLP
How to Remove the Disc
Press ZOPEN/ CLOSE.
“ INFO WRITE” flashes in the front panel display for about a
minut e w hile an electronic index of the recorded cont ent s is
written on t he disc.
Remove the disc w hen the disc tray opens,
and press ZOPEN/ CLOSE again to close the
disc tray.
Want t o play a recorded DVD on ot her DVD
equipm ent ?
You may need to finalize t he disc. See “ Finalizing a disc
(Finalize)” in the chapt er “ Edit ing a DVD.”
Now that you have f amiliarized yourself wit h the DVD
recorder, try t he f unct ions below by follow ing the st eps in
the Operat ing Instructions.
•Copy VCR tape contents to a DVD
See “ Recording f rom Connected Equipment” in the
chapt er “ Connect ing a Digital Video Camera or Other
Equipment .”
•Copy DV or Digital8 camcorder contents to a DVD
See “ Available DV Dubbing Funct ions” in the chapt er
“ Connect ing a Digit al Video Camera or Other Equipment.”
ENTER RETURN
Select the way in which you will receive channels.
EASY SETUP
Tuner Preset 3/5
Antenna
Cable
ENTER RETURN
EASY SETUP
TV Type 4/5
Select your TV screen type.
16 : 9
4 : 3 Letter Box
4 : 3 Pan Scan
ENTER RETURN
EASY SETUP
Audio Connection 5/5
Is this recorder connected to an amplifier (receiver)?
Select the type of jack you are using.
Yes :
LINE OUT(R-AUDIO-L)
Yes :
DIGITAL OUT
No
D
ENTER RETURN
Disc Information
DiscName Movie
Media DVD-RW Format VR
Title no. Original 3 / Playlist 2
Protected Not Protected
Date 9/15/2003 ~ 10/28/2003
HQ : 0H30M
LP : 1H30M
HSP : 0H45M
EP : 2H00M
SP : 1H00M
2. 3 / 4. 7GB
SLP : 3H00M
Remainder
Disc Name
Format
Erase All
Finalize
Protect Disc
Close
Remaining disc space
ENTER RETURN
EASY SETUP
Clock 2/5
Select a method for setting the clock.
If you select "Auto", this recorder will look for a
time signal when you turn it off.
Auto
Manual
How to Play the Recorded TV Program
Press TITLE LIST.
The TITLE LIST menu appears.
Press M/mto select the title you w ant to play.
Press HPLAY.
Playback st art s from t he beginning of the t it le.
Don’t know w hat ’s going on?
Tr y pressing the DISPLAY butt on on t he remot e. This
will display t he current playing status on your TV
screen.
With this Sony DVD recorder, all of the recorded cont ent s can be
displayed in the TITLE LIST show n
above. This list not only allows
you to direct ly select the t itle you
want t o w at ch, but it also displays
recording data, such as t he lengt h
of t he tit le. And if you can’t
remember what the t itle
contained, press the ZOOM +/-
buttons t o display a t humbnail
picture of each title’s first scene.
I/1(on/st andby)
but t on
</M/m/,(joyst ick)
Press t he cent er of t he
joystick t o make a select ion
(ENTER)
ENTER RETURN
Easy Setup is finished
EASY SETUP
Finish
How to Insert a Disc
A new, unused DVD disc will be f ormat t ed when insert ed. For
informat ion about t he dif f erent t ypes of available DVD discs, see
the chart on the back cover of t he Operating Instructions.
Press ZOPEN/ CLOSE and place a recordable
DVD on the disc tray.
Press ZOPEN/ CLOSE again to close the disc
tray.
“ LOAD” will flash for about a m inute in the recorder’s f ront
panel display w hile the recorder det ermines what kind of disc
you have inserted. If t he disc is a new DVD-R or DVD+RW, it
will be aut omat ically format t ed. If the disc is a new DVD-RW,
you can f ormat the disc in eit her Video or VR mode.
• Video mode: Allows f or playback on most DVD equipment
once finalized
•VR mode: Allows for a variet y of edit ing opt ions using a
Playlist
See “ Before Recording” in the chapt er “ Recording/Timer
Recording” of the Operat ing Inst ruct ions f or more det ails
about t he differences between Video mode and VR mode.
Don’t know w hat’s going on?
Look at your TV screen, not t he front panel display.
Messages explaining the current st at us of t he recorder
or what act ions you are required to take w ill appear on
your TV screen. Not e t hat t he remot e does not work
while “ LOAD” is f lashing, so be pat ient !
DVD Recorder Dist inct ive
DVD Recorder Dist inct ive
DVD Recorder Dist inct ive
Downloaded from: https://www.usersmanualguide.com/

