manuals.online logo
Brands
  1. Home
  2. •
  3. Brands
  4. •
  5. Sony
  6. •
  7. Home Theater System
  8. •
  9. Sony BDV-E980 User manual

Sony BDV-E980 User manual

Other manuals for BDV-E980

1

This manual suits for next models

3

Other Sony Home Theater System manuals

Sony HT-DDW795 User manual

Sony

Sony HT-DDW795 User manual

Sony DAV-BC150 - Dvd Home Theater System User manual

Sony

Sony DAV-BC150 - Dvd Home Theater System User manual

Sony HDMI DAV-TZ140 User manual

Sony

Sony HDMI DAV-TZ140 User manual

Sony BDV-IZ1000W User manual

Sony

Sony BDV-IZ1000W User manual

Sony DAV-S500 - Compact Av System User manual

Sony

Sony DAV-S500 - Compact Av System User manual

Sony HT-RT5 User manual

Sony

Sony HT-RT5 User manual

Sony SA-SS888 User manual

Sony

Sony SA-SS888 User manual

Sony HTP-78DW User manual

Sony

Sony HTP-78DW User manual

Sony DAV-JZ8888K User manual

Sony

Sony DAV-JZ8888K User manual

Sony DAV-DZ390K User manual

Sony

Sony DAV-DZ390K User manual

Sony VGX-TP20EW - Vaio Tp Series Living Room Pc User manual

Sony

Sony VGX-TP20EW - Vaio Tp Series Living Room Pc User manual

Sony HT-AS5 User manual

Sony

Sony HT-AS5 User manual

Sony HT-DDW5500 User manual

Sony

Sony HT-DDW5500 User manual

Sony HDMI DAV-TZ140 User manual

Sony

Sony HDMI DAV-TZ140 User manual

Sony BDV-N8100W  Guide User manual

Sony

Sony BDV-N8100W Guide User manual

Sony BDV-NF620 User manual

Sony

Sony BDV-NF620 User manual

Sony HT-V600DP User manual

Sony

Sony HT-V600DP User manual

Sony HT-DDW830 User manual

Sony

Sony HT-DDW830 User manual

Sony HT-DDW970 User manual

Sony

Sony HT-DDW970 User manual

Sony Esprit TAV-L1 User manual

Sony

Sony Esprit TAV-L1 User manual

Sony DAV-DZ790K User manual

Sony

Sony DAV-DZ790K User manual

Sony DAV-HDX587WC - Bravia Theater System User manual

Sony

Sony DAV-HDX587WC - Bravia Theater System User manual

Sony HTD-710SS Instruction manual

Sony

Sony HTD-710SS Instruction manual

Sony HT-DDW790 User manual

Sony

Sony HT-DDW790 User manual

Popular Home Theater System manuals by other brands

Samsung HT-DL200 instruction manual

Samsung

Samsung HT-DL200 instruction manual

Samsung HT-ES6600 user manual

Samsung

Samsung HT-ES6600 user manual

Curtis DVD6010 instruction manual

Curtis

Curtis DVD6010 instruction manual

Philips MCD716/12 user manual

Philips

Philips MCD716/12 user manual

Sherwood ST-4108 operating instructions

Sherwood

Sherwood ST-4108 operating instructions

Philips HTS5520/12 quick start

Philips

Philips HTS5520/12 quick start

LG HT503PHW owner's manual

LG

LG HT503PHW owner's manual

Samsung HT-ES4200K user manual

Samsung

Samsung HT-ES4200K user manual

Samsung HT-P10 instruction manual

Samsung

Samsung HT-P10 instruction manual

Philips HTS5131 User manaul

Philips

Philips HTS5131 User manaul

Goodmans GDVD19SWS user manual

Goodmans

Goodmans GDVD19SWS user manual

Moxi media center user guide

Moxi

Moxi media center user guide

Samsung HT-EM35 user manual

Samsung

Samsung HT-EM35 user manual

Manta GK-500 user manual

Manta

Manta GK-500 user manual

Sharp SBW800 user manual

Sharp

Sharp SBW800 user manual

Philips HTS3541 user manual

Philips

Philips HTS3541 user manual

LG LHT799 specification

LG

LG LHT799 specification

Samsung HT-TWZ415 user manual

Samsung

Samsung HT-TWZ415 user manual

manuals.online logo
manuals.online logoBrands
  • About & Mission
  • Contact us
  • Privacy Policy
  • Terms and Conditions

Copyright 2025 Manuals.Online. All Rights Reserved.

SUBWOOFER
SUR L
SUR R
FRONT R
CENTER
FRONT L Main unit
Unité principale
4-261-411-21(1)
©2011 Sony Corporation Printed in Malaysia
(1)
Quick Setup Guide/Guide d’installation rapide
BDV-E980/E880/E580/T58
1
Connect the speakers/Raccordez les enceintes
For BDV-E980/E880, speaker assembly is necessary. Refer to the supplied“Speaker Installation Guide.”
Pour le BDV-E980/E880, l’assemblage des enceintes est nécessaire. Reportez-vous au « Guide d’installation des enceintes » fourni.
To connect speaker cords to the speaker/Raccordement des cordons d’enceinte à l’enceinte
Connect the cord so that the cord’s color tube matches the color of the label on the rear of the speaker.
Branchez le cordon en veillant à ce que son tube coloré corresponde à la couleur de l’étiquette située à l’arrière de l’enceinte.
Rear or bottom of the speaker
Arrière ou dessous de l’enceinte
Connect the speaker cords to match the color of the SPEAKERS jacks of the unit.
Raccordez les cordons d’enceinte aux prises SPEAKERS de couleur correspondante sur l’appareil.
Rear panel of the main unit/Panneau arrière de l’unité principale
FRONT R FRONT L
SUR L
SUR R
SUBWOOFER CENTER
SPEAKERS
ONLY FOR SS-TS
ONLY FOR
SS-WS
ONLY FOR SS-TS
ONLY FOR
SS-CT
Y
P
VIDEO OUT
Blue
Bleu
Gray
Gris
Red
Rouge
White
Blanc
Green
Vert
Purple
Violet
2
Connect your TV/Raccordement de votre téléviseur
Connecting with an HDMI cable (recommended)/Raccordement à l’aide d’un câble HDMI (recommandé)
HDMI IN DIGITAL OUT
OPTICAL
COMPONENT VIDEO OUT
Y
P
B
PR
VIDEO OUT
AUDIO IN
L
R
AUDIO
SAT/
CABLE
COAXIAL
DIGITAL IN
ARC
OUT
IN 1 IN 2
OPTICAL
DIGITAL IN
TV
TV
Téléviseur
HDMI cable*1
Câble HDMI*1
Digital optical cord*2
Make this connection to enjoy TV sound via the system.
This connection is unnecessary if your TV is compatible with
the Audio Return Channel (ARC) function.
Cordon optique numérique*2
Effectuez ce raccordement pour écouter le son du téléviseur
via le système.
Ce raccordement n’est pas nécessaire si votre téléviseur est
compatible avec la fonction ARC (Audio Return Channel).
Rear of the main unit
Arrière de l’unité principale
*1 Supplied with Mexican/Latin American models and BDV-T58 only.
*1 Fourni avec les modèles du Mexique/Amérique latine et avec le modèle BDV-T58 uniquement.
*2 Not supplied./*2 Non fourni.
Connecting with a video cord/Raccordement à l’aide d’un cordon vidéo
VIDEO IN
COMPONENT VIDEO OUT
Y
P
B
PR
ARC
OUT
IN 1 IN 2
AUDIO IN
L
R
AUDIO
SAT/
CABLE
COAXIAL
DIGITAL IN
DIGITAL OUT
OPTICAL
OPTICAL
DIGITAL IN
TV
VIDEO OUT
TV
Téléviseur
Video cord*
Cordon vidéo*
Digital optical cord*
Make this connection to enjoy TV sound via the system.
Cordon optique numérique*
Effectuez ce raccordement pour écouter le son du
téléviseur via le système.
Rear of the main unit
Arrière de l’unité principale
*Not supplied./*Non fourni.
You can confirm that the system and TV are connected correctly
using the Easy Setup Disc (supplied with U.S. and Canadian
models only).
En utilisant le Disque d’installation facile (fourni avec les modèles
américain et canadien uniquement), vous pouvez vérifier que le
système et le téléviseur sont correctement raccordés.
For details, refer to the Operating Instructions.
Pour plus d’informations, reportez-vous au Mode d’emploi.
Continued/Continúa 
BDV-E580 is the model used for illustration purposes.
Le modèle illustré est le BDV-E580.
4
Perform “Easy Setup”
Exécutez « Régl. facile »
Do not insert a disc before performing the “Easy Setup.”
N’insérez pas de disque avant l’exécution de « Régl. facile ».
1. Insert batteries into the remote.
Insérez les piles dans la
télécommande.
2. Connect the AC power cords of the
main unit and your TV to the AC power
outlet, and then turn on the power of
the main unit and your TV.
Raccordez les cordons d’alimentation
de l’unité principale et du téléviseur à
la prise secteur, puis mettez l’unité
principale et le téléviseur sous
tension.
3. Switch the input selector on your TV
so that system screens like the ones
below appear on the TV screen.
Commutez le sélecteur d’entrée du
téléviseur afin que des écrans du
système similaires à ceux ci-dessous
apparaissent sur l’écran du téléviseur.
“Easy Setup” screen
Ecran « Régl. facile »
Starting up
Mise en route
3
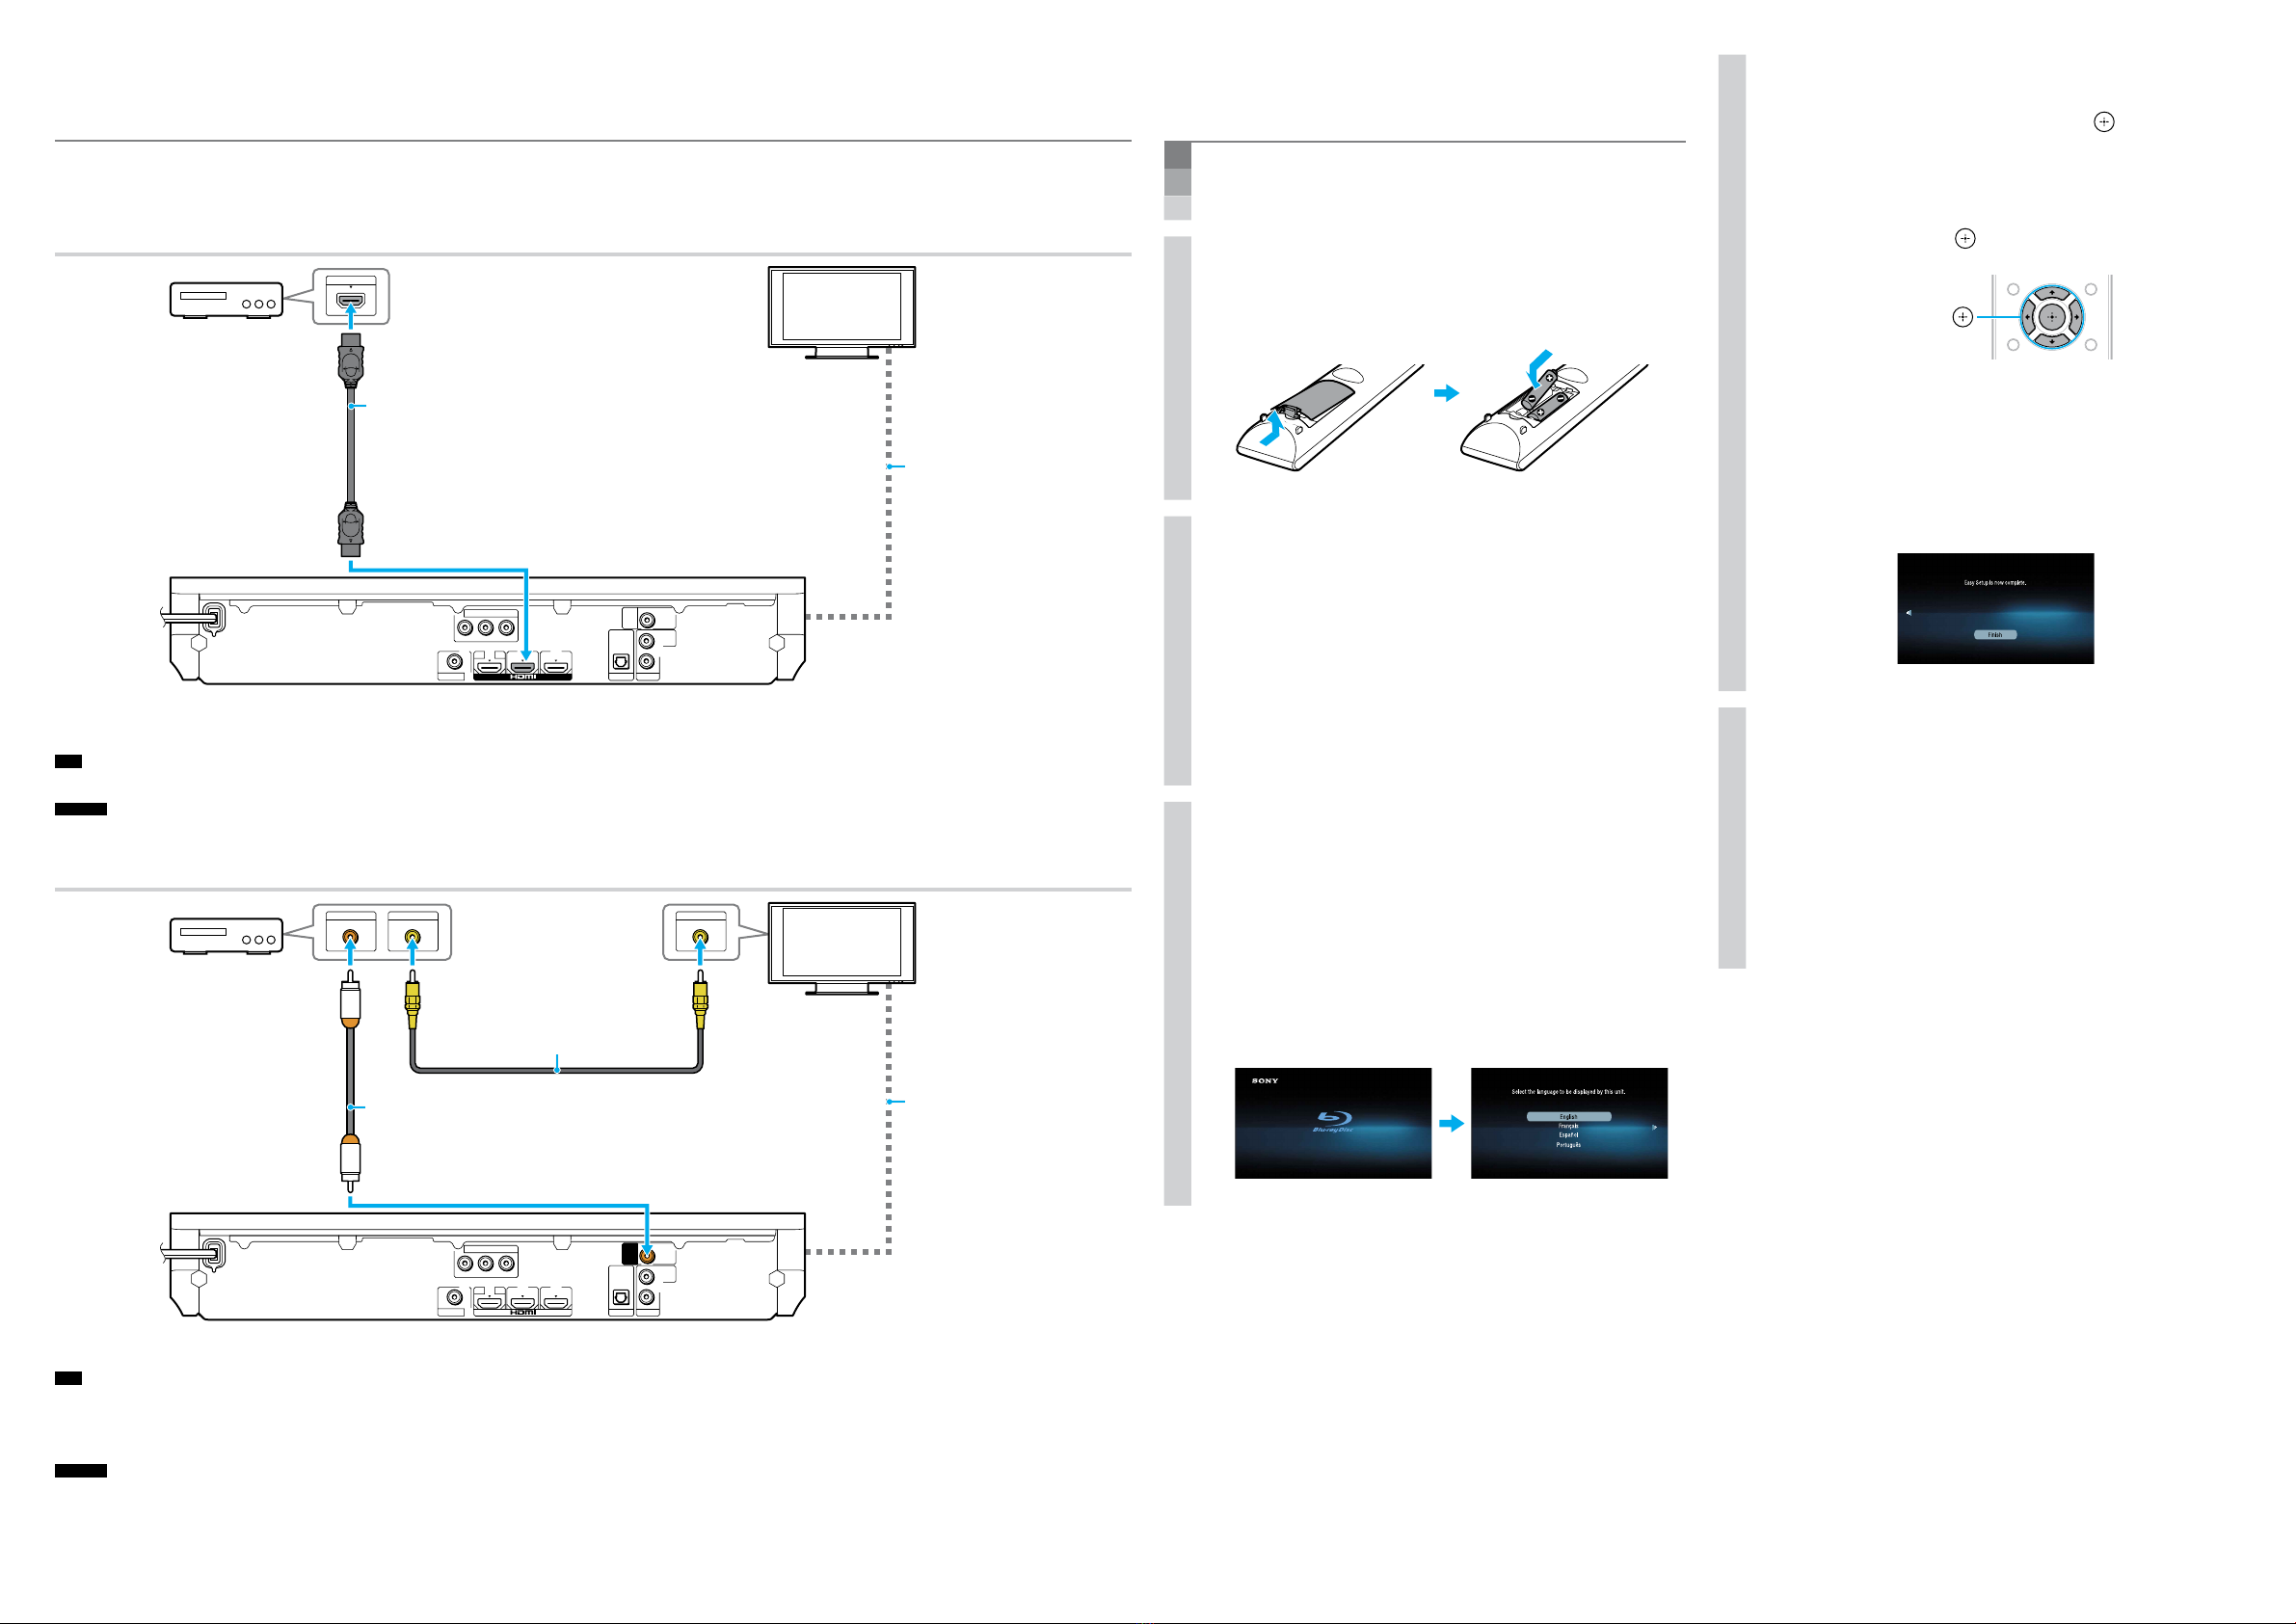
Connect your cable box/Raccordement de votre décodeur
If you do not use a cable box, skip to Step 4.
Si vous n’utilisez pas de décodeur, passez à l’étape 4.
Connecting with an HDMI cable (recommended)/Raccordement à l’aide d’un câble HDMI (recommandé)
COMPONENT VIDEO OUT
Y
P
B
PR
VIDEO OUT
OPTICAL
DIGITAL IN
TV
AUDIO IN
L
R
AUDIO
SAT/
CABLE
COAXIAL
DIGITAL IN
HDMI OUT
ARC
OUT
IN 1 IN 2
TV
Téléviseur
HDMI cable*
Câble HDMI*
Rear of the main unit
Arrière de l’unité principale
Cable box
Décodeur
*Not supplied./*Non fourni.
This connection is completed
in Step 2, “Connecting with an
HDMI cable (recommended)”
on the front side.
Ce raccordement s’effectue de
la manière décrite à l’étape 2,
« Raccordement à l’aide d’un
câble HDMI (recommandé) »,
au recto.
Note
To enjoy sound from your cable box, press FUNCTION repeatedly to select “HDMI 1.”
Remarque
Pour écouter le son provenant de votre décodeur, appuyez plusieurs fois sur FUNCTION afin de sélectionner « HDMI 1 ».
Connecting with a video cord/Conexión con un cable de vídeo
DIGITAL OUT
COAXIAL
COMPONENT VIDEO OUT
Y
P
B
PR
VIDEO OUT
ARC
OUT
IN 1 IN 2
OPTICAL
DIGITAL IN
TV
AUDIO IN
L
R
AUDIO
VIDEO OUT VIDEO IN
COAXIAL
DIGITAL IN
SAT/
CABLE
TV
Téléviseur
Video cord*
Cordon vidéo*
This connection is completed
in Step 2, “Connecting with a
video cord”on the front side.
Ce raccordement s’effectue de
la manière décrite à l’étape 2,
« Raccordement à l’aide d’un
cordon vidéo », au recto.
Rear of the main unit
Arrière de l’unité principale
Cable box
Décodeur
Digital coaxial cord*
Make this connection to enjoy cable box sound via the system.
Cordon coaxial numérique*
Effectuez ce raccordement pour écouter le son du décodeur via le
système.
*Not supplied./*Non fourni.
Note
To enable this connection, set [Control for HDMI] in [HDMI Settings] of [System Settings] to [Off]. For details, refer to “Using the Setup
Display” in the supplied Operating Instructions.
To enjoy sound from your cable box, press FUNCTION repeatedly to select “SAT/CABLE.”
Remarque
Pour activer ce raccordement, réglez [Commande pour HDMI] sur [Non] dans la section [Réglages HDMI] de [Réglages Système]. Pour
plus d’informations, reportez-vous à la section « Utilisation de l’écran d’installation » du Mode d’emploi fourni.
Pour écouter le son provenant de votre décodeur, appuyez plusieurs fois sur FUNCTION afin de sélectionner « SAT/CABLE ».
4. Perform basic settings by following
the on-screen instructions in “Easy
Setup” using ///and .
Définissez les paramètres de base en
vous conformant aux instructions
affichées dans « Régl. facile » à l’aide
de ///et .
///,
[Easy Setup is now complete.] appears when “Easy
Setup” is complete.
Le message [Le Réglage facile est maintenant
terminé.] s’affiche une fois l’opération « Régl. facile »
terminée.
Basic setup is complete. Refer to the
supplied Operating Instructions for
details on how to enjoy disc playback
and many other features.
La configuration de base est terminée.
Reportez-vous au Mode d’emploi fourni
pour plus de détails sur la lecture d’un
disque et de nombreuses autres
fonctions.