HT-SS370 4-168-167-31(1) US/FR/ES/DE
3
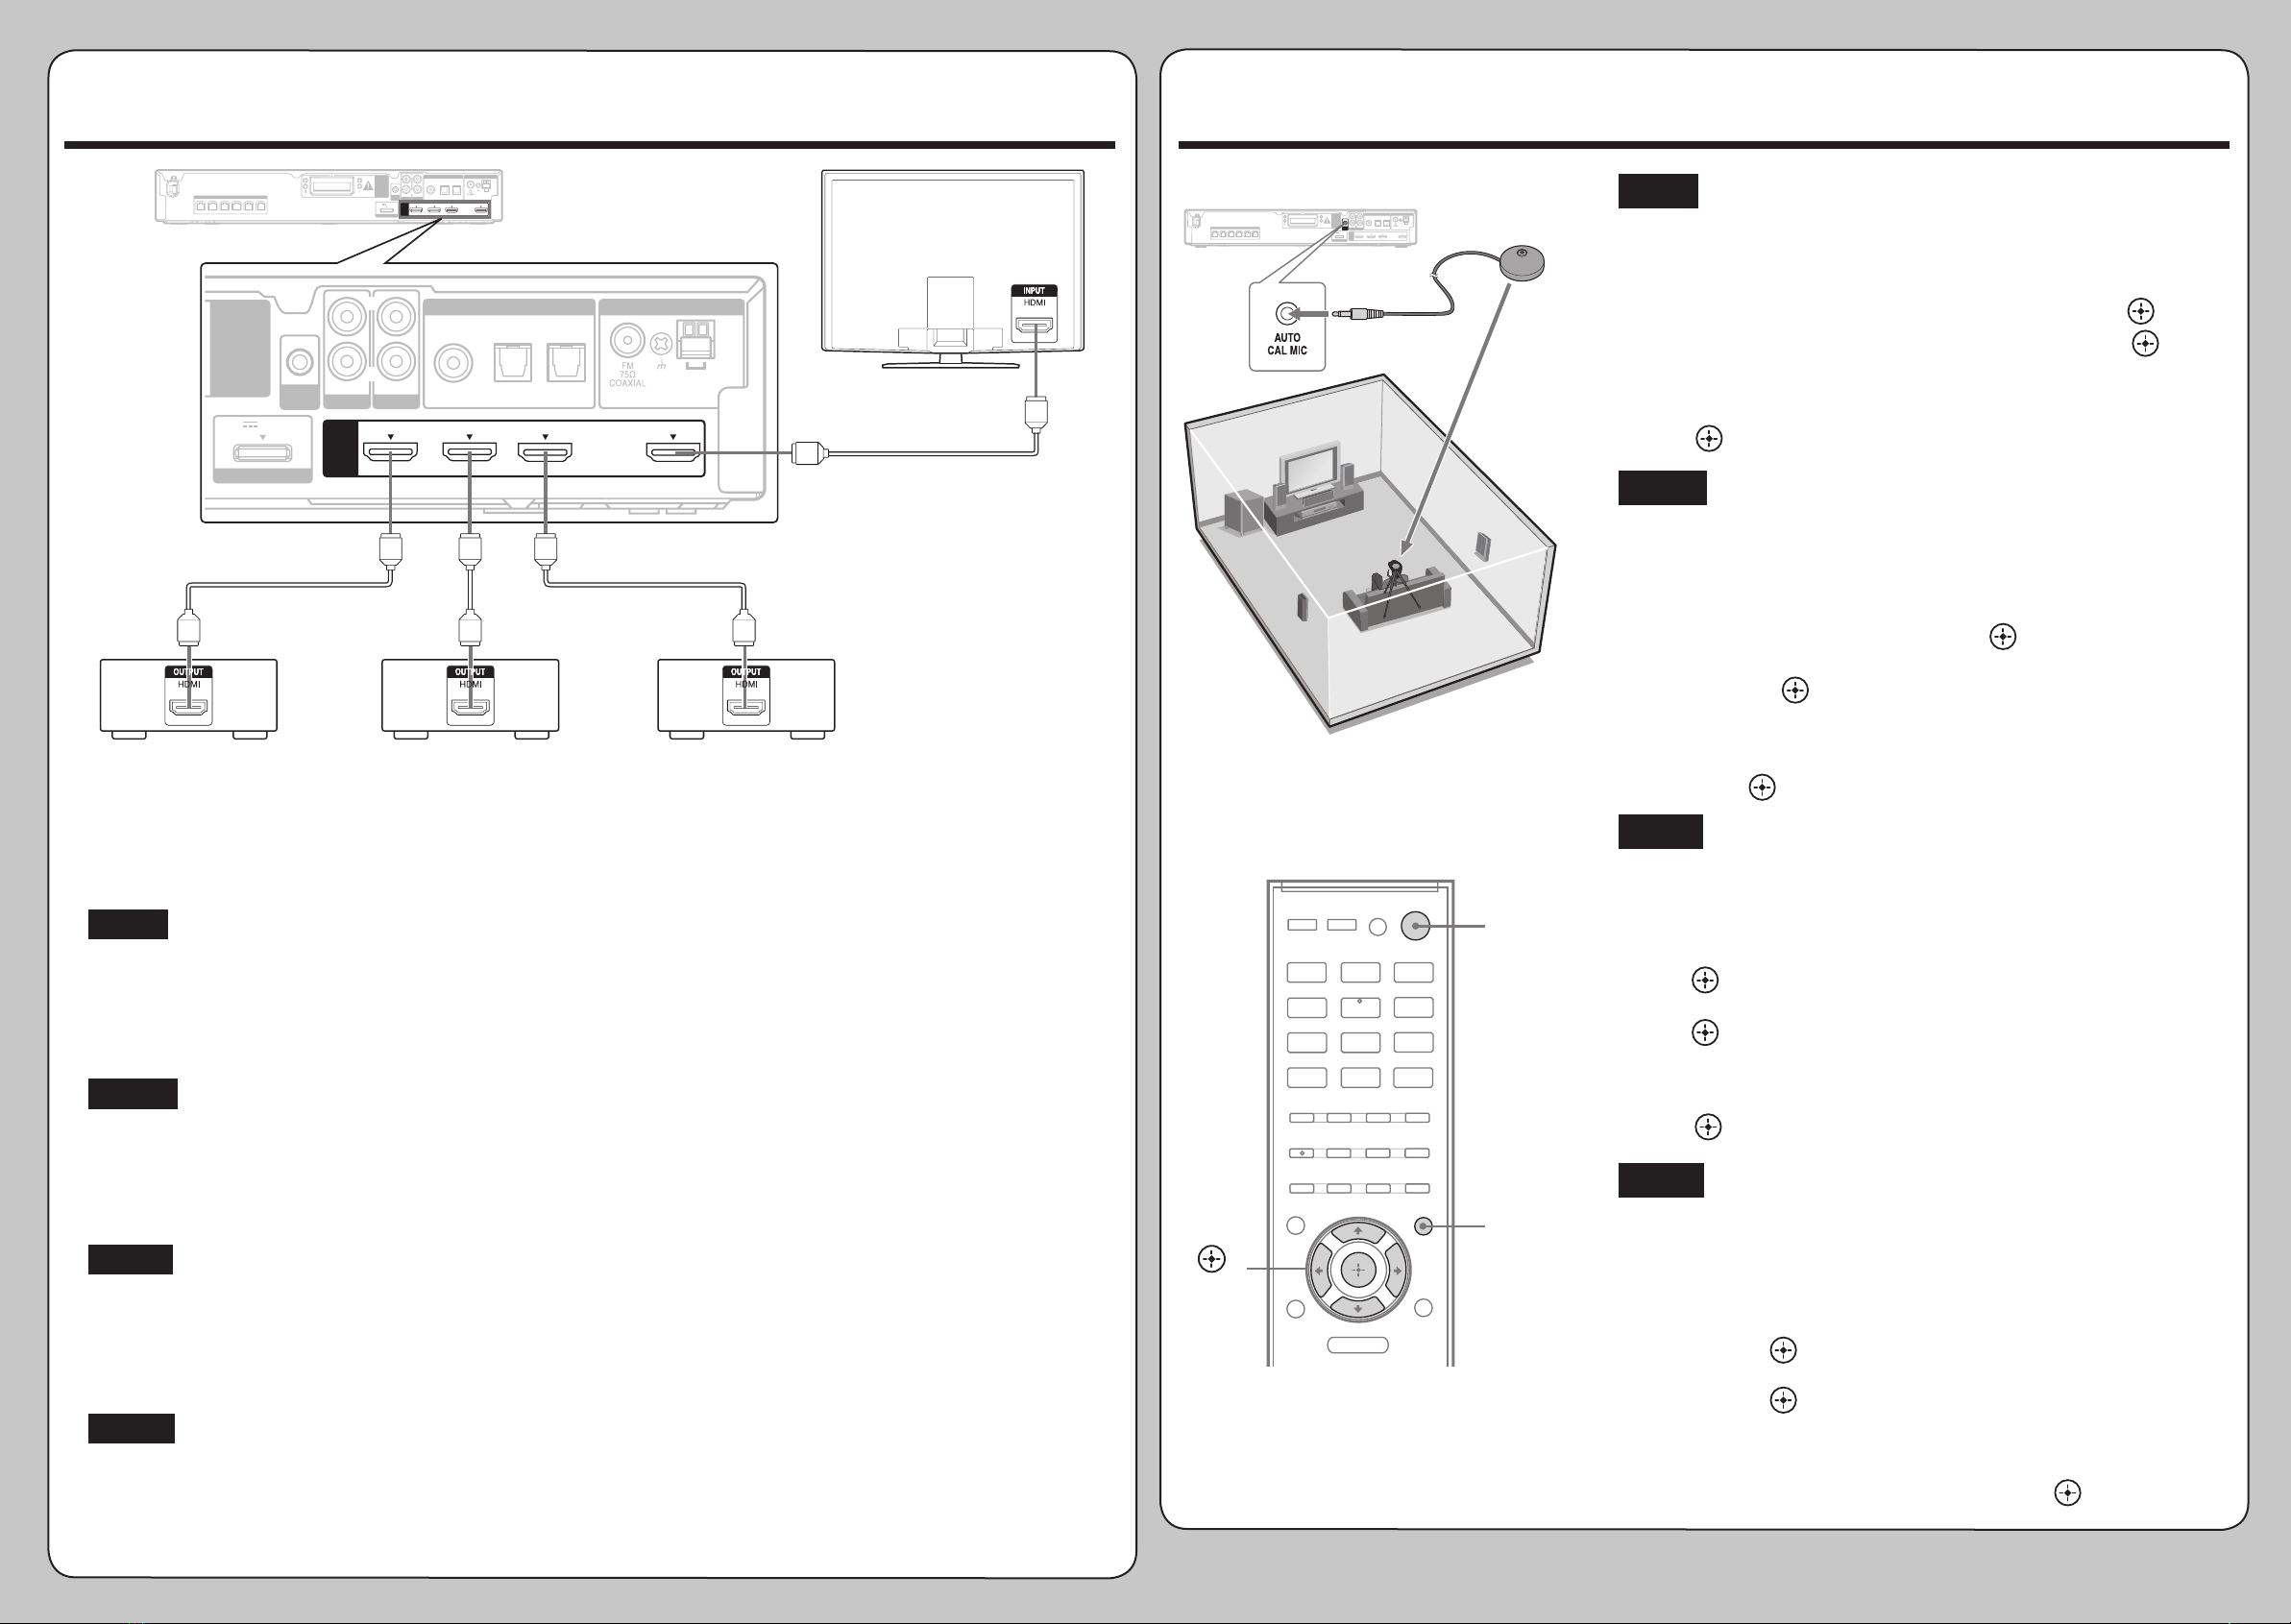
Connecting other components/Raccordement d’autres composants/
Conexión de otros componentes/Anschließen weiterer Komponenten
4
Performing the Auto Calibration/Étalonnage automatique/
Calibración automática/Durchführen der automatischen Kalibrierung
For details, refer to the supplied operating instructions./Pour plus de détails, consultez le mode d’emploi fourni./Para obtener más información, consulte el manual de
instrucciones suministrado./Einzelheiten finden Sie in der mitgelieferten Bedienungsanleitung.
AM
ANTENNA
AUTO
CAL MIC
HDMI
EZW-T100
DMPORT
DC5V 0.7A MAX
D SA TV OUT
ARC
AUDIO IN
VIDEO
L
R
SA-CD
/
CD
COAX IN
SAT/CATV TV
OPT IN OPT IN
AUDIO IN
TV
DIGITAL
AM
ANTENNA
AUTO
CAL MIC
HDMI
EZW-T100
SPEAKERS
CENTER
DMPORT
DC5V 0.7A MAX
DVDIN BD IN SAT/CATV IN TV OUT
ARC
AUDIO IN
VIDEO
L
R
SA-CD
/
CD
COAX IN
SAT/CATV TV
OPT IN OPT IN
AUDIO IN
TV
DIGITAL
VD IN BD IN T/CATV IN
"
"""
FRONT R FRONT L SURR SURL
SUBWOOFER
ARC
DVD recorder/
Enregistreur DVD/
Grabadora de DVD/
DVD-Recorder
Blu-ray disc player/
Lecteur de disques Blu-ray/
Reproductor de discos Blu-ray/
Blu-ray-Disc-Player
Satellite tuner, cable television tuner/
Tuner satellite, tuner de la télévision par câble/
Sintonizador por satélite, sintonizador de televisión por cable/
Satellitentuner, Kabelfernsehen-Tuner
TV/
Téléviseur/
Televisor/
Fernsehgerät
English
1Connect the optimizer microphone and set it at the listening position.
2Press
/to turn on the receiver.
3Press AMP MENU.
4Press
/repeatedly until “A.CAL MENU” appears, then press or .
5Press
/repeatedly until “A.CAL START” appears, then press .
The Auto Calibration starts in a few seconds.
The measurement process will take approximately 30 seconds to complete. When the
measurement ends, a beep sounds and “SAVE EXIT” appears on the display.
6Press to save the measurement result.
Français
1Raccordez le microphone optimiseur et installez-le à la position d’écoute.
2Appuyez sur
/pour mettre le récepteur sous tension.
3Appuyez sur AMP MENU.
4Appuyez plusieurs fois sur /jusqu’à ce que
« A.CAL MENU » s’affiche, puis appuyez sur ou .
5Appuyez plusieurs fois sur /jusqu’à ce que « A.CAL START » s’affiche,
puis appuyez sur .
L’étalonnage automatique démarre dans quelques secondes.
La mesure prend environ 30 secondes. Lorsqu’elle est terminée, un signal sonore est émis et
l’indication « SAVE EXIT » s’affiche à l’écran.
6Appuyez sur pour enregistrer les résultats de la mesure.
Español
1Conecte el micrófono optimizador y colóquelo en la posición de escucha.
2Pulse
/para encender el receptor.
3Pulse AMP MENU.
4Pulse
/varias veces hasta que aparezca “A.CAL MENU”; seguidamente,
pulse o .
5Pulse
/varias veces hasta que aparezca “A.CAL START”; seguidamente,
pulse .
La calibración automática se inicia en unos segundos.
El proceso de medición tarda unos 30 segundos en completarse. Cuando finaliza la medición, se
escucha un pitido y aparece “SAVE EXIT” en la pantalla.
6Pulse para guardar los resultados de la medición.
Deutsch
1Schließen Sie das Optimierungsmikrofon an und stellen Sie es an der
Hörposition auf.
2Zum Einschalten des Receivers drücken Sie auf /.
3Drücken Sie auf AMP MENU.
4Drücken Sie so lange auf /, bis „A.CAL MENU“ erscheint. Anschließend
drücken Sie auf oder .
5Drücken Sie so lange auf /, bis „A.CAL START“ erscheint. Anschließend
drücken Sie auf .
Die automatische Kalibrierung startet in wenigen Sekunden.
Der Messprozess dauert insgesamt ca. 30 Sekunden. Sobald die Messung beendet wurde ertönt
ein Piepton und auf dem Display erscheint „SAVE EXIT”.
6Zum Speichern der Messergebnisse drücken Sie auf .
BD DVD SAT/
CATV
VIDEO SA-CD/
CD
DMPORT TUNER
0
TV
MENU
AM
ANTENNA
AUTO
CAL MIC
HDMI
EZW-T100
FRONTR
SPEAKERS
FRONTL SURR SURL CENTER
SUBWOOFER
DMPORT
DC5V 0.7A MAX
DVDIN BDIN SAT/CATVIN TVOUT
ARC
AUDIOIN
VIDEO
L
R
SA-CD
/
CD
COAXIN
SAT/CATV TV
OPTIN OPTIN
AUDIOIN
TV
DIGITAL
Optimizer microphone/
Microphone optimiseur/
Micrófono optimizador/
Optimierungsmikrofon
AHDMI cable (not supplied)/Câble HDMI (non fourni)/Cable HDMI (no suministrado)/HDMI-Kabel (nicht mitgeliefert)
/
AMP
MENU
,
///
English
Note on TV connection
If your TV is compatible with Audio Return Channel (ARC) function, the TV sound will output from the speakers connected to
the receiver when you set “ARC” to “ARC ON” in SET HDMI menu. Otherwise, refer to the operating instructions for the audio
connection of the TV to the receiver.
For details on the TV settings, refer to the operating instructions of the TV.
Français
Remarque concernant la connexion d’un téléviseur
Si votre téléviseur est compatible avec la fonction ARC (Audio Return Channel), le son du téléviseur est émis via les enceintes
raccordées au récepteur lorsque vous réglez « ARC » sur « ARC ON » dans le menu SET HDMI. Dans le cas contraire, consultez le
mode d’emploi pour obtenir de plus amples informations sur la connexion audio du téléviseur au récepteur.
Pour plus de détails sur les réglages du téléviseur, consultez le mode d’emploi du téléviseur.
Español
Nota sobre la conexión del televisor
Si su televisor es compatible con la función ARC (Canal de retorno de audio), el sonido del televisor se emitirá por los altavoces
conectados al receptor si ajusta “ARC” como “ARC ON” en el menú SET HDMI. En caso contrario, consulte las instrucciones de
conexión de audio del televisor al receptor.
Para obtener más información sobre los ajustes del televisor, consulte su manual de instrucciones.
Deutsch
Hinweis zum Anschluss an ein Fernsehgerät
Falls Ihr Fernsehgerät mit der Audiorückkanalfunktion (Audio Return Channel/ARC) kompatibel ist, wird der Fernsehton von den
mit dem Receiver verbundenen Lautsprechern ausgegeben, wenn Sie im Menü SET HDMI von „ARC” auf „ARC ON” schalten.
Andernfalls lesen Sie die Bedienungsanleitung der Audio-Verbindung vom Fernsehgerät zum Receiver.
Einzelheiten zu den Einstellungen des Fernsehgeräts finden Sie in der Bedienungsanleitung des Fernsehgeräts.


