manuals.online logo
Brands
  1. Home
  2. •
  3. Brands
  4. •
  5. Sony
  6. •
  7. Mini Disc Player
  8. •
  9. Sony MZ-NH900 User manual

Sony MZ-NH900 User manual

Other manuals for MZ-NH900

3

Other Sony Mini Disc Player manuals

Sony MZ-E70 User manual

Sony

Sony MZ-E70 User manual

Sony MDS-JB920 User manual

Sony

Sony MDS-JB920 User manual

Sony CDX-505RF - Compact Disc Changer System User manual

Sony

Sony CDX-505RF - Compact Disc Changer System User manual

Sony Walkman MZ-E909 User manual

Sony

Sony Walkman MZ-E909 User manual

Sony MD WALKMAN MZ-E300 User manual

Sony

Sony MD WALKMAN MZ-E300 User manual

Sony MDX-65 User manual

Sony

Sony MDX-65 User manual

Sony MZ-E80 User manual

Sony

Sony MZ-E80 User manual

Sony MDS-M100 - Md Player User manual

Sony

Sony MDS-M100 - Md Player User manual

Sony MZ-E80 User manual

Sony

Sony MZ-E80 User manual

Sony MZDN430 - MZ-DN430PSBLK Psyc MiniDisc Network... User manual

Sony

Sony MZDN430 - MZ-DN430PSBLK Psyc MiniDisc Network... User manual

Sony CDX-CA730X Product guide

Sony

Sony CDX-CA730X Product guide

Sony MZ-NE410 Notes on installing & operating... Owner's manual

Sony

Sony MZ-NE410 Notes on installing & operating... Owner's manual

Sony Hi-MD WALKMAN MZ-DH710 User manual

Sony

Sony Hi-MD WALKMAN MZ-DH710 User manual

Sony MDS-M100 - Md Player User manual

Sony

Sony MDS-M100 - Md Player User manual

Sony Walkman MZ-R900DPC User manual

Sony

Sony Walkman MZ-R900DPC User manual

Sony MZ-R55 User manual

Sony

Sony MZ-R55 User manual

Sony MD Walkman MZ-E44 User manual

Sony

Sony MD Walkman MZ-E44 User manual

Sony MDS-JE440 - Md Player User manual

Sony

Sony MDS-JE440 - Md Player User manual

Sony MXD-D4 User manual

Sony

Sony MXD-D4 User manual

Sony MDX-C670 User manual

Sony

Sony MDX-C670 User manual

Sony MDS-JE780 User manual

Sony

Sony MDS-JE780 User manual

Sony MDS-JE520 User manual

Sony

Sony MDS-JE520 User manual

Sony MDS-JE480 User manual

Sony

Sony MDS-JE480 User manual

Sony MDS-S39 User manual

Sony

Sony MDS-S39 User manual

Popular Mini Disc Player manuals by other brands

Panasonic SJ-MR220 Schematic diagrams

Panasonic

Panasonic SJ-MR220 Schematic diagrams

Technics SJ-MD150 Service manual

Technics

Technics SJ-MD150 Service manual

Clarion 2060 Service manual

Clarion

Clarion 2060 Service manual

Yamaha MDP2 owner's manual

Yamaha

Yamaha MDP2 owner's manual

Teac MD-5 owner's manual

Teac

Teac MD-5 owner's manual

Kenwood DMC-G7R Service manual

Kenwood

Kenwood DMC-G7R Service manual

Sharp MD-MS722H Service manual

Sharp

Sharp MD-MS722H Service manual

JVC XU-301BK instructions

JVC

JVC XU-301BK instructions

Sharp MD-DS8 Operation manual

Sharp

Sharp MD-DS8 Operation manual

Sharp MD-SR505E(S) Service manual

Sharp

Sharp MD-SR505E(S) Service manual

Kenwood DMC-G3 instruction manual

Kenwood

Kenwood DMC-G3 instruction manual

Sharp MD-T60H Operation manual

Sharp

Sharp MD-T60H Operation manual

Sharp MD-MT821(GL) Service manual

Sharp

Sharp MD-MT821(GL) Service manual

Tascam MD-350 Service manual

Tascam

Tascam MD-350 Service manual

Panasonic SJ-MJ88 Service manual

Panasonic

Panasonic SJ-MJ88 Service manual

Sharp MD-ST770 Operation manual

Sharp

Sharp MD-ST770 Operation manual

Panasonic SJ-MJ95 operating instructions

Panasonic

Panasonic SJ-MJ95 operating instructions

Sharp MD-ST700 Operation manual

Sharp

Sharp MD-ST700 Operation manual

manuals.online logo
manuals.online logoBrands
  • About & Mission
  • Contact us
  • Privacy Policy
  • Terms and Conditions

Copyright 2025 Manuals.Online. All Rights Reserved.

1
Recording with the Sony MZ-NH-900
Set-Up Steps for MD Mode Only
The HiMD recorders can record in two formats: the higher quality HiMD
format or the Standard MD SP format. They can also record on both the
old, “MD” discs and the new HiMD discs. The separate set-up steps for
the Hi-MD mode follow these below.
These steps are for MD Disc mode, NOT Hi-MD !!
Files created in the MD format cannot be transferred digitally via
SoundStage and a USB cable on a PC. MD format recordings have to be
transferred in real time on the Transfer platform in B-18 or via a analog
cable. Format Your Discs should be formatted in HiMD mode unless you
have a special reason to use MD mode.
Recording Kit: Sony MZ-NH900 recorder; 110 A.C. power Supply;
Charging cradle; USB cable; AA battery holder (detachable); Sony MDR-
V600 Headphones or similar. 1- Rode NT4 stereo mic or 1- stereo pair
of Sound Professional Binaural mics.
With a Sound Devices Preamp Some Sony MZ-NH900 recorders will
become available alone and some will be in backpack kits using the
MP-2 or Mix Pre mic preamps and condenser mics-- probably the Rode
NT1A’s and the CAD 179’s. The later kits can only be checked-out to
students who have taken Field Audio 420 or are enrolled in 460 and
receive a demo.
Set-Up Steps for the Sony MZ-NH900 MD Recorder
It is very important to go through theses steps every time before you
start recording and, preferably, before you even set off to record. Take
some time to practice placing the recorder into manual record gain
mode because you’ll need to be able to do this quickly and confidently
in the field. If you fail to do some of the below steps, your recording
can suffer in terms of quality and in some cases, it won’t be able to be
imported into a computer without a lot of extra work or maybe, not at
all.
2
3
Perform these steps with No Disc in the Recorder:
3.
+
3.
..
4
4. Set to Advanced Menu Mode Press and hold the Navi/Menu button
for 2 seconds until the menu window activates. Rotate the circular jog
wheel until the word, "Option," is blinking. Press down on the small
ENTER button (the button in the middle of the Jog wheel) to select
“Option.” Rotate the jog wheel until the word "Advanced" is blinking
and select it by pressing ENTER. You cannot access manual record
gain unless it is in this mode.
“EOR” (EDIT; OPTION; RECORD SET)
5. Format Disc in MD format (this erases everything that is already
recorded on the disk) Press and hold the Navi/Menu button for 2
seconds until the menu window activates. Rotate jog wheel to EDIT,
select it by pressing the ENTER button in the center of the Jog
Wheel. Under Edit-> select Format-> and blinking “Yes.” If there is
no “Format” option provided, select “Erase All.” "Disc Mode" is
blinking. Select “Disc Mode” by pressing ENTER. Jog until the word,
“MD” is blinking. Select it with ENTER.
6. Set Disc Mode in MD format Press and hold the Navi/Menu button for
2 seconds until the menu window activates. Rotate jog wheel to
Option, select it by pressing the ENTER button in the center of the
Jog Wheel. Under Option-> select Disc Mode-> and blinking “MD.”
7. Set Record Mode to SP Press and hold the Navi/Menu button for 2
seconds until the menu window activates. Rotate Jog Wheel until
"REC Set" is blinking and press Enter. Select “Rec Mode” and then
“SP.”
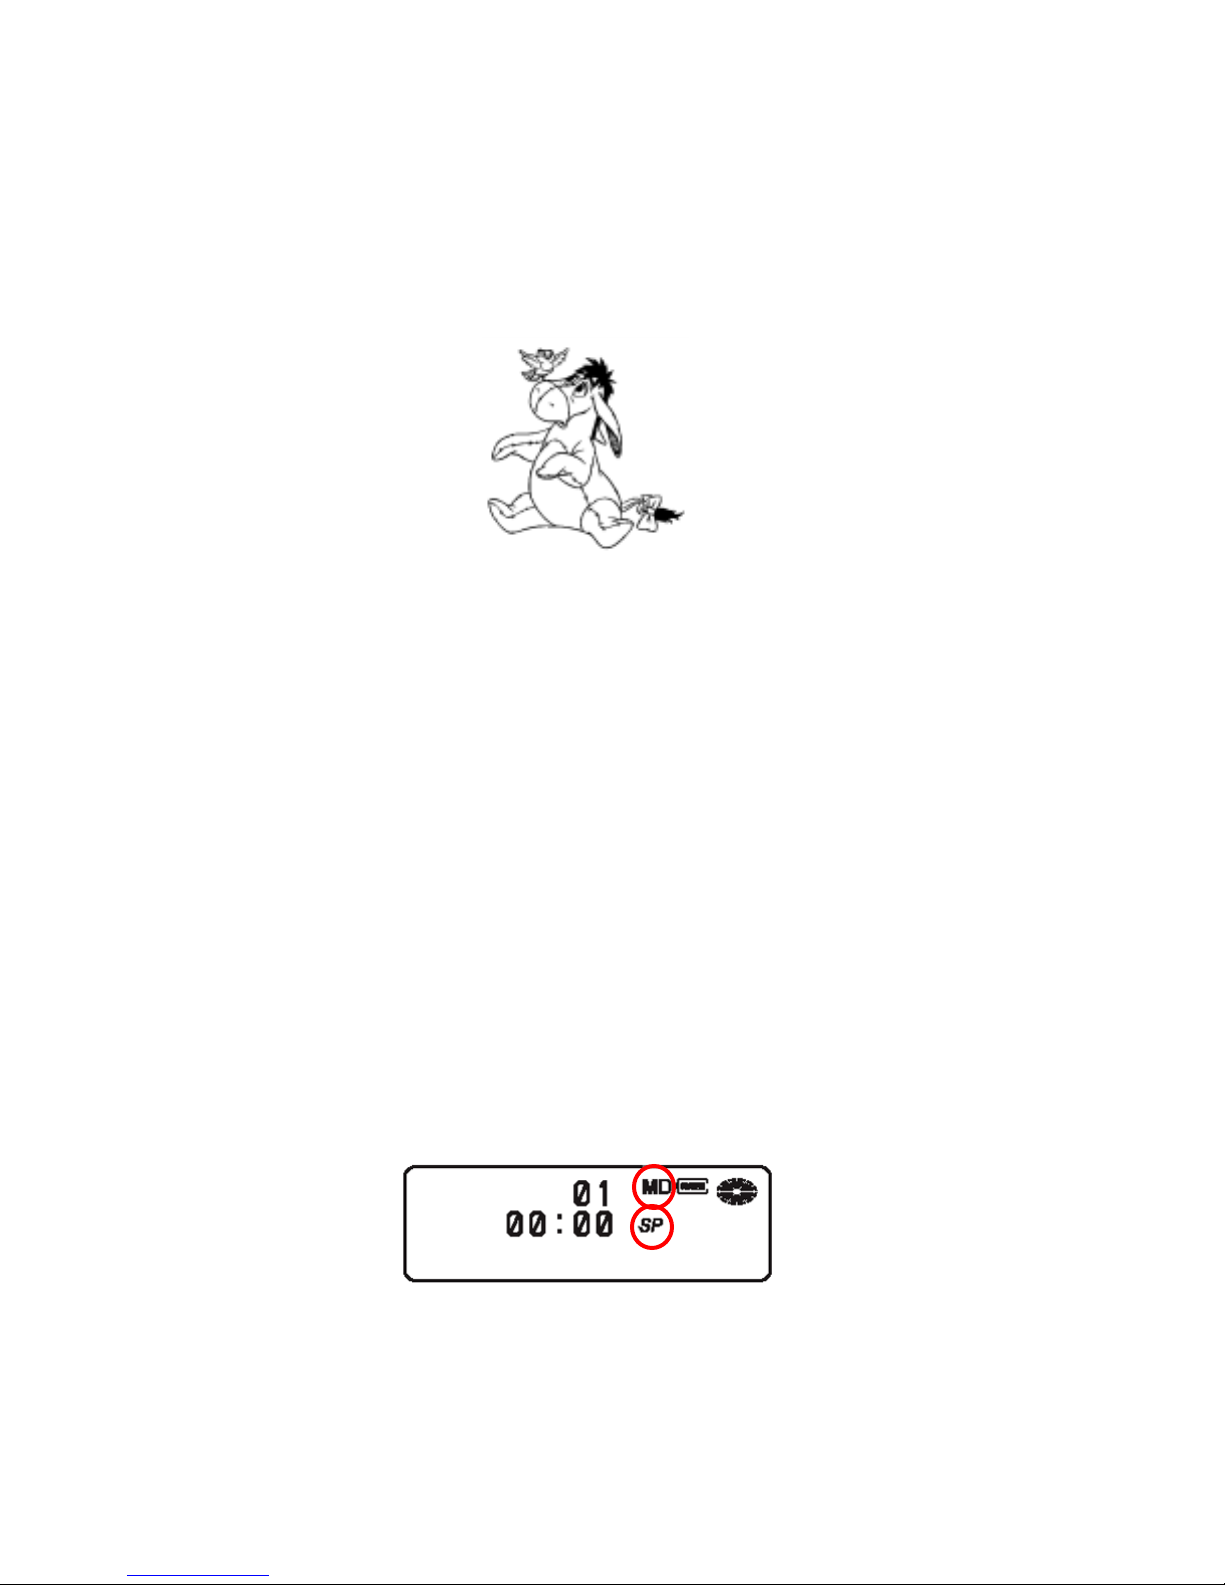
8. Look at the Menu window. The Record Mode should show “MD” and
“SP. If the window shows HiMD or LP2, re-do the above steps 5 and
7.
9. Install a fresh, alkaline, 9 volt battery into the Rode NT-4 mic by un-
screwing the lower section of the body and sliding the battery into the
cavity (terminals first). Check for correct polarity (+ to + and – to –).
Secure the battery in place with the flexible spring clip and screw the
sections back together.
5
10. Slip the mic back into the shock mount and attach the fake fur
jacket. The Rode NT-4 mic is very sensitive to hand-holding and the
slightest amount of wind. Unless you are mounting it on a mic stand
indoors, the results are likely to be disappointing without a shock
mount/zepplin.
11. Its best to turn ON the mic before plugging it in to the Recorder. The
switch is on the Mic body ON. When the NT4 is switched ON, the red
battery status light should illuminate for about 1 second and turn off. If
the L.E.D. remains illuminated significantly longer, the battery should be
replaced. Life expectancy for a high quality alkaline battery is in excess
of 400 hours. If left ON, the battery power will be unnecessarily
depleted.
12. Attach the XLR-> 1/8” stereo mini-plug cable to the end of the
NT4 mic. Plug the mini-plug connector into the RED mic in jack on
the Sony Recorder and the headphones into the black headphone
jack.
13. Set/Check Mic Sensitivity (Low or HI) Press and hold the
Navi/Menu button for 2 seconds until the menu window activates. Use
Jog Wheel to navigate to "Rec Set" and then "Mic Sens." Select
"High" if you are recording ambience or "Low" if you are recording
close voice or loud sound effects.
14. Set in Manual Record Level Mode Unfortunately, one cannot go
directly into Manual Record Mode; you must go into Auto Gain mode,
MIC IN
Headphone OUT
6
place it in pause and then use the menu to change to Manual
Record level. Push the RED REC button down and slide the button to
the right to put the recorder in instant record mode (auto gain).
Press on the PAUSE BUTTON. Press and hold the Navi/Menu button
for 2 seconds until the menu window activates. Rotate jog wheel until
"REC Set" is blinking. Select “REC Volume,” and then “Manual.” You
can now adjust Record Level manually with the Jog Wheel. Set the
record level gain so the normal volume "peaks" cause about 1/2 of
the segments to come on (turn black). Notice that the over-
modulation segment occurs right under the “0” of “30.”
You can change the record level as the deck while recording if
necessary.
15. To start recording, press again on the Pause button. When you are
ready to stop recording, press on the PAUSE button again. Try to
not stop the recorder with the STOP button unless you are taking a
break because this will take the deck out of Manual Record Level
mode. Note that the recorder jumps to unused disc space when a
new recording is started. Recordings are organized into “groups.” A
‘Group” includes all the tracks made with the pause button. Pressing
STOP will cause a new “group” to be created the next time the a
recording is made on the disc.
16. To raise the headphone volume, press on the top edge of the
ENTER button and on the lower edge to lower the headphone
volume. This may take some practice.
17. You can create a marker for a new track as the Recorder is running
by pressing the "T mark" button above the mic input jack. This will
create a new track at this point making it much easier to locate later.
18. Allow the Record to Save the Files. After pressing STOP, the
recorder needs to write the file to the disk in order to save it. DO
NOT remove the disk or turn off the power to the unit by removing
the battery or power cord during this phase or you will lose the
recordings on the disc.
7
19. Playing Recordings. Insert the disc, press the left or right edge of
the ENTER button to shuffle through your tracks.
20. Prevent accidental erasure of recorded discs by sliding the white tab
on the rear edge of the disc until the slot is open.
21. Disc Capacities: A standard MD disk has a capacity of 74-80
minutes recorded in SP mode. (Don't record in the LP mode, the
quality is compromised!)
8
Sony MZ-NH-900
Hi-MD and MD format Recorder
Set-Up Steps for HiMD Record Mode Only
The HiMD recorders can record in two formats: the HiMD format which
can create a 16bit PCM file on HiMD disks and the older MD SP format
which uses compression.
Most users will want to record on HiMD formatted disks because, in
addition to better quality, one can transfer the files digitally to a PC
using a USB transfer cable and Sony’s Soundstage/Wave Converter
software v3.2.
You can obtain higher resolution files and digital transfer capability
using the older MD discs but the discs must be formatted to HiMD
before recorded upon.
You also cannot make USB digital transfers of a recordings made onto
an older MD disc unless the disk is reformatted into the HiMD format.
There is a PC computer in B-56 or B-18 for making the digital transfers
from the Sony NH-900 itself. You must use a Mac compatible HiMD
recorder and disks recorded on this Mac compatible recorders (models
MZ-M100 or MZ-M10) to be able to transfer HiMD recordings directly to a
Mac. HiMD disks recorded on a PC compatible HiMD recorder like the
NH-900 must be transferred on a PC platform.
Set-Up Steps for the Sony MZ-NH900 MD Recorder
It is very important to go through these steps before you start recording
and, preferably, before you set off to your location. Take some time to
practice placing the recorder into manual record gain mode because
you’ll need to be able to do this quickly and confidently in the field. If
you fail to do some of the below steps, your recording can suffer in
terms of quality and in some cases, it may not be able to be digitally
imported into a computer.
9
10
Perform these steps with No Disc in the Recorder:
4. Set to Advanced Menu Mode, Press and hold the Navi/Menu button
for 2 seconds until the menu window activates. Rotate the circular jog
wheel until the word, "Option," is blinking. Press down on the small
ENTER button (the button in the middle of the Jog wheel) to select
“Option.” Rotate the jog wheel until the word "Advanced" is blinking
and select it by pressing ENTER. You cannot access manual record
gain unless it is in this mode.
5. Insert disk you wish to record on into the recorder with the metal
slide on top and to the right.
+
3.
..