manuals.online logo
Brands
  1. Home
  2. •
  3. Brands
  4. •
  5. Sony
  6. •
  7. Plasma TV
  8. •
  9. Sony KDE-P42XS1 User manual

Sony KDE-P42XS1 User manual

Quick Start Guide
©2004 by Sony Corporation
Ecological Paper - Totally Chlorine Free
4-103-039-11 (1)
Printed in Spain
Thank you for purchasing this Sony product.
After following this step by step guide you will be
able to:
Insert Batteries into the Remote Control.
Connect the AC Cable, Aerial and VCR to your
TV.
Stabilize the TV set.
Tune your TV.
Change the broadcast channels into a
different order.
View TV Programmes.
Use the basic functions of the Remote Control.
Make sure you insert the supplied batteries using the correct polarities.
Always remember to dispose of used batteries in an environmentally friendly way.
• Use the supplied mains lead (Type BF, see step 1).
• Use one of the supplied coaxial cables for aerial connection, and the other one for digital connection.
• The Scart lead is optional, however if you use a Scart lead to connect your VCR it can improve
picture and sound quality when using it.
• For more details of VCR connection, please refer to the section “Connecting Optional
Equipment” on page 50 of the instruction manual.
If you do not have a Scart lead, after automatically tuning the TV, tune in the VCR test signal to
the TV programme number “0” by using the “Manual Programme Preset” option. (for details of
how to manually programme these presets, see page 32, step A of the instruction manual).
Refer to your VCR instruction manual to find out how to find the output channel of your VCR.
1 Remote control (RM-Y1011): 2 Batteries (AA size): 2 Coaxial Cables:
2 Anchor attachments: 1 Cleaning Cloth: 1 AV Mouse:
1 Mains Lead (Type BF): 1 Clamp Belt: 1 “Notes on the Plasma TV” book.
Do not remove ferrite cores.
OUTIN
VCR
Connecting an aerial
Connecting a VCR with an aerial
or
Do not connect to
the mains before all
connections are
complete.
Do not connect to
the mains before all
connections are
complete.
After setting up, secure the TV set to a wall, pillar, etc, using the supplied anchor
attachments, for a safety purposes.
1Remove the two screws attached to the upper rear side of te TV set.
2Replace the two screws with the two supplied anchor attachments.
3Secure a wall anchor bracket (not supplied) to a solid wall or a pillar.
4Pass a strong cord or chain trough both holes of the anchor attachments and then secure to a wall
or pillar, etc.
Connecting the AC
Cable, Aerial and VCR
Checking the
Accessories Supplied
KDE-P37XS1
KDE-P42XS1 4
Stabilizing the TV set
1
GB
3
Inserting Batteries into
the Remote Control
2
4-092-684-01(1)
Notes on the Plasma TV
©2002Sony Corporation
English..............2
01GBQSKE-P37XS1.fm Page 1 Monday, March 29, 2004 3:23 PM
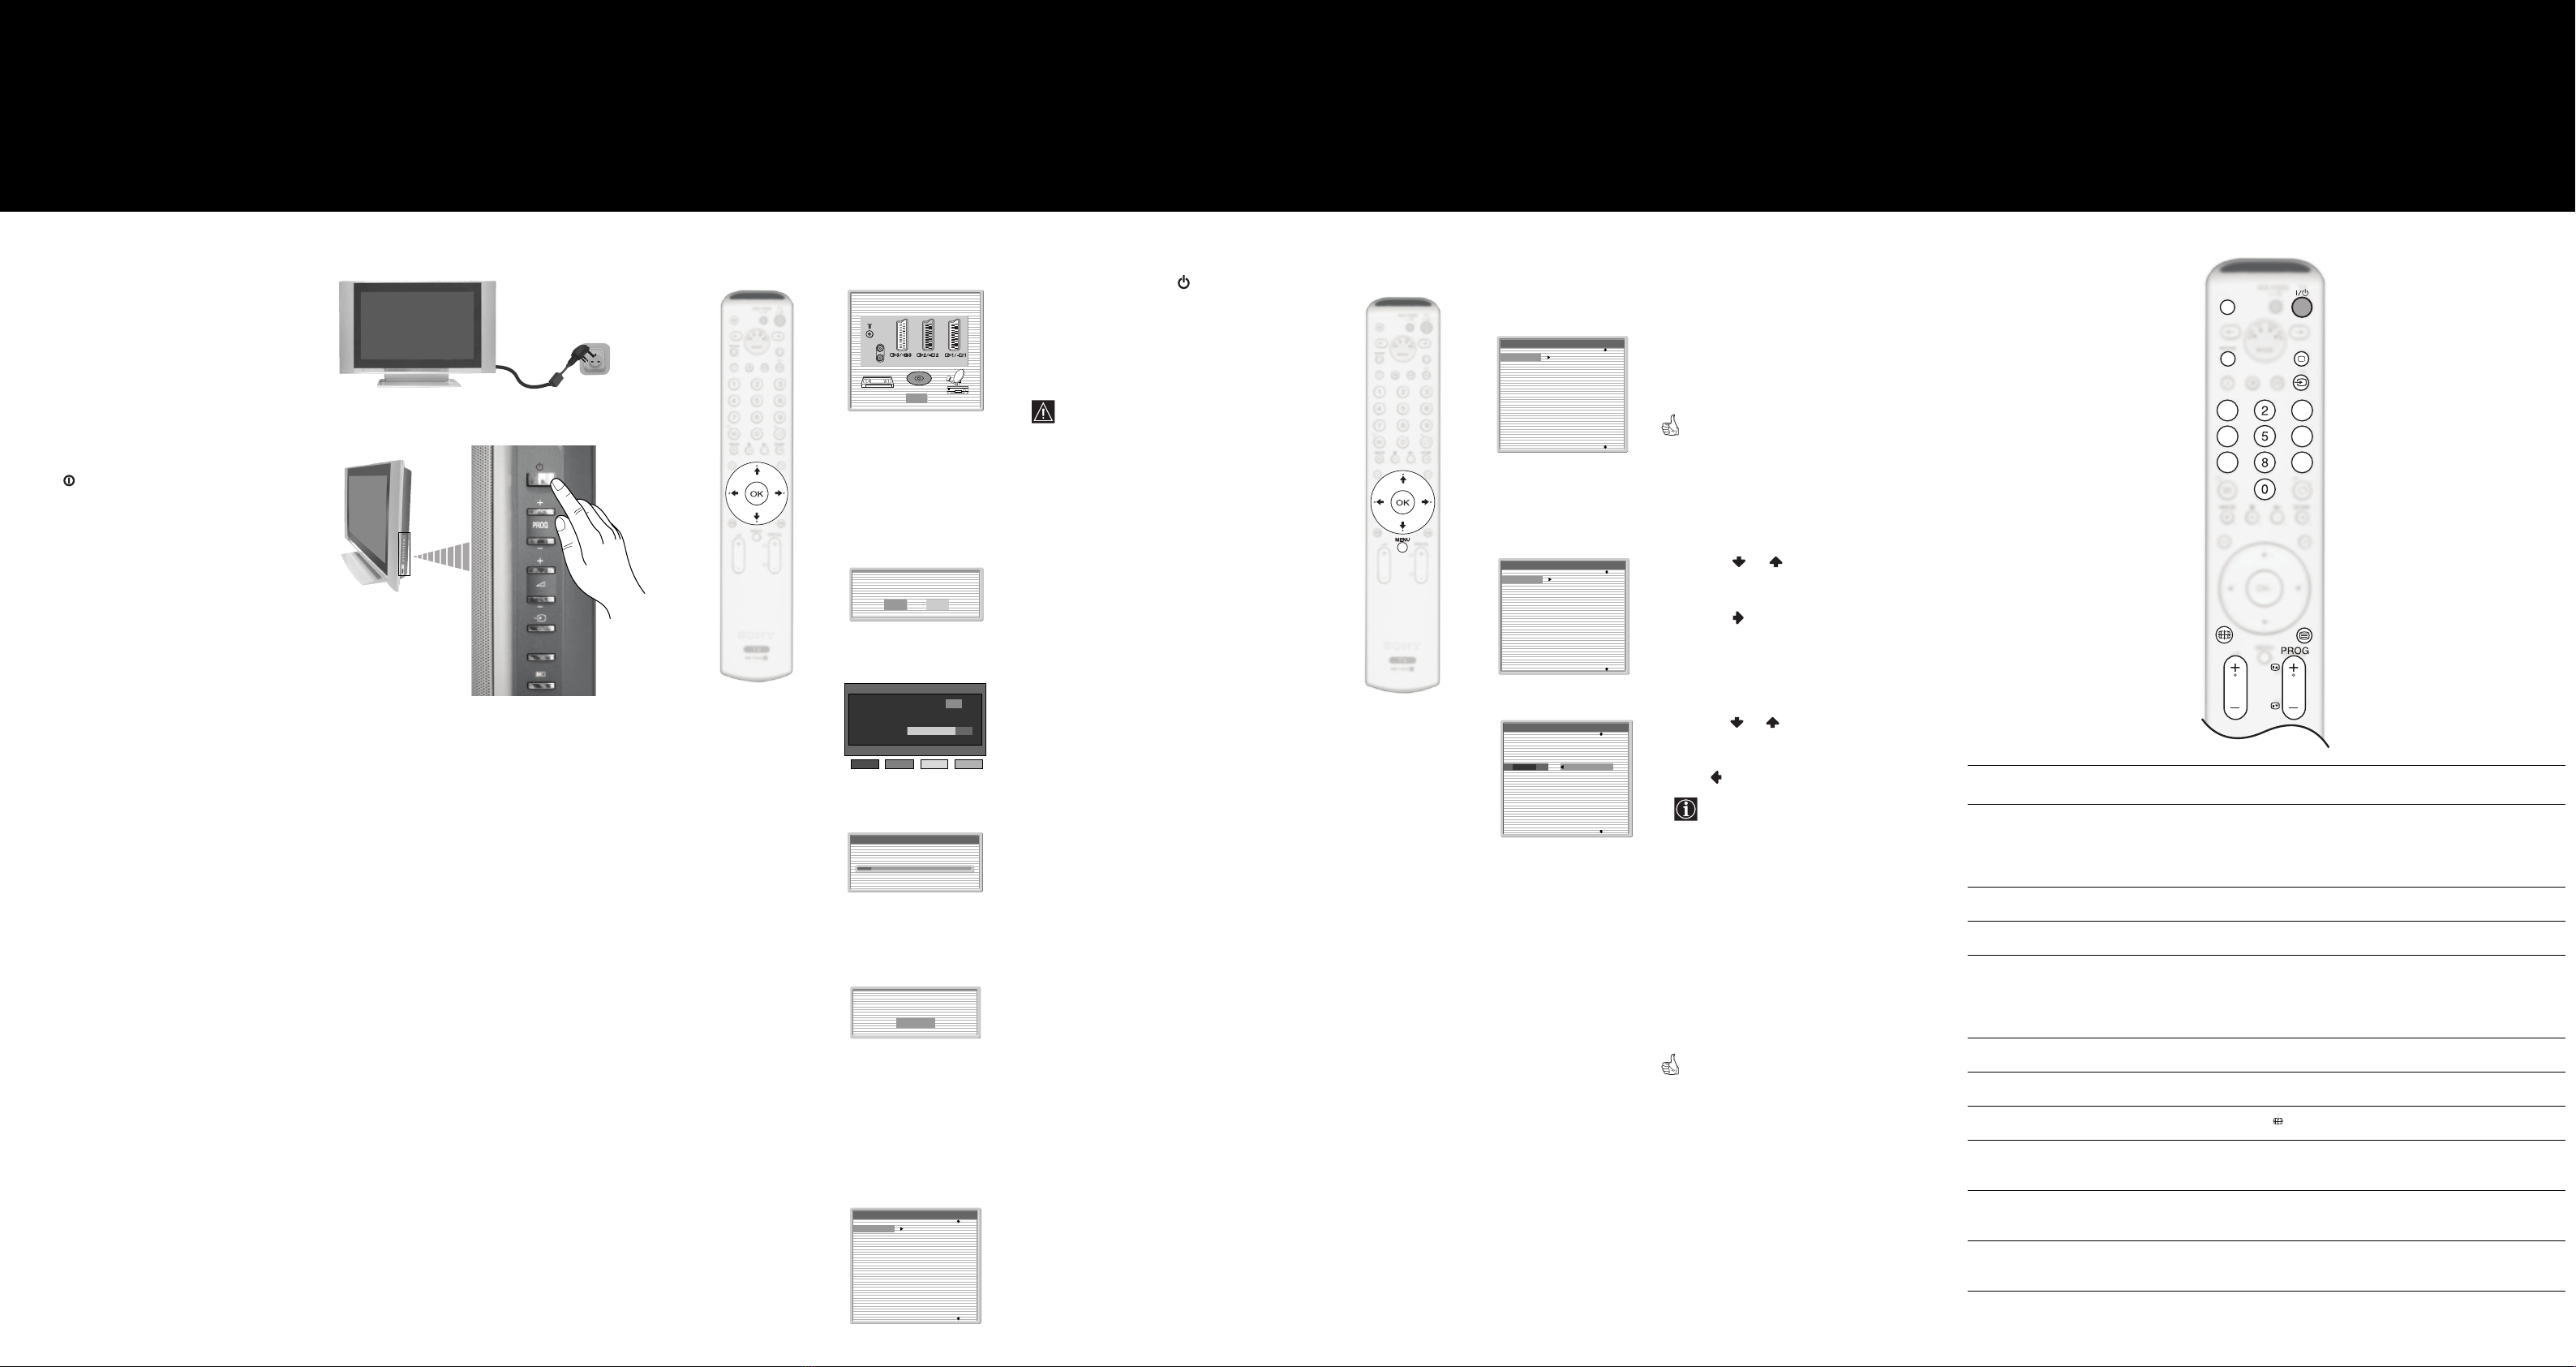
The first time you press the Power switch,
a diagram showing you how to connect
equipment to your TV set appears on the TV
screen. Follow the instructions and finally
press the OK button to remove the picture and
continue the automatic tuning process.
The connection diagram should be used as
a guide only as most equipment can be
connected to more than one type of TV
socket. Once the TV has completed the
automatic tuning process, refer to the
‘Connection Guide’ section on page 27 of
the instruction manual for further
information on getting the best set up for
your equipment.
1Press the OK button on the remote control
to select Yes.
2The TV starts to automatically search and
store all available broadcast channels for
you as follows:
a) The Digital autotune display appears on
screen and the search and store procedure
begins. All the available Digital channels
will now be captured and stored. As this
may take some time, a message is
included in the display to inform you of
the tuning progress.
b) When Digital tuning is complete, the
analogue display appears automatically
and the search and store procedure for the
analogue channels begins.
•This procedure could take some minutes.
Please be patient and do not press any
buttons, otherwise automatic tuning will not
be completed.
• If no Digital and no Analogue channels were
found during the auto tuning process then a
new menu appears automatically on the
screen asking you to connect the aerial.
Please connect the aerial (see page 15) and
press OK. The auto tuning process will start
again.
• Once all Digital and Analogue channels have
been captured and stored, the TV returns to
normal operation and displays the first Digital
channel tuned.If no Digital channels are
captured, the Analogue channel that is
stored on channel number 1 is displayed.
When the auto tuning is finished, the
Programme Sorting menu appears
on the screen (only if the TV has
captured analogue channels).
OK
Please connect your equipment
according to this chart
DVD
Do you want to start
automatic tuning?
Yes No
Auto Tuning
Programmes found: 4
No channel found.
Please connect aerial
Confirm
Auto Tuning
The number of stored services 16
0% 100%
Searching. . . 63 %
Press Blue key to cancel Auto Tuning.
Cancel
a) If you wish to keep the analogue channels in
the tuned order:
Press the MENU button on the remote
control to exit and return to the normal TV
screen.
Your set is now ready for use.
b) If you wish to store the analogue channels in a
different order:
1Press the or button to select the
programme number with the channel (TV
Broadcast) you wish to rearrange, then
press the button.
2Press the or button to select the new
programme number position for your
selected channel (TV Broadcast), then
press .
The selected broadcast channel now
moves to its new programme position
and the other broadcast channels
move accordingly.
3Repeat steps 1) and 2) if you wish to change
the order of the other channels.
4Press the MENU button on the remote
control to exit and return to the normal TV
screen.
The TV set is now ready for use.
Programme Sorting
01
02
03
04
05
06
07
08
TVE
TVE2
TV3
C33
C27
C58
S02
S06
m
Programme Sorting
01
02
03
04
05
06
07
08
TVE
TVE2
TV3
C33
C27
C58
S02
S06
Programme Sorting
01 TVE
01
02
03
04
05
06
07
08
TVE
TVE2
TV3
C33
C27
C58
S02
S06
1Connect the TV plug to the mains socket
(220-240V AC, 50Hz).
2The first time that the TV set is connected, it
is usually turned on. If the TV is off, press the
on/off button on the TV set to turn on the
TV.
a/DIGITAL
Changing the Programme Order
of the analogue channels
By following the instrutions below, you can rearrange the
order in which the analogue channels appear on the screen.
65 Automatically Tune the TV
You need to tune the TV to receive channels (TV Broadcast).
By following the instructions below, this set automatically
searches and stores all available channels for you.
Switching on the set 7Basic overview of the
Remote Control
To Press
Select channels... PROG +/- or Numbered buttons.
When selecting double digit numbers using the
Numbered buttons, press enter the second digit
within two seconds.
Adjust the volume... 2+/- buttons.
Mute the sound... %button. Press again to cancel.
Turn off the TV temporarily... TV I/1button on the remote control. When the
TV is in standby mode, the 1indicator on the TV
is lit red. Press the TV I/1button again to return
to normal TV operation.
Switch to Digital mode... DIGITAL button.
Switch to Analogue mode... abutton.
Change the screen mode... button.
Watch pictures from equipment connected to the
TV´s front and rear sockets (video input mode)...
tbutton repeatedly until the picture appears.
Access text services (depending on availability of
service) ..
/button.
Return to normal TV operation (from text, video
input mode etc.)...
abutton.
Please refer to the main instruction manual
for a complete overview of the remote control.
Your television stations are now
stored in your television’s memory.
13
46
79
TV
2
%
TV
DIGITAL
8
Programme Sorting
01
02
03
04
05
06
07
08
TVE
TVE2
TV3
C33
C27
C58
S02
S06
01GBQSKE-P37XS1.fm Page 2 Monday, March 29, 2004 3:23 PM

This manual suits for next models

1

Other Sony Plasma TV manuals

Sony KE-42XBR900 - 42" Xbr Plasma Wega™ Integrated... User manual

Sony

Sony KE-42XBR900 - 42" Xbr Plasma Wega™ Integrated... User manual

Sony WEGA KE-37XS910 User manual

Sony

Sony WEGA KE-37XS910 User manual

Sony KDE-50XS955 - 50" Flat Panel Color Tv User manual

Sony

Sony KDE-50XS955 - 50" Flat Panel Color Tv User manual

Sony WEGA KE-50XBR900, KE-42XBR900 User manual

Sony

Sony WEGA KE-50XBR900, KE-42XBR900 User manual

Sony WEGA KDE-W50A10 User manual

Sony

Sony WEGA KDE-W50A10 User manual

Sony WEGA KE-MV42A1 User manual

Sony

Sony WEGA KE-MV42A1 User manual

Sony WEGA KE-42M1 User guide

Sony

Sony WEGA KE-42M1 User guide

Sony KE-42MR1E User manual

Sony

Sony KE-42MR1E User manual

Sony WEGA KE-W50A10E User manual

Sony

Sony WEGA KE-W50A10E User manual

Sony WEGA KE-V42A10E User manual

Sony

Sony WEGA KE-V42A10E User manual

Sony KDE-42XBR950 - 42" Xbr Plasma Wega™ Integrated... User manual

Sony

Sony KDE-42XBR950 - 42" Xbr Plasma Wega™ Integrated... User manual

Sony WEGA KE-W50A10E User manual

Sony

Sony WEGA KE-W50A10E User manual

Sony WEGA KDE-42XS955 User manual

Sony

Sony WEGA KDE-42XS955 User manual

Sony KE-MX42A1 User manual

Sony

Sony KE-MX42A1 User manual

Sony WEGA KDE-W50A11E User manual

Sony

Sony WEGA KDE-W50A11E User manual

Sony WEGA KDE-37XS955 User instructions

Sony

Sony WEGA KDE-37XS955 User instructions

Sony WEGAKE-MX42 User manual

Sony

Sony WEGAKE-MX42 User manual

Sony WEGA KDE-37XS955 User manual

Sony

Sony WEGA KDE-37XS955 User manual

Sony WEGA KDE-37XS955 User manual

Sony

Sony WEGA KDE-37XS955 User manual

Sony KE-32TS2 - 32" Flat Panel Color Tv User manual

Sony

Sony KE-32TS2 - 32" Flat Panel Color Tv User manual

Sony WEGA KE-42MR1 User manual

Sony

Sony WEGA KE-42MR1 User manual

Sony KDE-50XS955 - 50" Flat Panel Color Tv User guide

Sony

Sony KDE-50XS955 - 50" Flat Panel Color Tv User guide

Sony WEGA KDE-37XS955 Use and maintenance manual

Sony

Sony WEGA KDE-37XS955 Use and maintenance manual

Sony Wega KE-P37XS1 User manual

Sony

Sony Wega KE-P37XS1 User manual

Popular Plasma TV manuals by other brands

Panasonic Viera TC-P60ST60 Service manual

Panasonic

Panasonic Viera TC-P60ST60 Service manual

RCA 42PA30RQ user manual

RCA

RCA 42PA30RQ user manual

LG 50PN5300 Specifications

LG

LG 50PN5300 Specifications

LG 42PX5R owner's manual

LG

LG 42PX5R owner's manual

Samsung PN50B530S2F user manual

Samsung

Samsung PN50B530S2F user manual

Samsung PN51E8000 E- user manual

Samsung

Samsung PN51E8000 E- user manual

Daewoo DPP-42A1LCSB Service manual

Daewoo

Daewoo DPP-42A1LCSB Service manual

Samsung LED 6500 series user manual

Samsung

Samsung LED 6500 series user manual

Panasonic Viera TH-P42S10D operating instructions

Panasonic

Panasonic Viera TH-P42S10D operating instructions

Mitsubishi PD-4225S owner's guide

Mitsubishi

Mitsubishi PD-4225S owner's guide

Samsung PN43D450A2D E-manual

Samsung

Samsung PN43D450A2D E-manual

Panasonic TC-P46U1N Service manual

Panasonic

Panasonic TC-P46U1N Service manual

Panasonic Viera TX-P42ST50E Operating instrucktion

Panasonic

Panasonic Viera TX-P42ST50E Operating instrucktion

Panasonic TC-P50X1 operating instructions

Panasonic

Panasonic TC-P50X1 operating instructions

Samsung ps51d450a user manual

Samsung

Samsung ps51d450a user manual

LG 60PS80 Series Specifications

LG

LG 60PS80 Series Specifications

LG 50PX4DR - 50 Plasma HDTV owner's manual

LG

LG 50PX4DR - 50 Plasma HDTV owner's manual

Panasonic TH-P54Z1D Service manual

Panasonic

Panasonic TH-P54Z1D Service manual

manuals.online logo
manuals.online logoBrands
  • About & Mission
  • Contact us
  • Privacy Policy
  • Terms and Conditions

Copyright 2025 Manuals.Online. All Rights Reserved.