10
SRS-RF90R/RF90RK/TMR-RF90
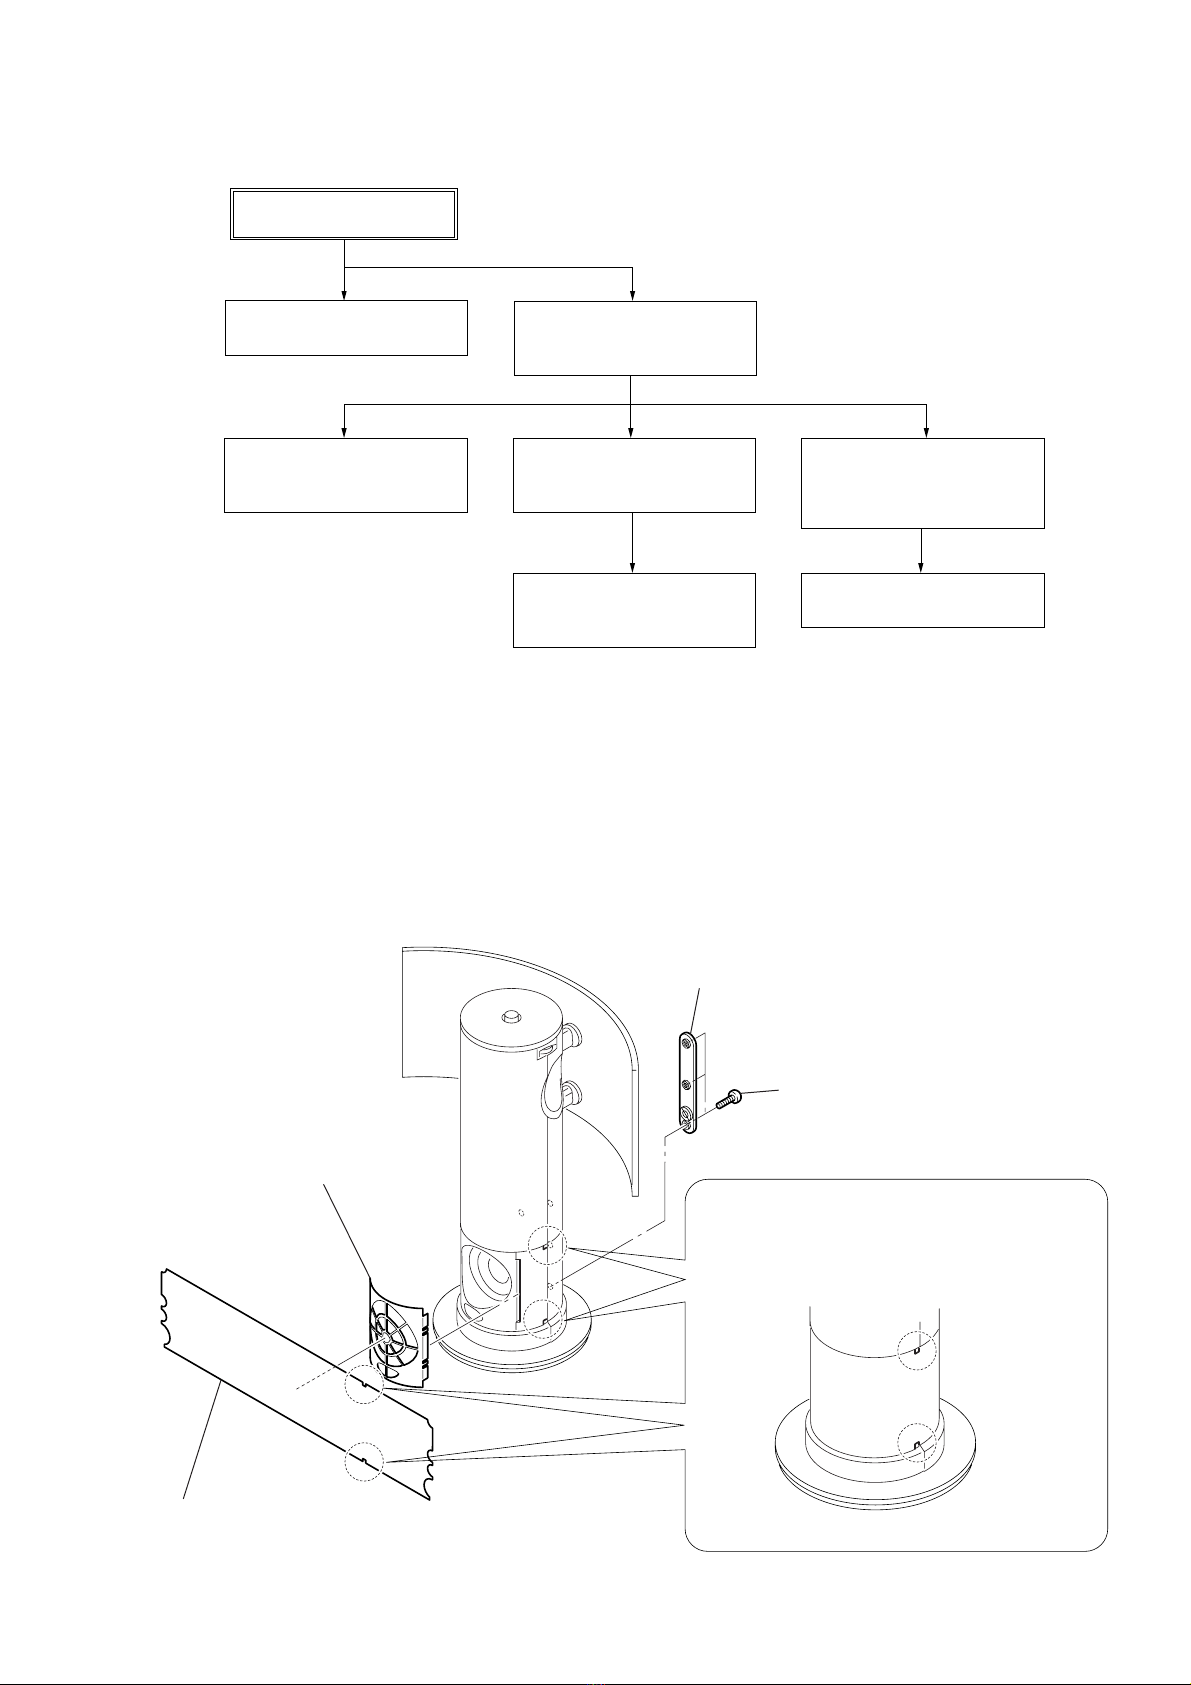
Notes:
1. Use transmitter with check and adjustment already completed.
2. On adjusting the speaker section, use the transmitter as a
jig.
Wireless Active Speaker : SRS-RF90R
Transmitter : TMR-RF90
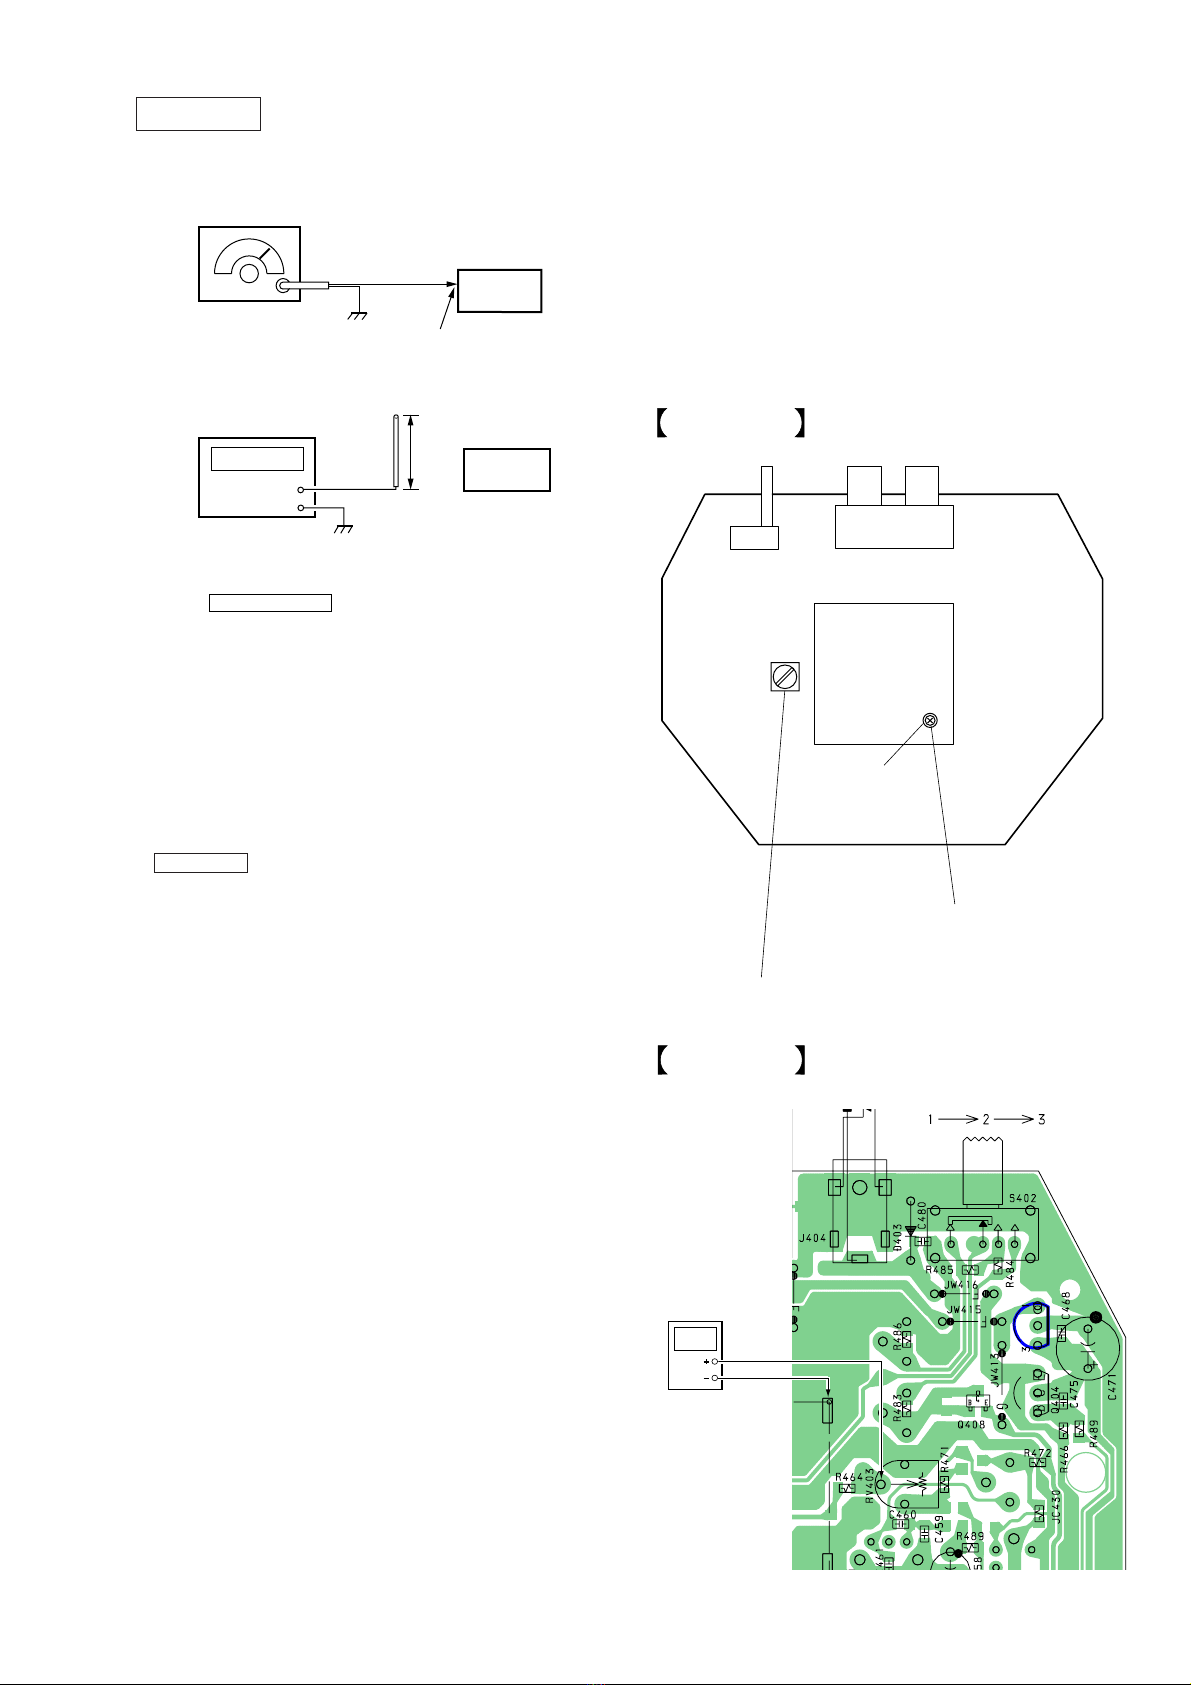
Procedure:
1. Connect an oscillator with attenuator and terminator (600 Ω)
to the transmitter AUDIO IN-A connector (J402).
2. Connect an AC adapter to the transmitter DC IN 9V jack (J404).
3. Short between Q101 corrector and GND on the RX board.
4. Connect an AC adapter to the speaker DC IN 9V jack (J801).
5. Connect lead wires to IC101 pin 4, pin 6, pin 7 and GND on
the RX board.
6. Connect a resistor 33k Ωbetween IC101 pin 4 and pin 7.
7. Connect lead wires to the speakers’terminals (L+,L-,R+,R-)
on the AMP board.
Free Run Frequency Check and Adjustment
1. Set the transmitter AUDIO IN-A connector (J402) to no signal.
Note: In this case, operation time is about 5 or 10 minutes.
Perform confirmation for less than 5 minutes.
2. Check the transmitter power indicator D401 (red) lights.
3. Set the transmitter CHANNEL switch to 1.
4. Connect DC 1.2V across TP102 and GND on the RX board.
5. Connect a frequency counter to IC101 pin 4 and GND on the
RX board, then confirm the frequency within 76kHz
± 50Hz
6. When the frequency dose not satisfy the specified value, adjust
the value of the frequency counter to specification by RV101
on the RX board.
Specified values: 76kHz ± 50Hz.
7. Remove a 33 kΩ resister between IC101 pin 4 and pin 7.
Setting :
Receiving Frequency Check and Adjustment
1. Set the transmitter CHANNEL switch to 2.
2. Set the transmitter NOISE FILTER switch to off.
3. Input a signal of 1kHz, 316mVrms to transmitter AUDIO IN-
A(L-ch) connector only.
4. Keep distance between transmitter and speaker to 5 meters over.
5. Set the speaker volume (RV301) to minimum.
6. Connect DC1.2V across TP102 and GND.
7. Connect an oscilloscope CH1 and CH2 to IC101 pin 6 and pin 4.
8. Check the waveform of the oscilloscope to CH1 is demodulated
1kHz signal and CH2 is GND.
9. If CH1 and CH2 are not satisfied in step 8, adjust the coil (L101)
on the RX board to satisfied step 8.
10. Disconnect DC1.2V across TP102 and GND.
11. Open between Q101 corrector and GND on the RX board.
12. Switch the transmitter off and push the TUNE switch (S301).
Check the waveform of the oscilloscope at the TP102 as follows:
13. Switch on the transmitter again.
14. Set the transmitter CHANNEL switch to 1.
15. Push the TUNE switch (S301) to receive radio frequency.
16. Check same step 8.
17. Set the transmitter CHANNEL switch to 3.
18. Push the TUNE switch (S301) to receive radio frequency.
19. Check same step 8.
Carrier Modulation Check
1. Set the transmitter CHANNEL switch to 2.
2. Set the transmitter NOISE FILTER switch to off.
3. Input a signal of 1kHz, 316mVrms to transmitter AUDIO IN-A
(L-ch) connector only.
4. Set the speaker volume (RV301) to minimum.
5. Connect an oscilloscope CH1 and CH2 to IC101 pin 6 and pin 4.
6. Push the TUNE switch (S301) to receive radio frequency.
7. Check the waveform of the oscilloscope that the CH1 is
demodulated 1kHz signal and CH2 is GND.
8. Connect an AC voltmeter with LPF to IC101 pin 6 and GND.
9. Check the value of the AC voltmeter to 26mVrms ± 2mV
Setting :
Separation Check
1. Set the transmitter CHANNEL switch to 2.
2. Set the transmitter NOISE FILTER switch to off.
3. Input a signal of 1kHz, 316mVrms to transmitter AUDIO IN-A
(L-ch) connector only.
4. Connect an oscilloscope CH1 to speakers terminal (L+,L-) and
CH2 to IC101 pin 4 and GND.
5. Push the TUNE switch (S301) to receive radio frequency.
6. Check the waveform of the oscilloscope that the CH1 is
demodulated 1kHz signal and CH2 is GND.
7. Connect an AC voltmeter with LPF to speakers terminal
(L+,L-).
8. Adjust the value of the AC voltmeter to specification by
speaker volume RV301.
Specified values: 155mVrms
9. Connect an AC voltmeter with LPF to speakers terminal
(R+,R-).
10. Measure the value of the AC voltmeter.
11. Check the difference of the L and R to more than 20dB.
12. Input a signal of 1kHz, 316mVrms to transmitter AUDIO IN-A
(R-ch) connector only.
13. Connect an AC voltmeter with LPF to speakers terminal
(R+,R-).
14. Adjust the value of the AC voltmeter to specification by
speaker volume RV301.
Specified values: 155mVrms
15. Connect an AC voltmeter with LPF to speakers terminal
(L+,L-).
16. Measure the value of the AC voltmeter.
Setting :
+
–
regulated power supply
(DC 1.2V)
TP102 IC101 pin4
frequency counter
+
–
GND
1.8V
2-3sec 0.6V
Waveform of
auto-tuning
voltage at
the TP102
+
–
regulated power supply
(DC 1.2V) (from step 6 to step 9)
TP102 +
–
+
–
IC101 pin6 IC101 pin4
oscilloscope
(step 8, step 16, step 19)
CH1 CH2
SRS-RF90R
Setting :
+
–
TP102
oscilloscope
CH1
+
–
digital voltmeter
(AC range)
LPF
IC101
pin6
33000P
2.2K
+
–
+
–
IC101
pin6 IC101
pin4
oscilloscope
CH1 CH2