Sony SRS-NS7 Reference guide

Help Guide
Wireless Neckband Speaker
SRS-NS7
The following explains how to use this neckband speaker. Select a topic from the navigation pane.
Design and specifications are subject to change without notice.
Getting started
Parts and controls
Power source/charging
Charging the neckband speaker
Turning the power on
Turning the power off
Automatic Power Off function
Making connections
Connecting the transmitter and a TV
Connecting the neckband speaker with the transmitter via a BLUETOOTH® connection
Connecting the transmitter with BLUETOOTH headphones
1
Computer connection
Connecting the neckband speaker with a computer via a BLUETOOTH® connection (Windows)
Connecting the neckband speaker with a paired computer via a BLUETOOTH connection (Windows)
Connecting the neckband speaker with a computer via a BLUETOOTH connection (Mac)
Connecting the neckband speaker with a paired computer via a BLUETOOTH connection (Mac)
Smartphone connection
Connecting the neckband speaker with an Android™ smartphone or an iPhone via a BLUETOOTH connection
Connecting the neckband speaker with a paired Android smartphone or a paired iPhone via a BLUETOOTH connection
Switching the source device between the devices connected with the neckband speaker (BLUETOOTH
device/TV)
Multipoint connection
Connecting the neckband speaker with a TV and a smartphone in multipoint connection
Connecting the neckband speaker with a computer and a smartphone in multipoint connection
Connecting the neckband speaker with a music player and a smartphone in multipoint connection
Connecting the neckband speaker with 2 Android smartphones in multipoint connection
Connecting the neckband speaker with an Android smartphone and an iPhone in multipoint connection
Listening to TV audio
Enjoying TV audio in spatial sound through the neckband speaker
Enjoying TV audio in spatial sound through Sony brand headphones
Terminating audio output in spatial sound (After use)
Listening to TV audio through the neckband speaker
Listening to TV audio through headphones
Listening to music
BLUETOOTH device
Listening to music of a device via BLUETOOTH connection
Selecting the quality for music playback via BLUETOOTH connections (Codec)
Terminating the BLUETOOTH connection (After use)
Phone calls
Making a video call on a computer
Receiving a call
2

Making a call
Using the app
What you can do with the “Sony | Headphones Connect” app
Installing “Sony | Headphones Connect”
Accessing support information from “Sony | Headphones Connect”
Updating the neckband speaker software
Information
About the indicator on the neckband speaker
About the indicator on the transmitter
Notes on use
Precautions
Notes on charging
Notes on water resistant feature
How to care for the neckband speaker
About the BLUETOOTH wireless technology
License notice
Trademarks
Troubleshooting
What can I do to solve a problem?
Power supply
Unable to charge the neckband speaker
Unable to turn on the neckband speaker or the neckband speaker suddenly turns off
Sound
No sound/Sound from only one speaker component/Low sound level/Distorted sound/Humming or noise in the speaker output/No
voice or low voice from callers
BLUETOOTH connection
Unable to pair the neckband speaker with a BLUETOOTH device
Reset
Resetting the neckband speaker
Initializing the neckband speaker
3


Help Guide
Wireless Neckband Speaker
SRS-NS7
Parts and controls
Neckband speaker
Transmitter
(power)/ (BLUETOOTH) button1.
(microphone off) button2.
Microphone3.
Indicator (lights in orange or blue)
Stays lit in orange while battery charging is in progress. The power or communication state of the neckband speaker
is indicated by the orange or blue indicator.
4.
Speaker components5.
(play/call) button6.
-/+ (volume) buttons7.
Cap8.
DC input port (USB Type-C®)*
9.
The port is not compatible with music playback.
*
5
Related Topic
About the indicator on the neckband speaker
About the indicator on the transmitter
5-030-430-11(1) Copyright 2021 Sony Corporation
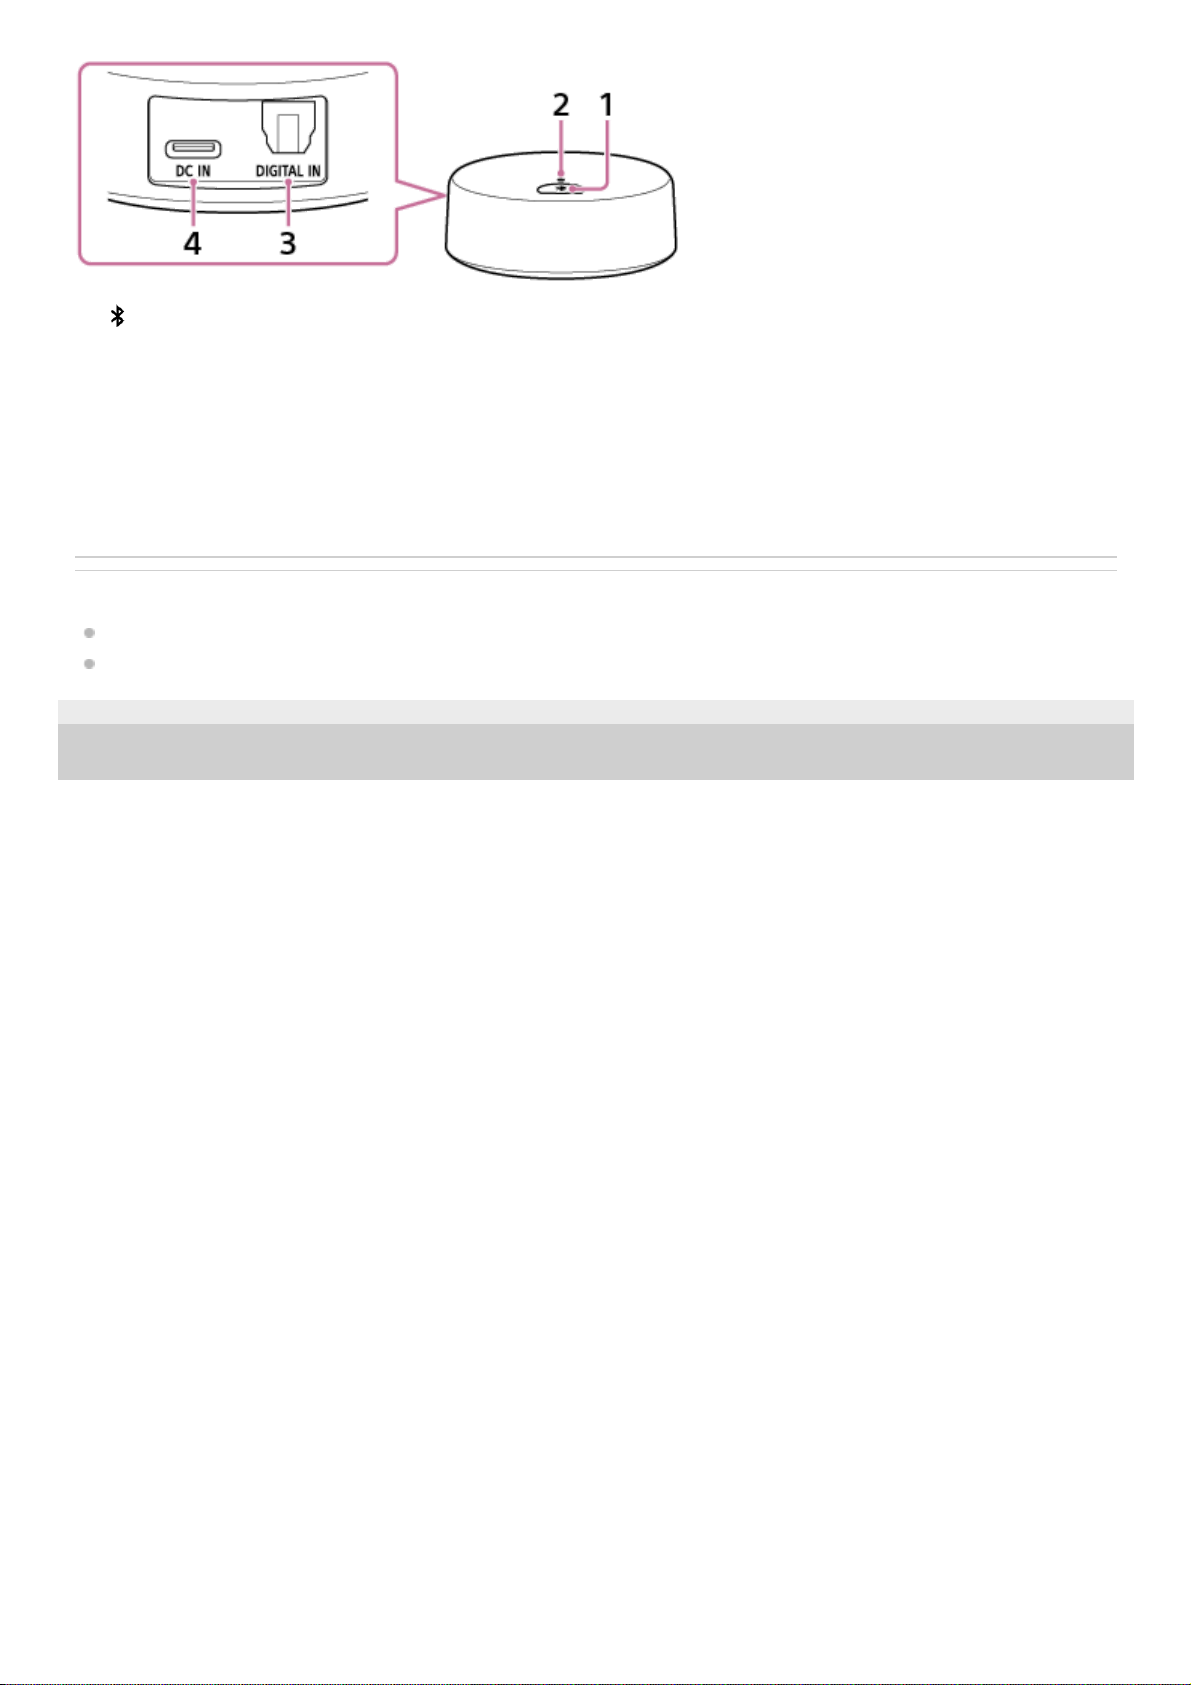
(BLUETOOTH) button1.
Indicator (lights in orange or blue)
The power or communication state of the transmitter is indicated by the orange or blue indicator.
2.
DIGITAL IN (optical digital audio input) port3.
DC IN port (USB Type-C®)
4.
6

Help Guide
Wireless Neckband Speaker
SRS-NS7
Charging the neckband speaker
The neckband speaker is equipped with a rechargeable built-in lithium ion battery. Charge the battery with a
commercially available USB AC adaptor and the supplied USB Type-C® cable before using the neckband speaker.
When using the neckband speaker for the first time, be sure to charge the built-in battery for more than 1 hour before
turning on the neckband speaker.
Checking the charging completion
If the built-in battery is fully charged when you connect the neckband speaker to an AC outlet with a commercially
available USB AC adaptor, the indicator lights in orange then goes out in about 1 minute.
Connect the neckband speaker to an AC outlet to charge it.
Connect one end of the supplied USB Type-C cable to the DC input port on the neckband speaker and the other
end to a commercially available USB AC adaptor, and then connect the USB AC adaptor to an AC outlet.
The neckband speaker supports USB AC adaptors capable of delivering an output current of 1.5 A. Use of any
other devices for battery charging is not guaranteed.
The indicator stays lit in orange while charging is in progress.
The estimated charging time varies depending on the power output capacity of the connected commercially
available USB AC adaptor. In addition, it may take longer than the charging time stated below depending on the
type and specification of the USB AC adaptor and USB cable. The charging time may differ from the time stated
below depending on the ambient temperature as well.
The following time is stated as a reference.
When a commercially available USB AC adaptor capable of delivering an output current of 1.5 A is connected,
charging completes in about 4 hours* and the orange indicator goes out.
When using a commercially available USB AC adaptor, make sure that it is capable of delivering an output
current of 1.5 A or more. You can use a USB AC adaptor with an output current of 0.5 A (500 mA) or more and
less than 1.5 A as well, but it may take a very long time before charging completes.
After you disconnect the USB cable from the neckband speaker upon completion of battery charging, be sure to
close the cap securely.
The cap plays a very important role in maintenance of the water resistant performance.
1
Time that is required to charge the empty rechargeable battery to its full capacity and may vary depending on the usage of the neckband
speaker.
*
7
When using the Android smartphone with OS 8.1 or later installed
When the neckband speaker is connected with the Android smartphone via an HFP (Hands-free Profile)
BLUETOOTH connection, tap [Settings] - [Device connection] - [Bluetooth] on the smartphone. The remaining battery
power of the neckband speaker is displayed along with the connected BLUETOOTH device name. For details, refer
to the operating instructions supplied with the Android smartphone.
Note that the remaining battery power displayed on the smartphone may vary from the actual remaining battery
power of the neckband speaker. Consider this information as a reference.
When using the iPhone with iOS 10.0 or later installed
While the neckband speaker is connected with the iPhone via an HFP (Hands-free Profile) BLUETOOTH connection,
the remaining battery power of the neckband speaker is displayed on the widget screen of the iPhone. For details,
refer to the operating instructions supplied with the iPhone.
Note that the remaining battery power displayed on the iPhone may vary from the actual remaining battery power of
the neckband speaker. Consider this information as a reference.
Checking the built-in battery level of the rechargeable built-in battery
While the neckband speaker is turned on, pressing the (power)/ (BLUETOOTH) button on the right half of the
neckband speaker triggers any of the following voice guidance in accordance with the remaining battery power.
91% - 100%: “Battery fully charged”
81% - 90%: “Battery about 90%”
71% - 80%: “Battery about 80%”
61% - 70%: “Battery about 70%”
51% - 60%: “Battery about 60%”
41% - 50%: “Battery about 50%”
31% - 40%: “Battery about 40%”
21% - 30%: “Battery about 30%”
11% - 20%: “Battery about 20%”
1% - 10%: “Battery about 10%”
Built-in battery life (using a BLUETOOTH connection)
About 12 hours
The volume level of the neckband speaker is set to 16.
About 5 hours
The volume level of the neckband speaker is set to maximum (31).
Built-in battery life (after the built-in battery is charged for 10 minutes)
10 minutes of charging provide approximately 60 minutes of music playback. (Provided that the volume level of the
neckband speaker is set to 16.)
The built-in battery life above is measured using our specified music source.
Actual performance time may vary from the listed time due to the volume, songs played, surrounding temperature, and
usage conditions.
When the built-in battery is running low
8
When you hear voice guidance (Low Battery, Please Recharge Speaker) and the indicator starts flashing slowly in
orange, the rechargeable built-in battery is running low. Charge the neckband speaker ahead of time.
When the rechargeable built-in battery has run out of power, you hear a notification sound and voice guidance (Please
Recharge Speaker. Power Off.) and the neckband speaker automatically turns off. Charge the neckband speaker.
Hint
You can charge the neckband speaker's built-in battery by connecting the USB cable connected with the neckband speaker to a
computer that comes equipped with a USB charging port as well. However, not all the computers are tested and found
compatible with this procedure and the procedure is not applicable to home-built computers.
Note
Connecting the neckband speaker to an AC outlet or a computer automatically turns off the neckband speaker. While connected
with a power source, the neckband speaker does not turn on.
In an extremely cold or hot environment, charging stops for safety. If charging takes a long time, it also makes charging of the
neckband speaker stop. To resolve these issues, disconnect the USB cable and connect it back again in an operating
temperature between 5 °C and 35 °C (41 °F and 95 °F), and then charge the neckband speaker once again. Be aware that the
room temperature may fall to 5 °C (41 °F) or lower especially in wintertime. Take the ambient temperature into consideration as
well for charging the neckband speaker.
Do not charge the neckband speaker's built-in battery in places where water may splash on it. The supplied USB Type-C cable as
well as the USB port behind the cap are not designed for water resistant.
Even if you do not intend to use the neckband speaker for a long time, charge the built-in battery sufficiently once every 6 months
to maintain its performance.
When the Android smartphone is configured to establish BLUETOOTH connections solely for music playback (A2DP), the
remaining battery power of the neckband speaker is not displayed on the smartphone.
When the Android smartphone or the iPhone is configured to establish BLUETOOTH connections solely for music playback
(A2DP) in multipoint connection, the remaining built-in battery power of the neckband speaker is not correctly displayed on the
Android smartphone or the iPhone.
Related Topic
Turning the power on
Notes on charging
5-030-430-11(1) Copyright 2021 Sony Corporation
9
Help Guide
Wireless Neckband Speaker
SRS-NS7
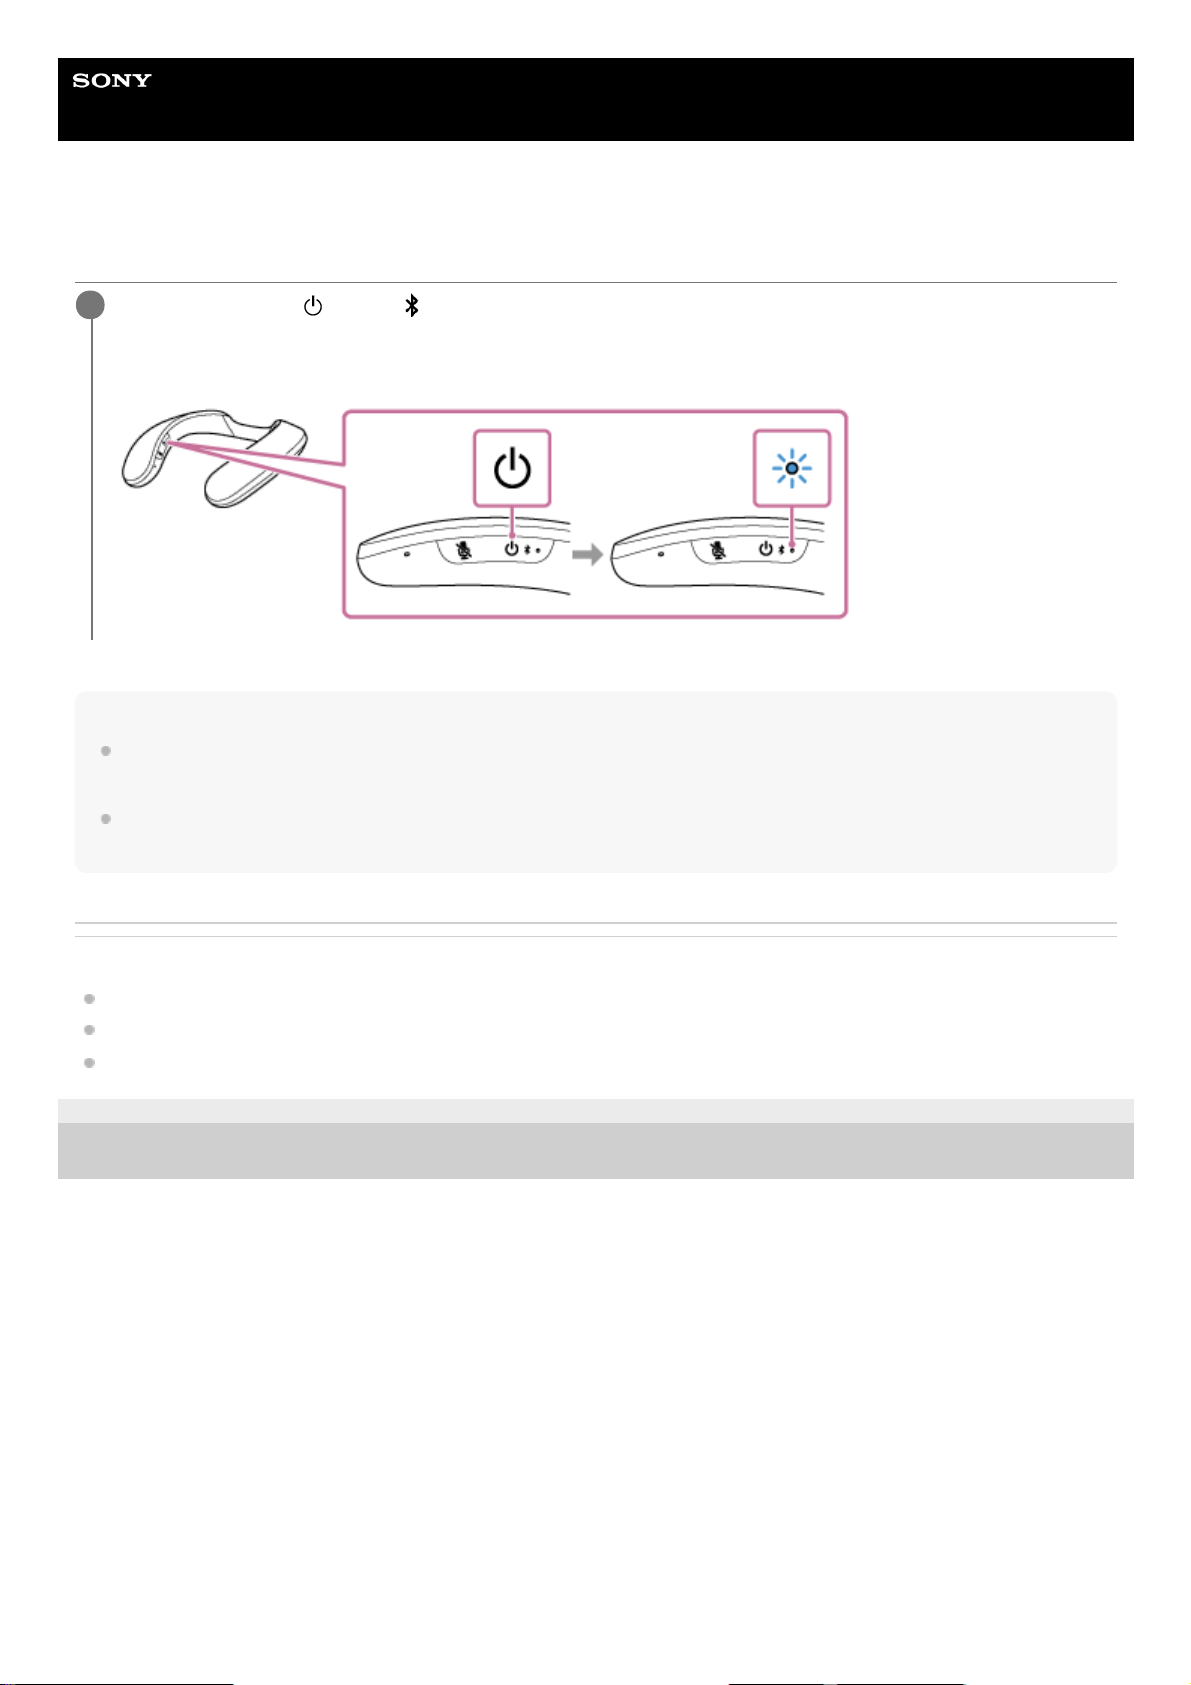
Turning the power on
Note
When you hear voice guidance (Low Battery, Please Recharge Speaker) and the indicator starts flashing slowly in orange, the
rechargeable built-in battery is running low. Charge the neckband speaker ahead of time.
When the rechargeable built-in battery has run out of power, you hear a notification sound and voice guidance (Please Recharge
Speaker. Power Off.) and the neckband speaker automatically turns off. Charge the neckband speaker.
Related Topic
Turning the power off
Charging the neckband speaker
About the indicator on the neckband speaker
5-030-430-11(1) Copyright 2021 Sony Corporation
Press and hold the (power)/ (BLUETOOTH) button for about 2 seconds until you hear voice guidance
(Power ON).
The neckband speaker turns on and the indicator starts flashing in blue.
1
10
Other manuals for SRS-NS7
3
Table of contents
Other Sony Speakers manuals


Sony
Sony SRS-BTD70 User manual

Sony
Sony LF-S50G User manual

Sony
Sony HT-ST9 User guide

Sony
Sony WS-FT7 User manual

Sony
Sony LF-S50G User manual

Sony
Sony SA-RS3S User manual

Sony
Sony HT-CT370 User guide

Sony
Sony XS-L835 Installation/Connections Instructions (primary... Product guide

Sony
Sony SRS-XG500 User manual

Sony
Sony XS-F694R User manual


