manuals.online logo
Brands
  1. Home
  2. •
  3. Brands
  4. •
  5. Sony
  6. •
  7. Speakers
  8. •
  9. Sony HT-DDW3000 User manual

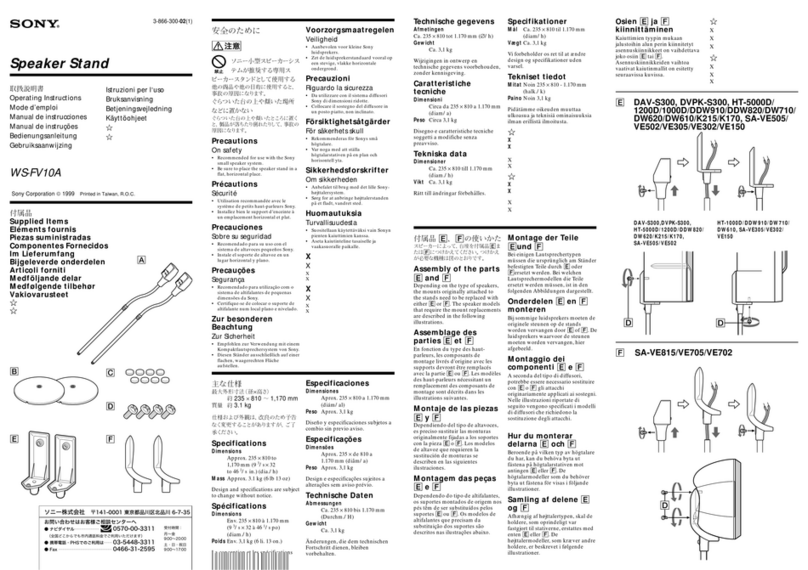
Sony HT-DDW3000 User manual

HT-DDW3000 3-292-326-01(1) GB/CT
3-292-326-01(1)
Sony Corporation © 2008 Printed in Malaysia
1: Installing the speakers/1: 安裝揚聲器
HT-DDW3000
Quick Setup Guide
簡易設定指南
2: Connecting the speakers/
2: 連接揚聲器
English
This Quick Setup Guide describes how to connect a DVD player or Blu-ray disc player, satellite
tuner or set-top box, TV, speakers and subwoofers so that you can enjoy multi channel surround
sound. Refer to the operating instructions supplied with the receiver for details.
The illustrations in the guide designate speakers as through .
Front speaker (left)
Front speaker (right)
Center speaker
Surround speaker (left)
Surround speaker (right)
Subwoofer
Subwoofer
1: Installing the speakers
The illustration at right shows an example of five speakers and two subwoofers configuration.
Refer to the operating instructions supplied with the receiver.
About speaker placement
The front speakers, center speaker and subwoofers are magnetically shielded to allow it to be
installed near a TV set. However, as the surround speakers are not magnetically shielded, we
recommend that you place them slightly further away from a TV set.
2: Connecting the speakers
The illustrations at right show how to connect the speakers. Before you connect the speakers, check the
speaker label on the rear panel of the speakers for the speaker type.
For details, refer to step 2 of “Getting started” of the operating instructions supplied with this receiver.
About speaker cords
• Black striped wire is minus (–) in polarity and should be connected to the minus (–) speaker terminal.
• Use the long speaker cords to connect the surround speakers and the short speaker cords to connect
the front and center speakers.
About speaker jacks
• Connect the
jack to the jack of the receiver and connect the jack to the jack of the receiver.
• Refer to the illustration at right for details of connecting speaker cords.
中⽂
本簡易設定指南介紹如何連接 DVD 播放機或藍⾊光芒光碟播放機、衛星調諧器或機上盒、電
視機、揚聲器和超低⾳揚聲器,以便享受多聲道環繞聲⾳。有關詳細内容,請參閱隨本接收機
附帶的使⽤說明書。
本指南的圖⽰以字⺟ 到 標⽰各揚聲器。
 前置揚聲器 (左)
 前置揚聲器 (右)
 中置揚聲器
 環繞揚聲器 (左)
 環繞揚聲器 (右)
 超低⾳揚聲器
超低⾳揚聲器
1: 安裝揚聲器
右邊圖⽰為五個揚聲器和兩個超低⾳揚聲器組態的範例。請參閱隨本接收機附帶的使⽤說明
書。
關於揚聲器放置
前置揚聲器、中置揚聲器和超低⾳揚聲器均有磁屏蔽,可以安裝在電視機旁邊。但環繞揚聲器
無磁屏蔽,我們建議您將這些揚聲器放在離電視機稍遠⼀點。
2: 連接揚聲器
右邊圖⽰為揚聲器的連接⽅式。連接揚聲器之前,請先確認揚聲器後⾯板揚聲器標籤上的揚聲
器種類。詳細內容,請參閱隨本接收機附帶的使⽤說明書中的“準備⼯作”的步驟 2。
關於揚聲器線
• ⿊⾊條紋線是負極(-),必須連接到揚聲器負極(-)端⼦。
• 較⾧的揚聲器線⽤於連接環繞揚聲器,較短的揚聲器線連接前置和中置揚聲器。
關於揚聲器插孔
• 將 插孔連接到接收機的 插孔,將 插孔連接到接收機的 插孔。
• 有關連接揚聲器線的詳細內容,請參閱右邊圖⽰。
(1)
DVD/BD
IN
DIGITAL
OPTICAL
SAT
IN
COAXIAL
ANTENNA
AM
SA-CD
/
CD
L
R
TV SAT
IN IN IN
SURROUND
SUBWOOFER
LR
SPEAKERS
FRONTCENTER
LR
R
S
FRONTCENTER
LR
SS-MSP3000
L
SS-MSP3000
R
DVD/BD
IN
DIGITAL
OPTICAL
SAT
IN
COAXIAL
ANTENNA
AM
SA-CD
/
CD
L
R
TV SAT
IN IN IN
SURROUND
SUBWOOFER
LR
SPEAKERS
FRONTCENTER
LR
SS-CNP3000
R
S
FRONTCENTER
LR
SURROUND
SUBWOOFER
LR
SPEAKE
R
DVD/BD
IN
DIGITAL
OPTICAL
SAT
IN
COAXIAL
ANTENNA
AM
SA-CD
/
CD
L
R
TV SAT
IN IN IN
SURROUND
SUBWOOFER
LR
SPEAKERS
FRONTCENTER
LR
SS-SRP3000 SS-SRP3000
DVD/BD
IN
DIGITAL
OPTICAL
SAT
IN
COAXIAL
ANTENNA
AM
SA-CD
/
CD
L
R
TV SAT
IN IN IN
SURROUND
SUBWOOFER
LR
SPEAKERS
FRONTCENTER
LR
SS-WP3000 SS-WP3000
SURROUND
SUBWOOFER
LR
SPEAKE
R
10 mm
10
ASpeaker cord (supplied)/揚聲器線(附帶)
A
A
A
GBCT+DDW3000_2UC.indd 1GBCT+DDW3000_2UC.indd 1 2008-2-4 16:08:112008-2-4 16:08:11
HT-DDW3000 3-292-326-01(1) GB/CT
Video components/ 視頻組成機
3: Connecting other components/
3: 連接其它組成機
TV/電視機
BOptical digital cord (not supplied)/光纖數位線(無附帶)
CCoaxial digital cord (supplied)/同軸數位線(附帶)
DAudio cord (not supplied)/⾳頻線(無附帶)
EVideo cord (not supplied)/視頻線(無附帶)
DVD player or Blu-ray disc
player/ DVD 播放機或藍⾊光
芒光碟播放機
Notes
• Be sure to connect the video
output of the DVD player/Blu-ray
disc player and Satellite tuner/
Set-top box to the TV, so that the
image is displayed on the TV.
Refer to the operating instructions
of each connected component for
details.
• To fully enjoy surround sound while
watching TV programmes, connect
the audio output of your TV jacks
as shown and turn off the TV’s
volume or activate the TV’s muting
function.
• To enjoy multi channel surround
sound from the DVD player or
Blu-ray disc player, be sure to
connect the coaxial digital cord.
註
•務必將 DVD 播放機/藍⾊光芒光碟
播放機和衛星調諧器/機上盒的視
頻輸出連接到電視機,以便在電視
機上顯⽰影像。請參閱各連接組成
機的使⽤說明書以獲取詳情。
• 若要在觀看電視節⽬時充分欣賞環
繞聲,請如圖所⽰連接電視機插孔
的⾳頻輸出,並關閉電視⾳量或啟
動電視機的靜⾳功能。
• 若要欣賞來⾃DVD播放機或藍⾊光
芒光碟播放機的多聲道環繞聲,則
必須連接同軸數位線。
Satellite tuner or Set-top box/
衛星調諧器或機上盒
5: Calibrating the speaker settings automatically/
5: ⾃動校準揚聲器設定
Optimizer microphone (supplied)/
優化器⿆克⾵ (附帶)
123
46
78
0/10
ENTER
9
SYSTEM STANDBY
SLEEP TV INPUT
VIDEO DVD/BD SAT TV
2CH A.F.D.
RETURN/EXIT
TV CH –
PRESET –
TV CH +
PRESET +
REPLAY ADVANCE
MOVIE MUSIC
AMP MENU
CLEAR
DISPLAY MUTING
TV VOL
MASTER VOL
DVD/BD
MENU
D.TUNING
AUTO CAL
D.SKIP
SA-CD/CD TUNER
?/1
.<
<
>
5
TOOLS/
OPTIONS
TV
?/1
AV
?/1
MEMORY
MENU/HOME
-/--
>10/
AUTO CAL
AMP MENU
VIDEO IN/
PORTABLEAUDIO IN/
AUTOCAL MIC
PHONES
INPUT SELECTOR
A.F.D. MOVIE MUSIC
?/1
DIMMER SLEEP 2CH
DISPLAY
MASTERVOLUME
INPUT MODE
VIDEO IN/
PORTABLE AUDIO IN/
AUTO C AL M IC
English
3: Connecting other components
This is an example of how to connect this receiver and your components. Refer
to step 3 of “Getting started” of the operating instructions supplied with this
receiver for details on other connections and other components.
4: Connect all power cords last
Connect the AC power cord to a wall outlet.
Refer to “Connecting the AC power cord” in the operating instructions supplied
with the receiver.
5: Calibrating the speaker settings automatically
You can set up the speakers to obtain the sound you want from all connected
speakers automatically by using the Auto Calibration function. The Auto
Calibration function will:
• Check the connection between each speaker and the receiver.
• Adjust the speaker level.
• Measure the distance of each speaker from your listening position.
1Connect the supplied optimizer microphone to the VIDEO
IN/PORTABLE AUDIO IN/AUTO CAL MIC jack on the
receiver.
2Set up the optimizer microphone.
Place the optimizer microphone at your listening position.You can
also use a stool or tripod so that the optimizer microphone remains at
the same height as your ears.
3Press AMP MENU, then press AUTO CAL.
The Auto Calibration function starts.
For details on the Auto Calibration function, refer to step 6 of "Getting started"
of the operating instructions supplied with this receiver.
Notes
• If there are any obstacles in the path between the optimizer microphone and the
speakers, the calibration cannot be performed correctly. Remove any obstacles from the
measurement area to avoid measurement error.
•The Auto Calibration function cannot detect the subwoofer. Therefore, all subwoofer
settings will be maintained.
6: Setting up other components
You should set up each component so that the sound is output from the speakers
correctly when you playback a connected component. Refer to the operating
instructions supplied with each component.
After the setting
The receiver is now ready to use. Refer to the operating instructions supplied
with the receiver for details.
中⽂
3: 連接其它組件
此部份介紹如何連接本接收機和其它組成機。有關其它連接⽅法和其它組成
機的詳細内容,請參閱隨本接收機附帶的使⽤說明書中的“準備⼯作”的步
驟 3。
4: 最後連接所有電源線
把 AC(交流)電源線連接到牆上電源插座。
請參閱隨本接收機附帶的使⽤說明書中的“連接交流電源線”。
5: ⾃動校準揚聲器設定
您可以使⽤⾃動校準功能設定揚聲器來⾃動從所有連接的揚聲器獲得您想要的
聲⾳。⾃動校準功能會:
• 檢查每個揚聲器和接收機之間的連接。
• 調整揚聲器電平。
• 從您的聆聽位置測量與每個揚聲器的距離。
1將附帶的優化器⿆克⾵連接到接收機的 VIDEO IN/PORTABLE
AUDIO IN/AUTO CAL MIC 插孔。
2裝設優化器⿆克⾵。
將優化器⿆克⾵裝設在您的聆聽位置。您也可使⽤椅凳或三腳架,使優化
器⿆克⾵維持在與您⽿朵等⾼的⾼度。
3按下 AMP MENU,然後按下 AUTO CAL。
⾃動校準功能即開始。
有關⾃動校準功能的詳細内容,請參閱隨本接收機附帶的使⽤說明書中的“準
備⼯作”的步驟 6。
註
• 如果優化器⿆克⾵和揚聲器通道之間具有任何阻礙物,便無法準確進⾏校準。請移開測量
區域內的任何阻礙物,以避免出現測量錯誤的情況。
• ⾃動校凖功能無法檢測超低⾳揚聲器。因此,所有的超低⾳揚聲器設定將保持不變。
6: 設定其它組成機
應該對所連接的各个組成機進⾏設定,以便在播放某个連接組成機時能够從揚
聲器正確輸出聲⾳。請參閱隨各組成機附帶的使⽤說明書。
設定後
接收機已可以使⽤。有關詳細内容,請參閱隨本接收機附帶的使⽤說明書。
DVD/BD
IN
DIGITAL
OPTICAL
SAT
IN
COAXIAL
ANTENNA
AM
SA-CD
/
CD
L
R
TV SAT
IN IN IN
DVD/BD
IN
DIGITAL
OPTICAL
SAT
IN
COAXIAL
ANTENNA
AM
SA-CD
/
CD
L
R
TV SAT
IN IN IN
SURROUND
SUBWOOFER
LR
SPEAKERS
FRONTCENTER
LR
C
D
E
L
R
VIDEO
B
E
GBCT+DDW3000_2UC.indd 2GBCT+DDW3000_2UC.indd 2 2008-2-4 16:08:142008-2-4 16:08:14
Other manuals for HT-DDW3000

1

Other Sony Speakers manuals

Sony BDV-N9100W User manual

Sony

Sony BDV-N9100W User manual

Sony SRS-XB12 Reference guide

Sony

Sony SRS-XB12 Reference guide

Sony SRS-BTV5/WHT User manual

Sony

Sony SRS-BTV5/WHT User manual

Sony SS-CTB121 User manual

Sony

Sony SS-CTB121 User manual

Sony SRS-XB30 User manual

Sony

Sony SRS-XB30 User manual

Sony CFS-KW300S User manual

Sony

Sony CFS-KW300S User manual

Sony SRS-BTV5 Reference guide

Sony

Sony SRS-BTV5 Reference guide

Sony SMS-2P User manual

Sony

Sony SMS-2P User manual

Sony XS-F1711 User manual

Sony

Sony XS-F1711 User manual

Sony SRS-XE300 User manual

Sony

Sony SRS-XE300 User manual

Sony XS-V1331 User manual

Sony

Sony XS-V1331 User manual

Sony XS-R4644 User manual

Sony

Sony XS-R4644 User manual

Sony BSP60 User manual

Sony

Sony BSP60 User manual

Sony XS-F6936SE User manual

Sony

Sony XS-F6936SE User manual

Sony XS-HS4 Product guide

Sony

Sony XS-HS4 Product guide

Sony XS-V6933 Marketing User manual

Sony

Sony XS-V6933 Marketing User manual

Sony SS-HQ1 Supplement

Sony

Sony SS-HQ1 Supplement

Sony SRS-XV500 Reference guide

Sony

Sony SRS-XV500 Reference guide

Sony RDP-XF300iPN User manual

Sony

Sony RDP-XF300iPN User manual

Sony XS-AR1023 Product guide

Sony

Sony XS-AR1023 Product guide

Sony SCA-S30 User manual

Sony

Sony SCA-S30 User manual

Sony SDP-E300 User manual

Sony

Sony SDP-E300 User manual

Sony S-AIR AIR-SA50R User manual

Sony

Sony S-AIR AIR-SA50R User manual

Sony XS-GT5738F User manual

Sony

Sony XS-GT5738F User manual

Popular Speakers manuals by other brands

OHM CL-1TD manual

OHM

OHM CL-1TD manual

PSB CustomSound CW60R Specifications

PSB

PSB CustomSound CW60R Specifications

Wahsega Labs WL-SPKR-22-SIP-1 user guide

Wahsega Labs

Wahsega Labs WL-SPKR-22-SIP-1 user guide

Rockville APM5 owner's manual

Rockville

Rockville APM5 owner's manual

Cambridge Audio EVO S user manual

Cambridge Audio

Cambridge Audio EVO S user manual

Redback C 5285 operating instructions

Redback

Redback C 5285 operating instructions

Grain Audio PWS.01 manual

Grain Audio

Grain Audio PWS.01 manual

iHome iBT8080 instruction manual

iHome

iHome iBT8080 instruction manual

PHL Audio 1220 Specifications

PHL Audio

PHL Audio 1220 Specifications

Akai CEU6800-BT instruction manual

Akai

Akai CEU6800-BT instruction manual

Gadgetree 8047866 operating instructions

Gadgetree

Gadgetree 8047866 operating instructions

Beats BEATSPILL+ Getting started

Beats

Beats BEATSPILL+ Getting started

Motorola Power-Voice TSN6015A Installation manual and user's guide

Motorola

Motorola Power-Voice TSN6015A Installation manual and user's guide

Rockford Fosgate T152-S Template manual

Rockford Fosgate

Rockford Fosgate T152-S Template manual

CABASSE MT4 brochure

CABASSE

CABASSE MT4 brochure

Harman JBL FLIP 4 Service manual

Harman

Harman JBL FLIP 4 Service manual

Boston HSi H460T2 quick guide

Boston

Boston HSi H460T2 quick guide

Conrad MPA MANDY PA operating instructions

Conrad

Conrad MPA MANDY PA operating instructions

manuals.online logo
manuals.online logoBrands
  • About & Mission
  • Contact us
  • Privacy Policy
  • Terms and Conditions

Copyright 2025 Manuals.Online. All Rights Reserved.