Sony ST-5066 User manual

USA, Canada, AEP
and UK {Wodel
J
SPECI F ICATIONS
J
FM TUNER SECTION
Tuning range:
Antenna:
Usable sensitivity:
S/N ratio:
Frequency response:
Harmonic distortion:
87.5 MHz to 108 MHz
300 ohms balanced
75 ohms unbalanced
2.2pV (lHF)
1.7 pV (S/N = 30 dB)
68 dB
30Hztol5kHz1jOa
Mono : O.5o/o at 400 Hz 75 kHz
deviation (100%) Mod.
Stereo : O.Bo/o at 400 Hz 7 5 kHz
deviation ( l0Oo/o) Mod.
Greater than 35 dB at 400 Hz
Fm stereo separation:
A-M TUNER SECTION
Tuning range: 530 kHz to l,6Ob kHz
Antenna: Built-in bar antenna with external
antenna provision
SONÏfi
FtYl STEREO /FtrÏ.AtvI TllNTN
Sensitivity:
S/N ratio:
Harmonic distortion:
GENE RA L
Power requ irements:
Power consu mption:
Dimensions:
Net weight:
48 dB/m, built-in antenna
1 00 pV, externa I antenna
50 dB at 50 mV/m
o.6%
120 volts, 60 Hz ac
(USA and Canada Model)
1 10, 127, 22O, 24O volts, 50/60 Hz ac
(AEP and UK Model)
23 watts
41O (w) x 12O (hl x 284 (d) mm
t6r/a (w) x qrr/ro (rr) x 1 13Ao ldl inches
4.8 ks (10|b 9 oz)
SERtíIOE MANUAL

Section
1.
TABLE OF CONTENTS
Title
TECHNICAL DESCRIPTION
DIAGRAMS
5-1. Mounting Diagram
5-2. Schematic Diagram
6. EXPLODED VIEWS
7. ELECTRICAL PARTS LIST
Page
ll
l3
15
t7
20
l-l. Specifications
l-2. Block Diagram
2. DISASSEMBLY AND REPLACEMENT
2-l . Front Panel Removal
2-5. Printed Circuit Board Removal
2-6. Switch Replacement
ALIGNMENT AND ADJUSTMENT
3-1. Fm I-f and Discriminator Alignment ...:... ............ 6
3-2. Fm Frequency Coverage and Tracking Alignment ...... 7
3-3. Fm Stereo Separation Adjustment 8
34. A-m I-f Strip Alignment ...... ...... 9
3-5. A-m Frequency Coverage and Tracking Alignment 9
4. REPACKING
3
3
3
4
5
5
3.
5.
\/
V
L/
\/

\,
Intermediate fre-
quency: I O.7 MÍlz
Usable sensitivity: 2.2 pY (IHF)
1.1. SPECIFICATIONS
Fm Tuner Section
Tuning range:
Antenna:
S/N ratio:
Capture ratio:
Selectivity:
Image rejection:
I-f rejection:
Spurious rejection:
A-m suppression:
Frequency
resp onse:
Harmonic
distortion:
Fm stereo
separation:
19kHz, 38 kHz
suppression:
A-m Tuner Section
Tuning range:
Antenna:
87 .5 to 108 MHz
300 ohms balanced
75 ohms unbalanced
t.7 1tY ( S/N = 30 dB)
68 dB
1.5 dB
55 dB
45 dB
9s dB
75 dB
4s dB
30Hz to 15 kHz t l Og
Mono: 0.5 % at 400 Hz 7 5 kHz
deviation (lOO Vo) Mod.
Stereo: 0.8% at 400 Hz 7 5 kHz
deviation (lO0Vo) Mod.
Greater than 3 5 dB at 400 Hz
40 dB
530 to 1,605 kHz
Built-in ferrite bar antenna with
external antenna provision
SECTION 1
TECHNICAL DESCRIPTION
Sensitivity:
S/N ratio:
Image rejection:
I-f rejection:
Harmonic
distortion:
General
Signal outputs
and impedance:
Circuit system:
Semiconductors:
Power require-
ments:
t
\y
Intermediate fre-
quency: 455 kHz (USA, Canada and AEp
Model)
468kHz (Uf Model)
48 dBlm, built-in antenna
100 ltV, external antenna
50 dB at 50 mV/m
45 dB at I p00 kIIz
40 dB at 1,000 kHz
0.6%
NORMAL 0.7 5Y,4.5 kO
HIGH 1.5 V, 3.3 kO
at 400 Hz, 100 % Mod.
FM stereo, FM/AM superhete-
rodyne, switching MPX
2 FETs, 20 transistors and 14
diodes
120 volts, 60 Hz ac (USA and
Canada Model)
1 10, 127 , 220, 240 volts, 50/60
Hz ac (AEP and UK Model)
Power consump-
tion:
Dimensions:
Net weight:
Shipping weight:
23 watts
4t0 (w) x 120 (h) x 284 (d) mm
16r/d(w) x4tr/ro(h) x ll3/rcG)
inches
4.8 kg (l0lb 9 oz)
6.8kg (l5lb)
r
I
t
t
i
h
I
t
i
FT
t
t
r
I
l
F
t
I

1-2. BLOCK DIAGRAM
\
()
r-d-'
{{
s{
i\§
r==\
Íl.r {r \ ()
=OO\.
\=à\
\
o
r-f,-l
§§
§§
}-
5
rt
t
t{
§
t
a
ru
§i
os
qF*
§
q
l{r
a
o
§
A
v
§
U)
a
è
lJJ
s
l-'
f,
È
qt
t! !!
à1-
ȧ
N
ro
§8
{j
tJJ k)
§8
§
§8
{j
l.|J §
".E8
t
o
.ts
5a
Qr
o'
ȧ
aa
t
lJJ
l.l.
\>lr-
.\<*§
PQE t
§
\
§Ès
§i3
§§
ËN
FJ t-i
ÈGR
tLoa
t
trt
tL
tL:
\Q-Ë{
ȧ§ §§
§qi
l- *.
Srs
L! (\
TQ
§§
§§É
c
t{
x
§eu
ȧ
t(b
t!§
>\t
u-§o
§§§
qÍo
t
o
l-
{
{o'
ÈBË
t
a
,.§
t:1*.
§§P
t({O
q
P
{
§Ë§
{oCI
99
§È
˧
§[
{t- L nr'4arJ
v, w,
§§
..§È
I
2

Note: All screws in this
Phillips type (cross
otherwisc indicated.
SECTION 2
DISASSEMBLY AND REPLACEMENT
servicc manual are
recess type) unless
AM FM
lamp
Fig. 2-3. Dial lamp replacement
2.1 . FRONT PANEL REMOVAL
l. Remove the two screws at both sides of the wood-
en case. This frees the wooden case.
2. Remove the TUNING knob by pulling it straight
off .
3. Remove the two screws from the bottom plate
and one screw at both sides of the front subchassis
as shown in Fig. 2-l and 2-2. This frees the front
pane1.
Fig. 2-1. Front panel removal (bottom view)
,+.:i
Fig. 2-2. Front panel removal (side view)
2.2. LAMP REMOVAL
Dial Lamp
1. Remove the screw shown in Fig. 2-3.
This frees the dial lamp holder.
2. Remove the lamp from the holder.
Meter Lamp
1. Straighten the flat spring, then pull it up as shown
in Fig. 2-4. This frees the meter lamp holder.
2. Remove the lamp from the holder.
F ig. 2-4. Meter lamp removal
2-3. DIAL CORD STRINGING
Preparation
l. Cut a 1250 mm (5l-inch)
inch) diameter dial cord.
2. Tie the end of the cord
Fie. 2-5.
length of 0.5 mm (l 164-
to a spring as shown in
3. Rotate the tuning drum fully clockwise (max-
imum capacitance position).
4. Hook the spring to the tuning drum as shown in.
Fie. 2-5.
Procedure
1. Referring to Fig. 2-5 , proceed the stringing in nu-
merical order as shown.
Note: Refer to the ltig. 2-6, for wrapping thc
cord around the druttr.
At the finish point of stringing. tiglrten
the cord so that the spring is undcr tcn-
sion, and squeeze the eYelet.
2. After completing the dial cord stringing, make
sure that the tuning system works properly.
3
dia I lamp
flat spring
meter
lamp holder
meter lamp
shade

3.
4.
Apply a drop of contact cement to the finish
point. 2.4. FRONT SUBCHASSIS REMOVAL
Preparation
Fix the dial cord to the drum and the five pulleys
by using a cellophane tape.
Remove the tuning drum by removing the set
screw.
3. Remove the front panel as described in Procedure
2-r.
Procedure
1. Remove the two screws from the front bottom of
the chassis as shown in Fig. 2-8.
2. Remove the three screws at both sides of the
ihassis as shown in Fig. 2-9.
3. Remove the two screws shown in Fig. 2-10. This
frees the front subchassis with dial cord
F ig. 2-8. F ro nt su bchassl.s rem ova I
(Bottom view)
Put the dial pointer on
Fig. 2-7 , and tune the set
Move the dial pointer to
dial indication coincides
carrier frequency.
the cord as shown in
to the local fm station.
the position where the
with the local station
1.
2.
finish point starting Point
Fig 2-6. Wrapping the dial cord
F ig 2-7. D ial pointer installation
,..Q
three clockwise
turns
tuning drum
at fully
clockwise position
d
ë+
Finish point
Apply
a drop of
contact
cem ent-
F ig. 2-5. Dial cord stringing
4,

i
k
li-
Fig. 2-9. Front subcha,ss/s removal
(Side view)
F ig. 2- I 0. F ront su bchassls remova I
2.5. PRINTED CIRCUIT BOARD REMOVAL
I . Remove the front subchassis as described in Pro-
cedure 2-4.
2. Remove the four screws shown in Fig. 2-l L This
frees the printed circuit board.
Fig. 2-l l. Printed circuit board removal
2.6. SWITCH REPLACEMENT
Pushbutton Switch (a-key)
l. Remove the printed circuit board as described in
Procedure 2-5.
2. Remove the switch bracket by removing the two
screws (P2.6 x 4) shown in Fig. 2-12.
3. Remove the screw (P 2.6 x 14) from the bottom
as shown in Fig. 2-12.
4. With a soldering iron having a solder sucking tip,
clean the solder from each lug of the switch.
5. Install a new one.
- bracket
P 2.6x l4
Fig. 2-12. 4-key pushbutton switch replacement
E,
E-
\=
5

SECTION 3
ALIGNMENT AND ADJUSTMENT
3.1, FM I-F AND DISCRIMINATOR
ALIGNMENT
CAUTION
The ceramic filters in the fm i-f circuit are
selected according to their specified center
frequencies and color coded as shown
in Fig. 3- l and listed in Table 3- l . Check
the color code of the filters to identify
the same center frequency when replacing
any of these filters.
TABLE 3.1.
FM I.F CERAN{IC FILTERS
Signal Generator Method
Test Equipment Required
1. Signal generator capable of generating a 10.7 MHz
a-m/fm signal.
2. Oscilloscope
Vertical sensitivity
3. Ac VTVM
4. Aligpment tools
Preparation:
100 mV/cm minimum
l. Connect the input cable of the oscilloscope with
alligator clips to R 227 and ground on the fm (a-m)
front-end/i=f amp/MPX board, and solder a 0.02pF
capacitor across these clips as shown in Fig. 3-3.
2. Connect the output cable of the generator across
CVl02 on the fm (a-m) front-end/i-f amplMPX
board through a 0.02pF coupling capacitor as
shown in Fig. 3-4.
Fig. 3-3. Fm discriminator output connection
Part No. Color
l-527-220-11 red
l-527-220-21 blue
l-527-22G31 orange
l-527-220-41 black
l-527-22G'51 white
Specified Center Freq.
10.70 MHz
10.67 MHz
10.73 MHi
10.64 MHz
lO.7 6 MHz
color*rï
Fig.3-1. Color dot on ceramic filter
crt03
fm os
trimmer
Fig. 3-2. lnterruption of fm or a-m local
oscillator operation
Note: Local oscillator should be killed when
performing this alignment. To stop the
local oscillator operation, shunt the oscil-
lator capacitor with a 0.02pF capacitor
as shown in Fig. 3-2.
6
F ig, 3-4. I 0.7MHz signal iniection

=.
v'-
Y
v
Procedure:
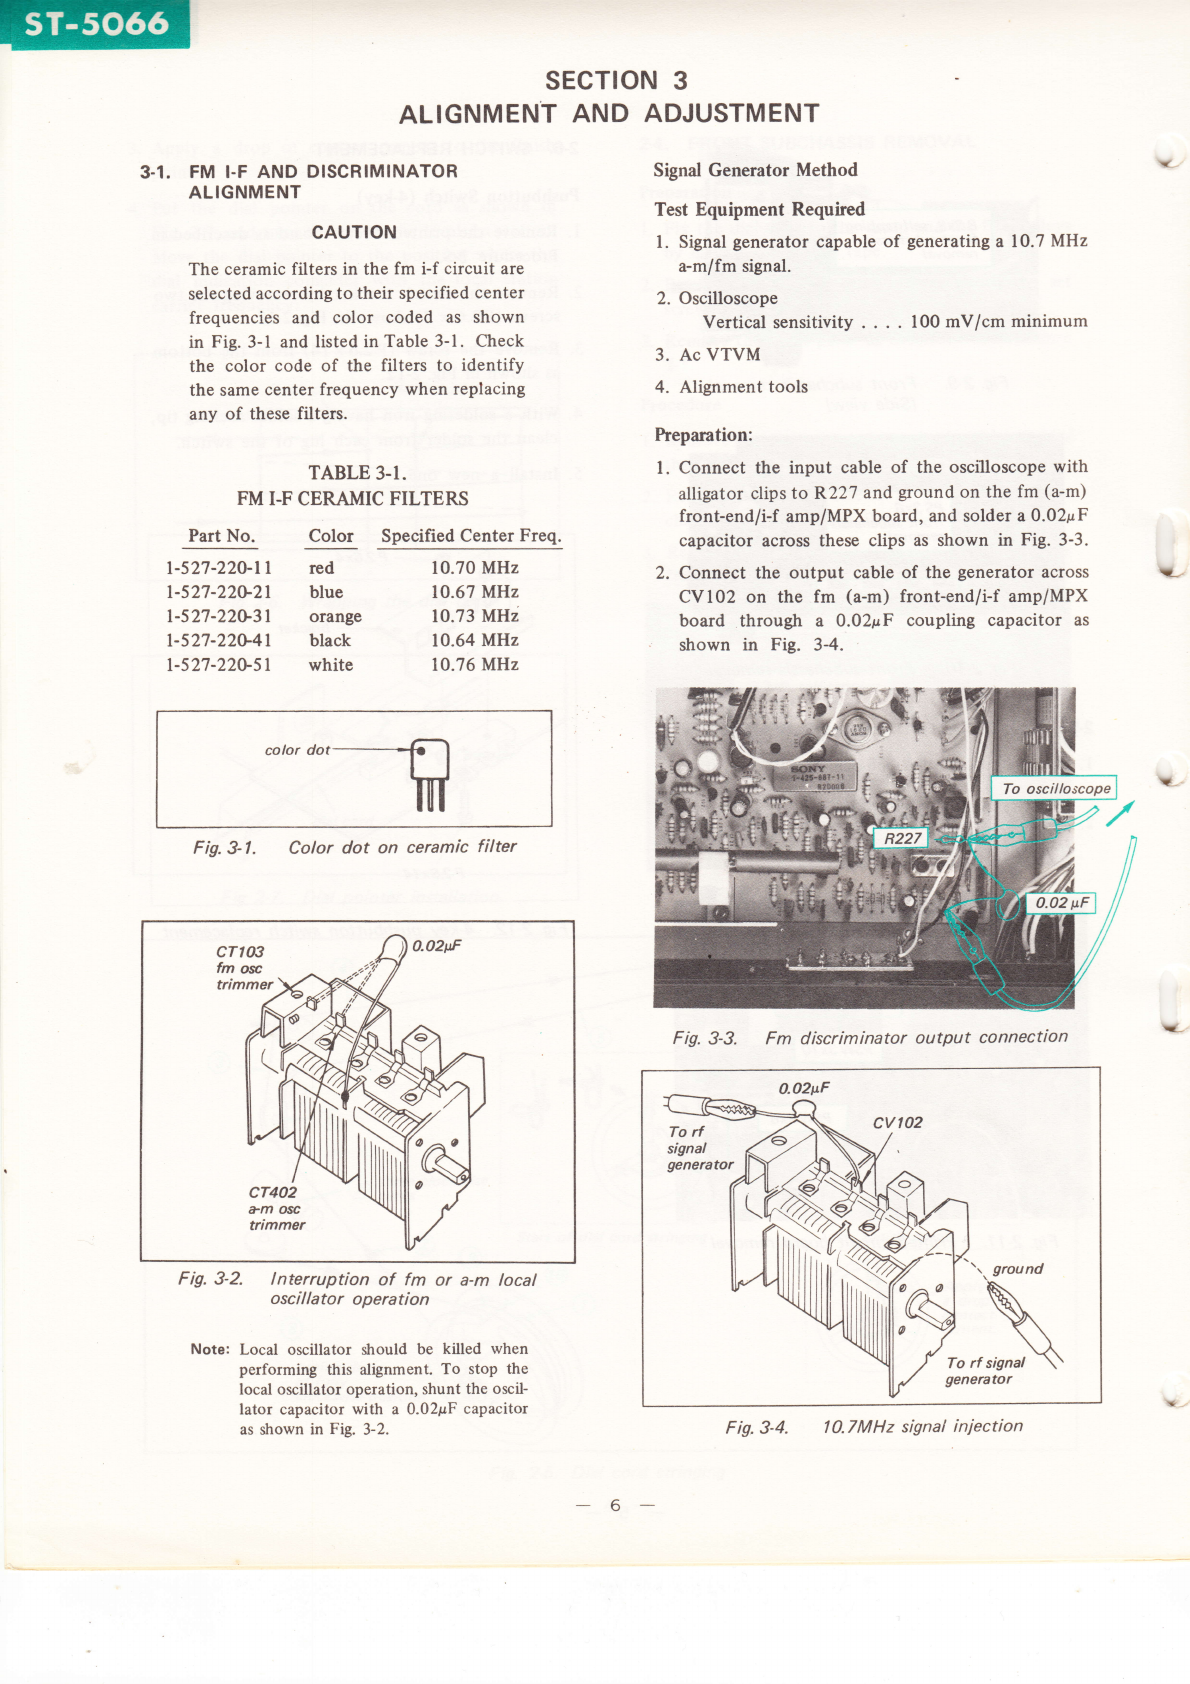
l. With the equipment connected as shown in Fig.
3-5, set the signal-generator controls as follows:
Frequency . . Specified frequency of
ceramic filter.
See Tabte 3- l.
Modulation .. . Fm,400Hz,75kHz
deviation ( 100%)
Output level . . 1,000rrV (60 dB)
2. Set the tuner switches as f«rllows:
FUNCTION switch F-M
MODEswitch.. ... MONO
3. Adjust the signal generator frequency slightly to
obtain a ntaximum output, then change the
signal generator modulation to a-m, 4OOHz 3Wo.
4. If the discriminator transformer IFT2OI is not
aligned correctly, 400 Hz ripple will be obseryed
as shown in Fig. 3-6. I
5. Turn the secondary side core of discriminator
transformer IFT20l (see Fig. 3- I 0) to obtain
a minimum indication on the oscilloscope with an
alignment tool as shown in Fig. 3-6.
Fig. 3-6. Fm discriminator alignment
output response
Note: Turn the core carefully and slowly
because the output appearing on the
oscilloscope jumps up and down when
turning the core. This might cause difÍï-
culty in determining the point of mini.
mum output. Also, at both extreme
positions of the top coÍe, decreased out-
put will be observed. The real null point
should be obtained in the middle of the
core thread length, and mar<imum output
appeaÍs at each side of the true null
point.
6. Change the signal generator modulation to fm,
400 Hz, I5 kHz deviation ( 100%).
7 . Turn the core of fm IFTI 0l and the primary side
core of discriminator transformer IFT201 (see
Fig. 3-10) to obtain the maximum output.
3.2. FM FREOUENCY COVERAGE AND
TRACKING ALIGNMENT
Note: Before startirrg this alignment, the fm i-f
and discriminator alignment should be
performed.
Test Equipment Required
l. Fm signal generator
2. Ac VTVM
3. Oscilloscope
4. Alignment tools
Preparation:
l. Connect the equipment as shown in Fig. 3-'l .
2. Set the tuner switches as follows:
FUNCTION switch FM
MODEswitch......MONO
Signal Generator Method
Follow the procedures given in Table 3-2 when
performing this alignment with an fm signal generator.
Be sure that the dial is mechanically calibrated.
Off-theAir Signal Method
F'requency coverage and tracking alignment can
also be performed by utilizing off-the-air local fm
signals. However, before performing the alignment,
be sure that the dial is mechanically calibrated.
Adjust
+
t
h
Fig.3-5. Fm Í-f and discriminator alignment fesf setup by rf signal generator
oscilloscope ac VTVM
0.O2ttF sT-5066 0.02ttF
rf
signal
generator r- :J
V
7

fm
signal
generator J I:NTENNA NORMAL
OUTPUT IN
lr- l.
3.3. FM STEREO SEPARATION ADJUSTMENT
Test Equipment Required
l. Fm stereo signal generator
2. Ac VTVM
3. Oscilloscope
Preparation:
Connect the equipment as shown in Fig. 3-8,
set the fm stereo signal generator controls as
follows:
Carrier frequency. . . . 98 MHz
Output level . . . . . . 1,000 pV (60 dB)
Mode. . . . . . . .... . . Stgrgo
Audio (400 Hz) Mod ..6'l .5 kHz (90 %) *
Pilot ( 19 kHz) Mod . . 7 .5 kHz (10 %)
* Note: 75 kHz (1007o) if the metering indicates
total modulation (audio-pilot).
t,
Y
Y
hocedure:
1. Precisely tune the tuner to the carÍLer frequency y
of stereo signal generator, then turn the top core
of switching transformer L301 (see Fie. 3-10) to
obtain maximum output at the left channel. Note
that this adjustment has a close relationship with
stereo distortion.
2. Record the output level of the left channel when
the stereo signal generator input selector is set to
the left channel.
3. Switch the stereo signal generator input selector
to the right channel and read the residual signal
level in the left channel.
4. The output-level to residual-level ratio represents
the separation. Adjust separation control RTs0l
(see Fig. 3-10) for minimum residual level.
Check the right channel for separation. Usually,
about an 8 to 9 dB difference in channel separation
exists. Readjust RTs0l for minimum difference
Fig. 3-7. Fm frequency coverage and tracking alignment test setup
TABLE 3.2. FM FREQUENCY COVERAGE AND TRACKING ALIGNMENT
FREQLIENCY COVERAGE SG Coupling.............. Direct
ALIGNMENT SG Output [rvel ...... 4OOHz,75 kHz Deviation mod; as low as possible
Step SG Frequency Dial Setting Ac VTVM
Connection Adiust lndication
I87.5 MHz lowest
position NORMAL
OUTPUT OSC coil Ll03
See Fig. 3-10. Maximum
VTVM
reading
2108 MHz 108 MHz OSC trimmer CTl03
See Fig. 3-10.
TRACKING ALIGNMENT SG
SG Coupling ....... ...... Direct
Output Level ...... 400 Hz, 75kHz Deviation mod; as low as possible
I87.5 MHz
Tune to the
SG signal
NORMAL
OUTPUT Antenna coil Ll0l
RF coil Ll02
See Fig. 3-10.
Maximum
VTVM
reading
2108 MHz Antenna trimmer CT I 0l
RF trimrner CT I 02
See FiS. 3-10.
8

AC VTVM
sr-5066
NORMAL
oscilloscope
fm
stereo
signat OUT
generator NORMAL oi----)
OUTPUT (R) ^ Ill
l- , I
q
JFig. 3-8. Fm stereo eparation adjustment test setup
between left- and right-channel separation. rilhile Signal Generator Method
doing this, remember that the output level also
changes according to the setting of RT50l. Test Equipment Required
l. Signal generator
2. Loop antenna
3-4. A-M l-F STRIP ALIGNMENT 3. Ac VTVM or oscilloscope
Note: The a-m i-f transformers (CFT40I and procedure:
IFT4OI) are shipped from the factory
with all adjustments set for correct With the equipment connected as shown in
operation. Therefore no adjustment is Fig.3-9, follow the procedures given in Table 3-3
required in field service' when performing this alignment with an a-m signal
generator. Be sure that the dial is mechanically
calibrated.
3.5. A-M FREOUENCY COVERAGE AND
TRACKING ALIGNMENT
Preparation:
Set the FUNCTION switch to AM.
Off-the-Air Signal Method
Frequency coverage and tracking alignment can
also be performed by utilizing off-the-air local a-m
signals. However, before performing the alignment,
be sure that the dial is mechanically calibrated.
ft
b
Fig. 3-9. A-m frequency coverage and tracking alignment test setup
loop
antenna
a-m
signal
generator l- |
AC VTVM
9

TABLE 3-3. A.M FREQUENCY COVERAGE AND TRACKING ALIGNMENT
FREQUENCY COVERAGE ALIGNMENT SG Coupling ...
SG Output Level Loop antenna
400H2 ,3Vo mod; as'low as possible
Step SG Frequency Dial Setting Ac VTVM
Connection Adjust lnd ication
I550 kHz 5 50 kHz NORMAL
OUTPUT OSC coil L403
See Fig. 3-10. Maximum
VTVM
reading
21,600 kHz 1,600 kHz OSC trimmer CT4O2
See Fig. 3- l 0.
TRACKING ALIGNMENT SG Coupling . .
SG Output Level Loop antenna
400H2 ,3Vo mod; as low as possible
I600 kHz Tune to the
SG signal.
NORMAL
OUTPUT Position of bar antenna
L402. See Fig. 3-10. Maximum
VTVM
reading
21,400 kHz Antenna trimmer CT40l
See Fig. 3-10.
Adjustment Parts Location:
fm rf trimmer
cTt 02
a-m ant. trimmer
cT40t
a-m osc coil
L403
fm ant. trimmer
crt 0t
a-m antenna
coil L4O2
fm ant. coil
Lt 0t
fm rf coil
Lt 02
fm osc coil
Lt 03
a-m osc fm osc
trimmer trimmer
cT402 CT|03
ru:,:*
Fig. 3-10. Adjustment parts location
sewrar,')brr,
RT50l '
switch ing
transformer
L301
fm discriminator
transformer I FT20l
fm i-f transformer
t FTl 0l
10

SECTION 4
REPACKING
)
t
,
)
The ST-5 06 6's original ship ping carton and
packing materials are the ideal containers for shipping
the unit. However to secure the maximum protection,
éií{íT;llr:opo t is h i n s
ïi:,:i{kï?x;'::rtr
3-793-107-00 (Canada Model only)
3-793-520-00 (UK Model only)
Card, warranty
3-780-189-ll (AEP and Canada Modet)
3-780-t89-2t (USA Modet)
3-780-189-81 (UK Modet)
Manual, instruction 3-793-645-11
Diagram, schematic
| -501-083.21
Ribbon Antenna, fm
t -534-049-3t
Cord, connection ( R K-79)
| -534-819-00
Cord, power
(UK Model only)
2-068-445-00
Cushion, upper
4-818-924-OO
Bag, polyethylene; unit
Note: Applicable Serial Numbers:
USA Model (Serial No. 800,001 and !ater)
Canada Model (Serial No. 700,001 and later)
UK Model (Serial No. 600,001 and later)
AEP Model (Serial No. 500,001 and later)
the ST-5 066 must be
precisely as before. The
are shown in Fig. 4-1 .
x-370t0-29-0
Card Ass'y, warranty
(USA Model only)
F ig. 4- I . R epack ing
repacked in these materials
proper repacking procedures
4-820-017.00
Cushion, corner
I
3-701-o20-oo
8ag, polyethylene
4-820-0t 7-OO
Cushion, corner
4-827-6t 2-00
Carton
11

MEMtrl
\I
L2 i-

SECTION 5
DIAGRAMS
sI .MOUNTING DIAGRAM
- Conductor side -
I R€I 5.67
roe.uanennue,mnaJ- ÉíÍ$--- §,^a,2^ _.ï $u*l l*,tt
I ..0'I Leozr f* ff aau* ftcp'ïuoï Y;P+ t "uT T,*';
ro r, .,,en,,. trlozt --!!4-- lmlH E To0G7 oo2
u'ailenÉL4u'<-T- in!u^ :" LH#fi' ï"ï,ïï:=*" s;.i"l{::q
.*" '-!lgltil- rFTror ,^, ,,n t.ou. ..i" g,r.su ? nzo{.z.zo s.ov* ö I 6.3v 5
roFManrenna,ermina t-i---r cD'? '-!lglvir- LH',I:..I "*" **'.!.ro t,'i'e'i$ï1 .*,ffi":; J L5'* 1
r'FManennarermnal--L .1, %iJTttr* -Ë h-,S-Pffi,fu*.1'*-;
l$#ffi+ffiffi+ i*
**rl o
-t2,v)"*-.--aíwH
Toosrantenna{r4o2r-l!ft- 7l
l-Ét*fi*iu*f+*=Ie-'81§*^$ra';** T,§ï
À r6v +ïibí, i*at6-o i L______
ó t€lE i
+:rf;
I ^.^,'ooo, ï*oo. "a-iiï t u S'*ï -:rf;,,F-- I I t cus à Àj
:*,*#**i:r*, ffu'ffi+ï+*fft
-:::: ;ï -rLjT? +q{ fiilF fl rufif ffi
20t 202
302
403 701
301 392. 304 303
40r 402 70t
Ll03 rFTlol
cTr02 cT402 cTt03
13

power transf ormer (PTB0l )
v
25K42
ffi"@;
G S.D
2SK23A
ÍIh
N " r!):
/ï\
SG D
2SC710
Note: Capacitors marked a are built
in transformers.
. [ ]: stereo operation
t4
1 T40
1T22A
cathode
t\
M
MZ-l2
_.,$\
10D-2
A1
M
fi,,<,
2sc4038
2SC631 A
2SC633A
$,@,
2SD291
E;4)
f ï,, /
flnr,<'
t-BuF
n2 201
403

*2. SCHEMATIC DIAGRAM
f-
tL
0ror 2SK42
(FM RF AMP) 0zor 25C4038
....(FM I-F AMP) 0zoz 2SC40
( FM I-F AM
osn 25C633A
( 19kHz AMP) Ag0z2SC633A 0g0l2SC633A D3ot-304 finA
(38rrHz AMp) (srrnrO LAMP SI{|ITCH) (S[I/|TCH|NG
-- --4ior
-- i: j* - nror..-Rrg
T
s.5v
IOv
o<-
IC!
tq
ro
lr-
r-F
È
cí)
&
c{
o
§
@
e
§
c\
\) o
o
§t
l.-
I
(-)
..t,
t
rttos
+
o
O
c!
C.l
Lr)
e
(.) 15.0Vt
I Cror
13.3/25V
Er-
I 2SV
:zl
C\I
3È:
OS
ca5
a<l
I
àl-
C{I
--\ I
co- |
í'Él :
öJl
-l
cól
§t
ogol
T
FM 3000
t-
FM 750
L6
AM
(VN)
.Y
C\
ao
cO
O
më
Éa
c{
o
ó
a<
PLaoe (STERE0)
o +oz2SC710 0+or2SC7l0 D qiTZZA
(A-M DEïECï0R)
Lasl 1004H
lLlaor
12
J
cq
Lí)
c.l
€
Qaor
Ci,nt
0.022
Luz
I
I
)<
cq
to:
€
I
to
J
+
qo
+
Dqoz lT22A
(A-M AGC)
.t
,Ö
Razs 4ik
t>
JL
?c!
/l F
_J§
§
(_)
l:>.
I t-óJ
lèlf
tè-l
L:c.j I
l,ol
i§r
t-c)
c!
O
F-
N
+
b
T
s8 02
s803
s804
s80 5
Description
HI-BLEND switch
(oN-oFF)
MODE switch
(MONO-STEREO)
FUNCTION switch
(FM)
FUNCTION switch
(AM)
POWER switch
(oN-oFF)
Position
OFF
STERE(
OFF
ON
OFF
I
i
L
I
I
I
Rw 220
lol -, cro,
----, i 2200p
Ë ^ 12.5vlF'i
qS ul02 If-'
t2A\'l
OJ
§;
Ëë J
Lri
o
c!
o<
0rB 2SC710
Rrwllk (FM os8) v cn{p
; 7/.
€ -c roó zop I
I
I
I
I
i
I
>
t8
È
r§
Cwq
1 000
Jl---
-+
c303
Dlo+ R35s 5.6k
Rrog B,2k I 'ï' 1.5k 220
)r
r--
sf-
@
O
ó
O
c-.]
@
o
E;
>
O
LÍ>
>:.1
6
5à
(_)
J
tó
@
Q
ó
k
+l , --l
-Y
S
13.5V§
Qmz {c-o I
ir):
cí7<
+
a<
-l o
.r:
:<
€
0+o+ 25 Cl1 0
J
C)
=
.+
c.l.
ë
J
r-(c
1.5\ W n+zstízo
15

0rt 2SC403B
FM I-F AMP )0r^,, 2SC403B
"-(ru t-F AMP) 2SC710
FM l-F AMP)
- C\'l
cv c!
IFTzot SS CPzor ----t
75V
4.4
tr-3u4 lT22A
I (S1ilIICHING
C21s 0 022
EMODULATOR)
2SC63l A
(PREAMP) 2sc633A
PREAMP)
Csor
USA ond
1k
O
c!
C!
iI)
-
2A2
O
c\
^l s
N
q
CF
al
R+
c'.r I
r_-{
lo-l
IOA
l6..l-
l<! I
Druzrosl0D-2 I
(PowER RECTIF|ER) I
:ïrË=l
--+0,*"r+.1
=
c7)
o>
c!
\_)
J
co
[r)
)l
LO
ri
Dzot, zoz *
1T40 .g
/ RECTIFIER \
(roN METEU
sooop | fi LC)
a
a
a
-
C\
Dar:rlT40 DmMZ-1Z arnq2S0291
o,o, ( f§[t§6t# tHËeuuron)
Dzor R23s3.3k R22s 2k Jroz
OLTPUT TERMINAL
Cw+ :
3.3/25V, ;:
100p HrcH I
L-CH
N0RMAL I
O
d
ca
q)
U.UJó
0.033
Rln
220
(1N)
6,0v
lË
rË
l€
t#
IE
àl
<l
§t
§l
6.0v
0.7\/
d)
à
È
r!
(!
(É
6
O
(r)
(\
O
a'
r.O
có
(J
PL801: AM l-amp
PL802: FM Lamp
PL803-PL805: Dial Lamp
PL806: Pointer Lamp
PL807: Meter Lamp
PL808: STEREO Lamp
'353 5,6k
D rríT224
r'+l OEIECIOR)
Daot
;-._+l
Fa*
I sooopl Rsoa 3k HrsH I
R-CH
NoRMALI
-J
-EANAPA Uodcl
--l
I
.t
feor,rul
s2^
oB
r--.§
§ è Rds Rqta
41k 910
PTaoI ORG
BL
RID
§3 a
-È (b
=-5
ae VVIIT
F zoz
0.34
r.'
--- Droz lT22A
(A-M AGC)
Position
OFF
STEREO
OFF
ON
OFF
. - (REGULAToU__
Note:
All resistance values are in ohms. k = 1,000 M = 1,000 k
All capacitance values are in pF except as indicated
with p, which means lrpF.
Al! voltages are dc measured with a VOM having 20 k
ohms/volt input impedance. No signal in.
Voltage variations may be noted due to normal
production to lerances.
I I : STEREO operation
Capacitors marked a are built in transformers.
D703
U K Model
Lr)
C'.1
r§
a
=;
(-)
-^/w
Rzzs
Cros:
200p
\--{F
+1k
J
C-.J
cci
<'
c!
C'J
c'.1
c!
O
d
r--
a
c\
U
4.'l\
-Y
C-l
c!
(!
&
0<
Rzrz 82 s8J-itus220
c!C)-
q)c! I
s9
\\
r-
1t
6
to
<-)
and AEP Model
J
§
=
o<
Rru+
41A
>
t.()
-e.r
J>r
LJ
+
c')
ó
t*-
\_)
Àru3
410
ir)
c-..1
J'-:
O
c\
c!
C!
C)
F
q_)
LÍ)
c!
O
rló
5
t-
e)
o
c-J
cÍ)
ë
d2
o
=
cf)
§
r-()
O
O.
-st
ci [anodo Model oni
f D"..
UI ,J5 I
AEP ond
F 703
VSaot
127V ORG S
11OV YTL
I
I
I
I
I
i
3
cov Fzot
-vrAL
Wll I 200;AT
127l/ GRN
p IIOV BLU
>
3
> o\/ ttoz
VY .(^ .
BRN
16

SECTION 6
EXPLODED VIEWS
Note: Applicable Serial Numbers:
USA Model (Serial No. 800,001 and later)
Canada Model (Serial No. 700,001 and later)
UK Model (Serial No. 600,001 and later)
AEP Model (Serial No. 500,001 and later)
Note: All screws in this service manual are
phillips type (cross recess type) unless
otherwise indicated. (-); slotted head.
(1 )
{
è
è
Ur
è
S
q.
$
d
o'È
9à
(o'
Rë-
(o'È
§§
l{)
§
(
.,§
OcO
8ö
rq.
§
§
§:
§H§
§§§
q)
q)
3
o
§
È
G
9E
qà.
§Ë'
NË
§§
Xq
g
I
§§
§è
Ql-
q0)
.I
§r.IÍ
§è
8§5
§3i
$ Èq-
§§r
\r (aÈ
§
o
§
§§
§à
§§
8§5
§§§
§§t
ï,
I=§
˧
:Ë"
3§§
88§
§§§
§§§ §!
.§
a
q
x(§
$i
§E
lo
to oo'
Eö
xq
§
o
§
o
§§
<s§
E§
À à«o
d h§ (
§à§ §
餤
È=
B€
§o
<\\
a-. §
lri Y -o
S]E
BBT
餤
§§§
\t§-I
Ë
o
oÈ
oi
c5-\
(o-ca
§{
§u
XE
s
§
o
§
o
.§
Rv
-§5
(\o
A >È
Í) cà
r§r
q.
+
8§
eià
BÈ
(ö
(!) {
löo
*§
s
o
è§
I H.5
§§E
l()oa
ö Ëq-
§§i
€
:§
§§
§sS
§ÈE §
§§§§
§l
.§
a.
a
sí!
$i
§E
tO
ró oo'
Eö
rq
.t
ö
.§
È
§
6
ö
.\
8i
Ëq
(öS
8§
NO
I
$§
R=
AQ
$+t
§=
§§§§
§§s§
§!
'\
&
x!§
$.i
§E
k)
tr> oo
Eö
ro
§s
Èè
TS
a.:
§
\
,o
\
O-
§Ë
8§
8Ë5
,. §§i
\ §§§
\\
\\)
§§ -1
\/,
§,
.\
a
a
xͧ
Nï
§E
(o
uioo
Eö
xo
§,
a
a
:(È
s.i
§E
ro oo'
Eö
t.. q
t7

l2l
.§
!E
E
lf)
§;
c
§1
§ 8§
,§ §§
' \i.'
\si
\r-
\ §(4
à.\/
§
cÀ
§
\i
C\
(o
(lo
§
(
:
orO
8ö
xo.
8§
§à
§§
ó§
§§
l.o
§
(
:
ovO
Eö
xq.
E
8:
˧
§s
C\q
§§
§{
ó§
§§ \
P'a
8Í
(à
§§
E
§§E
§;§
§{< i
§§ R{
§.e
RÉ
§§
xà
§
f
a
o.j
§{
Q*
§r
xö
§
(
S.
sö
§n
§§ §
NË §.
§§ §fi
§
§
8§
top
c5§
O)
RT
ȧ
§(a
a.
§
§
§§
É.R
k)t
9c
B§
roo
nt S
a
.\
Br
È:
Ng
!O q)
*§
€
o
a
(§
o
o
oE
§
§P
Bà
Br
\i s-
§)
.\
a.
a
xG
$.i
§§
o 3o;
ögö
qxo
È
o
8:
R\
àà
o{ q.
a.
§
§
a
ó
o)
oo
tO
s
\
o
§\
§t
co
&§
§s§
8;R§
S§èI
ë à* È
§§§3
a.
E
§
o
Q
8g
N*'
Nqt
9E
c\§
§§
öo
o
tr..
§[
§à
ód
ÈÈ
§h
1§
T\
o
8:
˧'--
§r
c! q-
È
§
&
§§
9e
B*.
9§
§-Y
s§
+a
I
ó
(\
O)
ó
N
6
$
N.
§
OO
a.§
-oo
trl
§ àa
G
-l ooa
ÈÈ
9È
§t
.\
a.
a
s(§
e.i
§B
tf)
ro oo'
Eö
xq
§
a.
a
s(§
ol ï
§E
tO
to oo'
Eö
rq
4r
§
(
\i
(O r^
[i§
Rn
È
§
s
\r
§
0o
§.i
§
oo
a-
È
!q.
E
a
I
ó
§
È
I
a.
§
(E
§-
§§
§..
\§
too
§
8:
ó,§
NÈ
r§
(o
ö
t
§
(
§
(o
cl
6
(o
(
I
s*
Sr
\t(a
t
l{
È
o
S
§
§
o
È
v,
=
I
§§
§§
§5
§§
tfr
]S
§§
§§
ó(ö
(5(5
§§
::
B§
8E
tx
§
o
\
§
+.i
o
\
q
I
§
§
s
+
8§
˧
§e
I
§e
*a
qts
$o
è
§
a
q.
a
§
§
È
8t
ót
o)
ós
ȧ
§'ö
Èq
§
(
8,^
(\x
6(ï
§n
§l
.s
a
§o
s
I
OO'
ö
a
È
§
&
8§
(Y) \.
(b
?Ë
§{<
§l§
qt§
\i" A
/ ///
/ / /'//
//il,.il
/ //f ,/#',
ry/ ,ff,
'/ f."r" I
/ /// ,;,§ //
' ,/// E/ l'/
,/// ! " l'/
[rLr
=/§
§
ö
a
§
ó
§
ro
cir
6
(o
(
- Hardware Nomenclature -
P Pan Head Screw @ G=
PS - Pan Head Screw
with Spring \vasher @ ([p
PSw- "",,il:il:,tï:-*ïlli,til':: @ ffi
K Flat Countersunk Head Screw @ D=
B Binding Head Screw @ (p
- Example -
_ [-Type of Slot
o P 3xl0
llLleng*'inmm(L) lf Jfl
I I Diameter in mm (D) l -- -! t - -U
I Type of Head -loL ''lnL
§)
.\
a_
a
x(§
+.i
§E
tf)
trr oo'
Eö
xo
18
Table of contents
Other Sony Stereo Receiver manuals

Sony
Sony STR-DE575 - Fm Stereo/fm-am Receiver User manual

Sony
Sony STR-DE197 Quick start guide

Sony
Sony STR-DE515 User manual

Sony
Sony STR-DA1000ES User manual

Sony
Sony STR-GX215 User manual

Sony
Sony XAV-AX210 User manual

Sony
Sony ICF-SW7600 User manual

Sony
Sony HT-6500DP User manual

Sony
Sony STR-D1011S User manual

Sony
Sony STR-D360Z User manual

Sony
Sony XAV-AX7000 User manual

Sony
Sony STR-DE915 User manual

Sony
Sony STR-DE595 User manual

Sony
Sony STR-DA4400ES User manual

Sony
Sony XAV-AX200 User manual

Sony
Sony STR-V200 - Fm Stereo/fm-am Receiver User manual

Sony
Sony STR-W555 User manual

Sony
Sony ICF ICF-SW11 User manual

Sony
Sony STR-DE1015G User manual

Sony
Sony STR-DE305 User manual