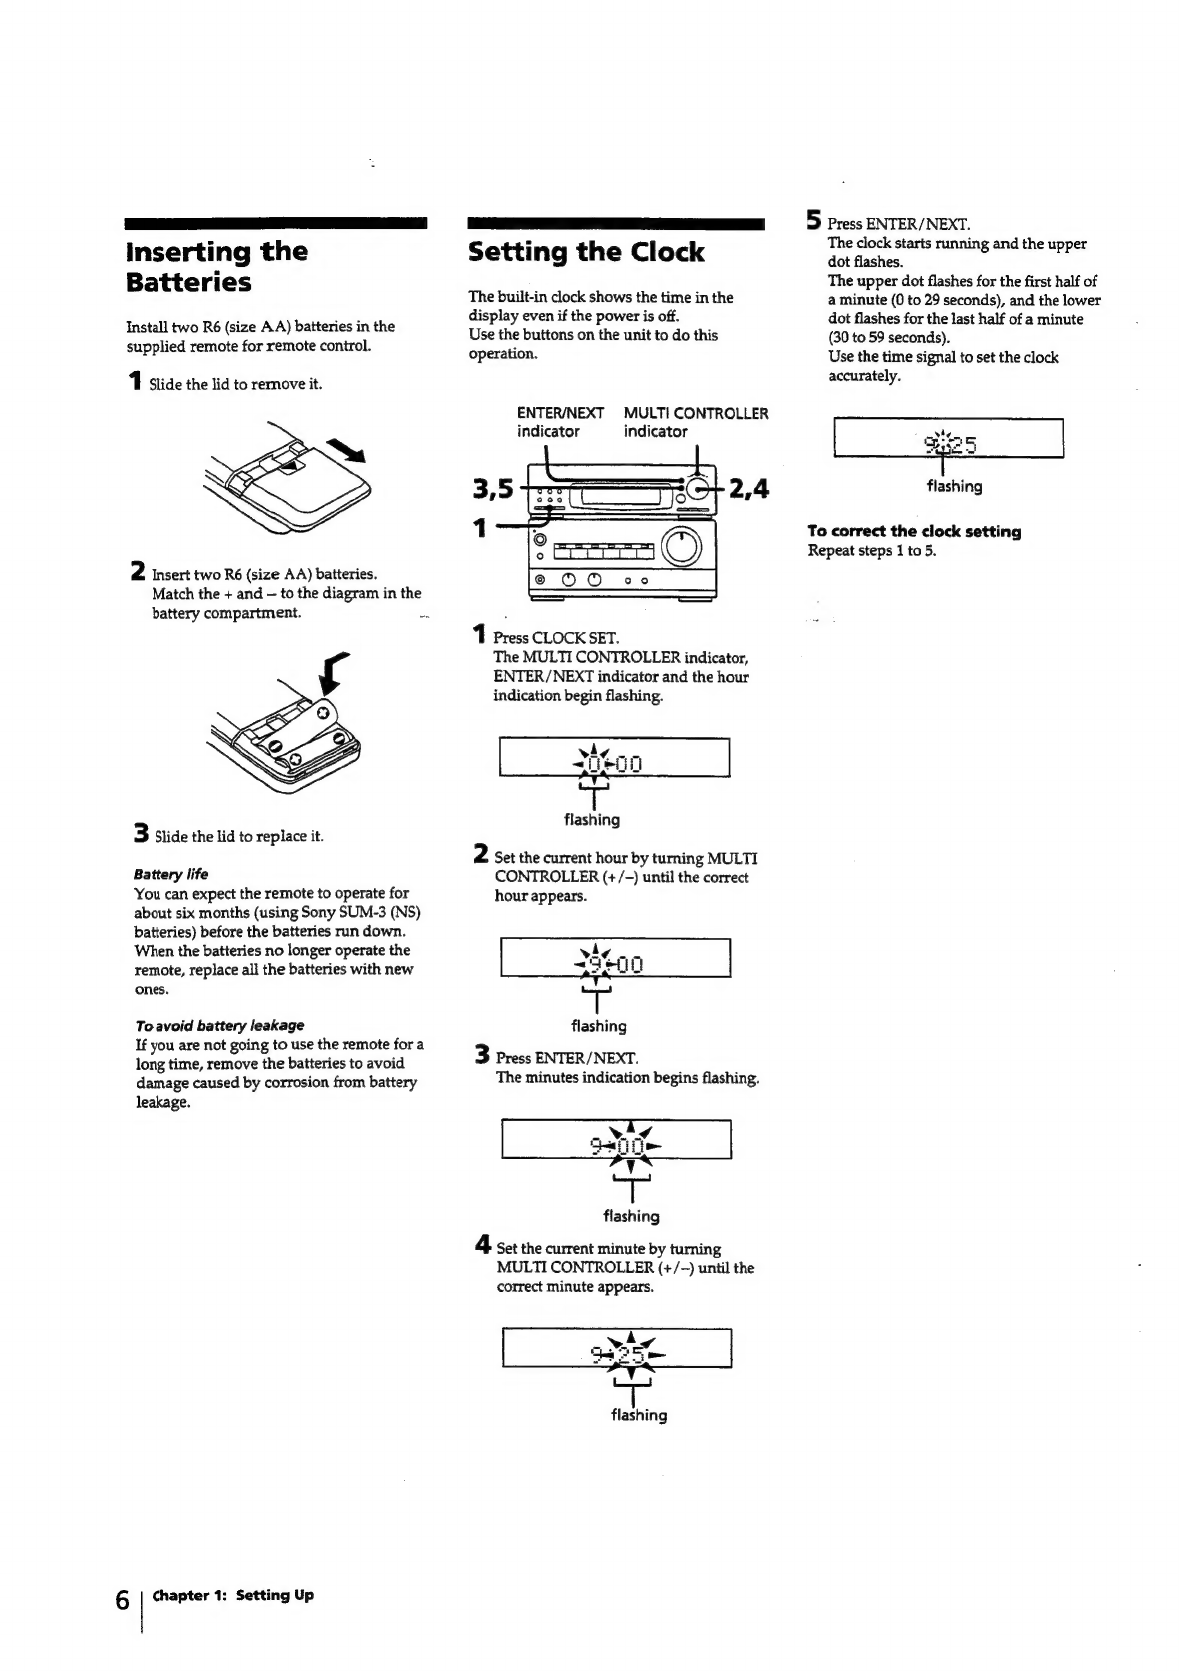
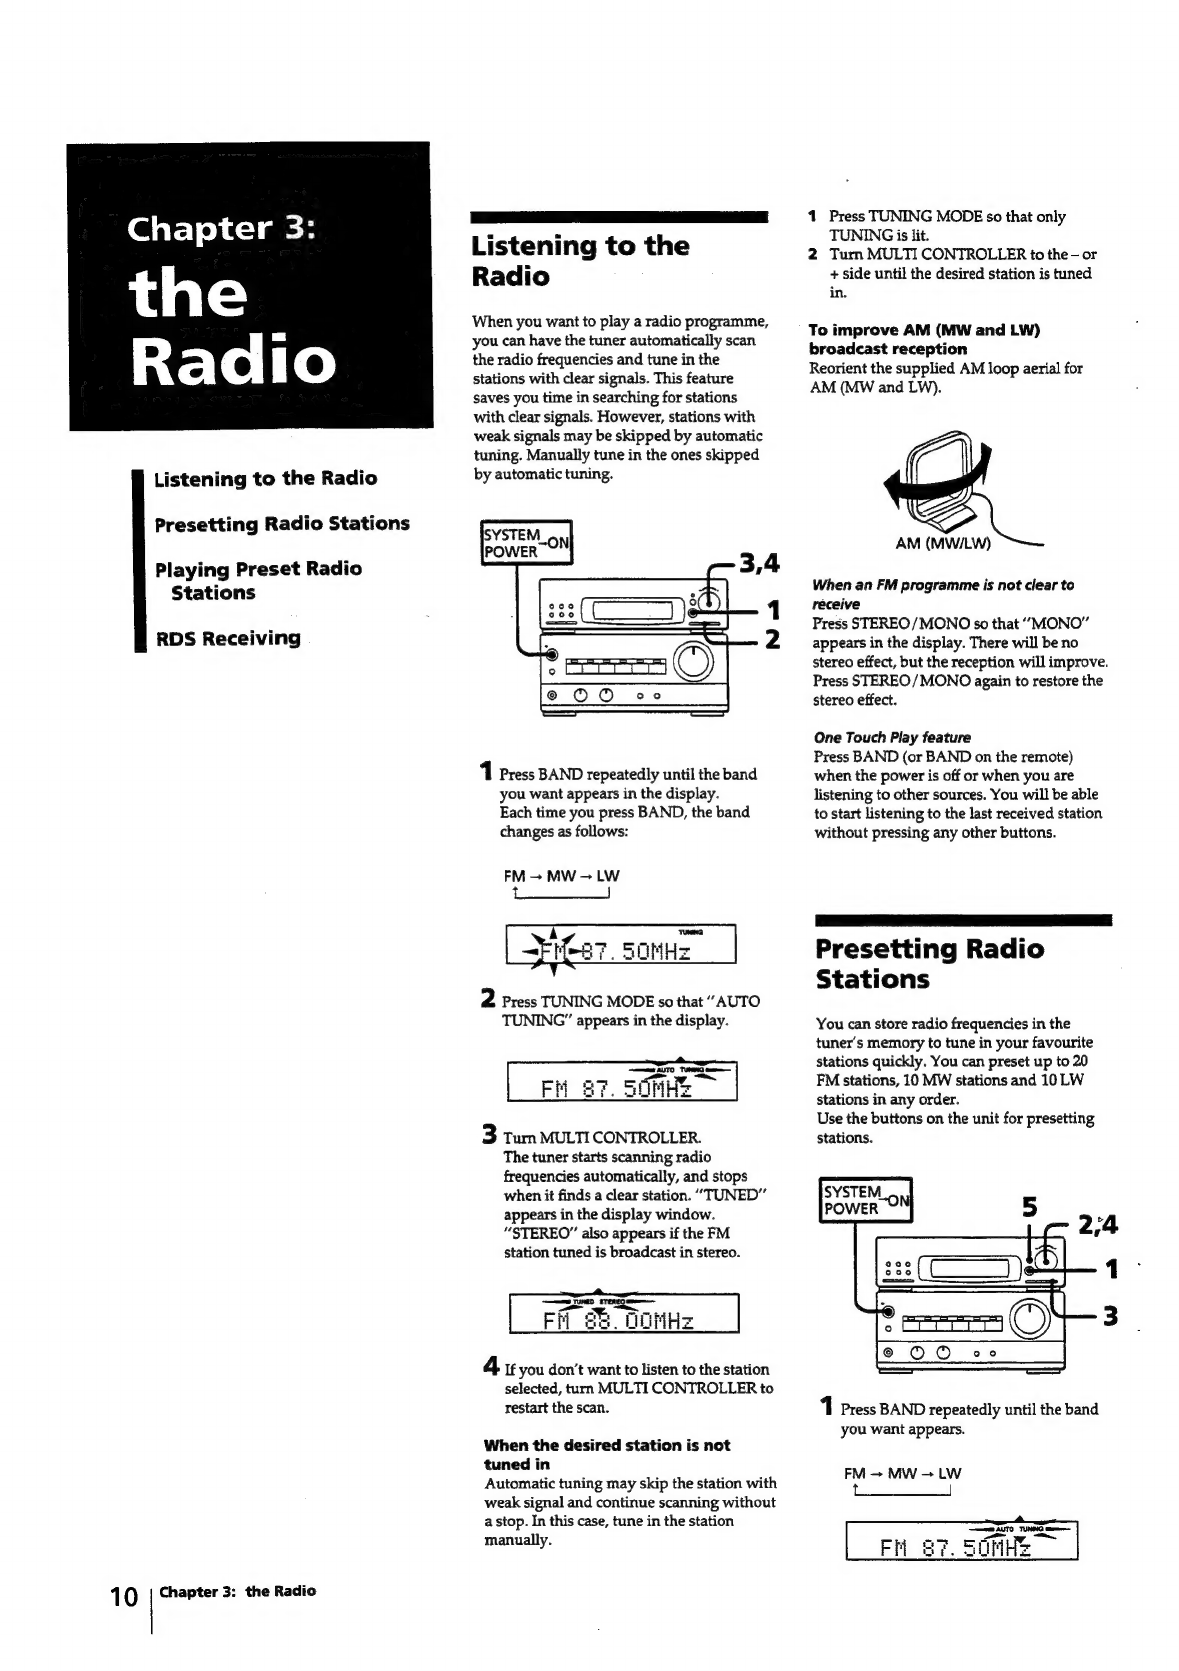
Sony MHC-EX5 User manual

SONY.
Mini
Hi-Fi
Component
System
Operating
Instructions
get
COR
D-SEON
MHC-EX5

2
|
WARNING
|
To
prevent
fire
or
shock
hazard,
do
not
expose
the
unit
to
rain
or
moisture.
To
avoid
electrical
shock,
do
not
open
the
cabinet.
Refer
servicing
to
qualified
personnel
only.
Do
not
install
the
appliance
in
a
confined
space,
such
as
a
bookcase
or
built-in
cabinet.
Laser
component
in
this
product
is
capable
of
emitting
radiation
exceeding
the
limit
for
Class
1.
This
appliance
is
classified
as
a
CLASS
1
LASER
product.
The
CLASS
1
LASER
PRODUCT
MARKING
is
located
on
the
rear
exterior.
CLASS
1
LASER
PRODUCT
LUOKAN
1
LASERLAITE
KLASS
1
LASERAPPARAT
CAUTION
j
INVISIBLE,
LASER
RADIATION
WHEN
OPEN.
This
caution
see
oe
RE
TO
—
a
label
is
located
ADVARSEL
;
USN
ASTRALING
VED
ABN!
hae
q
Sie
RHEDSAFBRYDERE
ER
UDE
AF.
FUNKTION.
inside
the
unit.
AVATTAESSA
JA
LET
ALTTIINA
+
LASERSTRALING
NAR
DENNA
DEL
AR
OPPNAD
*
OCH
SPARREN
AR
URXOPPLAD.
.
SYNLIG
LASERSTRALING
NAA
DEKSEL
APNES
ADVARSEL
+
UNNGA
EKSPONERING
FOR
STRALEN.
UKITUS
OHITETTAESSA
\TEILYLLE.
NOTICE
FOR
THE
CUSTOMERS
IN
THE
UNITED
KINGDOM
A
moulded
plug
complying
with
BS
1363
is
fitted
to
this
equipment
for
your
safety
and
convenience.
Should
the
fuse
in
the
plug
supplied
need
to
be
replaced,
a5
AMP
fuse
approved
by
ASTA
or
BSI
to
BS
1362,
(i.e.
marked
with
@orY
mark)
must
be
used.
If
the
plug
supplied
with
this
equipment
has
a
detachable
fuse
cover,
be
sure
to
attach
the
fuse
cover
after
you
change
the
fuse.
Never
use
the
plug
without
the
fuse
cover.
If
you
should
lose
the
fuse
cover,
please
contact
your
nearest
Sony
service
station.
IMPORTANT
Ifthe
plug
supplied
is
not
suitable
for
the
socket
outlets
in
your
home,
it
should
be
cut
off
and
an
appropriate
plug
fitted
in
accordance
with
the
following
instructions.
The
wires
in
this
mains
lead
are
coloured
in
accordance
with
the
following
code:
Blue:
Neutral
Brown:
Live
As
the
colours
of
the
wires
in
the
mains
lead
of
this
apparatus
may
not
correspond
with
the
coloured
markings
identifying
the
terminals
in
your
plug,
proceed
as
follows:
The
wire
which
is
coloured
blue
must
be
connected
to
the
terminal
which
is
marked
with
the
letter
N
or
coloured
black.
The
wire
which
is
coloured
brown
must
be
connected
to
the
terminal
which
is
marked
with
the
letter
L
or
coloured
red.
Do
not
connect
either
wire
to
the
earth
terminal
in
the
plug
which
is
marked
by
the
letter
E
or
by
the
safety
earth
symbol
+
or
coloured
green
or
green-and-yellow.
WARNING
To
prevent
shock
hazard,
do
not
insert
the
plug
cut
off
from
the
mains
lead
into
a
socket
outlet.
This
plug
cannot
be
used
and
should
be
destroyed.
Welcome!
Thank
you
for
purchasing
the
Sony
Mini
Hi-Fi
Component
System.
This
series
is
packed
with
fun
features.
Here
are
just
a
few:
+
A
preset
feature,
that
lets
you
store
and
recall
up
to
40
of
your
favourite
radio
stations
«
RDS
buttons
that
let
you
receive
RDS
(Radio
Data
System)
services
+
A
timer
that
lets
you
set
the
CD
player,
tape
player
or
radio
to
turn
on
and
off
whenever
you
want
-
A
dual
tape
deck
that
lets
you
record
from
the
radio,
CD
player
or
from
the
other
tape
deck
and
relay
play
from
both
decks
«
A
remote
that
lets
you
control
the
music
from
your
seat
The
MHC-EX5
consists
of
the
following:
-
CD
player:
CDP-EX10
~
Tuner:
ST-EX10
—
Stereo
cassette
deck:
TC-EX5
—
Integrated
stereo
amplifier:
TA-EX5
—
Speaker
system:
SS-EX50

Ta
re)
A
e
rey
i
Chapter
1:
Setting
Up
Connecting
the
Stereo
4
Inserting
the
Batteries
6
@)
al
e
al
S
Setting
the
Clock
6
Chapter
2:
the
CD
Player
Playing
a
CD
(normal
play)
7.
Playing
Tracks
in
Random
Order
(shuffle
play)
8
Playing
Tracks
in
the
Desired
Order
(programme
play)
8
Playing
Tracks
Repeatedly
(repeat
play)
9
Chapter
3:
the
Radio
Listening
to
the
Radio
10
Presetting
Radio
Stations
10
Playing
Preset
Radio
Stations
11
RDS
Receiving
12
Chapter
4:
the
Tape
Player
Playing
aTape
14
Recordinga
CD
15
Recording
a
CD:
Selecting
Tape
Length
Automatically
(tape
select
edit)
16
Recording
a
CD:
Specifying
Tape
Length
(time
edit)
17
Recording
a
CD:
Specifying
Track
Order
(programme
edit)
18
Recording
From
the
Radio
18
Recording
From
Another
Tape
(dubbing)
19
Chapter
5:
Sound
Adjustment
Adjusting
the
Sound
20
Chapter
6:
Additional
Features
Falling
Asleep
to
Music
21
Waking
Up
to
Music
21
Timer-Recording
Radio
Programmes
22
Connecting
Optional
Equipment
23
For
Your
Information
Precautions
25
Troubleshooting
Guide
25
Maintenance
26
Specifications
26
Glossary
27
Index
to
Parts
and
Controls
28
v
index
29
3

Chapter
1:
Setting
Up
Connecting
the
Stereo
Inserting
the
Batteries
Setting
the
Clock
4
Chapter
1:
Setting
Up
ee
ae
Connecting
the
Stereo
Use
the
illustrations
below
to
connect
your
stereo.
If
you
want
to
connect
any
optional
components
to
the
stereo,
see
“Connecting
Optional
Equipment”
in
Chapter
6.
ISTEP
1
Connecting
the
Flat
Cord
Connect
the
supplied
flat
cord
to
the
SYSTEM
CONTROL
connectors
with
the
same
colour
until
it
clicks.
To
disconnect
the
flat
cord
Pull
out
the
connector
of
the
flat
cord
while
pressing
its
sides.
Do
not
pull
the
flat
cord
itself.
|
STEP
2 |
Connecting
the
Audio
Cables
Use
the
supplied
audio
cords
to
connect
the
integrated
stereo
amplifier
and
other
components.
Be
sure
to
connect
the
following:
—
the
plugs
to
the
jacks
of
the
same
colour.
—
the
jacks
with
the
same
Roman
numerals.
Connect
the
jacks
With
the
jacks
on
on
the
integrated
the
other
stereo
amplifier
components
below
below
TUNER
IN
/i\
TUNER
OUT
/i\
on
the
tuner
CDIN@
CD
OUT
(f))
on
the
CD
player
TAPE]
OUT
TAPE1
IN
[ill]
on
the
tape
player
TAPE1
IN
Ww
TAPE1
OUT
®
on
the
tape
player
Bie)
Connecting
the
Speakers
1
Twist
the
speaker
cable
coating
and
strip
it
from
the
end
of
the
cable.
a
2
Connect
the
right
speaker
to
the
R
connectors
and
the
left
speaker
to
the
L
connectors.
See
the
instruction
manual
provided
with
the
speakers
for
details
of
connections.
SPEAKER
|
STEP
4,
Connecting
the
Aerials
ee
FM75Q.
7AM
NU
COAXIAL
LE
L/S
.
LOOP
ANTENNA
AM
loop
aerial
(supplied)
*Note:
Extend
it
horizontally

Right
speaker
Integrated
stereo
amplifier
To
improve
the
FM
reception
Connect
an
outdoor
FM
aerial
to
the
FM
75Q
terminal,
using
a
75-ohm
coaxial
cable
and
IEC
standard
socket
connector.
IEC
standard
socket
connector
(not
supplied)
To
improve
the
AM
reception
After
you
connect
the
AM
aerial,
connect
a
6-
to
15-
meter
(20-
to
50-
feet)
insulated
wire
to
the
AM
terminal.
Connect
the
>
terminal
to
earth.
FM
lead
aerial
(supplied)
AM
loop
aerial
(supplied)
CD
player
!Do
this
connection
last!
important
Ground
the
external
aerial
against
lightning.
To
prevent
a
gas
explosion,
do
not
connect
the
ground
wire
to
a
gas
pipe.
Insulated
wire
(not
supplied)
Ground
wire
(not
supplied)
Left
speaker
to
a
wall
outlet
ISTEP
5 |
Connecting
the
Power
Connect
the
mains
lead
to
a
wall
outlet
after
you
have
made
all
the
above
connections.
to
a
wall
outlet
Caution
Before
you
power
on
the
stereo,
turn
the
VOLUME
control
counterclockwise
to
decrease
the
sound
level.
Chapter
1:
Setting
Up
5

6
eee
See.
2
ae
ee
ee
eG]
inserting
the
Batteries
Install
two
R6
(size
AA)
batteries
in
the
supplied
remote
for
remote
control.
1
Slide
the
lid
to
remove
it.
“Na
2
Insert
two
R6
(size
AA)
batteries.
Match
the
+
and
—
to
the
diagram
in
the
battery
compartment.
3
Slide
the
lid
to
replace
it.
Battery
life
You
can
expect
the
remote
to
operate
for
about
six
months
(using
Sony
SUM-3
(NS)
batteries)
before
the
batteries
run
down.
When
the
batteries
no
longer
operate
the
remote,
replace
all
the
batteries
with
new
ones.
To
avoid
battery
leakage
If
you
are
not
going
to
use
the
remote
for
a
long
time,
remove
the
batteries
to
avoid
damage
caused
by
corrosion
from
battery
leakage.
Chapter
1:
Setting
Up
Setting
the
Clock
The
built-in
clock
shows
the
time
in
the
display
even
if
the
power
is
off.
Use
the
buttons
on
the
unit
to
do
this
operation.
ENTER/NEXT
MULTI
CONTROLLER
indicator
indicator
1
Press
CLOCK
SET.
The
MULTI
CONTROLLER
indicator,
ENTER/NEXT
indicator
and
the
hour
indication
begin
flashing.
vig
.-
<LELL
flashing
2
Set
the
current
hour
by
turning
MULTI
CONTROLLER
(+/-)
until
the
correct
hour
appears.
r
Va
=
<FSL
a
flashing
3
Press
ENTER/NEXT.
The
minutes
indication
begins
flashing.
flashing
4
set the
current
minute
by
turning
MULTI
CONTROLLER
(+/—)
until
the
correct
minute
appears.
flashing
5
Press
ENTER/NEXT.
The
clock
starts
running
and
the
upper
dot
flashes.
The
upper
dot
flashes
for
the
first
half
of
a
minute
(0
to
29
seconds),
and
the
lower
dot
flashes
for
the
last
half
of
a
minute
(30
to
59
seconds).
Use
the
time
signal
to
set
the
clock
accurately.
flashing
To
correct
the
clock
setting
Repeat
steps
1
to
5.

Chapter
2:
the
CD
Player
Playing
a
CD
(normal
play)
Playing
Tracks
in
Random
Order
(shuffle
play)
Playing
Tracks
in
the
Desired
Order
(programme
play)
Playing
Tracks
Repeatedly
(repeat
play)
Se
ee
Playing
a
CD
(normal
play)
You
can
play
a
CD
in
four
modes:
normal,
shuffle,
programme
and
repeat.
The
mode
decides
which
tracks
(songs)
you
will
listen
to,
in
which
order
and
whether
or
not
they
will
repeat.
Before
you
play
the
CD,
decrease
the
sound
level
by
turning
the
VOLUME
control
counterclockwise,
to
avoid
damaging
the
speakers.
You
can
also
use
the
remote
to
do
this
operation.
1
Press
2
OPEN/CLOSE
to
open
the
disc
tray.
2
Holding
the
CD
by
the
edge,
place
the
CD
on
the
CD
tray
with
the
label
side
up.
(When
you
play
an
8-cm
CD,
place
it
without
an
adaptor
on
the
inner
circle
of
the
disc
tray.)
3
Press
Dil
on
the
unit
(or
press
B
on
the
remote).
The
disc
tray
closes
and
play
starts.
Track
number
Music
calendar
Playing
time
4
Adjust
the
volume.
Turn
VOLUME
clockwise
to
turn
up
the
volume,
or
counterclockwise
to
turn
down.
(Or
press
VOL
(+/-)
on
the
remote.)
To
Press*
Stop
play
O
(m)
Pause
Dil
(Hu)
Resume
play
Dil
(B=
or
Hf)
Remove
the
CD
&
OPEN/CLOSE
*
The
buttons
on
the
remote
are
indicated
in
parentheses.
To
check
the
remaining
playing
time
Press
TIME
repeatedly.
Each
time
you
press
TIME
while
playing
a
CD,
the
display
changes
as
follows:
Playing
time
on
_
Remaining
time
the
current
track
on
the
current
track
=
Remaining
time
a
on
the
CD
To
check
the
total
playing
time
and
number
of
tracks
Press
TIME
in
stop
mode.
The
total
playing
time
and
number
of
tracks
appear
for
a
few
seconds.
Note
The
total
playing
time
and
number
of
tracks
also
appear
in
the
display
when
you
press
=
OPEN/CLOSE
to
close
the
disc
tray.
One
Touch
Play
feature
Press
Dil
on
the
CD
player
(or
CD
>
on
the
remote)
when
the
power
is
off.
When
a
CD
is
in
the
player,
you
will
be
able
to
start
listening
to
the
CD
without
pressing
any
other
buttons.
If
no
CD
is
inserted,
the
system
will
just
turn
on.
Automatic
Source
Selection
If
you
press
il
(or
CD
B>
on
the
remote)
while
another
source
is
selected,
the
CD
player
is
selected
and
play
starts
automatically.
The
Music
Calendar
Display
This
display
lights
according
to
the
number
of
tracks
on
the
CD.
As
each
track
is
played,
the
corresponding
number
disappears.
Tracks
numbering
in
excess
of
20
are
not
displayed.
continue
to
next
page
>
Chapter
2:
the
CD
Player
7

8
+>
continued
Locating
a
Specific
Track
(automatic
music
sensor:
AMS)
You
can
quickly
locate
any
track
while
playing
or
pausing
a
CD.
To
locate
Turn
The
next
or
ke
AMS
PPI
clockwise
succeeding
(or
press
PPI
on
the
tracks
remote
repeatedly)
until
you
find
the
track
The
current
<q
AMS
PI
counter-
or
preceding
clockwise
(or
press
K@
on
tracks
the
remote
repeatedly)
until
you
find
the
track
Locating
a
Particular
Point
in
a
Track
You
can
locate
a
particular
point
in
a
track
while
playing
or
pausing
a
CD.
Use
the
buttons
on
the
unit
to
operate
this
feature.
To
Do
this
Go
forward
Hold
down
>
and
quickly
release
it
at
the
desired
point.
Go
Hold
down
<4
and
backwards
release
it
at
the
desired
quickly
point.
Search
Hold
down
<4
or
PP
quickly
by
until
you
find
the
point.
observing
the
You
will
not
hear
the
display
sound
during
this
during
pause
operation.
To
find
a
track
directly
You
can
find
a
track
you
want
just
by
pressing
the
track
number
on
the
remote.
1
Press
CD.
2
Press
the
numeric
button
for
the
track
you
want.
If
the
track
number
is
11
or
more
Press
>10
and
the
track
number.
e.g.
For
the
track
number
21,
press
>10,
2,
1.
For
the
track
number
20,
press
>10,
2,
10
(as
the
figure
‘’0’’”).
Notes
on
handling
discs
+
To
keep
the
disc
clean,
handle
the
disc
by
its
edge.
Do
not
touch
the
surface.
+
Do
not
stick
paper
or
tape
onto
the
disc.
«Do
not
expose
the
CD
to
direct
sunlight
or
heat
sources
such
as
hot
air
ducts,
nor
leave
it
in
a
car
parked
in
direct
sunlight
as
there
can
be
a
considerable
rise
in
temperature
inside
the
car.
Chapter
2:
the
CD
Player
Playing
Tracks
in
Random
Order
(shuffle
play)
You
can
play
all
the
tracks
on
the
CD
in
random
order.
Use
the
buttons
on
the
unit
to
do
this
operation.
1
Press
PLAY
MODE
until
“SHUFFLE”
appears
in
the
display.
2
Press
Dil.
“©,”
appears
and
then
all
the
tracks
play
in
random
order.
To
skip
to
the
next
track,
turn
<4
AMS
PPI
clockwise.
To
replay
the
current
track,
turn
ié<_
AMS
PPI
counterclockwise.
You
cannot
replay
the
previous
track.
To
stop
playing
Press
O.
To
cancel
shuffie
play
Press
PLAY
MODE
repeatedly
until
“SHUFFLE”
disappears
from
the
display.
Tracks
continue
playing
in
their
original
order.
Playing
Tracks
in
the
Desired
Order
(programme
play)
You
can
programme
up
to
24
tracks
to
play
in
the
order
you
want
them
to
play.
You
can
also
use
the
remote
to
do
this
operation.
"
Numeric
buttons
1
Press
PLAY
MODE
until
“PROGRAM”
appears
in
the
display.
2
Turn
K€
AMS
PP
to
choose
a
track.
The
track
number
and
the
total
playing
time
appear.
3
Press
PLAY
MODE.
The
chosen
track
is
programmed.
The
playing
order,
the
track
number
and
the
total
playing
time
appear.
Also,
the
chosen
track
number
lights
up
in
the
music
calendar.
If
the
track
number
disappears
before
you
press
PLAY
MODE,
go
back
to
step
2.

To
programme
tracks
directly
Press
CD
and
then
the
numeric
buttons
on
the
remote
in
the
order
you
want
them
to
play.
Track
number
_—
Playing
order
)
STEP!
Total
playing
time
Notes
If
“STEP
FULL”
appears
during
programming,
you
have
programmed
a
track
number
which
exceeds
24.
+
If
the
playing
order
and
chosen
track
number
in
the
music
calendar
flash,
the
total
programmed
time
has
exceeded
100
minutes.
4
t
programme
additional
tracks,
repeat
steps
2
and
3.
5
Press
Pil.
All
the
tracks
play
in
the
order
you
chose.
To
check
the
remaining
time
of
the
programmed
tracks
Press
TIME
repeatedly.
Each
time
you
press
TIME
while
playing
a
CD,
the
display
changes
as
follows:
Playing
time
on
Remaining
the
currenttrack
~~
timeonthe
current
track
t_
Remaining
time
of
a
the
whole
programme
Note
If
“--.-”
appears,
this
means
the
remaining
playing
time
exceeds
100
minutes.
To
change
the
order
of
programmed
tracks
Erase
the
entire
programme
and
create
a
new
one.
Playing
Tracks
Repeatedly
(repeat
play)
You
can
choose
between
two
different
repeat
play
modes.
One
repeats
all
the
tracks
in
the
current
play
mode;
the
other
Repeating
a
single
track
(in
normal
play
only)
Press
REPEAT
repeatedly
while
playing
the
desired
track
until
“REPEAT
1”
appears
in
the
display.
To
cancel
repeat
play
Press
REPEAT
so
that
“REPEAT”
or
“REPEAT
1”
disappears
from
the
display.
To
Press*'
Check
the
CHECK
programme
repeatedly”?
Programme
apause
(#fl)*?
Stop
play
0
(@)
Cancel
the
PLAY
MODE“
programme
play
Erase
a
track
from
CLEAR
the
end
Erase
a
specific
track
CHECK
repeatedly
so
the
number
of
the
track
lights
up,
and
press
CLEAR
Erase
the
entire
programme
0
(®)
once
in
stop
mode
and
twice
while
playing
«1
The
buttons
on
the
remote
are
indicated
in
parentheses.
»
After
the
last
track
appeared
“CHECK
END”
appears
in
the
display.
»?
“P”
appears
and
the
total
playing
time
is
reset
to
0.00.
«4
The
programme
is
erased.
repeats
a
single
track.
You
can
also
use
the
remote
to
do
this
operation.
REPEAT
Repeating
all
the
tracks
(in
any
play
mode)
Press
REPEAT
repeatedly
until
“REPEAT”
appears
in
the
display.
—_
pee
a6
an
e78
>
eee
bea
Chapter
2:
the
CD
Player
9

Chapter
3:
the
stclelle,
Listening
to
the
Radio
Presetting
Radio
Stations
Playing
Preset
Radio
Stations
RDS
Receiving
1
0
Chapter
3:
the
Radio
Listening
to
the
Radio
When
you
want
to
play
a
radio
programme,
you
can
have
the
tuner
automatically
scan
the
radio
frequencies
and
tune
in
the
stations
with
clear
signals.
This
feature
saves
you
time
in
searching
for
stations
with
clear
signals.
However,
stations
with
weak
signals
may
be
skipped
by
automatic
tuning.
Manually
tune
in
the
ones
skipped
by
automatic
tuning.
‘1
Press
BAND
repeatedly
until
the
band
you
want
appears
in
the
display.
Each
time
you
press
BAND,
the
band
changes
as
follows:
FM
—
MW
>
LW
|
_SOMH=
2
Press
TUNING
MODE
so
that
“AUTO
TUNING”
appears
in
the
display.
3
Tur
MULTI
CONTROLLER.
The
tuner
starts
scanning
radio
frequencies
automatically,
and
stops
when
it
finds
a
clear
station.
“TUNED”
appears
in
the
display
window.
“STEREO”
also
appears
if
the
FM
station
tuned
is
broadcast
in
stereo.
4
you
don’t
want
to
listen
to
the
station
selected,
turn
MULTI
CONTROLLER
to
restart
the
scan.
When
the
desired
station
is
not
tuned
in
Automatic
tuning
may
skip
the
station
with
weak
signal
and
continue
scanning
without
a
stop.
In
this
case,
tune
in
the
station
manually.
1
Press
TUNING
MODE
so
that
only
TUNING
is
lit.
2
Turn
MULTI
CONTROLLER
to
the
-
or
+
side
until
the
desired
station
is
tuned
in.
To
improve
AM
(MW
and
LW)
broadcast
reception
Reorient
the
supplied
AM
loop
aerial
for
AM
(MW
and
LW).
AM
(MW/LW)
When
an
FM
programme
is
not
clear
to
receive
Press
STEREO/MONO
so
that
“MONO”
appears
in
the
display.
There
will
be
no
stereo
effect,
but
the
reception
will
improve.
Press
STEREO/
MONDO
again
to
restore
the
stereo
effect.
One
Touch
Play
feature
Press
BAND
(or
BAND
on
the
remote)
when
the
power
is
off
or
when
you
are
listening
to
other
sources.
You
will
be
able
to
start
listening
to
the
last
received
station
without
pressing
any
other
buttons.
eee
eee
Presetting
Radio
Stations
You
can
store
radio
frequencies
in
the
tuner’s
memory
to
tune
in
your
favourite
stations
quickly.
You
can
preset
up
to
20
FM
stations,
10
MW
stations
and
10
LW
stations
in
any
order.
Use
the
buttons
on
the
unit
for
presetting
stations.
1
Press
BAND
repeatedly
until
the
band
you
want
appears.
FM
—
MW
—
LW
jen
eee
FH

2
Turn
MULTI
CONTROLLER
to
tune
in
the
station
you
would
like
to
store.
amma
TUNED
STEREO
Gem
i
FA
oe
3
Press
MEMORY.
The
MULTI
CONTROLLER
indicator
and
the
ENTER/
NEXT
indicator
flash,
and
a
preset
station
number
appears
in
the
display
for
eight
seconds.
TUNED
STEREO
n
FM
So.
OOMH:
2
Preset
station
number
4
turn
MULTI
CONTROLLER
to
the
-
or
+
side
to
display
the
preset
number
you
decided
on
(1
to
20
for
FM,
1
to
10
for
MW
and
LW).
5
press
ENTER/NEXT.
The
station
is
stored
at
the
preset
number
you
decided.
6
Repeat
steps
1
to
5
for
each
station
you
would
like
to
store.
To
erase
a
stored
station
Store
a
new
station
at
a
previously
used
preset
station
number.
It
will
erase
the
old
station
and
replace
it
with
the
new
station.
if
you
have
trouble
storing
a
station
or
if
you
made
a
mistake
Repeat
steps
1
to
5.
Assigning
a
name
for
a
preset
station
(station
name)
You
can
assign
a
name
of
up
to
eight
characters
for
each
preset
station
(except
the
LW
stations).
The
station
name
appears
in
the
display
when
all
of
the
following
conditions
are
met:
+
You
are
tuning
in
a
preset
station.
+
You
have
already
assigned
a
name
for
that
station.
*
You
have
changed
the
frequency
display
to
the
station
name
display.
1
Tune
in
the
preset
station
you
would
like
to
assign
a
name.
2
Press
CHARACTER.
The
MULTI
CONTROLLER
indicator,
the
ENTER/NEXT
indicator,
and
the
cursor
(located
at
the
first
character)
flash.
3
Turn
MULTI
CONTROLLER
to
the
-
or
+
side
to
select
the
character.
4
Press
ENTER/NEXT.
5
Repeat
steps
2
to
4
above
to
enter
the
next
character.
6
Press
ENTER/NEXT
repeatedly
when
you
finish
entering
the
name.
The
cursor
moves
to
the
right
and
disappears;
the
name
is
now
memorized.
You
can
use
these
letters
and
symbols
ABCDEFGHIJKLMNOPQRST
UVWXYZ[\]4%-
|labcdefghij
kimnopaqrstuvwxyz{|}
gaa
eeiiddouuNGgBilaaeeii66
adAGSGi
(Space)!
"#0%
&'()*+,
-./0123456789:;<=>7@
To
erase
the
station
name
You
can
erase
the
station
name
by
changing
all
the
characters
of
that
name
into
“spaces”.
Use
the
buttons
on
the
unit
to
do
this
operation.
To
change
the
frequency
display
to
the
station
name
display
Each
time
you
press
DISPLAY,
the
frequency
or
station
name
(if
you
have
stored
any)
appears
in
the
display
repeatedly.
Playing
Preset
Radio
Stations
Once
you
have
preset
the
stations,
use
the
MULTI
CONTROLLER
to
quickly
tune
in
your
favourite
stations.
Use
the
buttons
on
the
unit
to
do
this
operation.
1
Press
BAND
repeatedly
to
select
the
band
you
want.
2
Press
TUNING
MODE
so
that
“PRESET”
appears
in
the
display.
——?
FM
87.
50MHz
3
Tum
MULTI
CONTROLLER
to
the
-
side
or
+
side
to
tune
in
a
preset
station.
The
station
frequency
or
station
name
appears
and
the
system
begins
receiving
the
station.
To
tune
in
a
preset
station
directly
Use
the
buttons
on
the
remote
to
do
this
operation.
1
Press
TUNER
to
change
the
function
mode
of
the
numeric
buttons
to
tuner
mode.
2
Press
BAND
repeatedly
until
the
band
you
want
appears.
3
Press
the
numeric
buttons
to
select
the
preset
station
number
you
want.
Chapter
3:
the
Radio
1
1
i
:
i
j
3
}
;
E

12
RDS
Receiving
You
can
enjoy
RDS
services
on
this
stereo
system.
RDS
(Radio
Data
System)
is
a
broadcasting
service
which
allows
you
to
receive
additional
information
with
the
regular
radio
programme
signal.
Receiving
RDS
Broadcasts
To
receive
RDS
broadcasts,
simply
make
sure
the
tuner
is
set
to
the
FM
band.
Use
the
buttons
on
the
unit
to
do
this
operation.
SYSTEM
POWER
ON]
DISPLAY
1
Press
BAND
repeatedly
to
select
FM.
2
Press
TUNING
MODE
so
that
“PRESET”
appears
in
the
display.
3
Turn
MULTI
CONTROLLER
to
the
-
side
or
+side
to
tune
in
a
preset
station
that
provides
RDS
service.
“RDS”
and
the
station
name
appear
in
the
display.
“RDS”
is
lit
while
receiving
the
RDS
broadcast.
To
check
the
RDS
information
Each
time
you
press
DISPLAY,
the
display
changes
as
follows:
Station
name
—
Frequency
t
Radio
text
<
Programme
type
When
“NO
PTY
Data”
appears
in
the
display
The
receiving
station
does
not
broadcast
the
programme
type
(PTY)
you
selected.
When
“No
Text
Data”
appears
in
the
display
The
receiving
station
does
not
broadcast
the
radio
text
data.
When
“PTY
Alarm”
flashes
in
the
display
There
is
an
emergency
announcement
by
governmental
authorities.
Chapter
3:
the
Radio
Monitoring
Enhanced
Other
Networks
(EON)
Enhanced
Other
Networks
(EON)
You
can
have
the
unit
automatically
switch
from
the
currently
selected
function
to
another
network
RDS
station
broadcasting
a
traffic,
news
or
information
programme.
The
tuner
switches
back
to
the
original
station
after
the
programme
is
finished.
Use
the
buttons
on
the
unit
to
do
this
operation.
1
Press
EON
to
select
the
desired
programme.
Each
time
you
press
EON,
the
display
changes
as
follows:
TA
>
NEWS
t ‘
(no
display)
—
INFO
Ta
WOR-Re
The
unit
enters
the
EON
standby
mode
and
“TA”
(Traffic-Announcement),
“NEWS”
or
“INFO”
(Information)
appears
in
the
display.
When
“No
TA
service”,
“No
News”
or
“No
Info”
appears
in
the
display
There
is
no
station
which
broadcasts
the
programme
you
selected.
2
When
the
unit
automatically
tunes
in
the
selected
programme,
“TA”,
“NEWS”
or
“INFO”
flashes
in
the
display.
After
the
programme
ends,
the
unit
switches
back
to
the
last
selected
function.
To
stop
monitoring
the
programme
Press
EON
once.
The
unit
returns
to
the
currently
selected
EON
standby
mode.
To
receive
the
RDS
information
while
the
system
power
is
turned
off
Because
EON
standby
mode
works
even
when
the
power
is
off,
you
can
receive
the
information
you
want
whenever
it
is
being
broadcast.
1
Press
EON
so
that
“TA”,
“NEWS”
or
“INFO”
appears
in
the
display.
The
unit
enters
the
EON
standby
mode.
2
Press
SYSTEM
POWER
to
turn
off
the
system.
“EON
Wait?”
and
“Push
EON
KEY”
appear
alternately.
3
Press
EON
within
six
seconds.
“EON
WAITING”
appears
in
the
display.
The
unit
enters
into
the
EON
standby
mode,
and
the
system
power
is
automatically
turned
on
upon
receiving
an
EON
programme.
When
the
programme
is
finished,
the
unit
is
turned
off
and
returns
to
the
EON
standby
mode.
Notes
»
Not
all
RDS
stations
provide
EON
service.
+
The
station
will
not
switch
if
the
current
‘receiving
station
broadcasts
the
“programme
you
selected
(TA,
NEWS
or
INFO).
When
“Now
TA”
appears
in
the
display
The
current
station
broadcasts
the
Traffic-
Announcement
Identification.
When
“Weak
Signal”
appears
in
the
display
The
current
EON
station
cannot
provide
RDS
data
due
to
a
weak
signal.
When
“Returning”
appears
in
the
display
about
four
minutes
after
receiving
a
signal
from
an
EON
station
The
current
EON
station
cannot
provide
RDS
data
due
to
a
weak
signal.
The
unit
is
attempting
to
retune
the
EON
station.
Notes
on
EON
and
recording
+
EON
receiving
function
does
not
operate
while
recording.
+
If
you
begin
recording
during
EON
reception,
the
recording
will
automatically
stop
when
the
EON
programme
ends.
Notes
on
EON
and
the
timer
+
The
station
set
with
the
timer
will
not
be
received
if
the
timer
is
turned
on
while
receiving
an
EON
programme.
+
The
timer
will
not
operate
if
you
make
the
EON
standby
mode
work,
even
while
the
timer
is
preset
and
the
power
is
off.
Make
sure
you
turn
EON
off
when
setting
the
timer.
Notes
on
EON
and
the
Function
Selectors
*
If
you
receive
an
EON
programme
while
playing
a
tape
or
CD,
the
system
automatically
switches
to
tuner
mode
and
the
tape
player
stops
playback
or
the
CD
player
pauses
playing.
When
the
EON
reception
finishes,
the
system
returns
to
the
playback
of
the
previously
selected
sources.
*
If
you
switch
the
function
while
receiving
an
EON
programme,
the
system
will
not
return
to
the
former
setting
nor
start
playback
when
the
broadcast
ends.

Searching
for
RDS
stations
by
Programme
Type
(PTY)
You
can
search
through
all
the
stored
RDS
stations
for
a
specific
type
of
programme
currently
being
broadcast.
Note
If
you
want
to
tune
in
traffic,
news,
or
information
programmes
as
they
occur
on
the
RDS
network,
use
the
EON
feature
(see
“Monitoring
Enhanced
Other
Networks
(EON)”).
The
unit
automatically
switches
to
these
programmes
and
you
can
listen
to
them
whenever
they
begin
broadcasting.
Use
the
buttons
on
the
unit
to
do
this
operation.
1
Press
PTY.
“PTY
Select’
appears
in
the
display.
2
turn
MULTI
CONTROLLER
to
the
+
or
~
side
to
select
the
programme
type
you
want.
3
Press
ENTER/NEXT.
The
unit
then
begins
searching
for
the
preset
RDS
stations.
While
the
unit
is
searching
for
the
preset
stations,
“PTY
Search”
and
the
selected
programme
type
are
displayed
alternately.
When
a
programme
is
received,
the
preset
station
number
flashes
in
the
rightmost
side.
4
Tum
MULTI
CONTROLLER
so
that
the
desired
preset
station
number
flashes
in
the
display.
WOR-R2
You
can
listen
to
the
selected
programme
while
selecting
the
other
programme.
To
receive
the
desired
programme
+
leave
the
preset
station
number
as
it
is
for
eight
seconds
¢
press
ENTER/NEXT
while
the
preset
station
number
is
flashing
When
“PTY
not
found”
appears
in
the
display
The
programme
that
you
selected
is
not
currently
being
broadcasted.
You
will
receive
the
last
selected
station.
When
“PTY
change”
appears
in
the
display
The
programme
type
that
you
selected
has
ended
while
PTY
scanning.
You
will
receive
another
station
if
it
broadcasts
the
same
type
of
pragramme.
When
“Text
waiting”
appears
in
the
display
while
receiving
Radio
Text
Data
Radio
Text
Data
is
not
being
provided.
Radio
Text
(RT)
You
can
receive
text
messages
that
appear
in
the
tuner
display.
List
of
Programme
Type
(PTY)
Identifies
the
type
of
RDS
programme.
This
allows
you
to
locate
a
specific
type
of
programme
being
broadcast.
The
programme
types
are
as
follows:
News
Programmes
about
the
current
news.
Affairs
Topical
programmes
which
expand
on
the
current
news.
Information
Programmes
about
consumer
affairs,
medical
advice,
etc.
and
also
weather
reports.
Sport
Programmes
about
sport
information.
Education
Programmes
intended
to
educate,
such
as
“How
to”
and
advice
programmes.
Drama
Radio
plays
and
serials.
Culture
Programmes
about
national
or
regional
culture,
such
as
religion,
language,
and
societal
concerns.
Science
Programmes
about
the
natural
sciences
and
technology.
Varied
Other
types
of
programming,
such
as
celebrity
interviews,
panel
games,
and
comedy.
Pop
Music
Popular
music.
Rock
Music
Rock
music.
M.O.R.
Music
Middle
of
the
road
music
(“easy
listening”).
Usually
vocal
and
of
short
duration.
L.
Classical
Classical
music
for
general
appreciation,
such
as
instrumentals,
and
vocal
and
choral
works.
S.
Classical
Performances
of
major
orchestras,
chamber
music,
opera,
etc.
Other
Music
Music
that
does
not
fit
into
any
of
the
above
categories,
such
as
jazz,
rhythm
and
blues,
and
reggae.
Alarm
Emergency
broadcasts.
PTY
undefined
Any
programming
not
defined
above.
Chapter
3:
the
Radio
13

Chapter
4:
the
Tape
Player
Playing
a
Tape
Recording
a
CD
Recording
a
CD:
Selecting
Tape
Length
Automatically
(tape
select
edit)
Recording
a
CD:
Specifying
Tape
Length
(time
edit)
Recording
a
CD:
Specifying
Track
Order
(programme
edit)
Recording
From
the
Radio
Recording
From
Another
Tape
(dubbing)
Chapter
4:
the
Tape
Player
Playing
a
Tape
You
can
use
any
type
of
tape.
The
deck
detects
the
tape
type
automatically.
You
can
also
use
the
remote
to
do
this
operation.
os
Ww
IT
PAUSE
When
you
use
the
remote
for
the
following
operations,
press
the
cassette
deck
operating
buttons
for
DECK
A
or
DECK
B.
1
Press
&
EJECT
to
open
the
tape
compartment.
Insert
a
recorded
tape
in
deck
A
or
B
with
the
tape
side
facing
down.
Push
to
close
the
compartment.
2
Set
DIRECTION
MODE
to
choose
single-side,
dual-side,
or
relay
play.
It
affects
both
decks.
To
play
Set
DIRECTION
MODE
to
One
side
of
the
tape
==
Both
sides*
cD
Both
decks
in
RELAY
succession**
»
The
deck
stops
automatically
after
repeating
the
sequence
five
times.
**
See
“To
play
both
decks
in
succession
(relay
play).
3
Press
[>
(to
play
the
front
side)
or
<1]
(to
play
the
reverse
side).
The
tape
starts
playing.
To
Press*
Stop
play
O
(m)
Pause
(deck
B
only)
Hi
PAUSE
Resume
play
after
Mf
PAUSE
or
<J
or
pause
(deckBonly)
[>
Fast
forward
CO
(Ml)
to
stop,
then
press
PP
for
front
side
or
<4
for
reverse
side
Rewind
(i
(Mi)
to
stop,
then
press
“#4
for
front
side
or
>>
for
reverse
side
Remove
the
cassette
“EJECT
*
The
buttons
on
the
remote
are
indicated
in
parentheses.
To
find
the
beginning
of
a
track
(AMS)
Using
the
AMS
(Automatic
Music
Sensor)
feature,
you
can
quickly
find
the
track
you're
looking
for.
The
deck
senses
where
a
music
track
begins
by
detecting
a
blank
space
of
more
than
four
seconds
between
tracks.
AMS
does
not
function
while
the
other
deck
is
being
played.
If
the
side
of
To
play
the
shes
psiveheee
-
next
track,
track
being
being
played
is
press
played,
the
press
:
Front
side
(>)
>>
<<
Reverse
side
(<J])
<4
>>
To
play
automatically
after
fast
winding
(auto
play)
To
start
playing
from
the
beginning
of
the
front
side,
press
[>
while
holding
down
<<.
To
start
playing
from
the
beginning
of
the
reverse
side,
press
<-]
while
holding
down
>>.
To
play
both
decks
in
succession
(relay
play)
Relay
play
always
follows
the
following
sequence.
When
the
reverse
side
of
the
tape
in
deck
B
finishes
playing,
the
following
sequence
continues
four
more
times.
Deck
A
_
|DeckA
(Front
side)
(Reverse
side)
t
)
Deck
B
~
|DeckB
(Reverse
side)
(Front
side)

4
Press
&
EJECT
and
insert
recorded
tapes
in
both
decks.
2
Set
DIRECTION
MODE
to
RELAY.
3
Press
<d
or
[>
on
either
deck.
To
stop
relay
play,
press
0
on
the
playing
deck.
If
you
play
both
decks
at
the
same
time
You
hear
the
sound
from
deck
A.
When
listening
to
a
tape
recorded
with
the
Dolby*
noise
reduction
system
Switch
the
DOLBY
NR
selector
to
B
or
C.
The
setting
affects
both
decks.
Dolby
noise
reduction
system
reduces
tape
hiss
noise
in
low-level
high-frequency
signals.
+
Dolby
noise
reduction
manufactured
under
license
from
Dolby
Laboratories
Licensing
Corporation.
“DOLBY”
and
the
double-D
symbol
00
are
trademarks
of
Dolby
Laboratories
Licensing
Corporation.
One
Touch
Play
feature
Press
[>
or
<<
(or
~<a
/B
for
DECK
A/B
on
the
remote)
when
the
power
is
off
or
when
you
are
listening
to
other
sources.
When
a
tape
is
in
the
player,
you
will
immediately
be
able
to
listen
to
the
tape
without
pressing
any
other
buttons.
If
no
tape
is
inserted,
the
system
will
just
turn
on.
Automatic
Source
Selection
If
you
press
C>
or
<<]
(or
TAPE]
~</P
on
the
remote)
while
another
source
is
selected,
the
tape
player
is
selected
and
play
starts
automatically.
Recording
a
CD
You
can
record
from
a
CD
to
a
tape.
Use
any
type
of
tape.
You
cannot
listen
to
other
sources
while
recording.
To
adjust
the
recording
level
The
recording
level
will
be
adjusted
automatically.
Recording
a
CD
Automatically
By
using
the
CD
SYNCHRO
button,
you
can
record
from
a
CD
to
a
tape
easily.
The
track
at
the
end
of
the
tape
does
not
break
abruptly
in
the
middle,
but
fades
out
automatically
(Fade
Synchro
Recording).
Use
the
buttons
on
the
unit
for
this
operation.
(See
““Glossary.”)
nN
©
NUID
ot
1
Press
2
OPEN/CLOSE
and
place
a
CD
on
the
tray.
Then,
press
2
OPEN/CLOSE
again
to
close
the
tray.
Total
number
of
tracks
and
the
total
playing
time
appears
in
the
display.
2
Press
&
EJECT
and
insert
a
blank
tape
into
deck
B.
Make
sure
the
tabs
on
the
cassette
have
not
been
removed.
3
select
dual
or
single-sided
recording.
To
record
Set
DIRECTION
MODE
to
One
side
=
Both
sides*
>
or
RELAY
*
Recording
always
stops
at
the
end
of
the
reverse
side.
Be
sure
to
start
from
the
front
side.
4
when
you
want
to
reduce
the
hiss
noise
in
low-level
high-frequency
signals,
switch
DOLBY
NR
selector
to
B
or
C.
Dolby
C
provides
greater
noise
reduction
benefit
than
Dolby
B.
5
press
CD
SYNCHRO.
Deck
B
stands
by
for
recording.
The
[>
(for
front
side)
or
<J
(for
reverse
side)
indicator
lights
steadily
and
shows
you
which
side
will
start
recording.
The
other
indicator
flashes
for
a
few
seconds,
then
disappears.
G
ic
the
indicator
for
the
side
you
want
to
start
recording
does
not
light,
press
>>
or
<J
to
light
the
side
to
start
recording.
If
it
lights,
skip
to
step
7.
7
Press
11
PAUSE
on
the
tape
player
to
release
recording
pause.
Recording
starts.
If
the
last
track
on
side
A
has
abruptly
been
cut,
the
track
will
record
again
from
the
beginning
on
side
B
when
you
choose
dual-sided
recording.
If
you
set
DIRECTION
MODE
to
>
or
RELAY,
recording
always
stops
at
the
end
of
the
reverse
side.
To
stop
recording
Press
0
on
deck
B
or
on
the
CD
player.
Adjusting
the
volume
will
not
affect
the
recording
level
But
this
control
will
change
the
sound
levels
you
hear
through
the
speakers
or
headphones.
Recording
a
CD
Manually
You
can
record
a
CD
as
you
like,
for
instance,
recording
just
the
songs
you
want
or
recording
from
the
middle
of
the
tape.
Use
the
buttons
on
the
unit
to
do
this
operation.
=
N
WNoO0
w=
oO
vs
1
Press
8
OPEN/CLOSE
and
place
a
CD.
Then,
press
2
OPEN/CLOSE
again
to
close
the
tray.
Total
number
of
tracks
and
the
total
playing
time
appear
in
the
display.
2
Press
EJECT
and
insert
a
blank
tape
into
deck
B.
Make
sure
the
tabs
on
the
cassette
have
not
been
removed.
3
Press
CD
(function)
to
select
the
CD
player.
4
select
dual
or
single-sided
recording.
To
record
Set
DIRECTION
MODE
to
One
side
—
Both
sides*
>
or
RELAY
*
Recording
always
stops
at
the
end
of
the
reverse
side.
Be
sure
to
start
from
the
front
side.
continue
to
next
page
>
Chapter
4:
the
Tape
Player
1
5

=>
continued
5
when
you
want
to
reduce
the
hiss
noise
in
low-level
high-frequency
signals,
switch
DOLBY
NR
selector
to
B
or
C.
Dolby
C
provides
greater
noise
reduction
benefit
than
Dolby
B.
6
Press
@
REC.
Deck
B
stands
by
for
recording.
The
[>
(for
front
side)
or
<S
(for
reverse
side)
indicator
lights
steadily
and
shows
you
which
side
will
start
recording.
The
other
indicator
flashes
for
a
few
seconds,
then
disappears.
7
ig
the
indicator
for
the
side
you
want
to
start
recording
does
not
light,
press
>>
or
<<]
to
light
the
side
to
start
recording.
If
it
lights,
skip
to
step
8.
8
Press
81
PAUSE
on
the
tape
player
to
release
recording
pause.
Recording
starts.
You
can
also
start
recording
by
pressing
[>
or
<1.
9
Press
Dit.
The
CD
player
starts
playing.
To
Press
Stop
recording
Con
the
deck
B
Pause
recording
il
PAUSE
on
the
deck
B
Stop
CD
play
(
on
the
CD
player
Pause
CD
play
Dil
Adjusting
the
volume
will
not
affect
the
recording
level
But
this
control
will
change
the
sound
levels
you
hear
through
speakers
or
headphones.
Inserting
a
Blank
Space
During
Recording
To
activate
the
AMS
function,
it
is
necessary
to
insert
a
blank
space
between
tracks.
Use
the
buttons
on
the
unit
to
do
this
operation.
1
6
|
Chapter
4:
the
Tape
Player
1
Press
©
REC
MUTE
while
recording
at
the
position
where
you
want
to
insert
the
blank
space.
“REC”
in
the
display
flashes
and
the
tape
runs
without
recording.
After
about
four
seconds,
“REC”
and
#8
light,
and
the
unit
enters
the
recording
pause
mode.
2
Press
tl
PAUSE
at
the
position
where
you
want
to
start
recording
again.
Recording
restarts.
To
make
a
blank
of
more
than
four
seconds
Press
O
REC
MUTE
for
as
long
as
needed.
“REC”
in
the
display
flashes
faster
after
4
seconds
have
elapsed.
The
tape
pauses
when
you
release
O
REC
MUTE.
To
make
a
blank
within
four
seconds
Press
O
REC
MUTE
while
“REC”
is
flashing.
rss
Pe Ay
a
2
ee
Recording
a
CD:
Selecting
Tape
Length
Automatically
(tape
select
edit)
You
can
have
the
stereo
system
select
and
indicate
the
most
suitable
tape
length
for
recording
each
disc
automatically.
You
cannot
use
Tape
Select
Edit
for
CDs
which
contain
21
tracks
or
more,
or
when
you
have
already
programmed
the
CD.
Use
the
buttons
on
the
unit
to
do
this
operation.
oh
Owa
wNO
1
Press
&
OPEN/CLOSE
and
place
a
CD
on
the
tray.
Then
press
&2
OPEN/CLOSE
again
to
close
the
tray.
The
total
number
of
tracks
and
total
playing
time
appear
in
the
display.
2
Press
EDIT.
“TAPE
SEL.
(tape
select)”
flashes,
and
the
player
divides
the
selections
automatically.
Then
the
display
changes
as
follows:
total
playing
time
and
tracks
for
side
A
we
OTA
y2a4
A
TS213
4
total
playing
time
and
tracks
for
side
B
“the
required
tape
length
ETA
RF
+2346
78
A
ee
TAPE
C<e~
=
flashing
3
insert
a
blank
tape
of
the
indicated
tape
length
(or
a
longer
tape)
into
deck
B.
4
select
dual
or
single-sided
recording.
Set
DIRECTION
MODE
To
record
to
One
side
=
Both
sides*
C>
or
RELAY
*
Recording
always
stops
at
the
end
of
the
reverse
side.
Be
sure
to
start
from
the
front
side.
5
Press
CD
SYNCHRO.
Deck
B
stands
by
for
recording.
The
>
(for
front
side)
or
<<
(for
reverse
side)
indicator
lights
steadily
and
shows
you
which
side
will
start
recording.
The
other
indicator
flashes
for
a
few
seconds,
then
disappears.
6
if
the
indicator
for
the
side
you
want
to
start
recording
does
not
light,
press
>>
or
<<J
to
light
the
side
to
start
recording.
If
it
lights,
skip
to
step
7.
7
Press
It
PAUSE
on
the
tape
player
to
release
recording
pause.
Recording
starts.
If
the
last
track
on
side
A
has
abruptly
been
cut,
the
track
will
record
again
from
the
beginning
on
side
B
when
you
choose
dual-sided
recording.
If
you
set
DIRECTION
MODE
to
>
or
RELAY,
recording
always
stops
at
the
end
of
the
reverse
side.
To
stop
recording
Press
[J
on
deck
B
or
on
the
CD
player.

=e
es
Recording
a
CD:
Specifying
Tape
Length
(time
edit)
You
can
have
the
stereo
system
create
programmes
based
on
tape
length.
The
CD
player
makes
programmes
that
will
fit
the
tape
length.
For
example,
if
you
use
a
40-minute
tape
to
record
a
46-minute
CD,
the
CD
player
will
automatically
choose
tracks
that
will
fit
within
the
40
minutes,
filling
as
much
of
the
tape
as
possible.
The
player
will
not
programme
tracks
beyond
track
number
21.
4
Press
&
OPEN/CLOSE
and
place
a
CD
on
the
tray.
Then
press
&
OPEN/CLOSE
again
to
close
the
tray.
The
total
number
of
tracks
and
the
total
playing
time
appears
in
the
display.
2
Press
&
EJECT
and
insert
a
blank
tape
into
deck
B.
Make
sure
the
tabs
on
the
cassette
have
not
been
removed.
3
Select
dual
or
single-sided
recording.
To
record
Set
DIRECTION
MODE
to
ee
One
side
=
bok
toot
sacri
Both
sides*
>
or
RELAY
Numeric
buttons
*
Recording
always
stops
at
the
end
of
the
reverse
side.
Be
sure
to
start
from
the
front
side.
4
Press
EDIT
until
“TIME
EDIT”
appears
in
the
display.
Time
Eo
wW
5
Tum
ke
AMS
PPI
clockwise
or
counterclockwise
to
designate
the
tape
length
or
“--.—”.
Choose
the
indication
for
tapes
of
corresponding
minute
length.
As
you
tum
kl
AMS
PP,
the
indication
changes
as
follows:
oe
C-AB
C54
C
(23.00)
(27.00)
>
€-90-+C-74-+C-60
(45.00) (37.00)
(30.00)
To
specify
the
recording
time
Press
CD
on
the
remote.
Use
the
numeric
buttons
(1
to
10)
to
specify
the
recording
time
on
each
side
of
the
cassette.
e.g.
To
specify
11
minutes
30
seconds,
press
1, 1,
3,
10.
6
Press
EDIT.
The
player
determines
the
tracks
to
be
recorded
on
side
A
automatically
and
““B”
flashes
in
the
display.
Tracks
to
be
recorded
for
side
A
Total
playing
time
for
side
A
7
When
you
record
on
both
sides,
press
EDIT
again.
The
player
determines
the
tracks
to
be
recorded
on
side
B.
Tracks
to
be
recorded
for
side
A
and
B
Total
playing
time
for
side
B
8
Press
CD
SYNCHRO.
Deck
B
stands
by
for
recording.
The
>
(for
front
side)
or
<J
(for
reverse
side)
indicator
lights
steadily
and
shows
you
which
side
will
start
recording.
The
other
indicator
flashes
for
a
few
seconds,
then
disappears.
9
if
the
indicator
for
the
side
you
want
to
start
recording
does
not
light,
press
>>
or
<<J
to
light
the
side
to
start
recording.
If
it
lights,
skip
to
step
10.
10
Press
11
PAUSE
on
the
tape
player
to
release
recording
pause.
Recording
starts.
If
the
last
track
on
side
A
has
abruptly
been
cut,
the
track
will
record
again
from
the
beginning
on
side
B
when
you
choose
dual-sided
recording.
If
you
set
DIRECTION
MODE
to
>
or
RELAY,
recording
always
stops
at
the
end
of
the
reverse
side.
To
stop
recording
Press
0
on
deck
B
or
on
the
CD
player.
To
select
the
desired
tracks
beforehand
You
can
place
priority
on
some
tracks
to
be
recorded
by
selecting
them
before
programming
them
up
to
20
tracks.
See
“Playing
Tracks
in
the
Desired
Order
(programme
play).”
To
check
the
order
Each
time
you
press
CHECK,
the
programme
for
side
A,
“P’’
(pause)
and
the
programme
for
side
B
appear
in
order.
To
cancel
time
edit
Before
you
press
EDIT
on
step
4,
press
0
to
cancel.
If
you
want
to
cancel
after
you
press
EDIT
on
step
6,
press
PLAY
MODE.
Chapter
4:
the
Tape
Player
17

[eR
Sa
a
Recording
a
CD:
Specifying
Track
Order
(programme
edit)
You
can
adjust
the
total
recording
time
to
the
tape
length
while
making
a
programme.
WwW
ON
NOU
O
1
Following
the
procedure
“Playing
Tracks
in
the
Desired
Order
(programme
play)”,
programme
the
tracks
you
want
to
record
for
side
A.
Make
sure
that
“A”
is
lit
in
the
display.
Make
sure
to
programme
the
tracks
so
that
the
total
playing
time
of
side
A
does
not
exceed
the
tape
length
of
one
side.
2
Press
Uf
on
the
remote.
“Pp”
and “B”
appear
in
the
display
and
the
total
playing
time
is
reset
to
“0.00”.
3
Programme
the
tracks
you
want
to
record
for
side
B
as
the
same
as
the
side
A.
Chapter
4:
the
Tape
Player
4
select
dual
or
single-sided
recording.
To
record
MODE
to
One
side
—-
Both
sides*
C>
or
RELAY
*
Recording
always
stops
at
the
end
of
the
reverse
side.
Be
sure
to
start
from
the
front
side.
5
Press
CD
SYNCHRO.
Deck
B
stands
by
for
recording.
The
C>
(for
front
side)
or
<<
(for
reverse
side)
indicator
lights
steadily
and
shows
you
which
side
will
start
recording.
The
other
indicator
flashes
for
a
few
seconds,
then
disappears.
6
Ir
the
indicator
for
the
side
you
want
to
start
recording
does
not
light,
press
>
or
<J
to
light
the
side
to
start
recording.
If
it
lights,
skip
to
step
7.
7
Press
11
PAUSE
on
the
tape
player
to
release
recording
pause.
Recording
starts.
You
can
also
start
recording
by
pressing
>>
or
<I.
If
the
last
track
on
side
A
has
abruptly
been
cut,
the
track
will
record
again
from
the
beginning
on
side
B
when
you
choose
dual-sided
recording.
If
you
set
DIRECTION
MODE
to
©
or
RELAY,
recording
always
stops
at
the
end
of
the
reverse
side.
To
stop
recording
Press
0
on
deck
B
or
on
the
CD
player.
Recording
From
the
Radio
You
can
record
from
the
tuner
onto
a
tape.
Use
any
type
of
tape.
Use
the
buttons
on
the
unit
to
do
this
operation.
Set
DIRECTION
1
Press
BAND
several
times
until
the
desired
radio
band
appears.
2
Tune
in
the
radio
station
you
want
to
record.
(See
“Listening
to
the
Radio”,
or
“Playing
Preset
Radio
Stations”
for
details.)
3
Press
&
EJECT
and
insert
a
blank
tape
’
into
deck
B.
*
Make
sure
the
tabs
on
the
cassette
have
not
been
removed.
select
dual
or
single-sided
recording.
To
record
Set
DIRECTION
MODE
to
One
side
—
Both
sides*
>
or
RELAY
*
Recording
always
stops
at
the
end
of
the
reverse
side.
Be
sure
to
start
from
the
front
side.
5
When
you
want
to
reduce
the
hiss
noise
in
low-level
high-frequency
signals,
switch
DOLBY
NR
selector
to
B
or
C.
Dolby
C
provides
greater
noise
reduction
benefit
than
Dolby
B.
6
Press
@
REC.
Deck
B
stands
by
for
recording.
The
C>
(for
front
side)
or
<I
(for
reverse
side)
indicator
lights
steadily
and
shows
you
which
side
will
start
recording.
The
other
indicator
flashes
for
a
few
seconds,
then
disappears.
7
if
the
indicator
for
the
side
you
want
to
start
recording
does
not
light,
press
>
or
<<]
to
light
the
side
to
start
recording.
If
it
lights,
skip
to
step
8.
8
press
ff
PAUSE
on
the
tape
player
to
release
recording
pause.
Recording
starts.
You
can
also
start
recording
by
pressing
[=>
or
<1].
To
stop
recording
Press
0
on
deck
B.

When
recording
AM
broadcasts
Sometimes
you
may
hear
a
whistling
sound
not
normally
heard
when
just
listening
to
a
broadcast.
If
this
happens,
adjust
the
position
of
the
AM
loop
aerial
until
the
whistling
sound
can
no
longer
be
heard.
Adjusting
the
volume
will
not
affect
the
recording
level
But
this
control
will
change
the
sound
levels
you
hear
through
speakers
or
headphones.
pe
ee
ee
ee
Recording
From
Another
Tape
(dubbing)
You
can
record
the
whole
tape
onto
another
automatically.
While
dubbing,
you
can
listen
to
the
radio
or
a
CD
by
pressing
TUNER
or
CD.
Use
the
buttons
on
the
unit
to
do
this
operation
and
any
type
of
tape
for
dubbing.
a
P
UIW
1
Press
&
EJECT,
and
insert
a
recorded
tape
in
deck
A
and
a
blank
tape
in
deck
B.
Make
sure
the
tabs
on
the
cassette
have
not
been
removed.
2
Choose
how
you
want
the
tape
to
record
and
set
DIRECTION
MODE
to
the
mode
you
want.
Position
Operation
=
Dubbing
stops
at
the
end
of
one
side
Cc
When
the
tape
in
one
deck
comes
to
the
end
of
the
front
side,
it
reverses
immediately
regardless
of
the
tape
position
in
the
other
deck.
RELAY
When
the
tape
in
one
deck
reaches
its
end
of
the
front
side,
it
stops
until
the
other
tape
come
to
its
end,
and
then
both
tapes
reverse
together.
3
Press
DUBBING
MODE
to
select
the
dubbing
speed
you
want.
Deck
B
stands
by
for
recording.
Each
time
you
press
DUBBING
MODE,
the
indicator
lights
in
the
following
order:
NORMAL:
dubbing
at
normal
speed
q
HIGH:
dubbing
at
high
speed
4
Choose
the
same
direction
on
both
decks
by
pressing
>>
or
<<.
To
dub
on
one
side,
choose
[>
or
<Q.
To
dub
on
both
sides,
choose
>.
When
dubbing
at
normal
speed
To
choose
the
direction
on
deck
A,
press
O
immediately
after
pressing
<I]
or
>.
5
Press
it
PAUSE.
Dubbing
starts.
When
the
tape
has
started
dubbing
from
the
reverse
side
in
(>
mode,
dubbing
will
stop
at
the
end
of
the
reverse
side.
To
stop
dubbing
Press
0)
on
deck
B.
You
do
not
have
to
set
DOLBY
NR
The
tape
in
deck
B
is
automatically
recorded
in
the
same
state
as
the
tape
in
deck
A.
Listening
to
another
audio
source
while
dubbing
is
in
progress
Select
the
sound
source
that
you
want
to
listen
to,
using
the
FUNCTION
buttons
on
the
integrated
stereo
amplifier.
Skipping
tracks
during
normal-speed
dubbing
Press
the
<4
or
PP
buttons
on
deck
A.
Deck
B
stands
by
for
recording,
and
you
can
skip
tracks.
To
resume
dubbing
when
the
lead-in
to
a
track
is
reached
and
playback
begins,
press
the
§§
PAUSE
button
on
deck
B.
During
high-speed
dubbing
None
of
the
buttons
on
either
deck
works,
except
for
the
0
button.
Chapter
4:
the
Tape
Player
19

20
Chapter
5:
Sound
Adjustment
jf
Adjusting
the
Sound
Chapter
5:
Sound
Adjustment
See)
Adjusting
the
Sound
To
fully
enjoy
the
sound
coming
from
your
stereo
system,
make
the
following
audio
adjustments.
Adjusting
the
Volume
You
can
also
use
the
remote
to
do
this
operation.
VOLUME
Turn
VOLUME
or
press
VOL
(+/-)
on
the
remote.
To
reduce
the
volume
temporarily
(muting)
Press
MUTING.
The
indicator
on
the
MUTING
button
lights
up
and
the
volume
is
reduced.
To
return
to
the
original
volume,
press
MUTING
again.
To
listen
to
music
without
any
audio
effects
Press
SOURCE
DIRECT
(or
DIRECT
on
the
remote).
The
indicator
on
the
SOURCE
DIRECT
button
lights
up.
The
direct
circuit
on
this
unit
passes
the
music
signals
directly
to
the
outputs
without
sending
them
through
the
tone
control.
This
feature
can
be
used
when
you
want
to
listen
to
the
music
in
its
pure,
unprocessed
state.
To
listen
through
the
headphones
Connect
the
headphones
to
HEADPHONES
jack.
No
sound
will
come
from
the
speakers.
Adjusting
the
Tone
Use
the
buttons
on
the
unit
to
do
this
operation.
BASS
TREBLE
SOURCE
DIRECT
To
adjust
the
bass
sound
Turn
the
BASS
control
clockwise
or
counterclockwise.
To
adjust
the
treble
sound
Turn
the
TREBLE
control
clockwise
or
counterclockwise.
Notes
«
You
cannot
record
the
adjusted
sounds.
*
When
you
cannot
adjust
the
tone,
press
SOURCE
DIRECT
(or
DIRECT
on
the
remote)
so
that
the
indicator
on
the
button
goes
off.
Table of contents
Other Sony Stereo System manuals

Sony
Sony MHC-GX555 - Mini Hi Fi Component System User manual

Sony
Sony GTK-XB60 User manual

Sony
Sony MHC-V71D User manual

Sony
Sony LBT-A590 User manual

Sony
Sony HCD-D690 User manual

Sony
Sony HCD-RG555 User manual

Sony
Sony HCD-V3900 User manual

Sony
Sony CMT-VP1 User manual

Sony
Sony MHC-GX470 - Mini Hi Fi Stereo System User manual

Sony
Sony Giga Juke NAS-SC500PK User manual

Sony
Sony ALT-SA32PC Marketing User manual

Sony
Sony SRS-X77 User manual

Sony
Sony MHC-V13 User manual

Sony
Sony FH-SR1D User manual

Sony
Sony MHC-GRX50 User manual

Sony
Sony SRS-ZR7 User manual

Sony
Sony HCD-DR3 User manual

Sony
Sony HCD-H991AV User manual

Sony
Sony HTC-V5550 User manual

Sony
Sony Giga Juke NAS-SC500PK Installation and operating manual