Sony SA-WS350 User manual

SERVICE MANUAL
Conditions of Use:
(1) Please use this information only for the purpose of performing repair, maintenance and/or configuration services of the Sony products (hereinafter the “Repair services”) under the ser-
vice agreement entered into with the Sony group company (hereinafter the “Service agreement”). Using this information for any purpose other than the purpose described foregoing is
forbidden.
(2) Only the Authorized Servicer’s officers, employees or subcontractors (including their officers and employees) whose duties justify a need-to-know and who have agreed to hold
confidential this information (collectively hereinafter the “Permitted users”) are permitted to access and use this information. To disclose or disseminate to any person other than the
Permitted users is forbidden.
(3) Destroy or erase any and all portion of this information promptly in an irrecoverable and secure fashion after achieving the purpose described in Section (1) above.
(4) Do not copy, replicate, reproduce, alter, translate, transmit, sell, lease, or distribute this information in whole or in part without the prior written permission of the author.
(Notwithstanding foregoing, it is permitted to copy and distribute this information to the Permitted users.)
(5) Please notify immediately any leakage, loss, theft, misappropriation, or other misuse of this information by e-mail to the following address:
(6) In addition to the above, the terms and conditions of the Service agreement shall be applied to using this information.
Revision of Information:
This information may be changed or updated at any time without any prior notice. Please confirm that this information is up-to-date before using it.
Sony CONFIDENTIAL
For Authorized Servicer
Sony Home Entertainment &
Sound Products Inc.
SA-WS350/WSD35
9-896-576-05
2020J33-1
© 2020.10
SYSSET
2020/10/1623:47:36(GMT+09:00)

SERVICE MANUAL
Sony CONFIDENTIAL
For Authorized Servicer
SA-WS350/WSD35
SPECIFICATIONS
ACTIVE SUBWOOFER
US Model
AEP Model
UK Model
SA-WS350/WSD35
Canadian Model
E Model
Australian Model
Chinese Model
Russian Model
SA-WS350
Ver. 1.4 2020.10
• SA-WS350 is the active subwoofer in HT-S350.
• SA-WSD35 is the active subwoofer in HT-SD35.
• All of the units included in the HT-S350 (SA-S350/
SA-WS350/Remote control) or HT-SD35 (SA-SD35/
SA-WSD35/Remote control) are required to confirm-
ing operation of this unit. Check in advance that you
have all of the units. Photo: SA-WS350
• For the TEST MODE for this unit, refer to the service manual of HT-S350/SD35.
(Except CH, BR)
POWER OUTPUT (reference)
150 W (at 2.5 ohms, 100 Hz)
(BR)
RMS output power:
85 W (at 2.5 ohms, 100 Hz, 10% THD)
(CH)
POWER OUTPUT (reference)
85 W (at 2.5 ohms, 100 Hz)
Speaker system
Subwoofer speaker system, Bass
reflex
Speaker
160 mm (6 1/2 in) cone type
Power requirements
120 V - 240 V AC, 50 Hz/60 Hz (EA, BR,
LA)
220 V - 240 V AC, 50 Hz/60 Hz (AEP,
UK, AUS, CH, RU, SP, E3, AR, TH, IND)
120 V AC, 60 Hz (US, CND)
120 V AC, 50 Hz/60 Hz (TW)
Power consumption
On: 25 W
Standby mode: 0.5 W or less
Dimensions* (approx.) (w/h/d)
190 mm × 382 mm × 390 mm (7 1/2 in ×
15 1/8 in × 15 3/8 in)
* Not including projection portion
Mass (approx.)
7.8 kg (17 lb 3 1/5 oz)
(Except CH)
Frequency band
2.4 GHz (2.4000 GHz - 2.4835 GHz)
Maximum output power (AEP, UK, IND,
AUS)
< 9 dBm
Modulation method
(CH)
FHSS (Freq Hopping Spread Spectrum)
Design and specifications are subject to
change without notice.
Wireless Receiver Section
This Sound Bar incorporates Dolby* Digital.
* Manufactured under license from Dolby
Laboratories.
Dolby, Dolby Audio and the double-D
symbol are trademarks of Dolby
Laboratories.
The BLUETOOTH®word mark and logos are
registered trademarks owned by Bluetooth
SIG, Inc. and any use of such marks by Sony
Corporation is under license. Other
trademarks and trade names are those of
their respective owners.
The terms HDMI, HDMI High-Definition
Multimedia Interface, and the HDMI Logo
are trademarks or registered trademarks of
HDMI Licensing Administrator, Inc.
“BRAVIA” logo is a trademark of Sony
Corporation.
“PlayStation” is a registered trademark or
trademark of Sony Interactive
Entertainment Inc.
MPEG Layer-3 audio coding technology
and patents licensed from Fraunhofer IIS
and Thomson.
Windows Media is either a registered
trademark or trademark of Microsoft
Corporation in the United States and/or
other countries.
This product is protected by certain
intellectual property rights of Microsoft
Corporation. Use or distribution of such
technology outside of this product is
prohibited without a license from Microsoft
or an authorized Microsoft subsidiary.
All other trademarks are trademarks of
their respective owners.
Copyrights and Trademarks
柵䋫剧♘
3/5 HI{!.!3/5946 HI{
孧↚㔝
GITT 濃Gsfr!Ipqqjoh!Tqsfbe!
Tqfdusvn濄
⌵⭨∃䋫
Ŭ31!eCn 濃FJSQ濄
SYSSET
2020/10/1623:47:36(GMT+09:00)

SA-WS350/WSD35
3
Sony CONFIDENTIAL
For Authorized Servicer
NOTES ON CHIP COMPONENT REPLACEMENT
• Never reuse a disconnected chip component.
• Notice that the minus side of a tantalum capacitor may be dam-
aged by heat.
SAFETY CHECK-OUT
After correcting the original service problem, perform the following
safety check before releasing the set to the customer:
Check the antenna terminals, metal trim, “metallized” knobs,
screws, and all other exposed metal parts for AC leakage.
Check leakage as described below.
LEAKAGE TEST
The AC leakage from any exposed metal part to earth ground and
from all exposed metal parts to any exposed metal part having a re-
turn to chassis, must not exceed 0.5 mA (500 microamperes.). Leak-
age current can be measured by any one of three methods.
1. A commercial leakage tester, such as the Simpson 229 or RCA
WT-540A. Follow the manufacturers’ instructions to use these
instruments.
2. A battery-operated AC milliammeter. The Data Precision 245
digital multimeter is suitable for this job.
3. Measuring the voltage drop across a resistor by means of a
VOM or battery-operated AC voltmeter. The “limit” indication
is 0.75 V, so analog meters must have an accurate low-voltage
scale. The Simpson 250 and Sanwa SH-63Trd are examples of a
passive VOM that is suitable. Nearly all battery operated digital
multimeters that have a 2 V AC range are suitable. (See Fig. A)
1.5 kΩ0.15 μF
AC
voltmeter
(0.75 V)
To Exposed Metal
Parts on Set
Earth Ground
Fig. A. Using an AC voltmeter to check AC leakage.
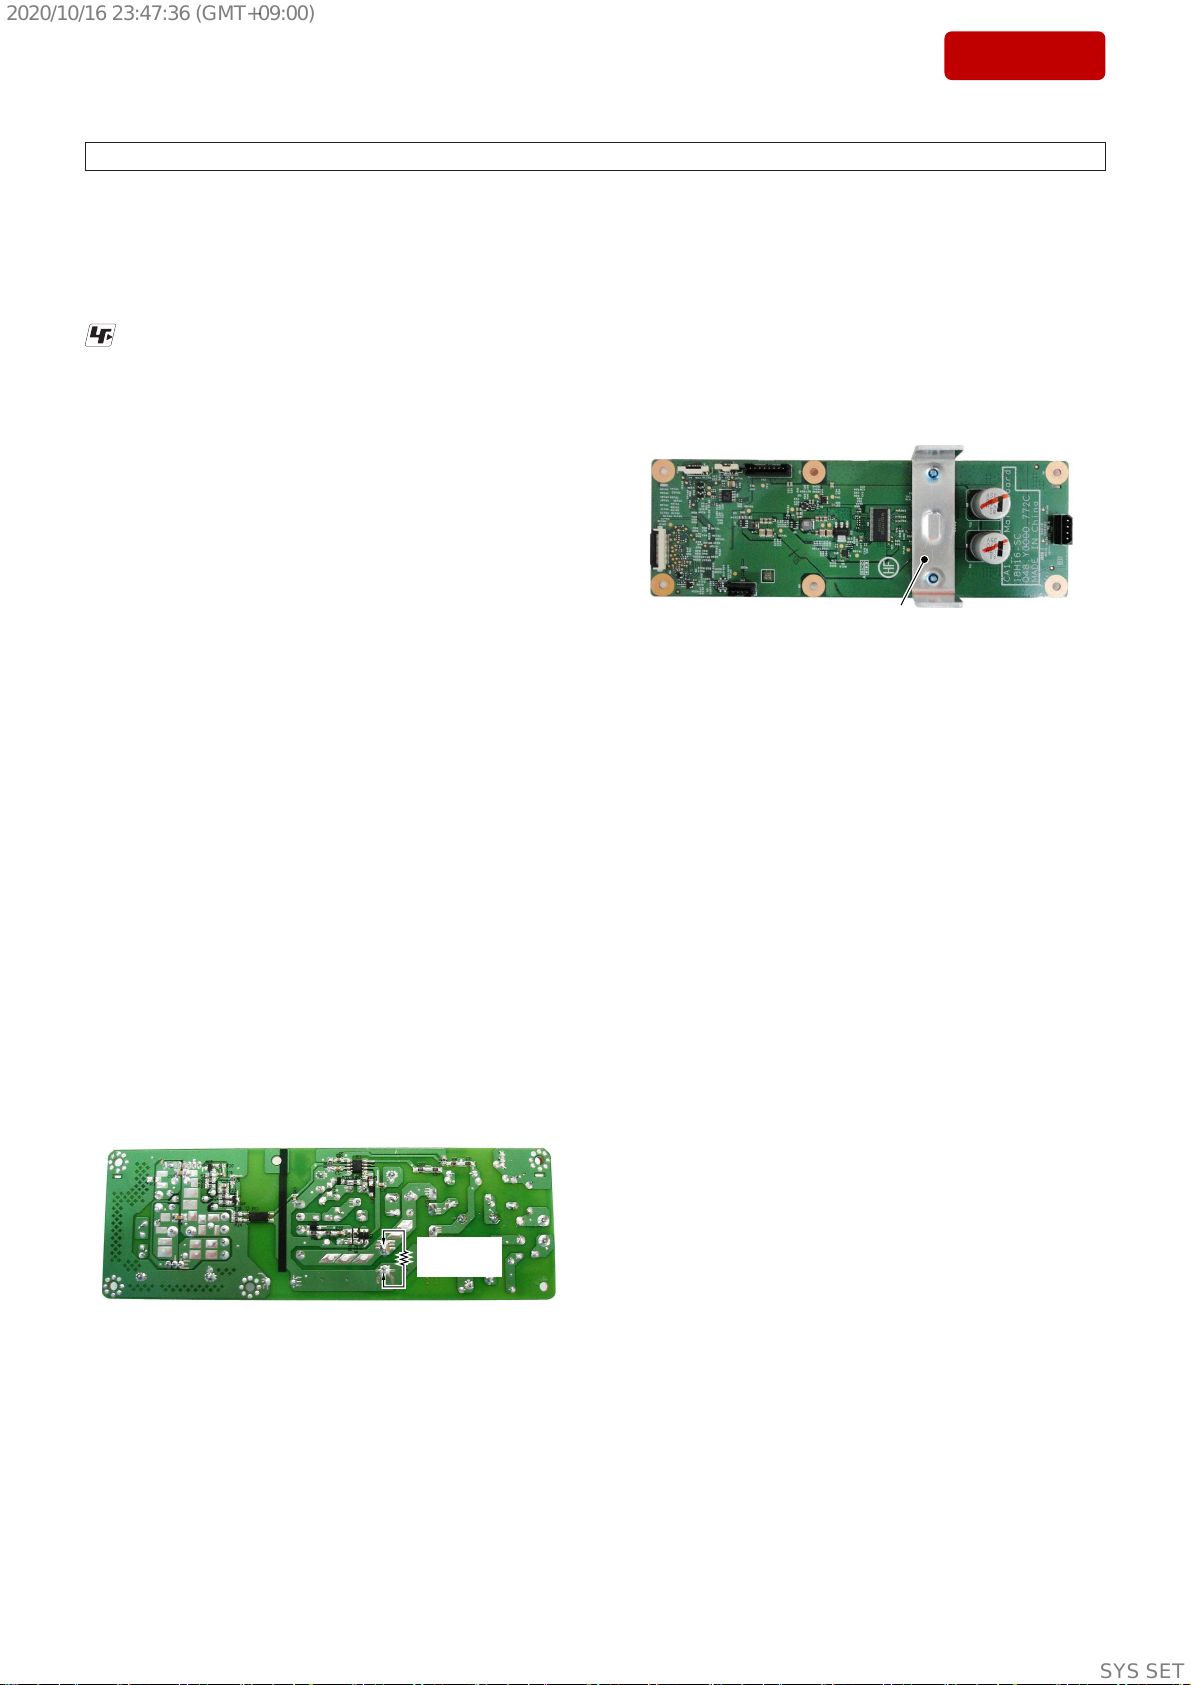
SAFETY-RELATED COMPONENT WARNING!
COMPONENTS IDENTIFIED BY MARK 0OR DOTTED LINE
WITH MARK 0ON THE SCHEMATIC DIAGRAMS AND IN THE
PARTS LIST ARE CRITICAL TO SAFE OPERATION.
REPLACE THESE COMPONENTS WITH SONY PARTS WHOSE
PART NUMBERS APPEAR AS SHOWN IN THIS MANUAL OR
IN SUPPLEMENTS PUBLISHED BY SONY.
ATTENTION AU COMPOSANT AYANT RAPPORT
À LA SÉCURITÉ!
LES COMPOSANTS IDENTIFIÉS PAR UNE MARQUE 0SUR
LES DIAGRAMMES SCHÉMATIQUES ET LA LISTE DES
PIÈCES SONT CRITIQUES POUR LA SÉCURITÉ DE FONC-
TIONNEMENT. NE REMPLACER CES COMPOSANTS QUE
PAR DES PIÈCES SONY DONT LES NUMÉROS SONT DON-
NÉS DANS CE MANUEL OU DANS LES SUPPLÉMENTS
PUBLIÉS PAR SONY.
1. SERVICING NOTES ................................................ 4
2. DISASSEMBLY
2-1. Disassembly Flow.............................................................. 8
2-2. AMP Block ........................................................................ 9
2-3. AC Cord............................................................................. 10
2-4. MAIN Board ...................................................................... 11
2-5. POWER Board................................................................... 12
2-6. KEY Board, Button............................................................ 13
2-7. MINI JACK Board............................................................. 14
2-8. BT Module (SW) ............................................................... 15
2-9. FFC Cable (6 Core), FFC Cable (12 Core)........................ 16
2-10. LED Board, Front Panel Assy (CA1_SW) ........................ 17
2-11. Speaker Unit (CA1_SW) ................................................... 18
3. DIAGRAMS
3-1. Block Diagram................................................................... 19
3-2. Printed Wiring Board - MAIN Board -.............................. 21
3-3. Schematic Diagram - MAIN Board (1/4) -........................ 22
3-4. Schematic Diagram - MAIN Board (2/4) -........................ 23
3-5. Schematic Diagram - MAIN Board (3/4) -........................ 24
3-6. Schematic Diagram - MAIN Board (4/4) -........................ 25
3-7. Printed Wiring Board - MINI JACK Board - .................... 26
3-8. Schematic Diagram - MINI JACK Board - ....................... 26
3-9. Printed Wiring Board - LED Board -................................. 27
3-10. Schematic Diagram - LED Board -.................................... 27
3-11. Printed Wiring Board - KEY Board -................................. 28
3-12. Schematic Diagram - KEY Board - ................................... 28
3-13. Printed Wiring Board - POWER Board -........................... 29
3-14. Schematic Diagram - POWER Board - ............................. 30
4. EXPLODED VIEWS
4-1. Speaker Section.................................................................. 31
4-2. AMP Section...................................................................... 32
5. ELECTRICAL PARTS LIST ................................. 33
TABLE OF CONTENTS
Ver. 1.4
SYSSET
2020/10/1623:47:36(GMT+09:00)

SA-WS350/WSD35
4
Sony CONFIDENTIAL
For Authorized Servicer
SECTION 1
SERVICING NOTES
The SERVICING NOTES contains important information for servicing. Be sure to read this section before repairing the unit.
UNLEADED SOLDER
Boards requiring use of unleaded solder are printed with the lead-
free mark (LF) indicating the solder contains no lead.
(Caution: Some printed circuit boards may not come printed with
the lead free mark due to their particular size)
: LEAD FREE MARK
Unleaded solder has the following characteristics.
• Unleaded solder melts at a temperature about 40 °C higher than
ordinary solder.
Ordinary soldering irons can be used but the iron tip has to be
applied to the solder joint for a slightly longer time.
Soldering irons using a temperature regulator should be set to
about 350 °C.
Caution: The printed pattern (copper foil) may peel away if the
heated tip is applied for too long, so be careful!
• Strong viscosity
Unleaded solder is more viscous (sticky, less prone to flow) than
ordinary solder so use caution not to let solder bridges occur
such as on IC pins, etc.
• Usable with ordinary solder
It is best to use only unleaded solder but unleaded solder may
also be added to ordinary solder.
NOTE OF REPLACING THE FUSE
The fuse is or could be in the neutral. When a fuse is being replaced,
the main plug shall be disconnected from the AC outlet to prevent
electric shock.
ADVANCE PREPARATION WHEN CONFIRMING OPER-
ATION
All of the units included in the HT-S350 (SA-S350/SA-WS350/Re-
mote control) or HT-SD35 (SA-SD35/SA-WSD35/Remote control)
are required to confirming operation of this unit. Check in advance
that you have all of the units.
DISCHARGE PROCESSING
Before checking the operation of the boards for the electric shock
prevention, perform the discharge processing by connecting the re-
sistor at both ends of the specified capacitor with referring to the
figure below.
Note: Be sure to discharge using a resistor of 800 or higher.
– POWER Board (Conductor side) –
800 :/2 W
(for C3)
ABOUT THE PROTECTION
If the status indicator on the subwoofer flashes in red, press the [1]
button of the subwoofer to turn the power offand check whether the
ventilation holes of the subwoofer is not blocked, leave it for a while
and turn the power on again.
NOTE OF PERFORMING THE OPERATION CHECK IN
THE STATE THAT HEAT SINK IS REMOVED
When performing the operation check in the state that this unit is
disassembled, it is possible to perform the operation check in the
state that heat sink is removed from the MAIN board.
However, in that case, volume setting to low and work in a short
time of about several minutes.
If you need more than volume setting to medium, or more than a
few minutes of work, be sure to work with attach the heat sink to
the MAIN board.
–
MAIN Board (Side A) –
heat sink
Ver. 1.3
SYSSET
2020/10/1623:47:36(GMT+09:00)

SA-WS350/WSD35
5
Sony CONFIDENTIAL
For Authorized Servicer
MODEL IDENTIFICATION
When identifying the destination and model of this unit, check the
part number, destination code and model name printed on the model
number label on the rear side of the main unit.
Note: The content printed and the part number suffix printed on the model
number label may be changed in the midway of production.
– Rear view – SA-WS350 : US, CND
SA-WS350 : CH
SA-WS350 : TW
SA-WS350 : AEP, UK, AUS, RU, EA, BR,
SP, E3, AR, TH, IND, LA
SA-WSD35: US, AEP, UK
Part No.
Model Name
Destination
code
Part No.
Destination
code
Model Name
Part No.
Destination
code
Part No.
Destination
code
System Name
Model Name
System Name
Model Name
Part No.
Desti-
nation
code
Model
Name
System
Name
Destina-
tion
5-000-988-01 (UC2) SA-WS350 - US, CND
5-000-988-11 or
5-000-988-12 (CEL) SA-WS350 - AEP
5-000-988-21 or
5-000-988-22 (CEK) SA-WS350 - UK
5-000-988-41 (LA9) SA-WS350 - LA
5-000-988-51 (E12) SA-WS350 - IND
5-000-988-61 (E3) SA-WS350 - E3
5-000-988-71 (RU3) SA-WS350 - RU
5-000-988-81 (CN4) SA-WS350 HT-S350 CH
5-000-988-91 (AU1) SA-WS350 - AUS
5-002-489-01 (U2) SA-WSD35 - US
5-002-489-11 (SP1) SA-WS350 - SP
5-002-489-21 (TW2) SA-WS350 HT-S350 TW
5-002-489-31 (TH1) SA-WS350 - TH
5-002-489-41 (EA3) SA-WS350 - EA
5-002-489-51 (AR2) SA-WS350 - AR
5-002-489-61 or
5-002-489-62 (CEL) SA-WSD35 - AEP
5-002-489-71 or
5-002-489-72 (CEK) SA-WSD35 - UK
5-002-489-81 (BR1) SA-WS350 - BR
DESTINATION ABBREVIATIONS
The following abbreviations for model destinations are used in this
service manual.
• Abbreviations
AEP : European area (Except for UK, Ireland), East European area,
CIS area (Moldova) and Middle East area (Israel, Jordan)
models
AR : Latin American area (Argentina, Paraguay, Uruguay) model
AUS : Australian and New Zealand models
BR : Brazilian model
CH : Chinese model
CND : Canadian and Latin American area (Puerto Rico) models
E3 : CIS area (Azerbaijan, Turkmenistan), Middle East area (Leba-
non, Pakistan, Yemen), Oceania area (Seychelles) and African
area (Algeria, Angola, Cameroon, Cote d’Ivoire, Egypt, Ethio-
pia, Morocco, Mozambique, South Africa, Tunisia) models
EA : Middle East area (Bahrain, Kuwait, Oman, Qatar, Saudi Ara-
bia, UAE), South East Asian area (Sri Lanka) and African
area (Botswana, Ghana, Kenya, Mauritius, Nigeria, Tanzania,
Uganda, Zimbabwe) models
IND : Indian model
LA : Latin American area (Except for Argentina, Brazil, Paraguay,
Puerto Rico, Uruguay) model
RU : CIS area (Except for Azerbaijan, Moldova, Turkmenistan) model
SP : South East Asian area (Except for India, Sri Lanka, Thailand),
East Asian area (Mongolia) and Oceania area (Except for
Australia, New Zealand, Seychelles) models
TH : Thai model
TW : Taiwan area model
UK : European area (UK, Ireland) model
Ver. 1.3
SYSSET
2020/10/1623:47:36(GMT+09:00)

SA-WS350/WSD35
6
Sony CONFIDENTIAL
For Authorized Servicer
RESET METHOD (for bar speaker)
After the repair of this unit is completed, be sure to reset the bar
speaker by referring to the following before checking the operation.
Reset procedure:
1. Insert the AC power cord of the bar speaker into the outlet.
Outle
t
2. Touch the [1] button on the bar speaker to turn the power on.
3. Touch the [1] button and [–] button at the same time for about
5 seconds or more, all indicators will flash 3 times automatically
and perform reset.
Touch for about
5 seconds or more.
flash 3 times
4. Unplug the AC power cord from the outlet.
Outle
t
5. Insert the AC power cord into the outlet again, then touch the
[1] button on the bar speaker to turn the power on.
Outle
t
6. Reset is complete.
WIRELESS CONNECTION (LINK) WORK OF THE BAR
SPEAKER AND THE SUBWOOFER
When replace each BT module or MAIN board of the bar speaker
or the subwoofer with a new part, the wireless connection (LINK)
between the bar speaker and the subwoofer will be disconnected.
Before returning the repaired product to the customer, please wire-
less connect (LINK) the bar speaker and the subwoofer referring to
the following.
Note: If only the bar speaker or the subwoofer is brought in for repair, can-
not wireless connection (LINK). Refer to “What to do if only the bar
speaker or the subwoofer are brought in for repair” on page 7.
Replacement that requires wireless connection (LINK)
work
• Replacing the BT module (CA1 BAR) of the bar speaker
• Replacing the MAIN board of the bar speaker
• Replacing the BT module (SW) of the subwoofer
• Replacing the MAIN board of the subwoofer
Wireless connection (LINK) method
After replacing the BT module or the MAIN board, perform the re-
set of this unit. After that, when turning the power on, it automati-
cally wireless connect (LINK).
(For the reset method, refer to “RESET METHOD” on the left)
What to do when not automatically wireless connection
(LINK)
If you do not automatically wireless connection (LINK) even if you
turn the power on, there is a possibility that the bar speaker and the
subwoofer before the repair were connected via the secure link.
In that case, perform a wireless connection (LINK) with reference
to the following.
• When the bar speaker is repaired
Procedure:
1. Press the [1] button on the subwoofer to turn the power on.
Subwoofer
– Rear view –
2. While the status indicator of the subwoofer flashes orange slow-
ly, press and hold the [LINK] button on the rear side for about
5 seconds and check that the status indicator switches to flashes
green →red light up (standby).
Alternatively, while the status indicator of the subwoofer flash-
es orange slowly, press the [LINK] button on the rear side for
a short and checking that the status indicator has switched to
flashes orange quickly, then leave as it is for about 2 minutes and
check that it switches to flashes green →red light up (standby).
Subwoofer
– Rear view –
Subwoofer
– Front view –
Status indicator
flashes orange
slowly
press
short
press and
hold 5 sec.
Subwoofer
– Front view –
Status indicator
flashes green
red light up
flashes orange
slowly
flashes orange
quickly (2 min.)
red light up
flashes green
3. Turn the power on of the bar speaker and automatically make a
wireless connection (LINK).
– Continued on next page –
SYSSET
2020/10/1623:47:36(GMT+09:00)

SA-WS350/WSD35
7
Sony CONFIDENTIAL
For Authorized Servicer
• When the subwoofer is repaired
Procedure:
1. Touch the [1] button on the bar speaker to turn the power on.
2. Press and hold the [SECURE LINK] button on the remote con-
trol for about 5 seconds, the [MULTI CH] indicator of the bar
speaker flashes 2 times and the secure link is released.
p
ress and hold
5 seconds flash 2 times
3. Touch the [1] button and [–] button at the same time for about
5 seconds or more, all indicators will flash 3 times automatically
and perform reset.
Touch for about
5 seconds or more.
flash 3 times
4. Unplug the AC power cord from the outlet.
Outle
t
5. Insert the AC power cord into the outlet again, then touch the
[1] button on the bar speaker to turn the power on.
Outle
t
6. Turn the power on of the subwoofer and automatically make a
wireless connection (LINK)
What to do if only the bar speaker or the subwoofer are
brought in for repair
If only the bar speaker or the subwoofer is brought in for repair situ-
ation, and either BT module or MAIN board is replaced, customers
themselves need to wireless connection (LINK) the bar speaker and
the subwoofer.
• If the customer was not performing the secure link:
It will automatically wireless connection (LINK) with the bar speak-
er and the subwoofer when turn the power on.
• If the customer was performing the secure link:
Customers themselves need to release the secure link of the bar
speaker or the subwoofer at hand of the customer and make a nor-
mal wireless connection. In that case, please inform the customer to
“What to do when not automatically wireless connection (LINK)”
on page 6.
In addition, if make a secure link again, please inform the customer
how to set up the secure link described in the operating instructions
(“Performing the Wireless Connection of the Subwoofer (SECURE
LINK)”).
NOTE OF REPLACING THE ELECTRICAL PARTS ON
EACH BOARD FOR REPAIRING
Among mounted electrical parts on each board, only parts that are
described in the electrical parts list can be replaced for repairing.
The parts that are not described in the electrical parts list cannot be
replaced with single for repairing.
If a part not described in the electrical parts list is defective, replace
it with the complete mounted board on which the part is mounted.
This service manual describes the schematic diagram and printed
wiring board for each board.
ABOUT THE THERMAL COMPOUND
The thermal compound is applied between U5 of the MAIN board
and the heat sink.
If you remove the heat sink from the MAIN board, be careful not to
wipe offthe thermal compound.
thermal compound
heat sink
(board surface side)
–
MAIN Board (Side A) –
heat sink
U5
thermal compound
Ver. 1.4
SYSSET
2020/10/1623:47:36(GMT+09:00)

SA-WS350/WSD35
8
Sony CONFIDENTIAL
For Authorized Servicer
SECTION 2
DISASSEMBLY
• This set can be disassembled in the order shown below.
2-1. DISASSEMBLY FLOW
SET
2-4. MAIN BOARD
(Page 11)
2-5. POWER BOARD
(Page 12)
2-6. KEY BOARD, BUTTON
(Page 13)
2-7. MINI JACK BOARD
(Page 14)
2-8. BT MODULE (SW)
(Page 15)
2-2. AMP BLOCK
(Page 9)
2-3. AC CORD
(Page 10)
2-11. SPEAKER UNIT (CA1_SW)
(Page 18)
2-10. LED BOARD, FRONT PANEL ASSY (CA1_SW)
(Page 17)
2-9. FFC CABLE (6 CORE),
FFC CABLE (12 CORE)
(Page 16)
JIG
When disassembling the unit, use the following
jig for speaker removal.
Part No. Description
J-2501-238-A JIG FOR SPEAKER REMOVAL
SYSSET
2020/10/1623:47:36(GMT+09:00)

SA-WS350/WSD35
9
Sony CONFIDENTIAL
For Authorized Servicer
Note: Follow the disassembly procedure in the numerical order given.
2-2. AMP BLOCK
bottom side
rear side
top side
2Open the AMP block in
the direction of the arrow.
3LED board cable
connector (CN9)
4speaker connection cable
connector (CN3)
7AMP block
Note 2: When installing the AMP block,
align the two ribs and two holes.
hole
hole
rib
rib
– Rear view –
Note 1: When removing the AMP block, do not remove the
eight screws at the vmark screws of figure below.
If you remove the vmark screws, the internal parts
may fall out and get damaged.
1eighteen screws
(BVTP4 u16)
v
v
v
top side
v
v
v
v
v
5screw
(BVTP3 u8)
6GND cable
left side
Installation direction of the LED board
cable connector (CN9)
Installation direction of the speaker
connection cable connector (CN3)
bottom side
MAIN board
– Inner view –
– Inner view –
MAIN board
[black]
[white]
[red]
[red]
CN9
CN3
SYSSET
2020/10/1623:47:36(GMT+09:00)

SA-WS350/WSD35
10
Sony CONFIDENTIAL
For Authorized Servicer
2-3. AC CORD
,QVWDOODWLRQGLUHFWLRQRIWKH$&FRUGFRQQHFWRU
hole
rear side
top side
AMP block
claw
side
1AC cord connector
(Power board: CN1)
AC cord
cord bush (2104)
Note: When installing the cord bush (2104) to the rear plate
in the AMP block, check the protrusion side position
of the cord bush (2104) and install correctly.
rear plate
bottom side
top side
bottom side
–,QQHUYLHZ–top side
cord bush (2104)
2two
claws
–5HDUYLHZ–
)LJ$!
3Draw out the AC cord with
cord bush (2104) from the
hole in the AMP block.
4cord bush (2104)
(See Fig. A)
,QVWDOODWLRQGLUHFWLRQRIWKHFRUGEXVK
5AC cord
protrusion
side
bottom
side
POWER board
claw side
AC cord
AC cord
cord bush
(2104)
70
± 3 mm
to
POWER
board
claw side
,QVWDOODWLRQSRVLWLRQRIWKHFRUG
EXVK
US,
CND
AEP, UK,
AUS, CH,
RU, EA,
BR, TW,
E3, AR,
TH, LA
IND SP
[black]
[white]
[brown]
[blue]
[black]
[red]
[blue]
[brown]
US,
CND
AEP, UK,
AUS, CH,
RU, EA,
BR, TW,
E3, AR,
TH, LA
IND SP
[black]
[white]
[brown]
[blue]
[black]
[red]
[blue]
[brown]
Ver. 1.2
SYSSET
2020/10/1623:47:36(GMT+09:00)

SA-WS350/WSD35
11
Sony CONFIDENTIAL
For Authorized Servicer
2-4. MAIN BOARD
+RZWRLQVWDOOWKH63.FRUGSRZHUFDEOH
FRQQHFWRU0$,1ERDUG&1
rear side
top side
bottom side
AMP block
1SPK cord power cable
connector
(MAIN board: CN1)
8three screws
(BVTP3 u8)
9Remove the MAIN board in
the direction of the arrow.
q; MAIN board (See Note 1)
Note 2: When installing the MAIN board,
align the two ribs and two holes.
2Unlock the
connector. The rear side
is terminal
side.
3FFC cable (26 core)
connected to the
BT module (SW)
8screw
(BVTP3 u8)
8screw
(BVTP3 u8)
hole
hole
rib
4Unlock the connector.
5FFC cable (12 core)
connected to the
KEY board
6Unlock the connector.
7FFC cable (6 core)
connected to the
MINI JACK board
terminal side
terminal side
connector (CN6) on
the MAIN board
connector (CN7) on
the MAIN board
rib
2. 1*
SPK cord power
cable connector
is fully inserted.
SPK cord power
cable connector
is not fully inserted.
–5LJKWYLHZ––5LJKWYLHZ–
MAIN board CN1 MAIN board CN1
[black] [red] [black] [red]
connector (CN10) on
the MAIN board
Note 1: If MAIN board is replaced with a new part, refer to “RESET METHOD”
on page 6, be sure to perform the reset.
Also, after completing the reset, refer to “WIRELESS CONNECTION
(LINK) WORK OF THE BAR SPEAKER AND THE SUBWOOFER”
on page 6, perform the wireless connection of bar speaker and subwoofer.
SYSSET
2020/10/1623:47:36(GMT+09:00)

SA-WS350/WSD35
12
Sony CONFIDENTIAL
For Authorized Servicer
2-5. POWER BOARD
1RWHIRULQVWDOOLQJWKHVFUHZ
+RZWRLQVWDOOWKH63.FRUGSRZHUFDEOH
FRQQHFWRU32:(5ERDUG&1
,QVWDOODWLRQGLUHFWLRQRIWKH$&FRUGFRQQHFWRU
rear side
top side
AMP block
1AC cord connector
(POWER board: CN1)
2SPK cord power cable
connector
(POWER board: CN2)
4Remove the POWER board
in the direction of the arrow.
claw
side
bottom side
3two screws
(BVTP3 u8)
3screw
(BVTP3 u8)
3three screws
(BVTP3 u8)
hole
hole
5POWER board
Note: When installing the POWER
board, align the two ribs and
two holes.
rib
rib
2. 1*
GND plate is screwed. GND plate is floating.
GND
plate
screw screw
GND
plate
POWER board POWER board
2. 1*
SPK cord power
cable connector
is fully inserted.
SPK cord power
cable connector
is not fully inserted.
–/HIWYLHZ––/HIWYLHZ–
POWER board CN2
[black] [red]
CN2
POWER board
[black] [red]
bottom
side
POWER board
claw side
AC cord
US,
CND
AEP, UK,
AUS, CH,
RU, EA,
BR, TW,
E3, AR,
TH, LA
IND SP
[black]
[white]
[brown]
[blue]
[black]
[red]
[blue]
[brown]
Ver. 1.2
SYSSET
2020/10/1623:47:36(GMT+09:00)

SA-WS350/WSD35
13
Sony CONFIDENTIAL
For Authorized Servicer
2-6. KEY BOARD, BUTTON
cushion EVA
KEY board
4Remove the KEY board block
in the direction of the arrow.
5cushion EVA
6KEY board
Note 1: When installing the KEY board, align
the two bosses and two holes.
7Remove the button in the
direction of the arrow.
8button
Note 2: When installing the button, align
the six bosses and six holes.
3DVWLQJSRVLWLRQRIWKHFXVKLRQ(9$
3two screws
(BVTP3 u8)
hole
hole
total six holes
boss
boss
three bosses
three
bosses
–5HDUYLHZ–
rear side
top side
AMP block
1Unlock the connector.
2FFC cable (12 core) connected
to the MAIN board
connector (CN1)
on the KEY board
The rear side
is terminal
side.
SYSSET
2020/10/1623:47:36(GMT+09:00)

SA-WS350/WSD35
14
Sony CONFIDENTIAL
For Authorized Servicer
2-7. MINI JACK BOARD
3two screws
(BVTP3 u8)
4Remove the MINI JACK board
in the direction of the arrow.
5MINI JACK board
Note: When installing the MINI JACK board,
align the two bosses and two holes.
rear side
top side
AMP block
hole
hole
boss
boss
1Unlock the
connector.
2FFC cable (6 core)
connected to the
MAIN board
The rear side is
terminal side.
connector (CN1) on
the MINI JACK board
SYSSET
2020/10/1623:47:36(GMT+09:00)

SA-WS350/WSD35
15
Sony CONFIDENTIAL
For Authorized Servicer
2-8. BT MODULE (SW)
The rear side is
terminal side.
1Draw out the FFC cable
(26 core) from the J2
on the BT module (SW).
BT module (SW)
J2
2screw
(BVTP3 u8)
3Lift up the BT module (SW) block
in the direction of the arrow.
5cushion EVA
6BT module (SW) (See Note)
3DVWLQJSRVLWLRQRIWKHFXVKLRQ(9$
rear side
top side
AMP block
hook
guide line cushion EVA
4Remove the BT module (SW) block
in the direction of the arrow.
–)URQWYLHZ–
BT module (SW)
BT module (SW) block
Note: If BT module (SW) is replaced with a new part, refer to “RESET METHOD”
on page 6, be sure to perform the reset.
Also, after completing the reset, refer to “WIRELESS CONNECTION
(LINK) WORK OF THE BAR SPEAKER AND THE SUBWOOFER” on
page 6, perform the wireless connection of bar speaker and subwoofer.
SYSSET
2020/10/1623:47:36(GMT+09:00)

SA-WS350/WSD35
16
Sony CONFIDENTIAL
For Authorized Servicer
2-9. FFC CABLE (6 CORE), FFC CABLE (12 CORE)
1screw
(BVTP3 u8)
4two screws
(BVTP3 u8)
2Remove the metal holder BT
in the direction of the arrow.
5Remove the metal bracket A
in the direction of the arrow.
3metal holder BT
Note 1: When installing the metal holder BT,
align the boss and rib with two holes.
6metal bracket A
Note 2: When installing the metal bracket A,
align the two bosses and two holes.
3DVWLQJSRVLWLRQRIWKH))&FDEOHFRUHDQG))&FDEOHFRUH
top side
bottom side
hole
hole
boss
rib
7FFC cable (6 core)
(for MAIN board – MINI JACK board connection)
(See Fig. B)
8FFC cable (12 core)
(for MAIN board – KEY board connection)
(See Fig. B)
guide line
guide line
boss
boss
rear plate block
rear side
hole
hole
)LJ%!
FFC cable (6 core)
(for MAIN board –
MINI JACK board
connection)
FFC cable
(12 core)
(for MAIN board
– KEY board
connection)
rear plate
block
–,QQHUYLHZ–
SYSSET
2020/10/1623:47:36(GMT+09:00)

SA-WS350/WSD35
17
Sony CONFIDENTIAL
For Authorized Servicer
2-10. LED BOARD, FRONT PANEL ASSY (CA1_SW)
Turn the
side facing
up.
bottom side
front side
top side
speaker cabinet
front panel
assy (CA1_SW)
block
soft cloth, etc.
top side
bottom side
front side
left side
top side bottom side
LED board
LED board
cable
1Insert a flat-head screwdriver into the
two slits on the bottom of the unit, and
open a gap between the front panel assy
(CA1_SW) block and speaker cabinet.
two slits
2Insert the jig into the space and slowly
remove the front panel assy (CA1_SW)
block.
Note 1: When using a jig, please work
carefully so as not to damage the
front panel assy (CA1_SW) block
and speaker cabinet.
top side
right side
bottom side
total five bosses
front side
front panel assy
(CA1_SW) block
front panel assy
(CA1_SW) block
3 While moving the jig in the direction
of the arrow, remove five bosses.
total five bosses
4Insert the jig into the space and
slowly remove the front panel
assy (CA1_SW) block.
Note 1: When using a jig, please
work carefully so as not
to damage the front panel
assy (CA1_SW) block
and speaker cabinet.
5 While moving the jig in the direction
of the arrow, remove five bosses.
6Remove the front panel
assy (CA1_SW) block in
the direction of the arrow.
7LED board cable
connector (CN1)
8two screws
(BVTP3 u8)
9LED board
Note 2: When installing the
LED board, align the
two bosses and two holes.
q; front panel assy (CA1_SW)
Note 3: When installing the front panel assy (CA1_SW),
remove cleanly the sticked bond on bosses and
holes, and apply bond to the front panel assy
(CA1_SW) again and install it.
• LED board cable setting
two holes
two bosses
total ten bosses
(with bond)
total ten holes
– Inner view –
groove
Turn the opposite
side facing up.
SYSSET
2020/10/1623:47:36(GMT+09:00)

SA-WS350/WSD35
18
Sony CONFIDENTIAL
For Authorized Servicer
2-11. SPEAKER UNIT (CA1_SW)
rear side
bottom side
soft cloth, etc.
top side
3 terminal (wide)
[red]
3 terminal (wide)
[black]
,QVWDOODWLRQGLUHFWLRQIRUWKHVSHDNHUXQLW&$B6:
6SHDNHUFRQQHFWLRQFDEOHVHWWLQJ
Note 1: When installing the speaker unit (CA1_SW),
make the position of terminals as shown in
the figure below.
Note 2: When connecting the speaker connection cable
terminal to the speaker unit (CA1_SW), take care
for the direction of the terminal and connect it.
1six screws
(BVTP4 u25)
4speaker unit
(CA1_SW)
2Lift up the speaker
unit (CA1_SW) block
in the direction of the
arrow.
3 terminal (narrow)
[black]
speaker unit
(CA1_SW)
speaker unit (CA1_SW)
terminals position
terminal
(wide)
[red]
terminal
(wide)
[black]
terminal
(narrow)
[black]
top side
bottom side
bottom side
OK NG
OK NG
OK NG
–)URQWYLHZ–
SYSSET
2020/10/1623:47:36(GMT+09:00)

SA-WS350/WSD35
19
Sony CONFIDENTIAL
For Authorized Servicer
SECTION 3
DIAGRAMS
3-1. BLOCK DIAGRAM
Subwoofer
I2S
Soundbar
Vcc
Vdc (+25.8V)
SMPS
# 2 Regulators
2 Keys
Mono Audio In
3.5 ݊3 pins
(Audio In & WIRE_ON)
LED
(2 colors)
AC
Input
I2C
UART
(Program Update)
Audio
Proc
PWM
AMP
# 2
(BTL)
BT Module
# 2
SYSSET
2020/10/1623:47:36(GMT+09:00)

SA-WS350/WSD35
20
Sony CONFIDENTIAL
For Authorized Servicer
THIS NOTE IS COMMON FOR PRINTED WIRING BOARDS AND SCHEMATIC DIAGRAMS.
(In addition to this, the necessary note is printed in each block.)
For Printed Wiring Boards.
Note:
• : Pattern from the side which enables seeing.
(The other layers’ patterns are not indicated.)
Caution:
Pattern face side:
(Conductor Side)
Parts face side:
(Component Side)
Parts on the pattern face side seen
from the pattern face are indicated.
Parts on the parts face side seen from
the parts face are indicated.
Caution:
Pattern face side:
(SIDE B)
Parts face side:
(SIDE A)
Parts on the pattern face side seen
from the pattern face are indicated.
Parts on the parts face side seen from
the parts face are indicated.
For Schematic Diagrams.
Note:
• All capacitors are in μF unless otherwise noted. (p: pF)
50 WV or less are not indicated except for electrolytics
and tantalums.
• All resistors are in Ωand 1/4 W or less unless otherwise
specified.
Note 2: Among mounted electrical parts on each board, only parts that
are described in the electrical parts list can be replaced for re-
pairing.
The parts that are not described in the electrical parts list cannot
be replaced with single for repairing.
If a part not described in the electrical parts list is defective,
replace it with the complete mounted board on which the part is
mounted.
This service manual describes the schematic diagram and print-
ed wiring board for each board.
Note 1: When the complete MAIN board is replaced, be sure to refer to
“WIRELESS CONNECTION (LINK) WORK OF THE BAR
SPEAKER AND THE SUBWOOFER” on page 6.
• Circuit Boards Location
MAIN board
KEY board
MINI JACK board
LED board
POWER board
BT module (SW)
(BT1)
Ver. 1.4
Note: The components identified by mark 0or
dotted line with mark 0are critical for safety.
Replace only with part number specified.
Note: Les composants identifiés par une marque
0sont critiques pour la sécurité.
Ne les remplacer que par une piéce portant
le numéro spécifié.
Note 2: Among mounted electrical parts on each board, only parts that
are described in the electrical parts list can be replaced for re-
pairing.
The parts that are not described in the electrical parts list cannot
be replaced with single for repairing.
If a part not described in the electrical parts list is defective,
replace it with the complete mounted board on which the part is
mounted.
This service manual describes the schematic diagram and print-
ed wiring board for each board.
Note 1: When the complete MAIN board is replaced, be sure to refer to
“WIRELESS CONNECTION (LINK) WORK OF THE BAR
SPEAKER AND THE SUBWOOFER” on page 6.
SYSSET
2020/10/1623:47:36(GMT+09:00)
This manual suits for next models
1
Table of contents
Other Sony Subwoofer manuals

Sony
Sony XS-L120P5H Product guide

Sony
Sony XS-L100P5M Product guide

Sony
Sony SA-WM40 User manual

Sony
Sony SA-CS9 User manual

Sony
Sony SA-WMSP75 User manual

Sony
Sony XS-L1090P5 Marketing Product guide

Sony
Sony XS-L10S Manual

Sony
Sony SA-WD100 User manual

Sony
Sony XS-L103P5B Product guide

Sony
Sony XS-L1265G Product guide