Sony MDR-IF420RK User manual

2Sony Corporation Printed in Korea

3
3-858-448-15(1)
© 1996 by Sony Corporation
Cordless Stereo
Headphone System
Operating Instructions page 2
Mode d’emploi page 16
Bedienungsanleitung seite 30
Manual de instrucciones página 44
MDR-IF420RK
MDR-IF520RK

2
WARNING
To prevent fire or shock hazard,
do not expose the unit to rain or
moisture.
To avoid electrical shock, do not
open the cabinet. Refer servicing
to qualified personnel only.
WARNING
You are cautioned that any changes or
modifications not expressly approved
in this manual could void your
authority to operate this equipment.
Owner’s Record
The model number is located at the
bottom of the transmitter and the right
inner side of the headband.
The serial number is located at the
bottom of the transmitter and in the
battery compartment of the
headphones.
Record these numbers in the spaces
provided below. Refer to them
whenever you call upon your Sony
dealer regarding this product.
Model No.
Transmitter
Headphones
Serial No.
Transmitter
Headphones
Welcome!
Thank you for purchasing the Sony
MDR-IF420RK/MDR-IF520RK
Cordless Stereo Headphone System.
Before operating the unit, please read
this manual thoroughly and retain it
for future reference.
Some features are:
• Cordless system that allows you to
listen to a program free from the
restriction of a cord.
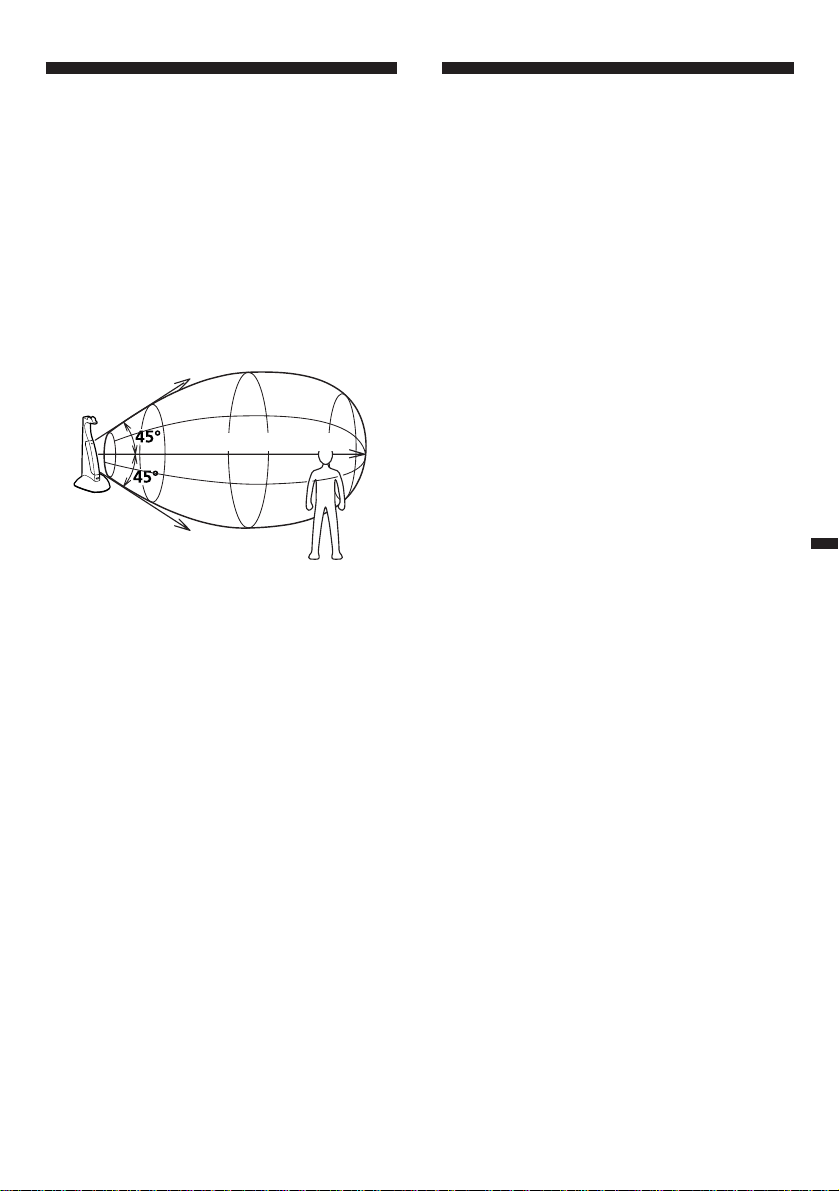
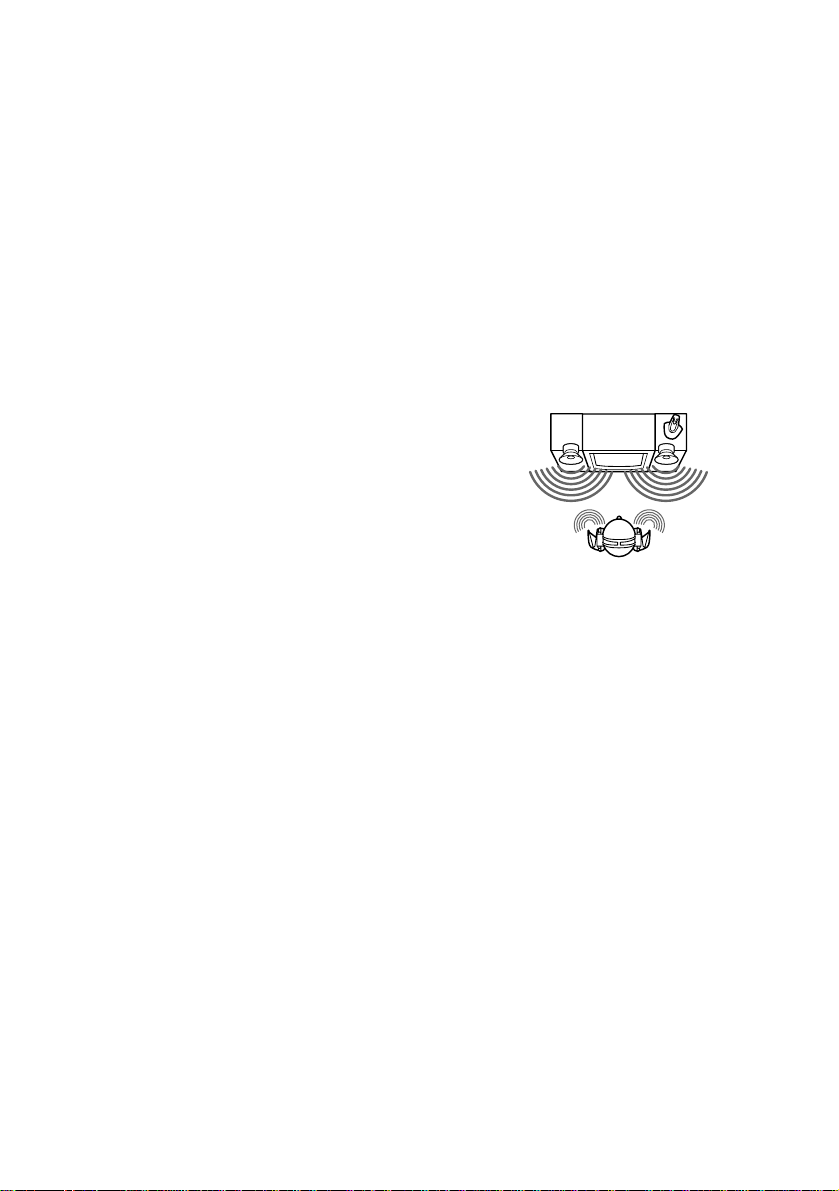
• The infrared rays from the
transmitter cover a broad horizontal
listening area with a maximum
distance of 10 m.
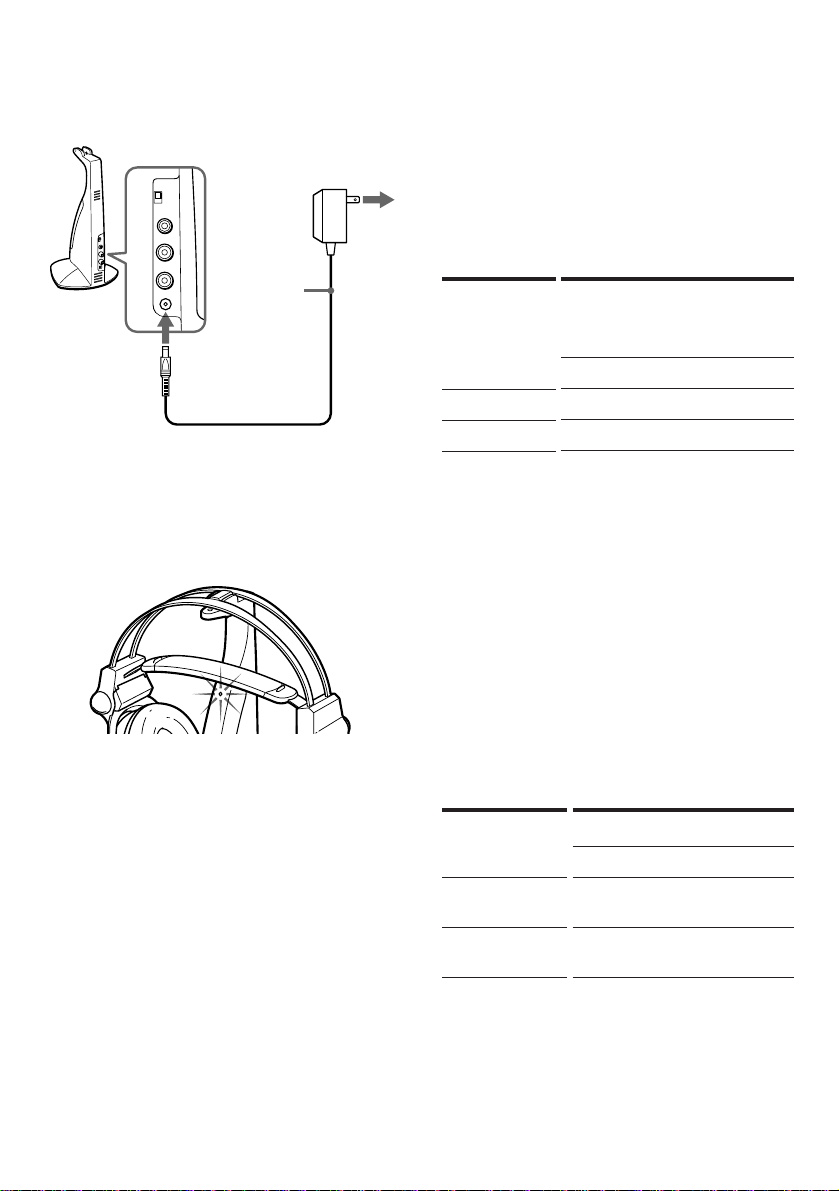
• Self-adjusting headband for fitting
your head perfectly.
• The power of the headphones turns
on and off automatically every time
you put the headphones on and off
(Auto power on/off function).
• Surround effect that enables you to
enjoy the sound which simulates the
sound field such as concert hall or
theater. (MDR-IF-520RK only)
• The VOL control adjusts the volume
level of both channels.
Furthermore, you can adjust the
balance between the left and right
channels with the BALANCE control.
(MDR-IF520RK only)
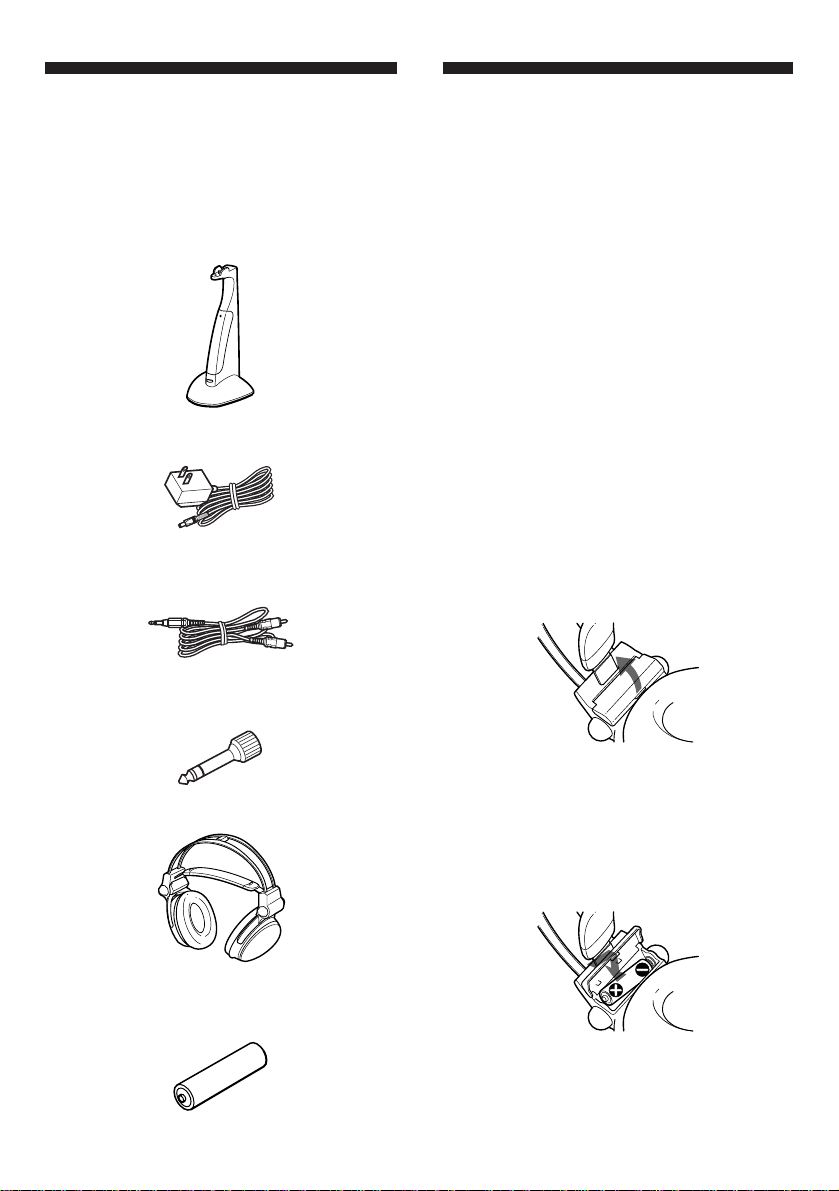
• The power source of the headphones
can be selected from either a supplied
rechargeable battery or a
commercially available R6 (size AA)
dry battery.

3
Table of contents
Getting started
Unpacking .......................................... 4
Charging the
headphones’ battery ...................... 4
Setting up the transmitter ................ 6
Operating the system
Listening to a program ...................... 8
Replacing the ear pads .................... 12
Additional information
Precautions ........................................12
Troubleshooting ...............................13
Specifications ....................................15
About the infrared
rays
communication
The illustration below shows the
approximate area covered by the
infrared rays emitted from the
transmitter.
Notes
•This system utilizes infrared rays for
communication so noise (hissing) can be heard
from the headphones as you move farther away
from the transmitter. The sound will also be
cutoff and noise will be heard if the infrared
rays are blocked. These are characteristics of
infrared ray communication and do not
indicate malfunction.
•The infrared rays will not penetrate walls or
opaque glass, therefore, be sure to stay within
sight of the transmitter.
•When you use the headphones inside the area
illustrated in the diagram, the transmitter can
be placed in the front, behind or by the side of
the listener.
•The sound you hear varies according to your
position and the transmitter position. Try
finding a position which yields the best sound.
•Do not cover the infrared sensors with your
hands or hair.
Infrared ray
Transmitter
Approx. 4 m
(1571/2in.)
Approx. 4 m
(1571/2in.)
Approx. 10 m (32.8 ft.)

4
(Getting started
Unpacking
Check that you have the following
items:
• The transmitter
• AC power adaptor
• Connecting cord (phono plugs ˜
stereo mini plug)
• Unimatch plug adaptor (stereo mini
jack nstereo phone plug)
• The headphones
• Ni-Cd rechargeable battery
NC-AA (HJ)
Charging the
headphones’
battery
Using the headphones for the first
time
The headphones are powered by either
a supplied rechargeable battery
NC-AA (HJ) or a commercially
available R6 (size AA) battery.
When you use the headphones with the
supplied rechargeable battery
NC-AA (HJ) for the first time, charge
the battery in the following manner.
NC-AA (HJ) is applicable only for Sony
cordless/wireless headphone systems.
Never use for any other purpose.
1Open the battery compartment lid
on the left inner side of the hanger.
2Install the supplied rechargeable
battery with its + and – matched to
those of the battery compartment.
Do not use a rechargeable battery
other than the supplied one.
3Close the battery compartment lid.

5
Approx.
using hours*
MDR-IF420RK MDR-IF520RK
1 1 hour. 15 min.
24 30
Approx.
charging
hours
1
24**
To recharge the headphones’
battery after use
To charge the battery, follow steps 4
and 5.
Since little electric current is used for
charging, there is no need to worry
about overcharging.
Charging and using hours
* at 1 kHz, 1 mW+1 mW output
** the hours required to fully charge an empty
battery
Using the headphones with a
commercially available R6 (size AA)
dry battery
Install the battery in the manner as
described in steps 1 through 3 of
“Charging the headphones’ battery.”
When a R6 (size AA) dry battery is
installed, the battery charge function is
not activated.
Battery life*
* at 1 kHz, 1 mW+1 mW output
Battery
Sony alkaline
battery LR 6 (SG)
Sony battery R6P
(SR)
Approx. hours
MDR-IF420RK MDR-IF520RK
70 80
35 40
4Connect the supplied AC power
adaptor to the transmitter.
5Rest the headphones on the
transmitter so that the contact pins
fit into the contact holes on the
headphones. The charging
indicator lights.
Notes
•Use only the supplied rechargeable battery NC-
AA (HJ).
•You cannot recharge other R6 (size AA)
rechargeable battery (NC-AA etc.) with this
unit.
When the indicator is not lit
Check the connection to make sure that
the contact pins are properly fitted into
the contact holes on the headphones, or
if the headphones are rested on the
transmitter correctly.
Transmitter to an AC
outlet
AC power
adaptor
(supplied)
to DC IN
9V jack

6
LINE
PHONES
LINE
PHONES
Check the remaining power of the
headphones’ battery
Pull up the suspender, and check that
the headphones’ power indicator lights
in red. You can now use the
headphones.
Charge the battery or install a new dry
battery, if the power indicator light is
weak or turned off and the sound
become distorted or has a lot of noise.
Notes
•During recharging, the transmitter is turned off
automatically.
•When the life of the rechargeable battery is
shortened by half even after a proper
recharging, take the headphone set to a Sony
dealer and have the old rechargeable battery
replaced by a new one.
Transmitter
Right channel
(red)
Left channel (white)
Unimatch
plug adaptor
(supplied)
Discman, MD,
WALKMAN*, TV,
VCR, etc.
to headphones
jack (stereo
mini jack)
Connecting cord
(supplied)
Setting up the
transmitter
1Connect the transmitter to audio/
video equipment. Select one of the
hookups below depending on the
jack type:
aTo connect to a headphones jack
Set the INPUT SOURCE selector to
PHONES.
to AUDIO IN A jacks
to headphones
jack (stereo
phone jack)

7
LINE
PHONES
LINE
PHONES
bTo connect to LINE OUT or REC
OUT jacks
Set the INPUT SOURCE selector to
LINE.
LINE
PHONES
LINE
PHONES
2If your AC power adaptor is
equipped with a voltage selector,
before connecting the AC power
adaptor to an AC outlet, set it to the
operating voltage in your area with
a screw driver.
3Connect the transmitter to a power
source.
Notes
•Do not connect to the AUDIO IN A jack and B
jacks at the same time. If you do so, the audio
signals may be mixed.
•Use only the supplied AC power adaptor. Do
not use any other AC power adaptor.
•If the plug of the AC power adaptor does not fit
in the AC outlet, use the supplied AC plug
adaptor.
•When you connect the connecting cord directly
to an earphone jack, the audio signal will not be
output through the right channel. In such a
case, use the separately sold PC-236HG plug
adaptor.
* WALKMAN is a registered trademark of Sony
Corporation.
Transmitter
to AUDIO IN B jack
Connecting cord (supplied)
Right
channel
(red)
Left
channel
(white)
to LINE OUT or
REC OUT jacks
Stereo system,
TV, VCR, etc.
Transmitter
to AUDIO IN A jack
Left channel (white)
Right
channel
(red)
Connecting cord (supplied)
to LINE OUT or
REC OUT jacks
Discman, MD
AC power adaptor (supplied)
Polarity of the plug

8
Adjust the balance between the left
and right channels. (MDR-IF520RK
only)
BALANCEVOL
POWER
Auto power on/off function
When you remove the headphones, the
power turns off automatically. Do not
allow the suspender to be pulled up,
otherwise the headphones will be
switched on.
Mute function
If a hissing noise is heard when the
infrared rays are obstructed, or the
headphones are used outside of the
effective range (see page 3), the mute
function will be activated and the
sound will not be heard from the
headphones. To restore the sound,
move nearer toward the transmitter or
remove the obstruction.
(Operating the system
Listening to a
program
1Turn on the audio/video
equipment connected to the
transmitter.
When the audio signal is input, the
transmitter turns on automatically
and the infrared emitters glow. If
the transmitter is connected to the
headphone jack, set the volume
control of the audio source
equipment as high as possible
but not so high that the audio
signal gets distorted.
2Put on the headphones and the
power turns on automatically.
The power indicator glows red
when the power turns on.
3Adjust the volume.
BALANCEVOL
POWER
Left channel’s
volume is higher
Right channel’s
volume is higher
Low
High

9
Enjoying the TV or VCR with the
simulated surround effect
(MDR-IF520RK only)
When using an audio equipment
with a stereo speakers
With this headphone system, you can
enjoy surround sound by listening to
the sound from the speakers of a
connected stereo TV or audio
equipment and to the rear sound from
the headphones created by the built-in
surround circuit.
To listen to the sound with this effect,
set up the equipment as follows.
1Connect the transmitter to audio/
video epuipment.
Select one of the hookups below.
Set the INPUT SOURCE selector to
LINE.
When no audio signal is received for
more than approximately five
minutes
The transmitter will be turned off
automatically.
After listening to a program
Take the headphones off and rest them
away onto the transmitter. The
transmitter power will automatically
be turned off. If the supplied
rechargeable battery is used for the
headphones, the charging indicator on
the transmitter lights up. The
rechargeable headphone battery is
continuously charged when the
headphones are placed on the
transmitter.
Since little electric current is used for
charging, there is no need to worry
about overcharging.
As MDR-IF420RK/MDR-IF520RK
Cordless Stereo Headphone System is
not affected by the memory effect of
the Ni-Cd battery, it is advisable that
the headphones are rested on the
transmitter whenever not in use so that
the headphones’ battery is always
charged.
When a R6 (size AA) dry battery is
used for the headphones, the battery
charge function is not activated.
Note
The infrared emitters light up when the
transmitter is turned on. The brightness of the
emitters may not be uniform, however, this is not
a malfunction.

10
1Connecting to a stereo TV with an
audio output jack
LINE
PHONES
LINE
PHONES
2Connecting to a stereo video
epuipment or laser disc player, etc.
LINE
PHONES
LINE
PHONES
When all the audio output jacks of the
epuipment that you are connecting to
are used, set up as follows.
LINE
PHONES
LINE
PHONES
Right
channel
(red)
Left
channel
(white)
Transmitter
to AUDIO IN B jack
Connecting
cord
(supplied)
to LINE OUT
jacks
Stereo TV
Left
channel
(white)
Right
channel
(red)
to LINE OUT or
REC OUT jacks
Stereo video,
Laser disc player, etc.
Transmitter
to AUDIO IN B jack
Connecting
cord
(supplied)
Right channel
(red)
to LINE OUT
or REC OUT
jacks
Left channel (white)
to AUDIO IN A jack
Left
channel
(white)
Right
channel
(red)
to an
audio
input
jack
Right
channel
(red)
Left
channel
(white)
Stereo video
Laser disc player, etc.
Stereo TV
Transmitter

11
3Press the SURROUND button to
activate the surround effect and
then play the connected equipment.
To cancel the surround effect, press
that button again.
SURROUND
ON/OFF
Notes
The surround effect does not work in the
following cases:
—The source sound is monaural.
—The source sound is bilingual.
•When you use the surround effect, do not
connect the transmitter to the surround
terminals of the audio/video equipment. If
you do so, the surround effect may not be
obtained or sound may not be output.
3Connecting to an audio equipment
LINE
PHONES
LINE
PHONES
Note
Do not connect to the headphones jack of a TV or
an audio equipment. If you do so, front speaker
sound will be lost, and the surround effect can
not be obtained.
2Open the housing cap as described
below.
In doing so, you can listen to the
sound from the speakers on TV or
audio system as well as from the
headphones in order to obtain the
full surround effect.
Transmitter
to AUDIO IN B jack
Connecting
cord
(supplied)
Left
channel
(white)
Right
channel
(red)
to LINE OUT or
REC OUT jacks
Stereo audio system

12
Replacing the ear
pads
When the ear pads become dirty or
damaged, you can get replacements
from your Sony dealer. Replace them
as illustrated below.
1Remove the old ear pad by pulling
it out of the groove on the housing.
2Place the new ear pad on the
housing and insert the edge of the
pad onto the groove as illustrated.
Make sure that the entire edge of the
ear pad is securely inserted into the
groove.
(Additional information
Precautions
• The CE mark on the unit is valid only
for products marketed in the
European Union.
• When the transmitter is not to be
used for a long period of time,
disconnect the AC power adaptor
from the AC outlet holding the plug.
Do not pull on the cord.
• Do not leave the cordless stereo
headphones system in a location
subject to direct sunlight, heat or
moisture.
Notes on headphones
Preventing hearing damage
Avoid using headphones at high
volume. Hearing experts advise
against continuous, loud and extended
play. If you experience a ringing in
your ears, reduce the volume or
discontinue use.
Caring for others
Keep the volume at a moderate level.
This will allow you to hear outside
sounds and to be considerate to the
people around you.
If you have any questions or problems
concerning the system that are not
covered in this manual, please consult
the nearest Sony dealer.
Be sure to bring the headphones and
the transmitter to the Sony dealer when
requiring repair work.

13
Problem
No sound/
Muffled
sound
Distortion
Solution
Check the position of the
BALANCE control (MDR-IF
520RK only).
Check the position of the
SURROUND button (MDR-
IF520RK only).
If the transmitter is
connected to the headphones
jack, turn down the volume
of the connected audio/
video equipment.
The headphones’ power
indicator light is weak or
turned off.
• Charge the rechargeable
battery because the
headphones’ battery is
weak, or if the power
indicator is still off after
charging the battery, take
the headphones to a Sony
dealer for a replacement
of the rechargeable
battery.
• If you are using the
conventional dry battery,
replace it with a new one.
Check if the INPUT
SOURCE selector is set to
the right position.
Problem
No sound/
Muffled
sound
Solution
Check the connection of the
audio/video equipment or
the AC power adaptor.
Check that the audio/video
equipment is turned on.
Turn up the volume on the
connected audio/video
equipment, if the
transmitter is connected to
the headphones jack.
The mute function is
activated.
• Check if there is any
object between the
transmitter and the
headphones.
• Use the headphones near
the transmitter.
• Change the position and
angle of the transmitter.
The headphones’ power
indicator light is weak or
turned off.
• Charge the rechargeable
battery because the
headphones’ battery is
weak, or if the power
indicator is still off after
charging the battery, take
the headphones to a Sony
dealer for a replacement
of the rechargeable
battery.
• If you are using the
conventional dry battery,
replace it with a new one.
Check if the INPUT
SOURCE selector is set to
the right position.
Troubleshooting

14
Problem
Loud
background
noise
Solution
Move closer to the
transmitter. As you move
away from the transmitter,
more noise is likely to be
heard. This is inherent to
infrared ray communication
and does not mean that
there is a problem with the
unit itself.
Check that there is no object
between the transmitter and
the headphones.
Check that the infrared
sensors are not covered
with your hands or hair.
Change the position or
angle of the transmitter.
• The headphones are used
by a window where the
sunlight is too strong.
nDraw the curtains/
blind to shut out the
direct sunlight, or use
the headphones away
from the sunlight.
If the transmitter is
connected to the
headphones jack, turn up
the volume of the connected
audio/video equipment.
The headphones’ power
indicator light is weak or
turned off.
• Charge the rechargeable
battery because the
headphones’ battery is
weak, or if the power
indicator is still off after
charging the battery, take
the headphones to a Sony
dealer for a replacement
of the rechargeable
battery.
• If you are using the
conventional dry battery,
replace it with a new one.
Problem
Loud
background
noise
Surround
effect
(MDR-
IF520RK)
cannot be
obtained.
The battery
cannot be
charged.
Solution
Noise is heard from the
connected audio equipment.
• Check if the INPUT
SOURCE selector is set to
the right position.
• Disconnect the connecting
cord with the power of
the transmitter on and
check if the noise is heard
from the headphones. If
the noise disappears, the
connected equipment is
the cause to make that
noise.
• When using more than
two transmitters, turn off
the power of the second
transmitter or move it so
that the area covered by
the infrared rays does not
overlap each other.
Press the SURROUND
button.
Check that the input signal
is stereo.
Check that the unit is
connected to audio/video
equipment properly.
Open the housing cap.
Check if the charging
indicator lights on. If not,
put the headphones on the
transmitter correctly so that
the charging indicator lights
on.
The dry battery is installed.
• Install the supplied
rechargeable battery.
The rechargeable battery
that is not supplied is
installed.
• Install the supplied
rechargeable battery.

15
Specifications
General
Modulation system
Frequency modulation
Carrier frequency
Right 2.8 MHz
Left 2.3 MHz
Frequency response
12 – 24,000 Hz (MDR-IF420RK)
10 – 24,000 Hz (MDR-IF520RK)
Transmitter
Power source DC IN 9V jack accepts power
supplied from the AC power
adaptor for use on the following
voltages:
Audio input Phono jacks/stereo mini jack
Dimensions Approx. 121 x 260 x 135 mm
(4 7/8x 10 1/4x 5 3/8in) (w/h/d)
Mass Approx. 190 g (6.7 oz)
Headphones
Power source Supplied Ni-Cd rechargeable
battery
R6 (size AA) battery
Mass Approx. 320 g (11.3 oz)
(MDR-IF420RK)
Approx. 390 g (13.8 oz)
(MDR-IF520RK)
including the supplied Ni-Cd
battery
Supplied Ni-Cd rechargeable battery
Model name NC-AA (HJ)
Type Ni-Cd
Voltage 1.2 V
Capacity 600 mAh
Optional accessories
Sony alkaline battery LR6 (SG)
Sony battery R6P (SR)
Plug adaptor PC-236HG
(stereo mini jack ˜monaural mini plug)
Connecting cords
RK-C510HG/RK-C515HG/RK-C520HG
(phono plug x 2 ˜phono plug x 2)
RK-G136HG
(stereo mini plug ˜stereo mini plug)
RK-G129HG
(stereo mini plug ˜phono plug x 2)
Design and specifications are subject to change
without notice.
Where purchased
U.S.A./Canada
U.K.
European countries
Japan (exept for Japanese
domestic model)
Other countries
Operating
voltage
120 V AC, 60 Hz
240 V AC, 50 Hz
220 – 230V AC, 50 Hz
110 V/120 V/220 V/
240 V AC, 50/60 Hz
220 – 230 V AC, 50/60
Hz or 120 V AC, 60 Hz

16
AVERTISSEMENT
Afin d’éviter tout risque
d’incendie ou d’électrocution, ne
pas exposer cet appareil à la
pluie ou à l’humidité.
Afin d’écarter tout risque
d’électrocution, garder le coffret
fermé. Ne confier l’entretien de
l’appareil qu’à un personnel
qualifié.
Bienvenue!
Nous vous félicitons pour l’achat de ce
système de casque stéréo infrarouge
Sony MDR-IF420RK/MDR-IF520RK.
Avant la mise en service de cet
appareil, prière de lire attentivement ce
mode d’emploi et de le conserver pour
toute référence ultérieure.
Cet appareil offre, entre autres, les
fonctions suivantes:
• Système de casque infrarouge vous
permettant d’écouter un programme
sans être gêné par un cordon.
• A une distance de 10 mètres
(maximum), les rayons infrarouges
émis par le transmetteur offrent une
large portée horizontale.
• Serre-tête auto-réglable s’adaptant
parfaitement à la forme de la tête.
• Mise sous et hors tension
automatique du casque quand vous
mettez et enlevez le casque (fonction
de mise sous tension et hors tension
automatique).
• Effet surround simulant l’acoustique
d’une salle de concert ou de cinéma
(MDR-IF520RK seulement).
• Réglage du niveau sonore des deux
canaux.
Vous pouvez en outre ajuster la
balance des canaux gauche et droit
avec la commande BALANCE (MDR-
IF520RK seulement).
• Deux sources d’alimentation du
casque au choix: pile rechargeable
fournie ou pile sèche R6 (format AA)
en vente dans le commerce.

17
Table des matières
Préparatifs
Déballage .......................................... 18
Recharge de la pile du casque ........ 18
Raccordement du transmetteur..... 20
Utilisation du système
Ecoute d’un programme .................22
Remplacement des oreillettes .........26
Informations complémentaires
Précautions ........................................26
Guide de dépannage........................27
Spécifications ....................................29
A propos de la
communication par
rayons infrarouges
L’illustration ci-dessous indique la
portée approximative des rayons
infrarouges émis par le transmetteur.
Remarques
•Ce système utilisant la communication par
rayons infrarouges, le sifflement augmente à
mesure que vous vous éloignez du
transmetteur, même si vous vous trouvez dans
la zone indiquée sur l’illustration. S’il y a un
objet entre le récepteur et le transmetteur, le son
risque d’être interrompu. Ces phénomènes
sont inhérents à la communication par rayons
infrarouges et ne signifient pas que le système
fonctionne mal.
•Comme les rayons infrarouges ne traversent ni
les murs ni le verre opaque, le récepteur
infrarouge doit être placé “en vue” du
transmetteur.
•Quand vous utilisez le casque dans la zone
indiquée sur l’illustration, vous pouvez placer
le transmetteur devant ou derrière vous, ou à
votre droite ou gauche.
•Le son du casque peut varier en fonction de la
position et de l’environnement. Nous vous
conseillons d’utiliser le système à l’endroit oú
vous obtenez le meilleur son.
•Ne pas couvrir les capteurs infrarouges avec les
mains ou les cheveux.
Transmetteur
Env. 4 m
(1571/2po.)
Env. 4 m
(1571/2po.)
Rayons infrarouges
Env. 10 m (32.8 pi.)

18
(Préparatifs
Déballage
Vérifiez que tous les éléments suivants
se trouvent dans l’emballage:
• Transmetteur
• Adaptateur secteur
• Cordon de liaison (fiches cinch ˜
minifiche stéréo)
• Adaptateur de fiche unimatch
(minijack stéréo nfiche 6,35 stéréo)
• Casque
• Pile rechargeable au nickel-cadmium
NC-AA (HJ)
Recharge de la pile
du casque
Lors de la première utilisation du
casque
Le casque peut être alimenté par la pile
rechargeable fournie NC-AA (HJ) ou
par une pile R6 (format AA) en vente
dans le commerce.
Quand vous utilisez pour la première
fois le casque avec la pile rechargeable
fournie, rechargez d’abord la pile de la
façon suivante:
Le casque peut être alimenté par la pile
rechargeable fournie NC-AA (HJ) ou
par une pile R6 (format AA) en vente
dans le commerce.
NC-AA (HJ) ne doit être utilisée
qu’avec les systèmes de casque sans fil
Sony. Ne pas utiliser dans d'autres
buts.
1Ouvrez le logement de la pile sur le
côté gauche de la face interne du
serre-tête.
2Installez la pile rechargeable
fournie en respectant la polarité de
la pile + et – indiqué e dans le
logement.
Ne pas utiliser d’autre type de pile
rechargeable que celle fournie.
3Refermez le couvercle du logement
de la pile.

19
4Raccordez l’adaptateur secteur
fourni au transmetteur.
5Posez le casque sur le transmetteur
en insérant les broches de contact
dans les orifices de contact sur le
casque. L’indicateur de recharge
s’allume.
Remarques
•Utilisez exclusivement la pile rechargeable
fournie NC-AA (HJ).
•Avec cet appareil, vous ne pourrez pas
recharger d’autres piles rechargeables R6
(format AA) (NC-AA, etc.)
Si l’indicateur ne s’allume pas
Vérifiez si les broches de contact sont
bien insérées dans les orifices de
contact du casque ou si le casque est
correctement posé sur le transmetteur.
vers une
prise
secteur
Transmetteur
Adaptateur
secteur
(fourni)
vers la prise
DC IN 9V
Pour recharger la pile du casque
après utilisation
Pour recharger la pile, effectuez les
étapes 4 et 5.
Etant donné que la recharge utilise très
peu de courant, il n’y a pas de risque
de surcharge.
Heures de recharge et d’autonomie
* à 1 kHz, sortie de 1 mW+1 mW
** Heures nécessaires pour recharger une pile
complètement vide
Utilisation du casque avec une pile
sèche R6 (format AA) en vente dans
le commerce
Installez la pile comme décrit dans 1 et
3 de “Recharge de la pile du casque”.
Quand vous installez une pile sèche R6
(format AA), la fonction de charge est
désactivée.
Autonomie de la pile*
* à 1 kHz, sortie de 1 mW+1 mW
Heures de
recharge
approx.
1
24**
Heures d’autonomie
approx.*
MDR-IF420RK MDR-IF520RK
1 1h 15
24 30
Pile
Pile alcaline Sony
(LR6) (SG)
Pile Sony R6P
(SR)
Approx. en heures
MDR-IF420RK MDR-IF520RK
70 80
35 40
This manual suits for next models
1
Table of contents
Languages:
Other Sony Wireless Headphones manuals

Sony
Sony MDR-IF230 User manual

Sony
Sony MDR-RF995RK User manual

Sony
Sony MDR-RF815R User manual

Sony
Sony MDR-RF811RK User manual

Sony
Sony MDR-RF855RK User manual

Sony
Sony WH-1000XM4 User manual

Sony
Sony MDR-RF985RK User manual

Sony
Sony MDR-ZX780DC Reference guide

Sony
Sony WH-XB900N User manual

Sony
Sony MDR-RF810RK User manual