Soul P910B User manual


Important Safety Instructions
Compliance with FCC rules (U.S.A., only)
This device complies with Part 15 of the FCC rules. Operation is subject to the following two conditions: (1) This device
may not cause harmful interference, and (2) this device must accept any interference received, including interference that
may cause undesired operation.
NOTICE
This equipment has been tested and found to comply with the limits for a Class B digital device, pursuant to Part 15 of the
FCC rules. These limits are designed to provide reasonable protection against harmful interference in a residential installa-
tion. This equipment generates, uses, and can radiate radio frequency energy and, if not installed and used in accordance
with the instructions, may cause harmful interference to radio communications. However, this is no guarantee that inter-
ference will not occur in a particular installation. If this equipment does cause harmful interference to radio or television
reception, which can be determined by turning the equipment o and on, you are encouraged to try to correct the inter-
ference by one or more of the following measures:
•Reorientorrelocatethereceivingantenna.
•Increasetheseparationbetweentheequipmentandreceiver.
•Consultthedealeroranexperiencedradio/TVtechnicianforhelp.
•Connecttheequipmenttoanoutletonadierentcircuitthantheonetowhichthereceiverisconnected.
FCC WARNING
•Changesormodicationsnotexpresslyapprovedbythepartyresponsibleforcompliancecouldvoidthe
user’s authority to operate this equipment.
•Properconnectionsmustbeusedforconnectiontoahostcomputerand/orperipheralsinordertomeet
FCC emission limits.
Ni-MH Batteries Safety Instructions
Your Party in a Box uses an“Optional”Ni-MH battery pack. Misuse can result in the batteries short-circuiting, the insulator
melting and damage to the safety valves or safety mechanisms, leading to leakage, heat generation, or rupturing. Please
observe the following precautions when using batteries.
•Donotdisposeinreorexposetohightemperature.
•Donotunderanycircumstancesinsertthebatterieswiththepositiveandnegativepolesreversed.
•Iftheconnectionwiththechargerdoesnotoperatecorrectly,donotforcethebatteryin,butinsteadcheckthe
direction of the positive and negative poles.
•Donotdirectlyconnectthebatteriestopoweroutletsorcarcigarettelighterports.
•Donotconnectthepositiveterminalandthenegativeterminalwithmetalssuchaswire.Also,donotstoreor
carry the batteries with metal necklaces, etc.
•Donotdisassembleormodifythebattery.
•Donotdirectlysolderthebattery.
•Incharging,useonlythecharger(AC/DCAdapter)thatwasprovidedwiththeproductwhenpurchased.Do not
under any circumstances use a substitute AC/DC adapter to power or charge the batteries.
•Thisbatteryisconstructedtoreleaseinternalgases.Forthisreason,donotalterthe(+)terminal.
•Thisbatterycontainsanalkalineliquid.Ifthisliquidcomesincontactwiththeeyes,thismayleadtolossofsight.
Without rubbing the eyes, immediately wash them with clean water and consult a doctor.
2.


Contents
Table of Contents
Important Safety Instructions .......................................................................................... 1 – 3
Table of Contents ................................................................................................................ 4
Introduction ......................................................................................................................... 5
Features and Benets ........................................................................................................ 5
Box Contents
Unpacking .................................................................................................................................... 6
Supplied Accessories ................................................................................................................ 6
Optional Battery Pack ............................................................................................................... 6
Power ON/Mute/OFF Button............................................................................................. 6
Remote Control Features................................................................................................... 7
Identifying the Control Buttons and Inputs of the PIAB ............................................. 8
Getting Started
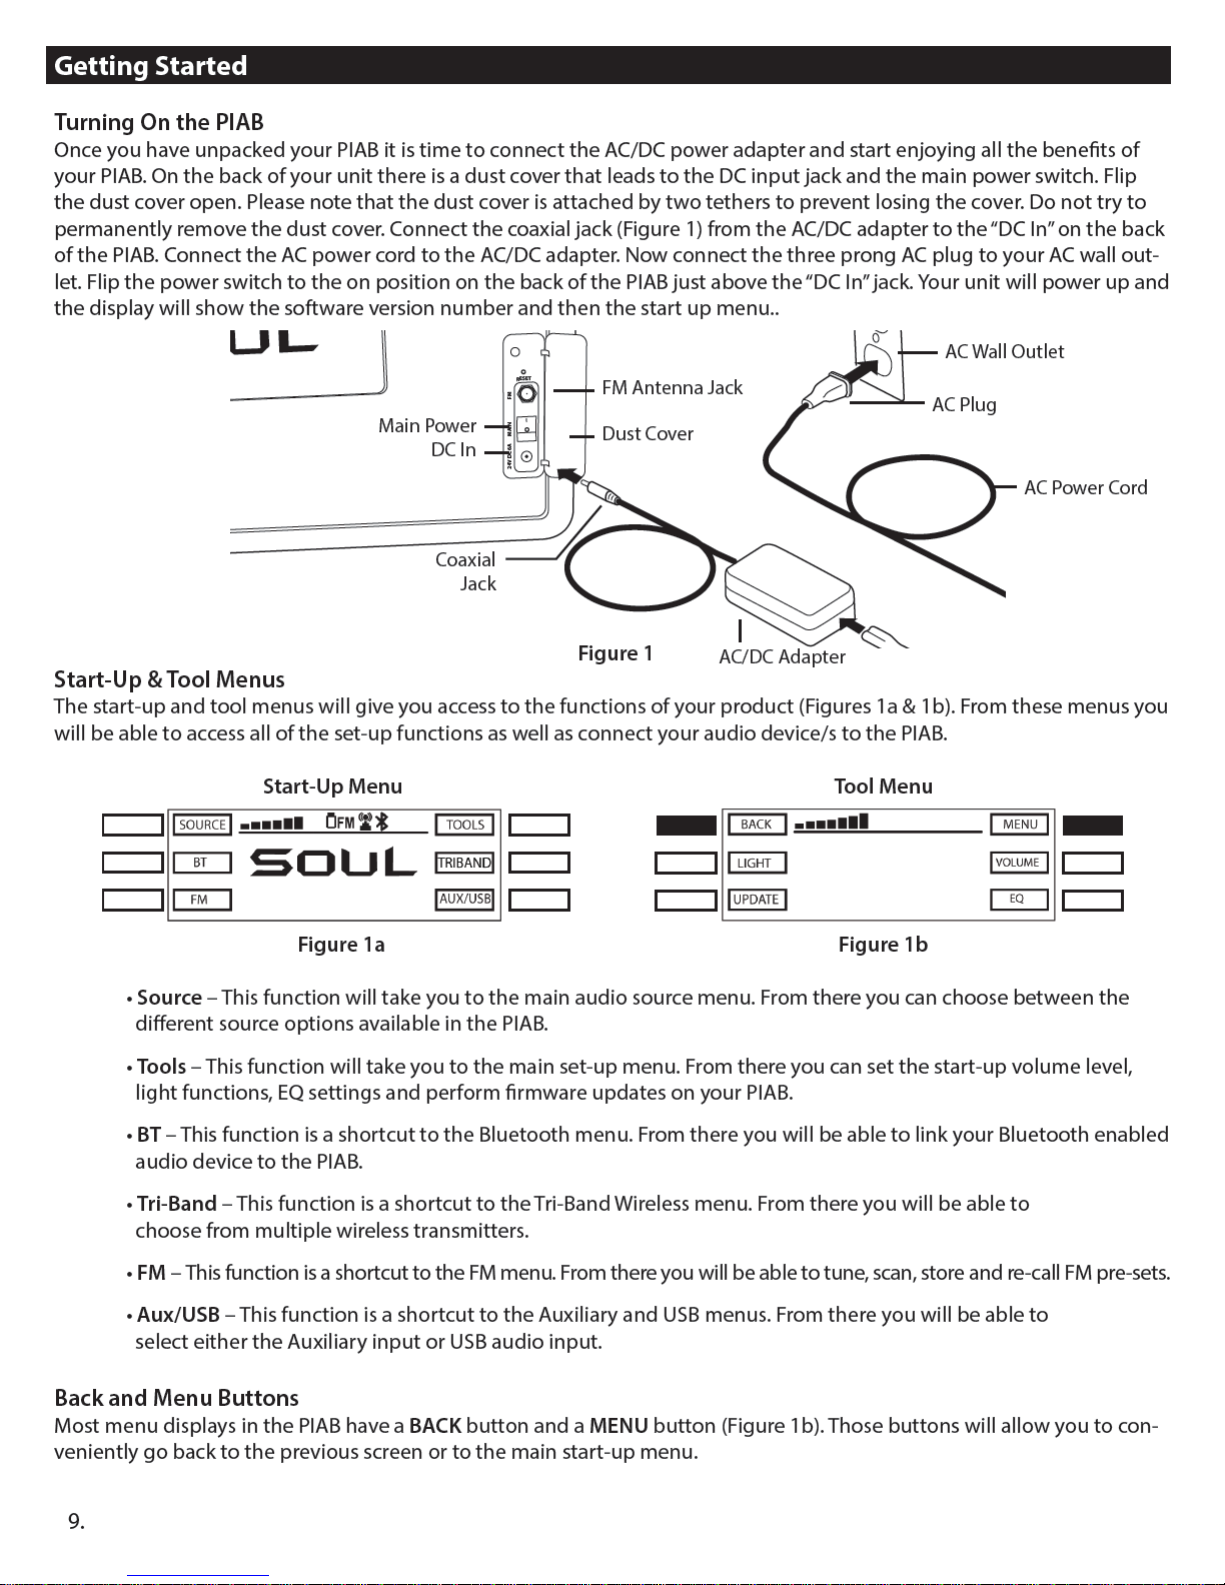
Turning On the PIAB................................................................................................................... 9
Start-Up and Tool Menus.......................................................................................................... 9
Back and Menu Buttons............................................................................................................ 9
Using the Source Menus of the PIAB
Bluetooth Audio Source ........................................................................................................... 10
Wireless Tri-Band Source........................................................................................................... 10 – 12
FM Source ...................................................................................................................................... 12 – 13
Auxiliary/USB Source ................................................................................................................. 13
Microphone/PA/Karaoke Source ........................................................................................... 14
Headphone Output Source..................................................................................................... 15
Using the Tools Menus of your PIAB
VolumeToolMenu...................................................................................................................... 16
Light Tool Menu........................................................................................................................... 17
EQ Tool Menu................................................................................................................................ 18
Firmware Software Update...................................................................................................... 18 – 19
Charging and Installing Optional Battery ...................................................................... 19
Maintaining & Cleaning the PIAB..................................................................................... 20
Trouble Shooting Guide..................................................................................................... 20 – 21
Warranty Information......................................................................................................... 22
4.

Introduction
Thank you for purchasing the Party in a Box (PIAB). To ensure proper operation, please read this owner’s manual carefully
before using the product. After using the manual be sure to keep it for future reference.
Your Party in a Box is a portable wireless entertainment system that can be used indoors and outdoors. It can be powered
by the included AC/DC adapter or the optional battery. This manual will cover all of the features of your Party in a Box.
Please be sure to follow each of the operational guidelines as described in this manual to ensure the best possible experi-
ence from your product.
Note: For future reference in this manual the Party in a Box will be referred to as the PIAB.
Party In A Box Features and Benets
P910B
5.
•Omnidirectional 8 Speaker Hybrid System - Powerful 8
speaker system with side ring dual 6.5”subwoofers, 3”
midrange speakers, and 1”tweeters. In addition to front ring
dual 1.5” mid-range drivers..
•Digital Signal Processing - For precision balancing and
mixing of bass, mids and highs. Also allows multiple EQ
curves on your PIAB.
•Bluetooth with aptX® Audio - Stream music wirelessly from
your Bluetooth enabled devices. aptX audio coding delivers
CD quality wirelessly over Bluetooth.
•CD Quality Uncompressed Tri-Band Wireless - Two-way
transceiver allows synching of more than one PIAB, wireless
speakers and other sources.
•FM Radio with RDS - Listen to your favorite FM stations. RDS
tuner displays the artist name and song on your display when
the station is broadcasting in RDS. External FM antenna and
memory pre-sets.
•Auxiliary Audio Input - Allows connection of most audio
devices through the built-in 3.5mm audio input.
•Balanced Microphone Input-Forhigh-qualityVoice/PA.
•Karaoke - Allows users to sing along with their favorite songs.
•Headphone Jack - For connecting your favorite SOUL
headphones when private listening is required.
•USB Charging Port and Media Playback - Allows for charging
of mobile devices through the USB port and playback of audio
les through a USB stick.
•Programmable Multi-Color Perimeter Light - For setting the
perfect mood or ultimate party.
•VU Analogue Meters-TheVUmetersdisplaythecurrent
voltage output of the PIAB. Watch the needles jump back and
forth with the music playing on the PIAB.
•IR Remote Control - Control the PIAB from the comfort of
your bed or couch.
•On Board Controls - Full function controls located on your PIAB.
•LCD Panel - Displays the current function on an easy to read
display panel.
•Carry Handle - Convenient carry handle makes it easy and
safe to transport your PIAB from place to place.
•AC/DC Power-110Vto240VAC50/60Hzpowersupplyallows
you to use the PIAB in most locations around the world.
•Side Mounted Guitar Pins - Fit any standard guitar strap to
easily carry PIAB over shoulder.
•Rechargeable Batteries - (Optional) Rechargeable batteries
gives the PIAB true portability when AC power is not available
such as the beach or park.


Using the Source Menus of the PIAB
If you are using your PIAB to transmit a signal to another source such as another PIAB or other product with an open KleerNet
protocol then you are ready to pair with the receiving device. If the PIAB is in receiving mode from prior use select the TX
button from the menu. The menu will now display TX in the center of the display (Figure 5) and will also show the options for
Mode selection (Stereo or Mono). In addition you will see the Pairing button that will allow you to link to another device and
the RX button that will allow you to change your PIAB from transmitting to a receiving mode. If you plan to receive an audio
signal from another source such as another PIAB or other KleerNet enabled device then you will select the RX button (Figure
6) from the menu. The new menu will now display RX Disconnect in the center of the display (Figure 7) and will also show the
options for Mode selection (Stereo or Mono) of the PIAB. In addition you will see the Pairing button that will allow you to link
to another device and the TX button that will allow you to change your PIAB from a receiving to a transmitting mode. Finally
you will see a Link button that will allow you to select from up to three dierent transmitting sources.
Tri-Band Pairing Menu Tri-Band Pairing Menu
Figure 6 Figure 7
Note: Each source must be paired with the PIAB by pressing the Pairing button on the PIAB (Figure 7) and your device.
Once the connection has been made you will see the display change to RX Connected (Figure 8). If you have previously
linked your PIAB to another device you should not be required to link again. In the event that the link has been lost or
erased then follow the steps above to link again.
The next step in the receiving mode is to link your PIAB with one of the transmitting sources available to you. From the
Tri-Band pairing menu select the Link button (Figure 8), once selected your display will change to the Tri-Band link menu
(Figure 9).
Start-Up Menu Tri-Band Pairing Menu
Figure 8 Figure 9
After Selecting one of the three sources (Figure 9) the display will change to the selected Link menu (Figure 10). From this
menu you will be able to select between channels 1, 2, 3 and 4. After selecting the desired channel your PIAB will be ready
to receive the audio signal source from that channel. To listen to another channel simply select a dierent channel from
the Link Menu. Note: if the transmitting source is only broadcasting one channel the above option will not be necessary.
Also if there is no signal source detected the PIAB will not change menus.
Start-Up Menu Tri-Band Pairing Menu
Figure 10 Figure 10B
If you are using multiple PIAB’s you have the option of setting each unit to play in Stereo (Left and Right Channel) or in
Mono (Left or Right Channel). The PIAB will always play in Stereo unless you select Mono in the Audio Mode Menu. From
the Tri-Band Pairing Menu’s (Figures 6 or 7) you can select the Mode Button that will take you to the Audio Mode Menu
11.

12.
Using the Source Menus of the PIAB
(Figure 10B). From there you can change the Audio Mode to play just the left channel or the right channel and you can
change back to Stereo as well. Once you have selected the channel you want to play the display will say Stereo, Left or
Right in the center of the display. This feature is benecial when you have more than one PIAB and you want to set them
close to each other but also want to hear a true channel separation during playback.
FM Source
From the start up menu you can select the FM shortcut button (Figure 11) once selected the display will change to the FM
menu (Figure 12) where you can choose between the FM tuning menu and the Presets menu.
Start-Up Menu FM Menu
Figure 11 Figure 12
Selecting the FM Tune button (Figure 12) will take you to the FM Tuning Menu (Figure 13). From there you will be able to
change the station frequency up or down one step at a time. If you hold the tune up or tune down button for two
seconds the frequencies will change faster until you release the button. You can also scan to the next active station auto-
matically by pressing the scan up or scan down buttons (Figure 14). In order to automatically change stations again
press the scan button once more.
FM Tuning Menu FM Tuning Menu
Figure 13 Figure 14
Storing and Re-calling Your Favorite FM Stations
The PIAB has two memory banks that can store up to 4 stations each. Once you have tuned to one of your favorite sta-
tions you are only a few steps away from storing that station into memory. From the FM Tuning menu you will select the
Store button (Figure 15). The display will change to the FM1 memory bank (Figure 16). From this menu you will hold down
the button for two seconds next to the location you want to store that station. If all the banks are used then press the
FM2 button which will take you to FM2 memory bank. If all of the memory banks are used you can store over an existing
location by pressing the button down for two seconds. Please note once you have stored a new station over an existing
memory location the previous station will no longer be available from your stored presets.
FM Tuning Menu FM1 Memory Bank
Figure 15 Figure 16
To access any of the stored stations select Presets from the FM Menu (Figure 17). Selecting presets will take you to the rst
memory bank FM1. From there you can select any of the stored stations from either bank (Figure 18).


Using the Source Menus of the PIAB
Microphone/PA/Karaoke Source
From the start-up menu you can enter the secondary source menu that will give you access to the Microphone/PA/Kara-
oke menu. Select the Source button (Figure 28) to gain access to the secondary source menu. From this menu select the
MIC button (Figure 29) which will give you access to the Microphone and Karaoke menu of the PIAB.
Start-Up Menu Source Menu
Figure 28 Figure 29
Once you have reached the Microphone/PA/Karaoke menu you can use your PIAB as a PA system or a sing along karaoke
entertainment system. To access the microphone/PA feature select the MIC/PA button (Figure 30) this will turn on the
microphone and it will be ready to use. You will see the words MIC ON for a couple of seconds displayed on the screen. To
turn o the microphone/PA feature simply press the MIC/PA button once again and you will see the words MIC O dis-
played on the screen.
Note: You can increase the PA volume by using the volume buttons located on the left side and by pressing the MIC button on the mixer.
Microphone/PA/Karaoke Menu Microphone/PA/Karaoke Menu
Figure 30 Figure 31
From the Microphone/PA/Karaoke menu you can access the Karaoke functions of the PIAB. The rst thing you will have to
do is to select KARAOKE from the menu (Figure 31). Once selected you are ready to choose between the dierent sources
of the PIAB to sing along with. Please note there are two Karaoke menus to choose from. You can access the second menu
by pressing the More button (Figure 32) and go back to the rst menu by pressing the More button (Figure 33) from the
second menu.
Karaoke Source Menu 1 Karaoke Source Menu 2
Figure 32 Figure 33
You can adjust the balance between the music and the microphone from the MIC/PA/Karaoke menu before selecting the Ka-
raoke source. It is preset in the middle but you may want to adjust depending on the song. Once you have selected the music
source you will also be able to adjust the balance. From the source menu you selected press and hold the Back button for 2
seconds until the mixer bar shows on your screen. Use the volume up and down buttons on the upper left side of your PIAB
to adjust the balance. Press the volume up to increase the music volume and the volume down button if you want to increase
the microphone volume. Please note that increasing one will decrease the other. The mixer will remain on your display for 6
seconds and then disappear. If you need to make further adjustments hold the back button down for 2 seconds again.”
14.

Using the Source Menus of the PIAB
Headphone Output Source
On the right side of the PIAB is a headphone jack that you can use when private listening is required. Simply plug your
favorite SOUL Headphones into the headphone jack (Figure 34) and the internal speakers of the PIAB will be disabled.
Note: The PIAB has a ¼”jack so a ¼” to 1/8”adapter may be needed.
Figure 34
15.
Or
TV
USB Stick
Headphone
Adapter

Using the Tools Menus of the PIAB
Using the Tools Menus of your PIAB
YourPIABincludesatoolsmenuthatgivesyouaccesstotheLights,Volumesettings,SoftwareUpdatesandEQsettings.
From these sub menus you will be able to set the light ambience of the PIAB as well as select a pre-set volume level that
your PIAB will always start at. In addition we will do periodic software updates to help improve the user experience of the
PIAB. These updates can be found on our website (www.soulelectronics.com)or through our customer service department
(1-800-566-7685). Updating the software is a simple process and only takes a few minutes. Finally we all know that music
sounds better if you can control the frequency output through an equalizer. We have created 12 pre-set EQ curves cover-
ing everything from Hip Hop to Country music and everything in between. The EQ curves will denitely enhance your
listening experience. Below are the instructions to access all of the features mentioned above.
Volume Tool Menu
In order to prevent damage to your equipment or your hearing we have preset the start up volume level of the PIAB. This
will prevent any sudden high output level that could cause damage or injury.
You do have the option to change the pre-set volume level on your PIAB. From the start-up menu select the Tools button
(Figure 35). From the Tool menu select the Volumebutton(Figure36)thiswillgiveyouaccesstotheVolumePresetMenu
(Figure 37). From this menu you can set the preset volume level Up or Down until you nd the desired setting. Once you
have selected the volume level press the Set button (Figure 37) to save the desired setting. From that point on every time
you turn the PIAB on it will start at the volume level you have preset.
You may also change the volume level at any time from the volume Up and Down buttons located on the upper left hand
corner of the PIAB. The PIAB can be placed in Mute mode by pressing the Power button once and releasing. You will see an
image of a speaker with an X across it on the LCD display (Figure 38). To unmute press the Power button again.
Start-Up Menu Tool Menu
Figure 35 Figure 36
Volume Preset Menu Start-Up Menu
Figure 37 Figure 38
Note: On page 4 of this manual you will nd information and a chart to help you understand the eects of loud noises on
your hearing.
16.

Using the Tools Menus of the PIAB
Light Tool Menu
From the start-up menu you can select the Tools button (Figure 39) to gain access to the Tool menu. From the Tool Menu
press the Light button (Figure 40) to gain access to the Light Menu. From the light menu you will be able to turn the lights
on and o as well as select the color of the light that will appear on the perimeter of the PIAB. You will also be able to
select the way the light is displayed. For example, the lights can be a xed color, set to a random color or beat to the music.
Finally you can set the contrast on your display brighter or dimmer depending on your preference.
Start-Up Menu Tool Menu
Figure 39 Figure 40
From the Light Menu the rst choice is to turn the lights on or o by selecting the On or O button (Figure 41). Please
note as you press the button the button display will change to either ON or OFF but will not change the actual menu you
are in. After turning the light on your next step is to select the color of the perimeter light by pressing the Color button
(Figure 41) that will give you access to the Color Selection menu (Figure 41a). You will have a choice between Blue, Red,
Green or Purple.
Light Menu Color Selection Menu
Figure 41 Figure 41a
After selecting the color you can also select if you want the PIAB to change colors randomly or beat to the music. From the
Light Menu select either Random, Party or both buttons (Figure 41).
Adjusting the Display Contrast
From the Light Menu select the Bright button (Figure 42) that will give you access to the Contrast Control Menu (Figure
43). From that menu you can increase or decrease the contrast on your display until you nd the desired setting. The con-
trast setting you selected will be saved automatically until you change the setting again.
Light Menu Contrast Control Menu
Figure 42 Figure 43
17.

Using the Tools Menus of the PIAB
EQ Tool Menu
From the start-up menu select the Tools button (Figure 44) to access the Tool Menu. From the Tool Menu select the EQ
button (Figure 45) to gain access to the rst EQ preset menu. Please note there are a total of four EQ Preset menus. You can
access each menu by selecting the More button (Figures 46 to 48). Each time you press the more button the screen will
change to the next set of EQ presets. Once you have reached the nal preset menu and press more again it will take you
back to the rst EQ preset menu.
Start-Up Menu Tool Menu
Figure 44 Figure 45
EQ Preset Menu 1 EQ Preset Menu 2
Figure 46 Figure 47
EQ Preset Menu 3 EQ Preset Menu 4
Figure 47 Figure 48
Note: The PIAB has been preset to the FLAT EQ setting at the factory.
Firmware Software Update
From the start-up menu select the Tools button (Figure 49) to access the Tools Menu. From the Tool Menu select the Up-
date button (Figure 50) to gain access to the Firmware Update Menu.
Start-Up Menu Tool Menu
Figure 49 Figure 50
18.

Table of contents


 manual")


