Sound Sation Scenesplit 6 Truss User manual

Please read this manual carefully and proper take care of this manual.
USER MANUAL
1 Input / 6 Outputs
DMX Distributor
Leggete questo manuale e conservatelo per future consultazioni!
MANUALE utente

TABLE OF CONTENTS
1. 1. INTRODUCTION ....................................................................................................5
1.1. Unpacking.................................................................................................................................................................5
1.2. Accessories...............................................................................................................................................................5
2. FRONT & REAR PANEL..............................................................................................5
3. MAINS CONNECTIONS .............................................................................................6
4. DMX CONNECTION...................................................................................................7
4.1. Building a Serial DMX Chain..............................................................................................................................7
4.2. DMX Terminator .....................................................................................................................................................8
4.3. 3-Pin vs 5-Pin DMX cables .................................................................................................................................8
5. SPECIFICATIONS ........................................................................................................9
6. WARRANTY AND SERVICE .....................................................................................10
7. WARNING.................................................................................................................10
Dear customer,
First of all thanks for purchasing a SOUNDSATION® product. Our mission is to satisfy
all possible needs of musical instrument, professional audio and lighting users offering
a wide range of products using the latest technologies.
We hope you will be satised with this item and, if you want to collaborate, we are
looking for a feedback from you about the operation of the product and possible im-
provements to introduce in the next future. Go to our website www.soundsationmusic.
com and send an e-mail with your opinion, this will help us to build instruments ever
closer to customer’s real requirements.
One last thing: read this manual before using the instrument, an incorrect operation
can cause damages to you and to the unit. Take care!
The SOUNDSATION Team
IMPORTANT SAFETY SYMBOLS
The symbol is used to indicate that some hazardous live terminals are
involved within this apparatus, even under the normal operating con-
ditions, which may be sufcient to constitute the risk of electric shock
or death.
The symbol is used in the service documentation to indicate that spe-
cic component shall be replaced only by the component specied in
that documentation for safety reasons.
Protective grounding terminal
Alternating current/voltage
Hazardous live terminal
Denotes the apparatus is turned on
Denotes the apparatus is turned off
WARNING: Describes precautions that should be observed to prevent the danger
of injury or death to the operator.
CAUTION: Describes precautions that should be observed to prevent danger of
the apparatus.
TAKING CARE OF YOUR PRODUCT
fRead these instructions
fKeep these instructions
fHeed all warning
fFollow all instructions
Water / Moisture
The apparatus should be protected from moisture and rain and can not be used near
water; for example near a bathtub, a kitchen sink, a swimming pool, etc.
Heat
The apparatus should be located away from heat sources such as radiators, stoves or
other appliances that produce heat.
Ventilation
Do not block areas of ventilation opening. Failure to do could result in re. Always
3
ENGLISH
SCENEsplit 6 truss User manual

install according to the manufacturer’s instructions.
Object and Liquid Entry
Objects do not fall into and liquids are not spilled into the inside of the apparatus for
safety.
Power Cord and Plug
Protect power cord from being walked on or pinched particularly at plugs, convenience
receptacles, and the point where they exit from the apparatus. Do not defeat the safety
purpose of the polarized or grounding-type plug. A polarized plug has two poles; a
grounding-type plug has two poles and a third grounding terminal. The third prong is
provided for your safety. If the provided plug does not t into your outlet, refer to an
electrician for replacement.
Power Supply
In case of external power supply, the apparatus should be connected to the power sup-
ply only of the type as marked on the apparatus or described in the manual. Failure to
do could result in damage to the product and possibly the user. Unplug this apparatus
during lightning storms or when unused for long periods of time.
Fuse
To prevent the risk of re and damaging the unit, please use only of the recommend-
ed fuse type as described in the manual. Before replacing the fuse, make sure the unit
turned off and disconnected from the AC outlet.
Electrical Connection
Always disconnect from the power source before servicing or replacing fuse and be
sure to replace with same fuse size and type. Cut off power before moving, repairing
and cleaning the unit. Improper electrical wiring may invalidate the product warranty.
To avoid electric shock, all xtures must be connected to circuits with a suitable ground.
Do not power on and power off the xture in a short time.
DMX connection
When use DMX controller, please make sure that there is no interference sources (e.g.
intercom, high frequency radio waves and radiation source).
Cleaning
Clean only with a dry cloth. Do not use any solvents such as benzene or alcohol.
Servicing
Do not implement any servicing other than those means described in the manual. Refer
all servicing to qualied service personnel only. Only use accessories/attachments or
parts recommended by the manufacturer.
4
ENGLISH
Scenesplit 6 truss User manual

1. 1. INTRODUCTION
Thank you for purchasing our SCENESPLIT 6 TRUSS. You now own a professional 1IN -
6OUTs DMX distributor with following features:
fSeparate high voltage protection on each Outputs
fHigh quality power supply stage for maximum stability at wider range voltage input
fHigh quality Fairchild®optical coupler for maximum isolation
fGolden plated XLR Connector for improved conductivity
This user manual is made to provide both an overview of controls, as well as informa-
tion on how to use them. In order to help you to understand the connections between
the various controls, we have gathered in groups according to their functions.
1.1. Unpacking
Your SCENESPLIT 6 TRUSS splitter was carefully packed to ensure safe transport. De-
spite this, we recommend you to carefully examine the package and its contents for any
signs of physical damage, which can occur during transport. It is composed by follow-
ing parts:
f1x SCENESPLIT 6 TRUSS unit
f1x Power cable
fThis User Manual
ATTENTION: Packaging bag is not a toy! Keep out of reach of children!!! Keep
in a safe place the original packaging material for future use.
1.2. Accessories
SOUNDSATION can supply a wide range of quality accessories that you can use with
your DMX controller, like Cables, Splitters, Stands, and a wide range xtures.
All products in our catalogue has been long tested with this device so we recommend
to use Genuine SOUNDSATION Accessories and Parts.
Ask your SOUNDSATION dealer or check out our website www.soundsationmusic.com
for any accessories you could need to ensure best performance of the product.
5
ENGLISH
SCENEsplit 6 truss User manual
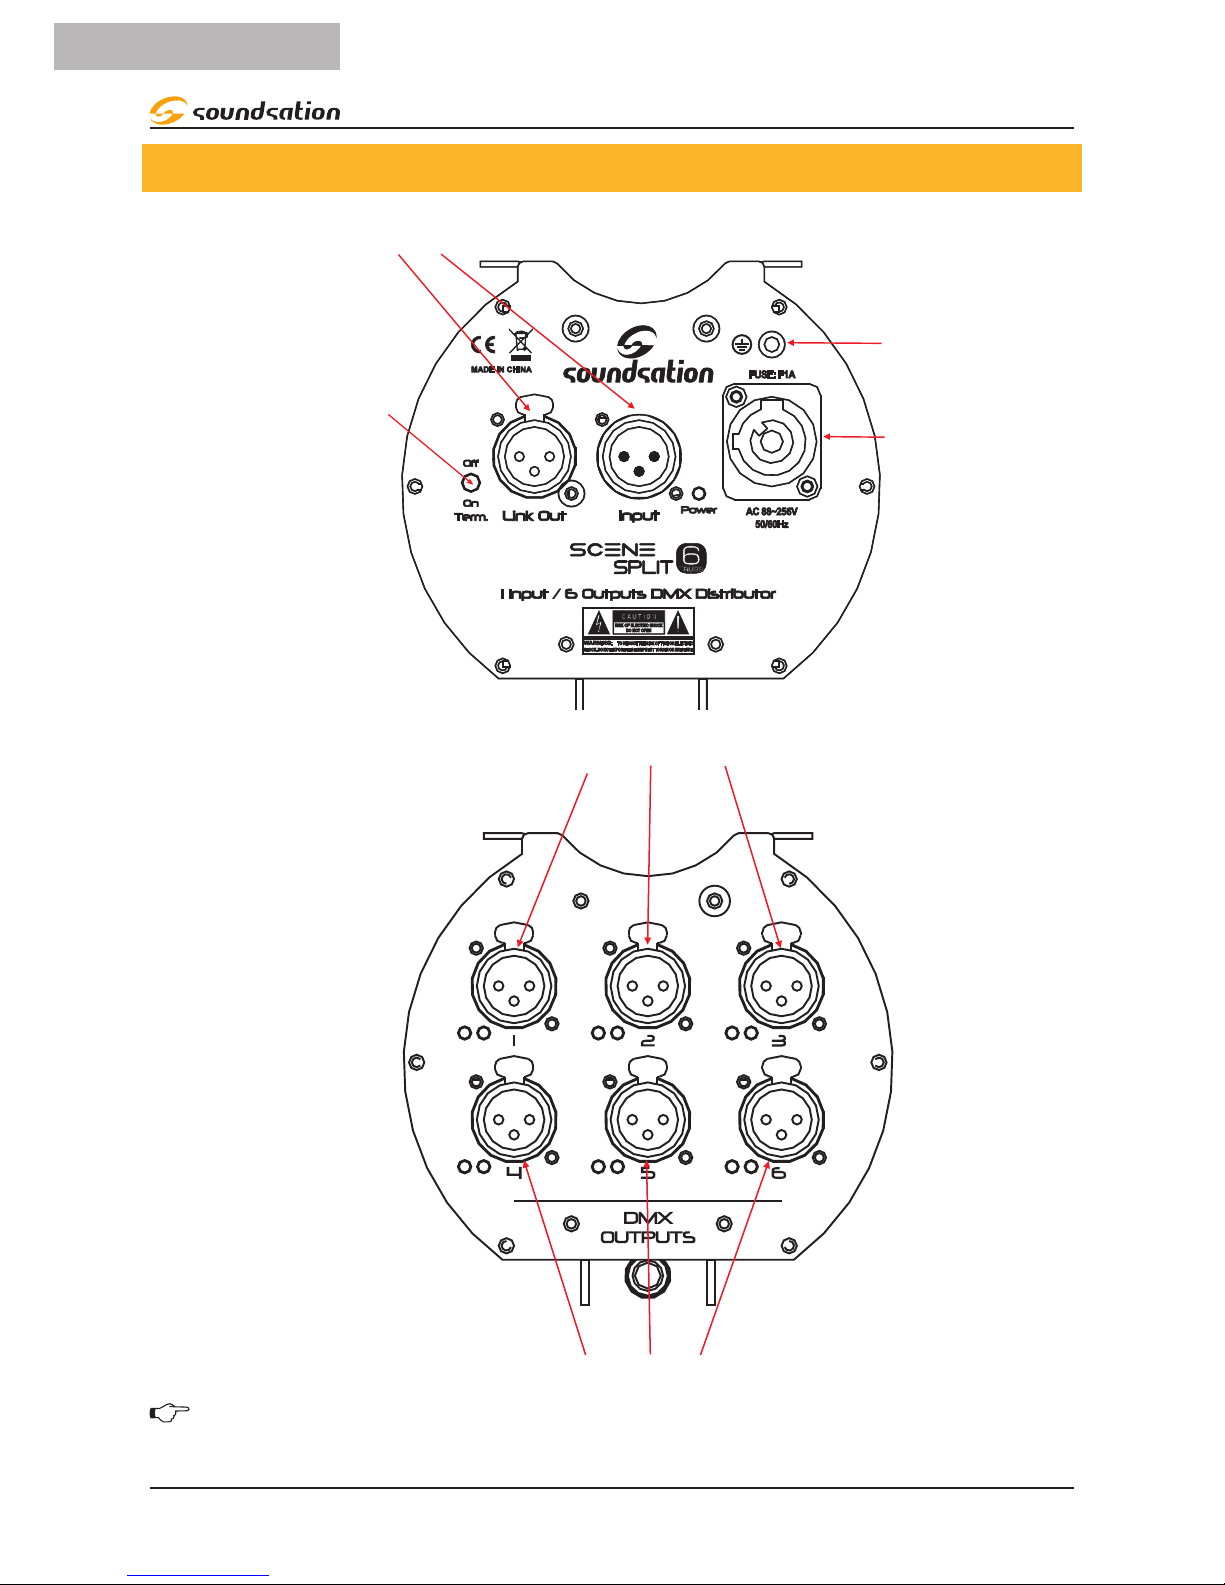
2. FRONT & REAR PANEL
DMX IN/THRU Connectors
Earth Terminal (*)
AC88~256V
Input Voltage
Termination On/Off
for DMX THRU Port
DMX Outputs 1 ~ 3
DMX Outputs 4 ~ 8
NOTE (*): It is highly recommended to connect this terminal to main electri-
cal earth for security reasons. Always pay attention to safety!
6
ENGLISH
Scenesplit 6 truss User manual
3. MAINS CONNECTIONS
Connect the device to the mains with the power-plug. The wire correspondence is as
follow:
Cable Pin International
Brown Live L
Blue Neutral N
Yellow/Green Earth
The earth must to be connected! Pay attention to the safety! Before taking
into operation for the rst time, the installation has to be approved by an
expert.
4. DMX CONNECTION
There are 512 channels in a DMX-512 connection. Channels may be assigned in any
manner. A xture capable of receiving DMX 512 will require one or a number of se-
quential channels. The user must assign a starting address on the xture that indicates
the rst channel reserved in the controller. There are many different types of DMX con-
trollable xtures and they all may vary in the total number of channels required.
Choosing a start address should be planned in advance. Channels should never overlap.
If they do, this will result in erratic operation of the xtures whose starting address is
set incorrectly. You can however, control multiple xtures of the same type using the
same starting address as long as the intended result is that of unison movement or
operation. In other words, the xtures will be slaved together and all respond exactly
the same.
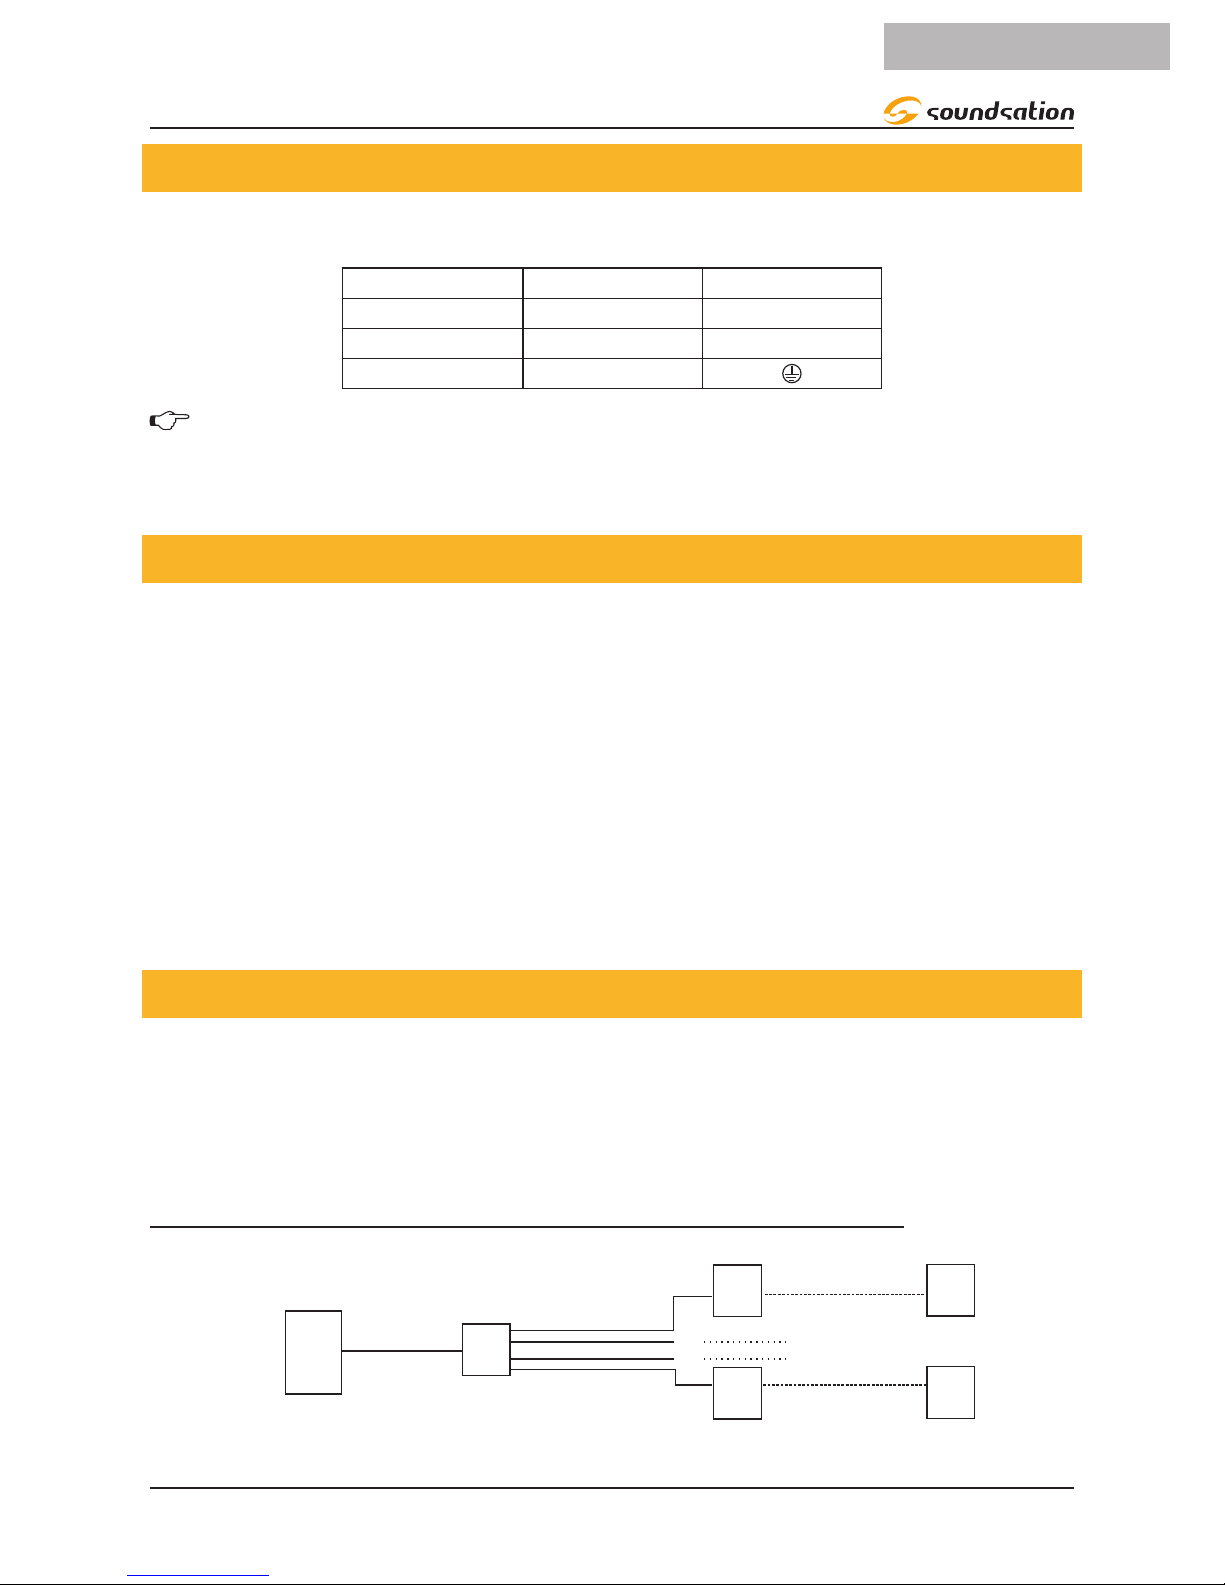
4.1. Building a Serial DMX Chain
DMX xtures are designed to receive data through a serial Daisy Chain. A Daisy Chain
connection is where the DATA OUT of one xture connects to the DATA IN of the next
xture. The order in which the xtures are connected is not important and has no effect
on how a controller communicates to each xture. Use an order that provides for the
easiest and most direct cabling.
Connect Splitter to DMX console directly
DMX controller
OUT IN
DMX
distributor
OUT 1
OUT 2
Fixture
IN
IN
Fixture
OUT
OUT
Fixture
IN
IN
Fixture
7
ENGLISH
SCENEsplit 6 truss User manual

NOTE: 32 lighting xtures maximum on each output
Connect Splitter to lighting xture rst
DMX controller
OUT IN
DMX
distributor
OUT 1
OUT 2
Fixture
IN
IN
Fixture
OUT
OUT
Fixture
IN
IN
Fixture
Fixture
IN OUT
Fixture
IN OUT
NOTE: Fixtures cannot exceed 31 units before DMX distributor and 32 units
on one output channel.
Connect xtures using shielded 2-conductor twisted pair cable with 3-pin XLR male to
female connectors. The shield connection is pin 1, while pin 2 is Data Negative (S-), and
pin 3 is Data positive (S+).
3-Pin XLR
Pin 1: GND
Pin 2: DMX -
Pin 3: DMX +
OUTPUTINPUT
DMX use of 3-Pin XLR Connectors
CAUTION: Wires must not come into contact with each
other; otherwise the xtures will not work at all, or will not
work properly.
4.2.DMX Terminator
DMX is a resilient communication protocol, however errors still occasionally occur.
In order to prevent electrical noise from disturbing and corrupting the DMX control
signals, a good habit is to connect DMX output of last xture in the chain to a DMX
terminator, especially over long signal cable runs.
The DMX terminator is simply an XLR connector with a 120Ω (ohm), 1/4 Watt resistor
connected across Signal (-) and Signal (+), respectively, pins 2 and 3, which is then
plugged into the output socket on last projector in the chain. The connections are
illustrated below.
4.3.3-Pin vs 5-Pin DMX cables
DMX connection protocols used by controllers and xtures manufacturers are not stan-
120ohm, 1/4W
resistor
DMX Terminator
8
ENGLISH
Scenesplit 6 truss User manual

dardized around the world. However, two are the most common standards: 5-Pin XLR
and 3-Pin XLR system. If you wish to connect SCENESPLIT 6 TRUSS to a 5-Pin XLR input
xture, you need to use an adapter-cable or make it by yourself.
Following the wiring correspondence between 3-Pin and 5-Pin plug and socket stan-
dards
5-Pins XLR (plug)
Pin 1: GND (Screen)
Pin 2: Signal (-)
Pin 3: Signal (+)
Pin 4: N/C
Pin 5: N/C
3-Pins XLR (socket)
Pin 1: GND (Screen)
Pin 2: Signal (-)
Pin 3: Signal (+)
5-Pins XLR (socket)
Pin 1: GND (Screen)
Pin 2: Signal (-)
Pin 3: Signal (+)
Pin 4: N/C
Pin 5: N/C
3-Pins XLR (plug)
Pin 1: GND (Screen)
Pin 2: Signal (-)
Pin 3: Signal (+)
5. SPECIFICATIONS
Power Input AC88 ~ 256Vac 50/60Hz.
Fuse F1A - 250V
Protocols DMX-512
Data Input/Outputs 3-pin XLR male (In) female (out) sockets
Data Pin Conguration Pin 1 shield, Pin 2 (-), Pin 3 (+)
Distributor Size (WxHxD): 186 x 124 x 128 mm
Net Weight 0.85 kg
Packing Dimension (WxHxD): 290 x 190 x 195 mm
Packing Gross Weight: 1.44 kg
9
ENGLISH
SCENEsplit 6 truss User manual

6. WARRANTY AND SERVICE
All SOUNDSATION products feature a limited two-year warranty. This two-year warranty is specic
to the date of purchase as shown on your purchase receipt.
The following cases/components are not covered from the above warranty:
• Any accessories supplied with the product
• Improper use
• Fault due to wear and tear
• Any modication of the product effected by the user or a third party
SOUNDSATION shall satisfy the warranty obligations by remedying any material or manufacturing
faults free of charge at SOUNDSATION’s discretion either by repair or by exchanging individual
parts or the entire appliance. Any defective parts removed from a product during the course of a
warranty claim shall become the property of SOUNDSATION.
While under warranty period, defective products may be returned to your local SOUNDSATION
dealer together with original proof of purchase. To avoid any damages in transit, please use the
original packaging if available. Alternatively you can send the product to SOUNDSATION SERVICE
CENTER – Via Enzo Ferrari , 10 – 62017 Porto Recanati - Italy . In order to send a product to service
center you need an RMA number. Shipping charges have to be covered by the owner of the prod-
uct.
For further information please visit www.soundsationmusic.com
7. WARNING
PLEASE READ CAREFULLY – EU and EEA (Norway, Iceland and Liechtenstein) only
This symbol indicates that this product is not to be disposed of with your household waste, ac-
cording to the WEEE Directive (2202/96/EC) and your national law.
This product should be handed over to a designated collection point, e.g., on an authorized one-
for-one basis when you buy a new similar product or to an authorized collection site for recycling
waste electrical and electronic equipment (WEEE).
Improper handling of this type of waste could have a possible negative impact on the environment
and human health due to potentially hazardous substances that are generally associated with EEE.
At the same time, your cooperation in the correct disposal of this product will contribute to the
effective usage of natural resources.
For more information about where you can drop off your waste equipment for recycling, please
contact your local city ofce, waste authority, approved WEEE scheme or your household waste
disposal service.
10
ENGLISH
Scenesplit 6 truss User manual

This product is imported in EU by
Questo prodotto viene importato nella UE da
FRENEXPORT SPA – Via Enzo Ferrari, 10 - 62017 Porto Recanati - Italy
www.soundsationmusic.com
Soundsation® is a registered trademark of FRENEXPORT SPA - Italy
Soundsation® è un marchio di fabbrica registrato della FRENEXPORT SPA - Italy

www.soundsationmusic.com
Ver 1.0 - July 2017
This manual suits for next models
1
Table of contents
Other Sound Sation Media Converter manuals

Popular Media Converter manuals by other brands


Moxa Technologies
Moxa Technologies IMC-P101 Series Hardware installation guide

ASEA
ASEA AC36Q-1 Operation manual

Lika
Lika ROTAPULS CB50 Series Mounting instructions

Baumer
Baumer HUBNER BERLIN HG 22 Mounting and operating instructions

TRENDnet
TRENDnet TFC-110S20D3 Specifications

Ace Plus
Ace Plus EX-G035 user manual


