Sound-X NPIPB-110 User manual

Operation Manual
Manual de uso
NPIPB-110
Alarm Clock Radio for your iPod
Radiodespertador para su iPod
IPB110 Eng SoundX.indd 1 2010/4/8 9:58:13 AM

GB - 1
CAUTION : TO REDUCE THE RISK OF ELECTRIC SHOCK, DO NOT REMOVE
COVER (OR BACK). NO USER-SERVICEABLE PARTS INSIDE, REFER SERVICING
TO QUALIFIED SERVICE PERSONNEL.
The lightning ash with arrowhead symbol, within an equilateral triangle, is intended to alert
the user to the presence of uninsulated “dangerous voltage” within the product’s enclosure
that may be of sufcient magnitude to constitute a risk of electric shock.
The exclamation point within an equilateral triangle is intended to alert the user to the presence
of important operating and maintenance (servicing) instructions in the literature accompanying
the appliance.
The symbol for Class II (Double Insulation)
WARNING
To prevent re or shock hazard, do not expose this appliance to rain or moisture.
The apparatus should not be exposed to dripping or splashing and no objects lled with liquids, such as
vases, should be placed on the apparatus.
The ventilation should not be impeded by covering the ventilation openings with items, such as
newspapers, table-cloths, curtains, etc.
No naked ame sources, such as lit candles, should be placed on the apparatus.
The electrical outlet plug is used as the disconnect device; the disconnect device should remain readily
operable.
In order to disconnect the apparatus from the electrical outlet completely, the electrical outlet plug should
be disconnected from the electrical outlet completely.
This power unit is intended to be correctly orientated in a vertical or oor mount position.
CAUTION
TO PREVENT ELECTRIC SHOCK, DO NOT USE THIS PLUG WITH ANY EXTENSION CORD, OR
OTHER OUTLET UNLESS THE PLUG CAN BE FULLY INSERTED WITHOUT EXPOSING ANY PARTS
OF THE BLADES.
FCC IMPORTANT
Since the alarm clock radio circuitry may cause interference with other radio tuners nearby, switch this
player off when not in use or move it away from an affected radio tuner.
This device complies with Part 15 of the FCC Rules. Operation is subject to the following two conditions:
(1) This device may cause harmful interference, and (2) this device must accept any interference received,
including interference that may cause undesirable operation.
Warning: Changes or modications to this unit not expressly approved by the party responsible for
compliance could void the user’s authority to operate the equipment.
NOTE: This equipment has been tested and found to comply with the limits for a Class B digital device,
pursuant to Part 15 of the FCC Rules. These limits are designed to provide reasonable protection against
harmful interference in a residential installation. This equipment generates, uses and can radiate radio
frequency energy and, if not installed and used in accordance with these instructions, may cause harmful
interference to radio communications.
There is no guarantee that interference will not occur in a particular installation. If this equipment does
cause harmful interference to radio or television reception, which can be determined by turning the
equipment off and on,the user is encouraged to try to correct the interference by one or more of the
following measures:
• Reorient or relocate the receiving antenna.
• Increase the separation between the equipment and receiver.
• Connect the equipment into an outlet on a circuit different from that to which the receiver is
connected.
• Consult the dealer or an experienced radio / TV technician for help.
This Class B digital apparatus complies with Canadian ICES-003.
RISK OF ELECTRIC SHOCK
DO NOT OPEN
IPB110 Eng 12B.indd 1 2009/7/16 2:32:05 PM

GB - 2
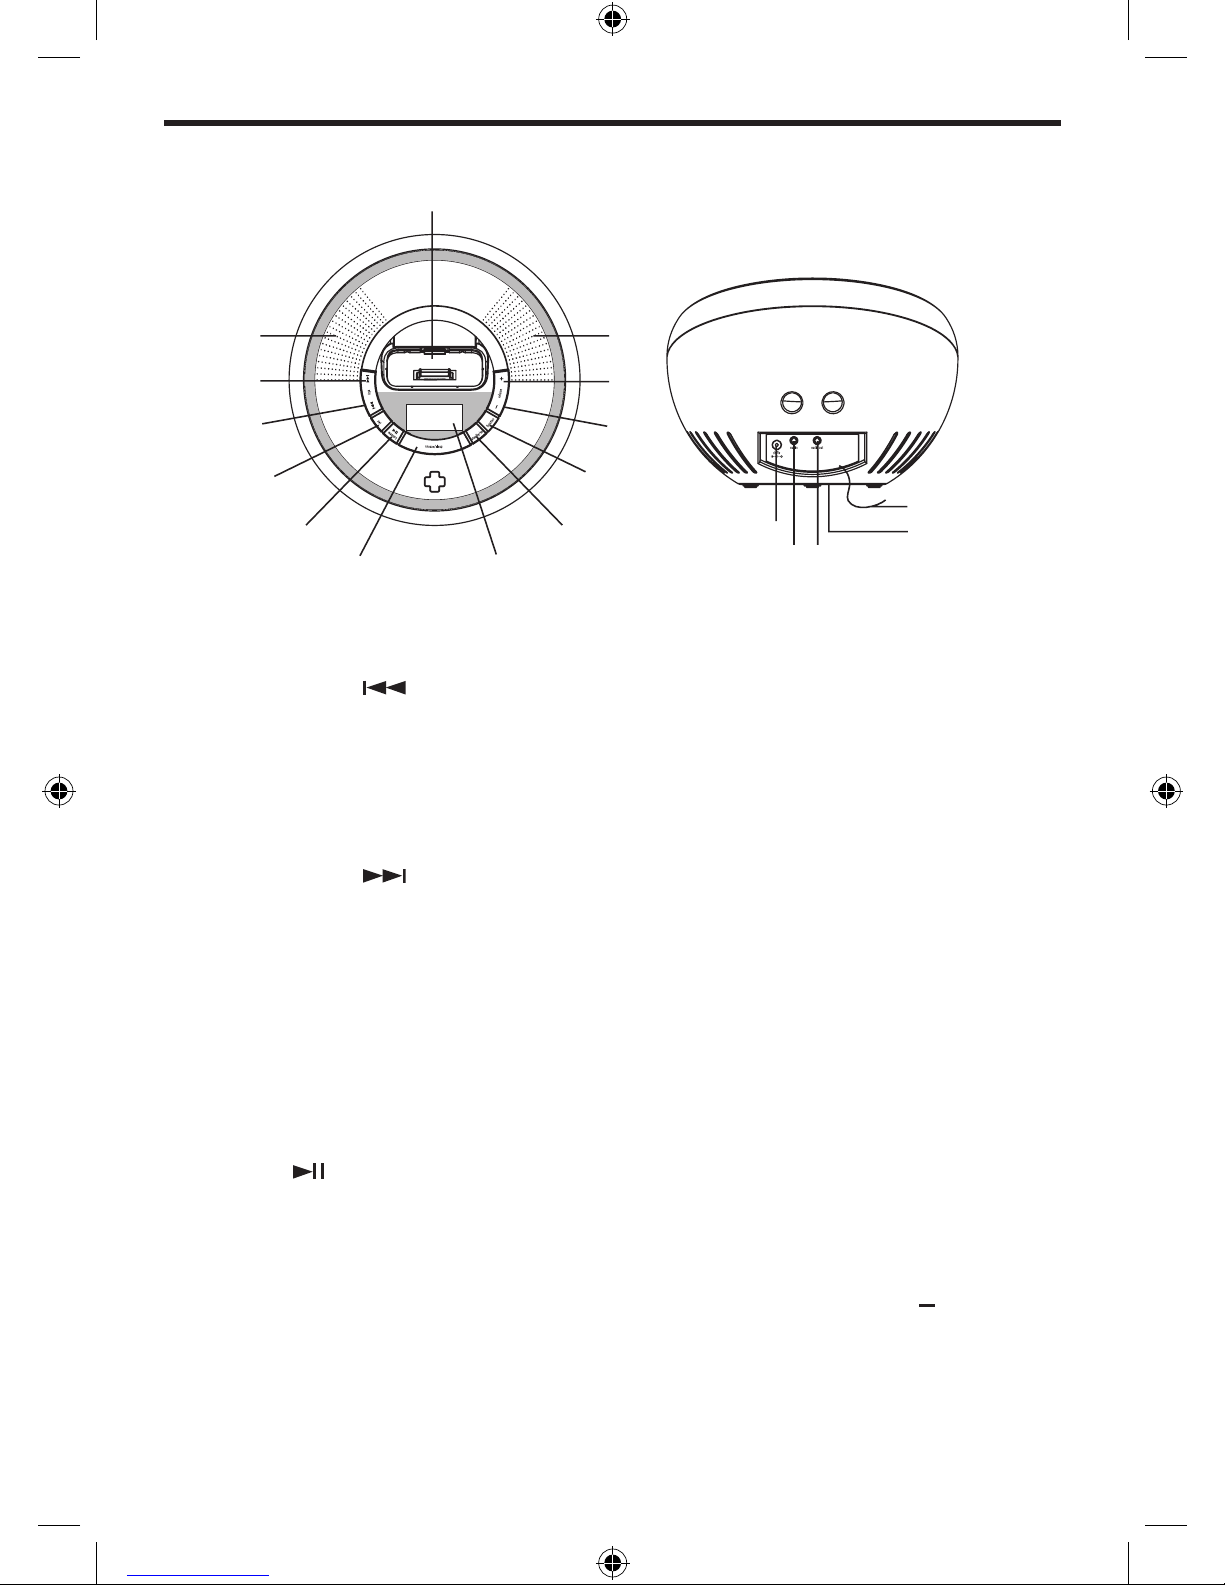
CONTROLS AND INDICATORS
1. iPod Dock
2. Speakers
3. SKIP ( ) Button
-
Radio mode: Tune down radio frequency
- iPod mode: Skip or Fast backward
while iPod is playing.
- SET mode: Select the hour while
setting time.
4. SKIP ( ) Button
-
Radio mode: Tune up radio frequency.
- iPod mode: Skip or Fast forward
while iPod is playing.
- SET mode: Select the hour while
setting time.
5. SET Button
-
Enter the time or alarm setting mode.
6. MEMORY/PLAY/PAUSE ( ) Button
-
Radio mode: Save a radio preset and
switch to the next the preset channel.
-
iPod mode: Play and Pause iPod play.
7. SNOOZE/SLEEP Button
8. DISPLAY
9. STANDBY / ON Button
- Switches the unit on or to standby.
-
Standby Mode Display: Clock and Alarm
- On Mode Display: Clock/Alarm and
Radio FM/AM/iPod/AUX mode
10. FUNCTION Button
- Normal mode: Selects Radio FM/
AM/iPod/AUX modes.
- Alarm mode: Selects alarm source
11. VOLUME - Button
- Normal mode: Adjust the sound
level lower.
- SET mode: Select the minute while
setting time.
12. VOLUME + Button
- Normal mode: Adjust the sound
level higher.
- SET mode: Select the minute while
setting time.
13. DC ... 9V IN Jack
14. AUX IN Jack
15. AUDIO OUT Jack
16. FM Wire Antenna
17. Battery Compartment
2
1
3
4
5
6
7
2
12
11
10
9
8
13
14 15
17
16
IPB110 Eng 12B.indd 2 2009/7/16 2:32:08 PM

GB - 3
AC Adapter Operation
1. Insert the DC plug (at the end of the adapter cord) into the DC input jack on the
product.
2. Plug the AC adapter into an AC power outlet socket. Only use with the recommended
9V -1.2A AC adapter and make sure the local voltage corresponds to adapter’s required
AC input voltage.
MAIN POWER SUPPLY
- Check that the power voltage as shown on the type plate corresponds to your local power
voltage. If it does not, consult your dealer or service organization.
-
Connect the AC Adapter to the wall outlet of AC power supply. As soon as you insert the
power plug into the wall outlet, the display time will ash and show . (Assuming there
is no battery for backup or battery is weak) Please see below how to set the correct time.
POWER FAILURE
If power failure occurs, the unit will switch off. As soon as the power supply returns,
will ash on the display indicating that you must reset the correct time.
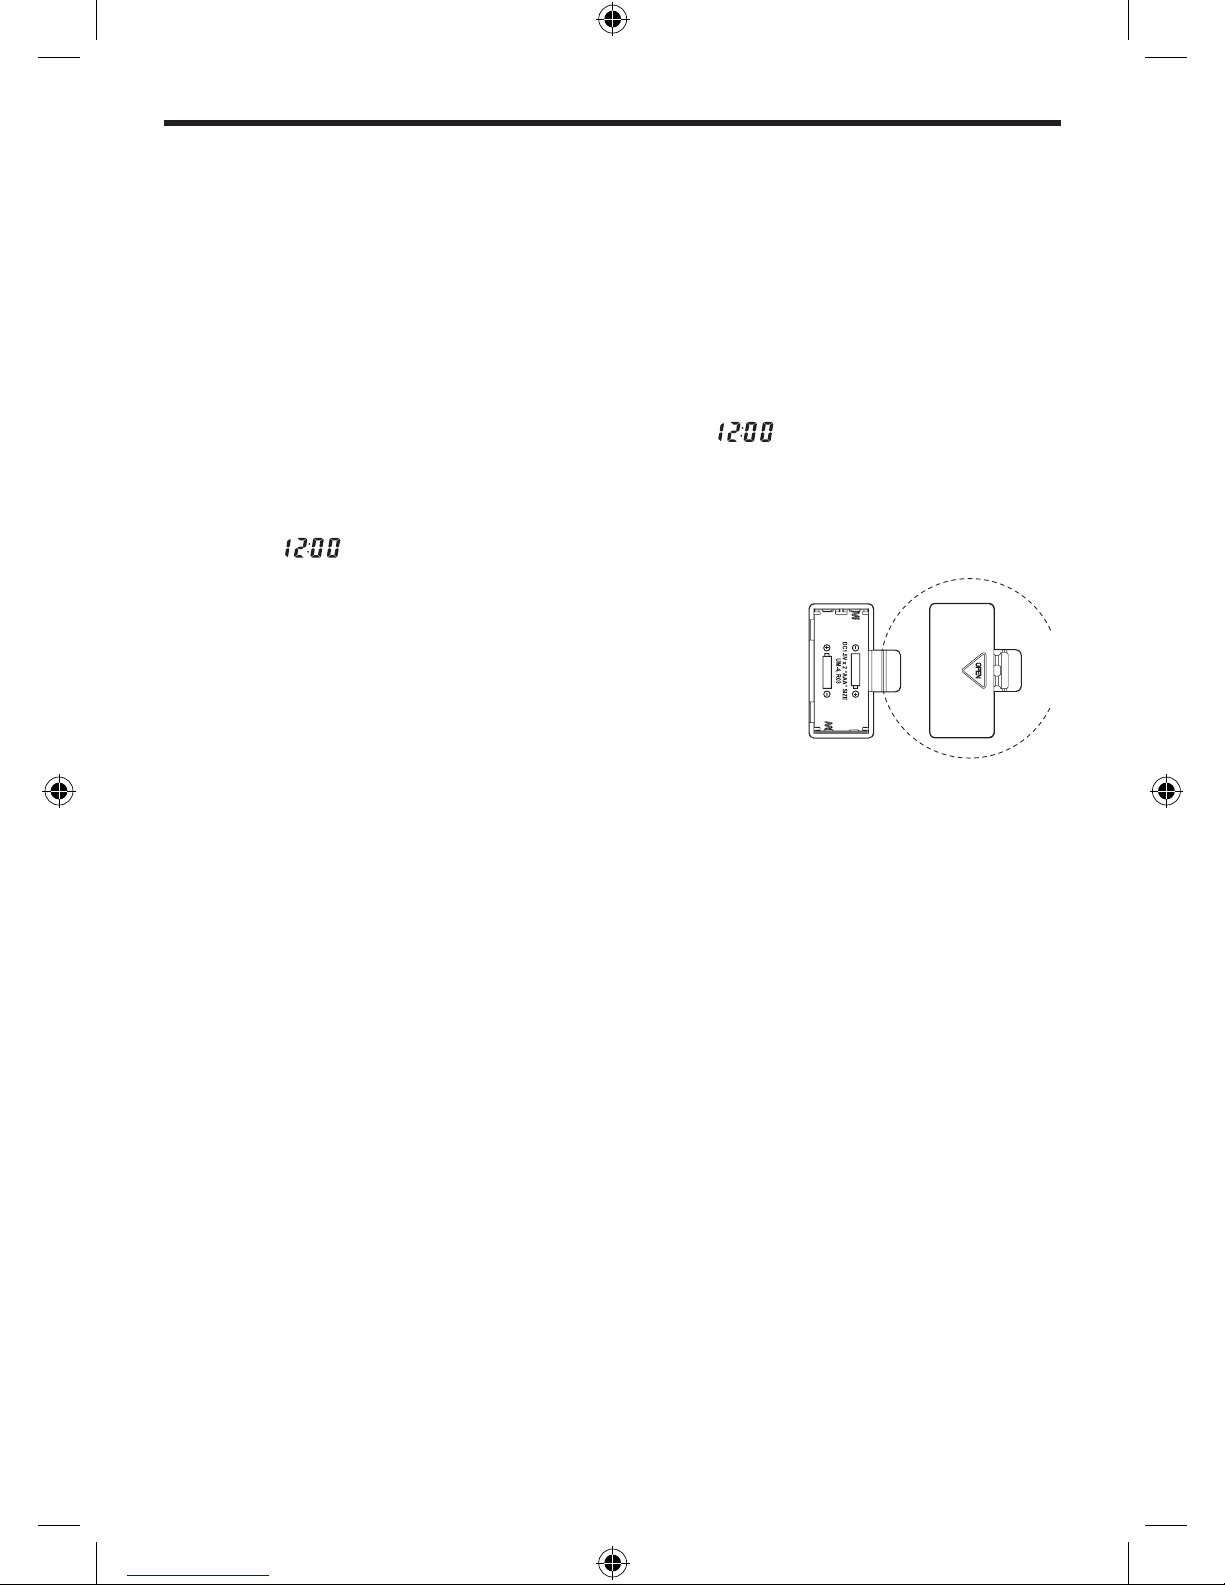
BATTERY BACK-UP SYSTEM
1. Slide the battery cover out.
2. Insert 2 “AAA” batteries into the battery compartment. In the
event of a power failure, the batteries will provide sufcient
power to maintain the time. When AC power is restored, the
correct time will be restored and will not require resetting.
• Neither the display nor the unit will operate until the unit is
connected to an AC outlet.
BATTERY WILL ONLY RESTORE CLOCK SETTINGS WHEN AC POWER IS RESTORED.
• Replace the battery once per year. The service of the battery depends on how often and
for how long the power supply fails. This varies from one region to another.
Note:
1. Always check the time and reset if necessary when rst connecting to the AC outlet or
after a power failure.
2.
The 2 batteries are used for backing up the time in case of AC power failure. When AC power
is not available, do not attempt to operate the unit, otherwise, battery life will be reduced.
BATTERY PRECAUTIONS
Follow these precautions when using batteries in this device:
1. The batteries (battery pack or batteries installed) shall not be exposed to excessive heat
such as sunshine, re or the like.
2.
Do not attempt to recharge, short-circuit, disassemble, heat or throw the batteries into a re.
3. Do not mix old and new batteries.
4. Do not mix alkaline, standard (carbon-zinc), or rechargeable (nickel cadmium)
batteries.
5. If the device is not to be used for a long period of time, remove the batteries to prevent
damage or injury from possible battery leakage.
6. Do not try to recharge batteries not intended to be recharged; they can overheat and
rupture. (Follow battery maufacturer’s directions.)
7. Dispose of batteries properly in accordance with local laws.
IPB110 Eng 12B.indd 3 2009/7/16 2:32:10 PM

GB - 4
iPod Inserts
Your System comes with removable inserts to t your iPod properly while docked. Each
insert carries a number to match your iPod. Please locate the correct one according to
below summary:
Refer to iPod MODE OPERATION chapter to operate and charge the iPod player. (Except
iPod shufe).
iPod Type
iPod mini
iPod photo
&
Color U2 iPod
iPod with
color display
iPod photo
&
Color U2 iPod
iPod with
color display
iPod nano
5G iPod with video,
U2 iPod with video
5G iPod with video
iPod nano
(2nd generation)
iPod nano
(3rd generation)
Memory
4GB & 6GB
20GB & 30GB
20GB
40GB & 60GB
60GB
2GB & 4GB
30GB
60GB & 80GB
2GB & 4GB
& 8GB
4GB & 8GB
Holder No.
Mini
Photo 20/30GB
Photo 20/30GB
Photo 40/60GB
Photo 40/60GB
Use nano (1GEN, 2GEN) holder.
1. Remove original rubber placed at left-
hand-side of the holder.
2. Replace the same rubber to the right-
hand-side of the holder.
(One additional rubber is supplied for
optional use.)
3. Please refer to follow drawing :
Video 30GB, CLASSIC 80/120GB
Video 60/80GB, CLASSIC 160GB
nano (1GEN, 2GEN) holder
nano (3 GEN) holder
IPB110 Eng 12B.indd 4 2009/7/16 2:32:14 PM

GB - 5
IMPORTANT! The identication number is engraved at the bottom
of the inserts. Please refer to the following illustration for the
location of the number.
iPod nano
(4th generation)
iPod touch
iPod touch
(2nd generation)
iPod classic
iPod classic
8GB &16GB
8GB & 16GB
8GB & 16GB &
32GB
80GB & 120GB
160GB
nano (4 GEN) holder
Touch (1 GEN) holder
Touch (2 GEN) holder
Video 30GB, CLASSIC 80/120GB
Video 60/80GB, CLASSIC 160GB
NOTE:
• The 10 inserts provided with this unit are for use with this unit only: they are not Universal Docks.
• The 3rd Generation iPod will not be recharged.
INSTALL THE iPod INSERT FOR DOCKING
1. Gently press the correct insert into the dock. (Refer to the drawing 1&2)
2. Place the iPod into the dock via the correct insert. (Refer to the drawing 3.)
3. Never pull iPod forwards or push backwards. This can damage your iPod and / or the
main unit. (Refer to the drawing 4.)
REMOVE THE iPod INSERT
1. Remove the iPod insert as shown.
2. Replace it with another one you need.
IPB110 Eng 12B.indd 5 2009/7/16 2:34:33 PM

GB - 6
Operation
- Press the STANDBY/ON button of the unit once to turn on the system.
Adjusting the volume
To adjust the volume on the unit:
Press the VOLUME +/- until the desired volume is reached. The volume level will be shown
on the display.
REAL TIME / ALARM TIME SETTING
Pressing the SET button at any time will allow you to enter the alarm and clock setting menu.
SETTING THE CLOCK
a) Press the SET button 5 times until all of the digits for the main clock are ashing.
b) Press the “SKIP ” button to decrease the hour or press the “SKIP ” button
to increase the hour. (A PM indicator appears when time is set to PM, there is no AM
indicator).
Press the “VOL - ” button to decrease the minute or press the “VOL +” button to increase
the minute.
Press and hold the SKIP / SKIP or VOL- / VOL+ button for more than 1 second
to scroll through the numbers quickly.
c) Press the SET button once to conrm and exit the time setting menu.
NOTE: If there are no key operations for 5 seconds, the unit will automctically exit the menu
and save changes.
ALARM TIME SETTING
a) Press the SET button 1 time to set alarm 1, 2 times to set Alarm 1 volume level, 3 times
to set Alarm 2, or 4 times to set Alarm 2 volume level. The relative ALARM icon will turn
on and all of the clock digits will ash when you have reached the appropriate Alarm set
menu.
When Alarm off is selected,"OFF" will show on the LCD and the alarm time cannot be
adjusted.
b) Press the FUNCTION button (when in the appropriate Alarm set menu and digits are
ashing) to select the alarm source as follows:
Alarm Off Alarm to iPod Alarm to FM Alarm to AM Alarm to Buzz
c) Press the “SKIP ” button to decrease the hour or press the “SKIP ” button
to increase the hour. (PM indicator appears when time is set to PM, there is no AM
indicator).
Press the “VOL -” button to decrease the minute or press the “VOL +” button to increase
the minute.
Press and hold SKIP / SKIP or VOL- / VOL+ button for more than 1 second to
srcoll through the numbers quickly.
d) In alarm volume setting mode, the alarm icon will be ON and the volume level will show
on the LCD with ashing. Use VOLUME +/VOLUME – button to select alarm volume
level (1 ~ 15), default is VOL10. So, when alram is activated, Alarm Buzzer/Radio/iPod
will on with alarm volume level.
e) When setting Alarm 1, Press the SET button 5 times to conrm and exit. When setting
Alarm 2, Press the SET button 3 times to conrm and exit.
NOTE: If there are no key operations for 5 seconds, the unit will automatically exit the menu
and save changes. When the alarm is in iPod mode, if the iPod is not docked the buzzer will
sound instead of the iPod.
IPB110 Eng 12B.indd 6 2009/7/16 2:34:44 PM

GB - 7
Arming and Disarming Alarm (Turn Alarm Function On and OFF)
a)
Press the SET button to reach the appropriate Alarm setting menu and press the FUNCTION
button to arm or disarm the alarm function. When armed, the alarm icon appears in display.
Resetting the Alarm to Come on the Next Day
a) When the alarm is sounding, press any button (except the SNOOZE/SLEEP button) to
stop the alarm and reset it to come on the following day.
SNOOZE
a)
Press the SNOOZE/SLEEP button after the alarm sounds.The alarm will be silenced and come on
again 10 minutes later. Snooze can be pressed several times during the 1 Hour alarm cycle.
SLEEP
The clock radio has a built-in sleep function. This function enables you to listen to the iPod or
RADIO (AM/FM) at bedtime without having to switch it off. The iPod / RADIO will automatically
switch off at the desired sleep time.
SLEEP time
The period of time you can listen to the iPod / RADIO before you fall asleep is called the sleep
time. The clock radio has 6 (six) different sleep times to choose from. Each consecutive press
of the sleep button will increase the sleep time by 10 min.(-- 10 20 30 40 50 60).
For example: If you wish to set the sleep time for 20 minutes, proceed as follows:
- Press the SLEEP button twice. 20 will appear on the display indicating that SLEEP is on
and you have a sleep time of 20 minutes.
CONNECTING TO OTHER AUDIO EQUIPMENT
Caution: Turn off power and disconnect from the DC supply before connecting any other
equipment.
• AUX IN - Connects to other audio equipment through an audio cable (not included) including
a VCR, video recorder, MP3 or non-docking iPod model to provide sound output through
the clock radio's speakers.
• AUDIO OUT - Connects to other audio equipment, including an Active Subwoofer, TV or
an amplier for alternative stereo sound. The other jack could be refered to as CD or AUX
on an amplier; LINE IN on a TV; or AUDIO INPUT on an amplier.
Note: Refer to your audio equipment guide to determine how the audio input or output port
is identied.
IPB110 Eng 12B.indd 7 2009/7/16 2:34:45 PM

GB - 8
iPod MODE OPERATION
1. Please make sure to use the correct insert for your iPod and be sure it is properly docked
into the system; failure to do so may damage your iPod.
2. No insert is provided for the iPod shufe model.
Charging the iPod
- While the iPod is docked and the system is properly connected to AC power, it is charged
automatically until it is fully charged.
- The 3rd Generation iPod will not be charged.
Listen to the iPod
1. Gently press the correct insert into the dock.
2. Place the iPod into dock via the correct insert.
3.
Press the function button to select "iPod" mode, "iPod" icon will appear on the display.
4. Press "PLAY/PAUSE/MEMORY" button of the system to play music from the iPod.
5.
Press "PLAY/PAUSE/MEMORY" button again to pause play; press again to restart play.
6. Press the volume +/- button to adjust the sound level.
7. Press SKIP ( ) or SKIP ( ) button to skip forwards or backwards, or hold the
button to fast forward or backward.
RADIO TUNER OPERATION
Listening to Radio
Please note: Extend the wire vertically on the back of the unit for better FM reception.
1. Press the function button to select FM or AM mode.
2. Press SKIP( ) or SKIP( ) to select a radio station.
Note:
• Short press SKIP( ) or SKIP( ): the receiving frequency step moves up or
down incrementally.
• If you press and hold SKIP( ) or SKIP( ) for more than few seconds, the
frequency will continue to increase or decrease automatically until a radio station is
received.
• The last tuned station is retained and recalled when you turn the system on. The tuned
station is stored into memory even if power is disconnected or cut due to temporary
power failure.
Setting Radio Stations into Memory
You may store up to 20 FM stations and 12 AM stations in the channel memory.
1. Press the FUNCTION button to select FM or AM mode.
2. Press SKIP( ) or SKIP( ) to select a radio station.
3. Press and hold the PLAY/PAUSE/MEM button to enter channel saving mode.
4. Press the PLAY/PAUSE/MEM button to select the desired preset channel number.
5. Press and hold the PLAY/PAUSE/MEM button again to save into memory. If it has been
previously set, the former station is replaced.
6. Repeat step 2 to 5 to store additional stations.
IPB110 Eng 12B.indd 8 2009/7/16 2:34:47 PM

GB - 9
Playing Preset Stations
1. Press the FUNCTION button to select FM or AM mode.
2. Press PLAY/PAUSE/MEM to select the desired preset channel.
Improving Reception
AM Reception:
- Reposition the unit to get better AM reception.
Note: Do not connect to an outside antenna.
Do not put another electronic adaptor close to the system, this may increase noise and
inuence with AM broadcasting station.
FM Reception:
- Fully unwind the FM wire antenna and position it for best FM signal reception.
CARE AND MAINTENANCE
Please disconnect the unit from the power supply before cleaning.
System
Wipe the housing gently with a soft, dry cloth. If the unit is heavily stained or soiled, wipe with
a moistened cloth. To avoid damage, do not use any cleaning agents or abrasive cleaners.
Speakers
Wipe the speakers gently with a clean, damp cloth. To avoid damage, do not use any cleaning
agents or abrasive cleaners.
IPB110 Eng 12B.indd 9 2009/7/16 2:34:47 PM

GB - 10
SPECIFICATIONS
GENERAL
Supply Voltage : DC IN 9V ... 1.2A
Power Consumption : 10.8VA
Radio Frequency Range : FM 87.5 -108 MHz
AM 520 - 1710 kHz
Power Output (speaker) : 2W per channel
Dimension (Main unit) : 200 (W) x 196 (D) x 142 (H) mm
Net Weight : 820g
AC/DC Adaptor Input : AC120V ~ 60Hz
Output : DC 9V ... 1.2A
DESIGN AND SPECIFICATIONS ARE SUBJECT TO CHANGE WITHOUT NOTICE.
TROUBLESHOOTING GUIDE
CAUSE
• Poor plug connection.
• iPod is not docked properly.
• iPod input not selected
• Improper volume level.
• Loose cable connections.
ACTION
• Insert AC power plug rmly
into AC outlet.
• Choose correct insert and
dock into system again.
• Choose "iPod" using the
function button
• Make sure that volume
controls are set properly.
Check master output level.
• Firmly connect all audio
plugs.
SYMPTOM
No power even
when POWER is
set to "ON".
Will not work with
iPod.
No sound
Humming Noise
IPB110 Eng 12B.indd 10 2009/7/16 2:34:49 PM

ES - 1
PRECAUCIÓN: PARA REDUCIR EL RIESGO DE DESCARGA ELÉCTRICA, NO QUITE
LA TAPA (O LA PARTE DE ATRÁS). NO HAY PARTES QUE EL USUARIO PUEDA
UTILIZAR, REFIÉRASE UN SERVICIO TÉCNICO CON PERSONAL CUALIFICADO.
El relámpago con punta de echa dentro de un triángulo equilátero advierte al usuario de la
presencia de “voltaje peligroso” no aislado dentro del chasis del producto, que puede ser de
la magnitud suciente para presentar un riesgo de electrocución a personas.
El punto de exclamación dentro de un triangulo equilátero está previsto para alertar al usuario
de la presencia de instrucciones importantes de funcionamiento y mantenimiento (revisión)
en la literatura que acompaña el aparato.
El símbolo para clase II (aislamiento doble)
ADVERTENCIA
Para prevenir peligro de incendio o de descarga eléctrica, no exponga el aparato a la lluvia o a la
humedad.
El aparato no debería ser expuesto a goteo o salpicaduras y ningún objeto lleno de líquido, como un
jarrón, debe colocarse sobre el aparato.
No se debe impedir la ventilación tapando las aberturas de ventilación con elementos, como son diarios,
manteles, cortinas, etc.
No se deben colocar en el aparato llamas, tales como velas encendidas.
El enchufe de corriente se usa como dispositivo de desconexión, el dispositivo de desconexión debe
estar listo para el uso.
Para desconectar por completo el aparato de la corriente, debe desconectarse el enchufe de la toma.
Esta unidad de potencia se piensa para ser orientada correctamente en una vertical o una posición del
montaje del suelo.
PRECAUCIÓN
PARA EVITAR ELECTROCUCIONES, NO USE ESTE ENCHUFE (POLARIZADO) CON CABLES
EXTENSORES U OTRAS TOMAS A MENOS QUE EL ENCHUFE PUEDA INTRODUCIRSE POR
COMPLETO SIN EXPONER NINGUNA PARTE DE LAS PATILLAS.
IMPORTANTE FCC
Ya que los circuitos del sistema de altavoces del iPod pueden causar interferencias con otros
sintonizadores que estén en las cercanías, apague este reproductor cuado no lo use o muévalo lejos del
sintonizador de radio afectado.
Este aparato cumple con las reglas de la FCC, parte 15. El funcionamiento está sujeto a las dos
condiciones siguientes: (1) Este dispositivo puede cuasar interferencias perjudiciales y (2) este
aparato debe aceptar cualquier interferencia recibida, incluidas las interferencias que pueden causar
funcionamientos no deseados.
Advertencia: Cambios o modicaciones sobre esta unidad que no hayan sido aprobados expresamente con
conformidad por la parte responsable pueden anular la autoridad del usuario para utilizar el equipo.
NOTA : Este equipo ha sido probado y se ha encontrado que cumple con los límites de la de los
dispositivos digitales clase B, según las reglas de la parte 15 de las FCC. Estos límites se han designado
para proporcionar una protección razonable contra las interferencias perjudiciales en las instalaciones
residenciales. Este equipo genera, usa y puede radiar energía de radiofrecuencia y si no se instala y usa
según estas instrucciones puede causar interferencias perjudiciales a las comunicaciones de radio.
No hay garantía de que estas interferencias no se vayan a producir en una instalación particular. Si este
equipo causa interferencias perjudiciales a la recepción de radio o televisión, que se puede determinar
encendiendo y apagando el equipo, se anima al usuario a que intente corregir las interferencias por una
o más de las medidas siguientes:
• Reoriente o recoloque la antena receptora.
• Aumente la separación entre el equipo y el receptor.
• Conecte el equipo dentro de una salida o un circuito diferente al que está conectado el receptor.
• Consulte al vendedor o a un técnico especializado en radio / TV para pedirle ayuda.
Este aparato digital de clase B cumple con las normas canadienses ICES-003.
IPB110 Spa 12B.indd 1 2009/7/16 2:39:40 PM
ES - 2
CONTROLES E INDICADORES
1. Toma iPod
2. Altavoces
3. Botón de salto ( ) Button
- Modo radio: Sintonizar la frecuencia
de radio hacia abajo
- Modo iPod: Saltar o retroceso rápido
durante la reproducción del iPod.
- Modo conguración: Seleccionar la
hora al congurarla.
4. Botón de salto ( )
- Modo radio: Sintonizar la frecuencia
de radio hacia arriba.
- Modo iPod: Saltar o avance rápido
durante la reproducción del iPod.
- Modo conguración: Seleccionar la
hora al congurarla.
5. Botón CONFIGURAR.
- Introducir la hora o modo
conguración de alarma.
6. Botón MEMORIA/REPRODUCIR/
PAUSA ( ):
- Modo radio: Guardar una memoria
de radio y cambiar al siguiente canal
preestablecido.
- Modo iPod: Reproducir y pausar el
iPod.
7. Botón REPOSO/DESCANSO
8. PANTALLA
9. Botón de ESPERA/ENCENDIDO
- Enciende y pone en espera la
unidad.
- Indicación de modo espera: Reloj y
alarma
- Indicación de modo encendido:
Reloj/alarma y modo Radio FM/AM/
iPod/AUX
10. Botón FUNCIÓN
- Modo normal: selecciona modo
radio FM/AM/iPod/AUX.
- Modo alarma: Selecciona la fuente
de alarma.
11. Botón VOLUMEN –
- Modo normal: ajusta el nivel de
sonido hacia abajo.
- Modo CONFIGURACIÓN:
Selecciona los minutos cuando se
congura la hora.
12. Botón VOLUMDN +
- Modo normal: Ajusta el nivel de
sonido hacia arriba.
- Modo CONFIGURACIÓN:
Selecciona los minutos cuando se
congura la hora.
13. Toma de ENTRADA CC ... 9V
14. Toma ENTRADA AUX
15. Toma SALIDA AUDIO
16. Antena de cable FM
17. Compartimiento de batería
2
1
3
4
5
6
7
2
12
11
10
9
8
13
14 15
17
16
IPB110 Spa 12B.indd 2 2009/7/16 2:39:43 PM
ES - 3
Funcionamiento del adaptador CA
1. Introducir la toma CC (en el extreme del cable adaptador) en la toma de entrada CC del
producto.
2. Conecte el adaptador CA en una toma de corriente. Usar solamente con el adaptador
recomendado 9V - 1,2A CA y asegúrese de que la tensión local se corresponda con la
tensión de entrada CA precisada por el adaptador.
ALIMENTACIÓN
- Compruebe que el voltaje indicado en la placa coincida con su alimentación local. Si no
es así, consulte a su vendedor u organización de servicio.
- Conecte el adaptador CA a la alimentación CA. En cuanto introduzca el enchufe en la
toma de corriente, la pantalla parpadeará y mostrará (si no hay batería de reserva
o la batería está gastada). Ver a continuación cómo congurar la hora correcta.
FALLO DE CORRIENTE
Si se produce un corte de corriente, la unidad se apagará. En cuanto vuelva la corriente,
parpadeará en pantalla, indicando que debe restablecer la hora correcta.
SISTEMA DE BATERÍA DE RESERVA
1. Deslice la tapa de la batería.
2. Inserte 2 baterías “AA” dentro del compartimiento para
baterías. En el caso de un fallo de corriente, las baterías le
proporcionarán suciente corriente para mantener la hora.
Cuando se restablezca la corriente CA, la hora correcta
se restaurará y no requerirá ningún reajuste.
• Ni la pantalla ni la unidad funcionarán hasta que la unidad se conecte a la toma de CA.
LA BATERÍA SÓLO RESTAURARÁ LOS AJUSTES DEL RELOJ CUANDO SE
RESTABLEZCA LA CORRIENTE.
•
Reemplace las baterías una vez al año. El funcionamiento de las baterías depende de cuán
a menudo y por cuánto tiempo el suministro de corriente falle. Varía de una región a otra.
Nota:
1. Compruebe siempre la hora y restablézcala si es necesaria la primera vez que conecta
a la corriente o tras un corte de alimentación.
2. Las 2 baterías se usan para tener una reserva para la hora si se corta la corriente CA.
Cuando la energía CA no esté disponible, no intente usar la unidad, o la duración de la
batería disminuirá.
PRECAUCIONES CON RESPECTO A LAS BATERÍAS
Siga las siguientes precauciones cuando use las baterías en este dispositivo:
1. Las baterías (paquete de baterías o baterías instaladas) no deben exponerse a calor
excesivo, como la luz del sol directa, el fuego o similares.
2. No intente recargarlas, generar un corto circuito, desmontarlas, calentarlas o tirarlas
dentro del fuego.
3. No mezcle las baterías nuevas con las viejas.
4. No mezcle baterías alcalinas, estándar (carbono-cinc) o recargables (níquel-cadmio).
5. Si el aparato no se va a usar durante un largo periodo de tiempo, quite las baterías para
prevenir daños o lesiones debido al goteo de las baterías.
6. No intente recargar las baterías que no estén diseñadas para ello; puede calentarlas
demasiado y romperlas. (Siga las instrucciones del fabricante de las baterías).
7. Deseche las baterías adecuadamente según las leyes locales.
IPB110 Spa 12B.indd 3 2009/7/16 2:39:44 PM

ES - 4
Adaptadores para el iPod
Su sistema viene con adaptadores desmontables para ajustar adecuadamente su iPod
cuando est acoplado. Cada adaptador lleva un número para encajar con su iPod. Localice
el correcto según el resumen de abajo:
Reérase al capítulo de MODO DE FUNCIONAMIENTO del iPod para hacer funcionar y
cargar el reproductor iPod. (Excepto el iPod shufe).
iPod Type
iPod mini
iPod photo
y
Color U2 iPod
iPod con la
visualización de color
iPod Foto
y
Color U2 iPod
iPod con la
visualización de color
iPod nano
5G iPod con vídeo,
U2 iPod con vídeo
5G iPod con vídeo
iPod nano
(2ª generación)
Memory
4GB y 6GB
20GB y 30GB
20GB
40GB y 60GB
60GB
2GB y 4GB
30GB
60GB y 80GB
2GB y 4GB
y 8GB
Holder No.
Mini
Foto 20/30GB
Foto 20/30GB
Foto 40/60GB
Foto 40/60GB
Use el soporte nano.
1. Saque la goma del lado izquierdo del
soporte.
2. Coloque la goma en el lado derecho
del soporte.
(Se incluye una goma adicional para
uso opcional)
3. Consulte la imagen siguiente:
Video 30GB, Clásico 80/120GB
Video 60/80GB, Clásico 160GB
nano (1GEN, 2GEN)
IPB110 Spa 12B.indd 4 2009/7/16 2:39:48 PM

ES - 5
NOTA:
• Los 10 adaptadores incluidos con esta unidad sólo pueden usarse con ella: No son
adaptadores universales.
• No se proporciona ningún adaptador para el modelo iPod shufe.
IMPORTANTE! El número de identicación est grabado en
la parte inferior de los adaptadores. Reérase a la ilustración
de arriba para encontrar el número.
iPod nano
(3ª generación
iPod nano
(4ª generación)
iPod touch
iPod touch
(2ª generación)
iPod clásico
iPod clásico
4GB y 8GB
8GB y 16GB
8GB y 16GB
8GB y 16GB y
32GB
8GB y 120GB
160GB
nano (3 GEN)
nano (4GEN)
Touch (1GEN)
Touch (2GEN)
Video 30GB, Clásico 80/120GB
Video 60/80GB, Clásico 160GB
INSTALACIÓN DEL ADAPTADOR DEL iPod PARA LA ACOPLACIÓN
1.
Coloque suavemente el adaptador adecuado dentro del acoplador. Reérase al dibujo 1 y 2).
2.
Coloque el iPod dentro del acoplador vía el adaptador correcto.(Reérase al dibujo 3).
3. Nunca tire del iPod hacia delante o empuje hacia atrás. Esto puede dañar su iPod y/o la
unidad principal. (Reérase al dibujo 4).
QUITE EL SEPARADOR DE MILLARES del iPod
1. Quite el separador de millares del iPod como se muestra.
2. Substitúyalo por otro que usted necesita.
IPB110 Spa 12B.indd 5 2009/7/16 2:39:53 PM

ES - 6
Funcionamiento
- Pulse el botón ESPERA/ENCENDIDO de la unidad una vez para encender el sistema.
Ajuste de volumen
Para ajustar el volumen de la unidad:
Pulse VOL +/- hasta llegar al volumen deseado. Se mostrará el volumen en la pantalla.
CONFIGURACIÓN DE HORA / HORA DE ALARMA
Pulse el botón CONFIGURAR en cualquier momento para acceder al menú de conguración
de alarma y reloj.
CONFIGURAR EL RELOJ
a) Pulse el botón CONFIGURAR 5 veces hasta que todos los dígitos del reloj parpadeen.
b)
Pulse el botón “SALTAR ” para disminuir la hora o pulse “SALTAR ” para aumentar la
hora. (Un indicador PM aparece cuando se pone la hora en PM, no hay indicador de AM).
Pulse el botón "VOL –" para disminuir los minutos, o pulse "VOL +" para aumentar los
minutos.
Presione y mantenga SALTAR / SALTAR o VOL- / VOL+ durante más de 1
segundo para navegar por los números rápidamente.
c) Pulse una vez el botón CONFIGURAR para conrmar y salir del menú de conguración
de hora.
NOTA: Si no se usan teclas durante 5 segundos, la unidad saldrá automáticamente del
menú y guardará los cambios.
CONFIGURACIÓN DE HORA DE ALARMA
a)
Pulse el botón CONFIGURAR 1 vez para establecer la alarma 1, 2 veces para establecer el nivel
de volumen de la alarma 1, 3 veces para congurar la alarma 2, o 4 veces para congurar el
nivel de volumen de la alarma 2. El icono ALARMA correspondiente se encenderá y los dígitos
del reloj parpadearán cuando llegue el menú de conguración de alarma establecido.
Cuando se seleccione Alarma apagada, se mostrará “APAGADO” en el LCD y no se
podrá ajustar la hora de alarma.
b) Pulse el botón FUNCIÓN (cuando esté en el menú de conguración Alarma y los dígitos
parpadeen) para seleccionar la fuente de alarma del modo siguiente:
Alarma apagada Alarma en iPod®Alarma en FM Alarma en AM Alarma en timbre
c)
Pulse el botón “SALTAR ” para disminuir la hora o pulse “SALTAR ” para aumentar la
hora. (Un indicador PM aparece cuando se pone la hora en PM, no hay indicador de AM).
Pulse el botón “VOL –“ para disminuir los minutos, o pulse "VOL +" para aumentar los
minutos.
Presione y mantenga SALTAR / SALTAR o VOL- / VOL+ durante más de
1 segundo para navegar por los números rápidamente.
d) En el modo de conguración de volumen de alarma, el icono de alarma se encenderá
y el nivel de volumen se mostrará en la pantalla LCD parpadeando. Use los botones
VOLUMEN +/VOLUMEN – para seleccionar el nivel de volumen (1 ~ 15), por defecto es
VOL10. De este modo, cuando se active la alarma, se activará el Timbre/Radio/iPod de
alarma con el volumen de alarma.
e) Cuando se congure la alarma 1, pulse el botón CONFIGURAR 5 veces para conrmar
y salir. Cuando se congure la alarma 2, pulse el botón CONFIGURAR 3 veces para
conrmar y salir.
NOTA: Si no se usan teclas durante 5 segundos, la unidad saldrá automáticamente del
menú y guardará los cambios. Cuando la alarma esté en modo iPod, si el iPod no está
conectado sonará el timbre en lugar del iPod.
IPB110 Spa 12B.indd 6 2009/7/16 2:39:54 PM

ES - 7
Activación y desactivación de la alarma (activar y desactivar función de alarma)
a) Pulse el botón CONFIGURAR para acceder al menú de conguración de alarma correcto y
pulse el botón FUNCIÓN para activar o desactivar la función de alarma. Una vez armada,
el icono de alarma aparecerá en la pantalla.
Restablecer la alarma para activarse al día siguiente
a) Cuando suene la alarma, pulse cualquier botón (excepto el botón REPOSO/DESCANSO)
para detener la alarma y restablecerla para que se active el día siguiente.
DESCANSO
a) Pulse el botón DESCANSO/REPOSO después de que suene la alarma. Se silenciará y
se activará de nuevo pasados 10 minutos. El reposo puede pulsarse varias veces durante
el ciclo de alarma de 1 hora.
REPOSO
La unidad tiene una función de reposo integrada. Esta función le permite escuchar el iPod
o la radio (AM/FM) al irse a dormir sin tener que apagarlo. El iPod /Radio se apagará
automáticamente pasado el tiempo de reposo deseado.
Tiempo de REPOSO
El periodo de tiempo que puede escuchar el iPod /Radio antes de dormir se llama tiempo de
reposo. El radiodespertador tiene 6 (seis) tiempos de reposo distintos entre los que elegir.
Cada pulsación seguida del botón de reposo aumentan el tiempo de reposo en 10 min. (--
10 20 30 40 50 60). Por ejemplo: Si desea establecer el tiempo de reposo en 20
minutos, realice el proceso siguiente:
- Pulse el botón DESCANSO dos veces. Aparecerá 20 en pantalla indicando que el
REPOSO está activado y que tiene un tiempo de reposo de 20 minutos.
CONEXIÓN A OTROS EQUIPOS DE AUDIO
Precaución: Apague la alimentación y desconecte de la alimentación CC antes de conectar
otros equipos.
• ENTRADA AUX - Conecta a otros equipos de audio mediante cable audio (no incluido),
incluyendo el vídeo, la grabadora, MP3 o iPod no conectado para proporcionar salida
por los altavoces de la radio.
• SALIDA DE AUDIO - Conecta a otros equipos de audio incluyendo subbae activo, TV o
un amplicador para sonido alternativo estéreo. El otro jack se puede utilizar como CD o
AUX en un amplicador, ENTRADA DE LÍNEA en un TV o ENTRADA DE AUDIO en un
amplicador.
Nota: Reérase a sus instrucciones del equipo de audio para determinar cómo se identica
el puerto de entrada o de salida de audio.
IPB110 Spa 12B.indd 7 2009/7/16 2:39:55 PM

ES - 8
FUNCIONAMIENTO DE MODO iPod
1. Asegúrese de usar el adaptador correcto para que su iPod esté correctamente conectado
al sistema, no hacerlo puede dañar el iPod.
2. No se incluye adaptador para el modelo iPod shufe.
Cargar el iPod
- Mientras el iPod esté conectado y el sistema esté correctamente conectado a la
alimentación CA, se carga automáticamente hasta estar completamente cargado.
- Los iPod de 3ª generación no se recargarán.
Escuchar el iPod
1. Presione suavemente el adaptador correcto dentro del acoplador.
2. Coloque el iPod dentro del acoplador vía el adaptador correcto.
3. Presione el botón de selección modo "iPod", el icono de iPod aparecerá en la pantalla.
4. Pulse REPRODUCIR/PAUSA/MEMORIA en el sistema para reproducir la música del
iPod.
5. Pulse REPRODUCIR/PAUSA/MEMORIA otra vez para pausar la reproducción y pulse
de nuevo para continuarla.
6. Pulse volumen +/- para ajustar el nivel de volumen.
7. Pulse el botón SALTAR ( ) o SALTAR ( ) para saltar adelante o atrás, o mantenga
el botón para avance o retroceso rápidos.
FUNCIONAMIENTO DE RADIO
Escuchar la radio
Observe: Extienda la antena de cable en la parte posterior de la unidad para una mejor
recepción de señal FM.
1. Pulse el botón de función para seleccionar el modo AM o FM.
2. Pulse SALTAR( ) o SALTAR ( ) para seleccionar una emisora.
NOTA:
• Pulse SALTAR ( ) o SALTAR ( ): los pasos de la frecuencia de recepción aumenta
o disminuye incrementalmente.
• Si presiona y mantiene SALTAR ( ) o SALTAR ( ) más de unos segundos, la
frecuencia seguirá aumentando o disminuyendo hasta recibir una emisora de radio.
• La última emisora sintonizada se conserva y recupera cuando enciende el sistema. La
emisora sintonizada se guarda en la memoria aunque se desconecte la alimentación
o se corte la corriente.
IPB110 Spa 12B.indd 8 2009/7/16 2:39:55 PM

ES - 9
Guardar emisoras de radio en la memoria
Puede guardar hasta 20 emisoras FM y 12 emisoras AM en la memoria de canales.
1. Pulse el botón FUNCIÓN para seleccionar el modo AM o FM.
2. Pulse SALTAR ( ) o SALTAR ( ) para seleccionar una emisora.
3. Presione y mantenga el botón REPRODUCIR/PAUSA/MEM para acceder al modo de
guardado de canales.
4. Pulse el botón REPRODUCIR/PAUSA/MEM para seleccionar el número de canal de
memoria deseado.
5. Presione y mantenga el botón REPRODUCIR/PAUSA/MEM de nuevo para guardarla en
memoria. Si se ha establecido anteriormente, se sustituye la emisora anterior.
6. Repita los pasos 2 a 5 para guardar más emisoras.
Reproducir emisoras preestablecidas
1. Pulse el botón FUNCIÓN para seleccionar el modo AM o FM.
2. Pulse el botón REPRODUCIR/PAUSA/MEM para seleccionar el canal deseado.
Mejorar la recepción
Recepción AM
- Recoloque la unidad para obtener una mejor recepción AM.
Nota: No conecte a una antena externa.
No ponga otro adaptador eléctrico cerca del sistema, puede aumentar las interferencias e
interferir con la emisora AM.
Recepción FM
- Desenrolle completamente la antena de cable FM y colóquela para obtener la mejor
recepción FM.
CUIDADOS Y MANTENIMIENTO
Desconecte la unidad de la alimentación antes de limpiarla.
Sistema
Limpie la carcasa suavemente con un paño seco y suave. Si la unidad está muy sucia o
estropeada límpiela con un paño ligeramente húmedo. Para evitar daños, no use agentes
de limpieza o limpiadores abrasivos.
Altavoces
Limpie los altavoces suavemente con un paño seco y suave. Para evitar daños, no use
agentes de limpieza o limpiadores abrasivos.
IPB110 Spa 12B.indd 9 2009/7/16 2:39:56 PM
Table of contents
Languages:
Other Sound-X Radio manuals


