SoundMax SM-LED24M04 User manual

LED TV
Телевизор цветного изображения
c жидкокристаллическим экраном
SM-LED24M04
Instruction manual
Руководство по эксплуатации

Table of contents
2
Table of contents
Before you start
Utilization of the product
Important safeguards
Installation
Base installation
Wall mounting
Connection
Outdoor antenna connection
Other connections
Operation
Control elements
Front panel
Back panel
Remote controller
Changing the battery
General operations
Signal sources
Teletext operations
OSD operation
Channel setting
Picture setting
Sound setting
Timer setting
Option setting
Lock setting
Electronic programme guide
Digital programme recording
Time Shift function
CI information
USB operation
Background information
Operations of file playback
General information
Troubleshooting
Causes of interference
Accessories
Specifications
Table of contents
Dear customer!
Thank you for purchasing our product. For safety, it is strongly recommended to read
this manual carefully before connecting, operating and/or adjusting the product and keep
the manual for reference in the future.
2
3
3
3
4
4
4
5
5
5
6
6
6
6
7
7
8
8
8
9
9
10
10
11
11
11
12
12
12
12
13
13
14
15
15
15
16
16

Before you start
3
Before you start
If you want to dispose of this product, do not mix it with general household waste. There
is a separate collection system for used electronic products in accordance with legislation
that requires proper treatment, recovery and recycling.
Please contact your local authorities for the correct method of disposal. By doing so,
you will ensure that your disposed product undergoes the necessary treatment, recovery
and recycling and thus prevent potential negative effects on the environment and human
health.
Utilization of the product
Important safeguards
• Please unplug the power cord from the AC
outlet and contact a service center for repair
if following occurs: any obvious abnormality
appears in the unit, such as smoky, peculiar
smell or strange sound; liquid has been spilled or
other objects have fallen into the unit; no picture
or sound; cover or panel is broken; although you
have operated the unit following the operating
instructions, it still cannot work normally.
• This unit can be connected to a power
supply outlet without the third ground contact
as well as with a ground contact.
• Always disconnect the power cord and
antenna during a storm.
• Do not fix the power cord with a metal nail.
• Unplug the power cord from the AC outlet;
also unplug the signal cables from the input
ports when the unit is unused for long periods
of time.
• When unplugging the plug, always hold the
wide slot, do not touch the metal part, and do
not destroy, twist, pull or roast the power cord.
• Please contact the service center
immediately if you found that the core is
showed in the air or has been broken.
• Please replace the AC outlet if the metal
bolt cannot be inserted into the power socket
completely or it cannot be fastened even when
it was pushed in, otherwise, any accidents of
shocks and fires would happen.
• Never touch the antenna wire or power
plug if it stars to thunder.
• Do not touch the power plug with wet
hands.
• Do not use any non-rated power socket
with numerous devices jointed on one power
socket or cable device. The wire of non-
designated capacity may cause the fire due to
the generation of heat.
• All instructions must be read and
understood well before you operate the unit.
Heed all warnings and follow all instructions.
• Please use the accessories provided
by the manufacturer. Using inadequate
accessories may result in accidents.
• Please adjust the product through the
panel buttons or the remote controller, do
not remove the cover or attempt to service
the product by yourself. Do not disassemble
back cover and do not make maintenance by
yourself to avoid the electric shock.
• Over-press the panel may destroy the
product.
• Do not place the product on an unstable
cart, stand surface, tripod, bracket, or table.
The product may fall, causing serious accidents
as well as the damage to the product.
• Please place the product on a flat surface
in a well-ventilated location. Keep it away from
the burning-light, direct sunlight, vibration,
high-temperature and humidity.
• Do not place any vase, potted plant, cup,
medicine and any container with water on this

Before you start
4
4
Before you start
product. If the liquid is spilt, it may cause the
fire, electric shock or breakdown.
• Do not install it at the place on the strong
magnetic field or current field. It may cause
break down. This equipment may be observed
deterioration of the picture by electromagnetic
radiation in electromagnetic environment.
• Fasten the wheel of the product or shelf
with wheels when installing this product. If it
moves or is tipped over, it may be damaged.
• Do not place any fire source such as
candlelight close to this product or place it on
this product. If it is tipped over or fallen down, it
may cause damage or fire.
• Do not place the unit into closed space
of TV for better ventilation; it can reduce the
product lifetime. Keep a space at least 10 cm
at above, left, and right of the TV.
• Please place all the signal cords behind of
rear panel.
• Do not overexert or touch the panel when
you convey the product. Do not transfer the
LED TV up or down display direction.
• Do not transport it with the power cord
or the connection cable connected. If you
move this product with the power cord or the
connection cable connected, damaged power
cord, connection cable or connection terminal
may cause fire, electric shock or breakdown.
• 2 persons or more shall transport the
device, which is heavier than 18 kg. If you drop
or tip over the device, it may damage it.
• The temperature of the product’s body
becomes a little higher after a long period use.
This phenomenon indicates that heat exchange
in normal working mode, thus please do not
let children or anyone who is sensitive of
temperature to touch.
All images provided herein are schematic
drawings and may differ from real objects.
WARNING
In order to avoid damage, make sure
to secure the unit on the wall
according to the wall mounting
instruction.
Wall or ceiling mounting implements
must be durable and sufficient enough to
support the weight of the unit.
Installation
Wall mounting
For wall mounting the back panel of this unit is
equipped with a VESA slot. A 100*100 mm
VESA wall-mount bracket should be used for
wall mounting. The wall-mounting bracket is not
included and should be acquired separately.
Manufacturer is not responsible for improper
mounting resulting in a damage to the unit.
Stand installation
Cover a flat stable surface with a soft cloth.
Place the TV unit facedown on the cloth. Insert
double support legs and fix them with 4
screws as shown below.

Before you start
5
5
Before you start
Connection
Outdoor antenna connection
Use 75 Ohm cable plug or 300-75 Ohm
impedance converter to plug in antenna input
terminal on the rear of the cabinet.
75 Ohm co-axis cable
TVRF antenna jack
Antenna cable connector
Other connections
• Connect the audio sources (Including
DVD, VCDR, CAMCORDER and PC) to the
proper Audio input jacks ‘L’ and ‘R’.
• Connect the video source to the Video
input using an RCA cable.
• Plug the power cable in the electric outlet,
making sure the current voltage is supported.
• When using the LED as a computer
screen, connect the PC to the VGA jack from
the monitor by the relevant cable (not included).
• This unit has PC audio in jack. Connect
this jack to PC main unit with related audio
cable in PC mode and adjust the volume to
what you want.
• If the video source has a HDMI output
jack, you can connect the signal to the monitor
by the HDMI cable (not included).
• Coaxial output is intended for transmitting
multi-channel sound to an external decoder
(e.g. in 5.1-CH format). Coaxial cable should
be used for connection.
• Connect your headphones or earphones
(not included) to the headphone socket of
this unit. When earphones are connected, the
sound output through the built-in speakers of
this unit is mute.
• PCMCIA slot is used for CI modules that
are obtained from your digital TV provider.

Operation
6
Operation
Control elements
Back panel
12345
10
9
8
7
1. Earphone socket
2. PC input (VGA)
3. Composite input
4. PC audio input
5. Antenna input
6. Coaxial output
7. HDMI input
8. USB port
9. Component input
10. PCMCIA slot
6

Operation
7
7
Operation
Remote controller (RC)
STANDBY: Turn on and standby.
MUTE: Mutes the sound.
0-9: Choose channel.
:Press to select channel.
:Switch to the previously viewed channel.
PMODE: Change the picture mode as following: Standard-Mild-User
Dynamic. Press once, the current picture setup will be shown.
SMODE: Change the sound mode as following: Standard-Music-Movie-
Sports-User. Press once, the current sound setup will be shown.
FAV: Press to add or remove your favorite channel.
MTS/II: Press to select the MTS mode/II mode.
SUB-T: Display the subtitle witch is broadcast with the program
VOL+/-: Increase/decrease the sound volume.
CH+/-: Switch channels up and down.
ASPECT: Switches between the preset screen size mode.
FREEZE: Freeze the current screen frame.
SLEEP: Press this key to control the auto time of turn off. Press (SLEEP)
then the auto turn-off time will change as following:
OFF-10-20-30-60-90-120-180-240-OFF.
SOURCE: Displays the source list of input signals.
DISPLAY: Displays the Channel Bar.
MENU: Access to the Main Menu, or return to the upper level of a
sub-menu.
EXIT: Exits the current menu or function.
:Confirmation button. Select the OSD menu option.
Red/Green/Yellow/Blue: Press these buttons directly to select
corresponding function on the screen.
TEXT/CC/
SUB.PG/
REVEAL/
:Teletext / CC subtitles / Backward.
:Display the subpage on the teletext screen / Play / Pause.
:Reveal hidden information such as the answer to a quiz in
teletext / Forward.
HOLD/
SIZE/
:Teletext hold / Previous.
:Select the size of the display screen / Next.
O
K
INDEX/ : Press to select the page number of the index from
Teletext / Stop.
ROOT
: Stops playback and goes to the root directory (USB mode).
REPEAT: Repeats the current file/folder.
LIST: Program list.
T.SHIFT: Activates the Time Shift feature.
REC: Records the current program.
EPG: Displays the Electronic Program Guide (EPG).

Operation
8
Operation
General operations
TELETEXT operations (option)
• Select the TV source mode. Then press
CH-/CH+ buttons to select TV channel in order
to pick up the picture signal of Teletext.
• Use two AAA batteries for the RC. The RC
should be pointed at remote sensor within 8
meters and within 30 degrees at the left or the
right side.
• Take the battery out of the RC if it is not
used for a long time.
• Do not mix new and used batteries or
different types of batteries. Weak batteries can
leak and severely damage the RC.
• Do not expose the RC to shock, liquids,
and do not place it in an area with high
humidity.
CAUTION!
Incorrect installation of the batteries may
lead to an explosion.
Please replace used batteries with the
batteries of the same or comparable type.
• Teletext button functions are as follows:
TEXT: Press this button to enter into Teletext
mode. Follow the guides on screen and use
the color buttons to navigate the Teletext.
Red/Green/Yellow/Blue buttons: Press
these 4 color buttons to access directly to
corresponding color page displayed at the
lower parts of teletext screen.
REVEAL: press this button to display and
reveal hidden information.
S.PAGE: press to access a subpage of
the Teletext.
HOLD: press this button to stop the move
to the next page. Press this button again to
cancel operation.
INDEX: press this button to go to the
index page.
SIZE: press to adjust the size of Teletext.
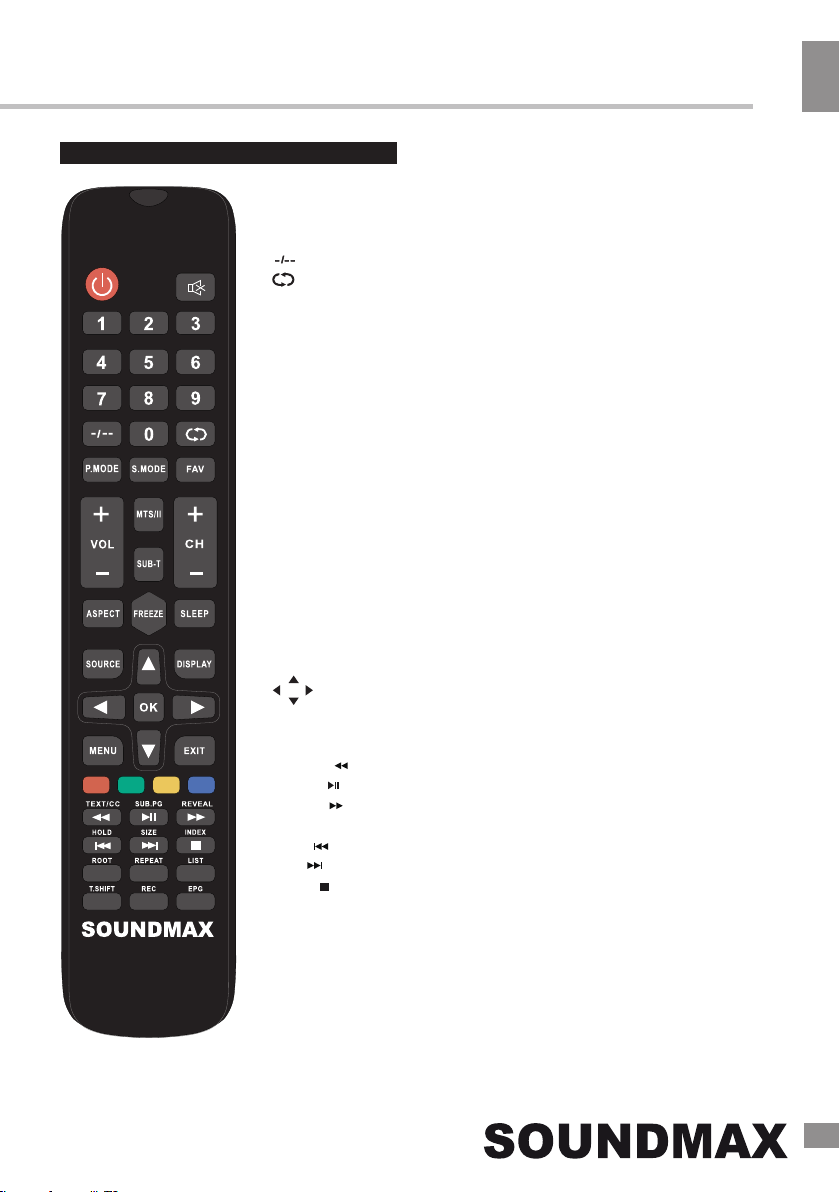
• Press button on the unit or on the RC
to switch on the power. Press POWER button
again to switch the unit off and go the the
stand-by mode. To completely power off the unit
unplug the power cable from the outlet.
• Press VOL- button repeatedly to decrease
the volume; press VOL+ button repeatedly
to increase the volume.
• Press SLEEP button repeatedly to set the
sleep time.
• Press DTV button to switch between
analog and digital TV.
• Press EPG to launch the Electronic
Program Guide (EPG).
• Press T.SHIFT to enable the Time
Shift function for digital TV.
• Press SUBTITLE to show and set the
language of a current DTV channel.
• Press REC to begin recording of current
playback in PVR mode.
• Press button on the RC to select
from the present channel and the previously
displayed channel.
• Press ASPECT button repeatedly to select
a screen display size from the available list:
4:3/16:9/Zoom1/Zoom2/Panorama. Available
aspects may differ for different signal sources.
• Press MUTE button to cut off sound, press
8this button again or adjust volume to resume
sound.
• Press TV/RADIO button to switch between
TV and radio modes when watching channels.
• Select the TV function mode. Press
CH-/CH+ buttons to select previous or next
channels; or press number buttons to enter a
channel number directly.
• Press P.MODE button repeatedly to cycle
through the available video picture modes.
• Press S.MODE button repeatedly to cycle
through the available sound modes.
• Press DISPLAY button to display the
preset TV channel play information.
•Press FREEZE button to freeze the
picture on or off.
• Press FAV button to show the favourite
channel list.
• Press MTS/II button in TV mode repeatedly
to switch between various Nicam sound modes
(can be unavailable for some channels).
Signal sources
Press SOURCE button, then press DOWN/UP
cursor buttons on the RC or CH+/CH- buttons
on the panel to select a source from available
source list: DTV - ATV - AV - YPbPr - HDMI -
VGA. Press OK button on the RC or MENU
button on the panel to confirm. Press EXIT to
exit.

Operation
9
9
Operation
OSD operation
1. Press MENU button to enter the setting
menu displayed on the screen.
2. Press UP/DOWN cursor buttons on the
RC or CH+/- buttons on the panel to select
setting page.
3. Press the OK button on the RC or VOL+
button on the panel to go to the parameter list.
4. Press UP/DOWN cursor buttons on the
RC or CH+/- buttons on the panel to select a
parameter to adjust.
5. Press cursor buttons on the RC or VOL+/-
or CH+/- buttons on the panel to adjust the
selected parameter.
6. Press EXIT button to quit the menu.
Some menu items may be in grey color,
in this case they are not adjustable. Pictures
of OSD menu are for reference only; they may
differ from the real screens.
Picture menu
•Picture Mode: Press UP and DOWN
buttons to select Picture Mode, then press LEFT/
RIGHT button to select one of the picture modes:
Standard, Mild, Personal, Dynamic.
Press P.MODE to change the picture mode
directly.
In Personal mode the following settings can
be adjusted manually:
Brightness: adjust the picture brightness.
Contrast: adjust the highlight intensity of the
picture.
Sharpness: adjust the peak level of detail
in the picture.
Colour: adjust colour intensity.
Tint: adjust the colour tint (only for NTSC).
•Colour Temperature: change the overall
colour temperature of the picture:
Standard: Default vivid color temp.
Cool: gentle blue-hued image.
Warm: bright red-hued image.
•Aspect Ratio: select the screen aspect
ratio.

Operation
10
10
Operation
Sound Menu
•Sound Mode: Press UP and DOWN
buttons to select Sound Mode, then press
LEFT/RIGHT button to select one of the sound
modes: Standard, Мusic, Personal, Movie).
Press S.MODE to change the sound mode
directly. In Personal mode you can adjust the
settings manually.
and right speakers to adapt to your listening
position.
•AVL: toggle auto-volume level on/off.
Volume automatically remains on the same
level of volume if you change programs.
Because each broadcasting station has its
own signal conditions, volume adjustment
may be needed every time when the channel
is changed. This feature allows users to enjoy
stable volume levels by making automatic
adjustments for each program.
•SPDIF: toggle digital sound via coaxial
cable on/off or set it to auto.
•Bass: manually adjust the bass.
•Treble: manually adjust the treble.
•Balance: adjust the balance between left
Channel Menu
•Channel Management: opens the submenu
•Favorite Management: opens the submenu
where you can add and delete favorite channels.
•Country: select your country.
•Auto Search: select this option to scan
for available channels automatically.
•DTV Manual Search: select option to scan
for available digital channels manually.
•ATV Manual Search: select option to scan
for available analog channels manually.
where you can lock, swap, delete and skip
channels.
•LCN On/Off: enable or disable the
the logical channel number (LCN) sorting. If
it is on, you cannot manually change the
number of the channel.

Operation
11
11
Operation
Feature menu
•Lock: access the lock system.
You must first enter the system
password. Default password is 0000.
•Language: select the preferred system
language.
•Clock: select and adjust the system clock.
•Sleep Timer: adjust the automatic TV
standby after period of inactivity. Off - 240 mins.
Setup menu
•OSD Timer: select the period for showing
the on-screen display menus.
•PC Setup: open the PC screen setup
submenu (only for PC source).
• Auto Power Off: adjust the automatic TV
power off period. Off - 240 mins.
•Hearing Impaired: enable/disable
the captions for people with impaired
hearing.
•CI Info: access the Common Interface
sub-menu.
•PVR/Timeshift: access the PVR/Timeshift
submenu.
• Auto Adjust: automatic adjustment of
the PC screen settings.
• H Position: adjust the horizontal position
of the picture.
• V Position: adjust the vertical position
of the picture.
• Phase: adjust phase.
• Clock: adjust clock.
•Blue Screen: toggle showing blue screen
when there is no signal
•Reset TV Setting: revert to factory settings.
•Software Upgrade: select to upgrade the
firmware using the USB (only for experts).
•Home Mode: this mode enables your TV
to consume less power.

Operation
12
12
Operation
USB operation
General playback information
• Insert a USB drive into the USB port.
Select Media source and press OK button.
The screen will show a USB playback window,
in which you can select Music, Photo and
Movie contents to play by pressing LEFT/
RIGHT cursor buttons and OK button.
• USB file systems supported: FAT16, FAT32,
NTFS. 2.0 USB version is supported; maximum
capacity 2 TB (NTFS). For correct and
satisfactory operation, licensed USB devices of
well-known brands should be used. Avoid using
USB devices of unknown brands. Playback of
some file formats cannot be supported.
• This unit supports playback of video files
with ASF, AVI, MKV, MPG extensions, with
video codecs WMV9, DIVX, H263, MPEG-4,
MPEGII, XVID and audio codecs WMA, MP3,
DD(AC3).
The above list of extensions and codecs
is for information only and is not a guarantee
that all files having the above extensions and
codecs should be read by this unit.
• Some AVI files cannot be played due to
their parameters and recording conditions.
Video files with AVI extension exceeding 2 GB
in size may be played partially.
According to the USB 1.1/2.0 Standard,
usage of a USB device with power current
consumption exceeding 500 mA is not
recommended without supplementary power
supply. Failure to use supplementary power for
connected USB drives with power consumption
exceeding this value as well as defective
USB drives may cause mechanical or thermal
changes of elements of this unit as well as
failure of internal elements of the USB port.
Such damages are not warranty cases.
Warning: usage of external USB drives
containing BIN files in the root directory may
cause malfunction of the unit or damage to the
software.
Operations of file playback
• Insert a USB into the USB port. Press the
SOURCE button or select USB source and
press OK button on the RC or VOL+/VOL-
button on the unit. The screen will show a USB
playback window, in which you can select
Music, Photo and Movie contents to play by
pressing LEFT/RIGHT cursor buttons and OK
button.
• In the content menu, press cursor buttons
to select folder, press OK button to enter it,
then press cursor buttons to select the file you
want to watch or to listen to. Press OK to play
the selected file.
• While playback, press OK button; the
bottom of the screen will show playback menu
in which you can select an operation by LEFT/
RIGHT cursor buttons or perform this operation
by pressing OK button.
• While playback, press button to pause
or resume playback. Press button to stop
playback.
• When playing music files you can press
/ buttons to fast reverse or forward. You can
press / buttons to select the desired files
manually in normal condition.
• When playing photo files, you can press
/ buttons to page up or page down the
file. Press LEFT/RIGHT cursor buttons to
rotate the image.
• Press EXIT button to stop playback and
return to the previous menu screen.

Operation
13
13
Operation
Electronic programme guide (EPG)
If you know the airing time of the current
programme you can access the EPG menu by
pressing the GUIDE button on the RC. The
menu displays the list of the current available
channels on the left, and the name of each
programme starting in scheduled time periods
on the right. Select the channel by pressing
UP/DOWN and the programme by pressing
LEFT/RIGHT. Follow the on-screen instructions
and use color buttons to navigate this menu.
PVR/Timeshift function
Insert a USB drive, the system will
automatically create a folder to store the files
recorded. Recording begins when REC button
is pressed, and it records all the time until
button is pressed or the memory is full.
PVR/Timeshift is a feature enabling you to
record an air program while you are away.
Press button to activate Time Shift while
recording. Press UP/DOWN cursor buttons to
zoom in/out the Timeshift menu. You can
operate referring to PVR/Timeshift menu on
the screen.
CI information
(only in DTV mode): This function enables
you to watch some encrypted services (pay
services). Please insert a CI card into the
PCMCIA slot according to the arrow on the CI
card.
• The function can only be available
when CI card is present.
• It is possible for you to change CI
(Common Interface) menu screen and service
by consulting your dealer.
• Please do not insert or pull out the CI card
when power on. During initialization of the CI
card, please don’t operate the TV.
• Do not insert or pull out the CI card
frequently so as to avoid any damages of the
TV and the CI card.
• If there is no picture and/or sound with the
CI+ CAM module inserted, please contact the
customer support of the service provider.

General Information
14
General Information
Troubleshooting
Below is a table describing simple measures that can help you eliminate most problems likely
to emerge when this unit is in use. If below measures do not help, turn to a service center or to the
nearest dealer.
Symptom Cause Solution
No picture, no
sound, and no
indicator light
The power cord is not plugged in.
Contrast, brightness, color and
volume are all in the minimum value
or TV is in mute mode.
Plug the power cord in.
Alter the value of contrast,
brightness, color and volume.
Picture and
sound with
abnormity
Contrast and color are set improperly.
Color system is set improperly.
Sound system is set improperly.
Set the value of Contrast and color
properly.
Set the sound system properly.
The picture in
VGA mode is
abnormal
The PC settings may be improper. Check and set the resolution
parameters of your PC.
Picture is spotted
or with snow
Signal source is low-grade or the
signal is in a lower quality.
Use the qualified signal cord.
Blue background No video signal or the signal cord is
improperly/not connected.
Connect the signal cord properly.
No sound No audio signal or the signal cord is
improperly/not connected.
Connect the audio signal cord
properly.
Set the sound system properly.
The RC does not
work
Batteries are improperly installed or
exhausted.
Make sure the positive and the
negative polarities are correct.
Reattach the battery lid.
Replace the batteries.
Causes of interference
Incorporated in your TV receiver are the most up-to-date devices to eliminate interference.
Local radiation however, can create disturbances, which visibly affect your picture. Proper
installations, a good aerial are your best safeguards against these disturbances.
• RF INTERFERENCE: Moving ripples across the screen are caused by nearby transmitting or
receiving short-wave radio equipment.
• DIATHERMY: Herringbone pattern and partial picture loss can result from the operation of
diathermy equipment from a nearby doctor’s surgery or hospital.
• SNOW: Weak TV signals from long distant stations result in an instead picture and give the
effect of falling snow. An antenna adjustment or antenna amplifier may be needed.
• GHOST: Multiple image, caused by TV signals reflected back from surrounding buildings,
hills, aircraft, etc. is minimized by correct aerial positioning.
• CAR IGNITION: Nearby cars and electrical motors can cause small streaks across the picture
or make the picture roll.

General Information
15
General Information
Accessories
1 pc
1 pc
2 pcs
4 pcs
1 pc
The LED panel is a high technology product with many thin film transistors that can
give you a fine picture details. Occasionally, a few non-active pixels may appear on the screen
as a fixed point of blue, green, red, black or white, please note that this does not affect the
performance of your LED TV.
Warning: Specifications may be subject to change without notice for improvement.
23.6" (60 cm)
1366x768
16:9
178°, 178°
9.5 ms
PAL, SECAM
B/G, DK, I
2 x 3 W
+
+
+
+
+
+
+
+
+
+
+
+
3D
+
99 analogue/1200 digital
1000 pages
II
AC ~100-240 V; 50 Hz
556.5 x 76 x 334 mm
556.5 x 165 x 368 mm
2.28 kg
from 5 to 35 °C
from 45% to 75%
from 86 to 106 kPa
(650-800 mm Hg)
Size (diagonal)
Resolution
Aspect ratio
View angle: vertical, horizontal
Response time
Color system
Sound system
NICAM stereo
Composite AV RCA input
Component YPbPr input (mini)
PC audio input
VGA input
HDMI input
Headphone jack
Coaxial digital output
DVB-T/DVB-T2/DVB-C signal reception
PCMCIA interface (CI, CI+)
Russian and English OSD
Progressive scan
Digital comb filter
Sleep timer
USB movie, audio and photo support
Quantity of channels
Telete xt
Electric shock protection class
Nominal voltage range:
Unit dimensions: without stand
with stand
Net weight
Operating conditions
Ambient temperature
Relative humidity
Atmospheric pressure
1. LED TV
2. Remote controller
3. Stand
4. Screw
5. Instruction manual
Specifications

Содержание
16
Содержание
Уважаемый покупатель!
Благодарим Вас за покупку нашего изделия. Чтобы понять, как правильно и безо-
пасно пользоваться приобретенным устройством, рекомендуется тщательно изучить
настоящее руководство перед подключением и эксплуатацией изделия. Сохраняйте
руководство для использования в будущем.
Содержание
Перед началом эксплуатации
Утилизация изделия
Меры предосторожности
Установка
Установка на подставку
Крепление на стену
Подключение
Подключение внешней антенны
Прочие подключения
Управление устройством
Элементы управления
Передняя панель
Задняя панель
Пульт дистанционного управления
Установка батареек
Общие операции
Источники сигнала
Операции с телетекстом
Экранное меню
Меню "Изображение"
Меню "Звук"
Меню "Канал"
Меню "Функции"
Меню "Параметры"
Операции с USB
Общая информация
Воспроизведение файлов
Электронный телегид (EPG)
Общая информация
Руководство по устранению
неисправностей
Источники помех
Комплект поставки
Технические характеристики
16
17
17
17
19
19
19
20
20
20
21
21
21
21
22
22
23
23
23
24
23
25
25
26
26
27
27
27
29
30
30
30
31
31
Перед покупкой рекомендуется провести
проверку оборудования:
- на отсутствие механических
повреждений конструкции, внешнего
оформления и упаковки, на
функционирование, на сохранность
пломб, на соответствие комплекта
поставки данным раздела
"Комплектность". Проведение проверки на
функционирование является
обязанностью продавца;
- на наличие гарантийного талона
- на правильность простановки в
гарантийном талоне даты продажи и
штампа продавца.
Рекомендуется сохранять товарный
(кассовый) чек, руководство по
эксплуатации с гарантийным талоном до
конца гарантийного срока эксплуатации.

Перед началом эксплуатации
17
15
Перед началом эксплуатации
Если вы желаете утилизировать данное изделие, не выбрасывайте его вместе с
обычным бытовым мусором. Существует отдельная система сбора использованных
электронных изделий в соответствии с законодательством, которая предполагает
соответствующее обращение, возврат и переработку.
Обращайтесь в органы местного управления за инструкциями по правильной
утилизации продукта. Тем самым Вы обеспечите утилизацию Вашего изделия с
соблюдением обязательных процедур по обработке, утилизации и вторичной пере-
работке и, таким образом, предотвратите потенциальное негативное воздействие на
окружающую среду и здоровье людей.
Утилизация изделия
Меры предосторожности
• Пожалуйста, извлеките шнур пита-
ния из розетки и свяжитесь с сервисной
службой в следующих случаях: если в
устройстве имеются явные неисправности,
например, из него идет дым, чувствуется
специфический запах или слышен неха-
рактерный звук; если внутрь устройства
попала жидкость или посторонние предме-
ты; если нет изображения или звука; если
поврежден корпус или панель; если Вы
пользуетесь устройством согласно инструк-
ции, но оно не работает должным образом.
• Данное изделие может подключаться
к розетке питания как без заземляющего
третьего контакта, так и с заземляющим
третьим контактом.
• Во избежание поражения электриче-
ским током защищайте шнур питания от
возможного нажатия на него или защемле-
ния, особенно рядом с разъемами.
• Не закрепляйте шнур питания метизами.
• Если Вы не пользуетесь устройством
длительное время или в случае грозы
обязательно отключайте шнур питания из
розетки, а также отключайте все сигналь-
ные кабели от входных разъемов.
• При отключении вилки из розетки всег-
да держитесь за утолщение на вилке, не
касайтесь металлических частей, не тяните
за шнур и не ломайте и не перегибайте его,
не ремонтируйте, не перекручивайте и не
нагревайте.
• При подсоединении и отсоединении
любых кабелей удостоверьтесь в том, что
телевизор отключен от сети электропита-
ния.
• Немедленно свяжитесь с сервисным
центром, в случае если имеются какие-либо
неисправности шнура питания, в нем оголи-
лись жилы или он поврежден.
• Замените сетевую розетку, если в
нее невозможно вставить вилку или вилка
плохо закрепляется в розетке. Иначе могут
возникнуть неисправности или произойти
несчастные случаи или возгорания.
• Не прикасайтесь к проводам мокрыми
руками.
• Запрещается использование розетки, в
которую подключено несколько устройств.
Перегрузка такой розетки может привести
к пожару.
• Место подключения вилки шнура
питания к сети 220 В должно оставаться
легкодоступным.
• Перед работой с устройством необ-
ходимо полностью прочитать и понять все
инструкции. Необходимо соблюдать все пред-

Перед началом эксплуатации
18
16
Перед началом эксплуатации
упреждения и следовать всем инструкциям,
приведенным в настоящем руководстве.
• Пожалуйста, используйте только реко-
мендованные производителем аксессуары.
Использование других аксессуаров может
привести к неисправностям.
• Пожалуйста, проводите все настройки
и регулировки только с помощью кнопок
на передней и боковой панелях или на
пульте дистанционного управления. Ни в
коем случае не снимайте заднюю панель
и не пытайтесь самостоятельно проводить
техническое обслуживание устройства,
так как существует опасность поражения
электрическим током, а также возможно
возникновение неисправностей.
• Не устанавливайте устройство на
непрочные или неровные поверхности,
тележки, стойки, треноги, кронштейны
или столы. Устройство может упасть, в
результате чего могут возникнуть неисправ-
ности или произойти несчастные случаи.
Используйте только те приспособления,
которые рекомендованы производителем
или продавцом.
• Пожалуйста, устанавливайте устрой-
ство на горизонтальной поверхности в ме-
стах с хорошей вентиляцией. Не допускайте
воздействия на устройство вибрации, пря-
мого солнечного света, высокой температу-
ры, а также попадания пыли и влаги.
• Не ставьте на устройство вазы, сосуды
с жидкостью. Попадание жидкости внутрь
аппарата может привести к пожару или по-
ломке устройства.
• Не устанавливайте устройство в зоне
магнитных волн. Это может привести к по-
ломке устройства. В зоне электромагнитно-
го излучения может наблюдаться искаже-
ние изображения.
• Не устанавливайте вблизи устройства
источники открытого огня, например, свечи.
В случае их падения устройство может быть
повреждено или может произойти возгора-
ние.
• Установка телевизора в замкнутое
пространство при эксплуатации может со-
кратить срок службы устройства; поэтому
необходимо обеспечить минимальную
дистанцию между LED-телевизором и
внутренними границами приспособления
под аппарат для нормальной вентиляции
(минимум по 10 см свободного простран-
ства со всех сторон).
• Располагайте кабели позади устрой-
ства. Не закрепляйте их метизами, не пере-
гибайте, не ремонтируйте и не нагревайте.
• При перемещении телевизора не
нажимайте и не касайтесь панели. Не пере-
носите телевизор в положении, при котором
экран направлен вверх или вниз.
• Не перемещайте устройство при под-
ключенном проводе питания или других
подключенных проводах. Повреждение про-
вода питания, подключенный провод или
подключенные устройства могут стать при-
чиной пожара, электрошока или поломки.
• Если устройство тяжелее 18 кг, его
должны перемещать не менее 2 человек.
При падении устройство может повредиться.
• Слишком сильное нажатие на панель
может повредить устройство.
• При длительном использовании может
немного повысится температура корпуса
устройства. Это явление свидетельствует о
теплоотдаче в нормальном рабочем режи-
ме. Однако не позволяйте детям и людям с
повышенной температурной чувствительно-
стью касаться устройства.
После транспортировки в холодную
погоду (ниже 5° С) рекомендуется не
включать телевизор в течение как
минимум трех часов: за это время он
нагреется до комнатной температуры, а
весь конденсат испарится.
Все иллюстрации, приведенные в на-
стоящем руководстве, являются схе-
матическими изображениями, которые
могут отличаться от реальных объектов.

Установка/Подключение
19
17
Установка/Подключение
Установка
Установка на подставку Средства для монтажа аппаратуры на
стене или потолке должны быть доста-
точными для выполнения своей функ-
ции.
Рекомендуется только вертикальное
расположение устройства.
ВНИМАНИЕ - До включения
аппаратуры в электрическую сеть
необходимо ознакомиться с мерами
электрической и противопожарной
безопасности, приведенными в
разделе "Меры предосторожности"
настоящего Руководства по
эксплуатации.
Крепление на стену
• Для крепления на стену на задней
панели телевизора имеются 2 отверстия
под винты. Расстояние между крепежными
отверстиями — 100*100 мм. Для крепления
следует использовать настенный
кронштейн VESA (в комплект поставки не
входит и приобретается отдельно).
Производитель не несет ответственности
за неправильно выполненный монтаж,
повлекший повреждение телевизора.
Выберите ровную плоскую
горизонтальную поверхность, накройте ее
мягкой тканью и разместите на ней
корпус телевизора экраном вниз.
Присоедините подставки к основанию,
вставив их в соответствующие пазы.
Зафиксируйте входящими в комплект
винтами.

Установка/Подключение
20
18
Установка/Подключение
Подключение
Подключение внешней антенны
Подсоедините антенну к соответствую-
щему разъему. Используйте
коаксиальный кабель 75 Ом при
подключении внешней антенны.
Прочие подключения
• Подсоедините источник аудиосигнала
(DVD, CAMCORDER) к соответствующим
аудиоразъемам ‘L’ (Левый) и ‘R’ (Правый).
•Композитный видеовход телевизора под-
соединяется к композитному выходу
другого видеооборудования с помощью
аудиовидеокабеля RCA.
• Кабель питания предназначен для под-
ключения к сети электрического питания.
• Подсоедините VGA-кабель (в комплект
не входит) к VGA-порту ПК и к VGA-
разъему телевизора; затяните болты по
часовой стрелке на обоих концах кабеля.
•Компьютерный аудиовход служит для
получения телевизором аудиосигнала с
персонального компьютера.
• Если источник видеосигнала имеет
HDMI-выход, подключите его к HDMI-входу
телевизора, используя специальный
HDMI-кабель (в комплект не входит).
•Коаксиальный выход предназначен
для передачи многоканального звука
на внешний декодер (например,
стереосистему 5.1). Для соединения
необходим коаксиальный кабель (в
комплект не входит).
• Подсоедините наушники (в комплект не
входят) к разъему для наушников.
При подсоединенных наушниках звук через
динамики телевизора не воспроизводится.
• Разъем PCMCIA используется для
подключения CI-модуля, приобретаемого у
поставщика услуг цифрового ТВ.
Антенный кабель 75 ОМ
Разъем для антенны
Штекер антенного кабеля
• Компонентный видеовход предназначен
для подключения внешнего
видеооборудования. Кабель в комплект не
входит.
Для подключения дополнительных
периферийных устройств используйте только
сертифицированные кабели и переходники.
Все соединения производите только после
отключения основного питания телевизора от
сети.
Table of contents
Languages:
Other SoundMax LED TV manuals