Soundtronics M2 SYNTH 192 User manual

SOUNDTRONICS M²SYNTH
User Manual 192
192 Programmable
Sequencer

i
192 Programmable Sequencer
Soundtronics Ltd
Unit 29 Webb Ellis Business Park
Woodside Park
Rugby
Warwickshire
CV21 2NP
UK
www.m2synth.com
www.soundtronics.co.uk

TableofContents
Overview..............................................................................2
Features...............................................................................3
Panel Controls......................................................................5
Basic Operation....................................................................6
Sequence Commands........................................................11
Control Commands ............................................................23
Live Editing ........................................................................28
External Controls................................................................30
MIDI Controls.....................................................................32
Using the 192 Sequencer...................................................33
Index..................................................................................35

2
Overview
The 192 Sequencer is one of the many modules from the Soundtronics
modular analogue synth –the M²Synth. While most modules require very little
introduction, the 192 Sequencer has features that many users may be
unfamiliar with. This manual describes each of the individual features enabling
you to get the most out of the sequencer.
Truly analogue sequencers tend to be rather large modules with typically 8 to
16 steps with each step often having one or more potentiometers and
associated switches. Sequencers output a voltage for each step based on a
potentiometer setting and can be quite difficult to tune to a musical scale. This
can be aided by a device called a quantizer that takes the step output voltage
and constrains it to voltage levels that follow the semitones (notes) as found in
the western world musical scales. Whether a note sounds or not is selected
using a toggle switch that enable or disables a gate pulse. These sequencers are
fantastic at what they do but have limitations such as an inability to store
sequences for later retrieval.
The 192 Sequencer emulates the analogue sequencer and adds further
functions to make this a powerful alternative to the basic sequencer described
above.
Chapter
1

3
Features
Main features and specifications of the 192 sequencer.
Size
Height 5U (222.25mm)
Width 2U (88.9mm)
Depth 40mm behind panel, 63mm overall
Electrical
Supply voltage +/-12V
Supply current +62/-6mA –to be confirmed
Digital outputs 5V
Digital inputs >2V, max 15V
Analogue outputs 0-10V
Panel Features
16x32 red LED dot matrix display 63x31.5mm
11 pushbutton switches
MIDI in/out sockets
Rotary encoder for value selection
11 ¼” jack sockets for analogue / digital signals
Memory
Internal for 100 tracks
Track
Each track has the capacity for 48 contiguous steps arranged in 3 banks of 16.
Each step consisting of a note, rest or sequence command, note type or
sequence command value, step control command, gate duration time, auxiliary
CV.
Chapter
2

4
Notes
User selectable from C-1 to G9 which covers all 128 MIDI notes of over 10
octaves
6 Note lengths demisemiquaver to semibreve which equates to 1 clock pulse to
32
Tempo 10 to 240 BPM where 1 beat is a crotchet
Sequence Commands
Sequence reset
Sequence stop
Sequence reverse
Goto bank (1-3)
Goto track (0-99)
Loop (loop back to start of current bank)
Repeat sign (repeat section 1-99 times)
Transpose (up/down up to 19 semitones
Goto step (1-48)
Hold (1-99 crotchets)
Gate on time (5-95% of note length)
Control Commands
Repeat begin (start of repeat section)
Programmable gate on
Programmable gate off
Ratchet 02 to 32 (number of repeat gates pulse per step)
External Controls
Gate out
Trigger out
CV Out (x2)
Programmable gate out
Auxiliary CV out
Clock out
Clock in
Reset input
Enable input

5
Panel Controls
Chapter
3
Press to adjust tempo
Press to adjust step
auxiliary voltage
Press for a rest (no gate)
Start / stop sequencer
Reset sequencer back to step 1
Press to select
sequence command
Press to select track to load
Press to select control command
Press to select note
Press to select note or
rest length
Save current track
Value knob with push to
enter
6
Basic Operation
On first power up,
The sequencer will be stopped on step 1, default note C4 and track 00
displayed. Note that at this stage, the sequencer will boot up with an empty
sequence with default values in its working memory, track 00 has not yet been
loaded.
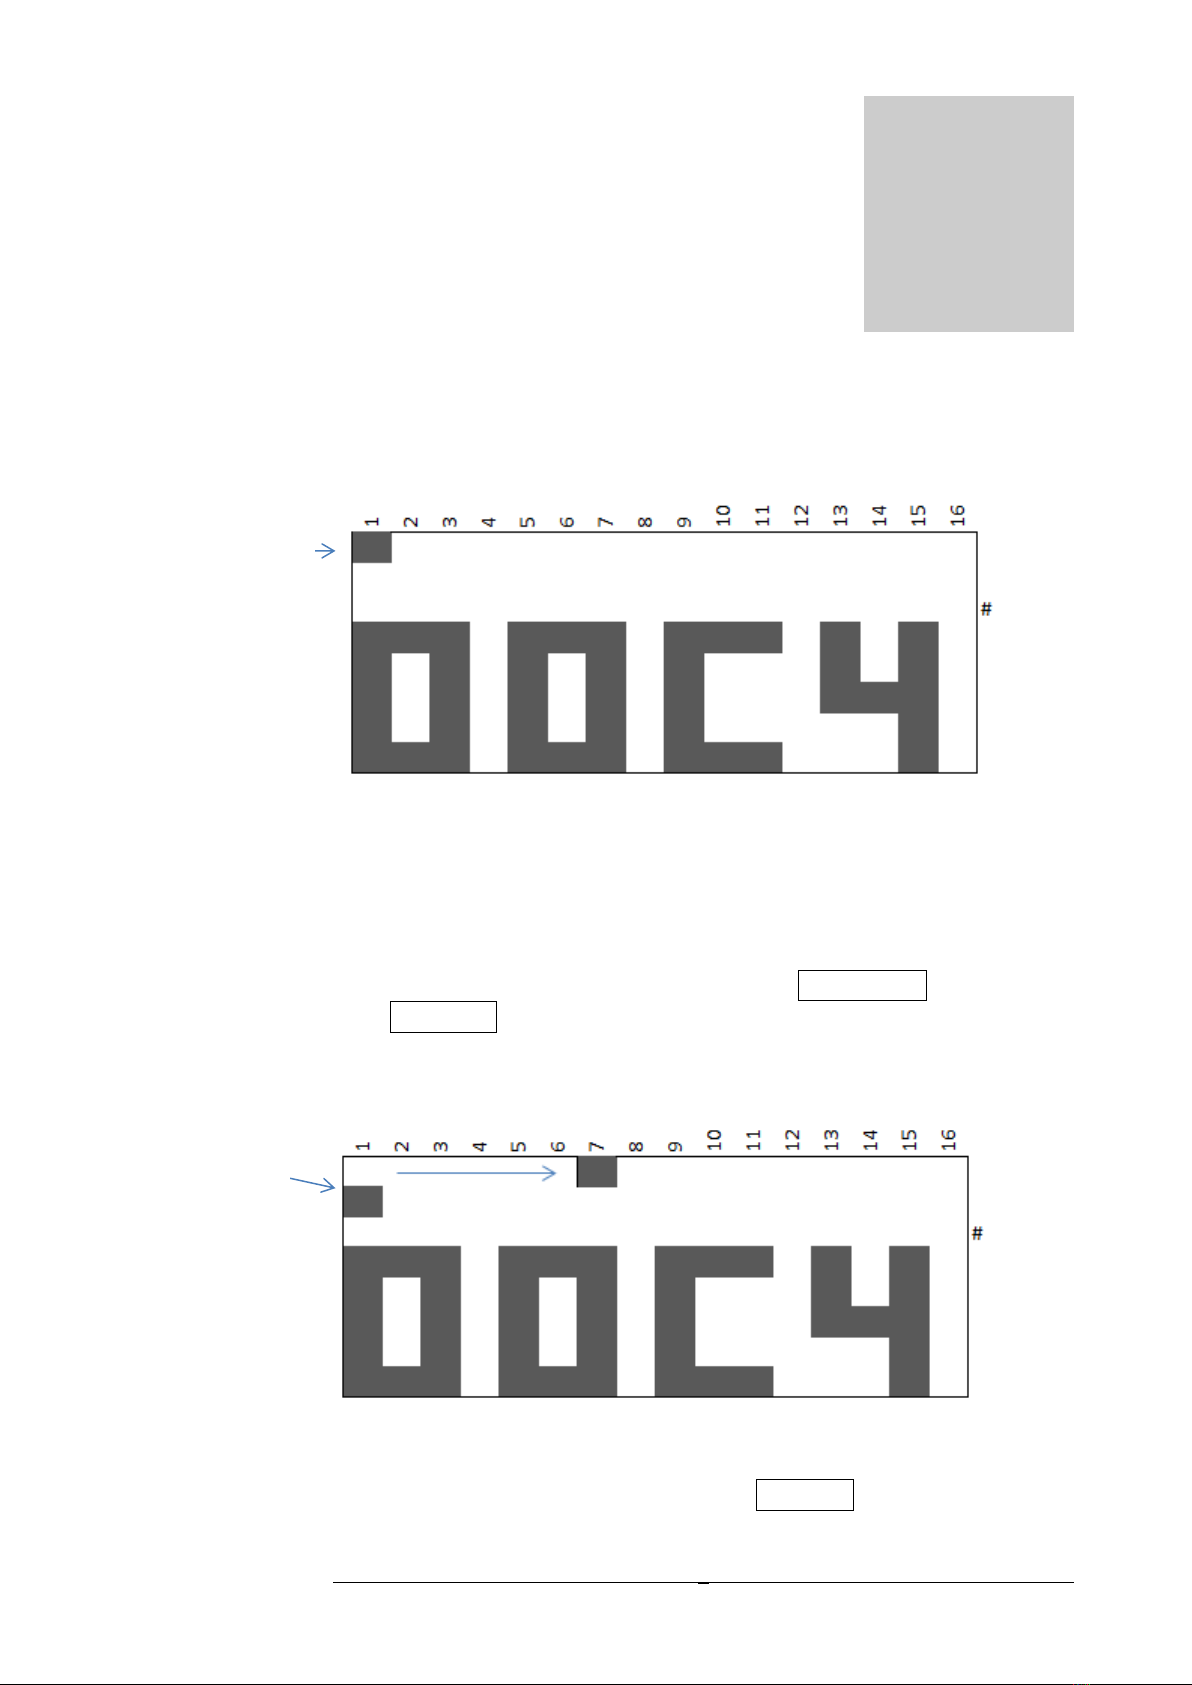
Note: Button presses will be indicated by a boxed button name.
Press Start / Stop and the sequence LED will step continuously from 1-16 plus
an LED will light up under step 1, this is the edit LED which will be described
later in Chapter 7.
This is very much like a conventional 16-step analogue sequencer but this
sequencer can accommodate 48 steps. Press Start/Stop to stop the sequencer
Chapter
4
Edit LED
Step LED

7
running and the last step reached will remain displayed. Press Reset and the
sequencer will revert back to step 1.
Step Selection
Now using the Value control knob, rotate it clockwise and the step LED will
move towards step 16 and anticlockwise to move it back towards step 1.
Moving clockwise past step 16 goes to step 1 of bank 2 (step 17).
An additional LED comes on under step 2 to indicate bank 2. Continuing to
rotate the Value control will change the step as before. Note that in step 1 of
bank 2, the note value changes to RS, this is the mnemonic for Reset, this is
why the sequencer only ran from step 1 to step 16. As soon as it reached step
17, it immediately reset to step 1. Going beyond step 16 of bank 2 will select
step 1 of bank 3 where once again a Reset command will be found.
This time the LED under step 3 lights to indicate bank 3. Going beyond step 16
of bank 3 (step 48) goes to step 49. Step 49 is not available as a note but can
contain sequence commands such as in this case, a Reset.
Step LED
Bank LED
8
Step 49 is indicated by all step LEDs being on. Press Reset to go back to step 1
or use the Value control.
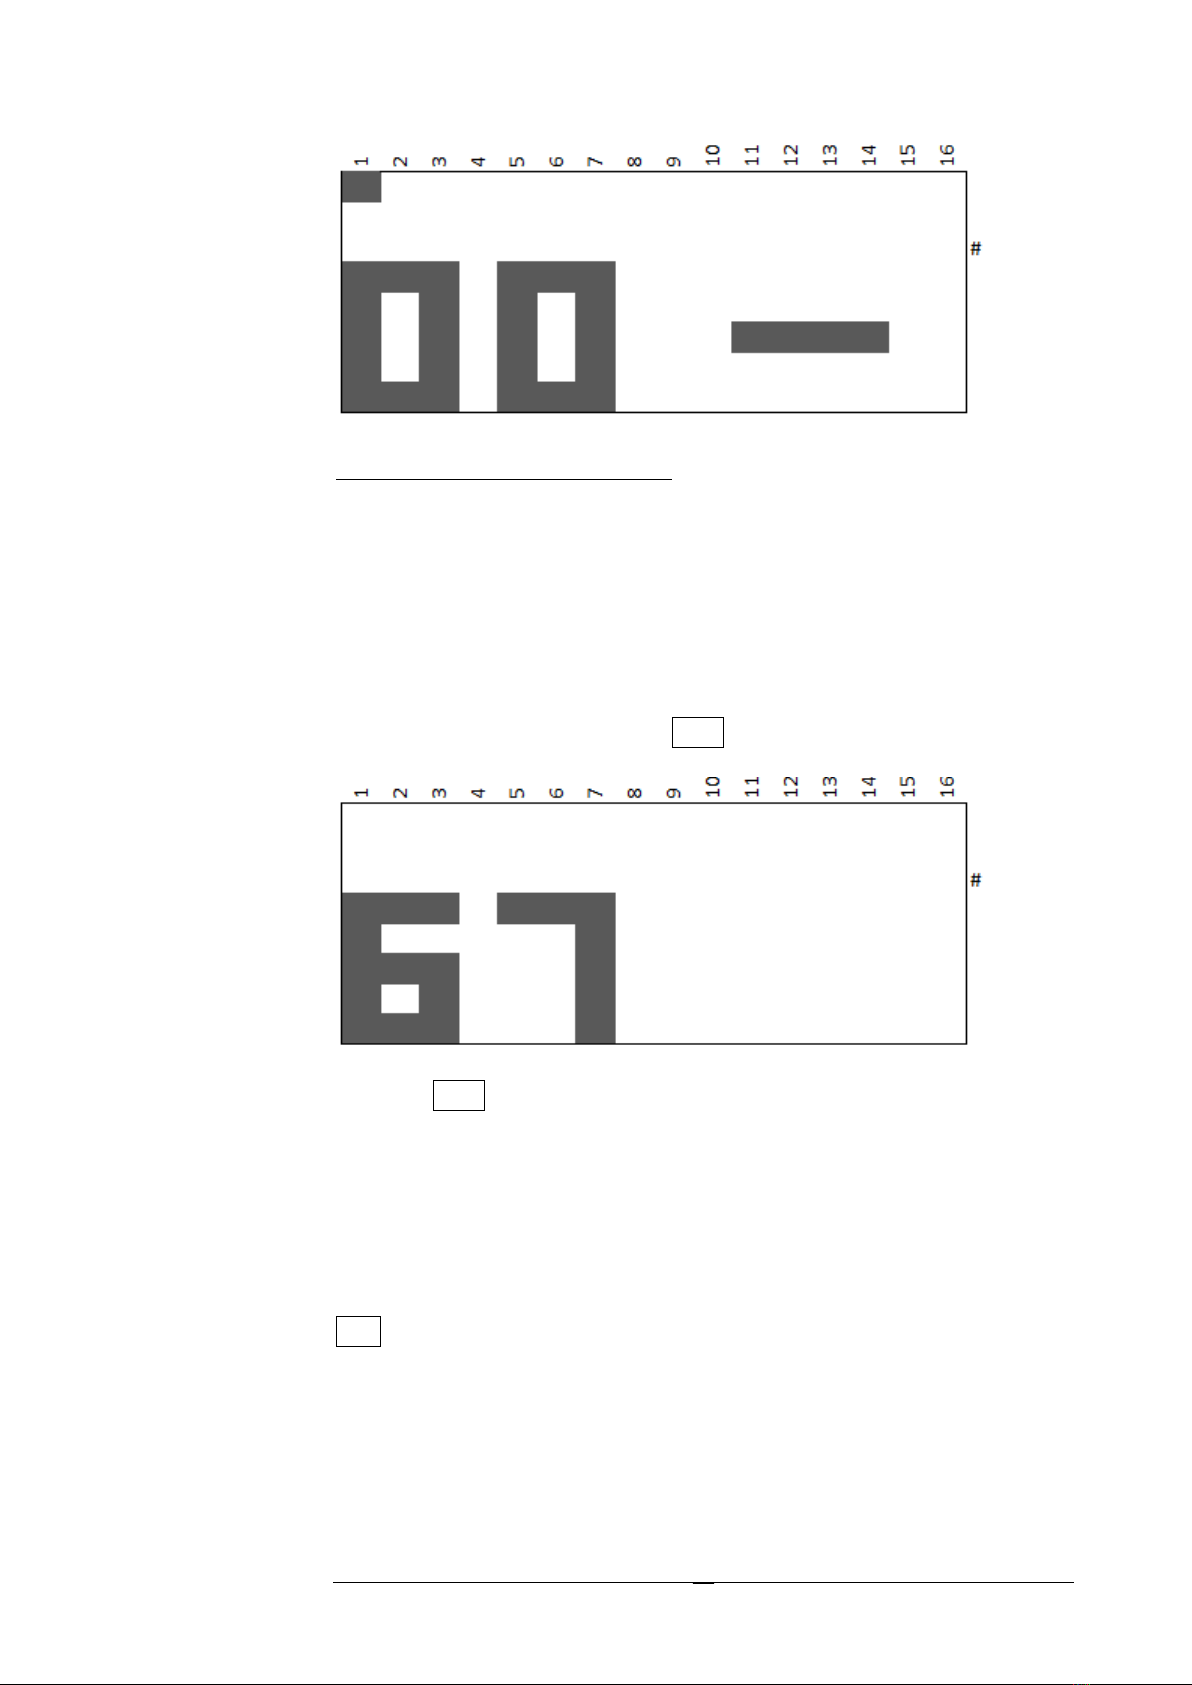
Note Selection
Now that you can select any of the 48 steps, let’s move on to choosing a
particular note for each step. Press and hold the Note button while rotating
the Value control to scroll through all from C-1 to G9.
Release Note button and select the next step and repeat the note selection.
Using just these two controls, you can quickly define the notes for any step in
the sequence. Note the # LED comes on when the note being selected is a
sharp.
The CV output voltage will relate exactly to the note selected. For example:
Note
CV Voltage (V)
C-1
0
C0
1
C1
2
C2
3
C3
4
C4
5
C5
6
C6
7
C7
8
C8
9
Sharp LED

9
C9
10
G9
10.5833
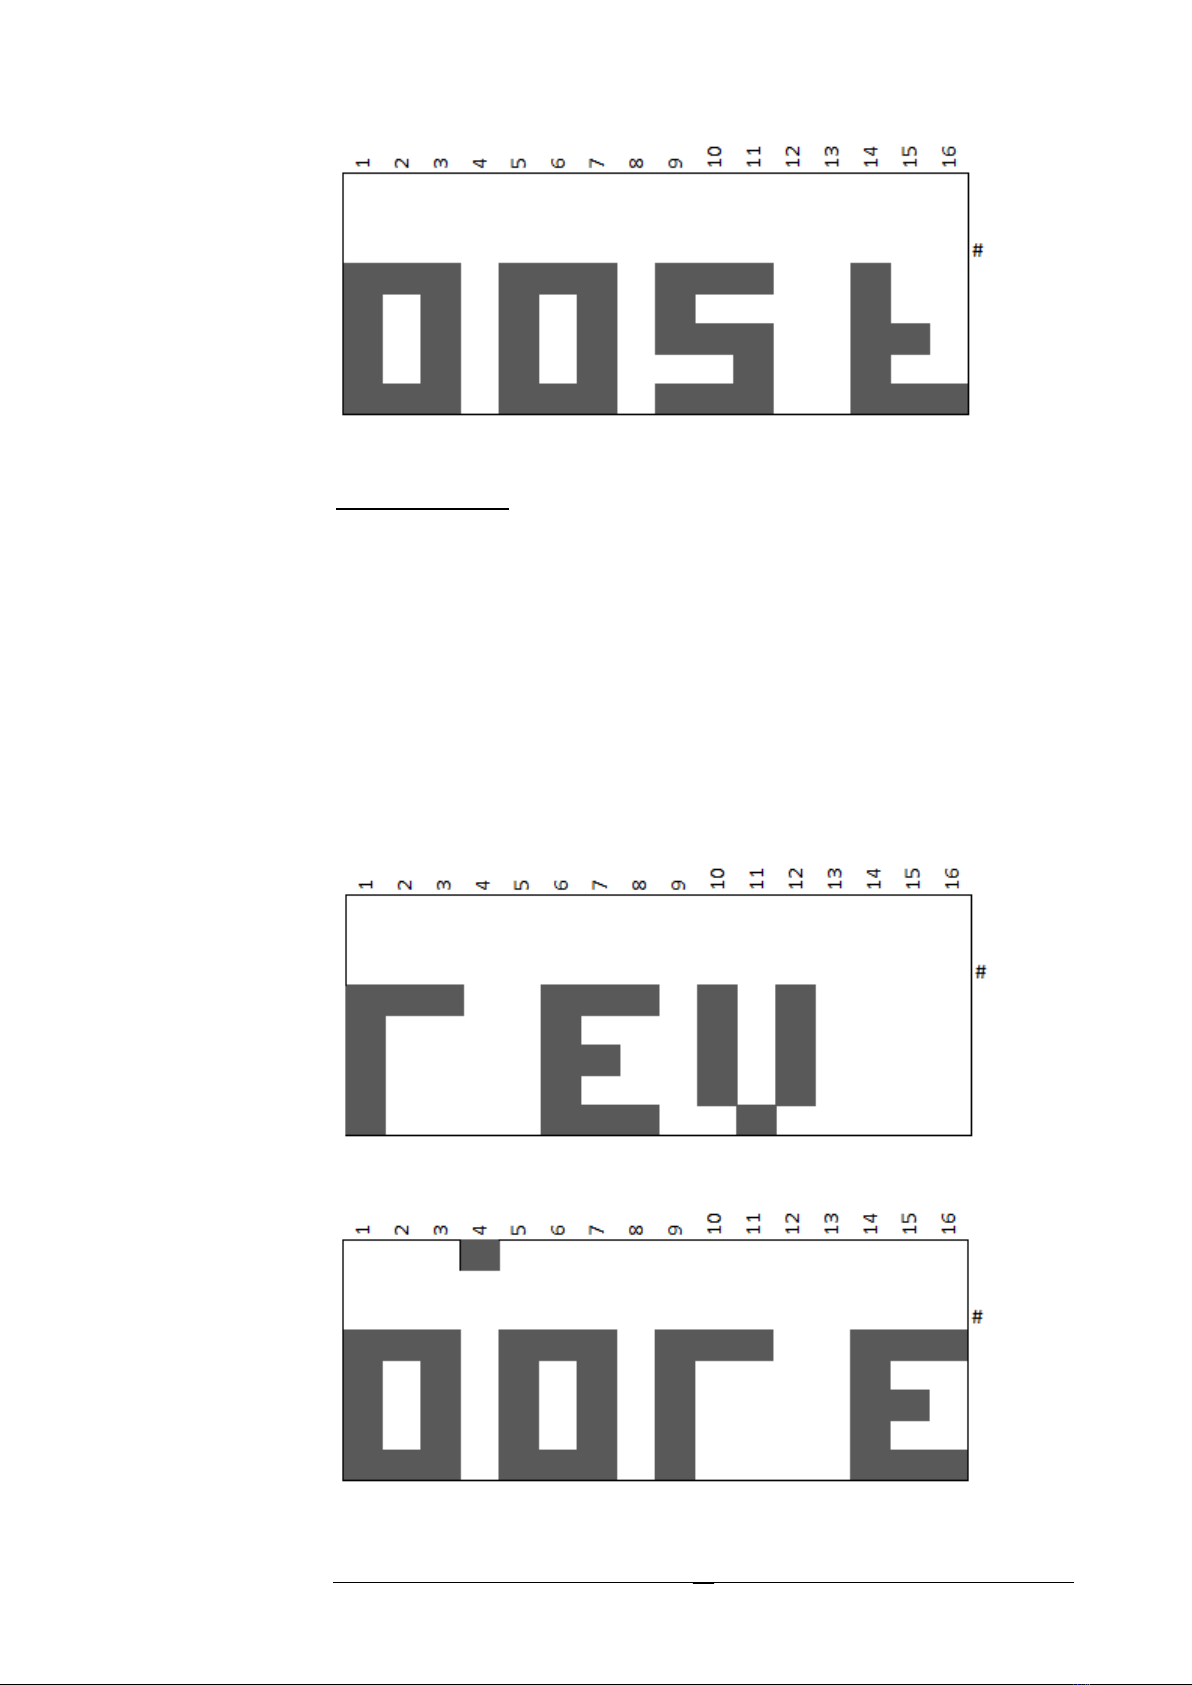
Note type (length)
Each note can have its length set by using the Note Type button.
Hold the Note Type button in and using the Value control allows the selection
of the note type from demisemiquaver to semibreve. The mnemonics for these
are displayed from ÷8 to x4 based on their relationship to a crotchet.
The following table summarises the note types.
Note Type
Mnemonic
Clock Pulses
Demisemiquaver
÷8
1
Semiquaver
÷4
2
Quaver
÷2
4
Crotchet
x1
8
Minim
x2
16
Semibreve
x4
32
Rest
In place of a note, a Rest can be entered which simply mans the CV out is not
changed and no gate or trigger pulse is generated.
Press and hold the Rest button and then select the Rest length using the Value
control just as in the case of a note length. Once the Rest button is released, a
‘-‘ is displayed to indicate a Rest in place of a note.
10
Track Selection, Loading and Saving
Up to now, we have only been using the working memory, powering down the
module will result in a loss of the sequence. In an attempt to keep menu diving
to a minimum and keep things simple to use, there is no copy function. This
means that if the intent is to save the sequence once created, the track
number should be selected first. Also, selecting a track will immediately over-
write any track currently in the working memory.
To select a track, press and hold the Track button and select a track from 00 to
99.
When the Track button is released, the track selected is loaded into working
memory. If the track selected has not been previously used, default vales will
be used for all steps with the only Reset command being at step 49.
Any changes made to the track will not be remembered unless saved which
will update the selected track number.
In summary, selecting a track will load the track into working memory. Pressing
Save will save the sequence in working memory to the track currently
displayed.

11
Sequence Commands
Any step can hold a sequence command in place of a note to direct the
sequencer to do something other than simply step onto the next step.
The sequence commands available when the sequencer is stopped are:
Sequence reset
Sequence stop
Sequence reverse
Goto bank (1-3)
Goto track (0-99)
Loop (loop back to start of current bank)
Repeat sign (repeat section 1-99 times)
Transpose (up/down up to 19 semitones
Goto step (1-48)
Hold (1-99 crotchets)
And a special command that does not replace a note
Gate on time (5-95% of note length)
To place a sequence command at a particular step, press Start/Stop to stop the
sequencer from running, press and hold the Sequence Cmd button and scroll
through the available commands using the Value control. If the command
expects an additional value, on release of the Sequence Cmd button, the
display will change to allow the entry of this value. Each command is displayed
using a maximum of 4 characters or symbols when selecting.
Reset
Command operation: When the sequence reaches the Reset command step,
the sequence immediately continues from step 1.
Chapter
5

12
The display when selecting the Reset command is RST. No additional value
required.
After selection, in place of the note, the display will show RS.
Sequence Stop
Command operation: When the sequence reaches the Stop command step,
the sequence immediately resets to step 1 and stops running.
The display when selecting the Stop command is STOP. No additional value
required.
After selection, in place of the note, the display will show ST.
13
Sequence Reverse
Command operation: When the sequence reaches the Reverse command step,
the sequence carries on running but downwards until it reaches step 1 when it
will begin stepping upwards again. For example, if the Reverse command is at
step 6, the sequence will continue from step 4. In practice the sequence would
look like 1-2-3-4-5-4-3-2-1-2-3-4-5-4 etc.. Best not have more than 1 Reverse
command in a sequence if a reverse can be executed while stepping
downwards.
The display when selecting the Reverse command is REV. No additional value
required.
After selection, in place of the note, the display will show RE.

14
Goto Bank
Command operation: When the sequence reaches the Goto Bank command
step, the sequence immediately continues from the first step in that bank (step
1, 17 or step 33). The bank can be before or after the current bank.
The display when selecting the Goto Bank command is BAN>. An additional
value for the bank number is required in the range 1-3.
After releasing the Sequence Cmd button, the display shows the value screen
to enter the bank number 01-03. Press the Value control knob to enter the
bank number selected.
After selection, in place of the note, the display will show BA.

15
Goto Track
Command operation: When the sequence reaches the Goto Track command
step, the sequencer will load the destination track and continue running from
step 1 of this new track. Note: make sure the initial track with the Goto Track
command is saved before running otherwise any changes made to it will be
lost.
The display when selecting the Goto Track command is TK >. An additional
value is required for the track number in the range 00-99.
After releasing the Sequence Cmd button, the display shows the value screen
to enter the track number 00-99. Press the Value control knob to enter the
track number selected.
After selection, in place of the note, the display will show TK.

16
Loop
Command operation: When the sequence reaches the Loop command step,
the sequencer will continue from the first step in the current bank. For
example, if the Loop command is contained within a step in bank 3, then the
sequence will continue from step 33.
The display when selecting the Loop command is LOOP. No additional value
required.
After selection, in place of the note, the display will show LO.
Repeat Section
Command operation: When the sequence reaches the Repeat section
command step, the sequence will continue playing from the nearest preceding
Repeat Begin control command (see chapter 6). The section will repeat the
selected number of times before then continuing from the step following the
Repeat section command.
The display when selecting the Repeat Section command is << :| ||. An
additional value is required for the number of repeats to be executed in the
range 01-99.

17
After releasing the Sequence Cmd button, the display shows the value screen
to select the number of repeats 01-99. Press the Value control knob to enter
the number of repeats.
After selection, in place of the note, the display will show <<.
Transpose
Command operation: When the sequence reaches the Transpose command
step, the sequence will continue playing from the step following the Transpose
command but all subsequence notes will be transposed by the selected value.
This is a cumulative transpose in that each time the Transpose command is
executed; the note will be further transposed on the already transposed note.
Stopping the sequencer will clear any residual transposing.

18
The display when selecting the Transpose command is TRAN. An additional
value is required for the number of repeats to be executed in the range down
19 to up 19.
After releasing the Sequence Cmd button, the display shows the value screen
to select the transpose value. Press the Value control knob to enter the
amount of transpose in semitones.
A null transpose value is indicated by selected 00.
Table of contents
Popular Recording Equipment manuals by other brands

ESD
ESD ECS-PMC/FPGA Hardware manual

Klein Tools
Klein Tools VDV500-063 Toner-Pro instruction manual

dbx
dbx 560A owner's manual

Pro-Ject Audio Systems
Pro-Ject Audio Systems Xtension Instructions for use manual

NI
NI RTI-12309 SAFETY, ENVIRONMENTAL, AND REGULATORY INFORMATION

Raymarine
Raymarine eci-100 Installation instructions manual


weintek
weintek cMT2128X Series Installation instruction

Mitsubishi Electric
Mitsubishi Electric MAC-568IF-E Quick reference guide

M-Audio
M-Audio Keystation 49e user guide

Auralex
Auralex MAX Kit Series Installation & user guide

Galaxy Audio
Galaxy Audio HDR2 instruction manual

IntesisBox
IntesisBox KNX Series installation manual