Fostex DV-824 Configuration guide
Model DV824 Owner’s manual
(V1.30 supplement)
8289627000
(435119)
© PRINTED IN JAPAN JUNE 20078289627000 FX
(435119)
FOSTEX CO.
3-2-35, Musashino, Akishima-shi,Tokyo, Japan 196-0021
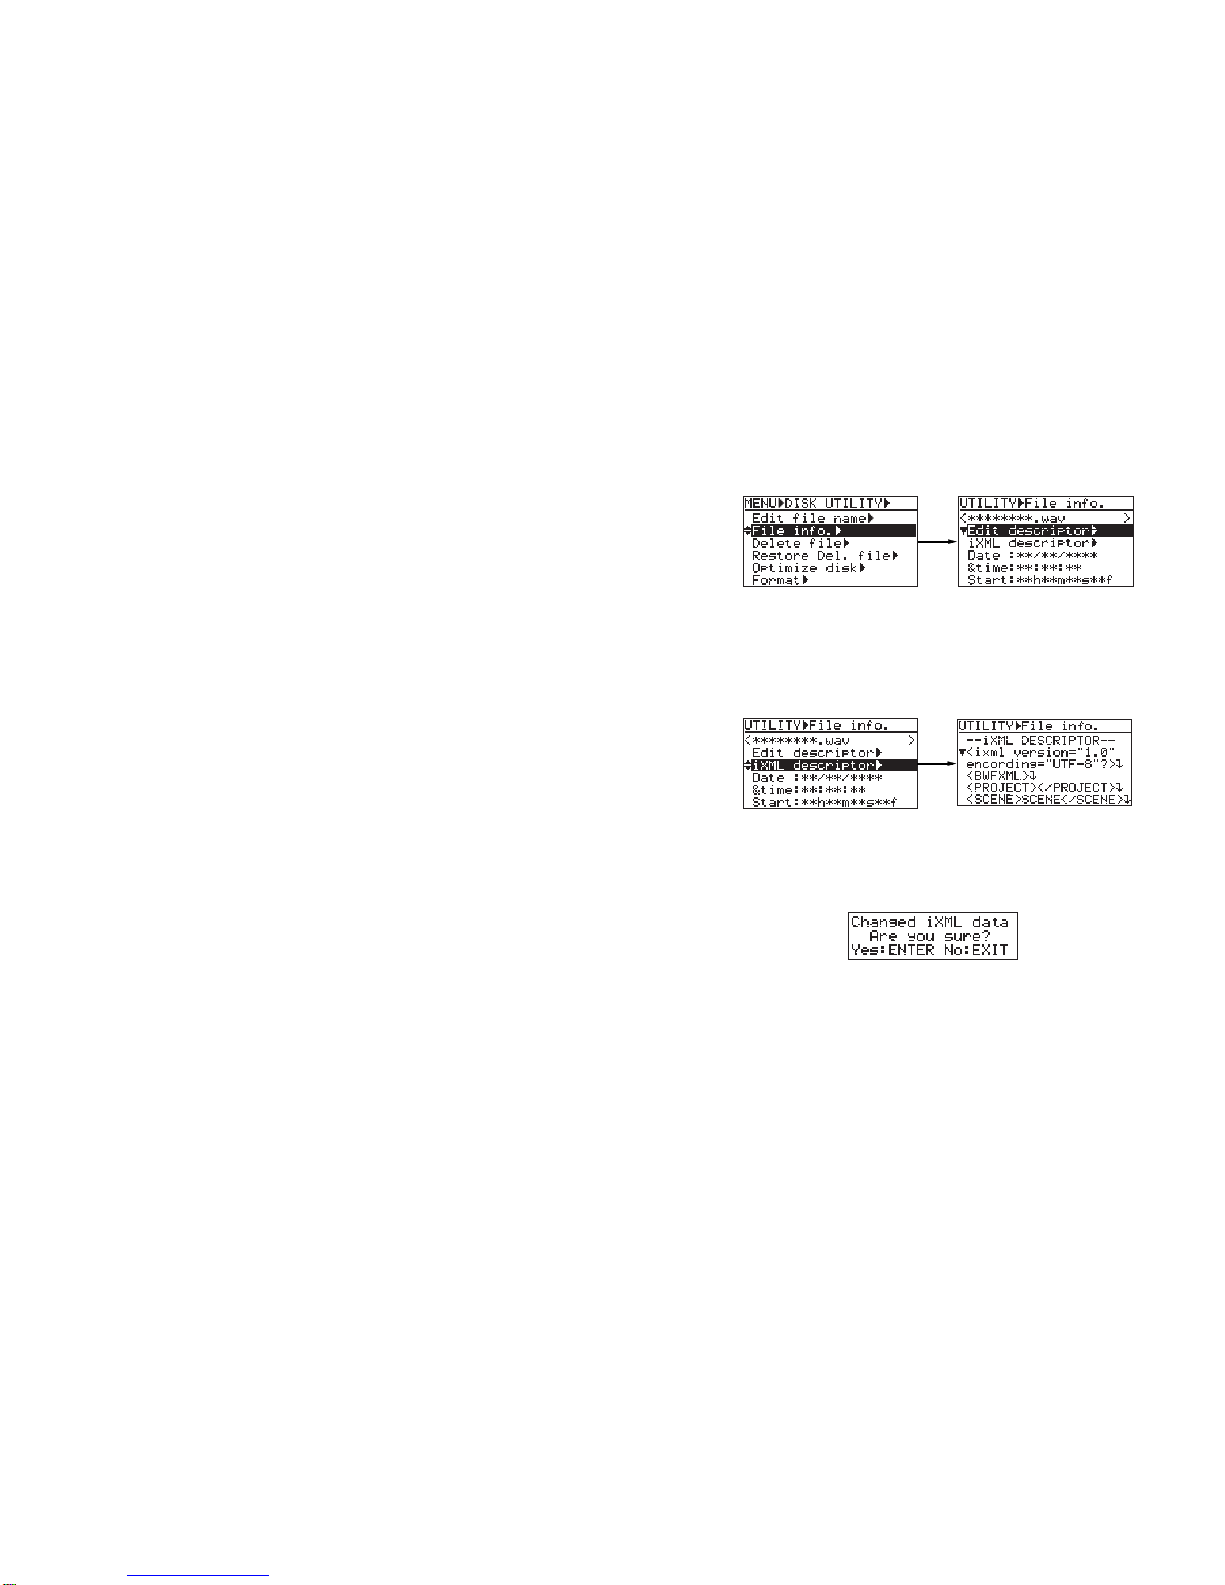
File info. >
The DV824 will show the following information of the current file; descriptor, File Name, File No.,
creation date, Start time, End time, duration and file capacity. Go to the UTILITY menu and
choose the File info. You can only change the contents on the Edit descriptor.
The menu with ">" has some more pages on the software menu.
iXML descriptor >
If you choose the iXMLdescriptor and press the [ENTER/YES] key, it will go the 3rd layer, which
looks like the following;
The screen shows the iXML Chunk data with a maximum of 20 characters. Pressing the return
key on the keyboard will start a new line. The cursor can be moved by the << key and >> key.
You can edit the contents using the ten key pad or USB keyboard. To finish editing, press the
ESC key, STOP key or HOME key on the USB keyboard.At this point, you will be asked for the
permission whether or not the DV824 should save the edited contents.
Note:
Upon saving the data, if you press either the STOPkey or HOME key, it will directly take
you back to the Home menu.
211

Seamless new file creation beyond the max file length
The V1.30 will automatically create a new file when the recording reaches the max file length
that is set in the system setup menu. This will achieve seamless recording as far as disk or
partition space is available. This function will take full advantage of 4.7GB disk capacity.
The user setting is not necessary for this function.
Manual New File mode
V1.30 can create a new file manually during recording. However, depending on the track mode
and bit rate, the DV824 will execute this function between 1 sec and 10 sec after receiving the
command.
Procedure:
During recording, press the [SHIFT] key as a preparation. When the [RECORD] key is pressed,
the display will prompt "Change New File" and the DV824 will create a new file.After 1 to 10sec
later, the "Change New File" display will disappear.
Note:
the Manual New File mode is not available in ES-Master mode.
Auto File Save function
The DVD forum for PRO-Audio has established a new standard of BWF file writing.
This writing method will save the data every minute during recording. The benefit of this is; if the
power is cut during recording, the DV824 will secure the recorded data up to max. 1 minute prior
to the power cut.
Note:
The recorded file with the new writing method can be fully compatible with computers.
However, in order to playback on the DV824 or DV40, please also update the software version
on the playback machines.
Default File Name
V1.30 offers an additional setting as "Add Machine ID" on the file name. This is to avoid creating
duplicated file names among the multiple DV824's connected via ES-Bus.
Procedure:
Go to the Menu by pressing the [ENTER/YES] key. On the SYS SETUP, choose the Default file
name.
****: File name mode, Date, Take, Reel (Initial setting is Take)
4. TC Chase on ES-Master
When TC chase is required across all the machines, it is only necessary to have only the
master machine chase lock to the external TC.All the slave machines will follow the
master machine.
5. File Name Edit
When the file names are edited on the master machines, all the slave machine will
automatically accomplish the file name edit. When the device ID is used, each machine
will automatically keep the machine ID even though the file name is edited.
6. False Start
When the False Start is processed, all the slave machines will accomplish the false start in
the same way as the master.
Rename Command issued.
Set Project Name
This will register the iXML information.
Choose the Set Project Name with the [MENU] dial and press the [ENTER/YES] key.
The default setting is blank. You can enter a name with up to 18 characters with the ten key pad,
[MENU] dial or USB keyboard. Use the DV824 |<<, >>| keys or USB keyboard arrow keys to
move the cursor. Pressing the enter key will store the name onto the internal Flash ROM.
Use the ESC key to cancel the operation.
Edit File Name
You can enter or edit the File Name.
Go to UTILITY menu and choose the Edit File Name.
You can enter a name with up to 18 characters with the ten key pad or [MENU] dial. Pressing the
[ENTER/YES] key will store the name onto the internal Flash ROM. If you entered an incorrect
name, the DV824 would warn you with the message "Illegal Name" and request entering the
name again. Use the [EXIT/NO] key to cancel the operation.
Note:
If the name is edited, it will automatically update the descriptor on the BEXT Chunk, as
fSCENE and fTAKE. It will also update the information stored on the iXML Chunk, as <SCENE>
and <TAKE>.
310

File name mode
Place the cursor to "File name mode", then press the [ENTER/YES] key to move it to the “xxxx”
field. Rotate the [MENU] dial to choose one from the following modes;
• Date: Time and Date will be set as the file name.
• Take: (Scene)_(Take No.).wav will be set as the file name.
• Reel: (Reel)_(File No.).wav will be set as the file name.
Press the [ENTER/YES] key to set the mode. The setting will be saved on the internal Flash
ROM.
Add Machine ID
You can choose whether or not the Machine ID is included in the file name. The machine ID is
created by the ES Device ID setting in the menu -> RS422.
Place the cursor to the "Add Machine ID", then press the [ENTER/YES] key to move it to the
right.
Rotate the [MENU] dial to choose either ON or OFF.
Press the [ENTER/YES] key to set the mode. The setting will be saved on the internal Flash
ROM.
Scene name
Place the cursor to the "SCENE NAME" and press the [ENTER/YES] key to move it inside the
parenthesis. You can now enter or edit the scene name by using the 10 key buttons, [MENU] dial
or a USB keyboard. Press the [ENTER/YES] key to set the scene name. The cursor will move to
the TAKE number edit menu. Press the [EXIT/NO] key once satisfied. The setting will be saved
on the internal Flash ROM.
The scene name set with the above procedure will be used for the file name, if the file name
mode is set as TAKE. Also, the scene name will be used as Scene Data in the metadata regard-
less of file name mode setting.
SCENE NAME
The first digit has to be a letter of the alphabet. The maximum scene name length is 17ASCII
characters on the DV824. If inappropriate letters are entered as the scene name, the display will
alert you with "Illegal Name!" message.
Take number
After entering the scene name, the cursor will move to the TAKE number edit menu. The default
take number is 001. You can now enter or edit the take number by using the 10 key
buttons, [MENU] dial or a USB keyboard. Press the [ENTER/YES] key then the [EXIT/NO] key
once satisfied. The setting will be saved on the internal Flash ROM.
The take number set with the above procedure will be used for the file name, if the file name
mode is set as TAKE. Also, the take number will be used asTake Data in the metadata regard-
less of file name mode setting. The take number will be automatically increased when a new file
is created.
3. Simultaneous Playback (ALE Link Playback)
It is essential that all the machines need to have theALE file created individually and
theALE file needs to have the identical events.
3.1. By pressing the List Play key, the Master machine will set the List Play mode and
issues Group select enabling the Bus connection to all the Slave machines.
The communication is one way via Sony P2 Protocol. The master will issue the Load
ALE File Command and let the slave machines load theALE file the same as the
master. When the slave machines do not have the same ALE file, it will cancel the
Bus connection. The master allocates enough waiting time to ensure all the slaves
load theALE file before it moves to the next step.
3.2. The Master machine will locate to the song start position itself. At the same time, it
will issue the Instant Locate Command to the slaves. The master machine will
secure a long enough locate time. The slave machines accomplish the Locate to
prepare for the Instant Play command issued by the master.
3.3. The master machine will issue the Instant Play Command to itself as well as to all the
slave machines.All the machines will go to the Play mode at the same time.
3.4. By pressing the [STOP] key, the master machine will issue the Stop Command.
The slave machines will stop playback.
3.5. The master machine will issue the Song Position Command to the slaves in order to
secure the precise stop position.
3.6. In order to secure a precise lock among all the machines, the steps 3.2 and 3.3 are
repeated automatically.
3.7. By pressing the [LIST PLAY] key, the master machine will issue the List Play Off
Command to the slaves and cancel the list play. The List Play can also be cancelled
by the Song File Load.
When the master loads the List Play, it establishes the Bus connection to the slaves.
LoadALE Command issued. When no such file is found, it will cancel the Bus connection.
Instant Locate Command issued.
Instant Play Command issued. Playback will start.
Stop Command issued. Playback will stop.
Song Position Command issued.
List Play Off Command issued.
4 9
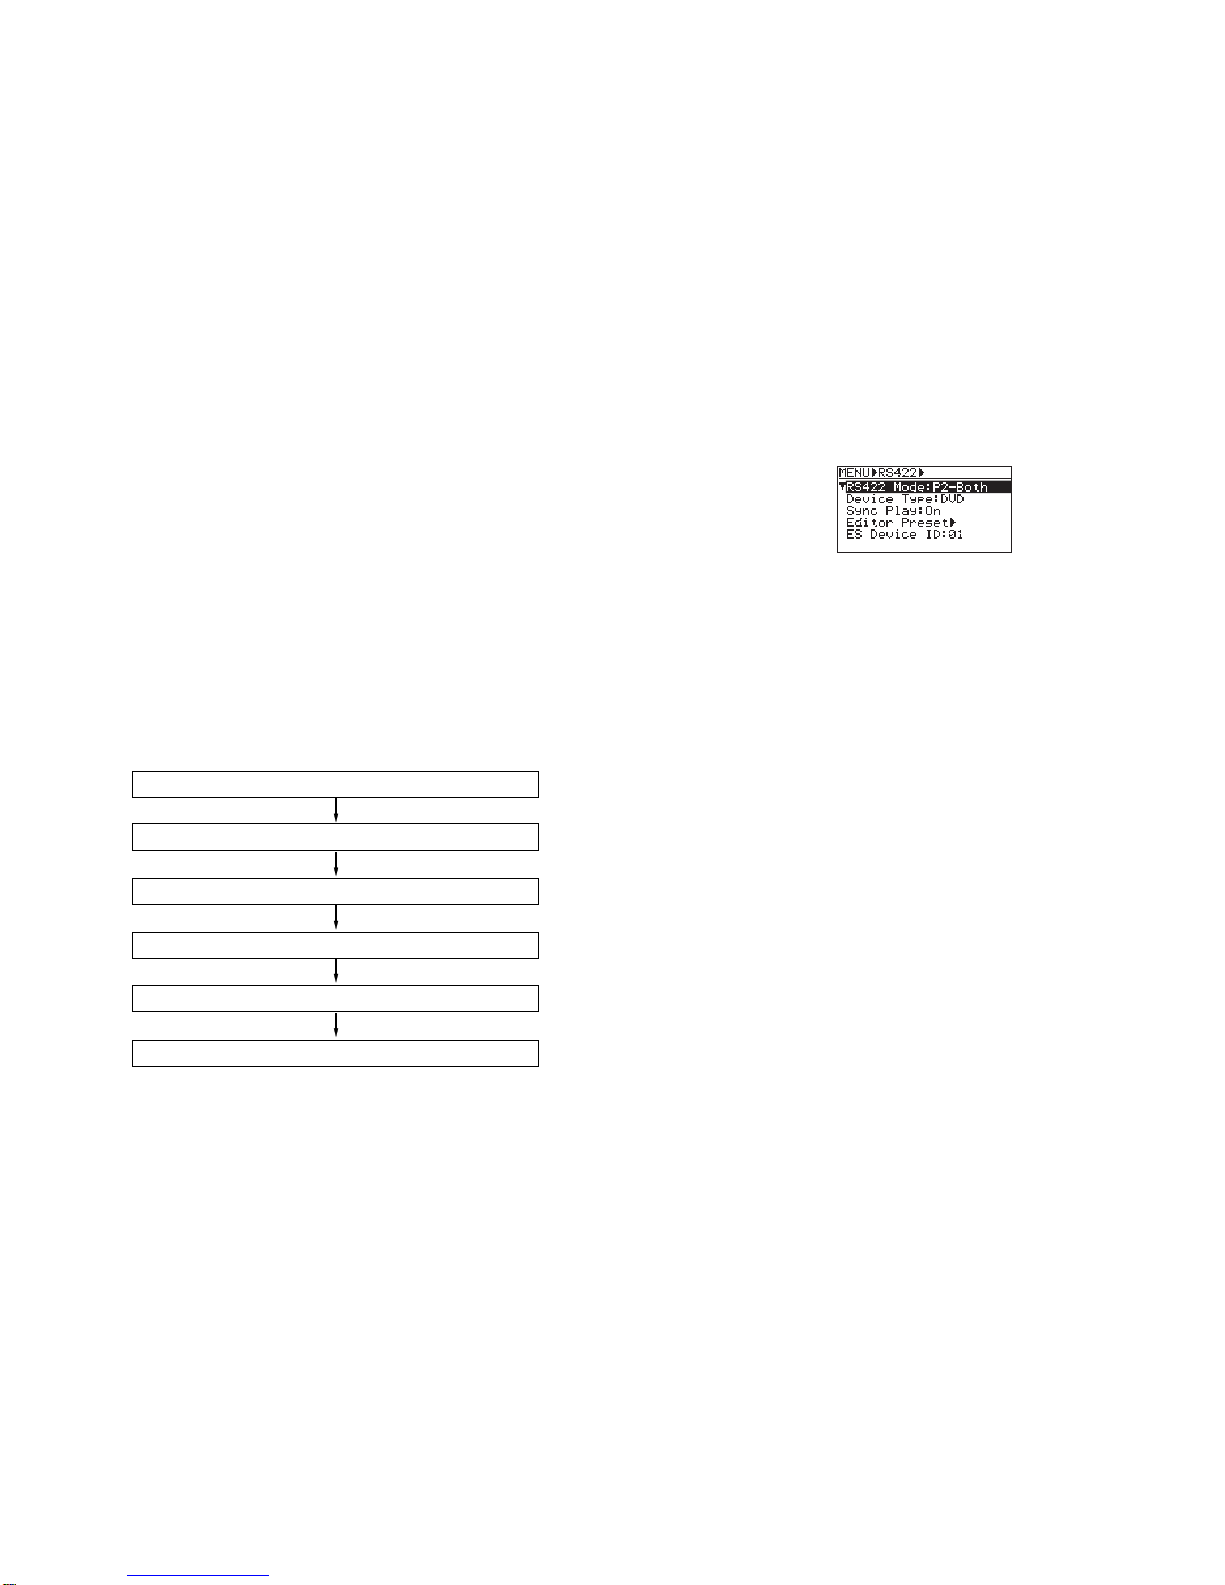
RS422 Setup
Go to the Menu by pressing the [ENTER/YES] key and choose the RS422 SETUP.
RS422 Mode
Here you can choose the RS422 operations from the following options;
• P2-Both:
The DV824 will accept its own panel controls and Sony P2 protocol.
• Local:
The DV824 will only accept its own panel controls. It ignores any RS422 commands.
• P2-Remote:
The DV824 will ignore its own panel controls. It only accepts Sony P2 protocol and performs
as Controlled Device.
• ES-Both:
The DV824 will accept its own panel controls and ES-Bus command. It performs as ES-Bus
Slave.
• ES-Slave:
The DV824 will ignore its own panel controls. It only accepts ES-Bus commands and
performs as ES-Slave.
• ES-Master:
The DV824 will accept its own panel controls and also send ES-Bus commends to all the ES-
Slave machines.
When set to ES-Slave with the ES-Bus connection established, the LCD screen will show
"ES-Slave". Likewise, when set to ES-Master, the LCD screen will show "ES-Master".
Note:
The word clock connection is recommended from the ES-Master to ES-Slave.
ES Device ID:
Please set different device ID's among the DV824's connected via ES-Bus. By doing so, the
above mentioned Machine ID is established within the file name. The ES Device ID can be
chosen from 01 to 99. This is used as Machine ID.
SCENE_001(01).wav (01): ES Device ID = 01
ES Master, Slave Control
The ES Master DV824 provides the simultaneous remote control of Record and Playback to
all the ES Slave DV824's. It is recommended to feed the external master word clock or video
signal to the master machine and all the slave machines.Alternatively, you can feed the word
clock from the master machine to the slave machines via the through ports.
The sync accuracy is 1ppm if TC card (8348) is fitted to all the machines.
2. Simultaneous Playback (Individual file playback)
The ES Slave machines need to be powered ON prior to the ES Master machines.
They need to have the same DVD disk or HD partition loaded as the ES Master.
2.1. The Master machine sets the Song File Select and issues Group select, enabling the
Bus connection to all the Slave machines. This communication is one way via Sony P2
Protocol. The master will issue the Load Song File Command and let the slave
machines load the file with identical file name as the master. When the slave machines
do not have the same file names, it will cancel the Bus connection. If thefile name has
the device ID, it will convert it to (* *) and consider the part as wild card.
2.2. The Master machine will locate to the song start position. At the same time, it will issue
the Instant Locate Command to all the slaves. The master machine will secure the
ample locating time. The slave machines accomplish the Locate to prepare for the
Instant Play command issued by the master.
2.3. The master machine will issue the Instant Play Command to itself as well as to all the
slave machines. All the machines will go to the Play mode at the same time.
2.4. By pressing the [STOP] key, the master machine will issue the Stop Command.
The slave machines will stop playback as well.
2.5. The master machine will issue the Song Position Command to the slaves in order to
secure the precise stop position.
2.6. In order to ensure precise lock among all the machines, the functions 2.2 and 2.3 are
repeated automatically.
When the master loads the File Select, it establishes the Bus connection to the slaves.
Load Song Command issued. When no such file is found, it will cancel the Bus connection.
Instant Locate Command issued.
Instant Play Command issued. Playback will start.
Stop Command issued. Playback will stop.
Song Position Command issued.
58

• Pre RecTime Set: Set Pre Rec command.
The ES-Master will send the command to set the identical Pre-Rec Time to the ES-Slaves.
• FS/Bit set and Pull Up/Down set: Set FS/Bit/Pull Up/Down command.
The ES-Master will send the commands to set the identical FS/Bit rate and Pull Up/Down
setting to the ES-Slaves. The "safe ready" needs to be set to ready prior to performing this
function.
• Edit File Name set: Rename File Name command.
Editing the File name on the ES-Master will simultaneously change the file name on the ES-
Slaves. The machine ID will be kept intact.
Applications
1. Simultaneous Recording
When the Master DV824 enters Record mode, it will issue the record command to all
the ES-Slave DV824s.
1.1. The ES bus connection will be established when the master machine sets Safe/
Ready to Ready. All the ES-Slave DV824's will accomplish Group Bus Select.
With the ESC command, one way communication is established via Sony P2
Protocol.
1.2. All the ES-Slave DV824s will have the identical file name as the master machine.
However, when the Machine ID mode is set to ON, It will add a Device ID in the
file name to identify the files.
1.3. All the ES-Slave DV824s will have the identical Time stamp as the master
machine. This is stored in the BEXT chunk time reference.
The ES bus commands that the master issues are of Broadcast type.
The communication is one way only and the master machine does not monitor
the status of the Slave machines.
The master sending Record command
When pushing the Safe/Ready key, the Edit Preset Command is issued. It will change Safe/Ready to
Safe.
By pressing the Stop key on the Master, a Record Stop Command is issued.All the machines stop
recording.
Set LTC Start Time Command issued. All the machines have the identicalTime Reference.
Instant Rec Command issued. All the machines will enter the record mode at exactly the same time.
By pressing the Record key on the Master, the Set new File Name Command is issued. It will now create
a new file on all the machines and set Rec-Pause.
The Edit Preset Command, Assemble Set issued. The bus connection with all the slave machines is
established. It will change Safe/Ready to Ready.
Commands generated by ES-Master
The majority of the following command can only be performed after the ES-Bus connection is
established among the ES-Master and ES-Slaves. For recording, it is done by the [SAFE/
RDY] key. For playback, it is done by the [FILE SEL] key.
• [PLAY] Key: Instant Play command.
The ES-Master and all the ES-Slaves will enter into the Record mode at the exactly same
address and same time.
• [STOP] Key: Stop + Set Song Position or Instant Locate command.
• ABS 0 Locate: Instant Locate command.
• ABS End Locate: Instant Locate command.
• [RECORD] Key: Set New File Name + Instant Rec command.
The ES-Master will send the information to all the ES-Slaves, the identical file name or the
identical file name with ES Device ID.
Set LTC Start Position command
After recording starts, the ES-Master will send the LTC start position to all the ES-Slaves.
• [MARK/CUE] Key (Cue Search): Instant Locate command.
The locate function is only available when in playback.
• [LOCATE] Key: Instant locate command.
• [FALSE START] Key: False start command.
The ES-Master will send the False start command to all the ES-Slaves. The False start setting
sent to the slaves will have the same setting made on the master machine.
• [SKIP] Key (File Skip): Load Song File command.
• [SKIP] key (Cue Skip):Instant locate command.
The locate function is only available when in playback.
• [ALL INPUT] Key: Full EE ON or Full EE OFF command.
• [SAFE/RDY] Key: Bus Select + Edit Preset command.
When safe ready is set to ready, the ES-Master will first establish the bus connection with all
the slave machines by using the Sony P2 protocol Bus select. It will then send a command to
set the ES-Slaves in the Ready mode. When safe ready is set to safe, the ES-Master will only
send the safe command but not the bus connection.
• [LIST PLAY] Key: Bus Select + LoadALE File command.
This operation is available on playback only. The ES-Master can set the link mode on the ES-
Slaves if the link mode is set to <All Link>. The ES-Bus function does not createALE files.
This needs to be created machine by machine.
If all the machines have the identicalALE already set, the ES master can set the link mode on
the ES-slave machines. If there are no identicalALE files existing on the slave machines, the
ES-Bus connection will be reset to idle.
• [FILE SEL] Key: Bus Select + Load Song File command.
When pressing the File Sel key on the ES-Master, it will establish ES-Bus connections to all the
ES-Slaves. When the ES-Master chooses a file, the ES-Slaves will follow the command and
load the identical files. However, if there are no identical file names existing on the slave
machines, the ES-Bus connection will be reset to idle.
• [F FWD], [REWIND] key: Stop command.
Even though the ES-Master enters either FF or RWD (including the Shuttle mode,) the
ES-Slaves will simply stay in the stop mode.
• [PRE REC] Key: Set Pre-Rec command.
The ES-Master will send the command to set the pre-record mode on the ES-Slaves.
6 7
Other manuals for DV-824
7
Table of contents
Other Fostex Recording Equipment manuals

Fostex
Fostex 3070 User manual

Fostex
Fostex VF80EX User manual

Fostex
Fostex D-10 User manual

Fostex
Fostex 4010 User manual

Fostex
Fostex VF-16 User manual

Fostex
Fostex RD-8 User manual

Fostex
Fostex X-15 Multitracker User manual
Fostex
Fostex FD-8 User guide

Fostex
Fostex MR-16HD User manual

Fostex
Fostex X-18H User manual

Fostex
Fostex D2424LV MKII User manual

Fostex
Fostex DV-824 Configuration guide

Fostex
Fostex VF-16 User manual

Fostex
Fostex E-2 User manual

Fostex
Fostex FR-2LE User manual

Fostex
Fostex 280 User manual

Fostex
Fostex DMT-8 User manual

Fostex
Fostex DE-1 User manual

Fostex
Fostex VF-16 User manual

Fostex
Fostex APPENDIX User manual


