Galaxy Audio HDR2 User manual


HDR2 Operation Manual
CONTENTS
TITLE PAGE
1. Introduction………………………..............................….1
2. Notice.…………………...................................................1
3. Parts description (switches, Connectors, and Buttons)……...2
4. Power on……………………...........................................4
5. Operate MENU setup....................................................4
6. Recording………..…........................................….….....5
7. Playback……..……...............................................….....8
8. Delete tracks……….....................................…………...9
9. Transfer to and from your computer…………..….…..9
10. Specifications...............................................................10

1.Introduction:
Thank you for purchasing the Galaxy Audio HDR2 Portable Handheld Digital Audio
Recorder. This product features leading edge digital recording technology, excellent sound
quality and easy operation. It is ideal for recording acoustic instruments, electric guitars,
vocals and keyboards as well as interviews, lectures, band rehearsal, nature field
recordings…and more.
Features of HDR2
9 Groups and 99 Recording Tracks
The HDR2 provides 9 groups, numbered 1-9, and 99 recording tracks for each group, for
either the internal flash memory or SD card. You may select any blank track number you
prefer to record on before you record, or the HDR2 will select a blank track for you
automatically. Whenever a track is recorded, the track number will remain the same, even if
the previous track is deleted or added. All of the internal flash memory or SD card may be
devoted to a single continuous track if desired.
Two Storage Folders
The HDR2 provides two folders for storage of files: in FOLDER 1, you can record music either
fromthebuilt-inmicrophones,fromexternalmicrophones,fromanelectricguitarorfromLine-
insourcesandplayitback. InFOLDER2,youcandownloadMP3musicfromyourPCorMAC
andplayit. Thetwofoldersallowflexibilitytoorganizeyourrecordingsanddownloads.
LeadingandUniqueSoundMixerTechnology
The GalaxyAudio HDR2 is equipped with built-in microphones, and two audio inputs. When
you connect audio inputs to record, the sound will automatically be mixed with the built-in
microphonewithabalancelevel. Ouruniquesoundmixingtechnologyisperfectforoccasions
with multiple instruments playing, combinations with background music or for the creation of
anycreativemusicmadebyyou!
MultipleAudioInputsSelection
The HDR2 is equipped with two Audio-in jacks for Left & Right channel recording. A selector
switch allows an external microphone, electric guitar, or Line-in as recording sources, by
changing the switch position of theAudio-in selector. The multiple audio input selection adds
moreconveniencetoyourrecordingexperience.
2.NOTICE
PleasereadthefollowingnoticebeforeyouusetheHDR2.
1. Pleasereadthisguidecarefullybeforeyouusethedevice.
2. PleasenoticethepositiontoputbatteriesinsidetheHDR2.
3. ThereisanoptionalUSBDCpoweradaptoravailable(HDR2USBDC)
4. Please do not take apart or repair the HDR2 by yourself. Please bring the HDR2 back to
yourretailerorcontactthefactory.
1

5. In order to keep stable data transmission, please do not twist the USB cable when you
plugitintothecomputer.
6. The built-in LCD display is a fragile electronic part, please do not press on it and do not
touch it with sharp objects. We suggest you use only a special cloth to clean the LCD
display.PleasemakesurethattheLCDdisplaydoesnotgetexposedtowater.
7. The SD card is a very precise electronic device, please use it according to the following
notice: Do not take the SD card out of the HDR2 during data transmission. Do not bend,
strike, drop or take apart the SD card. Do not place the SD card in a place with high
temperature, high humidity or dust. Do not expose the SD card to static electricity. In
addition:
lPlease make sure the SD card you are using has been formatted (the format type of
the HDR2 is FAT32).
lPlease release the write protection switch of the SD card before you record.
lThe HDR2 processes large amount of data during recording and playback. We strongly
suggest you use high speed SD cards only, to prevent noise, data loss or any
transmission problems.
Wedonotguaranteethefunction,operationorlifeofanySDcardthatisusedinthedevice.We
also do not take any responsibility for the damage of SD cards. Like any digitally stored
data,itshouldbebackedupregularly.
3.PartsDescription(Switches,Connectors,andButtons)
Switches and connectors on the HDR-2
GA L A X Y AUD I O
HANDHELD DIGITAL
RECORDER
HDR2
1. Built-in microphone “L “channel: an omni condenser microphone is installed into the
deviceas“L”channel.
2. Built-in microphone “R” channel: an omni condenser microphone is installed into the
deviceas“R”channel.
2

3. RecordingindicatorLED:theLEDwilllightupduringrecording.
4. Built-in speaker: a monitor speaker is installed, it is not active when earphones are
pluggedin.
5. Batterycover:openthecoverandinstalltwoAAbatteriestooperate.
6. Battery select switch: when using primary batteries (orAlkaline batteries), switch to
“1.5V”;orswitchto“1.2V”whenusingNi-MHrechargeablebatteries.
7. VolumecontrollerofAudio-in“L”channel
8. VolumecontrollerofAudio-in“R”channel
9. Audio-in “L” channel: it allows audio input of M(ext. microphone), G(guitar) or L(Line-
in).Itprovides1.5Vpowersupply.
10. Audio-in “R” channel: it allows audio inputs of M(ext. microphone), G(guitar) or
L(Line-in). Itprovides1.5Vpowersupply.
11. Audio-in selector: to select three kinds of audio input types, M(ext. microphone) /
G(guitar)/L(line-in)
12. Built-in microphone sensitivity selector: H(high) / L(low) / OFF: to select the
sensitivity level of built-in microphones, H(high) or L(low). Or switch off the built-in
microphones(OFF).
13. Key hold switch ON / OFF: switch “ON” to hold (stop running) the key control, or
switch“OFF”toreleasekeycontrol.
14. Earphone jack (stereo): when an earphone is connected to this jack, the built-in
speakerwillbeswitchedoff.
15.Lineoutport:connecttoanamplifier.
16.SDcardsocket:forSDmemorycards.
17.SDport/DCPowerin:UseaUSBcabletoconnectingwithacomputer. Youmayuse
a USB type DC adaptor (DC 5V) to power the unit from this port (DC power adaptor is
notincluded;modelHDR2USBDC).
Record button: press this button to start recording (there may be a few second pause
beforetheindicatorlightsup).
Stop button: press this button to stop or cancel operations (recording, playback,
delete…)
A-B loop button: press this button during playback to define a loop start point (Apoint),
then press the button again to indicate the loop end point (B point). The track will then
playfromAtoBrepeatedlyuntilyoupressthebuttonagaintostop.
MENUbutton:pressthisbuttontoenterMENU,pressthebuttonagaintoleaveMENU.
Power/Play button: press and hold 2 seconds to switch ON or OFF the HDR2; Press
the button to PLAYBACK; press it during playback will pause playback, push it again
to continue playback.
Track down/Rewind button: Press this button once to select previous track, hold
down the button to change the track number quickly; Hold down the key during
playing to rewind playback, release the button to go back to normal playback.
3

MODE button control
TheMODEbuttonisusedtoprovideadditionalfunctions.ToselectaMODEfunction,pressthe
MODE button first (the LCD will show MODE) and then press the desired function button
immediatelytoselecttheMODEfunction.Hereisadescriptionofthemodefunctions:
Track up/Forward key: Press this button once to select next track, hold down the
button to change the track number quickly; Hold down the key during playing to fast
forward playback, release the button to go back to normal playback.
Vol. up/ Manual selector button: Press this button during playback to increase the
volume level of headphone or speaker; Press this button for item selection when in
MENU mode.
Vol. down/ Manual selector button: Press this button while playing to decrease the
volume level of headphone or speaker; Press this button for item selection in MENU
mode.
Memoryselection:usethisfunctiontoselecttheinternalflashmemoryorthe
SDcardmemoryastherecordtargetandplaybacksource.
Deletetracksfunction
Folder1orFolder2selectfunction
Groupnumber:decreasetheselectionfunction
Groupnumber:increasethegroupnumber
4.Poweron
1. OpenthebatterycoverandinstalltwonewAAbatteriesintotheHDR2.
2. The HDR2 works on both primary batteries (Alkaline batteries) and Ni-MH rechargeable
batteries. When using Alkaline batteries, select the “1.5V” position; to use Ni-MH
rechargeablebatteries,selectthe“1.2V”positionofthebatteryselectswitch.
3. Press and hold the button for two seconds. The device will switch on and enter the
operatingmode.
4. Pressandholdthebuttonfortwosecondstoswitchoffthedevice.
5. Thedevice will switch offautomatically if no otherbutton is pressed after 5minutes (except
wheninrecordorplaymode).
6. The LCD will show “Battery Low” when the batteries are nearly exhausted. Please install
newbatteriesatthispoint.
5.OperateMENUsetup
When the key is pressed, the LCD will display all main items of MENU setup. Press
the or keystomovetopreviousornextmainitems.Press or keys to
select secondaryitems.Pressthe keyagaintoexitMENUmode.
+
+
+
+
+
4

1.Recordingformat:Therearetwoformatsavailableforrecording,WAVandMP3.
2. Sample rate: For WAV format, there are 6 sample rates to select: 8KHz, 11KHz, 16KHz,
22KHz,32KHz,44KHz. ForMP3format,thereisonlyonesamplerate:44KHz
3.REP(repeat): there are two playback repeat functions, REPEAT(the track will be repeated)
orREPAll(thedevicewillrepeatallthetracks). The LCD will show nothing if user does not
selectREPfunction.
4.BL(backlighttime):Therearefourselectablebacklighttimes:
ON(backlightalwayson)
10s (turn the back light off if there is not any other button pressed after
10sec)
20s (turn the back light off if there is not any other button pressed after
20seconds)
OFF(nobacklight)
6.Recording
Howtorecord
5

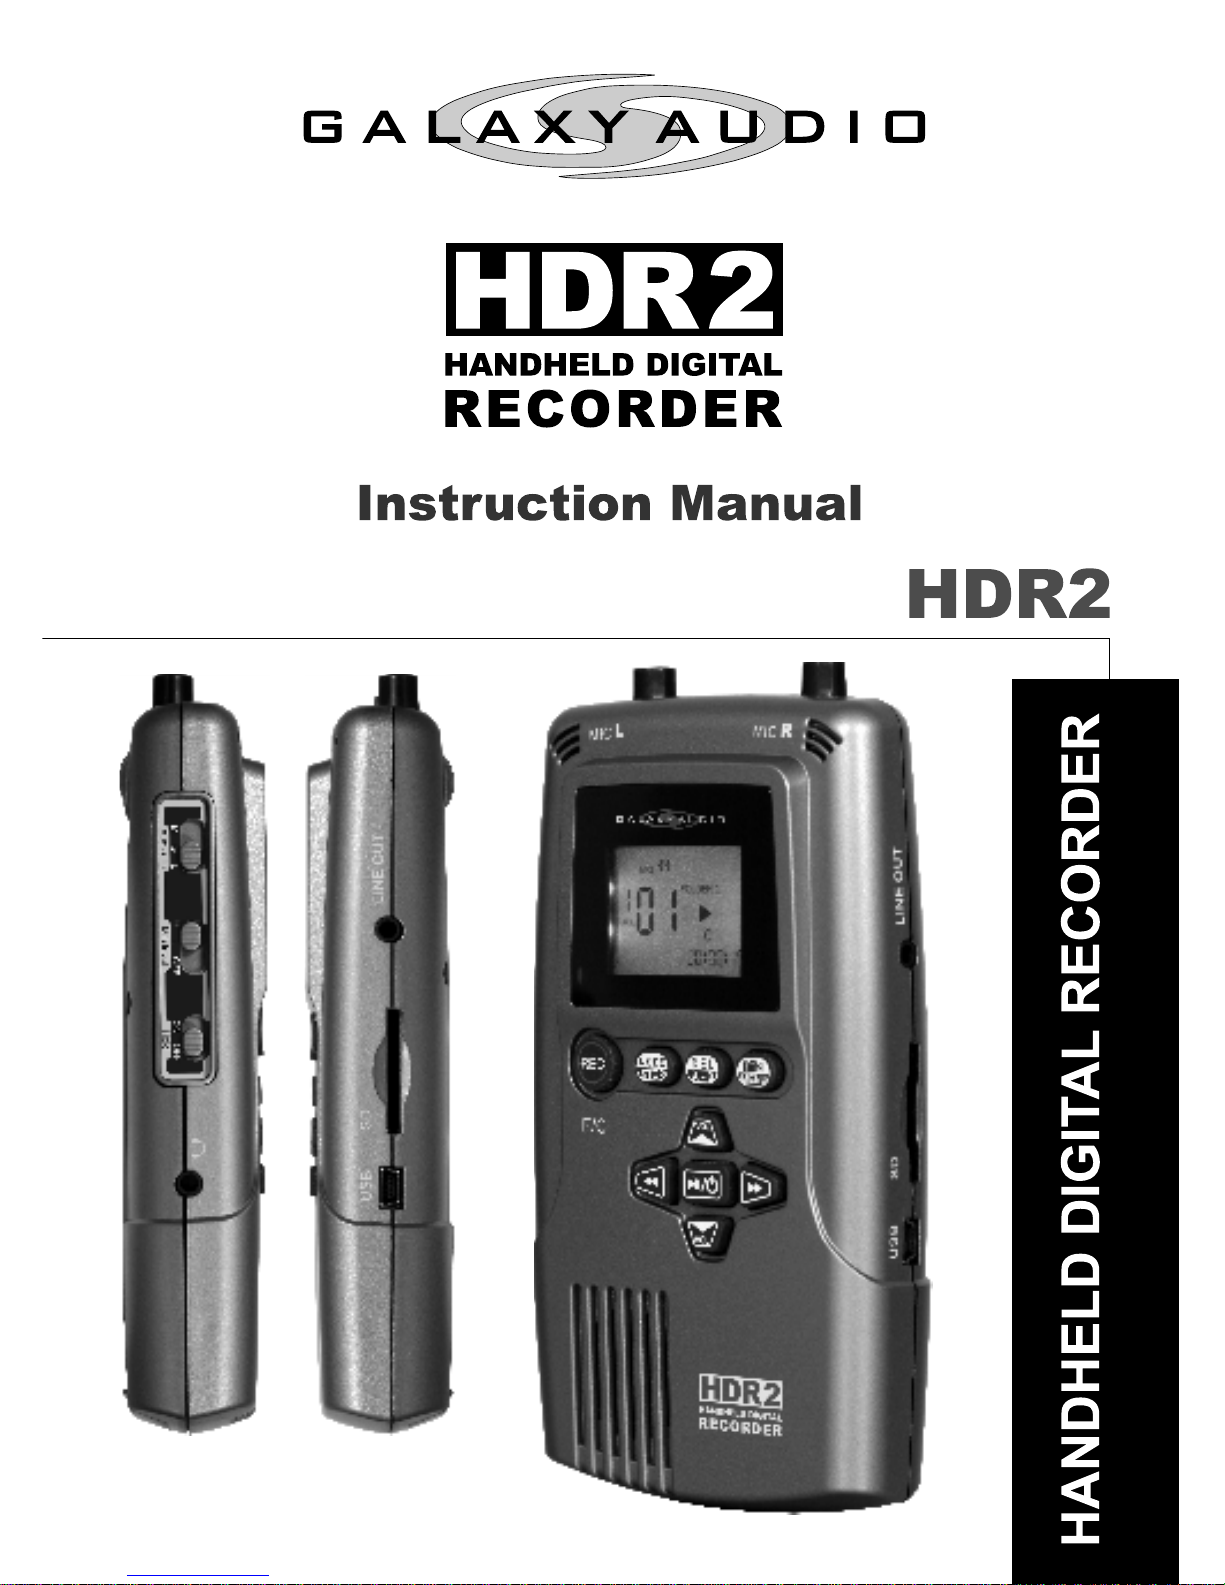
1. The device allows you to record ONLY in FOLDER 1. To change to FOLDER 1,
press + , when the LCD display shows FOLDER 1, you are in FOLDER 1
mode.(1)
2. The device allows you to record into the internal flash memory or into an installed SD card
memory (2). The HDR2 will change to the SD card memory automatically when SD card
is installed. Or you can press + to interchange between the memory of the
internalflashmemory(F)andtheSDcard(C).
3. Press + or + toselectthegroupnumberintherangefrom1to9.(3)
4. Press or toselecttherecordingtrackintherangefrom01to99torecord(4). You
mayselecttheblanktracknumberyouwanttorecordto,thenpress buttontorecord;
Or just press button directly, the device will select a blank track that follows the last
recordedtrack number to record (forexample,if the last recorded tracknumberis 05, the
automaticallyselectedtracknumberwillbe06).
5. Press buttontostartrecording,theRecordingindicatorLEDwilllightup(theirmaybe
ashortdelayafterpressingREC button andseeingtheindicators),andthetimeclockwill
start running (5), which means that the recording is in progress. Press to pause
record during recording, the Recording indicator LED will start flashing, press the same
buttonagaintocontinuerecording. Press buttontofinishrecording.
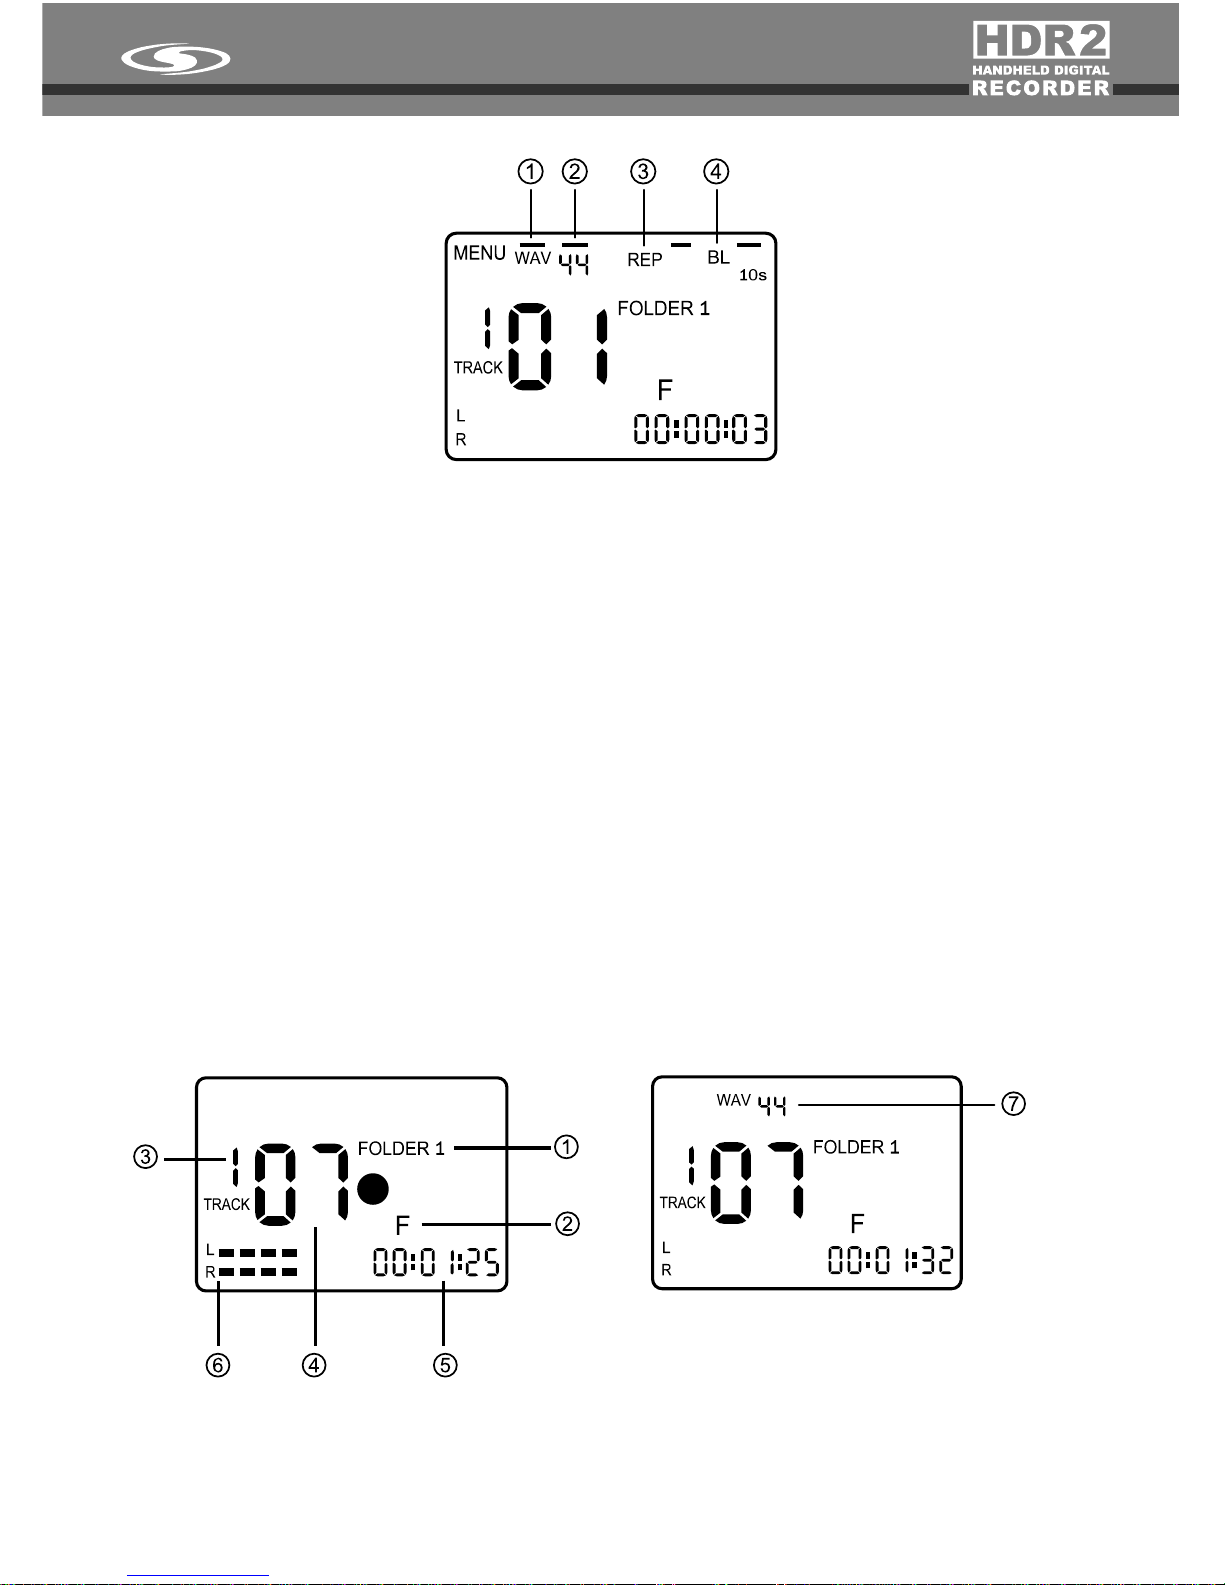
6. The volume indicator will show on the LCD during recording (6), you can adjust input
volumebytheVolumecontrollerofAudio-in(8 or 9).Besuretowatchtherecordinglevel.
Settingittoohighmayresultinadistortedrecordinglevel.
7. Whenyoufinishrecording,therecordingformatandsamplerateofthistrackwillshowupon
theLCD.(7)
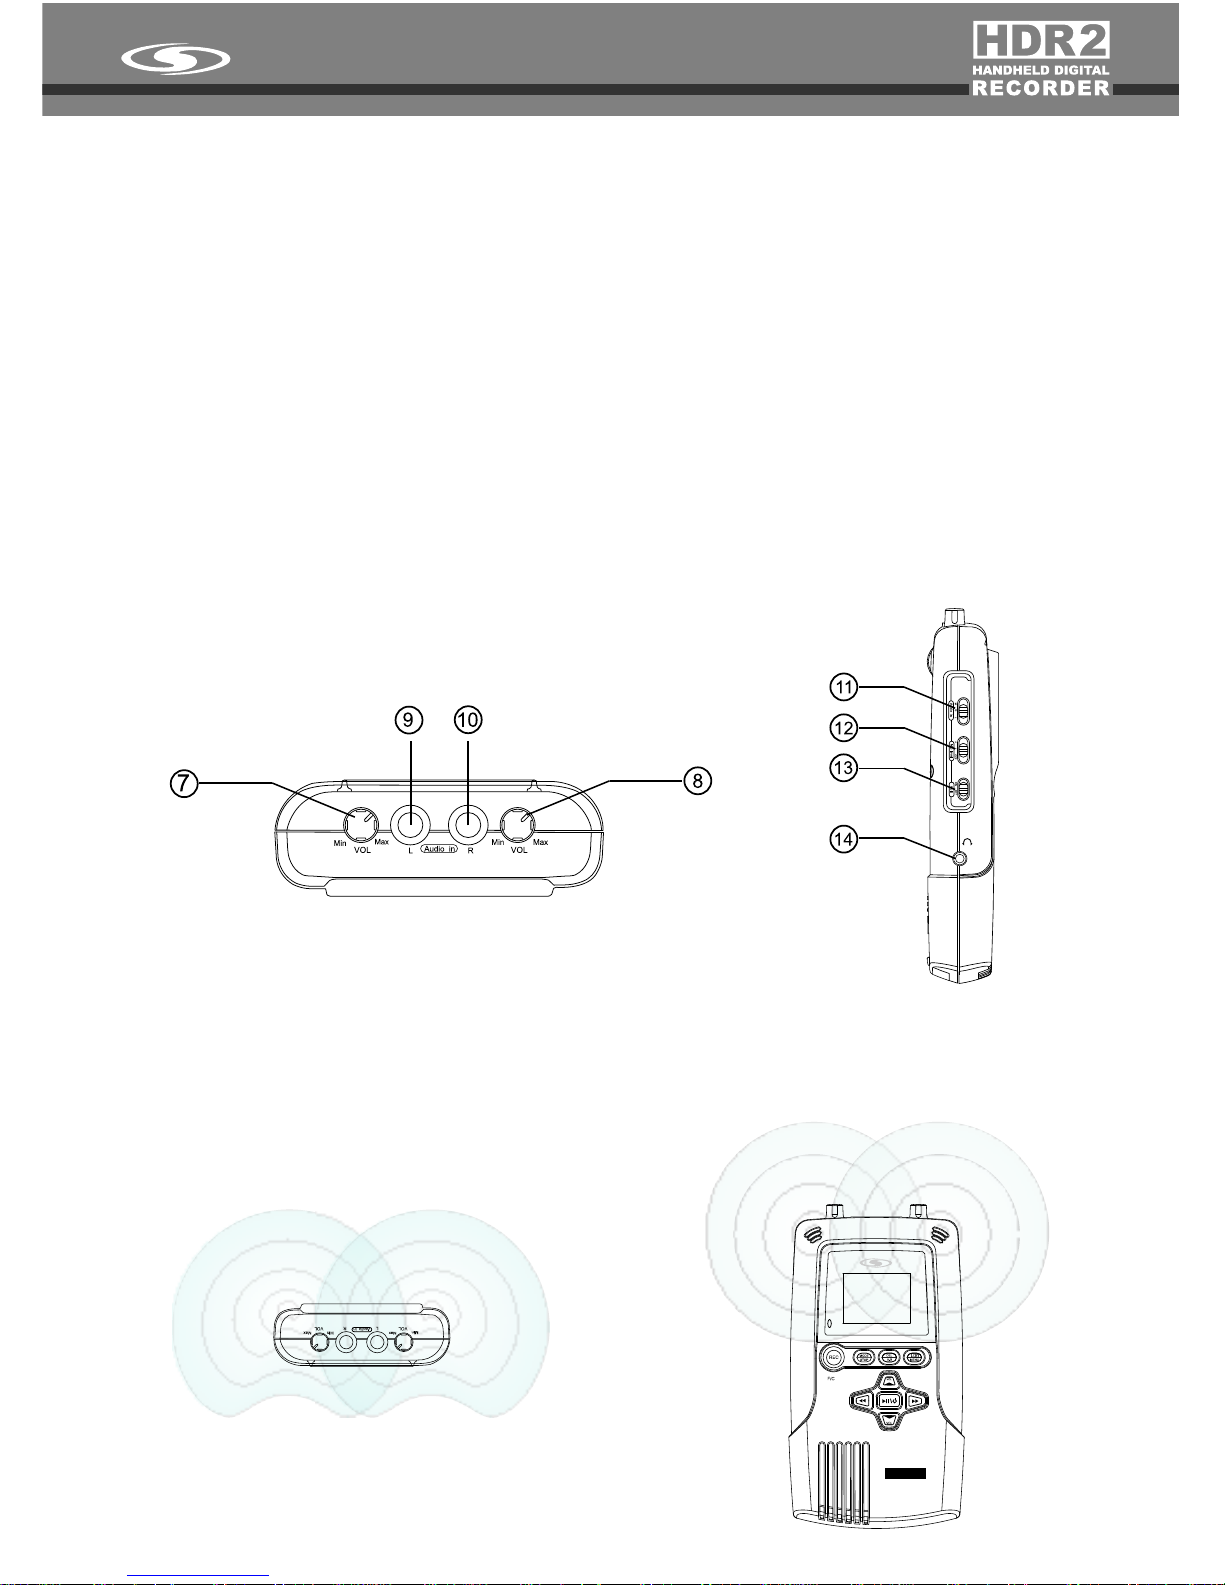
8. For extended time recording or playing, you can move the Key hold switch (14) to ON
position to disable all buttons and switch to the OFF position to enable all buttons. This
featureisusefultopreventaccidentalinterruptions.
Recordfrommicrophones
1. The HDR2 is equipped with two built-in microphones (omni directional condenser type).
You may adjust the high/low sensitivity level of the built-in microphones using the Built-in
microphonesensitivityselector(13).Thehighsensitivitylevelofbuilt-inmicrophoneisat-
45dB (at 1KHz), while the low sensitivity level is at -35dB (at 1KHz). You may also adjust
theVolumecontrolofAudio-intomakefinevolumeadjustments.(7or8).
2. Therearetwo¼”Audio-injacksontheHDR2(9&10).Theyallowyoutoplugtwoexternal
microphones into the jacks for recording. Select to “M” position of the Audio-in selector
(11). The twoAudio-in jacks both provide DC 1.5V power. You may use either condenser
microphones or dynamic microphones as recording sources. The external microphone
record level is adjustable via the volume controls (7 or 8). The mic sensitivity switch (12)
hasnoeffectontheexternalmics.
6

3. Thebuilt-inmicrophonesandtheexternalmicrophoneswillbemixedinstereototherecord
trackwiththebalancelevelsyouhaveset.
4. You may turn off the built-in microphones while recording from other sources. Switch OFF
theBuilt-inmicrophonesensitivityselector(12)
Recordfromelectricguitarorline-in
1. TheHDR2allowsyoutopluginanelectricguitarasarecordingsource.Pleaseselect“G”
on the Audio-in selector (11). The electric guitar record level is adjustable via the volume
controloftheAudio-injack(7or 8).
2. The HDR2 allows you to connect line level sources, such as CD players, tape decks,
radios, etc. Please select “L” of the Audio-in selector (10). The line-in record level is
adjustableviathevolumecontroloftheAudio-injack(7or8).
3. Thebuilt-inmicrophonesandtheelectricguitarorline-inrecordingsourcewillbemixedin
stereototherecordtrackwiththebalancelevelsyouhaveset.
4. Youmayturnoffthebuilt-inmicrophoneswhilerecordingfromothersources. SwitchOFF
theBuilt-inmicrophonesensitivityselector(13)
7
MicrophonePositioning
1. Polarpatternofthebuilt-inmicrophones:
The built-in microphones of the HDR2 are an omni-directional condenser. Following is a
diagram of the microphone polar pattern.
R L
Front
L R
GA L A X Y AUD I O
HANDHELD DIGITAL
RECORDER
HDR2

2.Toproducebestrecordingresult,wesuggestthatyouputtheHDR2atadistanceofaround2
ft.fromthesoundsource,attableheight.
3. Please adjust the input volume level to the proper setting. Do not set to the highest volume
levelonrecording,otherwise,therecordingsoundqualitywillbedistorted.Besuretowatch
therecordinglevel.Settingittoohighmayresultinadistortedrecordinglevel.
4. In situations where multiple instruments are played simultaneously, the HDR2 should be
positionedclosertoinstrumentswithlowersoundlevels–oryoumayneedtouseextension
microphonesforthedifferentinstruments.
5.If you want to recordspeech(e.g. from a teacher) togetherwiththeplaying of instruments, it
isbestifthespeakerusestheexternallapelmicrophone.
6. For better recording quality, the external lapel microphone could also be clipped on music
standsorthebodyofasingerorspeaker,dependingonthesituation.
7.Playback
8
1. FOLDER1orFOLDER2:EnterFOLDER1toplaythefiles/trackspreviouslyrecordedwith
the HDR2. Enter FOLDER 2 to play files downloaded/transferred from a computer. To
changebetweenthetwofolders,press + .(1)
2. PlaybackfromflashmemoryorSDcardmemory:Selectthefilesyouwanttoplaybackfrom
internal flash memory or SD card memory (2) (further explained in the previous chapter
Recording)
3. Select the Group and track you want to playback: Press + or to select group
numberintherangefromrange1to9.(3).Selectthetracktoplaybackbypressing or
buttonsintherangefrom1-99(4). Therecordingformatandsamplerateofthetrack
youselectwillshowupontheLCDdisplay. (5)
____

4. Press to start to playback. The LCD display will show “ “ . Press the same button
duringplayingtopause.TheLCDdisplaywillshow“ “andflash. Pressthesamebutton
againtocontinueplaying.
5. Forwardandrewindduringplayback:Holdon during playback torewindtheplaying.
Holddown toforwardtheplaying. Thetimedisplaywillmovequicklyaccordingtothe
position. Releasethebuttontogobacktonormalplayback.
6. Repeat and RepeatAll: Enter the MENU mode, to set up repeat mode. If you select REP,
the track will be repeated. If you select REP All, the device will repeat all the tracks.
Pleasenote that theREPAll function onlyworksin FOLDER 2mode. The LCDwillshow
REPmodeontheLCDdisplay.(6)
7. A-B loop : press button during playback to define a loop start point (Apoint), then
press the button again to indicate the loop end point (B point). The music will then play
fromAtoBrepeatedlyuntilyoupressthebuttonagaintostop.(7)
8. The device allows you to adjust the volume level of earphones or built-in speaker by
pressing or duringplayback. Thelevelrangeisfrom00to20.
8.Deletetracks
Youcandeletetherecordingfilesviacomputerorbythedeviceitself.Todeletethefileswiththe
device: Selectthe trackyouwant to delete,press + ,the LCD willshow“dEL”, then
press again, the machine will start to delete the track. When the LCD stops showing
“DELETE”, and the clock returns to 00:00:00, means the track is empty and is available for a
newrecording.
9.Transfertoandfromyourcomputer
The HDR2 can be connected to a computer to copy and store your recording files on your
computer(tobackupyourdata)ortodownloadmusictoplayontheHDR2.
When you connect the USB port of the HDR2 to your computer, the computer will detect the
HDR2 as two removable disks (the first disk represents the built-in flash memory; the second
disk represents the SD card memory), and you will find folders of Group 1 – 9 in each
removable disks. The music you have downloaded from the computer to the HDR2 will be
accessibleinFOLDER2,andthetracknumberdependsonthesequenceinwhichthefilesare
transferred. ThismeansthatthetracknumberinFOLDER2isnotfixedandcanbechangedat
anytimeifatrackisdeletedoradded.Ifyouwantthefilestohaveafixedtracknumber,youcan
store the music in FOLDER 1. To do this, you simply need to change the filenames according
tothefollowingsequence:
a) If you want to download files to FOLDER 1 with a fixed track number, and store
them to the built-in flash memory, change the file name to M_INT_xx (where xx is
thetracknumberyouwantittobe.)
b) If you want to download files to FOLDER 1 with a fixed track number, and store
themtotheSDmemorycard,changethefilenametoM_EXT_xx(wherexxisthe
tracknumberyouwantittobe.)
The HDR2 may be powered using a USB adaptor. When connecting with the computer, press
once,themachinewillentertheoperating mode, then you can operate the device with
thepowerfromthecomputer.Toexittheoperatingmode,press forover2seconds.
______
9

10.Spcifications
Recording media: Internal flash memory 128MB, SD memory card (16MB - 2GB), SDHC
memory card (4GB)
SD card format type: FAT 32
Recording format: WAV(16bit), sample rate:8/11/16/22/32/44.1KHz; MP3(128Kbps),
sample rate: 44.1KHz.
Playback format: WAV: PCM WAV with sampling rate of 8KHz, 16KHz, 32KHz and
44.1KHz, MP3: MPEG1, MPEG2, MPEG2.5 Layer3, from
32K~320Kbps
S/N ratio at 1KHz: 55dB
Frequency response: 20 – 20KHz
Built-in microphone: Omni-directional condenser microphone type
Input: Two 1/4” mono for selection of extension microphone, Line-in, and Guitar (plug-in
power 1.5V) Built-in stereo microphones(L & R).
Output: 1/8” stereo headphone
1/8”stereo Line out
Built-in speaker: 0.2Watt, 8 Ohm
USB interface: Mini-B type (USB 2.0 Full-Speed compatible)
Power requirements: AA battery x 2, USB transfer cable, or USB DC adaptor 5V (not
included).
Battery life (Alkaline batteries): 5 hours for recording, or 6 hours for playback (by
headphone)
Dimensions: 6”(L) x 3.3”(W) x 1”(D)
Weight: 7oz (about 0.5lbs) (not including batteries)
Accessories: Two lapel microphones, USB cable, two AA batteries, and ear buds.
10


Specifications subject to change without notice.
V4242008
Table of contents
Other Galaxy Audio Recording Equipment manuals

Galaxy Audio
Galaxy Audio Any Spot AS-900 User manual

Galaxy Audio
Galaxy Audio Any Spot AS-900 User manual

Galaxy Audio
Galaxy Audio ANY SPOT AS-1400-2P User manual

Galaxy Audio
Galaxy Audio DSPOT DS-CP22 User manual

Galaxy Audio
Galaxy Audio Any-Spot AS-1800 User manual

Galaxy Audio
Galaxy Audio RM2 User manual

Galaxy Audio
Galaxy Audio AS-1400 User manual