Southern Pride SC-200 User manual
1 of 22 Copyright 2015 by Southern Pride Distributing, LLC Volume 2
401 South Mill Street , Alamo, Tennessee 38001 731-696-3175 http://www.southern-pride.com
OWNER’S MANUAL
Electric Woodchip-Burning
Stationary Rack BBQ Smoker
Southern Pride smokers have been tested and approved by Intertek Testing Services,
and are ETL listed to UL STD 197, certified to CSA STD C22.2 No. 109,
and to NSF/ANSI Standard 4.
ETL File Number 4007026
SC-200

2 of 22 Copyright 2015 by Southern Pride Distributing, LLC Volume 2
Southern Pride electric smokers are woodchip-burning, ETL listed, commercial cooking appliances
whose installation, operation, and maintenance should comply with the instructions in this manual,
NFPA® 96 and other codes and standards as called out in this manual.
For a list of ETL approved smokers go to www.intertek.com/directories, click on ETL Listed Mark
Directory and search “Southern Pride.”
For more information on NFPA® 96, or to obtain a copy of the latest publication, please contact:
NFPA®
1 Batterymarch Park
PO Box 9101
Quincy, MA 02169-7471
www.nfpa.org

3 of 22 Copyright 2015 by Southern Pride Distributing, LLC Volume 2
CONGRATULATIONS!
In selecting Southern Pride, you have chosen the finest, most advanced
and most fully automatic woodchip burning barbecue smoker available.
With us, “ It’s Simply, a Matter of Pride”.
Please read this Manual carefully prior to installation, operation and maintenance of
your Southern Pride smoker. Proper installation, operation, and maintenance are essen-
tial for your satisfaction and safe operation.
KEEPTHIS MANUALFOR REFERENCE
NOTE: An Electrical Diagram for this appliance can be found on the inside of the service access panel.

4 of 22 Copyright 2015 by Southern Pride Distributing, LLC Volume 2
TABLE OF CONTENTS
Safety Information and Precautions...................................................................5
Diagram of Controls & Components.............................................................. 6-7
INSTALLATION
Receiving the Smoker...........................................................................................8
Delivery Location..................................................................................................8
Unloading the Smoker..........................................................................................8
Unpacking the Smoker.........................................................................................8
Site Instructions ...................................................................................................8
Electrical Instructions..........................................................................................9
Installation Instructions for Restraining Device .............................................10
Venting Instructions...........................................................................................11
OPERATION
Woodchip Box Loading Instructions................................................................12
Product Loading Instructions ...........................................................................13
Control Operating Instructions...................................................................13-14
Product Unloading Instructions........................................................................14
Ash Removal Instructions..................................................................................15
Grease Removal Instructions ............................................................................15
Wood Storage Instructions................................................................................15
MAINTENANCE
Daily.....................................................................................................................16
Monthly .........................................................................................................16-17
As Needed......................................................................................................18-19
Wiring Diagram..................................................................................................20
Replacement Parts List......................................................................................21
Before You Call For Service..............................................................................21
Limited Warranty ..............................................................................................22
5 of 22 Copyright 2015 by Southern Pride Distributing, LLC Volume 2
SAFETY INFORMATION AND PRECAUTIONS
DANGER:
Do not store or use gasoline or other
flammable vapors or liquids in the
vicinity of this or any other appliances.
DANGER:
Improper installation, alteration, adjustment, service, or maintenance could result in severe
injury, death, or cause property damage. Read the installation, operating, and maintenance
instructions thoroughly before installing or servicing this equipment.
1. IT IS EXTREMELY IMPORTANT TO FOLLOW THE PRESCRIBED CLEANING INSTRUCTIONS.
GREASE OR SOLIDS BUILDUP INSIDE THE SMOKER COULD RESULT IN A FIRE HAZARD.
2. This smoker is intended for use in commercial facilities where all operators are familiar with the purpose,
limitations, and associated hazards of this equipment. The operating instructions and warnings must be read and
understood by all operators and users.
3. This manual and all supplied instructions, diagrams, schematics, parts lists, notices and labels must remain with the
smoker even if the smoker is sold or moved to another location.
4. The area around the smoker MUST be kept clear and free of combustible materials, gasoline and other flammable
vapors and liquids.
5. The flow of combustion and ventilating air MUST NOT be obstructed from reaching the smoker.
6. The frame of the smoker MUST be electrically grounded at all times. See “Electrical instructions”.
7. DO NOT remove service compartment access panels when smoker is in operation or leave off during operation.
8. DO NOT allow unqualified personnel to perform service work or adjustments on this smoker. Doing so, will VOID
WARRANTY and could result in a hazardous condition.
9. Ensure new employees, who might operate the smoker, are properly instructed and supervised on the operation and
safety information prior to operating the smoker.
10. Ashes removed from the woodchip boxes should be stored in a non-combustible container with a sealed lid only.
Store ashes in a well ventilated area. FUMES COULD BE HAZARDOUS.
This Manual should be considered a permanent part of this smoker. THE SMOKER MUST BE INSTALLED
BY A QUALIFIED SERVICE TECHNICIAN. All troubleshooting guides, component views and parts lists
included in this manual are for general reference only and are intended for use by qualified technical personnel.
CAUTION:
Metal parts and surfaces of this smoker
become extremely hot when in operation.
To avoid burns, always use hand
protection when operating the smoker.
WARNING:
ELECTRIC SHOCK HAZARD
Follow these rules to avoid electric shock.
Use only a properly grounded circuit.
Do not spray water directly on electrical compo-
nents.
Turn off power before servicing.
Read the owner’s manual before using.
6 of 22 Copyright 2015 by Southern Pride Distributing, LLC Volume 2
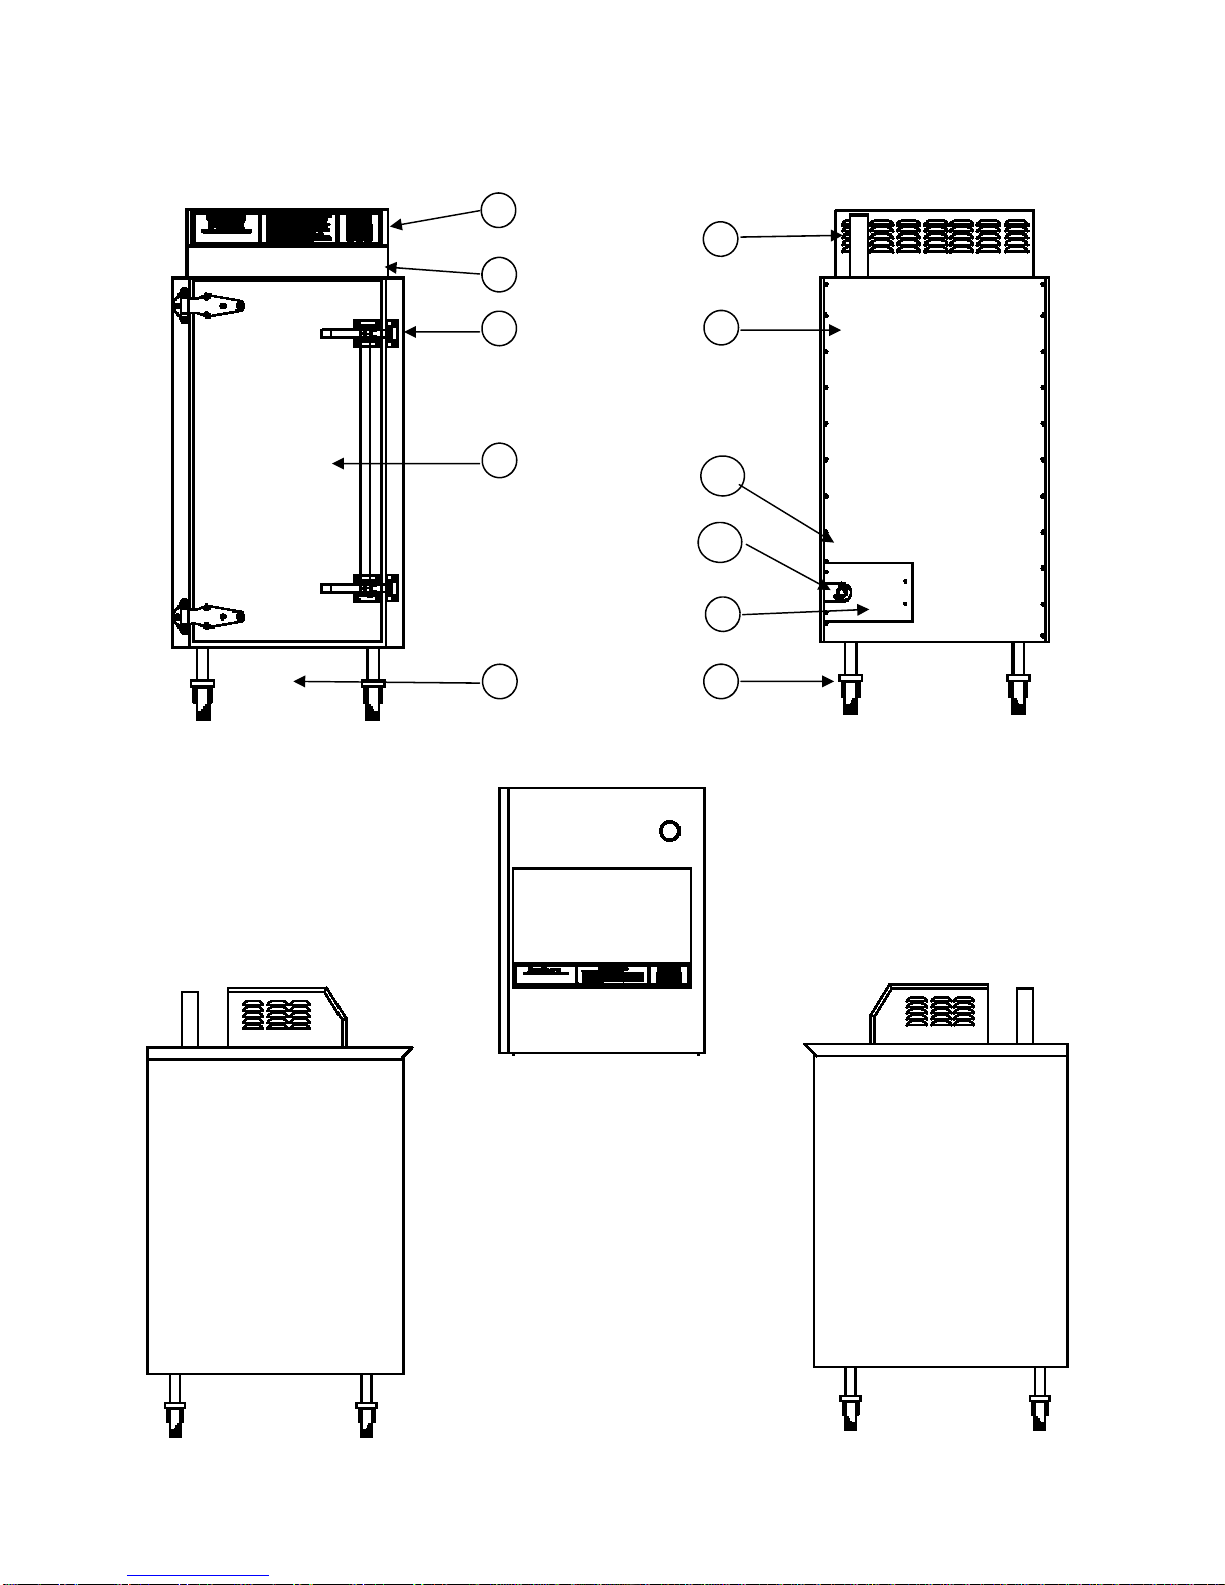
DIAGRAM OF CONTROLS AND COMPONENTS
Front View Rear View
Left Side View Right Side View
Top View
1
10
4
7
8
6
9 5
2
3
11

7 of 22 Copyright 2015 by Southern Pride Distributing, LLC Volume 2
DIAGRAM OF CONTROLAND COMPONENTS
1. DIGITAL COOK & HOLD CONTROL - Provides precise temperature control of the smoker along with control of the other
functions of the smoker.
2. FLUE - Designed for use with Type-1 Canopy hood.
3. GREASE DRAIN PAN – Opening in bottom of smoker allows grease to drain from Smoker into pan during the cook cycle.
Pan must be emptied after each cook cycle.
4. CASTER WHEELS - Casters provide a solid base and offers convenient mobility. The front casters are locking.
5. DATA PLATE - Label containing smoker’s serial number, model number, manufactured date, etc.
6. CONTROL / FAN MOTOR COMPARTMENT – Location of the convection fan motor, control module and relay board.
7. ELECTRICAL COMPARTMENT COVER - Access to the terminal block for electrical connection.
8. PRODUCT LOADING DOOR – Provides access to load/unload product and for cleaning the interior of the smoker.
9. PRODUCT LOADING DOOR LATCHES - Latches apply positive pressure and seals door.
10. POWER CORD CONNECTION - Access point for supply power cord to smoker.
11. TETHER / WALL ANCHOR BOLT MOUNTING LOCATION - Threaded hole for installation of eyelet bolt used to attach
restraining device for smokers mounted on caster wheels to guard against transmission of strain to the electrical connections.
Required by UL STD 197.

8 of 22 Copyright 2015 by Southern Pride Distributing, LLC Volume 2
INSTALLATION
RECEIVING THE SMOKER
Your smoker will be shipped via Common Carrier. Once the smoker arrives you will need a forklift to unload
the crated smoker from the truck, or utilize lift gate delivery service.
NOTE: The above weights are for the base model only.
DELIVERY LOCATION
Commercial smokers are large and heavy. Before scheduling the delivery of your smoker have a plan and lo-
cation in place to accept the delivery of the smoker and maneuver the smoker into the desired installation loca-
tion. The trucker will require a flat, level surface that is safe from traffic to unload the smoker. A forklift will
be required to unload the smoker unless lift gate delivery has been specified. The trucker is only responsible
for delivery of the smoker. It is your responsibility to unpack the smoker, move it to its installation location,
and install the smoker.
UNLOADING THE SMOKER
Once the smoker has been unloaded from the truck, note any damage to the crate, smoker or accessories. Do
not sign the delivery bill until the smoker has been inspected and any damage noted on the delivery bill.
The smoker is shipped on a wooden pallet with an industrial cardboard carton. Once the smoker is in a level
and safe place remove the cardboard box beside the smoker and the cardboard carton. The piece of oriented
strand board (OSB) next to the cardboard box folds down and functions as a ramp. After folding down the
ramp and unlocking the casters the smoker can be slowly and carefully rolled off the pallet. To prevent the
smoker from tipping over, two people should guide the smoker down the ramp.
UNPACKING THE SMOKER
The cardboard box beside the smoker on the pallet contains the following items:
(2) 18” x 26” (457 x 660mm) nickel chrome product racks (3 product racks are located in the smoker).
2 1/2” (63.5mm) grease drain pan
(2) woodchip boxes
Restraining device
(2) Drop-in flue dampers
SITE INSTRUCTIONS
The Southern Pride smoker must be installed in a location that will permit the smoker to function for its in-
tended purpose and to allow adequate clearance for ventilation, proper cleaning, and maintenance access.
Model Approx. Wt.
Uncrated Approx. Wt.
Crated
SC-200 284 lb. 350 lb.
9 of 22 Copyright 2015 by Southern Pride Distributing, LLC Volume 2
INSTALLATION
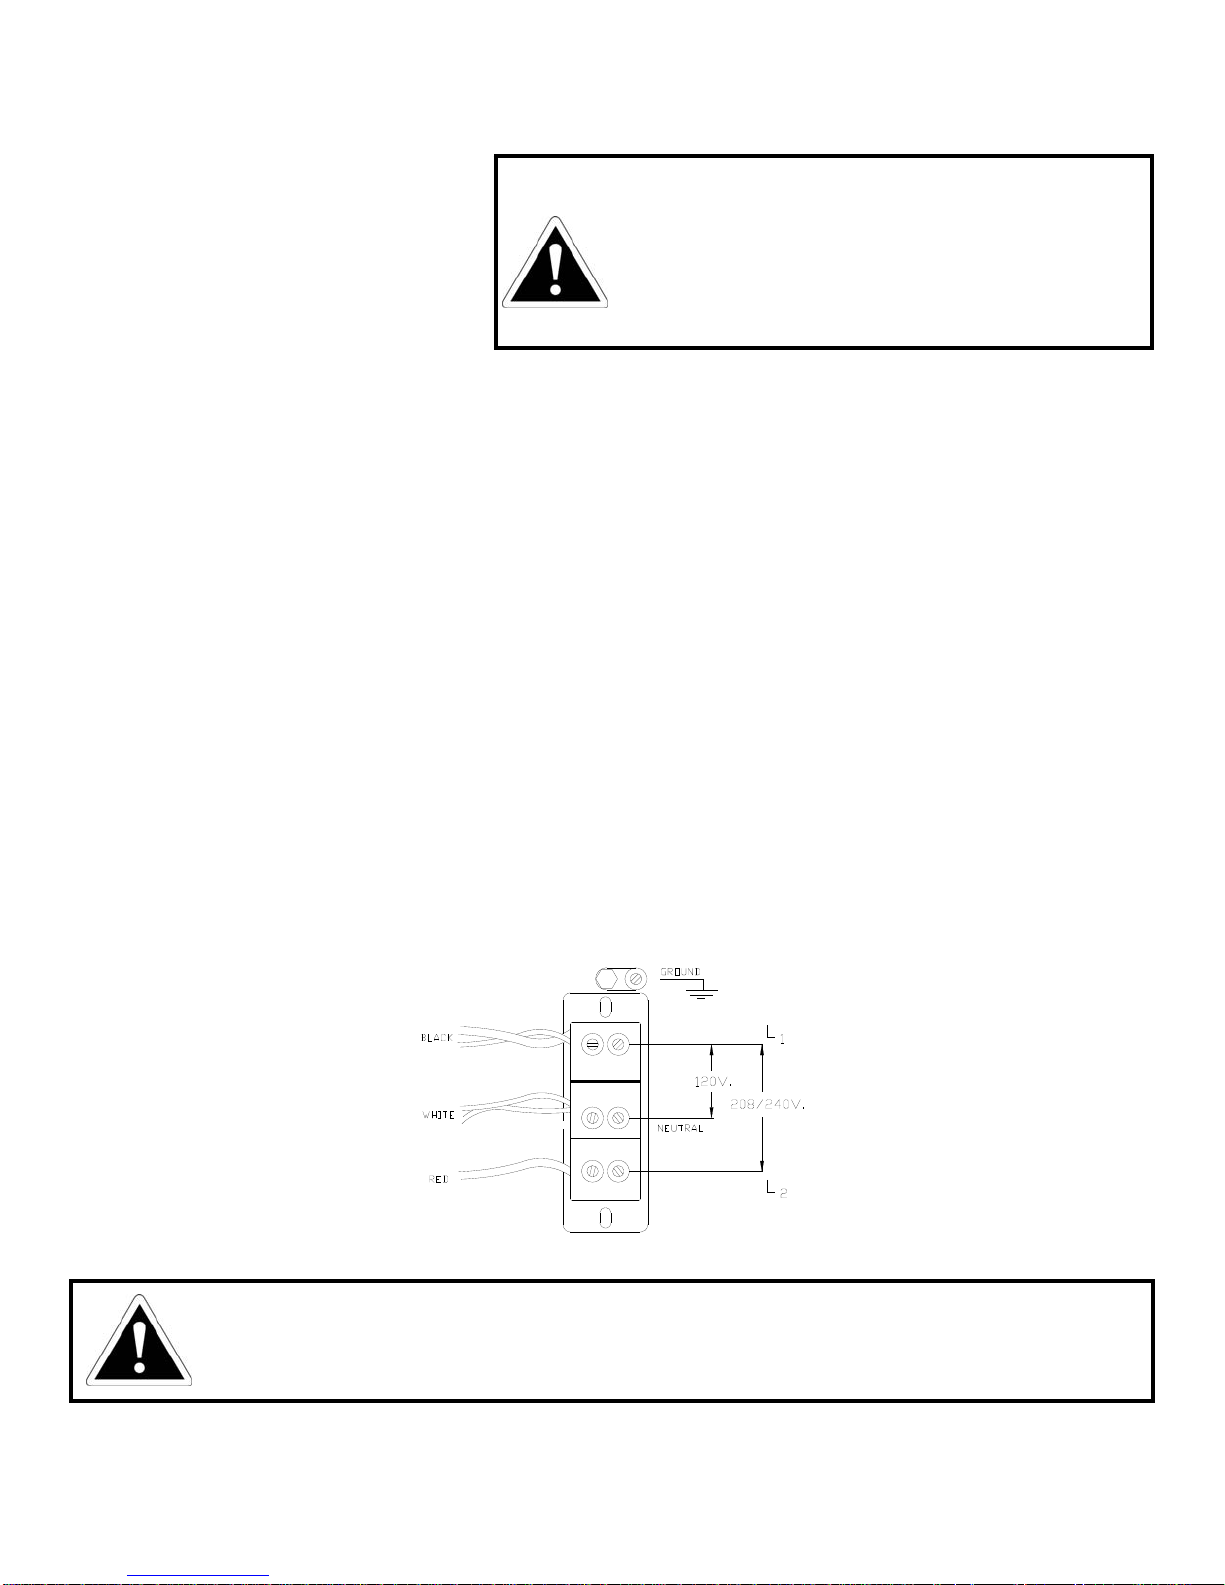
ELECTRICALINSTRUCTIONS
Electrical Requirements:
120/208 or 120/240 volts AC, 60 Hz
3 wire (plus ground), single phase
30 amp required
THE WARRANTY IS VOID IF THE SMOKER IS CONNECTED TO ANY VOLTAGE OTHER
THAN SPECIFIED ABOVE AND ON THE SMOKER DATA PLATE. THE CHASSIS MUST BE
GROUNDED TO PREVENT POSSIBLE SHOCK HAZARD.
Remove all packing material before connecting the electrical supply to the smoker.
The smoker is not equipped with a power cord from the factory.
Power supply connections should be made with flexible conduit. Use a No. 12 AWG wire suitable for at
least 90° C.
The power is to be left OFF throughout the installation.
Electrical service is provided to the smoker at the main terminal block located behind the access panel in
the lower rear left corner of the smoker
Verify correct voltage at the main terminal block and replace the access panel.
The restraining device must be installed.
WARNING:
This appliance, when installed, must be electrically
grounded in accordance with local codes, or in the
absence of local codes, with the National Electrical
Code, ANSI/NFPA 70, or the Canadian Electrical
Code, CSA C22.2, as applicable.
WARNING
Some components in this smoker operate on 110/120 volts AC. This current is supplied
from L1 and the neutral connection on the terminal block. This must be verified before
applying power to the smoker.

10 of 22 Copyright 2015 by Southern Pride Distributing, LLC Volume 2
INSTALLATION INSTRUCTIONS FOR RESTRAINING DEVICE
1. Restraining device should be installed parallel (in line) with the power supply cord.
2. Restraining device parts list: See Figure A for a photo of the materials contained in the restraining kit.
3. Attach staple bracket: Fasten the staple bracket (Figure B) to a stud located in the wall that the power
receptacle is located on. Use the (4) #10 x 1” screws and plastic anchors if needed.
4. Install eyebolt: Thread jam nut onto eyebolt. Screw eyebolt into threaded hole above the power cord
connection point on back of smoker. Tighten eyebolt and then tighten jam nut to keep eyebolt tight
(Figure C).
5. Connect restraining cable: Attach one end of cable using the spring loaded hook to the eyebolt. Attach
other end of cable to the staple bracket using the other spring loaded hook.
6. Note: To provide strain relief the restraining cable must be shorter than the power supply cord. The
restraining device should always be connected when the smoker is in use.
Figure A
1. Staple bracket
2. Eyebolt with jam nut
3. Restraining cable
4. Spring loaded hook
5. #10 x 1” screws
6. Plastic anchors
7. Instruction sheet
Figure B
Figure C
1 2
3
4
5
6
7
11 of 22 Copyright 2015 by Southern Pride Distributing, LLC Volume 2
VENTING INSTRUCTIONS
THE METHOD OF VENTILATION MUST BE APPROVED BY THE LOCAL CODE ENFORCE-
MENT AGENCY PRIOR TO EQUIPMENT INSTALLATION.
1. The smoker ventilation system should comply with this manual and the current edition of NFPA® 96.
2. It is recommended that Local Code Officials and a Commercial Kitchen Ventilation Contractor be consult-
ed prior to installation.
TYPE-1 CANOPY HOOD VENT
All smoker models may be installed under an approved Type-1 canopy hood system rated for commercial
cooking appliances.
Placement under a common hood shared with other appliances may be prohibited.
NFPA® 96 specifies a minimum canopy overhang of 6 inches on all sides.
Exhaust fan size must be determined by a ventilation contractor specifically for your application. Hood
dimensions, exhaust duct length and routing all factor into the calculation.
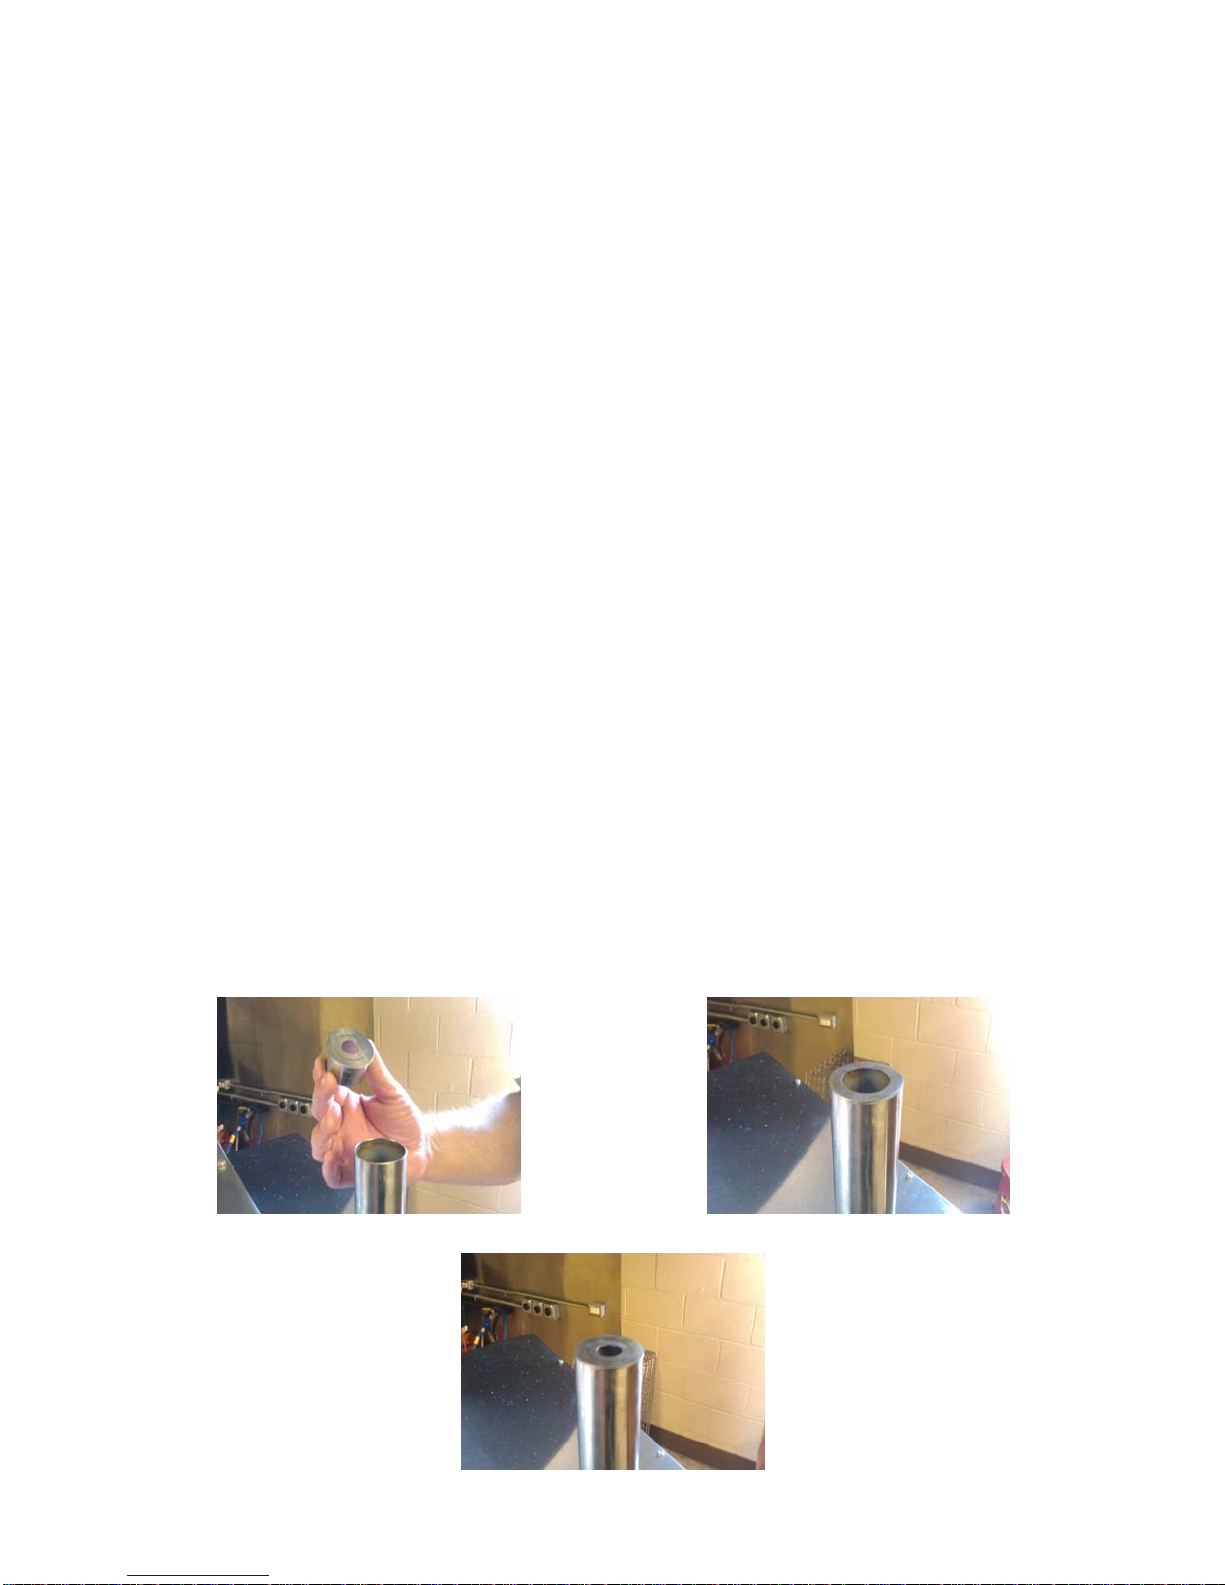
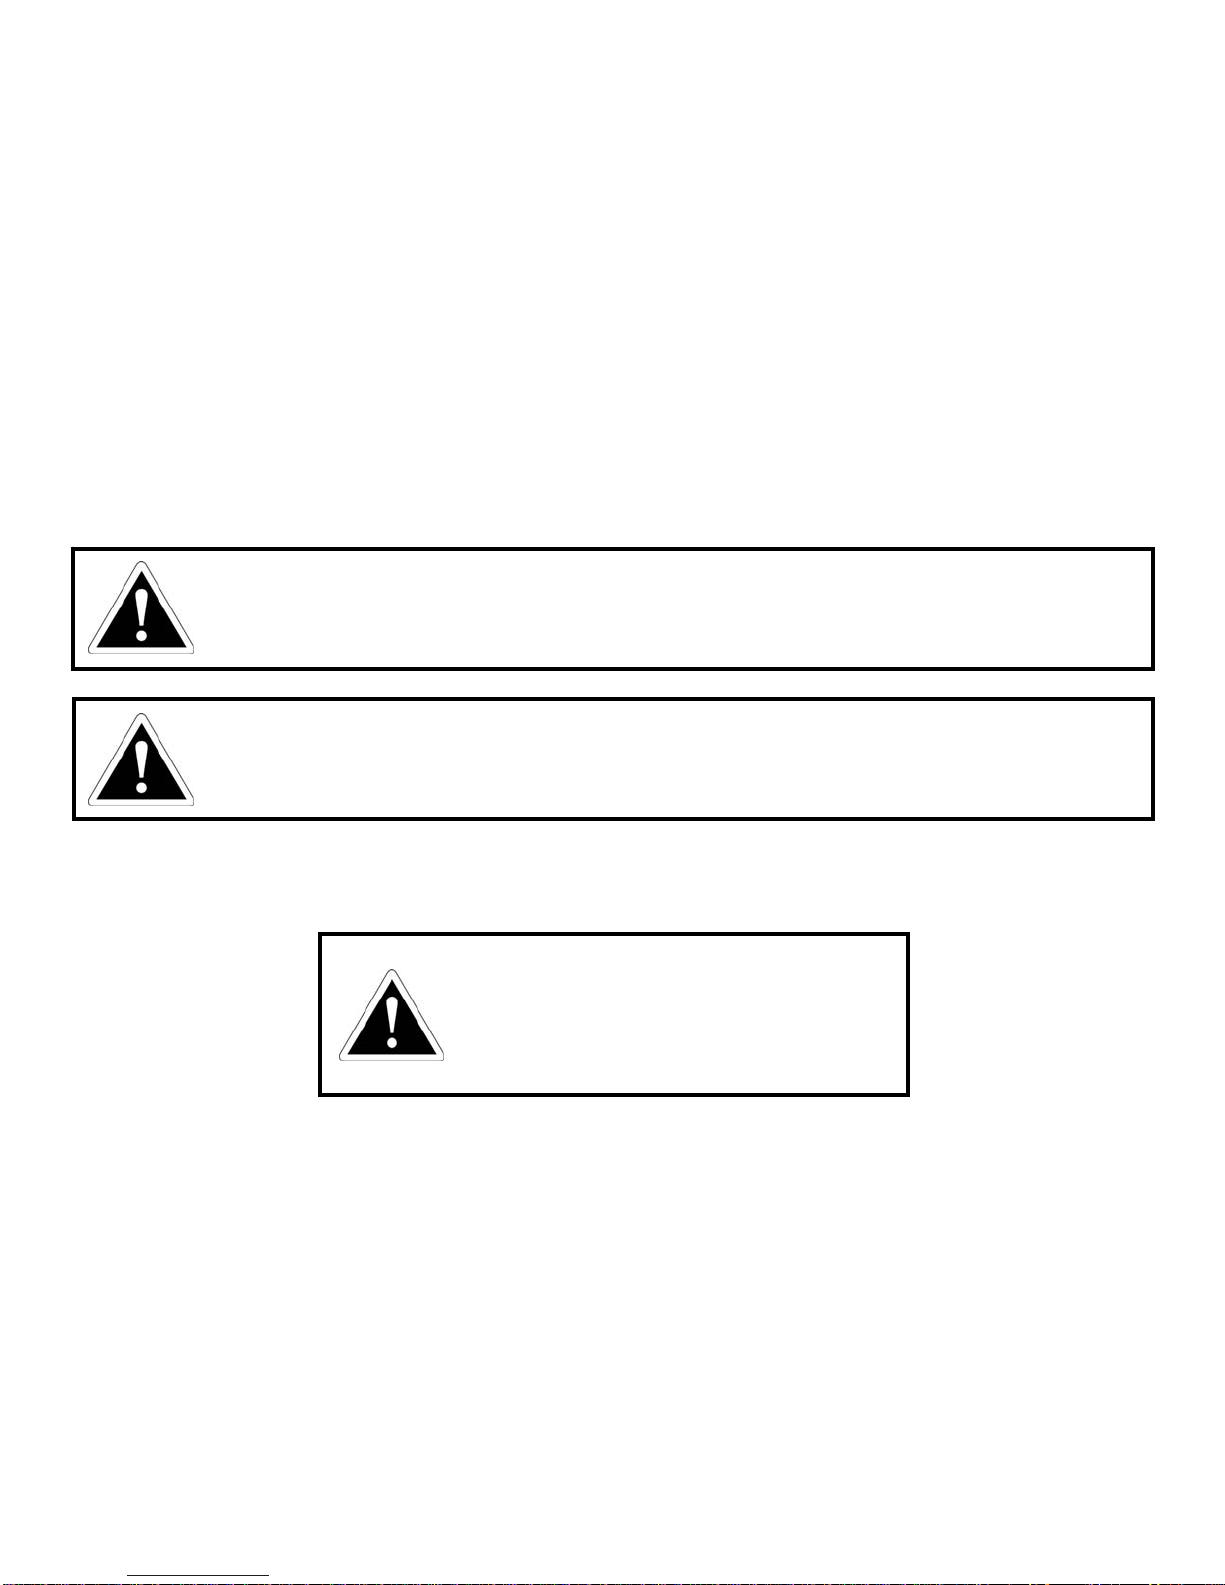
VARIABLE SIZED DROP-IN FLUE DAMPER
The smoker is equipped with a 2” (51mm) flue outlet on the top of the smoker. To increase the flexibility of
the smokers, each smoker comes with two (2) drop-in flue dampers to adjust the size of the flue outlet. The
options are:
A. No drop-in flue damper – A fully open 2” (51mm) flue outlet.
B. Drop-in flue damper with center piece removed – A 1 - 5/16” (33mm) flue outlet.
C. Drop-in flue damper without center piece removed – A 3/4” (19mm) flue outlet.
To remove the drop-in flue damper center piece, use a screwdriver to pry the piece loose and remove it from
the rest of the drop-in flue damper.
NOTE: A restricted flue will maintain more moisture and smoke in the smoker cabinet.
A.
C.
B.

12 of 22 Copyright 2015 by Southern Pride Distributing, LLC Volume 2
OPERATION
The smoker should be operated in the following order (with all operations according to the subsequent instruc-
tions):
1. Load the woodchip boxes with the desired wood.
2. Load the product into the smoker and close the product loading door.
3. Ensure that the drain pan is empty and installed in the pan rails located under the smoker drain hole.
4. Set the control and start the cook cycle.
5. Once the cook cycle is complete, turn the control off.
6. Remove the product from the smoker.
7. Remove the ashes from the woodchip boxes.
8. Empty the grease from the grease pan.
WOODCHIP BOX LOADING INSTRUCTIONS
1. The solid fuel should be handled in accordance with NFPA® 96.
2. Ensure the control is OFF, or in the Idle or Pause position, before opening the product door.
3. Slide each woodchip box off of the smoke element bracket.
4. Load woodchips into each woodchip box. THE WOODCHIPS ARE ONLY USED TO FLAVOR THE
PRODUCT, NOT TO HEAT THE SMOKER.
5. Close the woodchip box lid and slide the boxes onto the smoke element brackets.
6. If the cook menu was paused, a press of the start button is required to resume the menu..
WARNING
Woodchip boxes must be installed on the smoke element brackets at all times during
operation of the smoker. Failure to do so can damage the smoke elements and/or result in
terminal failure of the smoker.
CAUTION
Remove coals and ashes from previous cook cycle before loading new woodchips into
the woodchip box. Refer to Ash Removal Instructions on page 15.
Woodchip box will be hot when the smoker has been in operation.
Do not overload woodchip box.

13 of 22 Copyright 2015 by Southern Pride Distributing, LLC Volume 2
PRODUCT LOADING INSTRUCTIONS
The smoker is equipped with five (5), 18” x 26” (457 x 660mm) product racks for the loading of product.
1. Remove the wire product rack from the smoker.
2. Place the product directly on the product rack, leaving an air gap between each piece of product.
3. With the product placed on the product rack, carefully slide the loaded product rack into the smoker start-
ing from the bottom rack slide position.
4. Repeat steps 2 and 3 until all product is loaded into the smoker. Product height will determine how many
rack slide spaces you need to maintain an air gap between each loaded product rack.
CONTROL OPERATING INSTRUCTIONS
1. The product loading doors must be closed.
2. The control should be in the “IDLE” mode. (The elements, and convection fan will be off). If the control
is “OFF” a press of any button will bring the control back to “IDLE.”
3. A menu consists of a cook temperature, cook time, hold temperature, and the ability to turn the smoke ele-
ments on or off.
4. Press the cook temp button (tEnP will appear in the LED display), then press the up/down buttons to obtain
the desired cook temperature.
5. Press the cook time button (tinE1 will appear in the LED display), then press the up/down buttons to obtain
the desired cook time.
6. Press the hold temp button (HtEnp will appear in the LED display), press the up/down buttons to obtain the
desired hold temp, if a hold temp is not desired press the down button until “OFF” is displayed in the LED.
7. Programming the menu is complete. To start the menu, press the start/stop button one time. CHIPS will
appear in the LED display. Press the up button to start the menu with the smoke elements on, or press the
down button to start the menu with the smoke elements off.
8. To cancel or stop the menu, press and hold the start/stop button until “IDLE” is displayed in the LED.
9. When the cook cycle is complete there are two possible actions that can be taken. One is if a hold tempera-
ture was programmed into the menu, the control will momentarily sound an audible alarm then, “HOLD”
and the length of time the control has been in the hold mode will alternately flash in the LED display. The
control will maintain the hold temperature until the start/stop button is depressed to “END” the menu, and
bring the control to the “IDLE” mode.
10. If the hold temperature was programmed to “OFF” and the cook time has elapsed, “END” will be dis-
played on the LED display, and an audible alarm will sound continuously until the start/stop button is de-
pressed, to “END” the menu, and bring the control to the “IDLE” mode.
11. After the control has been in the “IDLE” mode for five minutes it will go to “OFF”, a press of any button
will bring the control back to “IDLE”.
12. After each cook cycle the ashes should be removed from the woodchip boxes, and the grease emptied from
the drain pan.

14 of 22 Copyright 2015 by Southern Pride Distributing, LLC Volume 2
CONTROL OPERATING INSTRUCTIONS (continued)
OPTIONAL MEAT PROBE
When equipped with the optional meat probe the smoker can be programmed one of two ways:
Timed cook - Cook to a set smoker temperature using time to control the length of the cook cycle.
Internal temperature of product cook - Cook with a set smoker temperature until the internal tem-
perature of the product reaches the temperature the meat probe is set for.
To choose to cook by time, the control must be set to “P-off”.
1. With the control in “IDLE,” press the up button and the display will read either “P-on” or “P-off.” One
press of the up button will change the setting. Change the setting to “P-off.”.
2. After a three second pause the control will return to “IDLE” and the menu can be programmed. Refer to
the instructions on the previous page to program a menu.
To choose to cook to an internal temperature using the meat probe, the control must be set to “P-on.”
1. With the control in “IDLE,” press the up button and the display will read either “P-on” or “P-off.” One
press of the up button will change the setting. Change the setting to “P-on.”.
2. After a three second pause the control will return to “IDLE” and the menu can be programmed. Refer to
the instructions on the previous page to program a menu.
3. When step 5 is reached the temperature that the meat probe will cook the product to will be set instead of
the cook time.
4. NOTE: The meat probe must be plugged into the socket inside the smoker with the probe inserted into the
product. The tip of the probe should be inserted into the thicker part of the product and not against a bone.
PRODUCT UNLOADING INSTRUCTIONS
1. Before unloading the product, the control should be in the “OFF” or “IDLE” position.
2. Carefully open the product loading door just enough to release the smoke from the cabinet, then wait ap-
proximately 5 seconds before fully opening the product loading door.
3. Product should be removed from top rack to the bottom rack.
15 of 22 Copyright 2015 by Southern Pride Distributing, LLC Volume 2
ASH REMOVALINSTRUCTIONS
1. The ashes should be handled in accordance with NFPA® 96.
2. After each cook cycle, remove the remaining wood, ash and hot coals from woodchip boxes. Use heat re-
sistant gloves while handling woodchip boxes, ash container, and ash removal tools.
3. Place small lots of them in a noncombustible corrosion resistant pan and spray with water. A noncombus-
tible corrosion resistant pan should be kept just outside the smoker for this purpose.
4. Once wood and ash have been sprayed, place them in a heavy metal container with a tight fitting metal lid
(16 gauge minimum, capacity not to exceed 20 gallon). This container shall be assigned for this one pur-
pose, shall be able to be handled easily by any employee assigned the task, and shall pass easily through
any passageway to the outside of the building. The container shall always be covered when it is being
moved through the premises. When any hole occurs in a container from corrosion or damage, the contain-
er shall be repaired or replaced immediately.
5. The ashes should be carried to a separate heavy metal container (or dumpster), outside the premises, that is
used exclusively for the purpose of hot ash storage.
GREASE REMOVAL INSTRUCTIONS
1. Immediately empty the grease pan after each cook cycle. CAUTION: Grease will be hot.
2. Grease should be poured into an approved grease recycling bin.
WOOD STORAGE INSTRUCTIONS
The solid fuel should be stored in accordance with NFPA® 96.
WARNING
Never empty ash/coals from the smoker into a common trash dumpster. Embers from ash/
coals could ignite materials resulting in a fire.
CAUTION
Be sure smoker product loading door is secured in the closed position immediately
following a cook cycle and during non-use periods.
WARNING
Do not remove the drain pan while the
smoker is still in operation or while
burning wood and hot coals are still in
the woodchip boxes.

16 of 22 Copyright 2015 by Southern Pride Distributing, LLC Volume 2
MAINTENANCE
DAILY:
1. Remove all product racks from smoker and take to sink area for cleaning. Use a commercial foodservice
detergent / degreaser. Follow the product manufacturer’s instructions for proper use, cautions and warn-
ings. Protective gear such as goggles and rubber gloves should be used.
2. Sanitize product racks with a commercial product service sanitizer. Follow the product manufacturer’s in-
structions for proper use, cautions and warnings. Protective gear such as goggles and rubber gloves should
be used.
3. Remove ashes and coals from woodchip boxes after each cook cycle. Refer to the Ash Removal Instruc-
tions on page 15 of this manual.
4. Drain the grease pan after each cook cycle. Refer to the Grease Removal Instructions on page 15 of this
manual.
MONTHLY:
1. Check the thermostat thermocouple. The thermocouple is located in the top, back, right inside corner of
the smoker. Be sure there is no solids or creosote buildup. Clean as needed.
2. Check the product door hinges and the product door latches. Tighten screws and align as needed.
WARNING
It is extremely important to follow the below maintenance procedures.
Grease or solids buildup inside the smoker could result in a fire hazard.
WARNING:
Before any service is performed on the smoker, the power must be disconnected and the
smoker should be allowed to cool down.

17 of 22 Copyright 2015 by Southern Pride Distributing, LLC Volume 2
MAINTENANCE (continued)
MONTHLY (continued):
3. Remove and clean the air channels. Remove the air channels on both sides of the smoker by lifting slightly
up and out. When re-installing the air channels, the bottom of the air channel should be set on the bottom
catch and then leaned up and over the top slotted catches.
4. Inspect the blower wheel for solids or creosote buildup or an out-of-balance condition. Clean as needed.
WARNING: Solids buildup will cause the blower wheel to be out of balance and, if not cleaned, can
cause damage to the blower wheel and to the convection fan motor.
WARNING: Smoker MUST be off with power turned off at the breaker, and allowed to cool
down, before removing fan shroud.
To remove the blower wheel for cleaning:
a. Remove the air channels on both sides of the smoker.
b. Remove two, 1/4-20 bolts with a 7/16 head that secure the blower wheel shroud to the smoker.
c. Carefully allow the shroud to drop down away from the blower wheel and then pull the cover
straight out of the smoker.
d. Loosen the Allen head or square head set screw for the blower wheel.
To re-install repeat the above steps in reverse order. Be sure to tighten the blower wheel set screw.

18 of 22 Copyright 2015 by Southern Pride Distributing, LLC Volume 2
MAINTENANCE (continued)
AS NEEDED:
(Frequency will depend on usage and local health department’s requirements):
INTERIOR:
Use a commercial product service detergent/degreaser to clean the smoker interior. Follow the product
manufacturer’s instructions for proper use, cautions and warnings. Protective gear such as goggles and rub-
ber gloves should be used. Note: Avoid the use of abrasive cleaning compounds, chloride based clean-
ers, or cleaners containing quaternary salts. Never use hydrochloric acid (muriatic acid) on stainless
steel.
Smoker should be cool. Do not try to put cleaner on smoker when hot.
While product racks are out of the smoker apply cleaner to the smoker interior: walls, ceiling, and floor
and allow to soak for 10 minutes.
Thoroughly rinse smoker interior with water using a water hose or pressure washer. (Do not directly pres-
sure wash the convection blower wheel; the blower wheel should be removed for cleaning).
Drain waste water; place a container under the drain. Dispose of rinse water according to local environ-
mental requirements.
Inspect the interior of the smoker for any areas that did not come clean; repeat the cleaning procedure in
those areas.
Thoroughly rinse the interior of the smoker and drain.
Sanitize the smoker interior: walls, ceiling, floor, and convection fan with a commercial product service
sanitizer. Follow the product manufacturer’s instructions for proper use, cautions and warnings. Protective
gear such as goggles and rubber gloves should be used. Wet all surfaces using a cloth or sprayer. Allow to
remain wet for 10 minutes.
To dry interior of the smoker leave product door open and allow to air dry.
Note: Consult with the appropriate state or local health department regarding all applicable cleaning
and sanitation requirements for equipment.
WARNING
It is extremely important to follow the below maintenance procedures.
Grease or solids buildup inside the smoker could result in a fire hazard.

19 of 22 Copyright 2015 by Southern Pride Distributing, LLC Volume 2
MAINTENANCE (continued)
AS NEEDED:
(Frequency will depend on usage and local health department’s requirements):
STAINLESS STEEL SURFACES:
Use non-abrasive cleaning products for use on stainless steel surfaces. Cleaning agents must be chloride-free
compounds and must not contain quaternary salts. Never use hydrochloric acid (muriatic acid) on stainless
steel surfaces. Always use the proper cleaning agent at the manufacturer’s recommended strength.
EXTERIOR:
Southern Pride BBQ Smokers are known for their attractive appearance. We achieve this by selecting only the
finest grade of type 304 stainless steel and applying exacting workmanship.
All of the exterior of the smoker can be cleaned with a mild soap and water solution.
Before cleaning the smoker, make sure it is turned off, and power is turned off to the smoker at the electri-
cal panel.
If the smoker is HOT from use, allow adequate time for it to cool down (approximately 1 hour).
After the smoker exterior has been washed, apply a stainless steel polish cleaner to all surfaces.
Wipe control panel, door handles, and door gaskets thoroughly, since these areas harbor food debris.
Do not use scotch bright pads or scouring pads to clean the outside of your smoker. If a non-
abrasive scouring pad must be used, make certain to scrub with the visible grain of the surface metal
to avoid scratches.
CAUTION
Some cleaning products are not suitable for stainless steel; be sure to read the label
before use.
20 of 22 Copyright 2015 by Southern Pride Distributing, LLC Volume 2
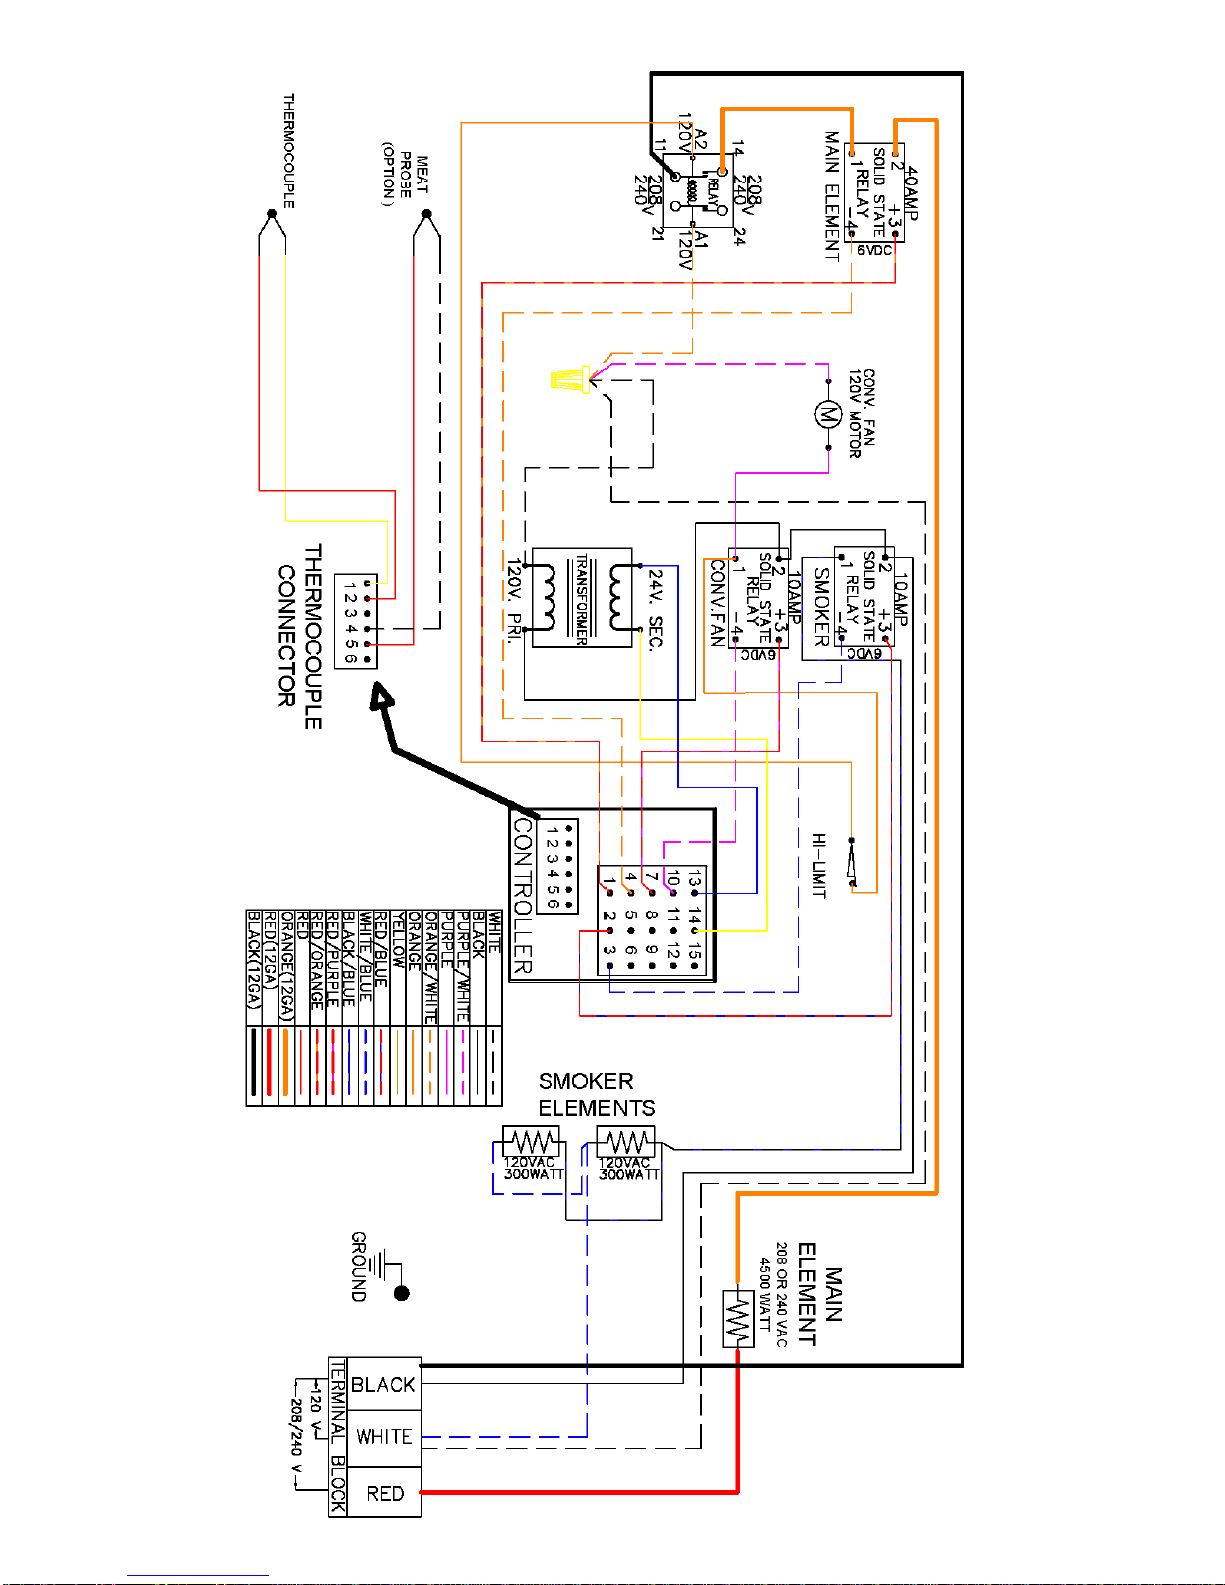
WIRING DIAGRAM
Table of contents
Other Southern Pride Grill manuals


Popular Grill manuals by other brands

Dacor
Dacor Epicure OB36 installation instructions

Weber
Weber SMOKEY JOE PREMIUM owner's manual

Napoleon
Napoleon P665NSS manual

CampMaid
CampMaid Petromax pro-ft quick start guide

Dansons Group
Dansons Group Louisiana Grills LG900C2 Assembly and operation

Sovereign
Sovereign Outback RV Explorer Installation and operating instructions


