Sovereign SC60TCWE User manual

ELECTRIC COOKERS
INSTRUCTIONS
SINGLE CAVITY 4 HOTPLATES ELECTRICAL OVEN
DOUBLE CAVITY 4 HOTPLATES ELECTRICAL OVEN
IMPORTANT:-
This product must be installed by a fully qualified
engineer.
Failure to do so will invalidate your guarantee.
Read these instructions carefully before attempting
to use this product.
It is advisable to keep these instructions in a safe
place for future reference.
Dear C u s tom e r,
T h a n k y o u fo r pu rc h asi n g th is p rodu c t. W h ilst y o u can b e ass u red th at th is
a pp lia n ce h as b een p ro d u ced to th e h igh est s ta nd a rd s, it is imp o rta n t th at
y o u read th roug h th is in s tru c tio n boo klet tho rough ly as th is w ill h elp y o u to
g et th e b est p e rfo rm a n c e fro m y ou r n ew S o v e rei g n a pp lia n c e .
H o w e v e r, s hou ld y o u h a v e a n y d iff ic u lties, p lea s e phon e ou r
S e rv ice
Helpline on
01527 - 573010 .
INDEX:
Section 1 Technical Specifications & Cooker Components
Section 2 Important Safety Notices
Section 3 Installation of Cooker
Section 4 Control Panel & Use of Hotplates
Section 5 Using the Oven
Section 6 Grilling in the Oven
Section 7 Setting the Digital Timer
Section 8 Cleaning & Maintenance
Section 9 Moving or transporting your cooker
Section 10 Troubleshooting

Upper O ven (lt) 35
O ven
V o lu m e
Lo w er O ven (lt) 66
Upper O ven (W ) 2,5 0 0
SE C T IO N 1 T E CHNI C A L S P E CI F IC A T IO NS & C O O K E R C O M P O N E N T S
Color White / Silver /
S/Steel
Hob
4 Ho tp lates
T he rm ostat (C) 50 -2 8 0 d e grees
T im er D ig ita l / M e ch a nica l
T otal Hot p la te P o w er (W ) 5,5 0 0
La rge H otp la te (P cs - W ) 1 - 1,5 0 0
Rap id H ot p late (P cs - W ) 1 - 2,0 0 0
S m a ll Ho tpla te (P cs - W ) 2 – 1,0 0 0
O ven
P o w er Lo w er O ven (W ) 1,2 0 0
Gr ill P o wer (W ) + / 2 ,0 0 0
V o lta g e (V o lt) 230
Fr equen ce (H z.) 50 -60
F an M otor P o w er (W ) 35
Fan +
E ne rg y E fficien c y C la ss A
E ne rg y C on su m ption
(Conventional) (Kilowatt hour)
0,76
E ne rg y C on su m ption
C OOK E R C O M P O N E N T S
1,2 –145 mm dia Hotplate
3–180 mm dia RapidHotplate
4–1 8 0 m m d ia H o tp late
5–C o n tro l P a n el
6–U pp e r C a v it y D oo r
7–U pp e r C a v it y H a n d le
8–L o w er O v e n H a n d le
9–L o w er O v e n D oo r
1 0 –O v en T r ay
1 1 –H o b
1 2 –G r ill E le m e n t
1 3 –Gla s s L id
1 4 –C o n tro l K n ob s
1 5 –T im er
(Forced air convection)
(Kilowatt / hour)
0,75
DIM E N S IO N S W idth (mm ) 600
Len g th (mm ) 600
He ig ht (mm ) 900

SE C T IO N 2 IM P O R T A NT S A F E T Y N O T IC E S
T his electrical coo ker is design ed for do m estic coo king o n ly.
Do no t u se for an y other pu rpo se.
In s talla tio n
-
T h is a pp lia n ce mu st b e in s talled b y qu ali fied p e rs onn el
, acc o rdin g to
the m anu fa ctu rer’s in stru ctions a n d to the re le va nt S a fe ty S ta nda rd s.
- T his app lian ce is h ea vy. T ake care w hen m oving it.
- Re m ove a ll pa ckag ing, p ro te ctive film s and oils from the ap plian ce b efore
u sing for th e firs t tim e.
- E nsu re th at the e lectrica l sup ply com p lies w ith the typ e stated on the rating
plate.
- Do no t attem pt to m od ify th e applian ce in an y w ay.
- V o lta g e of the co o ker is 2 3 0 V olt - 50 H z.
-
Wa rning: T h is a pp lia n ce mu st b e e a rth e d .
W h en y o u h a v e fin is h ed c oo ki n g c h eck th at a ll c ont ro ls a re in th e O F F
po si tion .
• You m ust en sure th a t you r coo ker conne ction is ope ratin g o n a 40 am p fuse.
• Your coo ker m ust be ea rthed.
K ee p an y electric cab le aw a y from hot areas and sha rp e dge s.
If the electric cab le be com es da m aged, conta ct a q ua lified e lectrician an d get it
rep lace d.
In sta llation m ust be carried out b y a qu alified en ginee r..
Con nectio n m ust be m ade in accordan ce w ith the a ss em b ly and co n ne ction
instru ctio ns. P le ase pa y a spe cial a tten tio n to ventilation req u irem ent. The dista nce
be tw een ap p lian ce and a coo ker hood m u st be a t least as the dista nce descr ibed
in coo ker ho o d U ser M an u al.
T he coo ker can be insta lled be tween kitchen cab inet s. (C la ss 2/1 ). W hen
po sitioned ne xt to a w all or a cab in et th a t is ta ller th an the coo ker, the gap betw ee n
the cab inet or w a ll m u st be at lea st 3 00 m m and on ly a w o rk top h eig ht cab ine t
m ay be p laced on th e oth er side of the ap plian ce . W all han g in g cup boa rds m ust be
po sition ed a t a he ight of no t le ss th an 6 50 m m from the top of the hob.
A n y se rvice w o rk ca rried out on the a pp lia nce m ust on ly be d one b y a qu a lifie d
and app ro ved eng inee r. .
W hen u sing the h ob, ple ase ta ke ca re to avo id an y sp illag e on to the hot p lates as
th is can be da n ge ro us.
S team and h eat w ill be generated du ring coo king , so ensure th at yo ur kitchen is
we ll ven tila ted. K eep n atural ven tila tion op e n, or ha ve m echan ical ve nt ilation
insta lle d. (C oo k er Hood / E xhau st F an) P a ge 5
U se oven gloves wh e n han d ling hot pot s, p ans or tra ys.
E xte rna l surfaces of coo ker m a y be hot w he n the ove n is in use.
C h ild ren S a fe ty
- T his app lian ce is de sig ned to be ope ra ted b y ad ults. Do not a llow childre n to
pla y n ear or w ith the a p plia nce.
- The ap p lia nce gets h ot when it is in u se. C h ildren shou ld be kept a w a y un til it
has coo led d o w n.
- Ch ildren m a y a lso injure th em se lves b y pu lling pans or pots o ff the ap p lian ce.
- Be fo re using your co oker, re m ove all pa cking m ate rials. P acking m ate rial can
also b e a da nger to ch ildre n.
- Do n ’t let children tou ch he ating elem ents inside ove n, or the g lass ove n door
when the oven is in u se. K e e p children an d p ets aw a y from all pa rts of the
coo ker w he n it is in use.
P ress ing o n the g lass lid w ith he a vy ite m s cou ld cau se da m age to the glass or the
cover hinge s, so p le ase do not sit or p lace h eavy ite m s on the g lass lid.
D u rin g U s e;
-
W hen coo king he a vy item s, eg; turkeys, do n ot p ull the o ven shelf out wh ile the
item is still on the shelf. T he re m a y be a risk of the she lf tipping.
-
Ne ver use the a p plia n ce for hea tin g a room .
-
O uter surfa ces of oven ca n get hot du ring norm al use..
-
T he oven d o or m ust alw ays be clo sed prope rly du ring coo king .Ensu re that the
door seal is kept clean.
-
Ne ver use the o ve n w ith th e d o or inner g lass pa nel rem o ved.
-
Ne ver use the d ro p do w n d oor as a ste p to rea ch ab o ve cab inet s.
-
Ne ver sto re ite m s that children m ay atte m pt to rea ch , abo ve the a pp lian ce.
-
Ne ver rem ove the o ven sh elves w h en the o ve n is hot.
-
N E V E R U S E A F IRE E X T IN G UI S H E R T O P UT O UT A P A N F IRE as the fo rc e of
the exting uisher co uld tip the p a n over.
-
Ne ver use water to e xting uis h oil or fat pa n fires.
-
Ne ver use p ans or the ove n com pa rtm ent for sto ring infla m m ab le or heat -
sen sitive ite m s.
-
A fter u sing the o ven, w ipe d o w n w ith a cloth to rem ove a n y con den sa tio n th at
m ay ha ve form ed du ring th e coo king proce ss ,.
-
W hen ope n ing the app lian ce d o or, ta ke care to avo id skin conta ct w ith an y
steam that m a y e sc a p e from the oven.
-
P erish ab le food, p lastic item s and ae roso ls m a y be affected b y he a t an d sh ould
not b e sto red ab ove or a round the ap p lian ce.
-
Con nectin g lea ds of other hou sehold electrical eq u ipm ent w hich m a y be in use
wh ile the coo ker is in operation sho u ld be kept we ll a w a y from the hea ting
elem ent s.
H otp la tes
-
A lw a ys keep the h ot plates clean. A dirty p late do es no t tran sfer heat e fficient ly.

-
Ne ver tu rn the hot pla tes on w itho ut a d ish or pa n on the m .
-
A vo id p lacin g w e t pa ns on the h ot p la te s.
-
Ne ver sprinkle co ld w a ter o n an overhe ated p late. P ag e 6
-
T urn the hot p late off a few m inutes be fore th e end of coo king as p late w ill ho ld
its’ heat for som e tim e after it has be en turn e d off. T his w ill sa ve e ne rg y an d
m on e y.
-
Ne ver use the h ot p lates for coo king foods w rap ped in a lum inium foil or in
plastic of an y kind ,
-
Ne ver place an y plastic tra ys etc. o n the hot plate s.
S A F E T Y A D V IC E IN T HE C A S E O F A C OO KING P A N F IRE
In th e e v e n t o f a c oo ki n g p an fire:
1.
T urn o ff the coo ker at the w a ll sw itch.
2.
C o ver the p an w ith a fire bla nket or da m p cloth. T his w ill sm other the flam es an d
extin guish the fire.
3.
Le a ve the p a n to cool for at lea st an hour be fore atte m pt ing to m o ve it. In jurie s
are o ften cau sed b y picking up a hot pan a n d rush ing out side with it.
SE C T IO N 3 IN S T A L L A T IO N O F O VE N
B efore con n ecting your a pp lian ce , plea se che ck local con n e ction cond itio ns
(e le ctricity) su ita b ility to typ e of ap p lian ce .Y our A p p lia n ce is set for e le ctricity.
W hen placin g your a pp lian ce, the h ob of the co oker sho u ld be at the sam e level
as the w o rk top. P os ition the ap p lian ce at the sa m e leve l as the w ork top b y
ad justing the feet if require d.
T he sidew a lls of the kitche n cabinets whe re the ap plian ce is po sitio ned sho u ld
be m ade from du rab le m ate rials re sistan ce to heat..
Please see F ig ure 2 for po sition ing the co o ker.
F ig ure 3 C o n tr o l Pa nel
Use of the Electric Hotplates
T urn the ho tp late sw itches clockw ise to the de sired po sitio n.
T he hot plate is activate d when the indicator lam p is lit.
W hen coo king is finish ed, turn the sw itch to “0” position.
P o si tio n 1
25 0 W
P o si tio n 2
75 0 W
P o si tio n 3
10 00 W
W arm ing - Coo king Coo king Frying W ith low hea tin g .
●B e fo re coo king for the first tim e. T urn the hotp late sw itch to po sitio n “3” and allo w
hot p late to get hot for 5 m inutes w ith out pu tting a pa n on it. T his m akes the up p er
surfa ce of the hot pla te, wh ic h is he at resista nt, harde r.
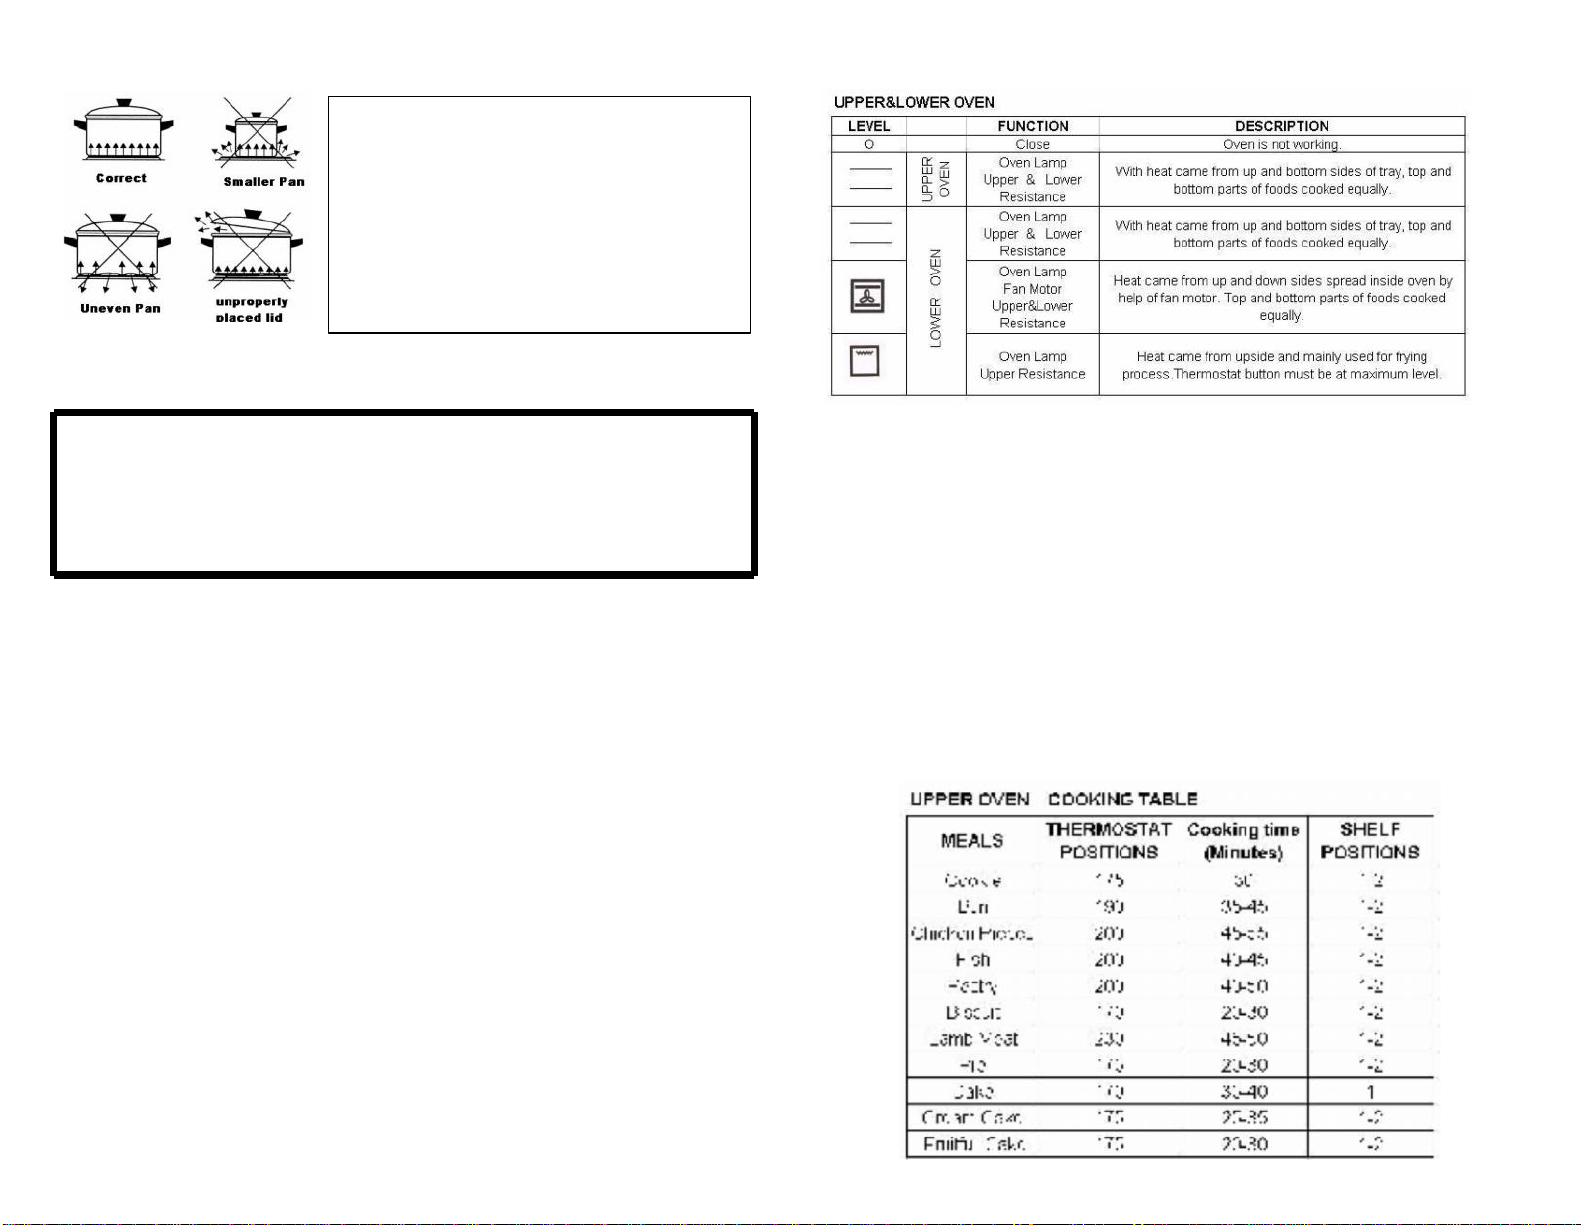
● U se pans and dish es on the hotp late th at h a ve a flat ba se and m ake a good
conta ct. T hat e na b les the heat to be a pplied m o st effective ly.
* Cookware should have a thick, flat and dry base of the same diameter or slightly
bigger than the hot plate. If the cookware diameter is smaller than the hot plate, heat
will be wasted
* Cookware with uneven bases is very inefficient, making the cooking time longer and
wasting electricity.
* Cookware made of flameproof glass, suitable for hot plate cooking, should match the
hot plate size. Pans projecting beyond the hot plate may be broken due to temperature
stresses. The heated pan must never be filled up with cold water or placed on cold
metal or stone surfaces.
In order to obta in m axim um efficien cy u se the sa uce pans of sm ooth ba se in the
fo llo w ing size s:
● La rge coo king area diam eter 20 -26 cm
● No rm al coo king: are a diam eter 18 -24 cm
Impo rta n t !
1. N ever tu rn the hot plate on be fore p lacing a
pan on it, e xc ept P RI O R TO firs t use.
2. If the hot p late is n ot to be used for a long
tim e, app ly a little grea se to the p ain ted
surfa ce.
3. Do not allo w sp ills to be bu rnt on to the h o t
plate as ba ked on sta ins are very d ifficu lt to
rem o ve.
SECTION 5 USAGE OF OVEN
Du ring in itia l operation of your o ven, a sm e ll em anat ing from the insulation
m ate rials and he a ting e lem ents w ill be ge nerated. W e recomm end that you
ope ra te yo ur o ve n at 2 5 0 C for 45 m inutes be fore u se. Do n o t place an y foo d
ite m s on the shelves w h ilst carrying out th is initial clea ning proce du re.
Controling the Oven
T he ind ica tor lam p w ill com e on w hen the te m pe ratu re cont rol has been se t,
W hen the he at inside the oven rea ch es the correct te m pe ratu re, the the rm ostat w ill
cut out and the indicator lam p w ill go ou t. A s the tem peratu re inside the ove n sta rts
to fall, the the rm ostat w ill cut ba ck in a nd the ind icator lam p w ill a g ain be lit.
Using the Oven
1.
S et po sition of she lves.
2.
S et the rm o stat po sition
3.
Re com m ended coo king tim es are given in the co oking table.
4.
T urn the “oven co nt rol” sw itch clockw ise to set th e coo king tim e for the m eal
yo u w ish to coo k.
5.
B efore coo king, p re-heat the o ven for 10 m inute s. P ut the dish in th e o ve n afte r
pre -hea ting on the correct she lf an d ad just tem pe ratu re as req uired.
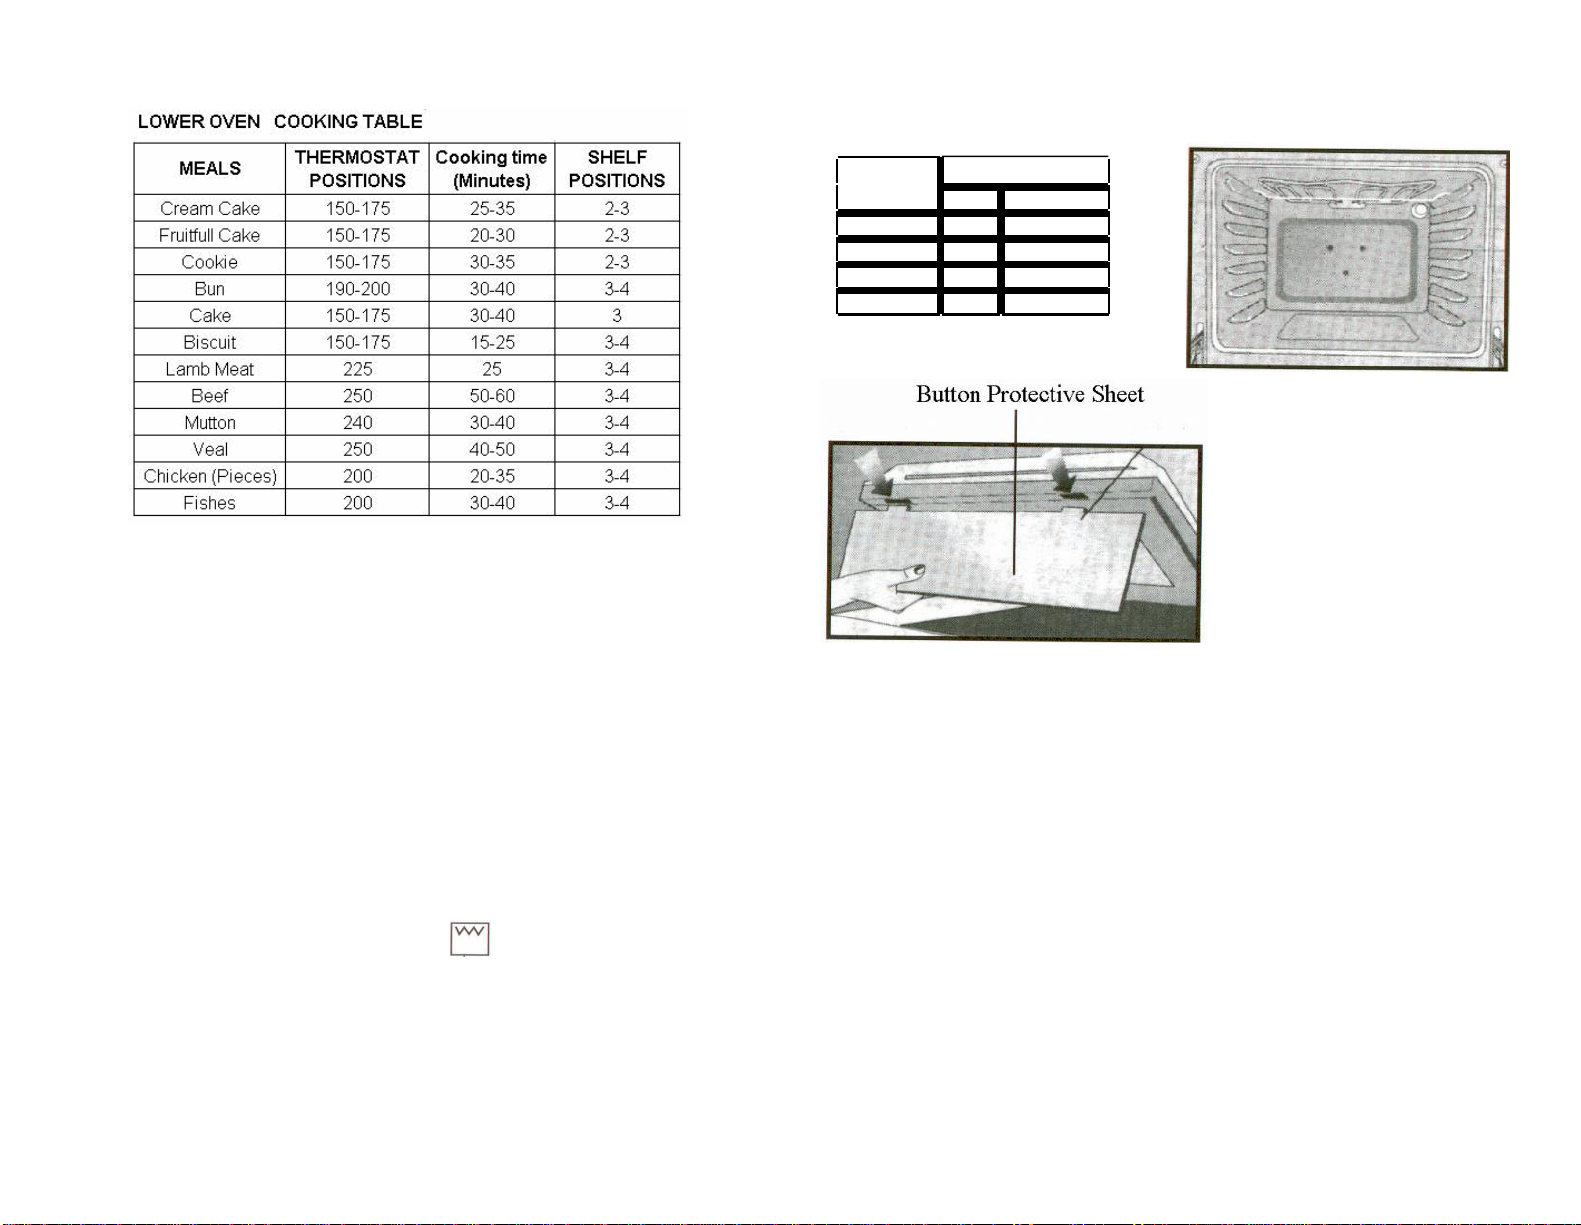
T he m ea ls that ca n be co ok ed
1.
P ositions of tra ys
2.
T he rm ostat po sitio ns
3.
Re com m ended coo king tim es are given in coo king tab le.
4.
T urn the “ove n h eating cont rol” (Fi gu re 6) sw itch clockw ise to ad just coo king
tim e for the m eal yo u de sire to co ok, refer to coo king tab le.
5.
B efore coo king, p re-heat the o ven for 10 m inute s. P ut the dish in th e o ve n afte r
pre -hea ting.
A fter pre-h e ating p lace the food th at yo u cook in o ve n and ad just co ntrol butt on to
related position.
N O TE :
T h e v a l u es g iv en i n t h e ta b le a r e f o r g u id a n ce o n l y . Y o u can v a r y t h e ti m e s a n d
te m p e r at u r es to s u it y o u r o wn r e q u i r e m e n t s . C oo k in g t i m es w ill v a r y acc ord in g to t h e
q u a n ti t y o f i n g r e d ie n t s us e d . U s in g c a k e p a p e r s g iv e s b etter r e su lts f o r m a k i n g c a k e s .
SECTION 6 GRILLING IN THE OVEN
T urn the oven te m pe ratu re butt on to po sition
W e ad vise yo u to use grill triv et w he n you are grilling.
S em i-close the door and prehe at th e grill for 5-10 m inu te s.
W hen you are grilling, keep the door a t the se m i-closed po sitio n
A TT E N T IO N :
W h en us i n g th e g r ill, p lea s e us e t h e h eat d e f lect o r as sh o w n i n th e d i a g r a m m e
b el o w . T h is w ill e n s u r e th at t h e c o n tro l ta p s a r e n o t d a m a g ed b y h eat f r o m th e g r ill un i t.
G R IL L
S h e l f
T im e ( m i n .)
L a m b M eat
4 - 5
1 5
L a m b Ch op s
4 - 5
1 5
C alf C h op s
4 - 5
15 - 2 5
S h eep C h op s
4 - 5
15 - 2 5
SECTION 7 ADJUSTMENT of TIMER (Optional)
S E T T IN G E LE C T R O N IC TI M E
Y o u m us t s et t h e t i m er b e for e us i n g y o u r o v e n . O t h e r w i s e, yo u r o v en w ill n o t op e r ate.
E lect r ic is s u pp lied to th e h ea t in g e le m e n ts t h roug h t h e ala r m cl o c k . I n ord er to tu r n t h e
h eat i n g el e m e n ts o n , th e cl o ck m u s t b e s et c orr ect l y .
T h e cl o c k /t i m er o f t h e o v e n f un c ti o n s i n t h e s a m e w a y as a n o r m al cl o c k . I n c a s e o f
elect r ici t y f a il u r e s , t h e cl o c k is r e s et. I f th e m a i n s s u pp l y f r e q u e n c y is u n d er 5 0 Hz, th e
cl o ck w ill b e s lo w e r . I t is n o t a f ai l u r e o f t h e cl o c k . I n s u ch ca s e s , r ea d j us t th e cl o c k .
2 .
U s e it as ala r m cl
W i t h yo ur ov en cl o c k , yo u c a n;
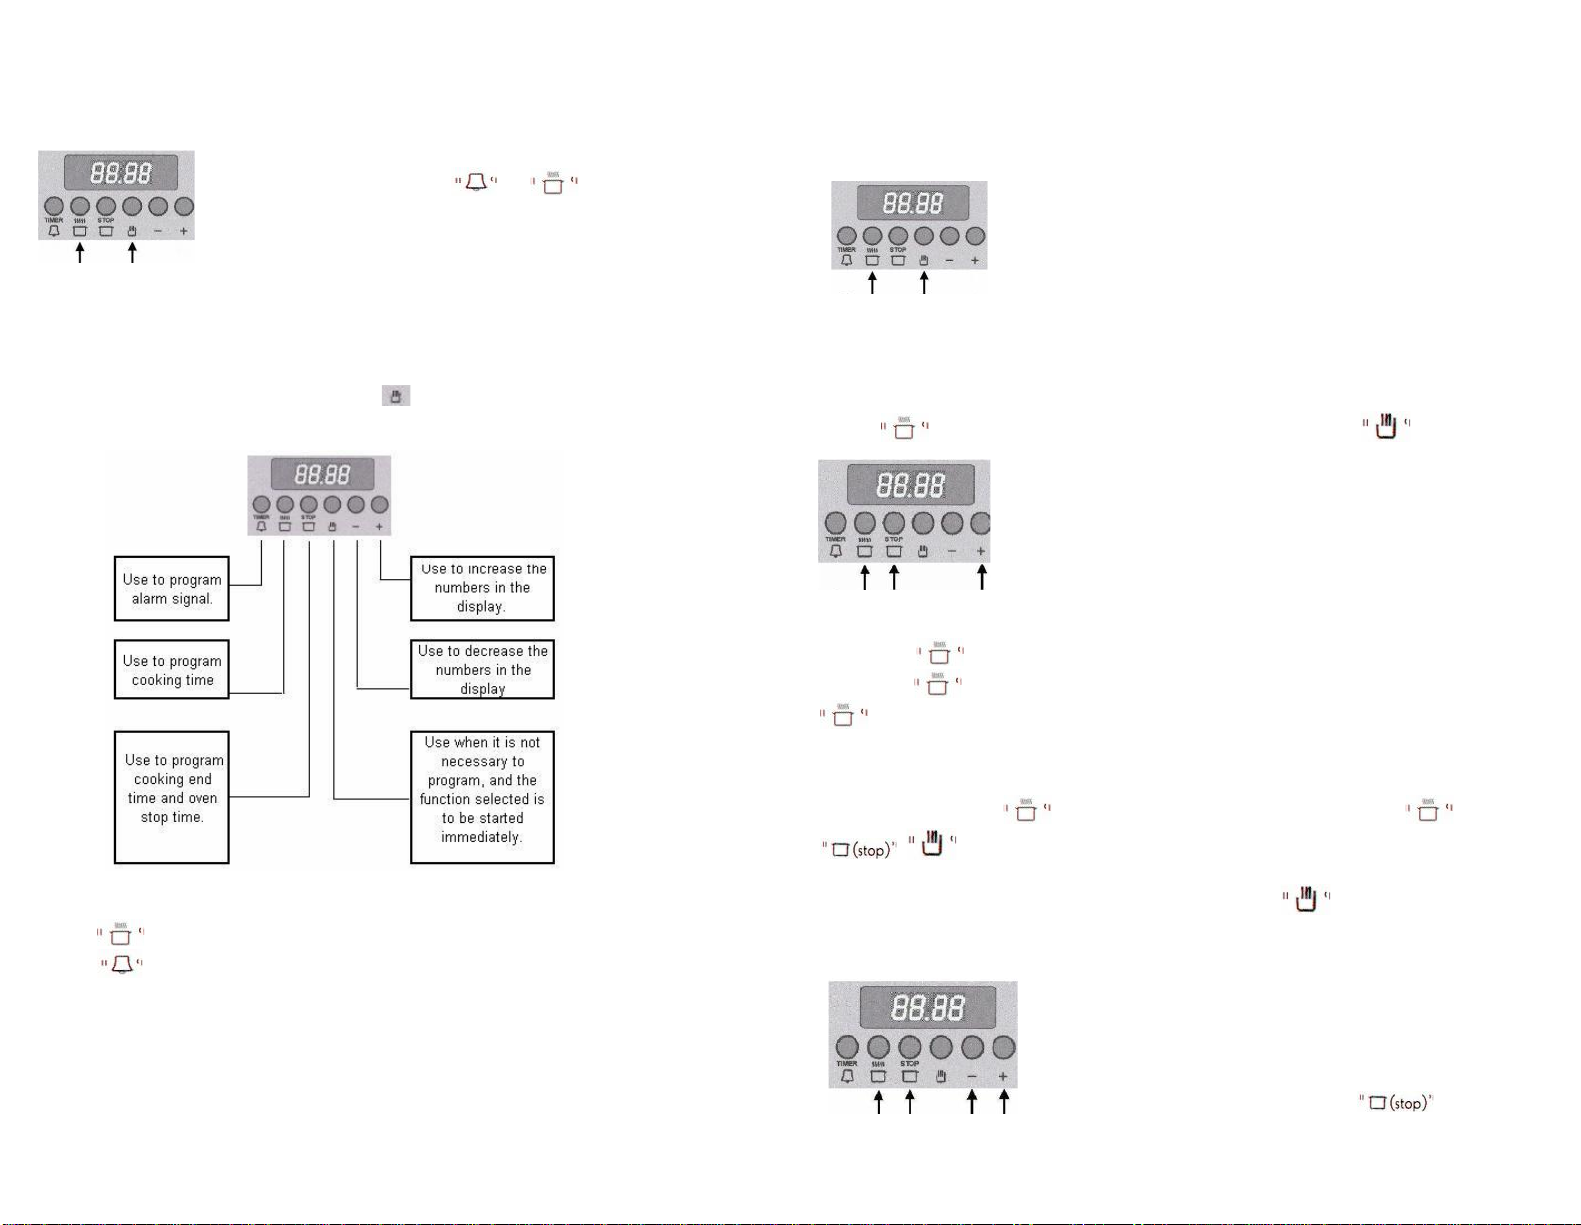
1 .
Set c oo k i n g t i m e b e t w e e n 0 - 2 4 h o u r s .
o ck b e t w e en 0 - 2 4 h o u r s .
1. Set day time while pressing and and pressing “-“or “+”.
You can increase number one by one by pressing “-“,“+” as well as you can
increase the number fast by hold it pressed.
2. When you release the button, the clock/timer and your oven starts
functioning manually.
If you do not want the oven to function, “Oven control” switches should be
off. If full or semi-automatic programming has been made before,
clock/timer can not be set without deactivating the program.(see clock / timer
reset).
3 .
P ro g r am f u ll a u to m atic, s e m i a u t o m atic o r m a n u al c oo k i ng .
Y o u can s ee c oo k i n g ti m e b y pr e ss in g b u tt o n , C oo k e n d t i m e b y pr e ss i n g s to p
s w it c h . D a y r eal ti m e w ill b e d is p la y ed a g a i n 5 s ec o n d s a f t e r pr e ss in g i t.
AU T O :
S h i n es s tea d il y w h e n th e o v e n i s pro g r a m m e d .
:
S h in e s s tea d il y w h en t h e o v e n is run n i ng .
:
S h in e s s tea d il y w h en t h e ala r m is pro g r a m m ed
M ANUAL M O DE
C OOK I NG W IT HO U T P R O G RAM
I t is us ed w h en n o pro g r a m m i n g i s n ece s s a r y a n d t h e c ook i n g
is to b e s ta r ted a n d e n d ed b y y o u .
Fi r s tl y r e s et. I f a n y pro g r a m m ed o r m a n u al ( n o n - pro g r a m m e d )
c oo k in g h a s b een m a d e b e f or e a n d t h e m e m o r y h a s th i s
pro g r a m , A U T O f la s h es i n th e d is p la y in d icat or . Y o u a r e to r e s et
it in bo th c a s e s . O th e r w i s e, yo u w ill n o t b e a b le to d o m a nu al
( n on - pro g r a m m e d ) c oo k i ng .
1 .
I f th e m e m o r y h as a n y progr a m , r e s et y o u r cl o c k /t i m e r .
2 .
Af ter p lac i n g t h e f oo d in th e o v e n , t u r n th e o v en c on t ro l s w it c h to th e r e qu i r ed po s iti o n .
3 .
T h e cl o c k /t i m er do es n o t in te rr u p t elect r ic ci r c u it in n o n - pro g r a m m ed ( m a n u al) c oo k in g ,
y o u t u r n t h e s w i tch to po s iti o n “0”to e n d t h e c oo k i ng .
C lo c k /t i m er r e s et:
1 .
P r e s s b u tt o n
2 .
P r e s s “-“b u tt o n to r e s et.
3
.
P r e s s b u tt o n
SE M I-A U T O M A T IC P R O GR A MM ING
I n t h is m od e y o u s ta r t t h e c oo k i n g pro ce s s a n d t h e o v en w ill
a u t o m a t ical l y s w it c h it s e l f o f f a g a in w h en t h e s et t i m e is
r eac h e d . Y o u m us t s e t th e l e n g th o f t i m e f o r c oo k i n g .
1 .
F ro m t h e o v e n c o n t ro l p a n el s et t h e c oo k in g t e m p e r at u r e r e q u ir e d . P r e p a r e t h e d is h y o u
w a n t to c oo k a n d p lace it in t h e o v e n .
2 .
H o ld t h e b u tt o n a n d pr e s s “ +” to s et t h e le n g th o f c oo k i n g t i m e r e q u i r e d . T h e
A U T O a n d a r e d i s p la y ed in t h e d i s p la y p a n el. T h e t i m e is c ou n ted d o w n . P r e s s
b u tt o n to s ee t h e r e m a in i n g ti m e w h e n c oo k i n g pro ce s s is o n . D a y ti m e i s d i s p la y ed
5 s ec o n d s a f ter pr e ss i n g t h e b u tt o n .
3 .
A t t h e e n d o f s et c oo k i n g t i m e th e o v en s to p s a u to m a t ic al l y a n d an ala r m is h ea rd . A t t h at
ti m e A U T O f la s h es a n d s ig n is d elete d . T o s to p t h e ala r m pr e s s ei t h er ,
,
4 .
T u r n t h e o v e n t e m p e r a t u r e b u tt o n to po s iti o n ( 0 ) .
5 .
“A U T O ” w ill c on ti n u e to f l a sh . T o d elete t h e pro g r a m , pr e s s b u tt o n
A U T O M A T IC M O DE
S E T T I N G T H E D AY R E AL TI M E
Y o u p r o g r a m t h e c oo k i n g s ta r t a n d e n d t i m e a n d le ng t h o f
c oo k ing .
1 .
B e for e pro g r a mm i ng , e n s u r e th at th e c orr ect t i m e h as
b een s et. Set t h e o v en te m p e r a tu r e r e q u i r ed a n d p lace th e
d is h y o u w a n t to c oo k in t h e o v e n .
2 .
Set th e c oo k i n g e n d ti m e b y ho l d i n g b u tt o n

P i
ş
irm e n in b iti
ş
za m a n ın ı d e
ğ
i
ş
tirm e k iç in :
O to m atik prog ram lam a yaptıysa nı z;
1- S T O P (du rdu rm a) düğ m esine ba sın ız.
2- Ra kam ı küçü ltm ek için “
-
” düğ m e sine b ü yü tm ek için “
+
”
düğ m esine basını
a n d pr e ss in g “ +” b u tt o n . W h il e pr e ss in g b u tt o n pr e s s “.”bu tt o n at th e s a m e ti m e to
s et le n g t h o f c oo k i n g f r o m c o o k i n g ta b le. T h e “A U T O” a n d s ig n s a r e d i s p la y e d .
3 .
T h e o v en w ill s t o p it s e l f a u t o m atical l y at th e e n d ti m e a n d a n A la r m s ou n d w ill b e
h ea rd . T o s to p t h e ala r m , pr e s s eit h er , a n d .
4 .
Set th e te m p e r at u r e b u tt o n to po s iti o n ( 0 ) .
5 .
“A U T O ” w ill c on ti n u e to f l a sh . T o d elete t h e pro g r a m , pr e s s b u tt o n .
Ch a n g ing C oo k ing T im e A fter P r og r a m m ing
D u r in g f un c t io n i n g o f y o u r o v en y o u c a n c h a n g e t h e le ng t h o f c oo k i n g a n d
c oo k in g e n d t i m e.
T o c h a ng e c oo k i n g e n d t i m e :
I f y o u h a v e s e lected a u to m at i c m od e :
- P r e s s S T OP b u tt o n .
- P r e s s “-“b u tt o n to d ec r ea s e nu m b er a n d pr e s s “ +”
b u tt o n to in c r ea s e nu m b e r .
T o ch a n g e the len gt h o f coo k in g :
1 .
W h en b u tt o n is pr e ss e d , th e le n g t h o f c oo k i n g is
d is p la y e d . T o s et th e n e w le n g th o f c oo k i n g pr e s s “ +” o r “-“.
T o i n te rr u p t fu n cti o n i n g o f t h e o v e n ( to s t op ) h o ld pr e s s in g
b u tt o n a n d pr e s s “-“to r e s et.
T h e c oo k in g pro ce s s s t op s a n d th e cl o c k /t i m er g iv e s ala r m .
T o s to p it pr e s s eit h er o r .
U se o f Al a r m M o de fo r V a r io us P urp o ses
●
Y o u can us e th e cl o c k /ti m er o f y o u r o v e n f o r v a r i ou s p u rpo s es o t h er th a n c oo k i n g pro g ra m .
●
H o ld b u tt o n a n d pr e s s “ +” a t th e s a m e t i m e to s et t h e ala r m ti m e.
●
T h e s y m bo l is d is p la y e d .
●
W h en t h e s et t i m e i s r eac h e d t h e ala r m s ou n d s .
●
T o s to p th e ala r m pr e s s ei t h er o r .
SECTION 8 MAINTENANCE & CLEANING
Clea n in g y o u r O v en
1.
B e fore clea n in g, s w itch off the coo ker po w er sw itch . If the o ven is h ot, w a it for it
to cool do wn com plete ly.
2.
Do not u se ab ra sive clea n ing agents on e na m el or pain ted surfaces. U se
cr ea m s or liq uid cle a nin g a gent s.
3.
A lw a ys w ipe clean a n y liq uid spills as so on as p o ss ib le as th e y m a y cau se
da m age to ena m el su rfa ces if a llowed to dry h a rd.
4.
Do not use co rr osive cle an ing a ge n ts w he n cle aning the cont ro l p an e l.
5.
N e ver clean or to uch th e glass w hen the oven is ho t.
6.
Occ a ss ion a lly rem o ve the d o ors from the o ven a nd w a sh and rin se w ith soap y
wate r.
Clea n in g th e Int e rio r P a rt o f Y ou r O v en
● S w itch off the coo ker power sw itch b efore you sta rt clean ing. Re m ove tra ys and
grill p an. W ipe the interior p arts w ith a soap y cloth an d w ipe dry.
● Do not use d ry/po w d er clea n ing a ge n ts. C le an the gla ss surfaces w ith g lass
clea ning agent s.
● Do not use ha rd b rushe s, steel wo o l or sh arp instru m ents such as a knife w hen
clea n ing the in te rior pa rt of the o ve n.
● Re m ove the glass front lid b y un scr e w ing the fixin g pa rts b y use of a screw driver,
and rem o ve the in side glass, clean and rinse it. Re -assem ble after drying.
O v en D oo r a n d G as k et
In order to rem ove the ove n do or:
1. O pen the o ve n door fu lly;
2. F ind hinges that bo u nd d oor to bod y;
3. Ma ke free two forelegs on hin ges and tu rn th em ;
4. C lose the door ha lfly to the ove n b y h olding it from left and right;
5. Slo w ly lift the door and put it into a sa fe p lace.
C lean the glass part of o ven d oor w ith hot water a nd on ly a soft cloth.
A fter clea n in g set the d oor to o ven b od y b y a pp lying a bo ve steps in op p osite
orde r.
P ro per w ork of oven pro vided b y a ga sket surround e d on in ner bod y of o ven.
-
Che ck th is ga sket in reg u lar pe riod s. If it re qu ires clean it w ith o ut using
ab rasive m ate rials.
-
If ga sket is dam aged, im med iate ly con tact w ith closest autho rise d se rvise of
T erm ik el. Do not u se o ve n till ga sket fixed.
Shelling Out Inner Glass of Door
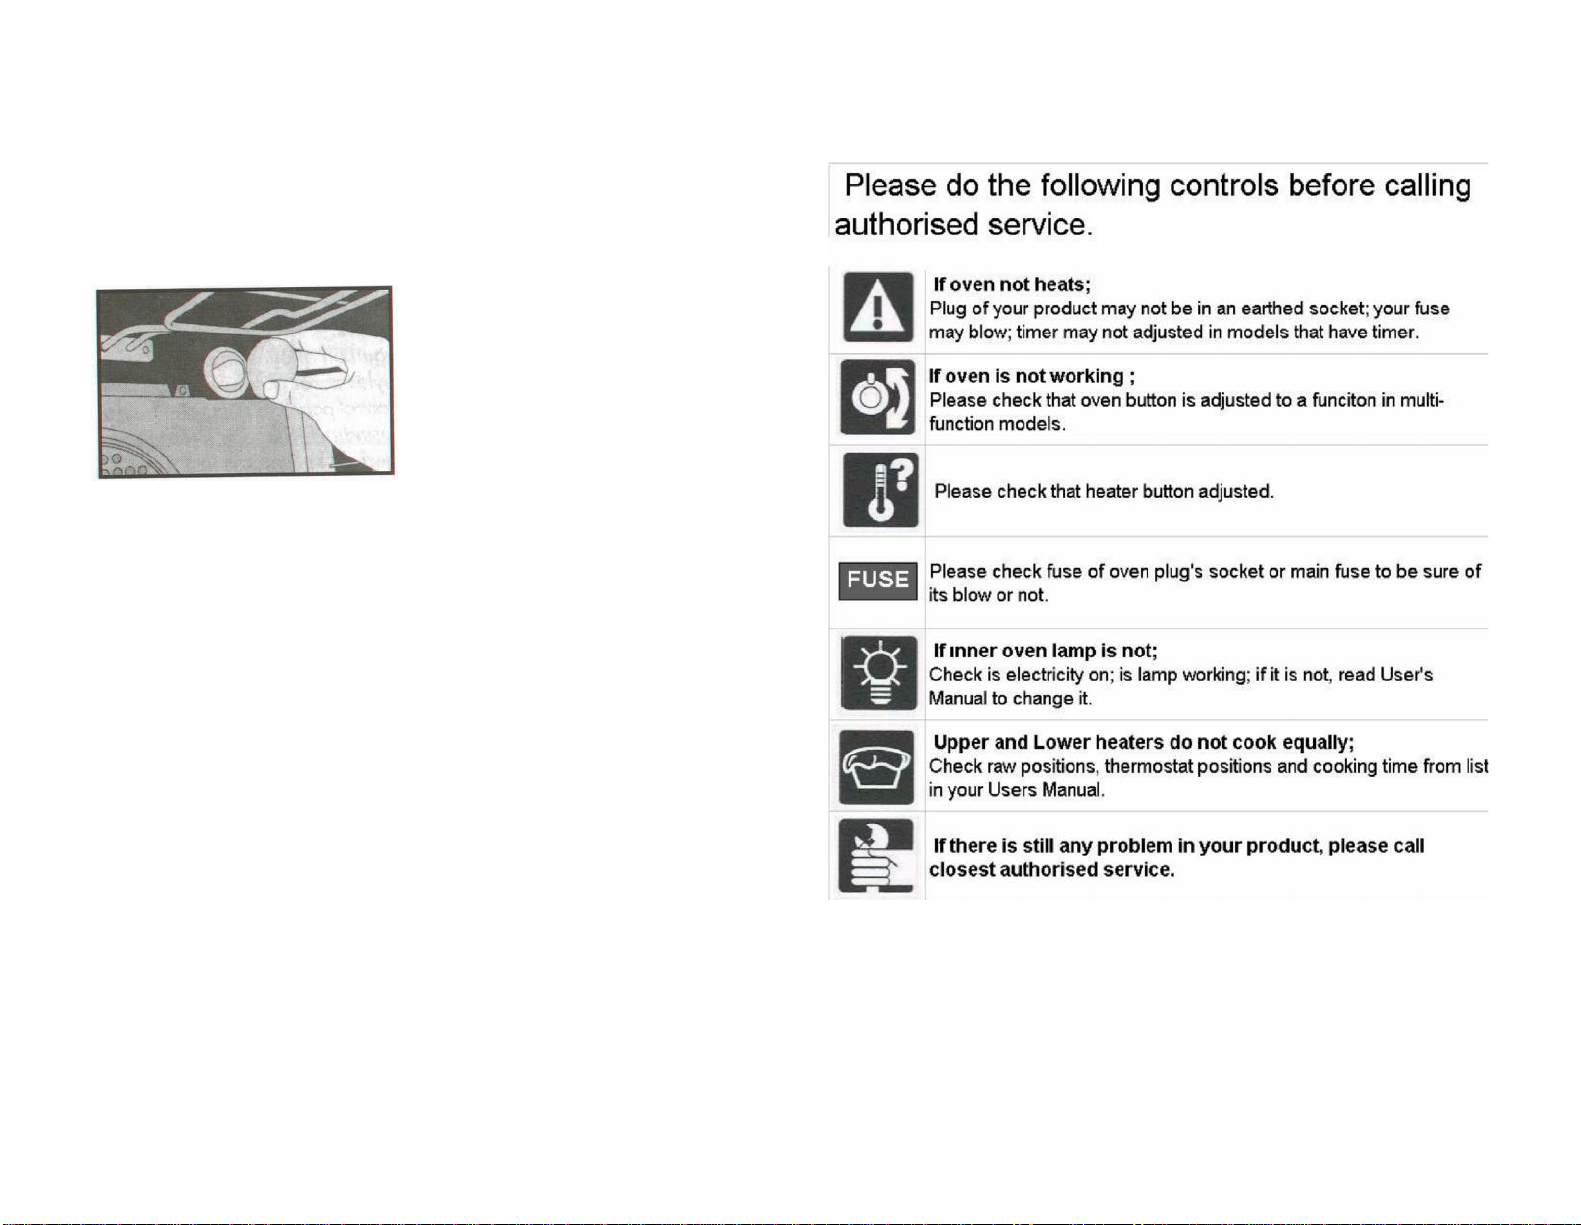
SECTION 10 Troubleshooting
C h a ng in g O v en L a m p
1.
S w itch o ff the o ve n po w e r sw itch .
2.
T urn the lam p fixing g lass counte r-clockw ise to rem o ve it.
3.
Re m ove the b ulb and insta ll an approved re pla cem ent. Re -ft the glass cover.
CHANGING OVEN LAMP
SECTION 9 TRANSPORTATION
When moving your oven ensure that you keep it upright and do not
place anything on top of it.
If you need to transport your oven and you do not have the original
packaging, please ensure that you wrap loose items such as oven shelves
and grill pans. Protect the oven doors, hob surface and the cooker side
panels with cardboard or a similar material.
Table of contents
Other Sovereign Cooker manuals


Popular Cooker manuals by other brands


Whirlpool
Whirlpool ADN 640 Instructions for installation, use e maintenance

Parmco
Parmco FS60R-8W Installation and operating instructions

Smeg
Smeg CE92IMX Instructions for installation and use

STOVES
STOVES 700DFDOa User & installation instructions

montpellier
montpellier MTE51W Installation and operating instructions

STOVES
STOVES RICHMOND DF user manual


