Sovereign SOVE5060W User manual

Installation
and
Operating
Instructions
MODELS: SOVE5060W & SOVE6060W
Free-Standing Electric Oven
Please
read
these
instructions
carefully
before
attempting
to
install
or
use
this
appliance.
It
is
advisable
to
keep
these
instructions
in
a
safe
place
for
future
reference.
(50x60 Model shown with Gas Hob for indicative purposes only)
Electric Hob Show
n
Above

2
In
t
roduc
t
ion
Thank you for choosing this Sovereign branded appliance. It
has been designed to give years of trouble-free use provided
it is installed and maintained correctly.
Please read these instructions carefully before installing or
using your appliance. It is advisable to keep your purchase
and
installation receipts with these instructions in a safe place for
future reference. Included is some important safety informat
ion
in addition to guidelines and recommendations that will enab
le
you to take full advantage of all the functions available.
This quality appliance has been tested and certified to meet all
applicable UK electrical and safety standards.
This appliance must be installed and connected in
accordance with current regulations.
After unpacking the appliance ensure that there is no visible
damage. If the appliance has been damaged during transit, do
not use it, contact your retailer immediately.

3
Your 1 year Manufacturer's guarantee
THIS DOES NOT AFFECT YOUR STATUTORY RIGHTS.
Your new Sovereign appliance carries a free guarantee which protects you
against the cost of repairs during the first 12 months from date of purchase
provided that:
Any claim is accompanied by evidence of the model reference, model serial
number and proof of purchase, such as a Sales Receipt, showing that the
appliance was purchased within the 12 months prior to the date of claim.
What is not covered under the Guarantee:
Any appliance not correctly installed and operated in accordance with the
manufacturer's instructions.
Any appliance that is used for anything other than domestic purposes.
Any defect caused by accident, misuse, unauthorized modification or
inexpert repair.
Cost of Call-out where a fault cannot be found with the appliance.
Cost of Call-out for work covering routine maintenance, such as, but not
exclusively, cleaning of filters or defrosting.
Cost of Call-out for work required to correct the alignment of doors
following door reversal procedures carried out by you.
Use of the appliance by anyone other than the Householder.
Use in any commercial environment.
Consumable items, such as, but not exclusively, fuses in plugs, bulbs and
breakable items which require routine replacement.
Repair costs incurred that have not been authorised by Repairtech and/or
carried out by a non-approved Repairtech engineer.
YOUR GUARANTEE IS VALID ONLY IN THE UK.
To Register your Appliance simply complete the card in your appliance pack and return it
with a stamp affixed or Alternatively you can Register online at www.repairtechuk.com
SERVICE HELP-LINE
Should your appliance develop a fault, please call the
Repairtech Service Helpline on:
01527-888133
Please remember to have all your product details available, including the model number,
serial number, date of purchase and your retailer’s details before registering a fault.
Your service call cannot progress without this information.
4
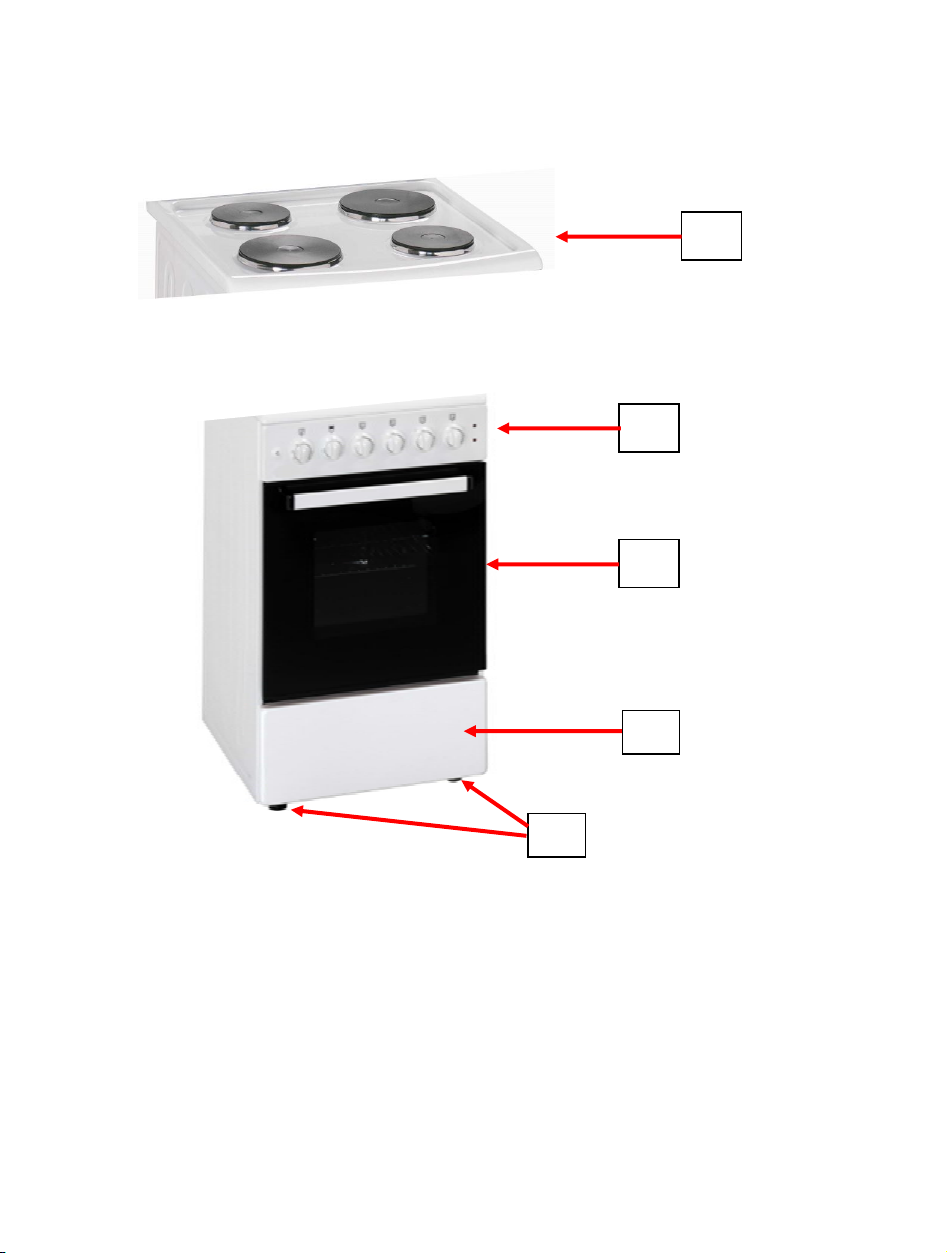
Description
Of
The
Appliance
1. Hotplate with 4 x Sealed Heat Zones
2. Control Panel
3. Glass Oven Door
4. ‘Fixed’ Fascia Panel (Not a storage drawer)
5. Adjustable Feet
(Picture indicative of model supplied)
2.
1.
3.
4.
5.

5
CONTENTS:
Section 1. Installation
Sect
i
o
n 2.
Safety
A
d
v
i
ce
Section 3. Operating the Appliance
Section 4. Maintenance
6
Section
1.
Installation
-Remove all packaging, protective film and securing tape from
the appliance.
-Position the appliance in a dry atmosphere.
- The following dimensions are provided as a guide for
installation – your installer will carry out the installation in
accordance with the current regulations.
- Your installer will connect the power cable in accordance with
the current regulations.
To install this appliance, please proceed as follows:
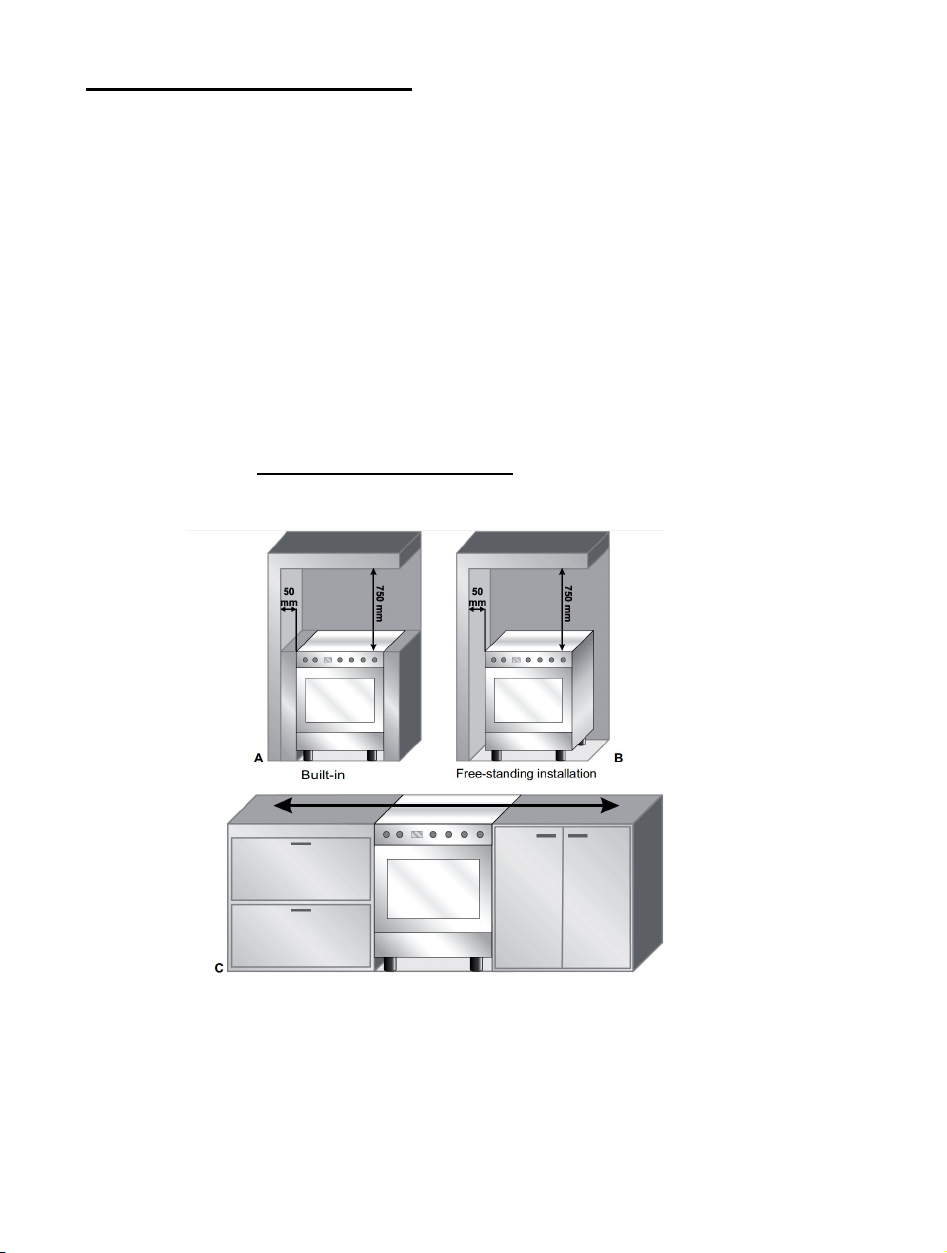
1.1. Position of the Cooker
You must ensure a minimum gap of 50mm between the edge
of the hotplate and an adjacent wall (see pic A/B above). You
must ensure a minimum distance of 750mm between the
hotplate and overhanging cupboards or a cooker hood (see
pic A/B above).
7
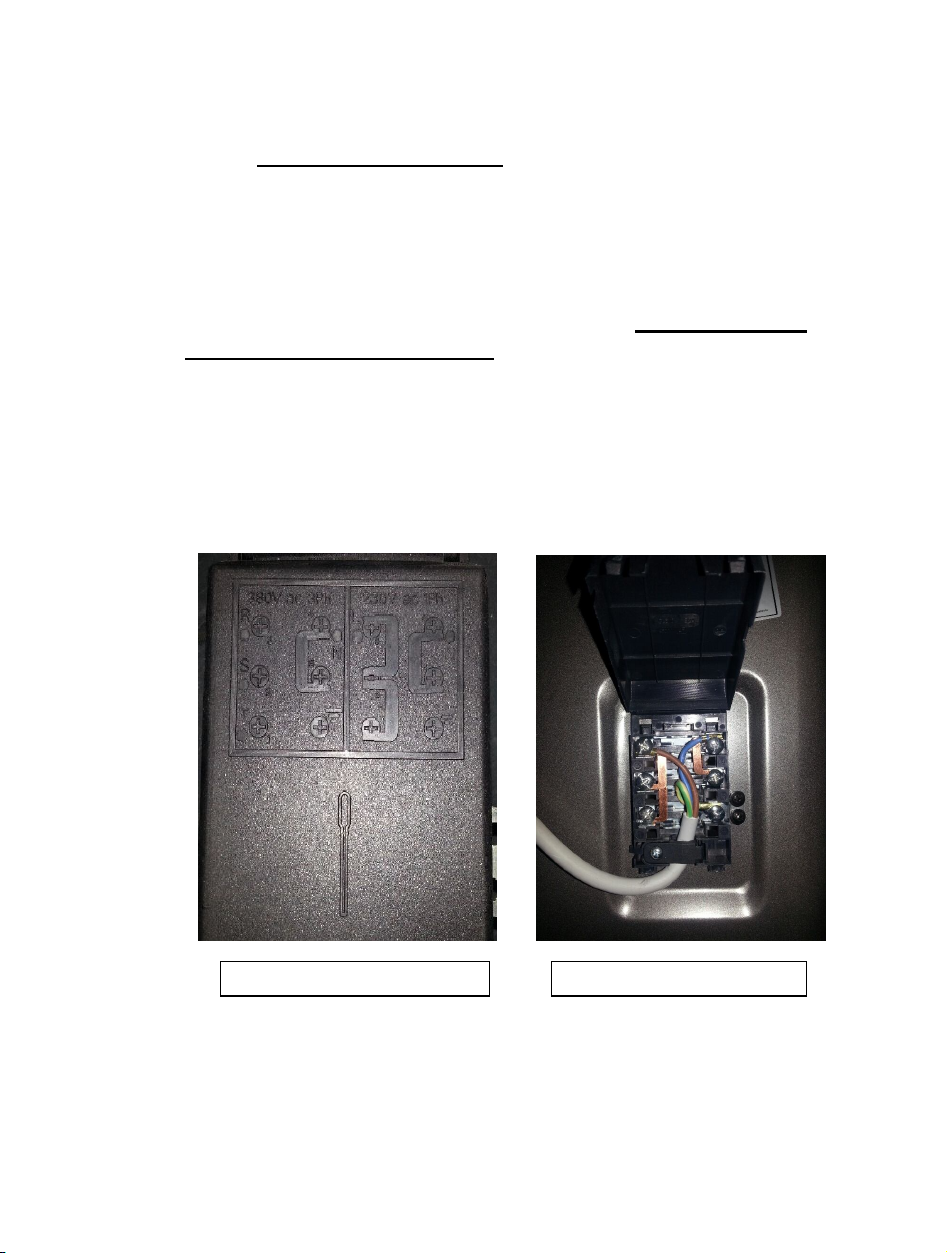
1.2. Electrical Connection
This appliance has a Power Rating well in excess of 3000W
and must be ‘hard wired’ to a suitable fused point adjacent to
the appliance housing. Please note that a switchable spur
should be accessible above the work surface in order that the
power can be turned off by the consumer. N.B. Cannot be
connected via a 3 pin plug!
Your installer will connect this appliance in accordance with
current regulations using the correct grade of electrical cable
and making a suitable connection between the fused spur and
the electrical connection block on the rear of the appliance.
See pics 1 & 2 below.
Pic.1 Electrical Connection Block
Pic.2
Co
nnection Block
Wiring

8
Section 2. Safety Advice
-Please read this booklet thoroughly before installing and
switching on the appliance. The manufacturer accepts no
responsibility for incorrect installation and usage.
-This appliance is guaranteed for Domestic Use Only.
-The appliance is not intended for use by persons (including
children) with reduced physical, sensory or mental capabilities,
or lack of experience and knowledge, unless they have been
given supervision or instruction concerning the use of the
appliance by a person responsible for their safety. Children
should be supervised to ensure that they do not play with the
appliance.
-This appliance must only be used for cooking/heating food
items. Do not use it for any other purpose.
-Do not twist or bend the connection/power cable, and keep it
away from hot surfaces.
-Following installation make sure that the power cable is not
trapped underneath the appliance.
-Keep the appliance surfaces clean. Failure to do this could
lead to the appliance malfunctioning.
-The surface of this appliance will get extremely hot during use.
Take care when using the appliance and keep children well
away.
-The interior and surface of this appliance will remain hot after
it has been turned off. Do not touch or clean the appliance
until it has completely cooled down.
-Never lift this appliance using the door handle or ‘open’ door.
-If the power supply cord is damaged, it must be replaced by
the manufacturer, it’s service agent or similarly qualified
persons in order to avoid a hazard.
9
Section 3. Operating the Appliance
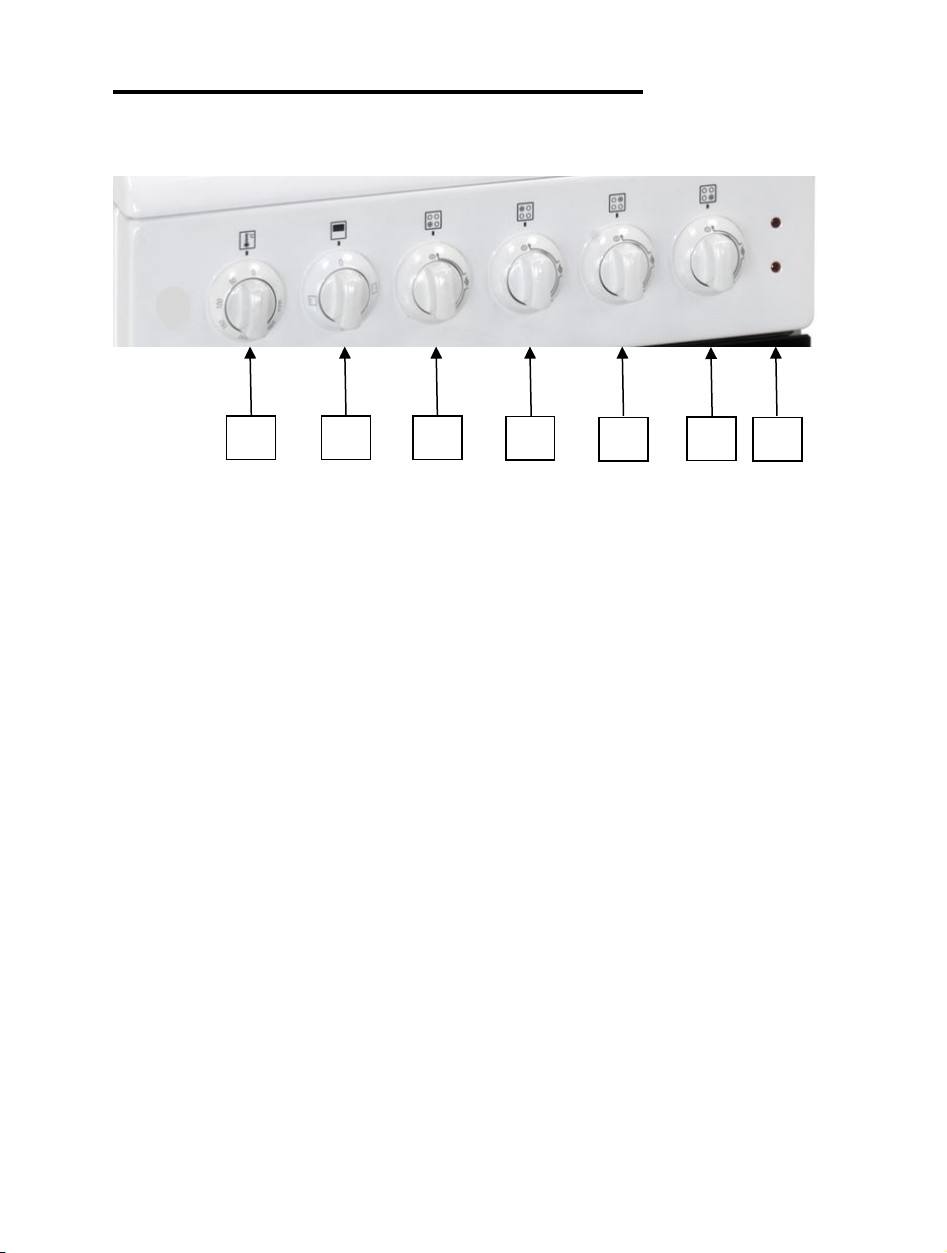
3.1. Control Panel
1. Thermostat Control Knob
2. Oven Function Control Knob
3. Left Hand Front Heat Zone Control Knob
4. Left Hand Rear Heat Zone Control Knob
5. Right Hand Rear Heat Zone Control Knob
6. Right Hand Front Heat Zone Control Knob
7. Upper & Lower Heat Warning Lights For Oven
3.2. Cooking & Thermostat & Functions
3.2.1. Using The Hotplate Heat Zones
Turn the required heat zone control knob (3, 4, 5 or 6) clockwise
to the required heat level. When you have finished, turn the
control knob back to the off position.
3.2.2. Operating the Oven
Turn the oven control knob (2) to the required function setting, i.e.
Top heat, Bottom heat or Grill and then turn the temperature
control knob (1) to the required temperature setting. Please note
that it takes a few minutes for the oven to reach the set
temperature. The small warning lights (7) will indicate ‘upper’ or
‘lower’ heat selection.
1.
3.
2.
4.
5.
6.
7.

10
Section 4. Maintenance
Before any maintenance or cleaning work is carried out,
DISCONNECT the appliance from the ELECTRICITY supply and
ensure that the appliance is completely cool.
4.1. Cleaning the Hotplate/Oven
Clean spillages from the hotplate and inside the oven as soon as
possible after use. Always ensure that the surface has cooled down
before cleaning.
Use a cloth with warm soapy water to clean the surface. If the
spillage has dried on the surface you may need to use a specialist
oven cleaner, available from all good supermarkets.
Clean the glass door with warm soapy water – always ensure the
glass is cool before you clean it!.
4.2. Changing the Oven Bulb
If your oven is supplied with an interior oven light, proceed as follows:
Warning! Only ever remove/replace the oven bulb when the oven is
cold.
Unscrew and remove the glass cover and then unscrew the bulb.
Ensure that the bulb is replaced with a ‘like for like’ 15 Watt bulb
having the same fitment.
Bulbs can be purchased from most electrical retailers or department
stores with electrical departments.

11
4.3. What to do if something goes wrong
There is no power to the appliance:
-Check there is not a power cut
-Check there is power to the electric socket/appliance
The oven operates but the oven light is not working:
-Replace the oven bulb as described in section 4.2. above.
Please note that bulbs are not covered under the guarantee.
YOUR GUARANTEE IS VALID ONLY IN THE UK.
To Register your Appliance simply complete the card in your appliance pack and
return it with a stamp affixed or Alternatively you can Register online at
www.repairtechuk.com
SERVICE HELP-LINE
Should your appliance develop a fault, please call the
Repairtech Service Helpline on:
01527-888133
Please remember to have all your product details available, including the model
number, serial number, date of purchase and your retailer’s details before
registering a fault.
Your service call cannot progress without this information.

12
Important Note:
This
appliance is
marked
according
to
the
European
directive
2002/96/EC
on
Waste
Electrical and
Electronic
Equipment
(WEEE).
By
ensuring
this
product
is
disposed
of
correctly,
you
will
help prevent
potential
negative
consequences
for
the
environment
and
human
health,
which
could otherwise
be
caused
by
inappropriate
waste
handling
of
this
product.
The
symbol
on
the
product,
or
on
the
documents
accompanying
the
product,
the
Crossed
Out Wheelie
Bin,
indicates
that
this
appliance may
not
be
treated
as
household
waste. Instead
it
shall
be
handed
over
to
the
applicable
collection
point
for
the
recycling
of
electrical
and electronic
equipment.
Disposal
must
be
carried
out
in
accordance
with
local
environmental
regulations
for
waste
disposal.
For
more
detailed
information
about
treatment,
recovery
and
recycling
of
this product,
please
contact
your
local
authority,
your
household
waste
disposal
service
or
the
retailer
where
you purchased
the
product.
We
continuously
try
to
improve
our
products
for
the
benefit
of
our
customers.
For
this
reason
we
reserve
the
right
to
make
changes
to
any
product
at
any
time,
without
notice
Issue: 02/01-07-2014
This manual suits for next models
1
Other Sovereign Oven manuals


