SP Scientific VIRTIS ADVANTAGE PRO User manual

FREEZE DRYER OPERATOR’S MANUAL
V
IR
T
IS
A
D
V
ANTAGE
P
RO
LABORATORY
BENCHTOP
FREEZE
DRYER


Rev 002, 01/14 i
© SP Scientific 2014
Copyright © 2014 SP Scientific. All marks herein are used under license.
All brand or product names mentioned may be trademarks or registered trademarks of their respective
companies.
Part Number 100008577
Rev 002, 01/14
Original Instructions
The U.S. English version of this document is the original instructions.
All other languages are a translation of the original instructions.
SP Scientific
3538 Main Street
Stone Ridge, NY 12484
USA
935 Mearns Road
Warminster, PA 18974
USA
815 State Route 208
Gardiner, NY 12525
USA
The Sovereign Centre,
Farthing Road,
Ipswich IP1 5AP UK
(800) 251-1531
(800) 523-2327
(800) 431-8232
+44 (0)1473 240000
(845) 687-0071
(215) 672-7800
(845) 255-5000
SP Service
(800) 548-4666
SP Service Fax
(845) 687-0024
Website
http://www.spscientific.com
This Freeze Dryer Operator’s Manual contains confidential and proprietary information of SP Scientific and may
be used only by a recipient designated by and for purposes specified by SP Scientific.
Reproduction of, dissemination of, modifications to, or the creation of derivative works from this Freeze Dryer
Operator’s Manual, by any means and in any form or manner, is expressly prohibited, except with the prior
written permission of SP Scientific. Permitted copies of this document must retain all proprietary notices
contained in the original.
The information in this document is subject to change without prior notice. Always confirm with SP Scientific
that you are using the most current version of this document. SP Scientific is free to modify any of its products
and services, in any manner and at any time, notwithstanding the information contained in this document.
THE CONTENTS OF THIS DOCUMENT SHALL NOT CONSTITUTE ANY WARRANTY OF ANY KIND,
EITHER EXPRESSED OR IMPLIED, INCLUDING BUT NOT LIMITED TO THE IMPLIED WARRANTIES OF
MERCHANTABILITY AND/OR FITNESS FOR A PARTICULAR PURPOSE OR GIVE RISE TO ANY LIABILITY
OF SP SCIENTIFIC, ITS AFFILIATES OR ITS SUPPLIERS.
The terms and conditions governing the use of this Freeze Dryer Operator’s Manual shall consist of those set
forth in written agreements with SP Scientific.

ii Rev 002, 01/14
© SP Scientific 2014
Important Symbols
WARNING! INJURY OR EVEN
DEATH MAY RESULT IF A
RECOMMENDATION MARKED WITH
THIS SYMBOL IS NOT HEEDED.
CRUSH HAZARD. KEEP HANDS
CLEAR WHEN OPERATING DOOR.
ELECTRIC SHOCK DANGER! USE
APPROPRIATE CAUTION TO AVOID
INJURY OR DEATH.
CORROSIVE CHEMICAL. WEAR
SUITABLE GLOVES, SAFETY
GLASSES, AND PROTECTIVE
CLOTHING.
BURN DANGER! POTENTIALLY HOT
SURFACE. USE APPROPRIATE
CAUTION.
PROPERTY CAUTION! TO PREVENT
DAMAGE TO CHAMBER EQUIPMENT
AND/OR LOAD, ADHERE TO
PROCEDURES MARKED BY THIS
SYMBOL.
DO NOT STORE FLAMMABLE
MATERIALS IN CHAMBER.
PRACTICAL OPERATING TIP. THESE
RECOMMENDATIONS STREAMLINE
UNIT OPERATION AND PREVENT
COMMON OPERATOR ERRORS.
ALWAYS WEAR APPROPRIATE
PERSONAL PROTECTIVE
EQUIPMENT (PPE) SUITED FOR THE
TASK YOU ARE PERFORMING.
EXPLOSIVE MATERIALS HAZARD!
KEEP OBJECTS AWAY FROM HEAT.
Freeze Dryer Safety Warnings
Do not freeze-dry explosive or highly flammable substances.
Always assume that shelf, condenser and internal parts may be very cold or very hot. Wear protectiveequipment to avoid burns.
Always ensure that only an authorized technician services the refrigeration, heat transfer, vacuum andelectrical systems.
Always ensure that refrigeration air intake is clear and clean.
Always ensure vacuum pump exhaust is properly ventilated and/or contained.
Always practice team lifting when moving heavy equipment.
Always use a maximum one pound regulator if backfilling from an inert gas source.
Always wear safety glasses when using glass flasks.
Always wear appropriate personal protective equipment (PPE) suited for the task you are performing.
Be sure to carefully read the entire instruction manual before attempting to operate the freeze dryer.
Be sure to verify that the electric service and other utilities match the unit’s requirements before connecting to power.
Never allow hand or body contact with open vacuum ports.
Never clean with solvents. Use mild detergent and water only.
Never operate the unit without all covers in place.
Never pressurize a freeze-drying chamber unless it has been specially designed and coded as a pressurevessel (e.g., displays an ASME-coded certificate).
Never use acrylic closures if they are cracked or crazed.
Never use with toxic, corrosive, flammable or organic materials unless special precautions are in place toprevent injury to personnel or damage to equipment.

Rev 002, 01/14 iii
© SP Scientific 2014
Warranty Information
VirTis AdVantage Pro Lyophilizers are warranted by SP Scientific to be free of defects in material and workmanship when
operated under normal conditions as specified in the instructions provided in this manual. Please take this opportunity to
locate the serial tag on your new VirTis AdVantage Pro and record the information below for future reference. SP Scientific
also recommends that you complete and return your unit’s warranty registration card.
Model Number
Serial Number
Part Number
Limited Warranty
SP Scientific (the “Company”) shall warrant each of its products against defects in material or workmanship for a period of 12
months from the date of installation or 15 months from the date of shipment (whichever comes first) provided that the
product is used in a reasonable manner under appropriate conditions and consistent with the applicable operating
instructions. In addition, the Company shall warrant the refrigeration system for a period of 24 months provided the system is
used in a reasonable manner under appropriate conditions and consistent with the applicable operating instructions.
The obligation of the Company shall be, at its option, to repair or replace, without charge any parts that prove to be defective
within the warranty period, if the purchaser notifies the Company promptly in writing of such defect. No product shall be
returned to the Company without prior approval of the Company.
This limited warranty shall cover the costs of parts and labor to repair or replace all defective product(s) at the Seller’s
factory. For all products installed by the Company and located within the Company service travel areas, this warranty shall
cover transportation charges to ship the product to and from the Company’s factory and/or the costs of travel, room and
board if the Company’s employees conduct repair at the Buyer’s location. In lieu of repair or replacement at the Company’s
factory, the Company may, in its discretion, authorize a third party to perform the repair or replacement at the Buyer’s
location, and at the Company’s sole expense.
The Company shall not be responsible for labor charges payable with respect to persons other than Company employees.
Replacement or repair of parts pursuant to this warranty shall not in any way extend the original warranty period. The
Company shall not be responsible for any unauthorized repairs, replacements or product modifications, nor will it be
responsible for any product failures resulting from such unauthorized repairs, replacements or product modifications
negligently or otherwise made by persons other than Company employees or authorized representatives of the Company.
The buyer shall assume transportation charges to ship the product to and from the Company’s factory and the costs of
travel, room and board if the Company’s employees conduct repair at the Buyer’s location within the warranty period if the
product was not installed by the Company’s and/or is not located within the Company’s service travel areas.
THE COMPANY DOES NOT MAKE AND EXPRESSLY DISCLAIMS ANY WARRANTY OF MERCHANTABILITY OR
FITNESS FOR A PARTICULAR PURPOSE OR ANY OTHER WARRANTY, EXPRESSED OR IMPLIED, WITH RESPECT
TO THE SALE, INSTALLATION, DESIGN OR USE OF ITS PRODUCTS. ADDITIONALLY, THE COMPANY SHALL NOT BE
LIABLE FOR ANY CONSEQUENTIAL DAMAGES RESULTING FROM THE USE OF OR ANY DEFECTS IN ITS
PRODUCTS.
The Company’s employees are available to provide general advice to customers concerning the use of the Company’s
products; however, oral representations are not warranties with respect to particular products or their uses and may not be
relied upon if they are inconsistent with the relevant product specifications for the items set forth herein.
Notwithstanding the above, the terms and conditions set forth in the Company’s formal sales contracts shall be controlling
and supersede any inconsistent terms contained herein, and any changes to such contracts must be made in writing and
signed by an authorized executive of the Company.
WARNING! THE DISPOSAL AND/OR EMISSION OF SUBSTANCES USED IN CONNECTION
WITH THIS EQUIPMENT MAY BE GOVERNED BY VARIOUS FEDERAL, STATE OR LOCAL
REGULATIONS. ALL USERS OF THIS EQUIPMENT ARE URGED TO BECOME FAMILIAR WITH
ANY REGULATIONS THAT APPLY IN THE USERS AREA CONCERNING THE DUMPING OF
WASTE MATERIALS IN OR UPON WATER, LAND OR AIR AND TO COMPLY WITH SUCH
REGULATIONS.

iv Rev 002, 01/14
© SP Scientific 2014

Rev 002, 01/14 v
© SP Scientific 2014
Contents
Important Symbols...............................................................................................................................................ii
Freeze Dryer Safety Warnings............................................................................................................................. ii
Warranty Information .......................................................................................................................................... iii
Introduction .................................................................................................................1
Overview..............................................................................................................................................................1
Key Features........................................................................................................................................................1
AdVantage Pro Series Freeze Dryer....................................................................................................................2
AdVantage Pro (Front View)............................................................................................................................2
AdVantage Pro (Side Views)...........................................................................................................................2
AdVantage Pro (Rear View)............................................................................................................................3
Getting Started............................................................................................................5
Initial Inspection...................................................................................................................................................5
Lifting the AdVantage Pro Freeze Dryer ..............................................................................................................6
AdVantage Pro Setup..........................................................................................................................................6
Service Connections............................................................................................................................................6
Vacuum Pump Installation ...................................................................................................................................7
Installing the Vacuum Pump............................................................................................................................7
Product Preparation: Shelf Drying........................................................................................................................8
Stoppering...................................................................................................................9
Inert Gas Backfill..................................................................................................................................................9
To Backfill with Inert Gas:..............................................................................................................................10
Stoppering Operation.........................................................................................................................................11
To Operate the Stoppering System:..............................................................................................................11
Quickseal Valves.......................................................................................................13
Quickseal Valves ...............................................................................................................................................13
Product Preparation: Flask / Manifold Drying.....................................................................................................14
Using Quickseal Valves During a Freeze-Drying Cycle.................................................................................15
Meltback........................................................................................................................................................16
Additional Options.....................................................................................................17
Bulk 316 Stainless Steel Trays ..........................................................................................................................17
Removable Bottom Stainless Steel Trays..........................................................................................................17
Stoppering Rod Extension .................................................................................................................................17

Contents
VirTis AdVantage Pro
vi Rev 002, 01/14
© SP Scientific 2014
Vacuum Break Solenoid (VBS) Valve................................................................................................................17
Shelf Latching Kit...............................................................................................................................................18
Solvent Resistant Door......................................................................................................................................18
Liquid Nitrogen Trap ..........................................................................................................................................19
To Operate a Liquid Nitrogen Trap:...............................................................................................................19
Filter Trap...........................................................................................................................................................20
Degassing Filter Trap Cartridges...................................................................................................................20
Lab Cart.............................................................................................................................................................21
Condenser Drain Tray........................................................................................................................................21
Replacement Door Gasket.................................................................................................................................21
General Maintenance................................................................................................23
Overview............................................................................................................................................................23
Vacuum System.................................................................................................................................................23
Vacuum Pump...............................................................................................................................................23
Changing Vacuum Pump Oil.........................................................................................................................24
Scheduling Oil Changes................................................................................................................................24
Clearing the Vacuum Pump Maintenance Alarm...........................................................................................24
Optional Secondary Traps.............................................................................................................................25
Gas Ballast Valve on the Vacuum Pump.......................................................................................................25
Vacuum Tubing and Gaskets........................................................................................................................25
Quickseal Valves...........................................................................................................................................27
Refrigeration System .........................................................................................................................................27
Air-Cooled Condenser...................................................................................................................................27
Compressor(s)...............................................................................................................................................28
Appendix A: Troubleshooting....................................................................................29
Vacuum Problems..............................................................................................................................................29
Product Melting..................................................................................................................................................30
Appendix B: Cover Removal.....................................................................................31
Appendix C: Shelf Latching.......................................................................................37
Shelf Latching Instructions.................................................................................................................................37
Appendix D: Serum Vial Capacities ..........................................................................39
Serum Vial Capacities Chart..............................................................................................................................39
Appendix E: Stainless Steel Cleaners.......................................................................41
Appendix F: Chemical Resistance Charts.................................................................43
Acrylic Parts.......................................................................................................................................................43
AdVantage Pro Bezel.........................................................................................................................................44
AdVantage Pro Front Panel...............................................................................................................................48
AdVantage Pro: Miscellaneous Parts.................................................................................................................50
AdVantage Pro Top ...........................................................................................................................................62


Rev 002, 01/14 1
© SP Scientific 2014
Chapter
1
Introduction
THIS IS THE EQUIPMENT OPERATOR’S MANUAL FOR THE VIRTIS ADVANTAGE
PRO LYOPHILIZER. FOR ADDITIONAL INFORMATION, REFER TO YOUR CONTROL
SYSTEM OPERATOR’S MANUAL.
Overview The VirTis AdVantage Pro lyophilizer incorporates proven technology in an efficient
freeze dryer with a convenient benchtop footprint. User-friendly yet technically
sophisticated, the AdVantage Pro utilizes the versatile Intellitronics™ control system,
which includes a detailed full-color, touch-screen display for monitoring and controlling
all aspects of the freeze-dry cycle.
The AdVantage Pro freeze dryer offers an optional pneumatic stoppering system for
stoppering vials and is available with up to three (3) usable product drying shelves.
The AdVantage Pro also includes a choice of refrigeration systems and a variety of
additional options and accessories to meet a vast amount of application requirements.
Notes: Refer to Chapter 5: Additional Options for further information on AdVantage Pro options
and accessories.
Key Features
Convenience of a tray dryer in a benchtop unit.
Intellitronics™ controller with a full-color, touch-screen display.
Available with up to three (3) usable product drying shelves.
Optional pneumatic stoppering system available for stopper vials.
Six-liter ice condensing capacity.
Introduction
VirTis AdVantage Pro
2 Rev 002, 01/14
© SP Scientific 2014
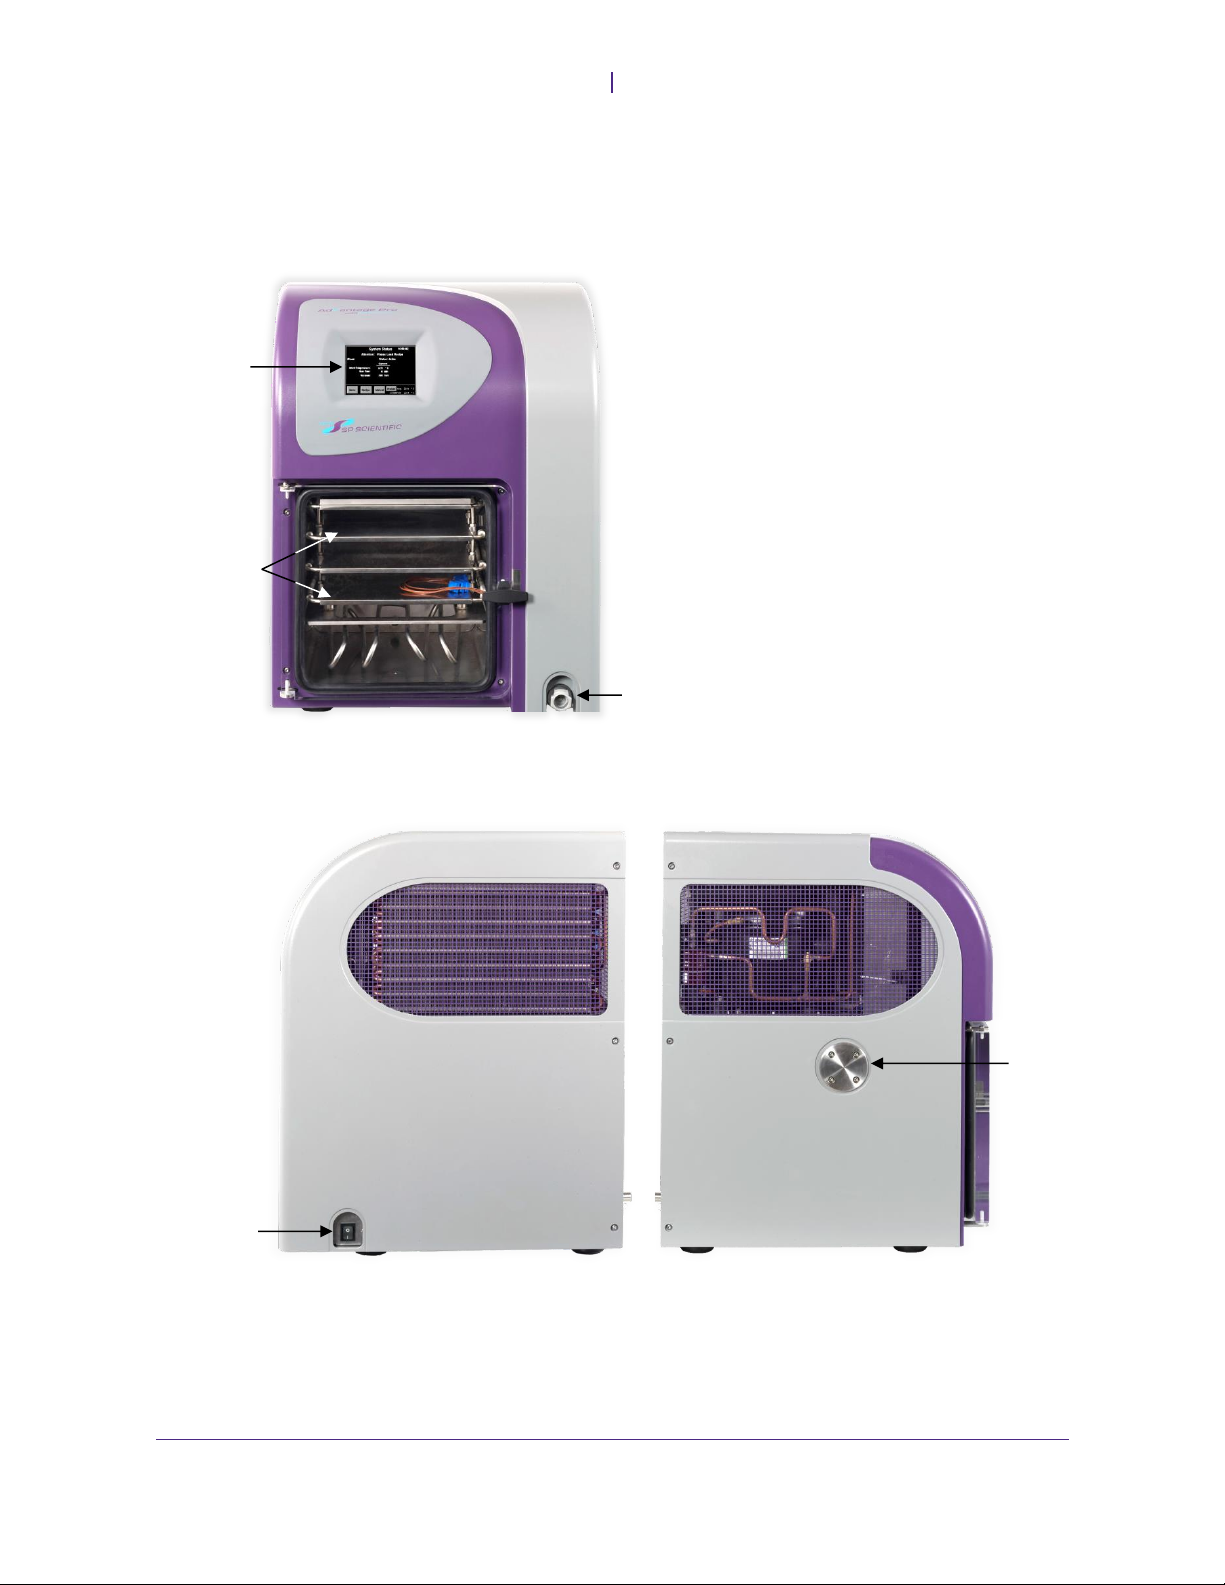
AdVantage Pro Series Freeze Dryer
AdVantage Pro (Front View)
AdVantage Pro (Side Views)
Drain
Intellitronics™
Controller
Product Drying
Shelves
Manifold
Adapter
On / Off Switch

VirTis AdVantage Pro
Introduction
Rev 002, 01/14 3
© SP Scientific 2014
AdVantage Pro (Rear View)
Serial Tag
Network Port
Main Power Inlet
Vacuum Pump
Outlet Port
Inert Gas
Backfill Port
Stoppering Air
Inlet Connection
Vacuum Break
Solenoid (VBS)
Power Outlet
Vacuum Pump
Power Outlet

Introduction
VirTis AdVantage Pro
4 Rev 002, 01/14
© SP Scientific 2014

Rev 002, 01/14 5
© SP Scientific 2014
Chapter
2
Getting Started
PRACTICAL OPERATING TIP. YOUR LYOPHILIZER IS SUPPLIED WITH A SOPHISTICATED
CONTROLLER. REVIEW YOUR CONTROLLER OPERATOR’S MANUAL BEFORE OPERATING
YOUR FREEZE DRYER.
WHEN IN OPERATION, ALWAYS ASSUME THE LYOPHILIZER CHAMBERS ARE UNDER VACUUM.
ALL GLASSWARE UNDER VACUUM REPRESENTS A SIGNIFICANT IMPLOSION HAZARD.
INSPECT ALL GLASSWARE USED IN THE LYOPHILIZER FOR VISIBLE DEFECTS (CRACKS,
CHIPS, OR SCRATCHES) PRIOR TO USE. DO NOT USE GLASSWARE THAT IS DEFECTIVE.
LIQUID NITROGEN IS A HAZARDOUS MATERIAL THAT BOILS AT -194 °C. LIQUID NITROGEN
PRESENTS A SEVERE FROSTBITE HAZARD. WHEN USING LIQUID NITROGEN, WEAR PROPER
EYE PROTECTION AND PROTECTIVE GLOVES.
ALWAYS WEAR APPROPRIATE PERSONAL PROTECTIVE EQUIPMENT (PPE) SUITED FOR THE
TASK YOU ARE PERFORMING (E.G., EYE PROTECTION) AT ALL TIMES WHEN WORKING WITH
OR ANYWHERE NEAR A LYOPHILIZER.
Initial Inspection
Your AdVantage Pro series lyophilizer was carefully packed and thoroughly inspected
before leaving the factory. However, in the unlikely event that shipping damage has
occurred, retain all packing material and contact your freight carrier immediately.
DO NOT ACCEPT DAMAGED SHIPMENTS FROM A CARRIER WITHOUT A
SIGNED NOTIFICATION OF DAMAGES.
Upon receiving your shipment, inspect all contents of your equipment for damage.
Check packing material for small accessory items. Remove all packing material
carefully and inspect for concealed shipping damage. Inspect the inside of the
machine for any visible damage. If concealed damage or loss is discovered, contact
the freight carrier immediately.
1
Keep all contents, packing material and related
paperwork intact until a written report is obtained.
Note: SP Scientific will cooperate in the matter of collecting your claim, but is not responsible
for the collection or free replacement of the material. When possible, replacement parts will be
shipped and invoiced to you, making them a part of your claim.
1
“Concealed damage or loss”refers to damage or loss that does not become apparent until the merchandise has been
unpacked and inspected. Should damage or loss be discovered, you may make a written request for inspection by the carrier's
agent within 15 days of the delivery date. You may then file a claim with the freight carrier or SP Scientific, depending on the
terms of your shipment. If your shipment was “FOB Destination” file your claim with SP Scientific and include the inspection
report and any other supporting documents. If your shipment was “FOB Shipping Point” file your claim with the freight carrier
and include the inspection report and any other supporting documents.

Getting Started
VirTis AdVantage Pro
6 Rev 002, 01/14
© SP Scientific 2014
Lifting the AdVantage Pro Freeze Dryer
If no damage was discovered following the initial inspection of the AdVantage Pro,
SP Scientific recommends using a moving assistance device (e.g., lift trolley) to safely
lift the unit into place. Ensure that at least two (2) individuals are available to safely lift
the unit on and off the moving assistance device. The AdVantage Pro should be lifted
at the metal frame near the unit’s four (4) feet, not at the front panel.
WARNING! THE ADVANTAGE PRO WEIGHS APPROXIMATELY 309 LBS
(140 KG). ALWAYS PRACTICE TEAM LIFTING WHEN MOVING HEAVY
EQUIPMENT.
AdVantage Pro Setup
Position your AdVantage Pro unit so it rests firmly and level on the desired location.
Allow sufficient space so the unit may be easily connected and ensure that the area
around the unit provides for adequate air circulation. The back of AdVantage Pro
should be at least 4 inches (10.2 cm) away from the wall.
Note: For efficient operation, SP Scientific recommends an operating range of 15 - 25 °C
(59 - 77 °F).
Service Connections
Ensure that the outlet you intend to use meets the service requirements listed on the
AdVantage Pro’s serial tag, which is located on the rear panel of your unit. Plug your
unit into an appropriate outlet and switch on the On / Off Switch located at the lower
left corner of the right side panel (when facing the unit). The Intellitronics™
touch-screen display will illuminate.
Note: The AdVantage Pro is configured with an IEC60320 C20 inlet on the back of the unit.
This inlet allows country specific power leads to be supplied.
Do Not Lift at Front Panel
Lift Here
Lift Here

VirTis AdVantage Pro
Getting Started
Rev 002, 01/14 7
© SP Scientific 2014
Vacuum Pump Installation
A remotely mounted vacuum pump (sold separately) is required for operation. The
vacuum pump must be a two-stage, high-vacuum pump or a suitable dry pump and
must meet the service requirements listed on the AdVantage Pro’s serial tag, which is
located on the rear panel of the unit. SP Scientific recommends using a vacuum pump
with a minimum capacity of 60 liters per minute (Lpm).
If not venting the pump externally, SP Scientific recommends installing an Oil Mist
Eliminator (OME) to reduce fumes from the vacuum pump.
Notes: Ensure that the pump is properly maintained prior to installation. For more information,
refer to the Vacuum System section of Chapter 6: General Maintenance and/or the operator’s
manual for your specific vacuum pump.
A vacuum pump inlet port adapter and sufficient tubing are required for connection to the
vacuum pump. If you need assistance, please contact SP Scientific.
For more information on Oil Mist Eliminators, please contact SP Scientific.
Installing the Vacuum Pump
Disable power to your AdVantage Pro series freeze dryer.1.
Position the vacuum pump near the freeze dryer to ensure that the pump will2. be easily accessible during routine maintenance.
Locate the inlet port on your vacuum pump.3. Note: For more information on the vacuum pump inlet port, refer to the operator’s
manual for your specific vacuum pump.
Remove all material with the exception of the inlet filter screen and gasket.4.
Place the vacuum pump inlet port adapter on the inlet port and secure it with5. a fitting.
Remove and retain all objects from the vacuum pump outlet port on the back6. of the unit (i.e., VACUUM).
Place the vacuum pump outlet port adapter on the VACUUM port.7.
Place the 3/4-inch Hose Barb fitting into the open end of the vacuum pump8. outlet port adapter.
Vacuum Pump Outlet Port Adapter
VACUUM
Vacuum Pump Outlet
Port Adapter
3/4-inch Hose Barb Fitting

Getting Started
VirTis AdVantage Pro
8 Rev 002, 01/14
© SP Scientific 2014
Connect vacuum tubing from the vacuum pump inlet port adapter to the
9. 3/4-inch Hose Barb fitting. Secure both ends with a fitting.
Once vacuum tubing is securely connected, check the vacuum pump oil level.10. The oil level should read halfway up the sight glass. Add oil only if necessary.
Note: Vacuum pumps are typically shipped with oil in them. Do not overfill.
Plug the vacuum pump into the vacuum pump power outlet on the back of the11. unit (i.e., VACUUM PUMP).
Product Preparation: Shelf Drying
Notes: If you are processing samples using the Four Port Manifold or in flasks, refer to
Quickseal Valves, Product Preparation: Flask / Manifold Drying section.
Product must remain below its critical formulation temperature throughout the drying process.
To process samples on the shelf (or shelves) within the product chamber:
Fill tray(s) or vials with your product.
2
Do not exceed half the container’s total 1. capacity.
If desired, insert product probes into the product. For accurate temperature2. readings, probe ends should make point contact with the bottom of the
container at the bottom of the product.
3
If your unit is equipped with the stoppering option and you are processing3. your product in vials, partially insert a split rubber stopper into each vial.
Load samples onto the shelf (or shelves) using removable bottom or bulk4. trays. If you are using product probes, connect the probes to the
thermocouple jacks that are provided.
Close the product chamber door.5. Note: Once product is loaded into the chamber, be sure to start a cycle after closing
the product chamber door. Failure to do so may lead to explosive and/or flammable
conditions.
WARNING! DO NOT USE THE VIRTIS ADVANTAGE PRO LYOPHILIZER
IN AN EXPLOSIVE ATMOSPHERE OR IN THE PRESENCE OF
FLAMMABLE GASES, VAPORS OR FUMES. DO NOT USE THE
ADVANTAGE PRO TO MEASURE THE PRESSURE OF EXPLOSIVE OR
COMBUSTIBLE GASES OR GAS MIXTURES.
2
For a list of standard serum vial capacities, refer to Appendix B: Serum Vial Capacities.
3
For precise positioning of probes in vials, contact SP Scientific about optional MVP Probe Holders.
VACUUM PUMP

Rev 002, 01/14 9
© SP Scientific 2014
Chapter
3
Stoppering
Your AdVantage Pro lyophilizer may be equipped with an optional top-down
stoppering system. Stoppering applies pressure to the stoppers of processed vials,
forcing them fully into the vials while sealing the product under the current system
vacuum. While in Recipe Mode, stoppering can be operated during the Product
Storage phase, before or after backfilling the chamber with an inert gas.
4
While in
Manual Mode, stoppering may be operated at any time. All stoppering must be
performed in full trays with vials of equal height to ensure uniform stoppering force
distribution and prevent vial shifting.
The optional stoppering system requires a constant supply of compressed air or
nitrogen regulated at 60 psig (90 psig maximum) to support the shelves and operate
the stoppering piston. The Compressed Air Inlet connection is a 1/4-inch British
Standard Pipe Thread (BSPT) bulkhead fitting located on the rear service panel of
your unit.
Note: A BSPT to 1/4-inch NPT adapter shall be provided with the unit. This allows users to
choose between a 1/4-inch BSPT fitting and a 1/4-inch NPT fitting.
Inert Gas Backfill
For a unit equipped with stoppering, inert gas may be admitted into the chamber
through the inert gas backfill port (i.e., 3/8-inch Hose Barb fitting) and the Vacuum
Release Solenoid (VRS) valve, storing your product in an optimal, oxygen-free
environment. Backfilling with inert gas is preferred for long-term storage of product
samples that are unstable in the presence of oxygen.
Note: Products may also be stoppered under vacuum by skipping the inert gas backfill
procedure.
WARNING! IF INERT GAS BACKFILL IS PERFORMED, ENSURE THAT ALL
PRODUCT SAFETY RULES ARE OBSERVED IN REGARD TO THE MSDS
(AND OTHER APPLICABLE CAUTIONS) FOR THE INERT BACKFILL GAS. DO
NOT OVERFILL WITH BACKFILL GAS.
WARNING! NEVER CONNECT A GAS SOURCE WITHOUT A PRESSURE
REGULATOR. THE PRESSURE REGULATOR MUST BE ABLE TO REDUCE
SUPPLY PRESSURE TO 1 PSIG (70 MBAR, 7 KPA), OR LESS.
4
AdVantage series freeze dryers must be connected to a low-pressure (≤1 psig) inert gas source when backfilling with an inert
gas.

Stoppering
VirTis AdVantage Pro
10 Rev 002, 01/14
© SP Scientific 2014
To Backfill with Inert Gas:
BACKFILL IS ONLY AVAILABLE THROUGH THE RECIPE MODE SCREEN.
AN ACTIVE RECIPE MUST BE IN THE PRODUCT STORAGE PHASE IN
ORDER FOR BACKFILL TO BE ENABLED.
Connect the gas source to the INERT GAS BACKFILL port on the back of1. your AdVantage Pro series freeze dryer.
Press the Recipe button to open the Recipe Mode screen.2.
Press the Backfill Stoppering button to open the Backfill & Stoppering3. screen.
Press the Vacuum Set Point numeric field. A numeric keypad will open.4. Note: The Actual vacuum pressure is displayed next to the Vacuum Set Point.
Press the keypad buttons to enter the desired Vacuum pressure.5.
Press the Esc button to close the keypad without making changes or press6. the enter button (i.e., ) to accept the entered value.
Press the Backfill button to enable the Backfill function. Backfill will run until7. the Vacuum Set Point pressure is reached.
When the Vacuum Set Point pressure is reached, ensure that the backfill8. cycle has ended then remove the backfill container.
Once backfilling is complete, stoppering may begin.9. Note: For instructions on stoppering, refer to the To Operate the Stoppering System
section of this chapter.
INERT GAS BACKFILL
PORT
Table of contents
Other SP Scientific Dryer manuals


