QUICK START GUIDE
MAKING A CALL
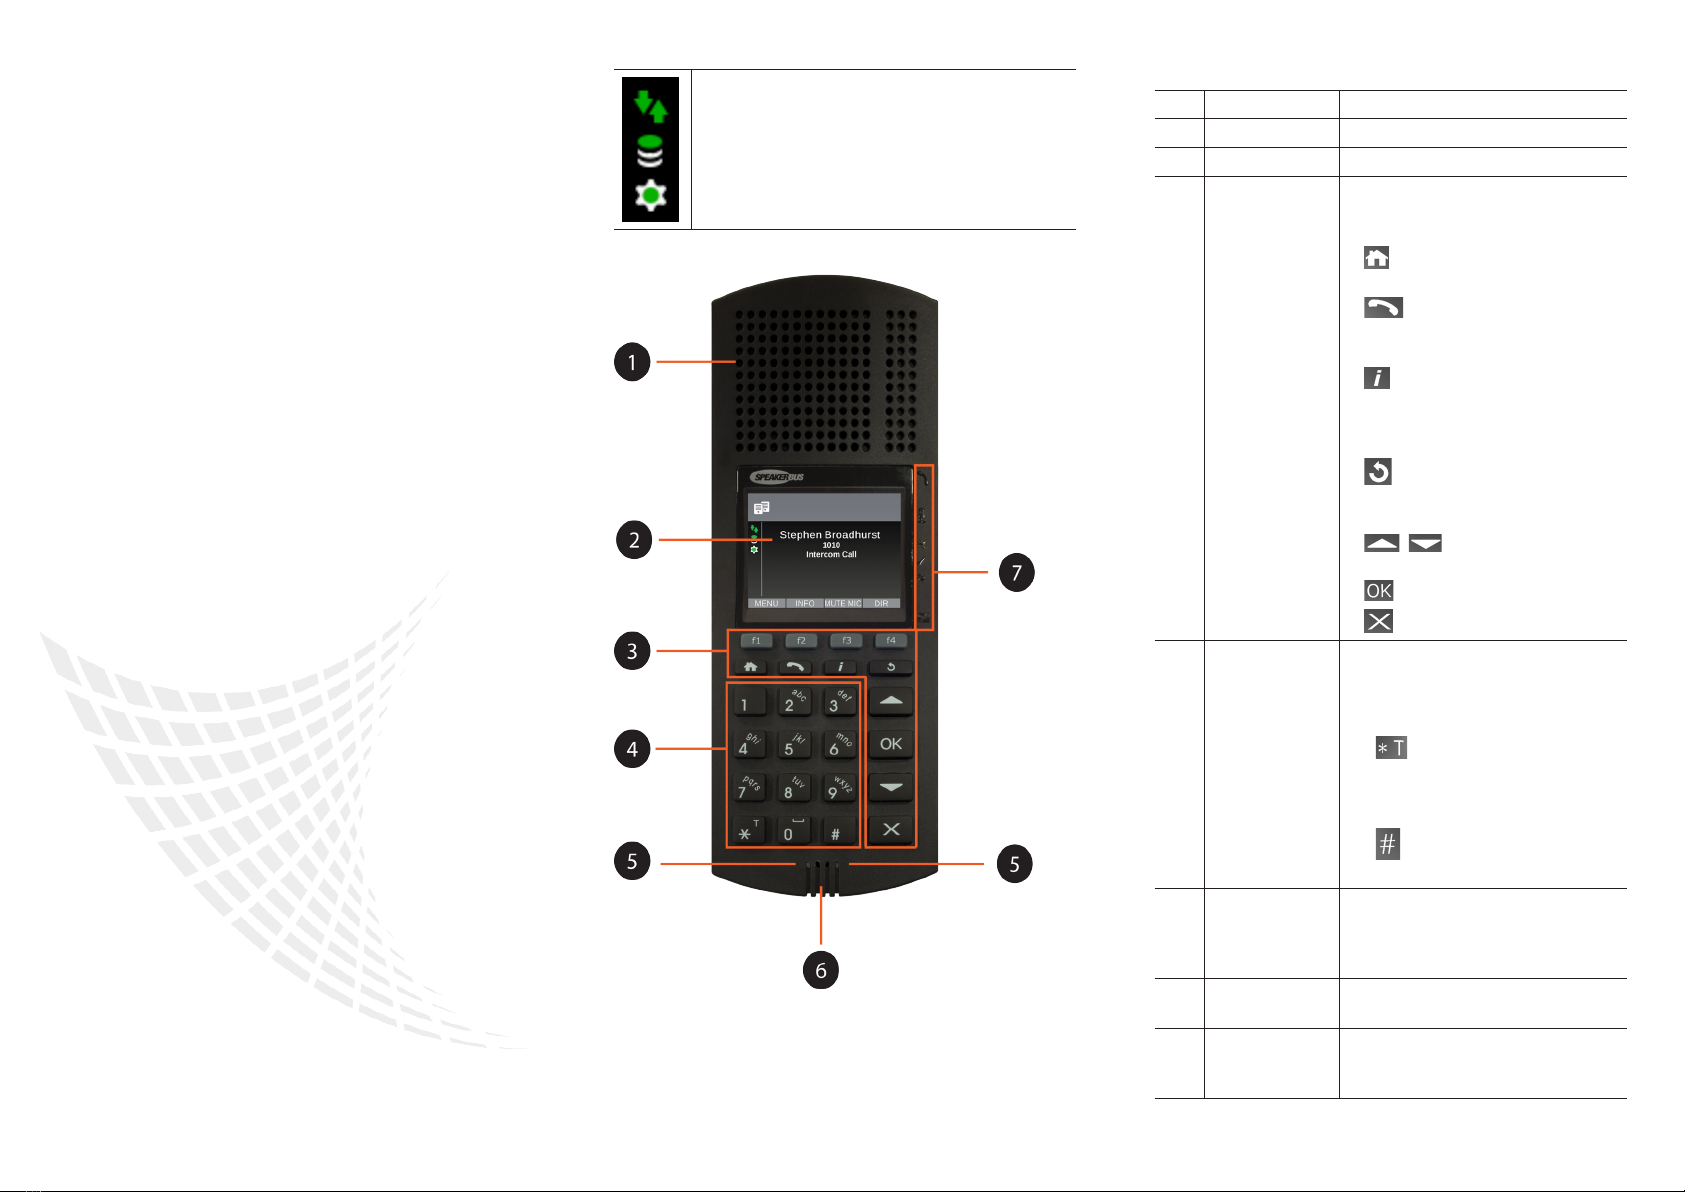
●Key Pad - Dial number on keypad OR
●Directories - Press f1 (MENU) • Press 2(Directories)
• Press 1, 2, 3or 4for the appropriate directory option
• Using ▲ and ▼ highlight the appropriate name and
press OK. If you selected option 4(Location) you will
need to select a place location followed by selecting the
appropriate name and then press OK. OR
●Call Register - Press f1 (MENU) • Press 3(Call Register)
• Press 1, 2, 3, 4or 5for the appropriate call register
• Using ▲ and ▼ highlight the appropriate name and
number and press OK.
●Speed Dials - Ensure the appropriate speed dial page is
displayed • Press the appropriate speed dial key.
RECEIVING A CALL
A received point to point or group call is indicated by an
audible beep, and the screen displaying the caller’s name and
dial number. Talk when the call is connected. The voice path is
automatically opened when the call is connected.
ENDING CALLS
Press X.
LAST CONNECTION RE-DIAL
Press f2.
MUTE MICROPHONE DURING CALL
1. Press f3 (MUTE MIC).
2. Press f3 (UN-MUTE) again to remove mute.
ACTIVATE PRIVACY
1. Press f1 (MENU).
2. Press 5(Intercom Privacy).
The privacy icon is displayed in the icon side bar. Repeat
above steps to turn off privacy.
iD 712 Deskstation, QS712/R6, September 2016
ACCEPT CALL IN PRIVACY MODE
When privacy is enabled the screen displays the name and
extension of the calling party for active incoming calls. The
following text is also displayed: [calling party’s name]
[calling party’s extension] Calling. Press OK key to
accept.
Press OK to accept the incoming call.
CALLING AN INTERCOM THAT HAS PRIVACY
TURNED ON
When calling an intercom that has privacy turned on, your
intercom will display the following text: [called party’s name]
[called party’s extension] Intercom call.
You will need to wait for the called party to answer before the
call is connected. Press Xif the called party does not answer.
DIRECTORIES
The Directory lists are contained within the Directories menu
and can be viewed by pressing:
1. f1 (MENU).
2. Press 2(Directories).
3. Using ▲ and ▼ highlight the appropriate directory and
press the OK key.
Directories contain the following options:
●Global - Contains a list of seated and un-seated users.
●Personal - Contains a list of personal users.
●Group Call - Contains a list of groups the user is a
member of.
●Location - Contains a list of remote sites.
●Voice Services - Contains a list of voice services the user
can use.
●Speed Dials - Contains four speed dial pages
DIRECTORY SEARCH
Each directory within the Directories option contains an
alphabetical search facility. This allows one to quickly locate a
contact, remote site or broadcast.
LISTEN TO A HOOT SERVICE
1. Press f1 (MENU).
2. Press f4 (NEXT>) to display Program.
3. Ensure Select Voice Service is highlighted and press
OK.
This displays a list of voice services.
4. Using ▲ and ▼ highlight the appropriate voice service
and press OK.
TALKING BACK TO A HOOT SERVICE
If it is possible to talk back to a hoot service the screen will
display the following text: Press “T” to talk.
To talk back to a hoot service:
1. Press and hold T(where applicable).
MUTE HOOT SERVICE
1. Press f3 (MUTE VS).
2. Press f3 (UN-MUTE) again to remove mute.
CLEARING A HOOT SERVICE
1. Press f1 (MENU).
2. Press f4 (NEXT>) to display Program.
3. Ensure Clear Voice Service is highlighted and press OK.
GROUP CALL
MAKING A GROUP CALL USING KEY PAD
1. Dial the number using the key pad.
2. If the group call is an Answerback to Owner type (a)
make request when call is connected, (b) press the *
(star) key when nished making request and (c) and wait
for response. OR
If the group call is a Mixing Group Call (Conference)
type, talk when call is connected.
MAKING A GROUP CALL USING DIRECTORIES
1. Press f1 (MENU) to display Main.
2. Press 2(Directories).
3. Press 3(Group Call).
4. Using ▲ and ▼ highlight the appropriate group and press
OK.
5. If the group call is an Answerback to Owner type (a)
make request when call is connected, (b) press the
*T ( key when nished making request and (c) wait for
response. OR
If the group call is a Mixing Group Call (Conference)
type, talk when call is connected.
TALKING ON A GROUP CALL
Talk if you initiated the call or press *T (if applicable) to talk.
RESPOND TO GROUP CALL INITIATOR
1. Press the *T key to establish point to point connection.
2. Talk when call is connected.