Special mobility e-Mobby User manual
User Manual e-Mobby
UM0002-EN_e-Mobby 2_1.0.docx

User Manual e-Mobby
Revision:
1.0
Page 2 of 30
Date of release:
2019-02-14
UM0002-EN_e-Mobby 2_1.0.docx
Revision history
Rev.
Date (yyyy-mm-dd)
Description
1.0
2019-02-14
First release
Table of contents
1. Introduction················································································································· 4
1.1 Contact information································································································· 4
1.2 Abbreviations / Definitions························································································ 4
1.3 Used symbols········································································································ 4
1.4 General warnings, cautions and notes········································································· 5
1.5 Included parts········································································································ 5
2. Product description······································································································· 6
2.1 Description of the product························································································· 6
2.2 Intended use········································································································· 6
2.3 Intended users······································································································· 6
2.4 Overview of the device ···························································································· 7
2.5 Configurations······································································································· 9
2.5.1 Major versions································································································· 9
2.5.2 Customizations·······························································································10
2.5.3 Options·········································································································10
2.6 Accessories ·········································································································10
2.7 Commissioning·····································································································10
3. Operating instructions ··································································································11
3.1 General overview operator controls and functions·························································11
3.2 Switching the e-Mobby ON and OFF··········································································13
3.3 Driving conditions··································································································13
3.4 Driving the e-Mobby·······························································································14
3.5 Balance···············································································································15
3.6 Operating the e-Mobby features ···············································································15
3.6.1 Walking stick holder·························································································16
3.6.2 Operator foot board (optional) ············································································16
3.6.3 Wide seat base·······························································································17
3.6.4 Luggage cradle·······························································································17
3.6.5 Electric powered lifters······················································································18

User Manual e-Mobby
Revision:
1.0
Page 3 of 30
Date of release:
2019-02-14
UM0002-EN_e-Mobby 2_1.0.docx
3.6.6 Towing hook for luggage cart ·············································································19
3.6.7 Passenger seat·······························································································20
3.6.8 Miscellaneous customizations ············································································21
3.7 Positioning of the passenger····················································································21
3.8 Docking a Mobby ··································································································22
3.8.1 Manual docking·······························································································22
3.8.2 Electric powered docking ··················································································22
3.9 Charging the batteries····························································································23
4. Safety statement·········································································································24
5. Maintenance and cleaning·····························································································24
5.1 Cleaning··············································································································24
5.2 Precautionary safety measures ················································································24
5.3 Regular maintenance, trouble-shooting ······································································24
5.4 Brake override······································································································24
5.5 Thermal protection·································································································25
5.6 Signal protection ···································································································26
6. Disposal····················································································································26
7. Product label and used symbols ·····················································································27
7.1 Product label········································································································27
7.2 Other used symbols·······························································································28
8. Technical specifications································································································30
All rights reserved
The information provided in this document may not be reproduced and/or published in any form without
the written approval of Special Mobility BV.
Although this user manual is prepared with the utmost care, Special Mobility BV assumes no
responsibility for errors or unintentional absences.
Special Mobility BV shall not be liable against any damages of any nature arising from the use, and/or
use of any options or accessories other than original Special Mobility BV products.

User Manual e-Mobby
Revision:
1.0
Page 4 of 30
Date of release:
2019-02-14
UM0002-EN_e-Mobby 2_1.0.docx
1. Introduction
Before the e-Mobby is being used, carefully read this user manual to get familiar with all its possibilities
and limitations. Use this manual as a reference work and guideline, make sure the operator is well
familiar with all functionality and options.
1.1 Contact information
Dear user, thank you for choosing and using the e-Mobby. The e-Mobby is a mobility product that is
designed, manufactured and marketed by Special Mobility BV.
If you need support, additional information or are having a problem with the device, please contact your
local distributor or Special Mobility BV:
Address: Special Mobility B.V.
Handelsweg 10
7041GX ‘s Heerenberg
The Netherlands
E-mail: info@specialmobility.eu
Internet: www.specialmobility.eu
Telephone: +31 (0)314 –667 210
Fax: +31 (0)314 –667 194
1.2 Abbreviations / Definitions
Name
Explanation
Mobby
Product of Special Mobility for manual transportation of a person not able to walk
long distances
Li-ion
Lithium ion
1.3 Used symbols
To ensure proper understanding of the information provided in this manual, the following symbols are
introduced. These symbols are used to indicate warnings, cautions and notes that are important for a
correct use and understanding of the vehicle.
Symbol
Explanation
WARNING:
Warnings are statements which -if not followed- can lead to fatal or serious injuries to a
passenger, operator or bystanders.
CAUTION:
Cautions are statements which -if not followed- can lead to damage to the device or
present surroundings and may lead to environmental pollution.
NOTE:
Notes provide additional advice and highlight remarkable points. A note must be seen
as complementary and not as an instruction.

User Manual e-Mobby
Revision:
1.0
Page 5 of 30
Date of release:
2019-02-14
UM0002-EN_e-Mobby 2_1.0.docx
1.4 General warnings, cautions and notes
WARNING:
The e-Mobby is a battery-powered vehicle with A-class drive components. Never
compromise this installation and only use the built-in battery charger for charging the
batteries.
WARNING:
It is highly recommended that only trained operators or operators who are very familiar
with comparable devices control and drive the e-Mobby. Inexperience may lead to
serious injuries to the passenger, bystanders and/or the operator!
NOTE:
Since the e-Mobby is available in multiple configurations and with multiple accessories,
the pictures used may not always exactly represent the model you have purchased.
1.5 Included parts
Depending on the way of transportation, the e-Mobby is properly packed to ensure the integrity of the
device is not compromised during transport. Before using the vehicle, please make sure there are no
traces of damage, contaminations and/or moisture. If this is the case, please immediately contact your
local distributor or Special Mobility B.V.
Along with the e-Mobby, the following parts are added:
Qty.
Description
Reference Special Mobility
1
User manual
UM0002-LL**
1
Technical manual
TM0002
1
Declaration of Conformity
DoC0002
1
Final Test Report
FTR - serial nr.
2
Dead man’s button
CAD.EMV.NDSTP.02
2
Key main switch
CAD.EMV.SLETL.04
** : “LL” indicates the user manual language and is dependent on to which country the e-Mobby is sold
to.

User Manual e-Mobby
Revision:
1.0
Page 6 of 30
Date of release:
2019-02-14
UM0002-EN_e-Mobby 2_1.0.docx
2. Product description
This chapter contains general information about the device, the environment in which it is used and for
which purposes to be used.
2.1 Description of the product
The e-Mobby is an electric driven device, manufactured by Special Mobility BV. It is designed for safe
transportation of a person, not able to walk long distances for whatever reason. The operator can walk
behind the e-Mobby or stand on a platform while driving the e-Mobby. The device is designed for a
maximum timeframe of ±30 minutes for transportation of a passenger.
The e-Mobby is designed to be used by skilled personnel and to be deployed in environments where it
can be used to facilitate in transporting people. The e-Mobby is suitable for professional purposes only,
thus not for domestic purposes.
A maximum of two additional Mobby’s can be linked at the front of the e-Mobby which means a total of
three persons can be transported with the e-Mobby. A luggage car can be linked at the back side of the
operator platform to carry luggage.
The e-Mobby is designed to operate in an indoor-environment only with flat floors. The drive system and
wheels are suitable for smooth surfaces but can handle small irregularities. The e-Mobby is equipped
with several safety measures to ensure safe use and precautions while driving. These measures are
explained in this manual.
2.2 Intended use
The intended use for the e-Mobby is the motorized transportation of a person, not able to walk long
distances, in an indoor environment.
2.3 Intended users
Four user types can be addressed and are identified below as primary and secondary users:
1. Primary user: Operator
The operator is the person who operates the e-Mobby and knows all functionalities
of the device.
Expertise and training: No specific education is required to operate the device.
Study of the accompanying documentation and proper practice with the e-Mobby
are highly recommended. Depending on the company policy, additional
requirements (e.g. compulsory training program, written approval, etc.) may be
applicable.
2. Primary user: Passenger
The passenger makes use of the facilities, offered by the company which operates
the vehicle. The e-Mobby is used as a transportation vehicle for moving the
passenger from A to B.
Expertise and training: No expertise or training is applicable other than following
the instructions of the operator.
3. Secondary user: Service technician
Is responsible for maintaining and repairing the device and supports the operator
in case of improper functionality of the device.
Expertise and training: The service technician must have educated knowledge of
mechanical and electrical installations. To execute proper maintenance, the
technical manual must be followed. For understanding the use of the device, this
user manual should be used.

User Manual e-Mobby
Revision:
1.0
Page 7 of 30
Date of release:
2019-02-14
UM0002-EN_e-Mobby 2_1.0.docx
4. Secondary user: Cleaning person
Is responsible for cleaning the device in a correct way.
Expertise and training: No special training or education is necessary. It is important
that the cleaning instructions, described in this user manual, are followed to ensure
proper functionality and lifetime.
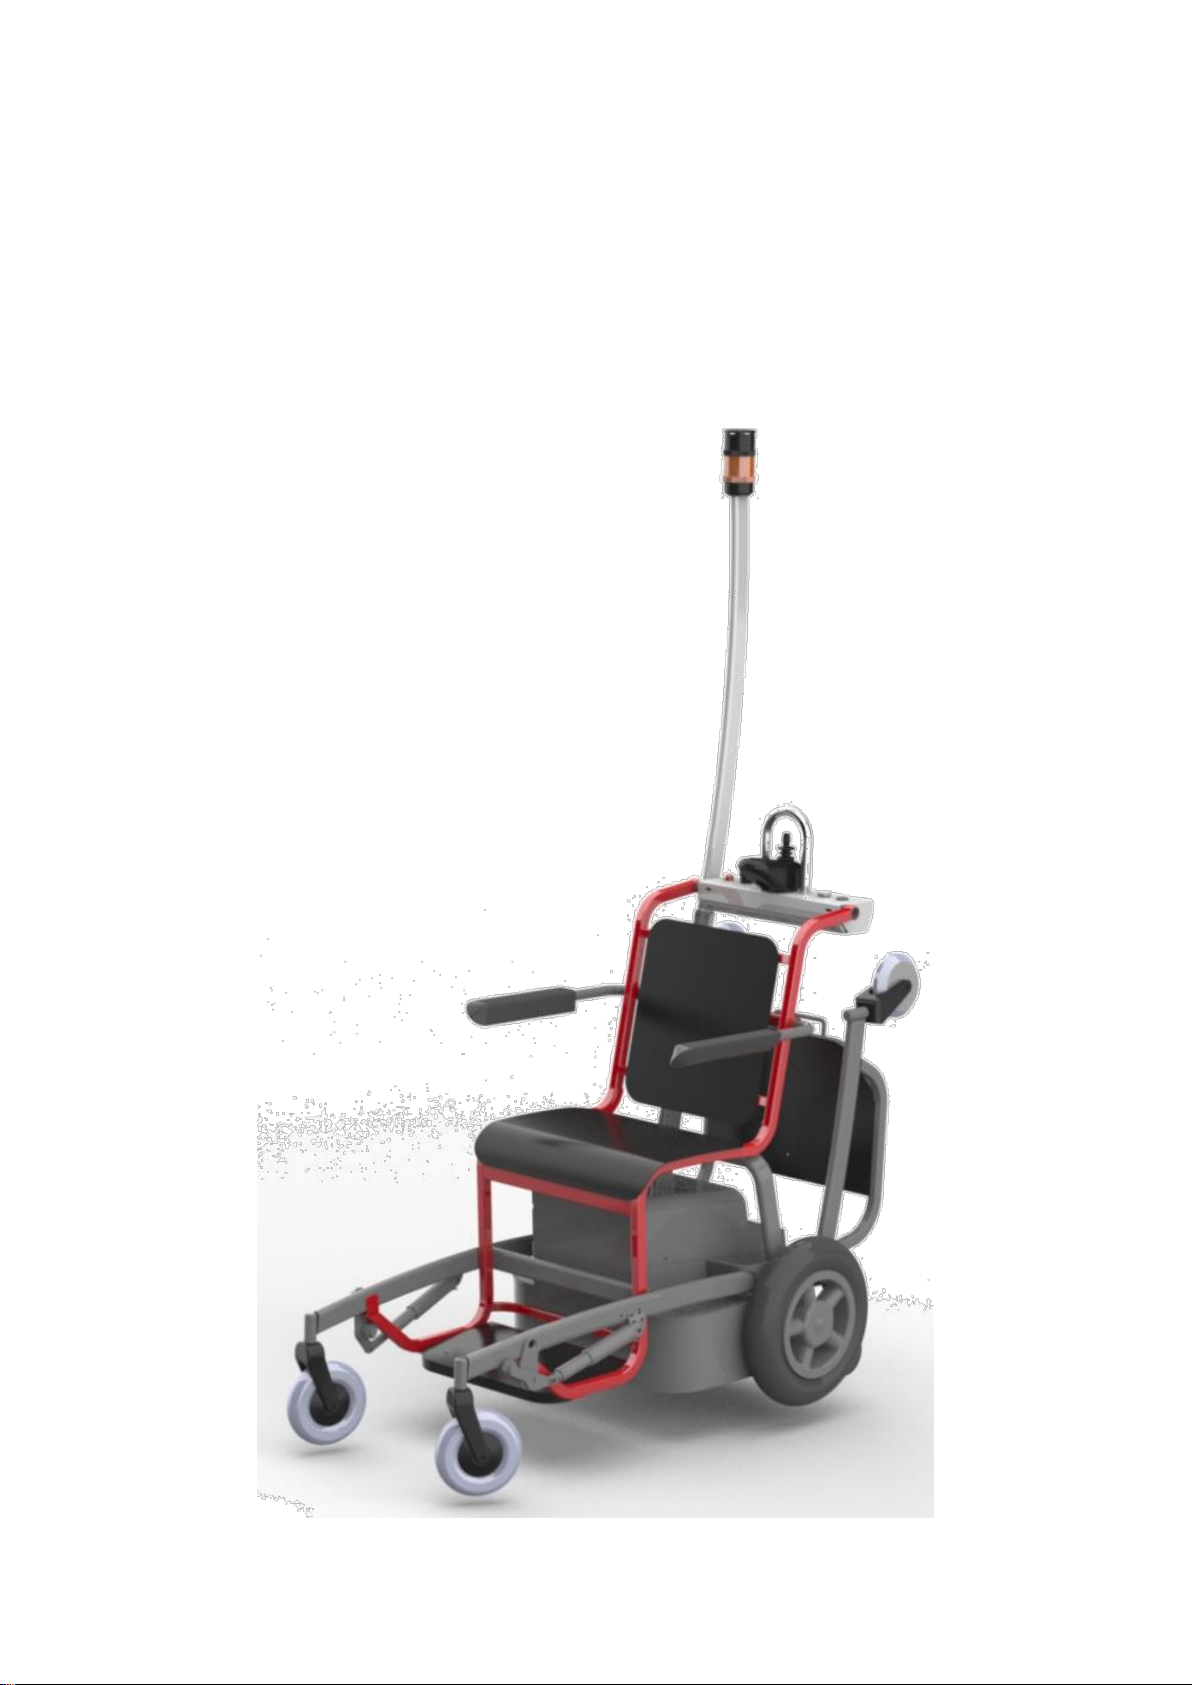
2.4 Overview of the device
A
C
B
D
E
F

User Manual e-Mobby
Revision:
1.0
Page 8 of 30
Date of release:
2019-02-14
UM0002-EN_e-Mobby 2_1.0.docx
Ref.
Description
A
Signal pole
B
Passenger seat
C
Passenger arm rest
D
Passenger foot rest
E
Front swivel wheels
F
Walking stick holder
G
Electronic chair coupling (optional)
H
Base frame
J
Electric driven wheels
K
Operator foot board (optional)
L
Control panel
M
Location of main switch and fuses
G
H
J
K
L
M

User Manual e-Mobby
Revision:
1.0
Page 9 of 30
Date of release:
2019-02-14
UM0002-EN_e-Mobby 2_1.0.docx
2.5 Configurations
The e-Mobby is available in two major versions and multiple options or customizations. Also, software
wise several customer specific configurations are applicable.
2.5.1 Major versions
The main difference between the two available versions is the power supply:
•Version A: Power supply by a lead acid sealed battery accompanied by a matching built-in
charger. This is the standard version for the e-Mobby.
•Version B: Power supply by a lithium ion battery accompanied by a built-in matching charger.
This battery has more capacity (thus requires less charging) and is more suitable for opportunity
charging compared to the lead acid sealed version.
The main difference between the two versions is within the enclosure of the e-Mobby. Nevertheless,
indicators identify the version:
Version A (Lead Acid):
Version B (Lithium Ion):
Battery indicator:
Charger indicator:

User Manual e-Mobby
Revision:
1.0
Page 10 of 30
Date of release:
2019-02-14
UM0002-EN_e-Mobby 2_1.0.docx
2.5.2 Customizations
Besides the choice in power supply, the e-Mobby is highly configurable to customer needs. The following
summary gives an overview of the available customizations:
•Customer specific color of the body parts
•Customer branding
•Type of seat; perforated panels (standard) or upholstered seats
•Customer specific notifications whiling operating the e-Mobby (e.g. drive sounds, additional horn,
visual signals)
2.5.3 Options
The e-Mobby has different options to complement the product and making daily use of the e-Mobby even
more convenient. The following options are available:
•Foot board for operator
•Wider passenger’s seat base, making the e-Mobby suitable for larger passengers
•Unbreakable polycarbonate luggage cradle
•Electric powered lifters (for lifting a Mobby to couple in front of the e-Mobby)
•Towing bracket for luggage cart
2.6 Accessories
For the e-Mobby, the following accessories are available:
- Luggage cart, to be towed behind the e-Mobby using the accompanying towing bracket
underneath the foot board. This luggage cart has a capacity of about 3 cabin size suitcases.
- Mobby, which can be coupled in front of the e-Mobby with a maximum of two Mobby’s to
transport a total of three passengers.
NOTE:
Please contact Special Mobility or your local reseller for detailed information about the
application and limitations of these accessories.
2.7 Commissioning
Commissioning of the e-Mobby must be done by the service technician. Instructions for this activity are
available in the technical manual (see TM0002).
User Manual e-Mobby
Revision:
1.0
Page 11 of 30
Date of release:
2019-02-14
UM0002-EN_e-Mobby 2_1.0.docx
3. Operating instructions
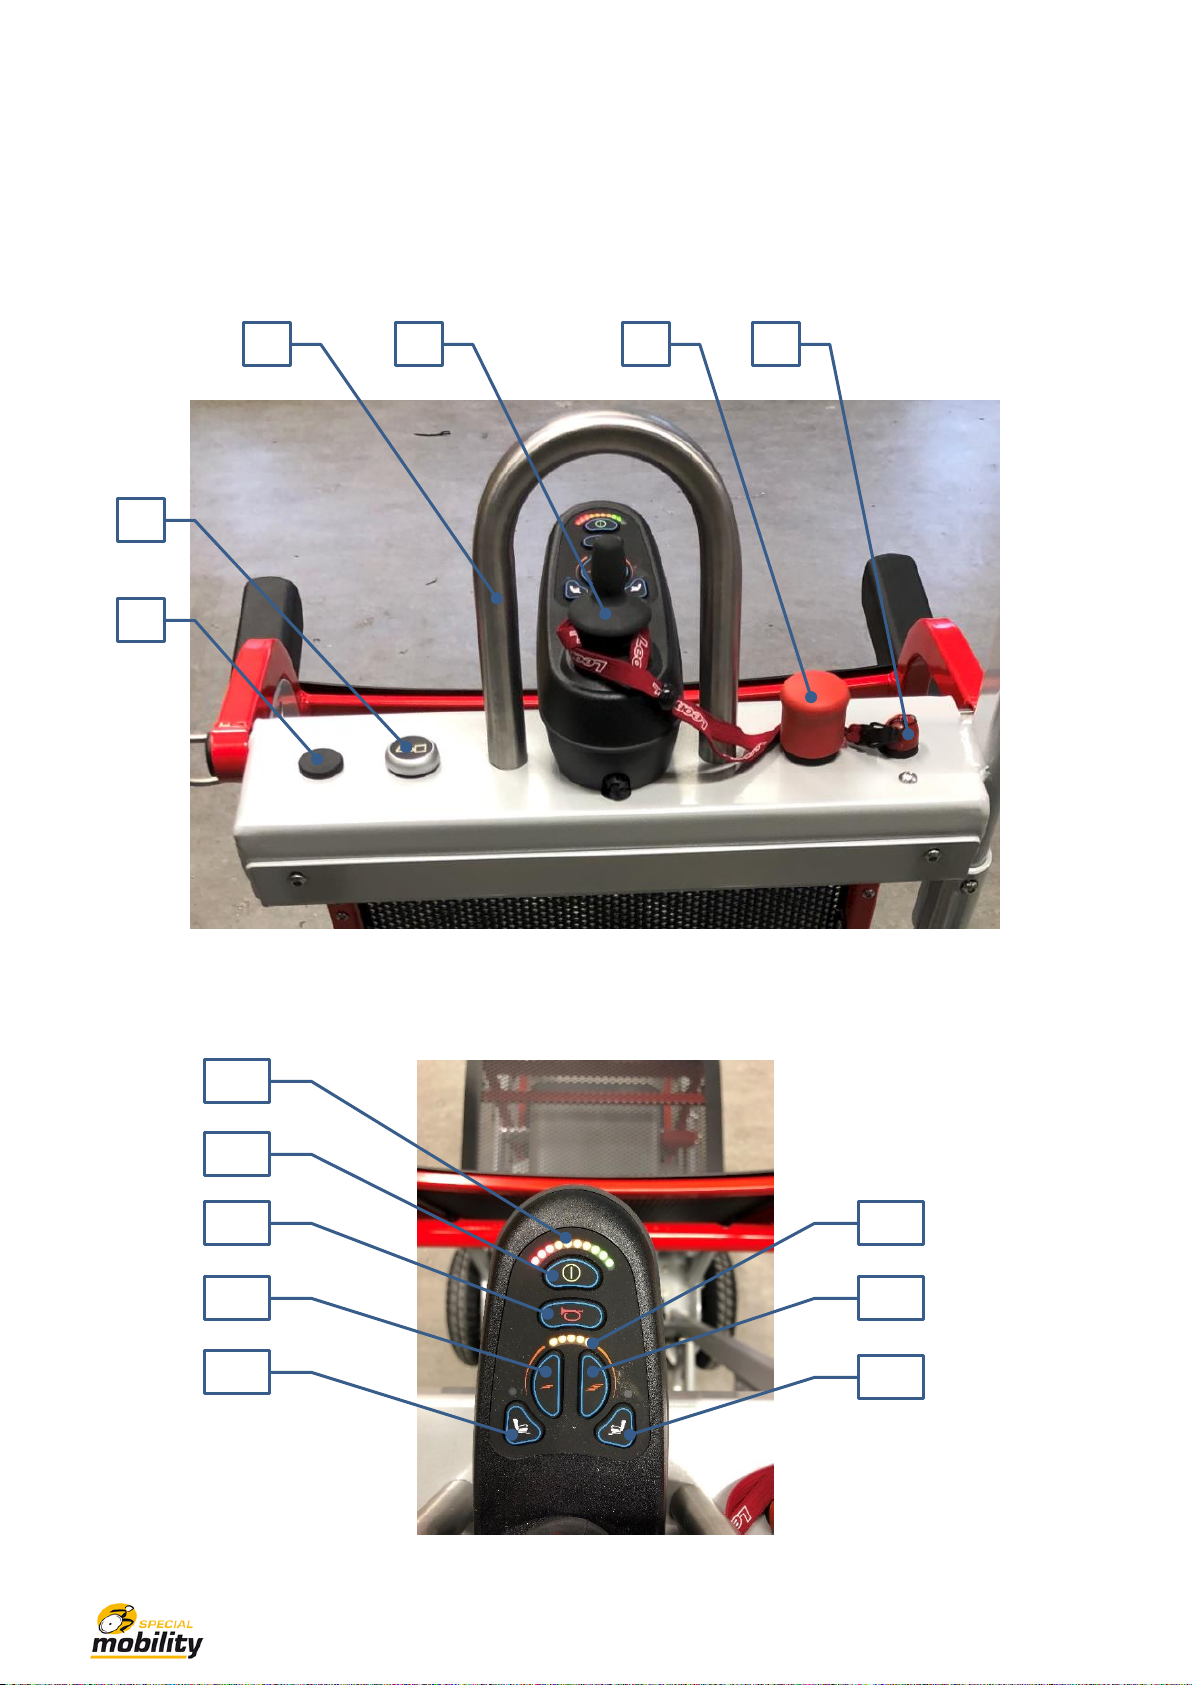
3.1 General overview operator controls and functions
As addition to the overview of the e-Mobby (see §2.4) below a sum up of the applicable controls for the
operator. These controls are explained further on in this manual.
D
B
C
E
A
F
D1
D2
D3
D5
D6
D8
D7
D4

User Manual e-Mobby
Revision:
1.0
Page 12 of 30
Date of release:
2019-02-14
UM0002-EN_e-Mobby 2_1.0.docx
Ref.
Description
Explanation
A
Position for battery indicator
Only applicable in case of Li-ion batteries
B
Horn
For operating the additional installed horn
C
Stainless-steel grip
For extra support while controlling and driving
D
Control panel
For operating and driving the e-Mobby
D1
Battery indicator
Only applicable in case of lead acid batteries
D2
Power button
For switching on the drive system
D3
Horn
For operating the internal horn of the control panel
D4
Speed indicator
Shows the set maximum speed limit
D5
Speed down button
For decreasing the maximum speed
D6
Speed up button
For increasing the maximum speed
D7
Activating lifting device
For electric lifting-unlocking coupled Mobby (optional)
D8
Activating lifting device
For electric lifting-unlocking coupled Mobby (optional)
E
Emergency stop
For shutting down the e-Mobby in case of an
emergency
F
Dead man’s button
For shutting down the e-Mobby in case the operator
falls off
G
K
J
H

User Manual e-Mobby
Revision:
1.0
Page 13 of 30
Date of release:
2019-02-14
UM0002-EN_e-Mobby 2_1.0.docx
G
Charger cable with strain relief
For charging the batteries. Plug type and connection
value may vary depending on country
H
Kill switch
For cutting off the power and physically separating the
battery connection with the system
J
Thermal fuse
For protecting the drive motors in case of overheating
K
Fuse
For protecting the sound and visual signals located on
top of the pole
3.2 Switching the e-Mobby ON and OFF
To switch on the vehicle, follow the steps below:
1. Make sure the emergency stop is not active (pulled out).
2. In case the charger is connected to mains, unplug the connector and store the connector in the
available space within the enclosure.
3. Make sure the dead man’s button is positioned onto the dedicated terminal.
4. Push the power button located onto the control panel to initiate the drive system.
5. Once initiated, the indicator lights on top of the control panel are continuously on.
6. The e-Mobby is now ready to drive, a flashing beacon combined with an audible signal indicates
that the device is ready for use.
NOTE:
In case of a Li-ion version, the separate battery indicator may be activated to check the
battery level. A detailed explanation can be found further on in this manual.
WARNING:
The vehicle may only be activated and driven by skilled and authorized operators or
service technician.
Switching off the vehicle can be done in the following ways:
A. Push the power button located at the control panel.
B. Remove the dead man’s button from the terminal, the drive system switches to a locked condition
and will shut down after x minutes (depending on the set parameters).
C. Push in the emergency button.
D. Kill the power by operating the main switch.
CAUTION:
Option “D”is not recommended for shutting down the vehicle and -in rare cases- may
cause damage to the drive or power system.
NOTE:
The timer for switching off the vehicle is an adjustable parameter and is normally set to
±2 minutes. In case of doubt please consult your service technician or reseller for the
correct value.
3.3 Driving conditions
Besides switching on the e-Mobby, several conditions must be met before the operator can drive:
1. The drive system is fully initiated and active
2. The dead man’s button is present onto the terminal
3. All lights on the control panel are continuously on
User Manual e-Mobby
Revision:
1.0
Page 14 of 30
Date of release:
2019-02-14
UM0002-EN_e-Mobby 2_1.0.docx
If all conditions as described above are met, the operator can drive the e-Mobby.
NOTE:
When driving the e-Mobby, along with the flashing beacon a (predefined) audio signal
plays continuously to notify bystanders.
NOTE:
The drive system is equipped with a brake function which is enabled if the e-Mobby is
not moving. Once the operator activates the joystick for moving forward or backwards,
the brake is released.
NOTE:
If -despite all conditions are met- it is not possible to drive the e-Mobby, please contact
your local reseller or service technician.
WARNING:
While driving always hold on to the stainless-steel grip and do not compromise the
balance of the e-Mobby to maximize a safe condition for the operator.
WARNING:
Always wear the band of the dead man’s button around your wrist while driving!
WARNING:
Before using the e-Mobby, always perform an overall check if the device is undamaged
and fully functional. If this is not the case, label the vehicle as “out of order” and contact
your local reseller or service technician.
3.4 Driving the e-Mobby
Driving the e-Mobby is very straight forward and is
done with the control panel as shown in §3.1.
Start by selecting the desired speed with the
buttons D5 & D6. The lights above these buttons
represent the set speed. The more lights are on,
the higher the maximum speed.
Move the joystick in the desired direction and the e-
Mobby starts driving. The joystick is springloaded
and always returns to its 0-position so when the
joystick is released, the e-Mobby automatically
breaks.
NOTE:
There is a small delay in the response of the drive system once the joystick is operated.
Take this into account when controlling the e-Mobby.
NOTE:
Driving backwards is always done at a lower speed, despite the speed setting.
CAUTION:
When releasing the joystick, the e-Mobby does not instantly stop but decelerates the
speed to zero. Consider that the e-Mobby drives for a certain distance -depending on
the set speed- before it completely stops.
D5
D6

User Manual e-Mobby
Revision:
1.0
Page 15 of 30
Date of release:
2019-02-14
UM0002-EN_e-Mobby 2_1.0.docx
WARNING:
The operator remains responsible for a safe use of the e-Mobby for not only
passenger(s) but also the surroundings. Always drive in a defensive way and anticipate
to avoid accidents or injuries to persons!
3.5 Balance
The e-Mobby has the best stability when a passenger is seated, when driving without a passenger make
sure to balance the e-Mobby in order to have maximum control. When leaning too much backwards, the
front wheels may lose contact with the floor. The e-Mobby contains additional bogie-wheels to avoid
tilting backwards.
3.6 Operating the e-Mobby features
The e-Mobby contains several standard and additional features which are explained in this paragraph.
NOTE:
Some explained features may not be applicable for your version of the e-Mobby.
Bogie
wheels
Balance around
drive wheels

User Manual e-Mobby
Revision:
1.0
Page 16 of 30
Date of release:
2019-02-14
UM0002-EN_e-Mobby 2_1.0.docx
3.6.1 Walking stick holder
The walking stick holder is a standard
feature and can hold up to two walking
sticks, depending on size. The holder is
placed at the left side of the e-Mobby
(seen from operator perspective).
Place the foot of the stick in the ‘box’ as
indicate in the picture at the left and
hook the upper part of the stick in the
dedicated bracket. Repeat in case of
two walking sticks.
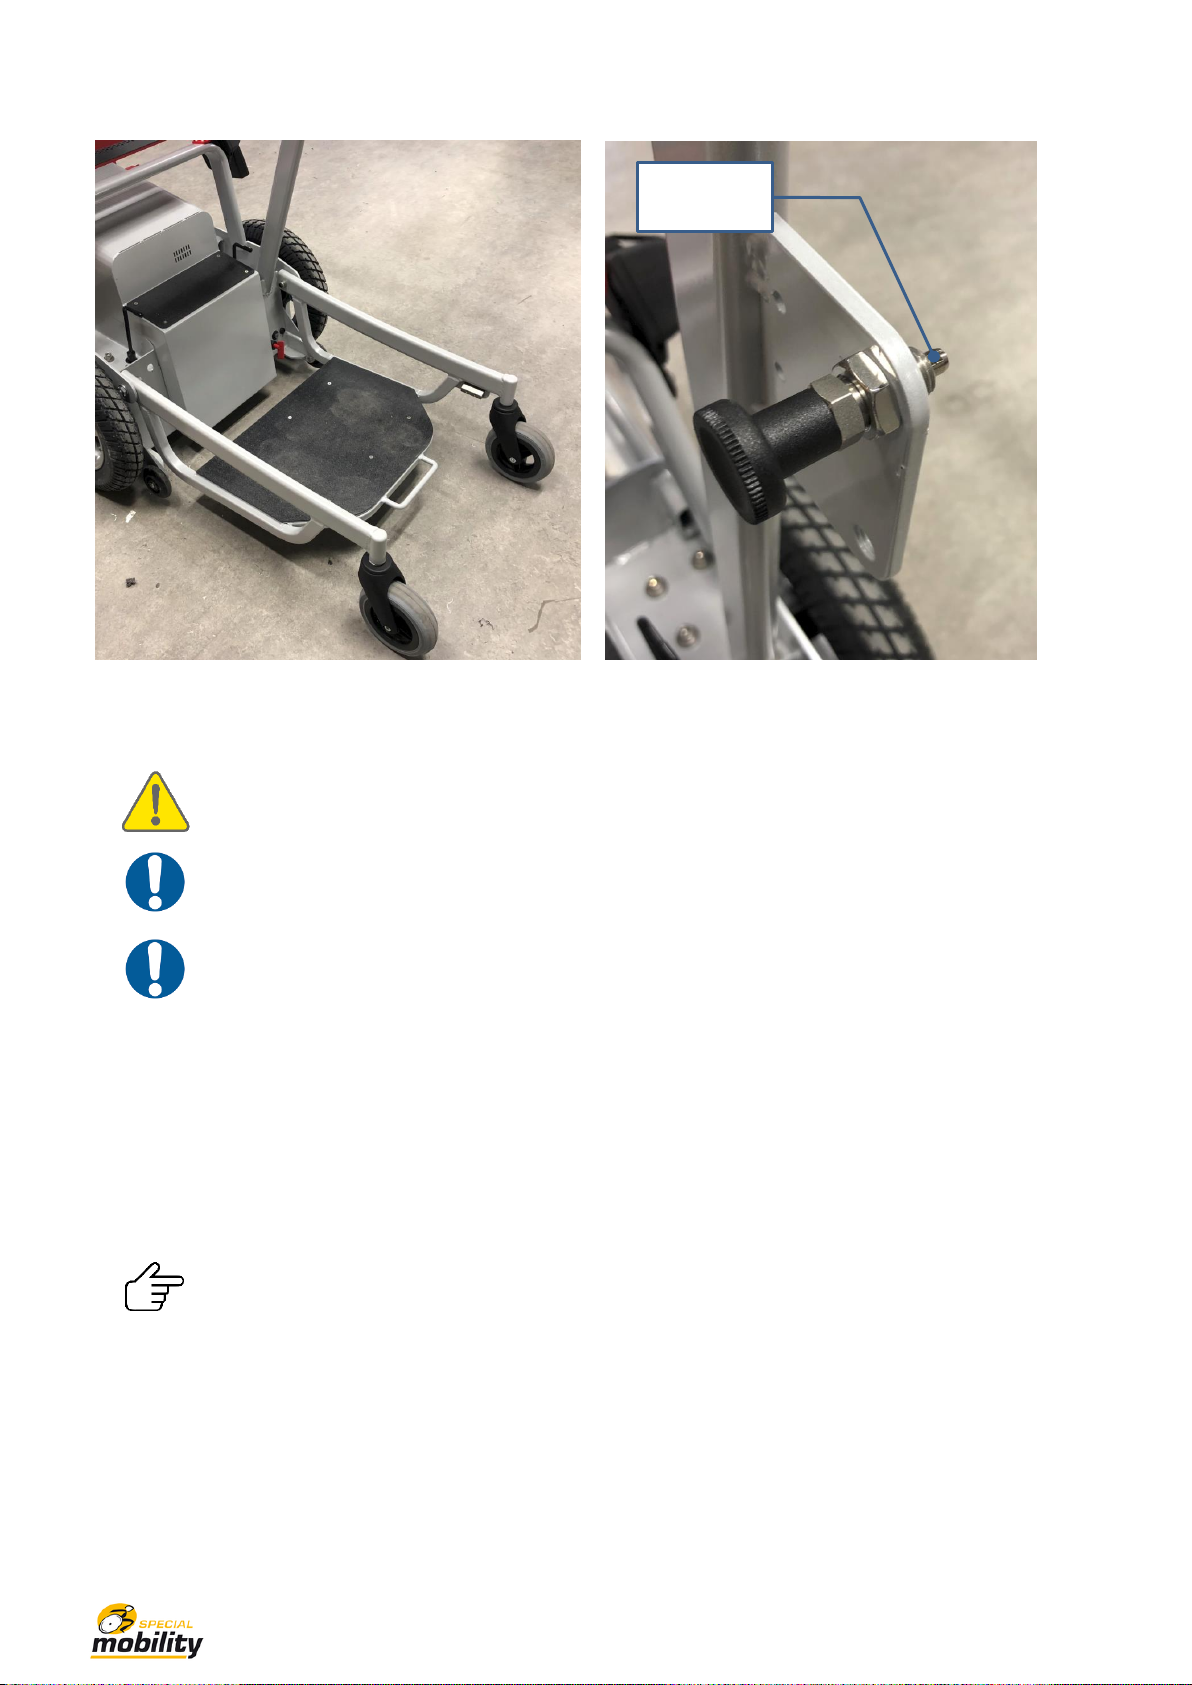
3.6.2 Operator foot board (optional)
For more convenience, an optional footboard covered with a non-skid material for the operator is
available. The operator does not have to walk behind the e-Mobby but can stand on a platform. In case
this is not required, the platform is folding.
For lowering the foot board, pull the spring-return knob while holding the foot board with the other hand
(see pictures below). Gently lower the board until the swivel wheels touch the ground. You can now
stand on the foot board and drive the e-Mobby.
Folding the foot board is done in reverse order. Gently pull up the foot board and lift it up until it ‘clicks’
behind the spingloaded knob. The foot board is now locked and folded.
Foot board in folded position
Pull knob and gently lower foot board
‘Box’
Bracket
User Manual e-Mobby
Revision:
1.0
Page 17 of 30
Date of release:
2019-02-14
UM0002-EN_e-Mobby 2_1.0.docx
Foot board in lowered position
Springloaded knob; when lifting the foot board, it
snaps behind the pin of the knob
WARNING:
Make sure you gently lower the foot board by hand. Dropping the foot board may cause
serious injuries when dropped onto a limb!
CAUTION:
(Accidentally) dropping the foot board may cause damage to the structure and/or swivel
wheels. Always gently lower the foot board by hand.
CAUTION:
Although the foot board is covered with a non-skid material, make sure the surface is
clean and undamaged before use. A slippery or dirty surface may result in losing grip
and thus falling from the foot board.
3.6.3 Wide seat base
The standard version of the e-Mobby contains a chair base, suitable for most passengers. In case
transport of larger passengers is required, a different chair base with a wider frame is available. This
does not compromise the functionality of the e-Mobby.
NOTE:
The wider seat base results in a larger total width of the e-Mobby. Take this into
account when driving the e-Mobby, especially when driving in narrow spaces.
3.6.4 Luggage cradle
At the backside of the enclosure, an optional luggage cradle can be mounted. This cradle is made of
unbreakable polycarbonate and can hold one piece of cabin-sized luggage. It is designed in such a way
that it can be combined with the optional foot board:
Snap
behind pin
User Manual e-Mobby
Revision:
1.0
Page 18 of 30
Date of release:
2019-02-14
UM0002-EN_e-Mobby 2_1.0.docx
NOTE:
Make sure the stored luggage stays in place while driving the e-Mobby to avoid damage
to the luggage and/or e-Mobby.
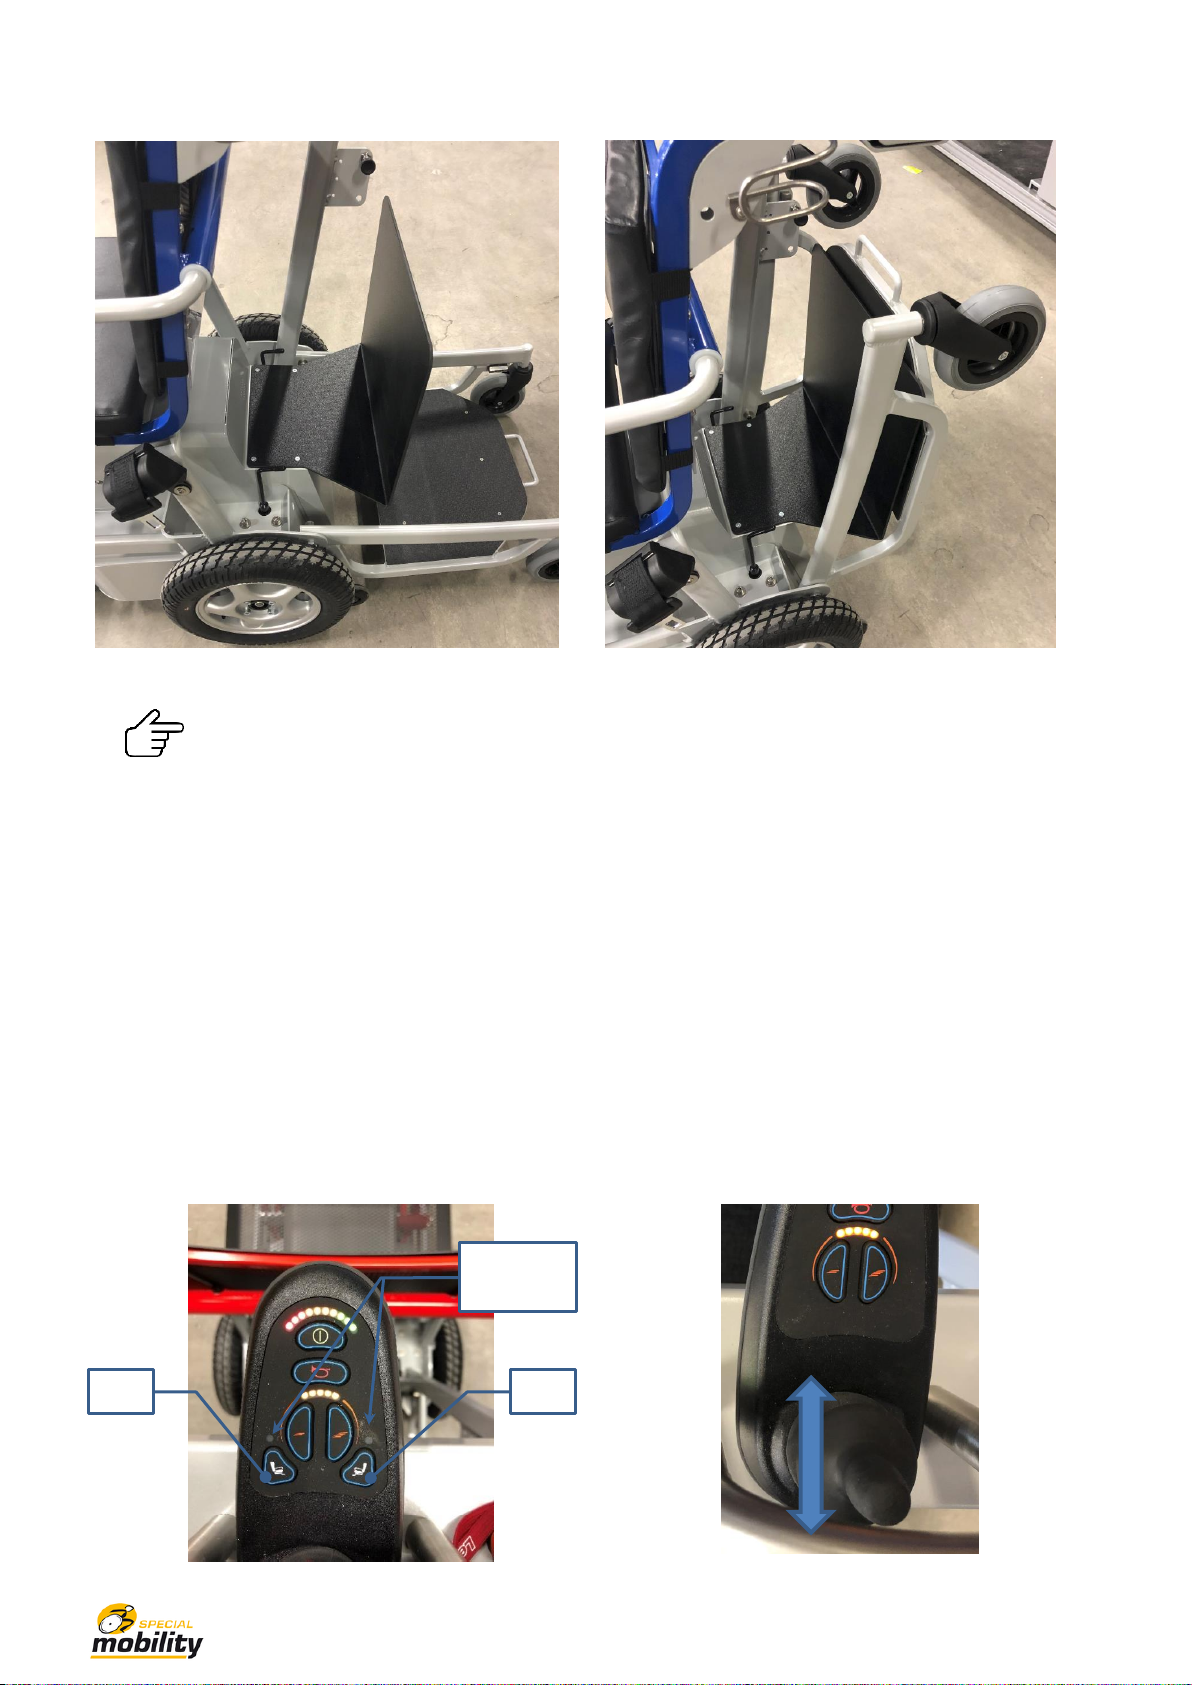
3.6.5 Electric powered lifters
The e-Mobby works with the patented Mobby-system to easily connect Mobby with each other. Normally,
this action is done manually, but for the e-Mobby this can be done by actuators. The regular fixture is
replaced by an actuator-mechanism which electrically lifts a Mobby. Operating the lifters is done as
follows:
1. Make sure the e-Mobby is activated and at a standstill
2. Activate the actuator control by pressing button D7 or D8; the indicator above the knobs turns
orange, driving function is disabled.
3. Use the joystick to operate the actuators, pushing forward lifts the fixture, pulling backwards
lowers the fixture thus releasing the docked Mobby.
4. Pressing one of the speed control buttons de-activates this function and activates the driving
function.
D8
D7
Indicator
light

User Manual e-Mobby
Revision:
1.0
Page 19 of 30
Date of release:
2019-02-14
UM0002-EN_e-Mobby 2_1.0.docx
Lifters down
Lifters up
NOTE:
Docking a Mobby in front of the e-Mobby is explained in further on in this manual
CAUTION:
Pinching hazard; always check if everything is clear before operating the lifters
3.6.6 Towing hook for luggage cart
This option requires the foot board as described in §3.6.2. A towing hook can be mounted underneath
this foot board for towing a luggage cart. The pinion of the towing hook fits the Special Mobility luggage
cart. This cart can hold up to three pieces of cabin sized luggage.
Lift the footboard a bit to position the pinion above the hole of the luggage cart tow bar. Gently lower the
pinion until it snaps in the tow bar. You can now drive with the luggage cart attached to the e-Mobby.
Decoupling the luggage cart works exactly the other way around.

User Manual e-Mobby
Revision:
1.0
Page 20 of 30
Date of release:
2019-02-14
UM0002-EN_e-Mobby 2_1.0.docx
3D impression of luggage cart
3.6.7 Passenger seat
Standard, the seat for the passenger is made from low-maintenance perforated panels. As an option,
these panels can be exchanged by upholstered panels which give more comfort to the passenger. Below
two pictures showing both options:
Perforated seat panels
Upholstered seat panels
NOTE:
The holstered seat gives more comfort but may also be more subject to wear than the
perforated option.
Table of contents
Other Special mobility Wheelchair manuals


Popular Wheelchair manuals by other brands

Drive Medical
Drive Medical Titan owner's manual

Sunrise Medical
Sunrise Medical Guardian Escort User instruction manual & warranty

GRIT
GRIT GRITJunior Assembly guide & user's manual

Pride Mobility
Pride Mobility QUANTUM SERIES owner's manual

You-Q
You-Q ALEX Assembly instructions

Quickie
Quickie Puma 40 Instructions for use


Sunrise Medical
Sunrise Medical Quickie Q200 R owner's manual

human care
human care Leia user manual

Leckey
Leckey leeway User instructions

MINOS
MINOS CRONOS Instruction and maintenance manual

lifestyle mobility aids
lifestyle mobility aids M170-3-416SF operating instructions

Shoprider
Shoprider XtraLite Jiffy UL7WR user manual