Spectro-UV Spectroline Q Series User manual
Q-Series
Ultraviolet Lamps
AM05008-4
PRINTED IN U.S.A. MARCH 2016
OPERATOR’S MANUAL

Q-Series Ultraviolet Lamps
UNPACKING AND INSPECTION
1. Carefully unpack and inspect the lamp for possible damage in shipment. If any
damage is noted, immediately notify the carrier and supplier before attempting
to use the lamp.
2. Save the shipping carton and packing materials for future storing and shipping
of the lamp.
3. Check the lamp’s electrical performance as soon as possible according to the
GENERAL FUNCTIONAL CHECKS outlined below.
NOTE: When unpacking a lamp equipped with a exible arm, use caution while
cutting the plastic tie securing the two major sections of the arm together. The
tension created by the springs will cause the sections to separate quickly. Hold
both sections of the arm rmly while cutting the tie and release them slowly.
GENERAL FUNCTIONAL CHECKS
1. Connect the plug to a power outlet that complies with the electrical
requirements specied on the lamp’s label.
2. The power supply cord is the disconnect for this lamp.
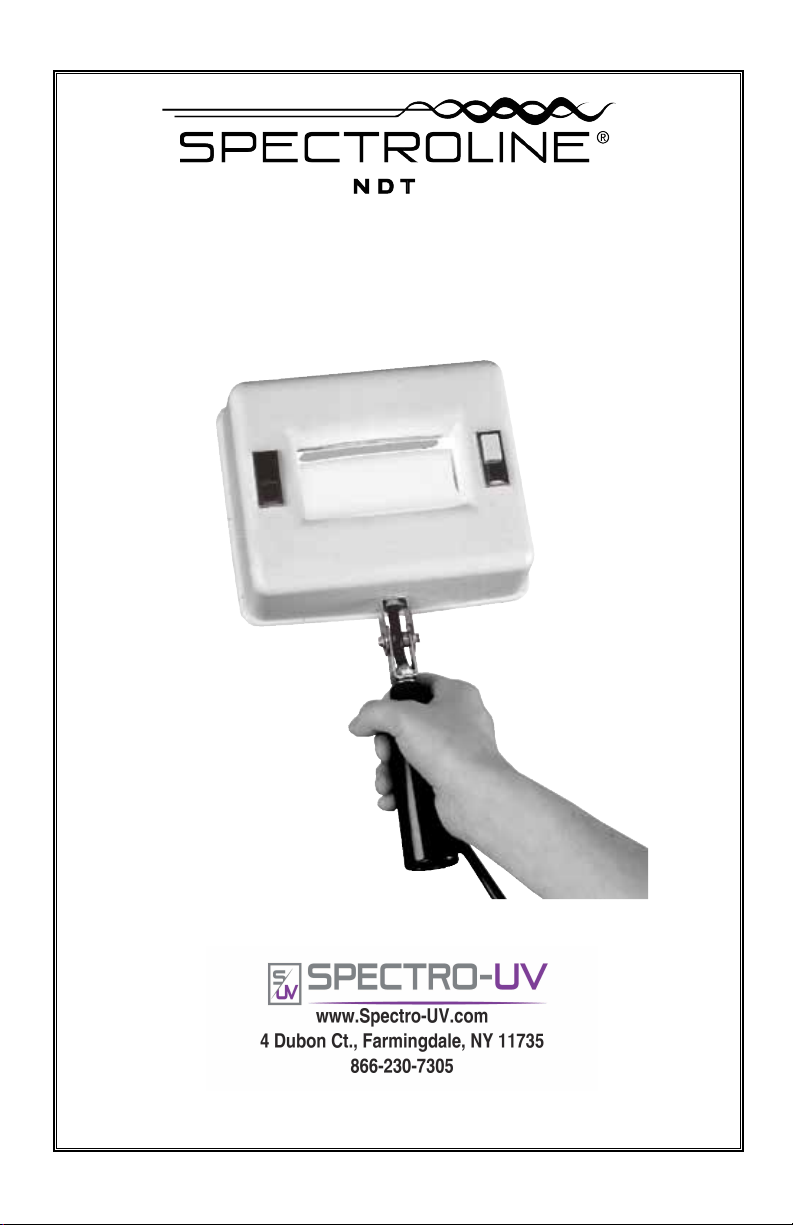
3. Depress the POWER ON switch for approximately 5 seconds. For a lamp with two
wavelengths, only one switch may be operated at a time. For a lamp with four long
wave UV-A tubes, use both POWER ON switches to activate all four tubes.
2
WARNING
Please read the instructions in this manual carefully before using your
Spectroline®Q-Series lamp. Never use this lamp in any manner not
specified in these instructions because the protection provided by the
lamp may be impaired. We recommend using Spectroline UV-absorbing
protective eye and face wear. See Replacement Parts and Accessories for
model numbers. This eye and face wear also improves
contrast between the fluorescent area and the background and eliminates
"blue haze" interference.
DANGER
Ultraviolet radiation emitted from this product. Avoid exposure.
ALWAYS WEAR PROTECTIVE CLOTHING. EXPOSURE MAY CAUSE
PREMATURE AGING OF THE SKIN AND CANCER. ALWAYS WEAR
PROTECTIVE EYEWEAR; FAILURE TO DO SO MAY RESULT IN
SEVERE BURNS OR LONG TERM INJURY TO EYE. Never look directly
into the lamp. Exposure can cause eye and skin allergy and allergic
reactions. Medications or cosmetics may increase your sensitivity to
ultraviolet radiation. Consult physician before operating this product if
you are using medications or have a history of skin problems or
believe yourself especially sensitive to sunlight.
FOR LABORATORY USE ONLY

3
4. The tubes should become energized and emit a steady glow of light. The light
may initially icker, especially if the lamp is cold, but should stabilize after a
few seconds.
5. To turn the lamp off, depress the red POWER OFF switch(es).
INSTALLING ACCESSORIES
1. To attach a lamp to the SQ-130 pedestal stand, place the stand on a level
surface. Slide the open end of the lamp handle onto the stand receptacle. Do
not force the handle onto the stand or it will lodge too tightly and be difcult
to remove. Adjust the lamp vertically to achieve the most comfortable viewing
position.
2. To mount a lamp equipped with a exible arm, attach the mounting bracket
provided to the bench, table or wall away from obstructions to allow for mobility
of the lamp. Insert the arm into the bracket and adjust the lamp horizontally
and vertically as desired.
OPERATOR SERVICING
The following servicing instructions are intended for limited maintenance of
the lamp. Do not perform any servicing other than that contained in these
instructions. Return the lamp to the factory for other maintenance not covered in
this section.
HOUSING AND MAGNIFIER LENS MAINTENANCE
The polycarbonate lamp housing protects the internal parts. Immediately clean
spills from the housing and magnier lens with water and a mild detergent
and wipe dry with a soft cloth. Do not allow any liquids to leak into electrical
components. Periodically clean the lens with a glass cleaner and a soft cloth.
TUBE AND REFLECTOR MAINTENANCE
To clean the tubes and/or reector, see the ‘’TUBE REPLACEMENT’’ section.
Using a soft cloth, the reector may be cleaned with a glass cleaner, while the
tubes may be cleaned with a mild detergent solution. Wipe dry with a soft cloth.
SHORT WAVE FILTER MAINTENANCE
To clean the lter, remove the two screws holding the lter assembly and slide it
off the open end of the lamp housing. Clean with a soft cloth and a glass cleaner.
TUBE REPLACEMENT
When replacing a tube, unplug the lamp from its power source before proceeding.
1. Lay the lamp housing on a at, level surface with the tubes facing up. For
lamps without a lter assembly, proceed to step #3.
2. Remove the two screws holding the lter assembly and slide it off the open
end of the lamp housing and set it aside.
WARNING
To avoid the risk of electrical shock, always unplug the lamp from its
power source before cleaning or servicing.

3. Grasp the tube by the metal bases located at each end. Applying even
pressure, gently rotate the tube a quarter turn until it loosens. The tube may
now be easily removed from its sockets.
4. Install the new tube by reversing the above procedure.
5. If installation of the new tube fails to yield correct lamp operation, check to
make sure the two pins at each end of the tube are properly connected with
the two copper contacts in each socket.
NOTE: The tubes in all Q-Series lamps are wired in series. Therefore, if one tube
fails the other tube of the same wavelength will not light, even though it may
be in good operating condition.
FILTER ASSEMBLY REPLACEMENT
Remove the two screws holding the lter assembly and slide it off the open end
of the lamp housing. Carefully install the new lter assembly by reversing this
procedure.
ENVIRONMENTAL SPECIFICATIONS
The Spectroline Q-Series lamps are designed to be safe under the following
conditions:
• Indoor use;
• Altitude up to 2,000 m (6,562 ft.);
• Temperature 5°C to 40°C (41°F to 104°F);
• Maximum relative humidity 80% for temperatures up to 31°C (88°F), decreasing
linearly to 50% relative humidity at 40°C (104°F);
• Mains supply voltage uctuations not to exceed ±10% of the nominal voltage;
• Installation Category II;
• Pollution Degree 2
4

MODEL WAVELENGTH NO.
TUBES
EQUIPPED WITH AMPS
Q-12 UV-A 2 0.2
Q-12NF UV-A/UV-C 1/1 SHORT WAVE
FILTER ASSEMBLY
0.2
Q-12SNF UV-A/UV-C 1/1 Q-12NF WITH
PEDESTAL STAND/
SW Filter
0.2
Q-12S UV-A 2 Q-12 WITH
PEDESTAL STAND
0.2
Q-22 UV-A/WHITE 2/2 0.2
Q-22B UV-A 4 0.4
Q-22SB UV-A 4 Q-22 WITH
PEDESTAL STAND
0.4
Q-22FA (B-4) UV-A/WHITE 2/2 FLEXIBLE ARM/
BENCH BRACKET
0.2
Q-22FA (T-4) UV-A/WHITE 2/2 FLEXIBLE ARM/
TABLE MOUNT
0.2
Q-22FA (W-4) UV-A/WHITE 2/2 FLEXIBLE ARM/
WALL MOUNT
0.2
Q-22FAB (B-4) UV-A 4 FLEXIBLE ARM/
WALL MOUNT
0.4
Q-22FAB (T-4) UV-A 4 FLEXIBLE ARM/
TABLE MOUNT
0.4
Q-22NF UV-A/UV-C 2/2 SHORT WAVE
FILTER ASSEMBLY
0.2
Q-22SNF UV-A/UV-C 2/2 Q-22NF WITH
PEDESTAL STAND/
SW FILTER
0.2
Q-22S UV-A/WHITE 2/2 Q-22 WITH
PEDESTAL STAND
0.2
ELECTRICAL SPECIFICATIONS
All Domestic models are 120V/60Hz.
Housing dimensions W x L x H: 5.75 x 2.25 in (14.6 x 17.8 x 5.7 cm).
All tubes are 4 Watt. The UV-A tubes are integrally filtered; the UV-C units feature a
LONGLIFE™filter assembly.
Long Wave (UV-A): 365nm
Short Wave (UV-C): 254nm
5

REPLACEMENT PARTS & ACCESSORIES
Description Part No.
Tube - Long Wave UV-A BLE-220B
Tube - White Light BLE-95D
Tube - Short Wave UV-C BLE-2537S
LONGLIFETM Filter Assembly - Short Wave UV-C 370B
Pedestal Stand SQ-130
Mounting Brackets—for Flexible Arm Models:
Bench Mount B-4
Table Mount T-4
Wall Mount W-4
Spectacles, UV-Absorbing UVS-30
Goggles, UV-Absorbing UVG-50
Face Shield, UV-Absorbing UVF-80
WARRANTY
The warranty policy for the Q-Series lamps is provided on the Certicate of
Limited Warranty enclosed separately with each unit.
NOTE: For assistance of any kind, including help with a lamp under warranty,
contact the Customer Service Department at Spectron-UV. In the U.S. and
Canada, call toll-free 1-886-230-7305. Include the model and serial numbers of
the unit and the date of purchase. Shipping instructions will be provided if
necessary.
If an estimate of charges for nonwarranty work or other service work is required,
a quote will be furnished upon evaluation of the unit. Service work will not be
performed without customer approval.
SHIPPING
Carefully pack the lamp in the original shipping container and packing materials.
Insure it for full value and ship it prepaid to the factory.
6
LAMP CONTAINS MERCURY
Manage in Accord with Disposal Laws
See: www.lamprecycle.org
7
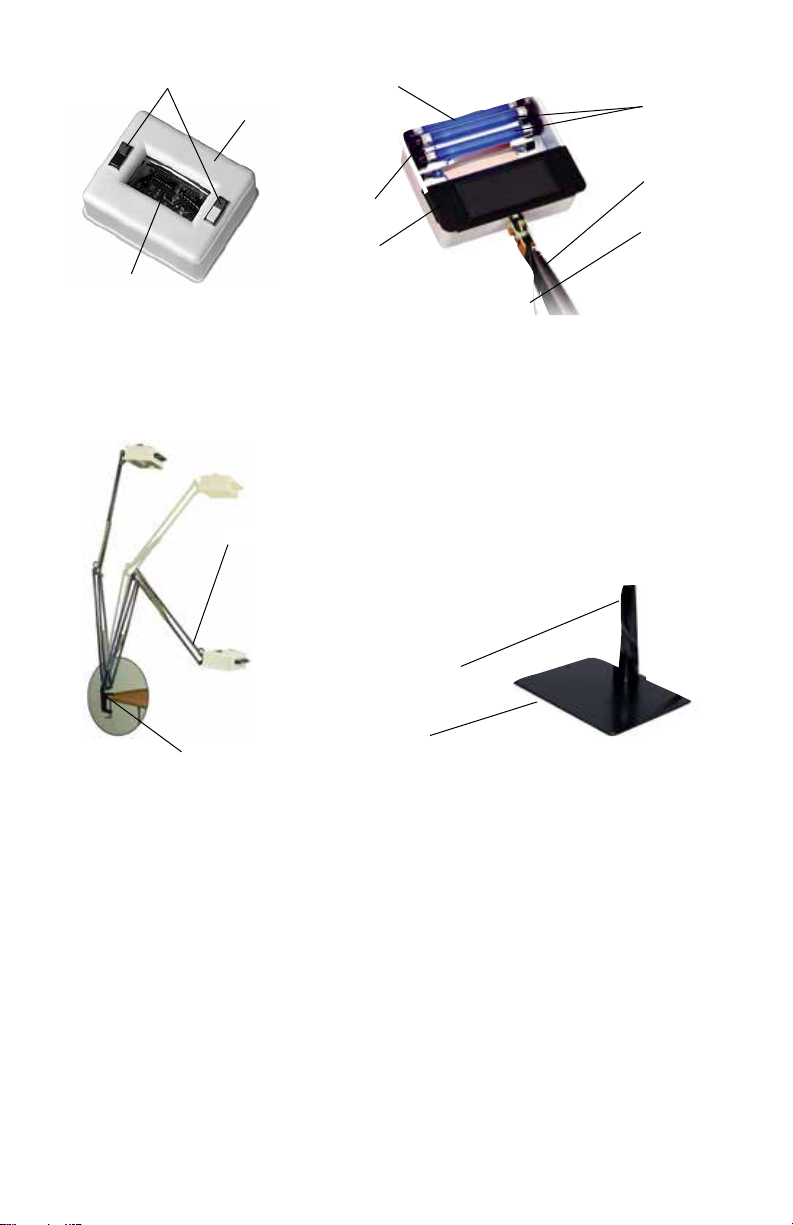
Flexible Arm
Mounting Bracket
(Bench)
ACCESSORIES
Stand Receptacle
Base
SQ-130 Pedestal Stand
On/Off Power Switches
Lamp Housing
Magnifier Lens
Tubes
Handle
Power Cord
Reflector
Sockets
Filter Assembly

This manual suits for next models
15
Table of contents
Other Spectro-UV Lighting Equipment manuals


Popular Lighting Equipment manuals by other brands

NANLITE
NANLITE PavoTube II 15X user manual

AEG
AEG A18SL Original instructions

Home Accents Holiday
Home Accents Holiday TY094-1614-1 Use and care guide

LIGMAN
LIGMAN ODESSA 13 installation manual

BAYLED
BAYLED TITUS installation guide

Vision & Control
Vision & Control DL60x60-R633/UDC/-a Instructions for use

Armacost Lighting
Armacost Lighting RibbonFlex PRO manual

Lithonia Lighting
Lithonia Lighting TWA installation instructions

Godox
Godox S60 instruction manual

Beamz professional
Beamz professional BPP225 instruction manual

American DJ
American DJ Electra 250 User instruction

ProLights
ProLights spider user manual


