Spectrum Industries 99037 User manual

0115955R1 Page 1 of 4
Assembly Instructions
Important
Before you begin, please make sure all parts and proper quantities
are included. Any parts damaged during shipment must be reported
within 15 days of receipt. To report information regarding damage, to
purchase parts or accessories, or if you have any questions, please
contact us at:
www.spectrumfurniture.com
715-723-6750, 800-235-1262
Thank you for purchasing Spectrum products!
Universal Cord Reel Kit
99037
(1) 0115882
mounting bracket
1. Determine mounting position
(1) 0114320
cord reel with 15’ cord
(3) 0101382
#14 x 7/8” PHSM screw
Phillips
screwdriver
Tools Required
Vertical
left power cord
(takes up 6RU)
Vertical
right power cord
(takes up 6RU)
Horizontal
right power cord
(takes up 3RU)
Note: The cord reel takes up rack-unit height and depth in all 3 positions. If you plan to install rack-mount equipment at or near the base panel, be
aware of the height and depth available for the components before installing the cord reel. Setting the cord reel onto the base panel will give an
idea of how much space is available in your particular lectern before the reel is installed.
pliers
base panel base panel base panel
(1) cord reel bracket
(included with reel-not used
with mounting bracket)
(1) connector pin
(included with reel)
The cord reel is intended to provide
temporary access to electrical outlets for
Spectrum mobile lecterns. Check local
electrical codes prior to installation.

3. Attach cord reel to mounting bracket
0115955R1 Page 2 of 4
Figure 2B
Figure 2C
Vertical left:
Horizontal right:
Figure 2A
Vertical right:
2. Attach mounting bracket to lectern
1. Set the mounting bracket into one of the
three positions below.
2. Align the mounting holes and attach to
the base panel with (3) #14 x 7/8” PHSM
screws and tighten securely.
Figure 3B
Figure 3C
Figure 3A
left side of
typical base
panel
right side
of typical
base panel
mounting
bracket
mounting
bracket
mounting
bracket
cord reel
cord reel
cord reel
connector pin
connector pin
connector pin
#14 x 7/8”
PHSM screw
(3 required)
#14 x 7/8”
PHSM screw
(3 required)
#14 x 7/8”
PHSM screw
(3 required)
right side
of typical
base panel
left side of
typical base
panel
right side of
typical base
panel
right side
of typical
base panel
1. Align the cord reel mounting hole with the mounting
bracket hole and install the connector pin.
Tools
Required
Phillips
screwdriver

4. Secure cord reel
5. Route power cord
0115955R1 Page 3 of 4
connector pin
Figure 4
Figure 5
Tools
Required
pliers
1. With the connector pin installed securing the reel, use pliers to
bend the straight end of the connector pin to an approximate 45°
angle. Figure 4.
1. Route the power cord through the side panel grommet. Figure 5.
Cord reel operation
Operating Instructions:
1. To latch cord - Pull cord out to full length. Allow the cord to retract 1-2 feet back into
the reel. Pull the cord out slowly. When a ‘click’ is heard, the cord will latch in place.
2. Plug into 110-125V (single phase), 3-conductor wall outlet.
3. To release cord - Unplug from wall outlet. Pull cord out slowly until clicking stops.
The latch will release and the cord can be guided back into the reel. Do not allow the
cord to y unrestricted back into the reel.
4. Do not overload or circuit breaker (15-amp maximum) will cut off current. To restore
power, remove overload, wait two minutes, then reset the circuit breaker by pressing
the button on the back of the 3-prong male power plug.
Maintenance:
1. Unplug cord reel before performing maintenance.
2. Remove dirt and grime as soon as it accumulates on the reel case by using a soft,
damp cloth (a mild detergent may be used if needed), being careful not to wet
the electrical plug. Never immerse any part of the unit in any solution to clean.
DO NOT use solvents such as gasoline, turpentine, etc. to clean unit.
3. Keep cord clean to assure smoothest automatic retraction. Simply pull cord to its
full length and allow to retract through a dampened rag. Pull out full length again
and sprinkle cord with talcum powder.
Specications:
1875W, 15A, 125V, 15’ retractable, 12 AWG with breaker, UL Listed
WARNING
• This cord reel is intended for general indoor use only. It is not intended to be used
in potentially dangerous locations such as ammable or explosive atmospheres.
• The cord reel is not waterproof and not intended for use in potentially wet locations.
• Do not overload (15-amp maximum).
reset button
power plug

0115955R1 Page 4 of 4
925 First Avenue, PO Box 400, Chippewa Falls, WI 54729 Ph: 800-235-1262, 715-723-6750 Fax: 800-335-0473, 715-738-2309
WE WILL MAKE IT RIGHT FOR YOU!
Spectrum is committed to provide complete customer satisfaction. Each of our products is manufactured from the best materials available and each
product is stringently monitored throughout the production process through our P.A.C.E. program (Product Assurance to meet Customer Expectations).
We expressly warrant that Spectrum products will be of good quality and workmanship and free from defect for the period set out in the warranty table
below from the date of delivery. This warranty shall not apply to defects or damage resulting from misuse, abuse, neglect, improper care, modication
or repair not authorized by Spectrum, or any other cause outside the control of Spectrum. Spectrum will, at its sole option, either repair or replace the
defective product.
This warranty is exclusive; no other warranty, written or oral, is expressed or implied. This warranty is given by Spectrum to Buyer and to no other per-
son or legal entity. No Spectrum dealer, distributor, agent or employee is authorized to make any modication or addition to this warranty.
NOTWITHSTANDING ANYTHING TO THE CONTRARY, SPECTRUM WILL NOT UNDER ANY CIRCUMSTANCES BE LIABLE FOR INDIRECT OR
LIQUIDATED DAMAGES, INCLUDING CONSEQUENTIAL, INCIDENTAL AND SPECIAL DAMAGES. IN NO EVENT SHALL SPECTRUM’S LIABIL-
ITY, WHETHER UNDER CONTRACT OR WARRANTY, IN TORT OR OTHERWISE, EXCEED THE PURCHASE PRICE RECEIVED BY SPECTRUM
FOR THE PRODUCT AT ISSUE AND “RECALL ACTION” EXPENSES. SPECTRUM SHALL NOT BE SUBJECT TO ANY OTHER OBLIGATIONS
OR LIABILITIES, WHETHER ARISING OUT OF BREACH OF CONTRACT, WARRANTY, TORT (INCLUDING NEGLIGENCE AND STRICT LIABIL-
ITY) OR OTHER THEORIES OF LAW, WITH RESPECT TO PRODUCTS SOLD OR SERVICES RENDERED BY SPECTRUM, OR ANY UNDERTAK-
INGS, ACTS OR OMISSIONS RELATING THERETO.
Our Customer Service Department is ready to provide immediate attention to any questions, comments or concerns. They are available to answer your calls
Monday through Friday from 7 am to 5 pm CST. In addition your product comments or concerns are welcome via e-mail at: [email protected].
Warranty Table
Item Warranty Period
• Adjustable Crank/Electric Desk Legs • 1 Year
• Flat Panel Desk Gas Cylinders
• Adjustable Height Chair Parts – including frames,
gas cylinders, wood and plastic parts, and control
handles Adjustable Height Chair Parts Casters
• Adjustable Height Chair Upholstery
• In-Stock Upholstery
• Graded-In Fabrics and Customer Owned Material
• 7 Years
• 2 Years
• 2 Years
• No Warranty
• Height Adjustable Columns and Lifts
• 1 Year
• General Use Casters
• Electrical
• Keyboard/Mouse Trays
• Flat Panel Monitor Arm – General Parts
• Flat Panel Monitor Arm – Gas Cylinders
• 5 Years
• 2 Years
• Computer Desk Chassis
• Cart Chassis
• Lectern Chassis
• 10 Years
Warranty
CAUTION
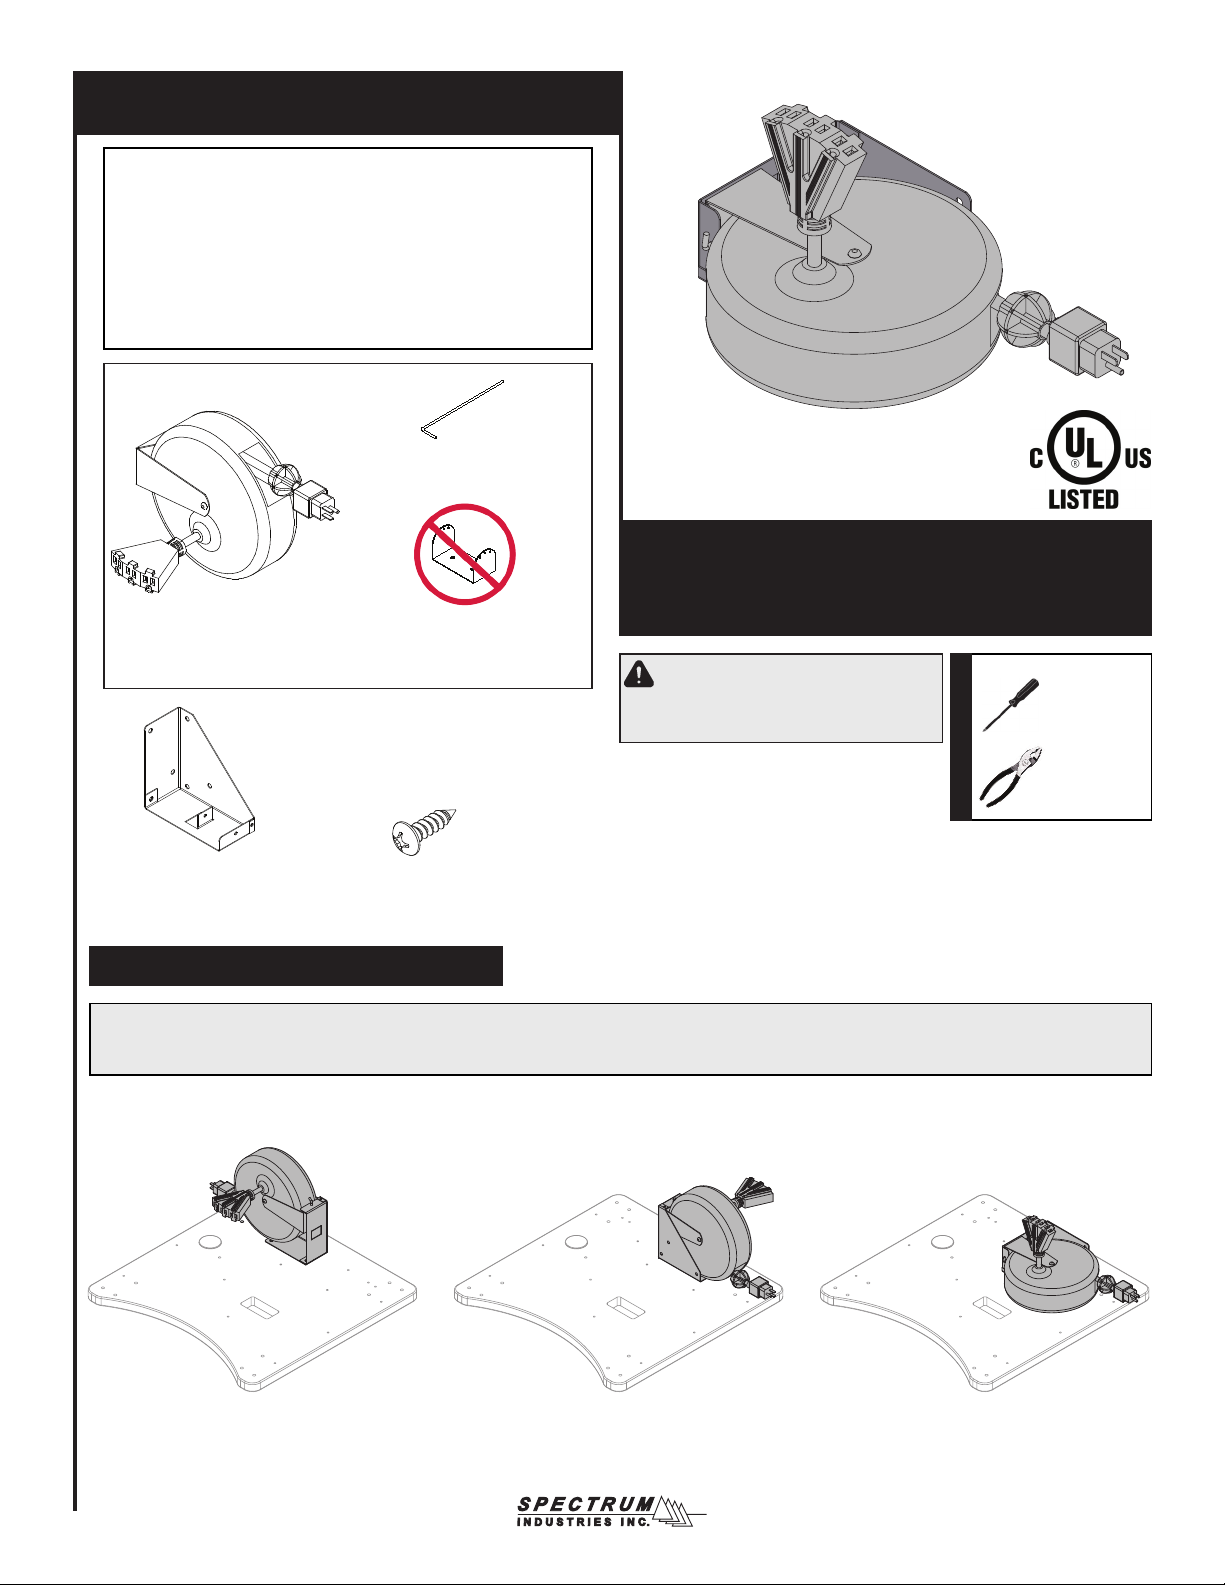
1. USE IN COVERED AREAS. OUT OF RAIN & WEATHER
2. NOT FOR USE IN AREAS REQUIRING EXPLOSION-PROOF FIXTURES.
3. REELS WITH ELECTRICAL OUTLETS:
• Do not overload - See instruction manual for amperage ratings.
• Pull entire cord from reel when using outlet.
4. WHEN HANGING REEL on ceiling (See Instruction Manual):
• BY HOOK - Close hook with pliers to prevent reel from coming down.
• BRACKET & PIN - With reel in place, bend end of “L” shaped pin to
PREVENT PIN FALLING OUT and reel falling.
5. INSPECT CORD OFTEN and replace if damaged.
6. READ INSTRUCTION MANUAL BEFORE INSTALLING OR USING.
7. UNPLUG BEFORE PERFORMING SERVICE.
Other Spectrum Industries Storage manuals
Popular Storage manuals by other brands

Addonics Technologies
Addonics Technologies AE25SNSP user guide

Keter
Keter DARWIN 120G 454L user manual

HP
HP 201723-B21 - HP StorageWorks Modular SAN Array 1000 Hard... Maintenance and service guide

Corvus systems
Corvus systems Corvus user guide

Bluetti
Bluetti EP600 installation manual

Kanguru
Kanguru 2.5'' user manual