Spectrum WatchDog 3349CN User manual

Sprayer Station Console/
Console Sync Software
PRODUCT MANUAL
Item # 3349CN
®

2
Contents
Components 5
Specifications 5
Installing the Console 6
Operating the Console 8
Display 11
Installing ConsoleSync Software 14
ConsoleSync Software 15
Sync 16
Console Appearance 18
System Settings 21
Data Storage 24
Log File Format 28
Troubleshooting 29
Thank you for purchasing the WatchDog
Sprayer Station Console. The Console is
designed to be used with the WatchDog
Sprayer Station, and will provide an accu-
rate indication and record of the environ-
mental conditions around a vehicle, wheth-
er it is stationary or in motion. It allows for
real-time measurement of weather data
before, during, and after a field operation.

3
Copyright 2008 Spectrum Technologies, Inc.
Quick Start
1. Check the box.
Ensure that it contains the Console with mounting
bracket, two cables, and a CD-ROM.
Page
5
2. Install the WatchDog Sprayer Station.
Use the instructions provided with the Sprayer Sta-
tion.
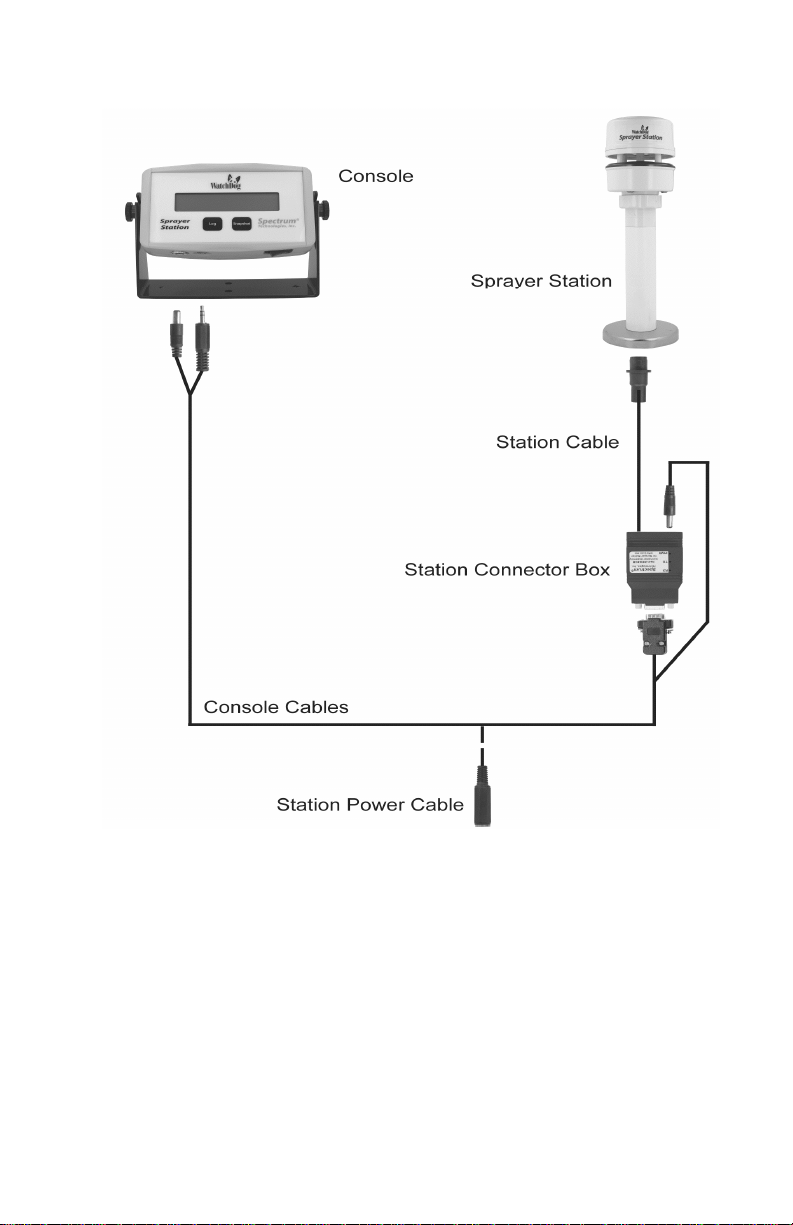
3. Install the Console.
Connect the Console to the Sprayer Station. You can
power it on and check the display, but don’t log or
snapshot data until it is configured to meet your
needs.
Pages
6 - 7
4. Install the ConsoleSync software.
Use the CD to install ConsoleSync on your PC. Page
14
5. Configure your Console
Use ConsoleSync to set units of measure and data
storage parameters.
Pages
18 - 27
6. Use the Sprayer Station / Console
Connect the Console to the Sprayer Station, and
gather weather data.
Pages
8 - 13
7. Save the Weather Data on Your PC
Bring the Console in to your PC, and use Con-
soleSync to preserve the data you collected.
Pages
16 - 17
8. Import the Weather Data to Other Programs
The Weather Data is stored as a tab-separated text
file for ease of importing to Excel, etc.
Pages
28 - 29
WatchDog® is a registered trademark, and SpecWare
TM
is a trademark of Spectrum Technologies, Inc.
SpecWare ConsoleSync software © 2008 by
Spectrum Technologies, Inc.

4

5
Components
Your WatchDog Sprayer Station package should contain the follow-
ing components:
A. Sprayer station console
B. Mounting bracket and screws
C. Station/Console Cable Assembly
D. PC Interface Cable
SpecWare Mobile / ConsoleSync CD and Product Manual (not pic-
tured.
—————————————————-
Please note that the front label on the Console has a high-gloss
finish. Most consoles ship with a layer of film protecting the label. If
your Console has a matte finish, or the LCD display is somewhat
cloudy through the window, the protective film needs to be peeled
off.
Specifications
Supply Voltage 10-16VDC (nominal 12VDC)
Supply Current 2 mA
Dimensions console: 5.3 x 3.1 x 1.6 inches, (13.5 x 8 x 4 cm)
bracket: 5.7 x 3.9 x 2 inches, (14.5 x 10 x 5 cm)
A
C
B
D

6
Installing
the Console
Before installing the console, install the WatchDog Sprayer Station
according to the instructions found in the WatchDog Sprayer Sta-
tion Product Manual.
Mounting the Console
Determine where in your cab you want to mount the WatchDog
Sprayer Station Console. The location should be easily seen by the
operator, preferably when they look forward (as compared to look-
ing to the side) so that the drift arrow indicator is intuitive.
Connect the Console and Sprayer Station as shown in the Wiring
Diagram on page 5. There is only one way to insert the two plugs
into the jacks on the Console. The jacks are located on the under-
side of the Console. The jacks on the Station Connecter Box and
the plugs on that end of the Console Cable are similarly unique.

7
Loosen the knobs on the sides of the Console and lift it out of the
bracket. Mount the Console bracket securely with bolts, screws,
foam mounting tape, or Velcro strips. Put the Console back in the
bracket and tighten the side knobs. You may wish to secure the
cables that plug into the console. Because the Console will periodi-
cally be removed from the cab to transfer weather data to your PC,
avoid having the cables fall to the floor.

8
On/Off Switch
The On/Off Switch is on the bottom of the Console (see image
above). The Console only needs to be on when it is in use. Your
data is stored on flash memory in the Console, and will not be lost
when the power is turned off.
When the Console is switched on, it waits for communications from
either the Sprayer Station or the PC. Once it establishes a connec-
tion, it will not recognize the other unless it is switched off and then
on again. This step is implicit in the normal operating procedure of
turning the Console off, removing it from the sprayer, carrying it in
to a PC, connecting it, and turning it back on.
Operating
the Console

9
IMPORTANT: The console contains a 9V rechargeable battery
which is designed to be used when the Console is removed from
the vehicle cab and connected to the PC. This battery will run the
Console for only 30 to 60 minutes. If the console is not shut off
when the vehicle is turned off, the battery will be fully drained within
an hour. Repeated draining of the battery will impact its longevity.
When the Console is switched on, the LCD displays the current
battery level (see “Display”, p. 11 for details). If the initial battery
level is below 6V, the Console has only about five minutes of inter-
nal battery life left. It should be recharged (on the vehicle) before
attempting to download any data from the Console.
Replacing the Battery
If the stand-alone battery life becomes too short, the battery can be
replaced. Detach the Console from the bracket, remove the four
screws on the back, and lift off the cover. The battery will be visible
on the left. Remove it from its connector and replace it with a stand-
ard 9 volt NiCad rechargeable battery. Re-attach the back cover (it
only fits one way) and tighten screws to hold it securely.
WARNING: If a non-rechargeable battery, especially an alkaline or
heavy duty battery, is used as a replacement, the Console will be
severely damaged when the battery is recharged from the vehicle’s
power supply.

10
Log Button
When the Console is connected to the Sprayer Station, pressing
the Log button starts the logging of weather data. The recording
interval is specified in the ConsoleSync program. The interval rang-
es from four seconds to one minute, and can also be disabled. Data
will be recorded at the specified interval until the Log button is
pressed again. The Console will beep to indicate logging has been
initiated or discontinued. “Log” is displayed on the fourth line of the
LCD while the Console is logging data.
Diagnostic Mode
If the Log button is pressed and held while the Console is switched
on, the Console will enter a diagnostic mode. The Console will beep
twice before displaying the diagnostic screens.
For more information on the Console’s diagnostic mode, see
“Troubleshooting” (p. 29).
Snapshot Button
When the Console is connected to the Sprayer Station, pressing
the Snapshot button records the geo-referenced weather data cur-
rently displayed on the LCD. The Console will beep to indicate a
record has been captured. Snapshot data is maintained in files sep-
arate from logged records.

11
Startup
When the Console is switched on, it will very quickly display the
following screen.
The bottom line of the startup display contains (from left to right) the
Console Serial Number, the firmware version number, and the ini-
tial voltage level of the internal battery, or the external power supply
(if connected).
Weather Conditions
Once the Console receives data from the Sprayer Station, it dis-
plays the following screen, which is updated every 4 seconds.
The above screen shows weather data without GPS information. In
this case, the word “Apparent” appears in the top line. This will be
displayed until the GPS obtains a position fix. The GPS time to first
fix is approximately one minute. Note that a GPS fix will not be pos-
sible when there is not a clear view of the sky. This would be the
case indoors or in a heavily forested location.
waing... 28
Spectrum Technologies
WatchDog Sprayer Staon
Gust 7 Apparent HH
Temp 82 RH 2 Dew 1 HH
Bar 29.35 dT 1 HH HH
Display

12
Customization:
The screen images on these pages represent the defaults for the
Console. ConsoleSync can be used to hide any of the parameters
(see Display Fields, p. 16) or to change the prompt words from
English to another language. The units for Speed, Temperature,
and Barometric Pressure can also be changed within ConsoleSync.
The standard display view consists of the following information:
Wind Speed and Direction
Two types of wind speed and direction can be displayed. Apparent
wind is the wind a person riding on the vehicle would feel. True wind
is the wind that would be measured if the vehicle were stationary. It
is computed from the apparent wind and the GPS-provided course
and speed.
If GPS data is available, the true wind values will be computed and
displayed on the right side of the display. The apparent wind speed
and direction (preceded by “ApWind”) will be displayed at the end
of the first data line. If GPS is not available, the apparent wind data
will be displayed on the right side of the display and the indicator
“Apparent” displayed in the first data line.
See the WatchDog Sprayer Station product manual for a more de-
tailed explanation of Apparent vs. True wind speeds.
Temperature (“Temp”)
The current temperature is displayed on the second line in whole
degrees
Relative Humidity (“RH”)
The relative humidity is displayed as a percent.
Dew Point (“Dew”)
Dew Point is computed from the current temperature and relative
humidity, and is displayed in whole degrees.
Barometric Pressure (“Bar”)
Barometric pressure is displayed on the third line.
Delta T (“dT”)
Delta T is the difference between dry bulb and wet bulb tempera-
tures (in Celsius). Delta T can be used to define limits for spraying.

13
Heading/Course (“Hdg”)
Heading or Course are displayed on the bottom line. Heading is the
direction the vehicle is pointed, and is displayed when the vehicle is
not moving (or GPS data is not available). Course is the direction
the vehicle is moving, and it and speed are displayed when the ve-
hicle is in motion.
Satellites (“s”)
The number of GPS satellites currently being received is displayed.
A GPS position fix is not obtained until at least three satellites are
being received. When more satellites are located, the position fix is
more accurate as is the computation of the vehicle and true wind
speeds.
Log
The “Log” indicator is displayed whenever weather data is being
periodically logged to flash memory. Logging is started and stopped
using the “Log” button (see p. 10). Logging is enabled and the re-
cording interval set within ConsoleSync.
Wind Drift Indicator
The Wind Drift Indicator is an arrow showing the direction any spray
drift would travel. Although this could be computed by the operator
using the travel and wind directions, the Indicator provides an intui-
tive visual aid for the operator, that shows potential drift relative to
the vehicle itself, regardless of the direction it is headed. For exam-
ple, if the vehicle is traveling East, and the wind is from the North,
the arrow will point to the right, indicating that any drift would be
heading to the right. On a return pass, traveling West, the arrow
would point left.
Gust 7 ApWind SE 5
Temp 82 RH 2 Dew 1
Bar 29.35 dT 1

14
Insert the SpecWare Mobile / ConsoleSync installation CD in your
computer’s disk drive. On most machines, the software installation
will begin automatically. If the installation program does not auto-
matically run, click on the “My Computer” (or “Computer”) desktop
icon. Locate the drive with the ConsoleSync CD. Double click the
setup.exe file.
Follow the screen instructions to complete the installation. You will
be asked which products you want to install. At a minimum, install
ConsoleSync. If you are using a laptop, you may also want to install
SpecWare Mobile for the PC, as this program will allow you connect
the Sprayer Station directly to your laptop and view the weather
conditions on your laptop screen. Desktop icons and Start menu
entries will be created to run the products you select.
Once the SpecWare ConsoleSync software is installed, you are
ready to configure your Console to use with your Sprayer Station.
——————————————
The current version of SpecWare Mobile and ConsoleSync soft-
ware is available on the Spectrum Technologies web site at
www.specmeters.com. This may contain corrections or new fea-
tures for ConsoleSync.
Installing
ConsoleSync
Software

15
Start ConsoleSync by clicking on the desktop icon.
ConsoleSync uses tabs to separate its functions.
The Sync tab is displayed first, because that will be
used on a day-to-day basis.
The tabs are arranged so that initial configuration is done from right
to left, ending with the Sync tab to transmit the configuration to the
Console.
Buttons
There are three buttons common to the other 3 configuration tabs:
Apply: Saves any configuration changes made.
Cancel: Returns the screen to the last saved values.
Exit: Exits ConsoleSync.
The Data Storage tab allows you to specify what data to collect on
your Console and where to preserve it on your PC. It contains the
following configuration options:
ConsoleSync
Software

16
The Sync tab is the most-used tab within ConsoleSync. It is used to
offload logged weather data and store it on your PC. It is also to
copy any custom settings to your Console.
Before using either button on the Sync tab, you must connect your
Console to the PC using the black PC Interface cable. See System
Settings (p. 21) for more details.
The Console must also be switched on to communicate with Con-
soleSync software. Note that when the Console is disconnected
from the vehicle power, it is running on an internal 9V rechargeable
battery. This battery can power the Console for 30-60 minutes.
Therefore, the Console should not be switched on until needed.
Sync

17
Get Data
Click the Get Data button to download weather data from the Con-
sole to the PC. A text report of progress will be displayed in the box
to the right of the buttons. During the download itself, a progress
bar will be displayed at the lower right corner of the ConsoleSync
screen.
When the download is initiated, ConsoleSync requests the serial
number from the Console. If this is the first time the Console has
been read, a prompt will be displayed asking for the name to be
used for this Console. You can choose to let it default to the serial
number, or give it another name. Since this name is used to form
data file names, the suggested name is edited to remove charac-
ters that are illegal for file names, such as slashes or quotes.
After the download is complete, the weather data is edited and
saved to files on the PC. If you have specified that you wish to ex-
plicitly name each Log file, you will be prompted for the names.
Once all data is successfully saved, ConsoleSync will issue a com-
mand to erase the data on the Console, so it can be reused.
Set Console
Clicking Set Console will copy all configuration information from
ConsoleSync to the Console. This only needs to be done when you
change a configuration option, but it must be done to each of the
Consoles you manage.

18
The Console Appearance tab allows you to customize what data is
displayed on the Console, the text prompts next to the data, alarms,
and specialty configurations.
Reset button
The Reset button is unique to the Console Appearance tab. Click-
ing Reset returns all fields listed in the Display Fields section back
to their original (factory) settings. This differs from the Cancel but-
ton, which returns settings to the previously saved (customized)
value.
Display Fields
All fields on the Console screen are listed and can be customized.
Changes to these fields are reflected in the rectangle in the upper
right corner of the screen, which displays the (approximate) appear-
ance of the actual Console screen, as currently configured.
Console Appearance

19
The format of each line is the same:
• The check box on the left determines whether the data field
and prompt are displayed (checked = display).
• The parameter type is followed by a number in parenthesis.
This is the maximum number of characters allowed on the Con-
sole screen.
• The text box on the right allows you to change the actual
prompt which will display on the Console screen.
The bottom four items have special characteristics.
“Apparent / No GPS” text is displayed over the “Apparent
Wind” (second item) when GPS is not available. In that case, be-
cause there is no way to compute True Wind, the apparent wind
values are displayed using the large digits.
“Reset” text is displayed on the Diagnostic Screen (see p. 28 for
details).
“Log” is only displayed if data logging is active.
“N_NEE_SES_SWW_NW” are the 8 two-character direction abbre-
viations that make up the wind rose. These are listed beginning
with North (N_), and proceeding clockwise, ending with Northwest
(NW). The Console displays (and logs) wind and vehicle direction
by looking up the abbreviation from this list. The text for these 8
abbreviations can be edited to reflect the local language.
Wind Alarm
This section is used to set visual and audible alarms on the Con-
sole.
The alarm is activated by selecting a number (instead of Disabled)
from the Alarm if over pulldown list. The wind speed alarm level is
in the same units chosen for speed on the System Settings tab
(see p. 19). If the true wind velocity reaches or exceeds the alarm
level, two asterisks (**) will appear under the large wind digits in the
lower right corner of the Console screen.

20
The Console can also beep to indicate that the alarm condition ex-
ists. There are three sound settings.
No Alarm Sound: Silences the audible alarm.
Every Time: Allows the alarm to sound at four-second intervals.
This is the same interval at which the Console screen is updated.
At most once per minute: Limits the alarm sound to one minute
intervals.
Wind Options
The Wind Options section allows three lesser-used options to be
configured.
Measured/Apparent Only (fixed loc)
If the station is used in a fixed location, instead of on a moving vehi-
cle, the measured, or “apparent” wind is also the true wind. Check-
ing this option ignores any true wind calculations and displays only
the apparent wind.
Show Degrees
If this option is checked, then the wind direction is displayed in de-
grees (0 to 359) instead of the two-character compass rose abbre-
viation.
Direction from Heading
If this option is checked, the wind direction is computed from the
station’s heading instead of from North. When combined with Show
Degrees, this option is designed for ground support of aerial appli-
cators.
NOTE: When you click Apply on the Console Appearance tab,
your settings are saved, but you must use the Set Console button
on the Sync tab to copy your settings to the Console. See
“Sync” (p. 16)
for details.
Other manuals for WatchDog 3349CN
1
Table of contents
Other Spectrum Pet Care Product manuals