Speed Link MULTISTATION 6in1 User manual

MULTISTATION 6in1
Multiplayer-Adapter Set
Bedienungsanleitung
User’s guide
Mode d’emploi
Manual de uso
Manuale di istruzioni
SL-4030
D
GB
F
E
I

Example for Setting up/Anschlussbeispiel

Achtung!
Standardmäßig ist Ihre Multistation auf „DVD Remote Control“
eingestellt. Beim Anschalten Ihrer Multistation, müssen Sie 1x
die „G/R“- Taste auf der Fernbedienung betätigen, wenn
Sie einen Gamecontroller an Slot A verwenden wollen.
Note!
Your Multistation defaults to DVD remote control operation
when rst switched on. To use a game controller instead (in slot
A), press the G/R button on the remote control.
Important !
Votre Multistation est réglée par défaut sur le mode « DVD
Remote Control ». Si vous souhaitez utiliser une manette de jeu
raccordée au port A, il vous faut donc appuyer sur la touche
« G/R » de la télécommande lorsque vous allumez l’appareil.
¡Atención!
De fábrica la Multiestación está ajustada para funcionar en
„DVD remote control“. Al conectarla, hay que accionar el botón
„G /R“ del mando a distancia si quiere utilizar una ranura A en el
controlador del juego.
Attenzione!
La Vostra Multistation è preimpostata a partire da fabbrica
su “DVD Remote Control“. All’accensione della Multistation è
necessario premere il pulsante “G/R” del Vostro telecomando
se desiderate avviare un gamecontroller collegato allo slot A.

4
D
GB
F
E
I
Einleitung
Vielen Dank, dass Sie sich für den Kauf der Multistation 6in1
entschieden haben. Dieses Gerät erlaubt Ihnen eine besonders
komfortable Handhabung der vielfältigen Funktionen der
Playstation2 und mit mehreren Spielern gleichzeitig aufregende
Spieleabenteuer zu erleben.
Inbetriebnahme
1. Setzen Sie die Spielekonsole vertikal in den Schacht
der Multistation und verbinden Sie die Geräte über das
Verbindungskabel an der Vorderseite der Multistation
miteinander. Das Gerät ist nun betriebsbereit.
2. Leuchtet die LED-Anzeige an der Multistation auf, können
Sie dieses Gerätes über die Fernbedienung bedienen -
Standardeinstellung.(Die LED-Anzeige kann durch Drücken
der „G/R”- Taste auf der Fernbedienung ausgeschaltet
werden).
3. Ist die LED-Anzeige der Fernbedienung ausgeschaltet,
können Sie Ihr Gamepad oder Ihren Joystick nutzen
(Anschluss über Slot A), um sämtliche Funktionen
auszuführen. Die weiteren Slots an der Multistation (Slot
B bis D) erlauben Ihnen bis zu 4 Joysticks oder Gamepads
gleichzeitig anzuschließen und Spiele mit mehreren
Mitspielern zu spielen.

5
D
GB
F
E
I
Die Game-Software muss diese Funktion jedoch
unterstützen. Die Slots bieten außerdem Platz für jeweils
eine Memory Card.
4.Die MultiStation bietet die Möglichkeit weitere Geräte
anzuschließen und über den Schalter auf der Vorderseite
zwischen den Betrieb von zwei Geräten zu wählen.
Wenn Sie ein Gerät an „Input1“ an der Geräterückseite
angeschlossen haben (wie etwa ein Fernsehgerät),
müssen Sie den Schalter an der Vorderseite auf „NO1.“
stellen, um Video/Audiosignal von „Input1“ übertragen zu
können.
Wenn Sie ein Gerät an „Input 2“ angeschlossen haben
(z.B. einen Videorecorder), müssen Sie den Schalter auf
„NO2“ stellen, um Signale übertragen zu können.
(vergl. Abbildung 1, S.2)
5. Die Multistation bietet Ihnen die Möglichkeit bis zu
4 DVDs oder Spiele und 6 Memory Cards in den dafür
vorgesehen Schächten unterzubringen.
Infrarot-Fernbedienung:
Einlegen der Batterien
1. Entfernen Sie die Abdeckung des Batteriefachs auf der
Rückseite der Fernbedienung.

6
D
GB
F
E
I
2. Legen Sie zwei „AAA” (RO3)-Batterien entsprechend der
Kennzeichnung ins Batteriefach ein.
3. Befestigen Sie die Abdeckung des Batteriefachs.
Batteriehinweise:
• Verwenden Sie nicht gleichzeitig alte und neue Batterien
oder verschiedene Batteriesorten. Befolgen Sie für den
Umgang mit Batterien die Anweisungen des Herstellers.
• Entsorgen und recyclen Sie verbrauchte Batterien gemäß
den örtlichen Bestimmungen.
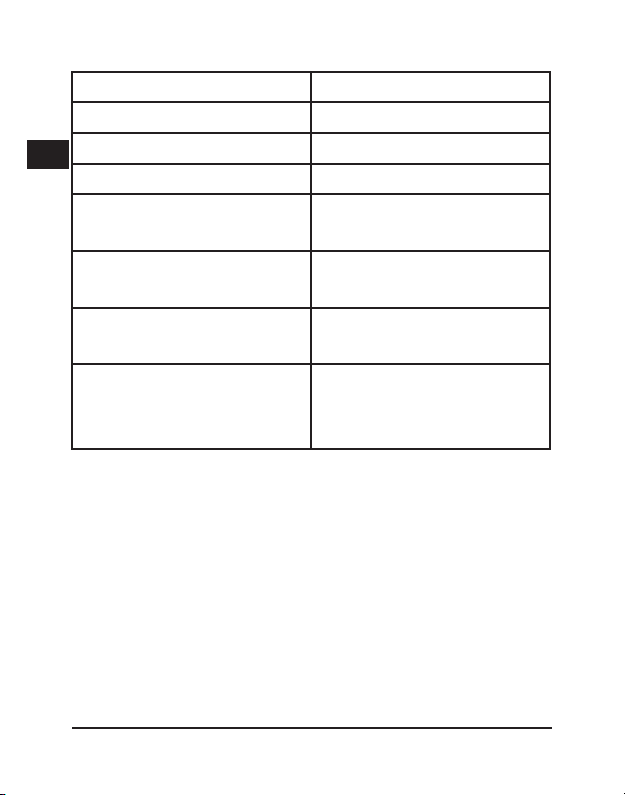
Verwenden der Fernbedienung
Taste: Funktion:
G/R Umschalten zwischen
Fernbedienung und Joystick/
Gamepad- Gebrauch
Left/Right/Up/Down Links/Rechts/Aufwärts/
Abwärts zur Navigation im
Select-Menü
Select Anzeige des Funktionsmenüs,
Auswahl einer Funktion
durch Left/Right/Up/Down-
Tasten

7
D
GB
F
E
I
Previous chapter Rückkehr zum vorherigen
Kapitel (die Kapitelabschnitte
sind auf der DVD festgelegt)
Rewind Search Schneller Rücklauf
Change Sound/Music Ermöglicht den Wechsel
zwischen verschiedenen
Tonspuren
Play/Pause Wiedergabe der DVD ab
angegebener Stelle
Stop Anhalten der Wiedergabe
Title Wechseln zum Titelmenü
DVD Menu Öffnet das DVD-Menü
Forward Search Schneller Vorlauf
Next Vorlauf zum nächsten
Abschnitt
Change Subtitle Ändern der Untertitel-
Sprache
Enter Bestätigen der aktuellen
Auswahl

8
D
GB
F
E
I
Special Kann das Abspielen einiger
DVDs ermöglichen, die sich
im normalen Modus nicht
abspielen lassen.
Problembehandlung
Gerät reagiert nicht auf die Fernbedienung
Richten Sie die Fernbedienung direkt auf den Sensor des
Gerätes. Räumen Sie alle Hindernisse beiseite, die den Weg
des Signals stören könnten. Überprüfen oder ersetzen Sie die
Batterien.
DVD-Features funktionieren nicht
Einige DVDs unterstützen unter Umständen nicht alle Features
der Fernbedienung, z.B. Untertitel, mehrsprachige Audio-
Tracks etc. Informationen zu unterstützten Features nden sie
im Informationsmaterial des DVD-Herstellers.
Keine Spannung
Überprüfen Sie, ob das Gerät eingeschaltet ist.
Überprüfen Sie, ob an der Steckdose Spannung vorliegt, indem
Sie ein anderes Gerät anschließen.
Kein Ton oder Bild
Vergewissern Sie sich, ob das Gerät richtig angeschlossen ist.
Schauen Sie nach, ob das Fernsehgerät eingeschaltet ist.

9
D
GB
F
E
I
Überprüfen Sie die Audio-Anschlüsse.
Wenn Sie ein Gerät an „Input1“ an der Geräterückseite
angeschlossen haben (wie etwa ein Fernsehgerät), müssen Sie
den Schalter an der Vorderseite auf „NO1.“ stellen, um Video/
Audiosignale von „Input1“ übertragen zu können.
Wenn Sie ein Gerät an „Input 2“ angeschlossen haben (z.B.
einen Videorecorder), müssen Sie den Schalter auf „NO2“
stellen, um Signale übertragen zu können.
(vergl. Abbildung 1, S.2)
Sicherheitshinweise
• Nehmen Sie die Multistation 6in1 unter keinen
Umständen auseinander!
• Versuchen Sie nicht, das Gerät selbst zu warten oder
zu reparieren. Übergeben Sie jegliche Wartungsarbeiten
an das zuständige Fachpersonal. Durch selbstvor-
genommene Veränderungen an dem Gerät verlieren Sie
jeglichen Garantieanspruch.
Standort-Auswahl
Wählen Sie einen sicheren Standort auf ebener und
waagerechter Oberäche, um den sicheren Stand des Gerätes
und damit der Spielekonsole zu gewährleisten.

10
D
GB
F
E
I
Garantie
Für dieses Produkt gewähren wir Ihnen eine Garantie von zwei
Jahren ab Kaufdatum auf Verarbeitung und alle eingebauten
Teile.
Falls Sie Hilfe benötigen...
Bei technischen Problemen wenden Sie sich bitte an unseren
technischen Support. Die Hotline-Nummer nden Sie auf der
Rückseite dieser Bedienungsanleitung.

11
D
GB
F
E
I
Introduction
Thank you for purchasing the Multistation 6in1. This product
provides convenient handling of all the functions of the
Playstation2 and lets you share exciting gaming adventures with
several players.
Setting up
1. Fit the games console vertically into the dock on top of
the Multistation and connect the two units by means of
the link cable on the front of the Multistation. The device
is now ready to use.
2. When the LED on the Multistation is lit, you can use the
remote control to operate all functions of the unit (you can
switch off the LED with the remote control’s G/R button).
3. When the LED of the remote control is off, you can
operate all functions with your gamepad or joystick
(connection via slot A). The other slots (B to D) of the
Multistation let you connect up to 4 joysticks or gamepads
at the same time and play games with several players.
However, the game software must support this function.
Each slot also provides space for one memory card.
4. The MultiStation provides a means of connecting further
devices and selecting, by means of a switch on the
front, which of two devices you wish to use. If you have

12
D
GB
F
E
I
connected a device such as a TV to „Input 1“ on the back
of the unit, move the switch on the front to „No. 1“ to
transmit the video/audio signals from „Input 1“.
If you have connected a device such as a video recorder
to „Input 2“ on the back of the unit, move the switch on
the front to „No. 2“ to transmit the signals from that
input.
5. The Multistation also provides storage slots for up to 4
DVDs or games and 6 memory cards.
Infrared remote control:
Fitting the batteries
1. Remove the cover of the battery compartment on the
back of the remote control.
2. Insert two AAA (RO3) batteries as shown inside the
battery compartment.
3. Replace the cover of the battery compartment.
Notes on battery use:
• Do not mix old and new batteries or batteries of different
types. Follow the manufacturer‘s instructions on the use
of batteries.
• Recycle or dispose of used batteries in accordance with
local guidelines.

13
D
GB
F
E
I
Use of the remote control
Button: Function:
G/R Switches between remote
control and joystick/
gamepad
Left/Right/Up/Down For navigating in the Select
menu
Select Displays the function menu;
select a function with left/
right/up/down buttons
Previous chapter Return to previous chapter
(these are determined by the
DVD)
Rewind Search Rewind Search
Fast rewind Fast rewind
Change Sound/Music Lets you switch between
different soundtracks
Play/Pause DVD playback from a selected
point
Stop Stops playback
Title Switch to title menu
DVD Menu Opens the DVD menu

14
D
GB
F
E
I
Forward Search Fast forward
Next Jumps forward to the next
section
Change Subtitle Changes the subtitle
language
Enter Conrms the current
selection
Special Enables playback of some
DVDs that won’t play in
normal mode.
Troubleshooting
Device does no respond to the remote control
Point the remote control directly at the sensor of the unit.
Move aside any objects that may obstruct the path of the
signal.
Check or replace batteries.
Cannot access DVD features
Some DVDs do not support all of the remote control’s features
such as subtitles, multilingual audio tracks, etc. For information
on supported features, refer to the documentation of the DVD
producer.

15
D
GB
F
E
I
No power
Check the unit is switched on.
Verify that there is power at the supply socket by plugging in
another device.
No sound or picture
Check that the device is correctly connected.
Make sure you switched on the TV.
Check the audio connections.
The MultiStation provides a means of connecting further devices
and selecting, by means of a switch on the front, which of two
devices you wish to use. If you have connected a device such
as a TV to „Input 1“ on the back of the unit, move the switch on
the front to „No. 1“ to transmit the video/audio signals from
„Input 1“.
If you have connected a device such as a video recorder to
„Input 2“ on the back of the unit, move the switch on the front to
„No. 2“ to transmit the signals from that input.
General safety information
Under no circumstances take the Multistation 6in1 apart!
• Do not attempt to service or repair the device yourself.
• Refer all servicing to qualied service personnel.

16
D
GB
F
E
I
• By modifying the device yourself, you will invalidate
the guarantee.
Installation position
Choose a at, level surface to ensure that the device and games
console are steady and safe.
Guarantee
We guarantee this product in respect of workmanship and all
built-in components for a period of two years from the date of
purchase.
If you need help...
Our technical support team will be happy to help with any
technical problems. The hotline number can be found on the
back of this manual.

17
D
GB
F
E
I
Introduction
Merci d’avoir choisi la Multistation 6in1. Cet appareil très
convivial facilite l’utilisation des nombreuses fonctions de la
Playstation 2 et vous offre la possibilité de vivre de palpitantes
parties multijoueurs en simultané.
Mise en service
1. Placez la console de jeu à la verticale dans le logement de
la Multistation et reliez les deux appareils à l’aide du câble
de connexion à l’avant de la Multistation. L’appareil est à
présent prêt à l’emploi.
2. Lorsque le voyant de la Multistation est allumé, vous
pouvez contrôler toutes les fonctions par télécommande.
(Pour éteindre le voyant, appuyez sur la touche « G/R »
de la télécommande.)
3. Lorsque le voyant de la télécommande est éteint, vous
pouvez utiliser votre manette de jeu ou votre joystick
pour exécuter toutes les fonctions (raccordement par
le port A). Les autres ports de la Multistation (ports B
à D) permettent de raccorder au plus simultanément 4
joysticks ou manettes de jeu an de jouer à plusieurs.
À noter que le jeu doit prendre en charge pour cela
l’option multijoueurs. Chaque port comprend en outre un
logement pour une carte mémoire.

18
D
GB
F
E
I
4. La MultiStation permet de raccorder d’autres appareils
et de choisir entre deux appareils à l’aide de l’interrupteur
à l’avant. Si vous avez raccordé un appareil à l’entrée
« Input1 » au dos de l’appareil (p. ex. un téléviseur), vous
devez placer l’interrupteur à l’avant en position « NO1 »
pour pouvoir transmettre les signaux audio/vidéo
« Input1 ».
Si vous avez raccordé un appareil à l’entrée « Input2 »
(p. ex. un magnétoscope), amenez l’interrupteur sur
« NO2 » pour pouvoir transmettre des signaux.
5. La Multistation permet de ranger 4 DVD ou jeux et 6
cartes mémoire dans les emplacements prévus à cet
effet.
Télécommande à infrarouges
Mise en place des piles
1. Retirez le cache du compartiment à piles.
2. Insérez deux piles « AAA » (RO3) en respectant les
indications qui gurent dans le compartiment à piles.
3. Remettez en place le cache.
Consignes relatives aux piles
N’utilisez pas en même temps des piles usées et neuves
ou différentes sortes de piles. Respectez les consignes du

19
D
GB
F
E
I
fabricant concernant la manipulation des piles.
Éliminez et recyclez les piles usées conformément aux directives
locales.
Utilisation de la télécommande
Touche Fonction :
G/R Commutation entre la
télécommande et le mode
joystick/manette de jeu
Left/Right/Up/Down Gauche/Droite/Haut/Bas
– pour naviguer à l’intérieur
du menu Select
Select Afchage du menu des
fonctions, sélection d’une
fonction à l’aide des touches
Left/Right/Up/Down
Previous chapter Retour au chapitre
précédent (le DVD est divisé
en chapitres)
Rewind Search Retour rapide
Change Sound/Music Pour changer de piste audio
Play/Pause Lecture du DVD à partir de
l’endroit indiqué
20
D
GB
F
E
I
Stop Arrêt de la lecture
Title Passage au menu des titres
DVD Menu Ouvre le menu du DVD
Forward Search Avance rapide
Next Passage à la section
suivante
Change Subtitle Pour changer la langue des
sous-titres
Enter Conrmation de la sélection
opérée
Special Permet de jouer certains
DVD qui ne peuvent être
lus en mode normal
En cas de problèmes
L’appareil ne réagit pas aux ordres envoyés par la
télécommande
Dirigez bien la télécommande vers le capteur du lecteur.
Écartez tous les obstacles qui pourraient gêner la transmission
du signal.
Vériez l’état des piles ou remplacez-les.
Les fonctions DVD ne marchent pas
Certains DVD ne prennent pas en charge toutes les fonctions
This manual suits for next models
1
Table of contents
Languages:
Other Speed Link Adapter manuals


