Speedheater 1100 S Instruction Manual

INSTRUCTION & SAFETY MANUAL
MAKE SURE YOU READ AND UNDERSTAND THE OWNERS MANUAL PRIOR TO USING
THIS TOOL. IMPROPER HANDLING CAN CAUSE PERSONAL INJURY AND MAY CAUSE FIRE.
To ensure the best possible use of your tool, we recommend you read the following
instructions carefully as well as the accompanying safety instructions.
DEAR CUSTOMER
Congratulations for choosing The Speedheater Infrared Paint Remover, model 1100 S.
1
ESTIMADO CLIENTE
Felicitaciones por elegir El Removedor de Pintura Infrarrojos Speedheater, modelo 1100 S.
Para asegurar la óptima utilización de la herramienta, se recomienda leer las siguientes
instrucciones cuidadosamente además de las instrucciones de seguridad incluidas.
MANUAL DE INSTRUCCIONES Y SEGURIDAD
MODE D'EMPLOI ET CONSIGNES DE SÉCURITÉ
LEA Y ENTIENDA EL MANUAL DEL USUARIO ANTES DE UTILIZAR ESTA HERRAMIENTA.
LA MANIPULACIÓN INCORRECTA PUEDE CAUSAR LESIONES PERSONALES E INCENDIOS.
Merci d'avoir choisi le Décapeur infrarouge Speedheater, modèle 1100 S.
Pour une utilisation optimale de votre appareil, nous vous recommandons de lire
attentivement les instructions et consignes de sécurité suivantes.
CHER CLIENT, CHÈRE CLIENTE,
ASSUREZ-VOUS DE LIRE ET DE BIEN COMPRENDRE LE MODE D'EMPLOI AVANT D'UTILISER
CET OUTIL. UNE MAUVAISE UTILISATION PEUT CAUSER DES BLESSURES OU UN INCENDIE.
English
Español
Fran aisç

2

TABLE OF CONTENTS
TECHNICAL SPECIFICATIONS
SAFETY PRECAUTIONS
INSTRUCTIONS FOR USE
TROUBLESHOOTING GUIDE
CLEANING AND MAINTENANCE, CHANGING IR TUBES
SPARE PARTS LIST
WARRANTY
3
Page
5
11 - 14
- 8
9
15
16 - 17
18
19 - 20
English

4
LIKE ANY POWER TOOL IT CAN BE DANGEROUS NOT USED PROPERLY.
READ THE FOLLOWING INSTRUCTIONS CAREFULLY AND FOLLOW
ALL SAFETY PRECAUTIONS.
IT IS THE RESPONSIBILITY OF THE OWNER TO USE THE SPEEDHEATER
INFRARED PAINT REMOVER, MODEL 1100 PROPERLY.
BASIC SAFETY INSTRUCTIONS SHOULD ALWAYS BE FOLLOWED WHEN USING
THIS ELECTRICAL TOOL IN ORDER TO REDUCE THE RISK OF FIRE, ELECTRIC
SHOCK AND PERSONAL INJURY.
THIS INSTRUCTION & SAFETY MANUAL IS NOT INTENDED TO SERVE
AS WARRANTY, GUARANTEE OR REPRESENTATION CONCERNING THE
FUNCTION AND OPERATION OF THE SPEEDHEATER INFRARED PAINT
REMOVER, MODEL 1100 S.
THIS TOOL SOFTENS PAINT, VARNISH AND PUTTY, ENABLING IT TO BE
SCRAPED OFF EASILY. USE A HIGH QUALITY SCRAPER WITH THIS TOOL.
DO NOT LEAVE UNATTENDED.
5
METAL SURFACES ARE HOT WHEN
IN USE. USE HEAT PROTECTIVE GLOVES.-
ALWAYS USE A RESPIRATORY MASK
AND/OR PROVIDE FOR GOOD
VENTILATION. FOLLOW LOCAL
LAWS AND REGULATIONS.
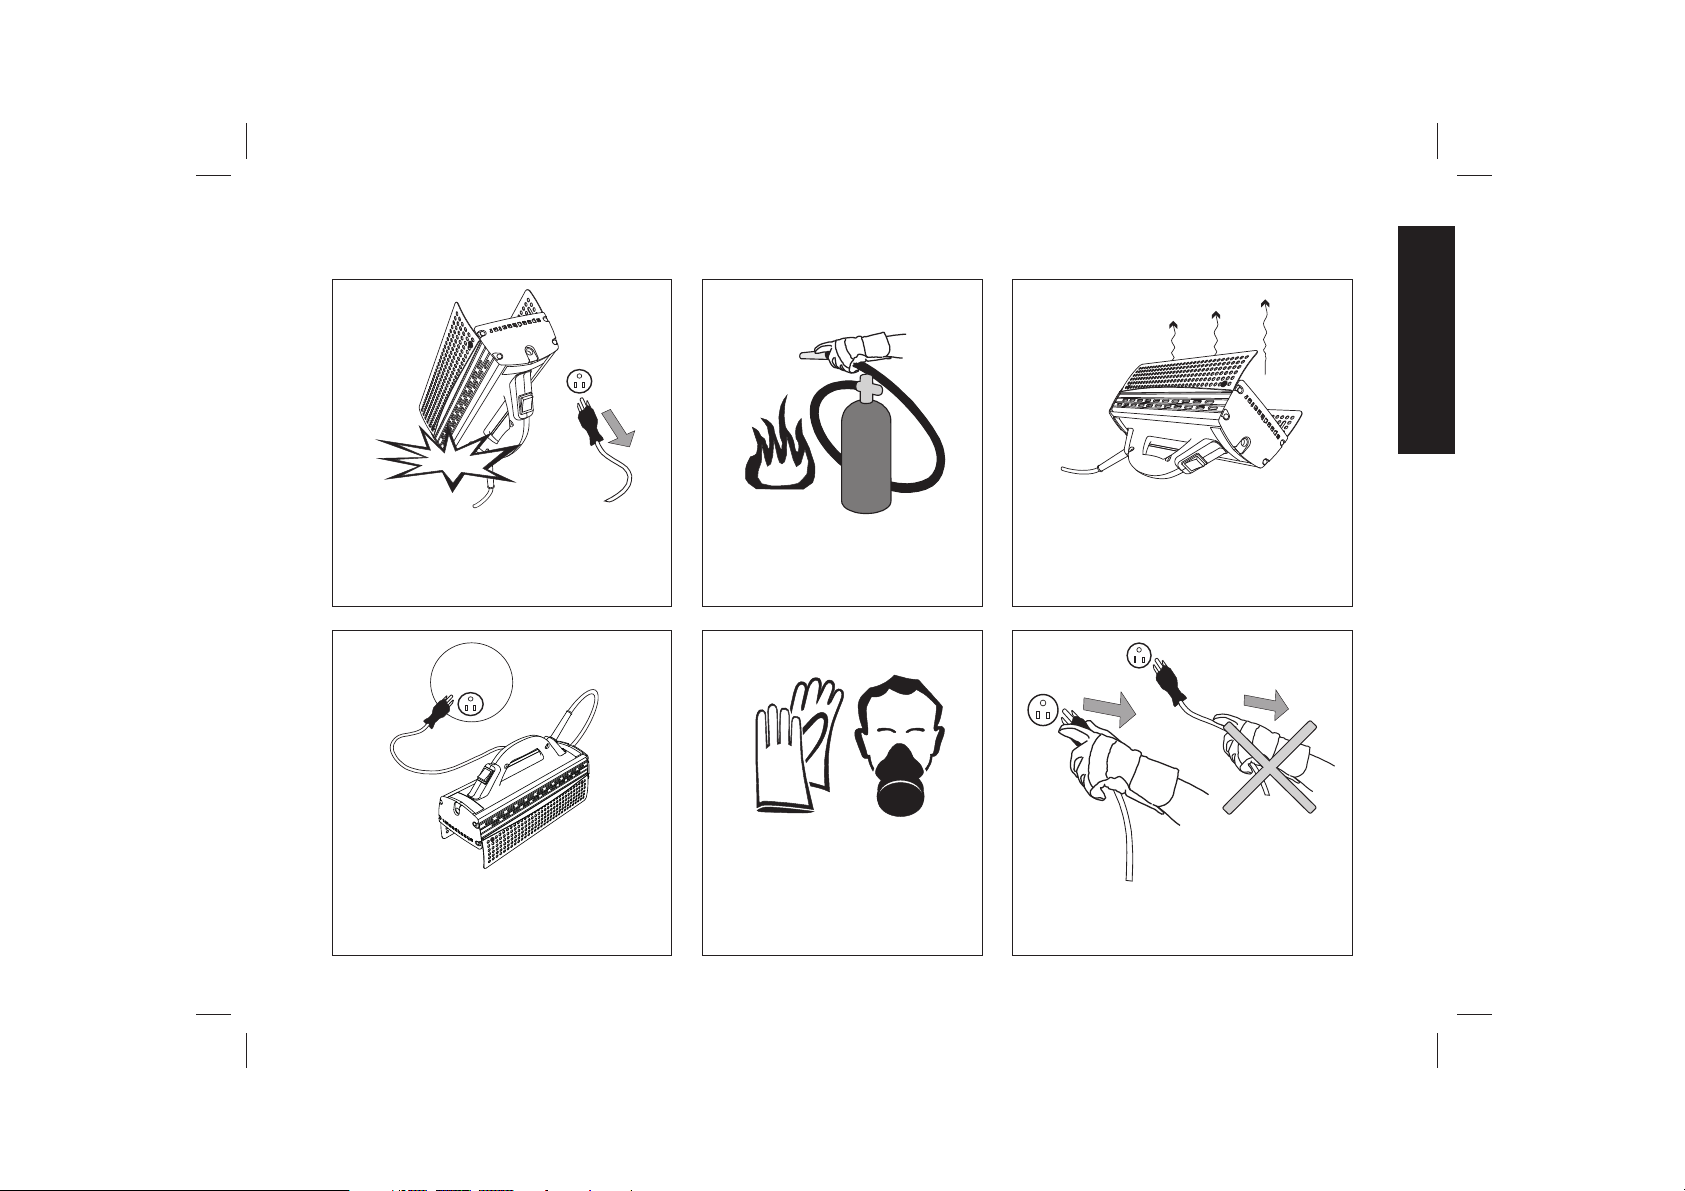
TURN OFF THE TOOL WHEN NOT IN USE .
DURING TEMPORARY WORK
BREAKS, ALWAYS TURN THE TOOL
UPWARDS FROM THE SURFACE AND NEVER
LEAVE IT UNSUPERVISED SINCE IT CONSTITUTES
A FIRE HAZARD
NEVER USE THE CORD TO
CARRY THE TOOL OR PULL THE PLUG
FROM AN OUTLET.
IF THE DEVICE IS EXPOSED TO A
THRUST OR OTHER DAMAGE, IMMIDIATELY
CUT THE POWER BY PULLING THE PLUG AND
CHECK THE DEVICE´S ELECTRICAL
COMPONENTS.
ALWAYS USE A POWER OUTLET
WITH A GFCI (GROUND FAULT CIRCUIT
INTERRUPTER) WHEN WORKING
WITH THIS POWER TOOL.
SAFETY PRECAUTIONS
IMPROPER HANDLING OF THIS
POWER TOOL MAY CAUSE FIRE: ALWAYS
KEEP A FIRE-EXTINGUISHER AT HAND
English
GFCI
PERSONAL SAFETY
Always ensure there is a fire extinguisher close at hand. In case of fire,
immediately switch the tool off and secure your safety.
Call an emergency number or a fire station immediately for assistance.
Always avoid any bodily contact with grounded surfaces such as pipes,
radiators, stoves or refrigerators. There is a risk of electric shock if your body is grounded.
An electric shock may cause severe personal injury or death.
. (Ground Fault Circuit Interrupter) when working with
this power tool. GFCI is designed to cut off the power when electricity is flowing through the ground wire.
This is an excellent protection against electric shock. If you are required to meet OSHA and NEC standards, you
must utilize a GFCI when working with any power equipment according to Federal United States law. If the tool
is not connected to a proper outlet, you may receive an electric shock which may lead to severe injury or death.
Check with a qualified electrician if you are in doubt as to whether the outlet is properly grounded. Do not
use any adapter plugs since this may cause fire or electrical shock that may cause injury or death. If the tool
should malfunction, the ground provides a low resistance path to carry electricity away from the user.
Grounded cords that comply with all codes and ordinances must be used.
The use of accessories or systems other than those
recommended in these instructions may cause personal injury, like as electric shock, fire or other. Use only
original spare parts and accessories from the manufacturer for this tool. Using parts other than those
specified in the spare parts list or otherwise approved by the manufacturer may cause personal injury and
render the warranty invalid. The same applies to using non-approved or unauthorized service centers.
The tool has been manufactured in accordance with prevailing regulations. Repairs should onlybe carried out
by a properly qualified electrician to avoid the risk of personal accidents or injury.
Disconnect the plug from the power source before making any
adjustments. Always disconnect the power cord when not in use or when the tool is being serviced.
Failing to do this may lead to electric shock. Someone may also turn on the machine involuntarily, which can
cause fire and or severe injury.
Ensure that a firm foothold can be obtained and that the work surface is stable.
Use the necessary safety equipment when working at heights. Firmly attach all anchoring points. If you intend
to utilize ladders and scaffolding, follow the safety instructions of that equipment carefully. Always use
appropriate safety equipment such as heat-protective gloves, a respiratory mask, eye protection, nonskid safety
shoes and a hard hat, where appropriate in order to avoid damage. Follow local laws and regulations.
Do not touch the tool's metal parts while in operation, since they become extremely
hot and can cause personal injury. Also avoid touching already heated and loosened paint, putty and varnish,
which can become hot as well. Always use appropriate safety equipment such as heat-protective gloves.
1. PREVENT FIRE HAZARD:
2. ELECTRIC SHOCK SAFETY:
3 ALWAYS USE A POWER OUTLET WITH A GFCI
4. GROUNDED TOOLS MUST BE PLUGGED INTO A PROPERLY INSTALLED OUTLET:
5. APPROVED ACCESSORIES, PARTS AND SERVICE:
6. ALWAYS USE THE ON/OFF SWITCH:
7. WORK SAFELY:
8. PREVENT BURNS:
6
If the paint is heated for too long and gets overheated the risk
of exposure to toxic gases and fumes increases. Follow the Safety Manual for proper use. Always follow
local laws and regulation.
Contact between the heat from the IR tubes or the gases and the electrical components in the machine may
cause an explosion which may lead to personal injury or death.
Do not let unauthorized people come in contact with this tool or power
cord since this might constitute a fire hazard or risk of injury.
This is to avoid possible toxic gases or other substances that might be in the air
or in the paint waste which might affect the child.
The power tool should never be left unsupervised when in
operation. After use, it should be switched off and allowed to cool to a safe temperature before being left
unattended. Leaving the tool unsupervised might cause fire or damage on other property.
Heating a surface for too long or leaving the power tool unattended may
cause fire or damage the machine or the surface. A surface should be heated only for 20 30
seconds indoors and 20 40 seconds outdoors. Apply only enough heat to make the paint pliable. The paint is
ready to be scraped off when it is both bubbling and smoking at the same time.
Untidy surfaces and work areas increase the risk of fire and
personal injury.
10. DO NOT EXCEED THE HEATING UP TIME.
11. DO NOT USE THE TOOL NEAR FLAMMABLE LIQUIDS OR GASES.
12. KEEP CHILDREN AND PETS AWAY:
13. CHILDREN, PREGNANT OR POTENTIALLY PREGNANT WOMEN AND NURSING MOTHERS
SHOULD NOT BE PRESENT IN THE WORK AREA UNTIL THE WORK IS DONE AND ALL CLEAN
UP IS COMPLETED.
14. NEVER LEAVE THE TOOL UNSUPERVISED:
15. LIMIT THE HEATING- UP TIME: -
16. KEEP THE WORK AREA CLEAN:
TO AVOID THE RISK OF FIRE
17. WE RECOMMEND HAVING A WATER SPRAYER handy to spray mist into cracks and crevices as a
precaution against overheating that may lead to fire. Slightly wetting the painted surface prior to paint removal
is advantageous and will aid the paint removal process and significantly reduce the risk of fire.
The power tool will dry out the moisture you previously introduced, making the wood dry and ready for the
primer coat and paint.
7
Ensure effective ventilation and use a respiratory mask when
working with paint or paint removal. Do this to eliminate the risk of inhaling possible toxic gases and dust.
Follow local laws and regulations.
9. AVOID INHALING FUMES AND DUST:
STOP
STOP
English
8
Always use extension cords approved for the required amperage and environmental
conditions or an electric overload may develop, which might lead to a short circuit.
19 Do not use this tool in damp or wet places.
If the machine gets wet it may cause short circuit.
Never use the cord to carry the tool or pull the plug from an outlet.
Keep cord away from heat, oil, sharp edges or moving parts. Replace damaged cords immediately.
Damaged cords increase the risk of electric shock. Make sure the power cord is not in contact with any of
the hot surfaces on the tool. This could destroy the cord and cause electric shock.
Keep the tool clean and dry. Take special care to ensure that the infrared tubes
and aluminum reflectors are clean and in working order. Dirty tubes and reflectors will reduce efficiency
and can cause fire. Check the power cord, safety shields, and other parts regularly. Replace damaged parts.
The IR tubes are made of quartz glass and must be handled with care. Always use gloves or a rag when
handling the IR tubes. Never touch them with your hands. If an IR tube breaks, immediately switch the
power tool off, pull the plug and replace the tube. Do not operate with only one tube working. Improper tool
maintenance may lead to malfunction, fire hazard, risk of electric shock and thereby personal injury.
Before continuing to use this tool, carefully check all safety systems and
other damaged parts to ensure the tool will function properly for the intended task.
The safety system or other damaged parts should be repaired or replaced immediately.
Although this power tool does not create dust itself, scraping the soft paint might
release dust particles that may contain lead. Clean up all removed paint and dust by wet mopping the floors.
Use a wet cloth to clean all walls, sills and any other surfaces where paint or dust is clinging.
Use an environmentally safe cleaning detergent. Place a drop cloth or tarpaulin under the work area to catch
any paint chips or peelings. Wear protective clothing. At the end of each session, put the paint waste and
debris in a double plastic bag, close it with tape or twist ties and dispose of properly. Follow local laws and
regulation. Use respiratory mask and heat protective gloves. Keep interior work area well ventilated.
Dropping this tool may cause irreparable damage to the housing and
infrared tubes. IR tubes are the most sensitive parts of this tool and will break if dropped.
Cracked IR tubes and/or damage to the housing void the warranty. It is recommended that a suspension
system be used for removal of paint on exterior walls, which will reduce the risk of dropping the tool and
causing damage to it. Various hands free systems are available from the distributor and/or the dealer
who sold you the Speedheater Infrared Paint Remover, model 1100 S.
18. EXTENSION CORDS:
. DO NOT EXPOSE THE TOOL TO RAIN:
20. DO NOT ABUSE THE POWER CORD:
21. TOOL MAINTENANCE:
22. CHECK DAMAGED PARTS:
23. DUST PARTICLES:
-
24. HANDLING THE POWER TOOL:
-
O T H E R W A R N I N G S
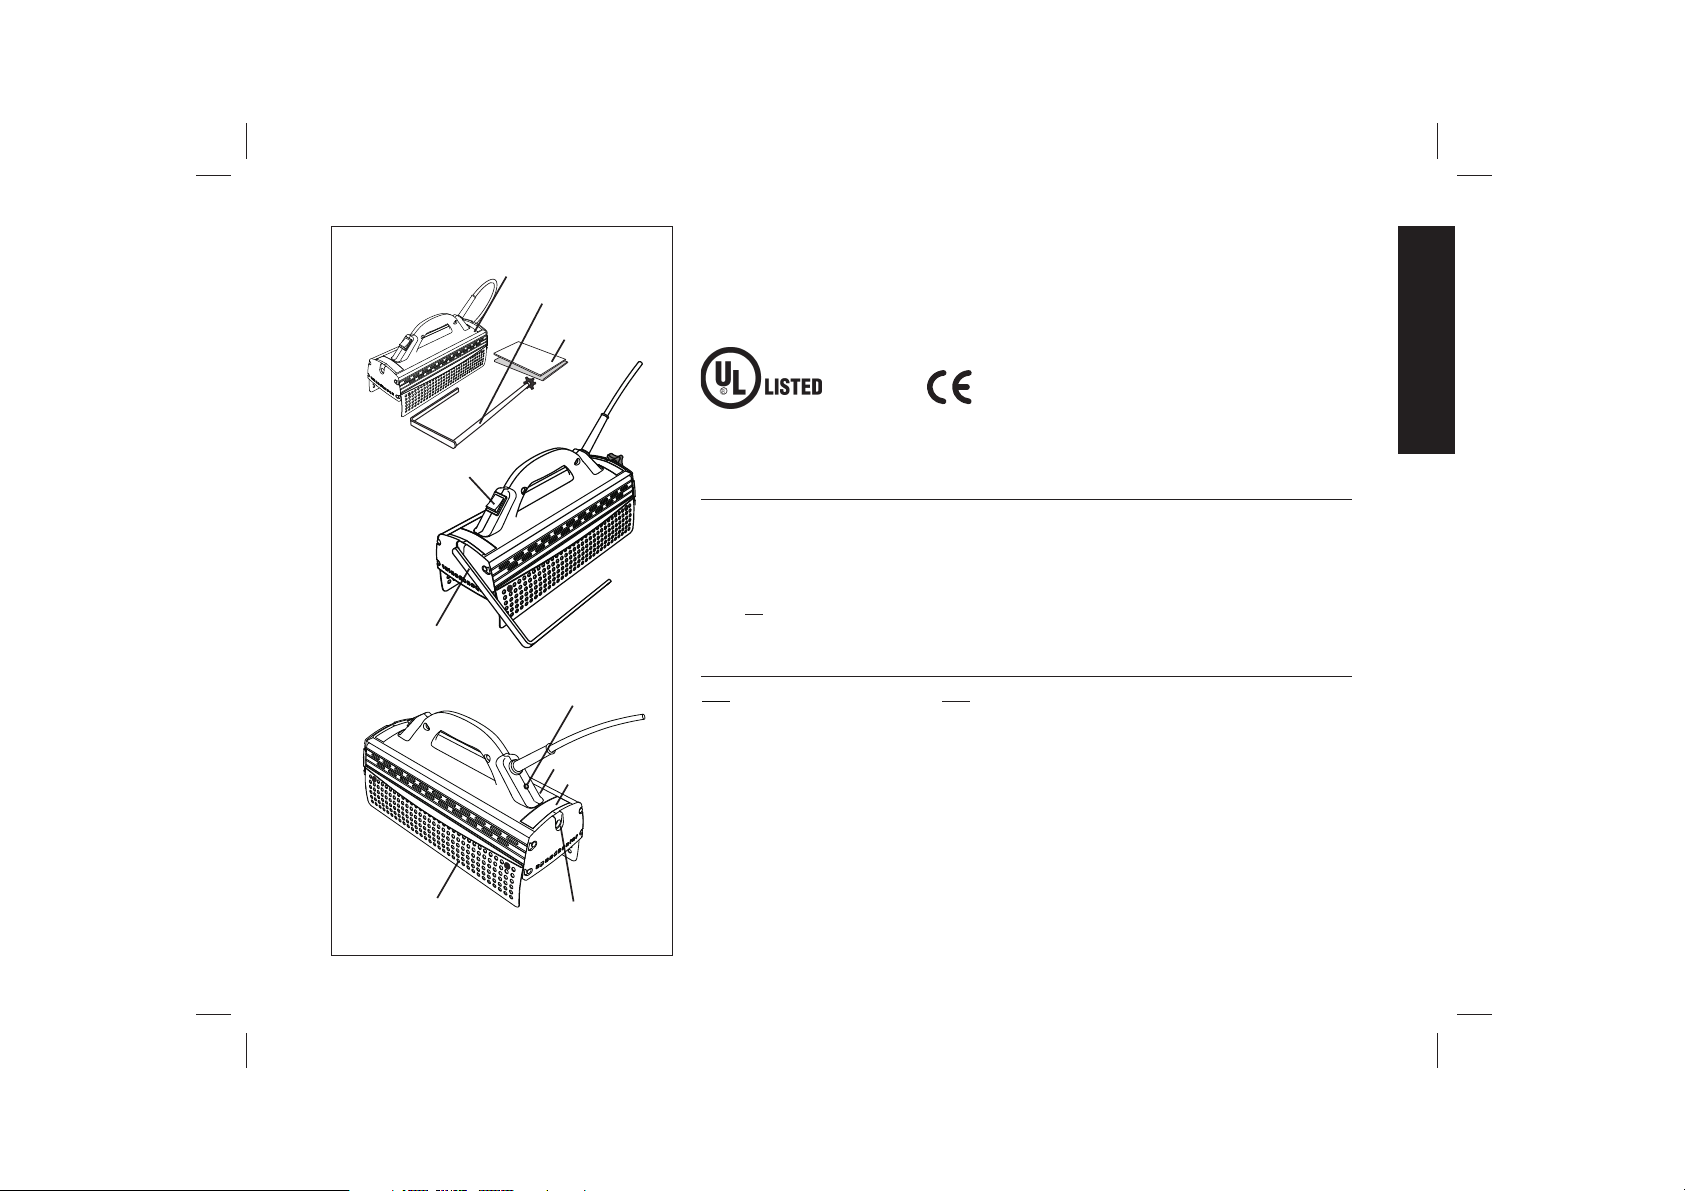
ON/OFF switch
Accessories
attachment point
Protective plates
TECHNICAL SPECIFICATIONS
Speedheater Infrared Paint Remover, model 1100 S
IR Paint Remover
Angle support
Angle support
Operating Temperature
This tool is made in Sweden by Speedheater System AB.
US Patent No. 008442391B2.
Indoors 20 to 30 seconds.
Outdoors 20 to 40 seconds.
The paint is ready to be scraped off when it is both bubbling and smoking simultaneously.
Reset button for
anti-overheat function
SH IR Paint Remover
Storage Box
Total length
idth
eight
:
W:
H:
20”
10 1/4”
9 1/2”
Total :
W:
H:
:
length
idth
eight
Approx. Weight
14 1/2”
6 3/4”
6 3/8”
4 lb 3 oz.
L:
W:
ength
idth
12 1/4”
4 7/8”
in accordance with EN 60335-1, EN 60335-2-45 standards.
Dimensions
Heating surface
Optimum exposure time for paint removal applications
Approximately 200 - 400 F (100-200°C) when used as described in the instructions. Heating for longer than
recommended increases the temperature and may thereby constitute a fire hazard, exposure to lead vapor and
other vapors that may cause severe personal injury.
o
Connection
1 phase standard grounded outlet.
Watts
Volts Amps
120 1100 9.2
Cord
16 gauge 3 wire, 8 feet long.
Anti-overheat function
The anti-overheat feature only protects the components of the tool from being overheated.
It does monitor the temperature of the substrate or protect against fire hazards.not
Serial number
ID # 000000
ELECTRIC PAINT REMOVER
36ER
English
Instruction &
Safety Manual
9

10
INSTRUCTIONS FOR USE
When heating in vertical angle, turn the
machine around after 2 hours. For keeping
even effect on ir bulbs.
11
General information before you start
Make sure the protective plates are in facing down before you turn the power tool on.
Never obstruct the airflow through the vented shields. Clean the shields if they get obstructed in any way.
The temperature required to remove paint, is significantly less than you may expect. Heat the paint only to
the point when it can be easily scraped off. Indoors 20-30 seconds, outdoors 20-40 seconds. The paint is
ready to be scraped off when it is bubbling and smoking simultaneously.
- Ambient temperature. (Colder temperature will increase time.)
- Wind will increase exposure time. (Outdoor applications.)
- Type of paint. (Acrylic paint needs a shorter heating time.)
- Layers of paint (Many layers will increase heating time.)
The Speedheater Infrared Paint Remover has a shut off function to prevent overheating. The anti-overheat
feature only protects the components of the tool from being overheated. It does monitor the temperature of
the substrate or protect against fire hazards.
If the anti-overheat function is triggered, power to the unit will be cut and the light on the ON/OFF switch will go
out. The safety switch only comes out approximately 1 mm.
Switch the unit OFF, place it with the heating surface facing up and allow it to cool completely. When cool, reset
the anti-overheat function by pressing the button beneath the power cable.
Start the tool up again, according to the Connecting and heating up instructions.
Variables concerning heatingtime
Anti-overheat function
not
“”
When doing a window restoration, place the Speedheater 1100S-15 in an angle with the help of the angle
support. Begin heating paint and putty for about 1-2 minutes. Putty takes longer to soften than paint and even if
the paint surface has bubbled up, it is good to wait close to 2 minutes for the putty to soften.
Reset button for
anti-overheat function
English

- Heating-up time indoors is 20 to 30 seconds and outdoors it is 20 to 40 seconds. To find out how much time
your specific application requires, begin with a short heating time and extend it if needed.
For different variables affecting heating time, see page 11 in the General Information section.
When the paint is smoking and bubbling, move the tool to a new area. Scrape the paint from the first area
while the next area is heating up.
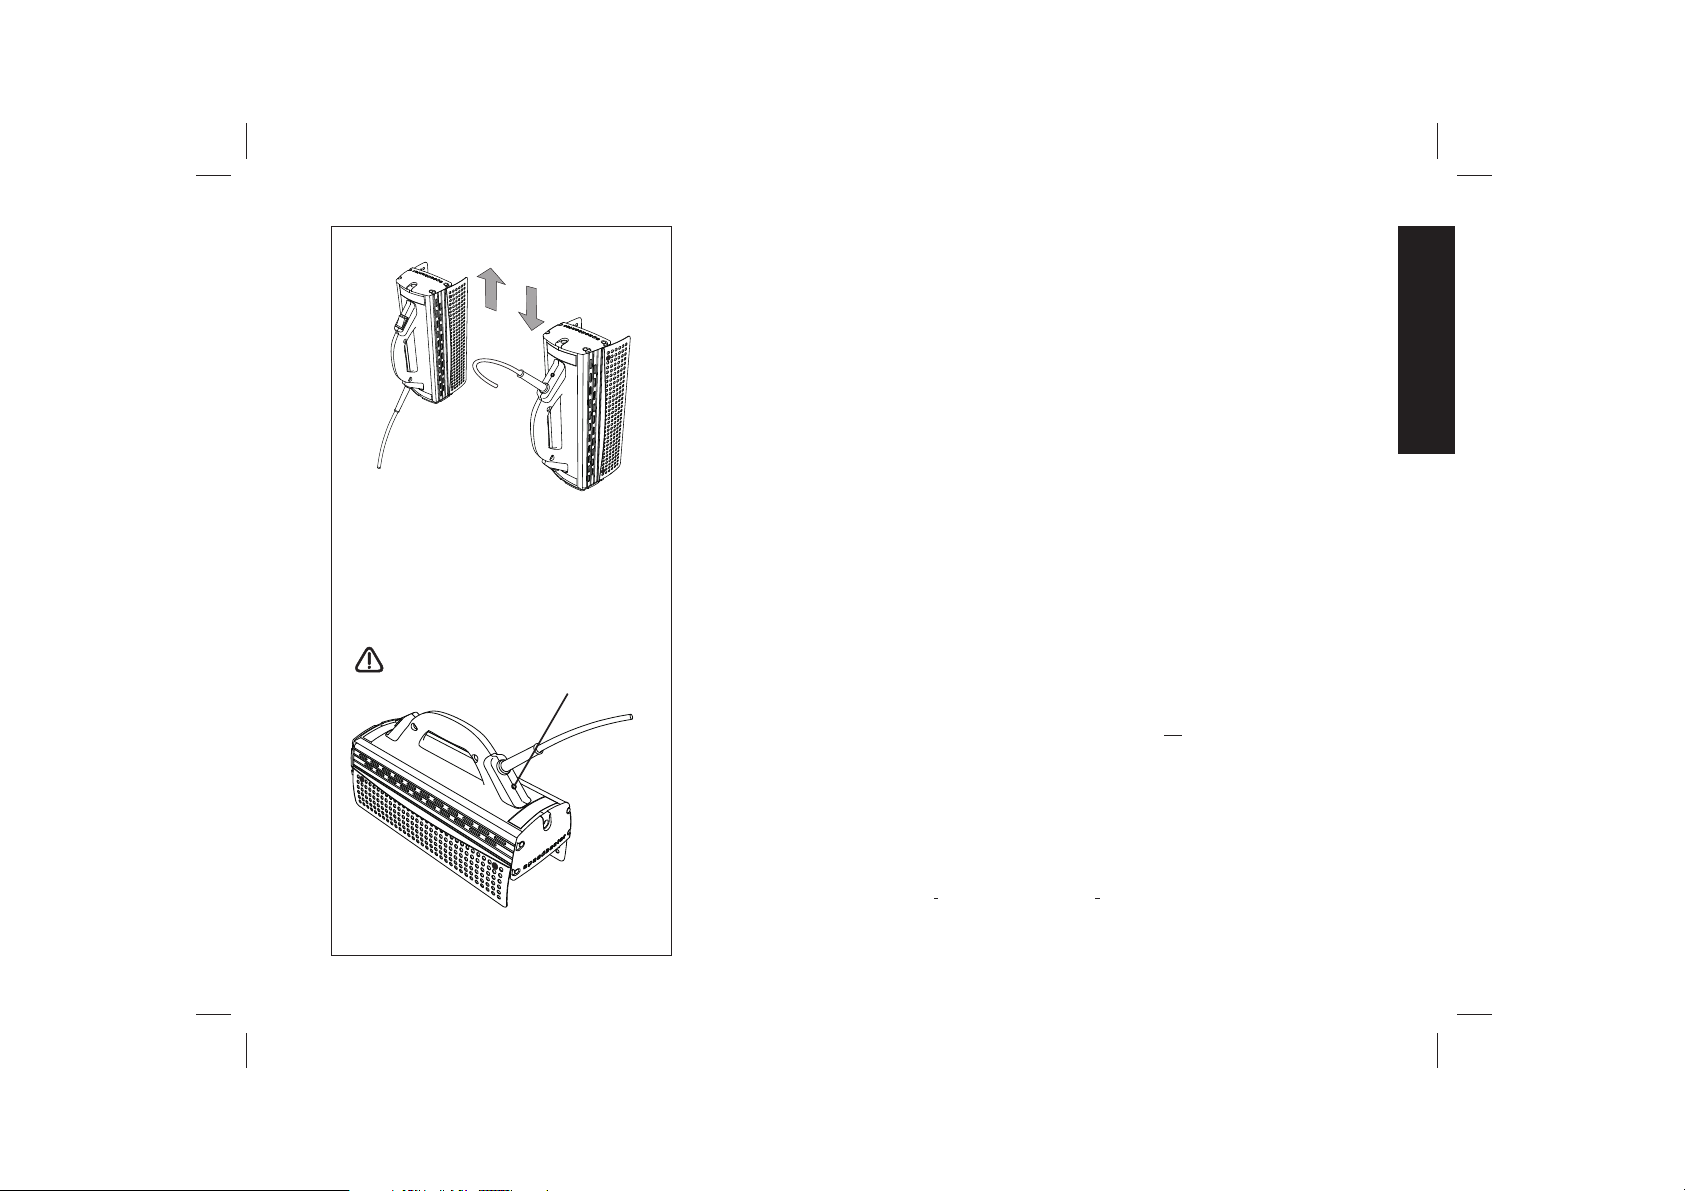
During temporary work breaks, the tool must always be turned upwards
from the surface and never left unsupervised (see diagram).
Connecting and heating up
h
Connect the cord to a 120 V grounded outlet.
- Always use a power outlet with a GFCI (Ground Fault Circuit Interrupter) when working with
the Speedheater Infrared Paint Remover, Model 1100.
- If using an extension cord, ensure it is approved for both the amperage and the environmental conditions.
Move the switch to the ON position, and set the tool down with the heat surface facing up.
Make sure that the tool is placed away from any surface or flammable materials when heating and never leave
it unsupervised.
When the machine is heated up and ready for use, the tubes will glow bright orange.
Heating-up time is approximately 2 minutes.
When the machine is properly warmed up, you can start to eat the paint by turning the Speedheater Infrared
Paint Remover to face the work surface, holding it in position with a firm grip. Wait until the paint
is completely soft, i.e. smoking and bubbling.
Paint stripping
During temporary work breaks, the tool must
always be turned upwards from the surface and
never left unsupervised.
12
Preparations
Ensure the work area is clean and free of flammable materials, liquids and gases.
Make sure ladders, platforms and scaffoldings are properly and safely erected.
- Follow the manufacturer´s mounting and installation instructions meticulously in order to avoid personal injury.
Old dried out paint and
- Paint pigment alone is not sensitive to heat. So to be able to remove very old and dried out paint, a solution
of 80% boiled linseed oil and 20% white spirits Naphtha Hydrotreated Light) can be applied on the dry
surface. Apply the solution using either a paintbrush or spray bottle at least one hour before stripping any paint.
This mixture will help dry paint become more sensitive to infrared heat, making it soft for easier scraping.
(
acrylic paint.
Make sure that the tool is placed away from
any surface or flammable materials when heating
and never leave it unsupervised.
Lay the tool down with the heat surface facing up.
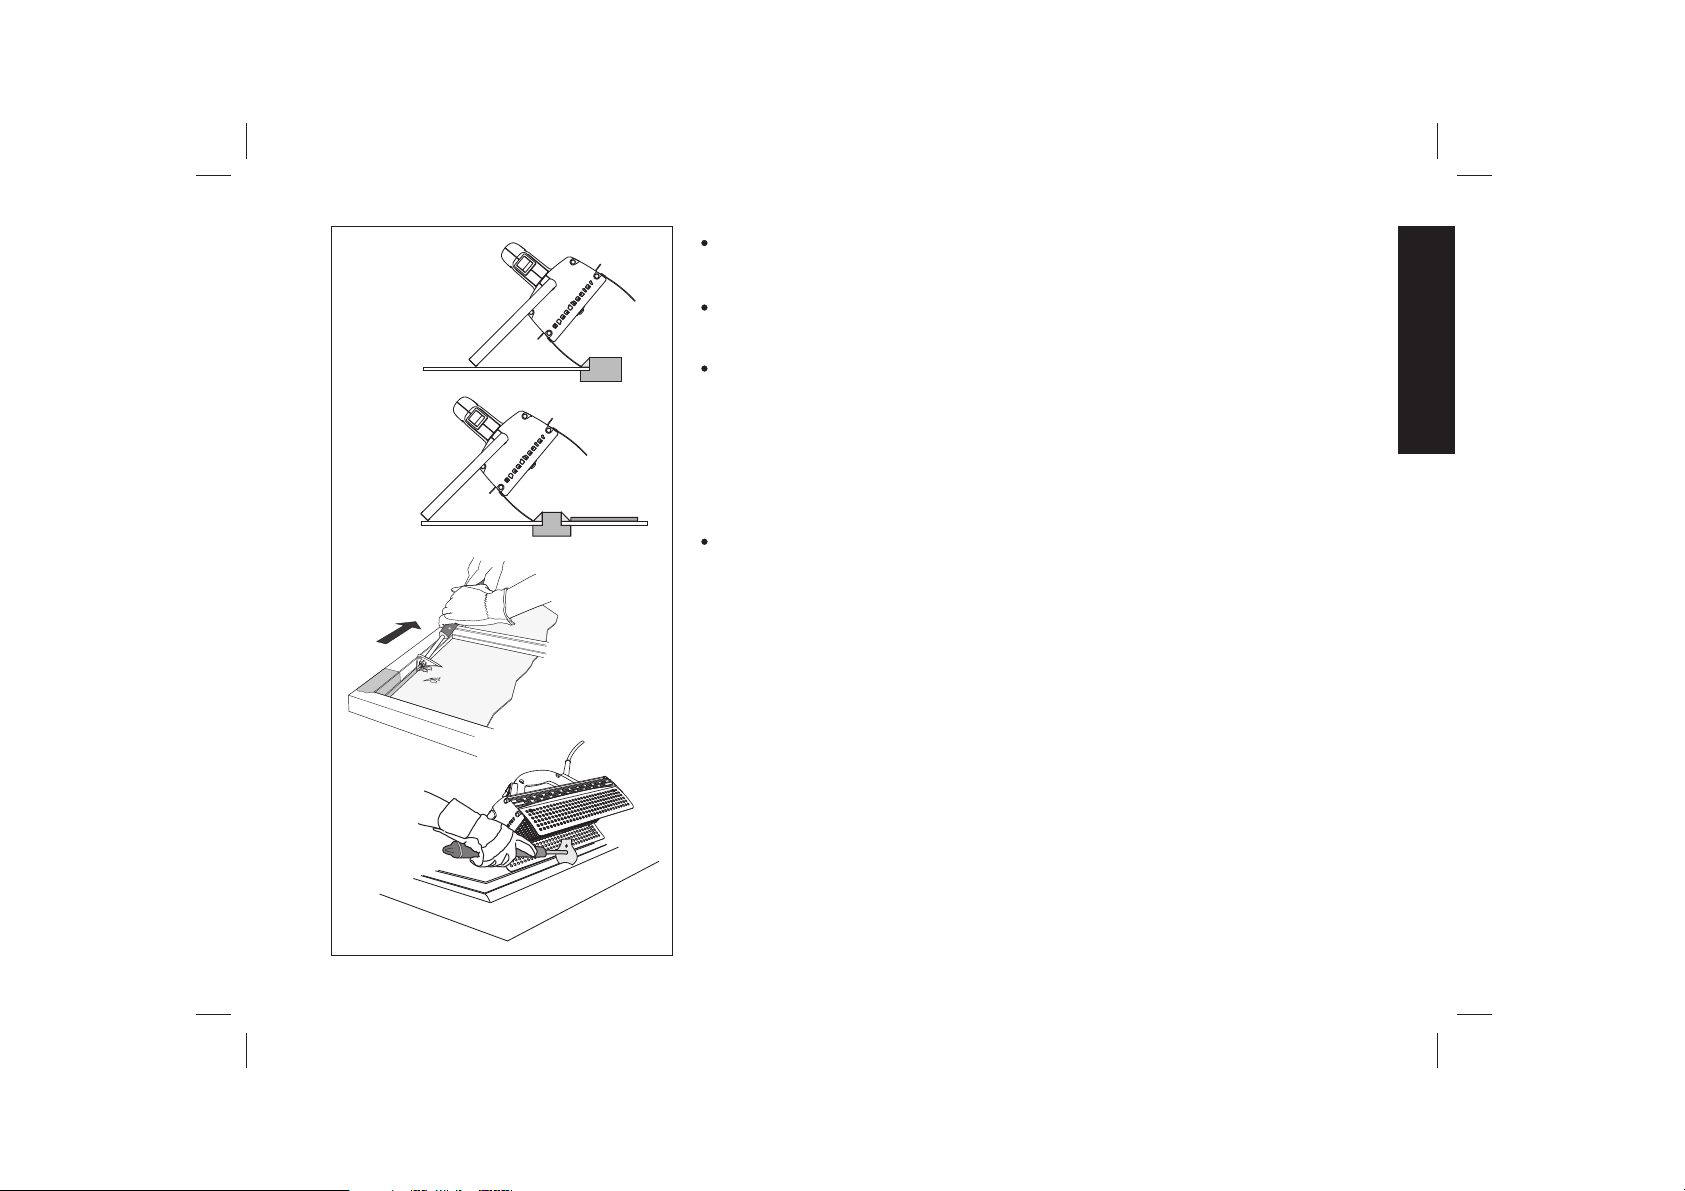
- It is very helpful to always use high quality scrapers for efficient paint removal.
For an even better results, use scrapers that you place on the surface and pull towards you, see Diagram 3.
When removing paint from textured surfaces, use the angle support and scraper as shown in the diagram 4.
- Remember that the metal parts of this power tool are very hot and may cause burns if you come into
contact with them. Always use heat-protective gloves.
- It is important to remember that working on a surface under the Speedheater Infrared Paint Remover
is never necessary but might facilitate scraping heavily profiled surfaces.
13
When working on window sash mountings, use a thin piece of wood covered with aluminum foil
or aluminum tape. It reflects heat radiation and prevents cracking of the facing glass, see Diagram 2.
When restoring windows, be extra gentle in order to protect the glass. Make sure the bottom shield edge of
the tool is placed along the edge of the putty you intend to remove. Avoid directing infrared heat onto the
glass. See Diagram 1.
First remove the paint and then the window putty using a putty chisel, for example. It is possible to reheat the
paint and putty. Heating time depends on the properties of the wood, the putty, type of paint and
climate conditions.
Window pane
Window pane
Wood, 4” wide and
at least the length of
the tool.
Diagram 2.
Diagram 1.
Diagram 3.
Diagram 4.
English

Switching off
Move the switch to the OFF position.
Set the tool down with the heating surface facing up and allow to cool.
- Do not leave the tool unattended until it has completely cooled and make sure that there
are no flammable materials close by.
Disconnect the power cord during breaks and when work is complete.
Do not place the tool in the carrying case before it has completely cooled down.
14
Make sure that the tool is placed away from
any surface or flammable materials when heating
and never leave it unsupervised.
Set the tool down with the heat surface facing up.

15
Problem
Tool does not turn on
Tool turned off after it was on
Fuse blows or circuit breaker trips
Likely cause
Tool not plugged in
The anti overheat function is not reset
The electrical devices in the machine
have been damaged
The fuse has been blown
Tool overheated and the anti-overheat
function shut the tool off
There has been a short circuit caused
by broken tubes or the power iscord
damaged.
-
Solution
Plug the cord into a 15 amp outlet
Reset the anti-overheat function by pressing
the button beneath the power cable.
Check the damage and let an authorized
electrician make the necessary repairs.
Change the fuse that goes to the outlet you
are using.
Let the tool cool down for at least 15 minutes
or until it has cooled and press the small
button below the power cord. You will hear
a clicking sound.
Have the tool inspected by an authorized
person to find out where the short circuit is.
Repair the tool with Speedheater System AB
approved components.
TROUBLESHOOTING GUIDE
English

16
CLEANING AND MAINTENANCE
The IR tubes are made of quartz glass and must be handled with care. If an IR tube breaks,
immediately switch the tool off, pull the plug from the wall socket and replace the tube.
Always use gloves or a rag when handling the IR tubes. Never touch them with your hands.
Repairs should be carried out only by a properly qualified electrician to avoid the
risk of accidents or injury.
The tubes are hot during operation and take some time to cool off. Before changing any tubes, make
sure they have cooled. Always use heat-protective gloves in order to avoid burning and
cutting injuries.
When changing the IR tubes you need to secure the handle of the Power Tool firmly in a vice with a
cloth around the handle so that when you turn the plinth screws you don't move the tool.
To remove the screws for the wires you need a flat head 1/8” wide screw driver.
The wrong size screw driver will crack the ceramic plinth and/or strip the screw heads.
When reassembling, make sure not to over tighten any of the screws.
Always ensure the power cord is disconnected from the electric outlet and the tool is completely
cooled before beginning any cleaning or maintenance work.
In order to maintain the product's safety and efficiency, the IR tubes and reflectors must be kept clean.
The IR tubes and reflectors can be wiped using a cloth moistened with Denatured Ethanol.
Ensure that the Power Tool has completely cooled down.
Remove the safety grid by undoing screws 1 at each end.
Carefully wipe accessible parts of the tubes, reflectors and the safety grid.
Replace the grid and ensure that the screws are seated tightly.
Avoid scraping with sharp objects.
Always use protective gloves.
-
-
-
Remove the safety grid by loosening the screws on each end 1 .
Unscrew the safety grid 2 and the reflector flanges 3 .
Detach the IR tube cable connections by undoing the screws on the connection plinths 4 .
CHANGING IR TUBES
Repairs should be carried out only by a
properly qualified electrician to avoid the
risk of accidents or injury.
Flat head 1/8” wide screw driver.
(4 mm)
4
4
1
1
3
2
3

Handle broken tubes very carefully to prevent anyone getting hurt.
Dispose of the IR tubes appropriately.
IMPORTANT!
- Carefully loosen the spring holders 5 in the outer ends in order to loosen the ceramic ends of the IR tubes.
- Turn the tube in the direction shown in the drawing until the tube is released from the middle spring holders 6 .
-
A new IR-tube is inserted in the opposite order from the steps above (6-1).
- Carefully insert and turn the tube into the spring holders in the middle 6 .
- Carefully fasten the outer spring holders 5 on the ceramic ends of the tube.
- Attach the cables to the connection plinths 4 and tighten the screws firmly, but not so hard that they break.
- Make sure the cables are firmly fastened in the right way according to the picture.
- Refasten the reflector flanges 3 , the safety grid 2 and retighten the screws 1 on each end.
Turn the machine on and test warm it with the heating area turned upwards.
The tubes shall have an even soft red/orange color tone.
If you have changed only one tube, a small color difference might occur.
Always use original tubes designed for this model of Speedheater IR Paint Remover.
If you do not have the proper competence for this kind of activity, talk to a professional
or the store where you bought the machine.
17
Flat head 1/8” wide screw driver.
(4 mm)
Make sure to replace the
wires on top as shown
in the picture.
5
6
English
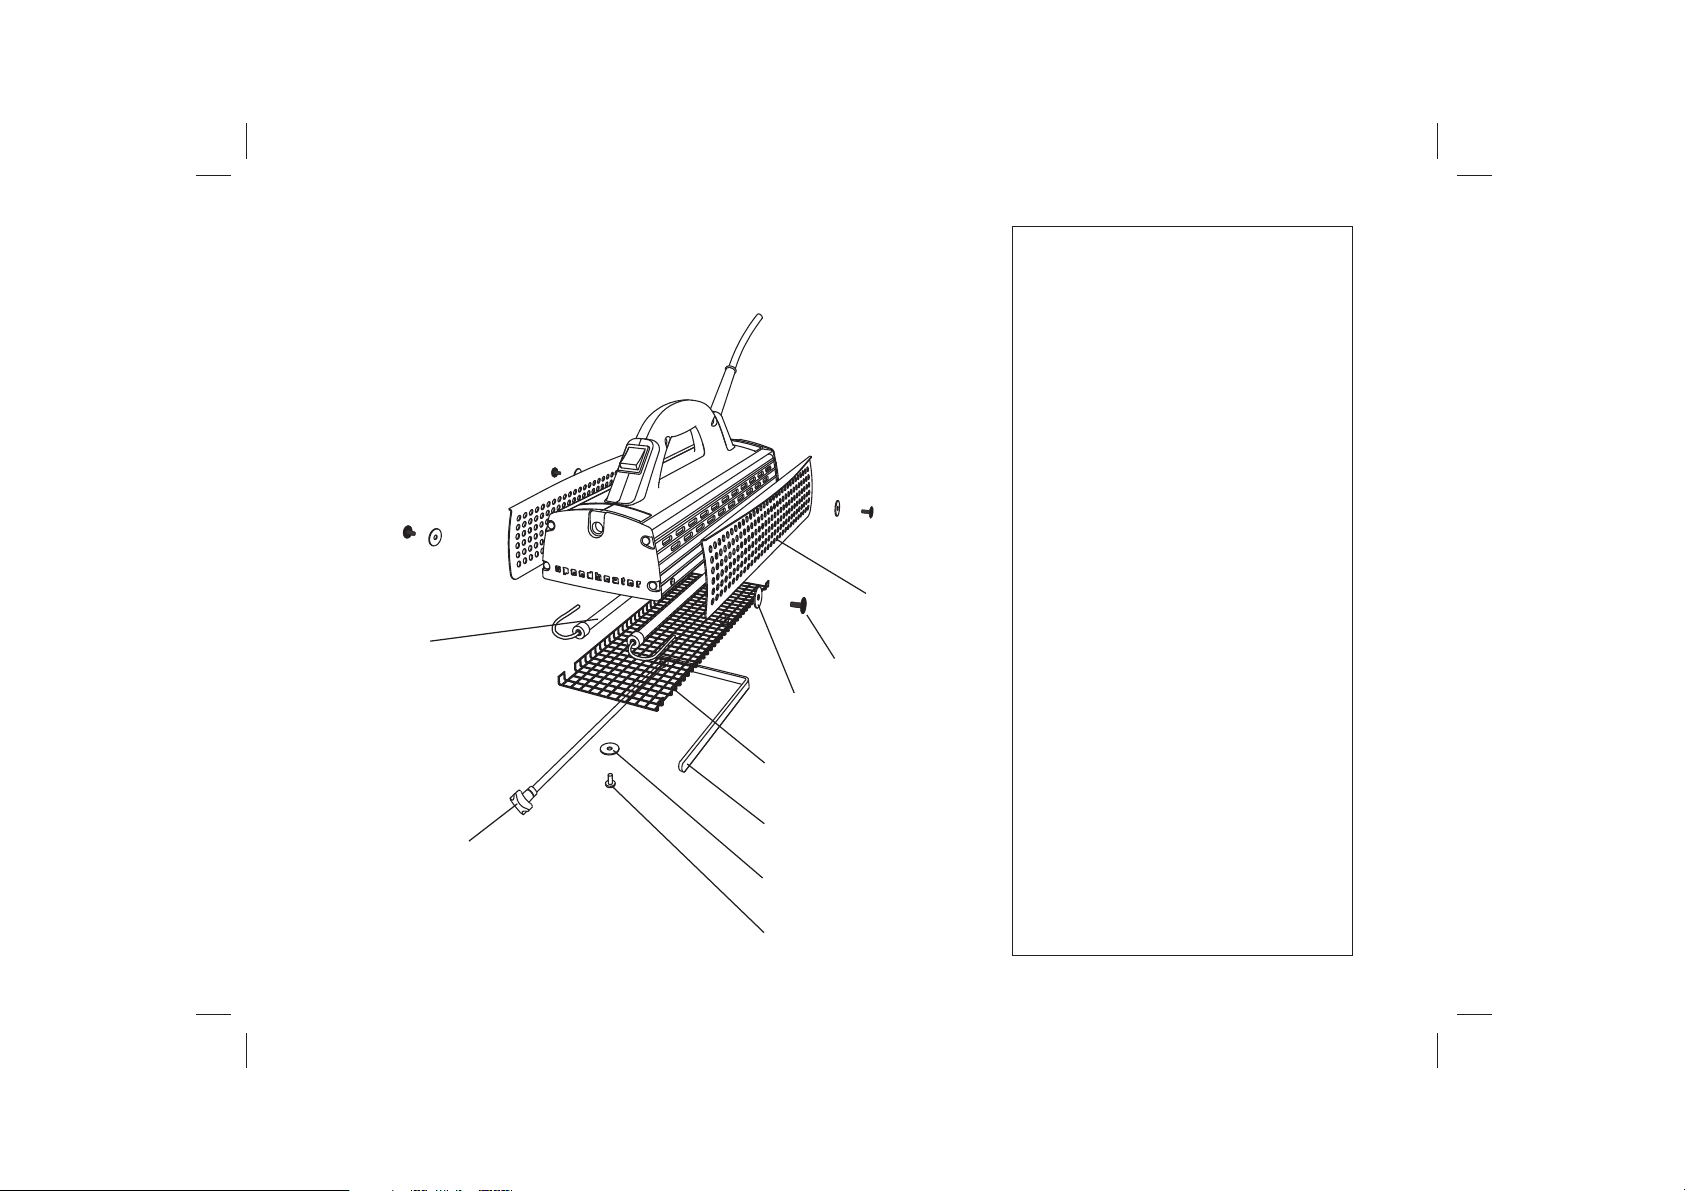
SPARE PARTS LIST
When ordering spare parts, always give the Power Tools
serial number and the part name and number.
The design of the tool is subject to changes
without prior notice.
The Speedheater Infrared Paint Remover, model 1100 S.
Repairs should be carried out only by a properly qualified
electrician to avoid the risk of accidents or injury.
18
11. Protective plate
12. Protective plate screw
14.Safety grid
16. Angle support
18. Protective plate screw washer
19. Grid screw
20.Grid screw washer
10. IR tube
17. Adjustment screw

ONE YEAR LIMITED WARRANTY
DE S
PEEDHEATER
WARRANTY SPE
PEEDHEATER SYS
WARRANTY SPEEDHEA
WARRANTY SPEEDHEATER
RANTY SPEEDHEATER SYSTEM AB WARR
AB WARRANTY SPEEDHEATER SYSTEM AB WA
ARRAN
ER SYSTEM AB WARRANT
EATER SYSTEM AB WARRANTY SP
SYSTEM AB WARRANTY SPEEDHEAT
TEM AB WARRANTY SPEEDHEATER SYSTEM
DHEATER SYSTEM AB WARRRANTY SPEEDHEATER
HEATER SYSTEM AB WARRANTY SPEEDHEATER SYSTEM
SPEEDHEATER SYSTEM AB WARRARNTY SPEEDHEATER S
ER SYSTEM AB WARRANTY SPEEDHEATER SYSTEM AB WARRA
WARRANTY SPEEDHEATER SYSTEM AB WARRANTY SPEEDHEATE
SPEEDHEATER SYSTEM AB WARRANTY SPEEDHEATER SYSTEM WARR
EATER SYSTEM AB WARRANTY SPEEDHEATER SYSTEM AB WARRANTY
M AB WARRANTY SPEEDHEATER SYSTEM AB WARRANTY SPEEDHEAT
SPEEDHEATER SYSTEM AB WARRANTY SPEEDHEATER SYSTEM AB W
HEATER SYSTEM AB WARRANTY SPEEDHEATER SYSTEM AB WARRAN
YSTEM AB WARRANTY SPEEDHEATER SYSTEM AB WARRANTY SPEEDH
SPEEDHEATER SYSTEM AB WARRANTY SPEEDHEATER SYSTEM AB W
ER SYSTEM AB WARRANTY SPEEDHEATER SYSTEM AB WARRANT
AB WARRANTY SPEEDHEATER SYSTEM AB WARRANTY SPEEDH
SPEEDHEATER SYSTEM AB WARRANTY SPEEDHEATER SYS
TEM AB WARRANTY SPEEDHEATER SYSTEM AB WARRAN
ANTY SPEEDHEATER SYSTEM AB WARRANTY SPEEDH
EEDHEATER SYSTEM AB WARRANTY SPEEDHEAT
ATER SYSTEM AB WARRANTY SPEEDHEATE
SPEEDHEATER SYSTEM AB WARRANTY
AB WARRANTY SPEEDHEATER SYST
NDE SPEEDHEATER SYSTEM AB W
SPEEDHEATER SYSTEM AB W
SYSTEM AB WARRANTY
ANTY SPEEDHEATER
SPEEDHEATER SY
ATER SYSTEM A
RANTY SP
SPEED
WA
One Year
Warranty
Speedheater System AB
hereby warrants that the Speedheater
IR Paint Remover, model 1100 S, is covered
by the terms in this limited warranty
against defects in material and workmanship
and it applies to one year from the date
when a sale was invoiced.
The limited warranty does not cover the
normal wear and tear of products.
19
1.
2
3.
4.
5.
6.
.
Speedheater System AB hereby warrants that the Products fully comply with the technical specifications in the
technical manuals and are covered by the terms of this limited warranty against defects in material and
workmanship, provided that any allegedly defective Product has not been altered, misused, neglected or
damaged through causes unconnected with its manufacture.
The limited warranty hereto applies for 1 (one) year from the date when a sale was invoiced. Faults of quality
and hidden defects which cannot be verified immediately upon delivery shall be communicated in writing within 8
(eight) days from discovery thereof. Returns of Products shall be made with proof of purchase to location where
it was purchased, but shall not be made without the authorization of the Dealer/Distributor. The limited warranty
hereto does not cover the normal wear and tear of products.
The limited warranty does not apply to damages caused during transportation (including transport to and from
the owner), or damage due to improper or lack of maintenance, voltage overloads or “undervoltage”, insufficient
or abnormal operation of electrical systems, or in general any cause which does not specifically depend on
defects in material or workmanship, or if the serial number on the product has been removed, altered or defaced.
This limited warranty provides for the replacement of the Products and/or of the assessed defective parts
thereof according to their availability, within about 90 (ninety) business days of receipt by Speedheater System
AB of the defective Products or parts, delivered to the same location and in the same condition and packaging
provided in the original delivery. In case of defects or non-compliance of the Products, Speedheater System AB
shall have up to 90 (ninety) business days to remedy the situation. In no event shall an authorized dealer or
retailer of Speedheater System AB products be entitled to reduce the price of the Speedheater System AB
products as a consequence of defects and/or non -compliance of the products without Speedheater System AB's
written consent.
EXCEPT AS EXPRESSLY PROVIDED IN THIS LIMITED WARRANTY, SPEEDHEATER SYSTEM AB
HEREBY DISCLAIMS ALL WARRANTIES, EXPRESS, STATUTORY AND IMPLIED, APPLICABLE TO
PRODUCTS, INCLUDING, BUT NOT LIMITED TO, ANY WARRANTY OF MERCHANTABILITY OR FITNESS
FOR A PARTICULAR PURPOSE AND ANY WARRANTY THAT ANY PRODUCT IS DELIVERED FREE OF
CLAIMS OF THIRD PARTIES BY WAY OF INFRINGEMENT OR THE LIKE.
SPEEDHEATER SYSTEM AB FURTHER DISCLAIMS ALL EXPRESSED, STATUTORY AND IMPLIED
WARRANTIES APPLICABLE TO PRODUCTS WHICH ARE NOT MANUFACTURED BY SPEEDHEATER
SYSTEM AB. THE ONLY WARRANTIES APPLICABLE TO PRODUCTS NOT MANUFACTURED BY
SPEEDHEATER SYSTEM AB SHALL BE THE WARRANTIES, IF ANY, OF THE MANUFACTURER OF
THOSE ITEMS.
English

7.
8.
9.
10.
11.
12.
The total liability of Speedheater System AB for any loss, damage or claim, whether in contract, tort (including
Speedheater System AB's active or passive negligence or strict liability) or otherwise, arising out of, connected
with, or resulting from the performance or breach of any distribution agreement, subdistribution agreement, or
sale agreement, or purchase order, or contract of sale accepted or executed by Speedheater System AB, or from
the design, manufacture, sale, delivery, resale, inspection, assembly, testing, repair, replacement, operation,
maintenance or use of any Product or from the performance of any service shall not, in any event, exceed the
price allocable to the product or service which gives rise to the claim, loss or damage.
IN NO EVENT, WHETHER AS A RESULT OF BREACH OF CONTRACT OR WARRANTY OR ALLEGED
NEGLIGENCE OR STRICT LIABILITY, SHALL SPEEDHEATER SYSTEM AB BE LIABLE FOR INDIRECT,
INCIDENTAL, CONSEQUENTIAL, SPECIAL OR EXEMPLARY DAMAGES, INCLUDING, WITHOUT
LIMITATION, LOSS OF PROFITS OR REVENUE, LOSS OF PRODUCTS OR ANY ASSOCIATED EQUIPMENT,
COST OF CAPITAL, COST OF SUBSTITUTED EQUIPMENT OR PARTS, FACILITIES OR SERVICES, DOWN-
TIME COSTS, LABOR COSTS, OR CLAIMS OF CUSTOMERS OR SUBDISTRIBUTOR.
IF ANY PORTION OF THIS LIMITED WARRANTY IS HELD ILLEGAL OR UNENFORCEABLE BY REASON
OF ANY LAW, SUCH PARTIAL ILLEGALITY OR UNENFORCEABILITY SHALL NOT AFFECT THE
ENFORCEABILITY FOR THE REMAINDER OF THIS LIMITED WARRANTY WHICH IS AND WILL ALWAYS BE
CONSTRUED TO BE LIMITED BY ITS TERMS OR AS LIMITED AS THE LAW PERMITS.
As a prior condition to any obligation of Speedheater System AB under the above limited warranty, the
purchaser of Speedheater System AB's products must have fully and finally paid for the products. The above
warranty does not cover normal wear and tear of the Speedheater System AB's products.
Speedheater System AB shall have no obligation under the limited warranty unless it is established to the
satisfaction of Speedheater System AB that the Speedheater System AB' product (i) has not been altered or
modified without the prior written consent of Speedheater System AB, (ii) has been assembled, maintained,
operated and used at all times in accordance with Speedheater System AB's current, applicable operation,
maintenance and other written instructions issued from time to time by Speedheater System AB, and (iii) has
been used only with parts specifically approved by Speedheater System AB for use with Speedheater System
AB's product.
This Limited Warranty distributes the risk of product failure between purchaser and Speedheater System AB,
and Speedheater System AB's product pricing reflects this distribution of risk and the limitations of liability
contained in this Limited Warranty. The agents, employees, distributors, and dealers of Speedheater System AB
are not authorized to make modifications to this Limited Warranty, or make additional warranties binding on
Speedheater System AB. Accordingly, additional statements such as dealer advertising or presentation, whether
oral or written, do not constitute warranties by Speedheater System AB and should not be relied upon.
20
Table of contents
Languages:
Other Speedheater Power Tools manuals


